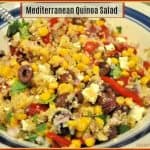
Category: Side Dishes

Brown Butter Green Beans with Toasted Almonds & Red Peppers

Brown Butter Green Beans is a festive vegetable side dish featuring fresh green beans cooked in browned butter, with toasted almonds and red bell peppers!Brown Butter Green Beans is a festive vegetable side dish featuring fresh green beans cooked in browned butter, with toasted almonds and red bell peppers!

If you need a delicious side dish, may I suggest this recipe for Brown Butter Green Beans with Toasted Almonds & Red Peppers? The recipe is easy, delicious, and perfect for any occasion.

I made these brown butter green beans as one of the side dishes for our Thanksgiving meal, but they would be great as a side dish any time of year! The flavor imparted by the browned butter sets these apart… they truly are delicious!

Scroll Down For A Printable Recipe Card At The Bottom Of The Page

How To Make Brown Butter Green Beans

Toast some sliced almonds in a dry skillet for about minutes, stirring occasionally. Be careful not to burn the almonds. Remove almonds from skillet; set on a paper towel to cool.

Toasting almonds in skillet.

Cook the fresh green beans in a large pot of salted water (medium-high) for about 5 minutes.

Green beans are cooked briefly in water, to begin making this side dish.

Add HALF of the chopped red peppers to the green beans. Cook for 1 more minute. Remove the pan from the heat, and drain the veggies. Set aside.

Chopped red bell pepper is added to green beans in water and cooked for one minute.

Brown The Butter

In a clean skillet, place 2 large Tablespoons butter. Cook the butter on medium heat for 2-3 minutes. Stir the butter frequently as it cooks, until the butter has browned. Do not burn the butter.

Butter is melted in large skillet for brown butter green beans.

Brown butter is ready for the green beans to be added to skillet.

Add the cooked green beans, red peppers and HALF of the toasted almonds to the brown butter in the skillet. Season the beans with salt and pepper, to taste. Stir well, to coat everything with the butter.  Continue to cook the beans for 1-2 minutes, until fully heated through.

Toasted almonds are added to the skillet with the brown butter green beans.

Time To Serve The Brown Butter Green Beans!

Pour the green beans (with the almonds and red peppers) into a serving bowl. Garnish the beans with the reserved half of the toasted almonds and red peppers (fresh, not cooked).

Brown Butter Green Beans with Toasted Almonds & Red Peppers are served in bowl.

Serve, and enjoy this delicious veggie side dish!  Have a wonderful day. Be kind to one another!

Looking For More VEGGIE Recipes?

You can find ALL of my recipes in the Recipe Index, located at the top of the page. I have LOTS of veggie recipes, including:

Interested In More Recipes?

Thank you for visiting this website. I appreciate you using some of your valuable time to do soIf you’re interested, I publish a newsletter 2 times per month (1st and 15th) with all the latest recipes, and other fun info. I would be honored to have you join our growing list of subscribers, so you never miss a great recipe!
There is a Newsletter subscription box on the top right side (or bottom) of each blog post, depending on the device you use, where you can easily submit your e-mail address (only) to be included in my mailing list.

You Can Also Find Me On Social Media:

Facebook page: The Grateful Girl Cooks!
Pinterest:
The Grateful Girl Cooks!
Instagram:
jbatthegratefulgirlcooks

Author's signatureRecipe Adapted From: http://www.acedarspoon.com/green-beans-with-brown-butter-and-toasted-almonds/

0 from 0 votes
Brown Butter Green Beans with Toasted Almonds & Red Peppers
Prep Time
10 mins
Cook Time
15 mins
Total Time
25 mins
 
Brown Butter Green Beans is a festive vegetable side dish featuring fresh green beans cooked in browned butter, with toasted almonds and red bell peppers!
Category: Side Dish, Vegetables
Cuisine: American
Keyword: brown butter green beans
Servings: 4 servings
Calories Per Serving: 139 kcal
Author: JB @ The Grateful Girl Cooks!
Ingredients
  • 1 pound fresh green beans (with ends trimmed)
  • 2 Tablespoons butter
  • 1/3 cup slivered almonds (toasted)
  • 3 Tablespoons chopped red pepper (divided)
  • Salt and Pepper , to taste
Instructions
  1. Toast sliced almonds in a dry skillet (medium-high heat) for about 3 minutes, stirring occasionally. Remove almonds from skillet; set on a paper towel to cool.
  2. Bring pan of salted water to a full boil. Cook the green beans (medium-high) for 5-6 minutes.
  3. Add HALF of the chopped red peppers to the beans, and cook for 1 additional minute. Remove from heat, and drain. Set aside.
  4. In a clean large skillet, place 2 large Tablespoons butter. Cook on medium-high heat 2-3 minutes, stirring frequently until the butter has browned and gives off a nutty aroma. Do not burn butter.
  5. Turn heat to low. Add cooked green beans, red peppers and HALF of the toasted almonds to the brown butter. Stir well, to coat everything with brown butter. Season with salt and pepper, to taste. Continue to cook for 1-2 minutes, until fully heated through.
  6. Pour into serving bowl. Garnish dish with reserved half of toasted almonds and red peppers (fresh, not cooked). Serve, and enjoy!
Nutrition Facts
Brown Butter Green Beans with Toasted Almonds & Red Peppers
Amount Per Serving (1 serving)
Calories 139 Calories from Fat 90
% Daily Value*
Fat 10g15%
Saturated Fat 3g19%
Cholesterol 15mg5%
Sodium 57mg2%
Potassium 317mg9%
Carbohydrates 10g3%
Fiber 4g17%
Sugar 4g4%
Protein 4g8%
Vitamin A 1175IU24%
Vitamin C 22.8mg28%
Calcium 66mg7%
Iron 1.5mg8%
* Percent Daily Values are based on a 2000 calorie diet.

Here’s one more to pin on your Pinterest boards!Brown Butter Green Beans is a festive vegetable side dish featuring fresh green beans cooked in browned butter, with toasted almonds and red bell peppers!

Save

Save

Save

Roasted Butternut Squash with Cranberries, Honey & Feta

Need a new vegetable dish for the holidays? Look no further! Roasted Butternut Squash with Cranberries, Honey & Feta is both delicious, sweet AND savory!Need a new vegetable dish for the holidays? Look no further! Roasted Butternut Squash with Cranberries, Honey & Feta is both delicious, sweet AND savory!
Are you on the search for a new vegetable side dish to serve during the holidays (or any old time, for that matter)? Well, here’s a sweet AND savory recipe for Roasted Butternut Squash with Cranberries, Honey & Feta.

This is one gorgeous side dish to look at, and a very tasty side dish to accompany various meals. The dish has so many different flavors going on- roasted butternut squash, creamy saltiness of feta cheese, and the “pop” of freshly roasted tangy cranberries. Butternut squash is topped off with the sweetness from honey being drizzled over the top of the ingredients! I am really glad I tried this recipe.

The recipe for roasted butternut squash is simple. Roast the butternut squash, add the fresh cranberries near the end of the roasting time, dish them up, garnish with the rest of the ingredients. That’s it, in a nutshell.

Scroll Down For A Printable Recipe Card At The Bottom Of The Page

How To Make Roasted Butternut Squash With Cranberries, Honey & Feta

Get yourself a butternut squash. Got one? Okay.  You only need ONE, but here’s a photo of 2 (perhaps to inspire you to double the recipe if cooking for a small village?)

To make roasted butternut squash, you need to start with fresh butternut squash!
Peel and chop one butternut squash into small bite-sized cubes. (Peeling the squash is the toughest part of this recipe… really!)

The butternut squash must be peel and sliced before it is roasted.

Drizzle some olive oil onto a large baking sheet and put the cubed squash on it, turning cubes to coat with the oil.

Roasted butternut squash requires squash cubes, tossed in olive oil.

Sprinkle squash cubes with salt and pepper, and give them another light drizzle of olive oil. Bake at 400 degrees for 25 minutes. Once done, remove the roasted butternut squash from the oven, and add fresh cranberries. Return the pan to the oven; cook for 15 additional minutes.

Fresh cranberries are ready to add to the roasted butternut squash.

Fresh cranberries are added to roasted butternut squash, then placed back into oven.

Getting Ready To Serve The Butternut Squash

When done, the cranberries should have popped a bit, and softened. Remove the roasted butternut squash and cranberries from the oven. Transfer the mixture onto a serving dish.

Roasted butternut squash and cranberries are removed from oven, and put on a serving platter.

To finish this roasted butternut squash dish, add a light dusting of cinnamon to top the veggies. Sprinkle the top with with crumbled feta cheese.

Feta cheese, cinnamon, and honey will be added to top of the roasted butternut squash.

Ready To EAT!

Drizzle some honey over the top of the entire dish, then add crumbled feta cheese and a little bit of dried parsley! YUM! Now this roasted butternut squash with cranberries, honey & feta cheese is ready to enjoy! Serve immediately.

Honey, feta cheese, parsley and cinnamon are added to top of the roasted butternut squash on platter.

That’s it! Serve the roasted butternut squash dish while hot!  Hope you enjoy the color and the variety of tastes in this simple, but delicious veggie side dish!

Roasted Butternut Squash with Cranberries, Feta & Honey on white platter, ready to eat!

If you enjoy butternut squash, be sure and check out my recipe for Butternut Squash Soup with Bacon. It tastes amazing! Have a fantastic day, friends. May God bless and keep you in, and through, all you do.

Looking For More BUTTERNUT SQUASH Recipes?

You can find ALL my recipes in the Recipe Index, located at the top of the page. I have some delicious recipes using butternut squash you’ll enjoy, including:

Interested In More Recipes?

Thank you for visiting this website. I appreciate you using some of your valuable time to do soIf you’re interested, I publish a newsletter 2 times per month (1st and 15th) with all the latest recipes, and other fun info. I would be honored to have you join our growing list of subscribers, so you never miss a great recipe!
There is a Newsletter subscription box on the top right side (or bottom) of each blog post, depending on the device you use, where you can easily submit your e-mail address (only) to be included in my mailing list.

You Can Also Find Me On Social Media:

Facebook page: The Grateful Girl Cooks!
Pinterest:
The Grateful Girl Cooks!
Instagram:
jbatthegratefulgirlcooks

Author's signatureRecipe Adapted from Jenn Laughlin: http://peasandcrayons.com/2014/11/honey-roasted-butternut-squash-cranberries-feta.html

0 from 0 votes
Roasted Butternut Squash with Cranberries, Honey & Feta
Prep Time
15 mins
Cook Time
40 mins
Total Time
55 mins
 
Need a new vegetable dish for the holidays? Look no further! Roasted Butternut Squash with Cranberries, Honey & Feta is both delicious, sweet AND savory!
Category: Side Dish
Cuisine: American
Keyword: roasted butternut squash
Servings: 8 servings
Calories Per Serving: 121 kcal
Author: JB @ The Grateful Girl Cooks!
Ingredients
  • 1 large butternut squash (peeled and cut into bite-sized cubes)
  • 2 Tablespoons olive oil (divided)
  • Salt and black pepper (to season with)
  • 2 cups fresh (and not frozen) cranberries
  • 1/4 cup feta cheese , finely crumbled
  • 3-4 Tablespoons honey
  • ground cinnamon , to taste
  • dried parsley (can also use fresh, if desired)-for garnish
Instructions
  1. Before beginning, preheat your oven to 400 degrees F. Pour 1 Tablespoonful of olive oil onto a large baking pan (with edges). Spread, to cover.

  2. Pour the cubes of butternut squash onto oiled baking pan. Drizzle the cubes with 1 additional Tablespoonful of olive oil. Lightly season squash cubes with salt and pepper.
  3. Put the baking pan onto the middle rack in the oven. Roast the squash at 400 degrees for 25 minutes. Pull out pan; add the fresh cranberries to the roasting pan and put back in the oven. Continue cooking squash and cranberries for 15 additional minutes. When done, the cranberries will have softened, and will have popped (or burst) a bit.
  4. Remove baking pan from oven. Sprinkle squash lightly with cinnamon. Sprinkle the feta cheese all over the top of the squash. Drizzle the squash with honey (try to sprinkle evenly so all get that bit of sweetness). Taste. If you want it sweeter, add some more honey to the dish. Garnish with parsley. Serve hot, and enjoy!

Nutrition Facts
Roasted Butternut Squash with Cranberries, Honey & Feta
Amount Per Serving (1 serving)
Calories 121 Calories from Fat 36
% Daily Value*
Fat 4g6%
Saturated Fat 1g6%
Cholesterol 4mg1%
Sodium 129mg6%
Potassium 351mg10%
Carbohydrates 20g7%
Fiber 3g13%
Sugar 9g10%
Protein 1g2%
Vitamin A 10000IU200%
Vitamin C 23mg28%
Calcium 70mg7%
Iron 0.8mg4%
* Percent Daily Values are based on a 2000 calorie diet.

Here’s one more to pin on your Pinterest boards!Need a new vegetable dish for the holidays? Look no further! Roasted Butternut Squash with Cranberries, Honey & Feta is both delicious, sweet AND savory!


Save

Save

Skillet Potatoes With Scallions And Parmesan

Skillet potatoes, cooked with garlic, scallions and Parmesan cheese, are an easy, delicious, and inexpensive side dish you will enjoy!Skillet potatoes, cooked with garlic, scallions and Parmesan cheese, are an easy, delicious, and inexpensive side dish you will enjoy!
I don’t know about you, but I’m on the lookout for new, easy, and inexpensive side dishes to add to our dinner meal. It’s easy to fall into a rut and serve the same old, same old veggies. That’s why I enjoyed making these Skillet Potatoes With Scallions And Parmesan!  Yum! They’re an easy and delicious dish you can serve with a variety of meats.

Scroll Down For A Printable Recipe Card At The Bottom Of The Page

It helped that I had just harvested some red potatoes from our backyard garden. Some of them were a little scarred from digging them up), but I was excited to use a few of them. I used 5 red potatoes, which made enough for 2-3 servings.

Red potatoes are used for this recipe after cleaning.
Prepare The Potatoes

Wash the potatoes very well, then slice them into about 1/2 inch slices. I keep the peel on, because I think the color looks really good in the finished dish, plus they contain extra fiber.

The red potatoes are sliced into rounds before cooking.
Place enough water in a large skillet to cover the bottom with about 1/2 – 3/4 inch of water. Put the sliced potatoes into the water and begin to cook them on medium-high heat.

Continue cooking the potatoes, turning gently, and added more water, when necessary, to ensure the potatoes do not stick to the bottom of the skillet. TIP: As the water cooks away you will need to add additional water.

Red potato slices begin cooking in a bit of water, in a large skillet.
Finish Cooking, Then Garnish Skillet Potatoes

Keep an eye on the potatoes as they finish cooking. Making sure there is enough water in skillet is the key to this dish.  Continue cooking (about 15 minutes or so) until the potatoes are fork-tender. Once fork-tender, remove any remaining water from the skillet. Add the butter, salt, pepper, minced garlic chopped scallions (green onions) to the skillet.

Coat the potatoes with the melted butter by spooning it up and over the top of the potatoes while they cook. Remove the potatoes from the heat after 1-2 minutes (don’t burn the garlic!). Gently pour potatoes into a serving bowl, and immediately sprinkle with grated Parmesan cheese.

Skillet Potatoes are garnished with butter, seasoning and green onions.

Grated Parmesan cheese is sprinkled on top of the hot potatoes.
Time To Eat The Skillet Potatoes With Scallions And Parmesan!

The cheese will melt in about a minute over the hot potato slices, then they are ready. Add additional salt and/or black pepper to taste, if desired. Serve, and enjoy!

A bowl of Parmesan and scallion covered buttered skillet potatoes, ready to eat.
 I’m pretty confident you will love these potatoes! The recipe is easily adapted to double or triple the amount of potatoes YOU want to serve!

A close-up photo of the skillet potatoes, served with chicken (in background).Thanks for stopping by today. I hope you have the opportunity to try these delicious skillet potatoes. Have a great day! I hope it is a memorable, and fun one for you! Please come back soon for more delicious recipes.

Looking For More POTATO Recipes?

You can find all of my potato recipes in the Recipe Index, located at the top of the page. I have some delicious ones, including:

Interested In More Recipes?

Thank you for visiting this website. I appreciate you using some of your valuable time to do soIf you’re interested, I publish a newsletter 2 times per month (1st and 15th) with all the latest recipes, and other fun info. I would be honored to have you join our growing list of subscribers, so you never miss a great recipe!
There is a Newsletter subscription box on the top right side (or bottom) of each blog post, depending on the device you use, where you can easily submit your e-mail address (only) to be included in my mailing list.

You Can Also Find Me On Social Media:

Facebook page: The Grateful Girl Cooks!
Pinterest:
The Grateful Girl Cooks!
Instagram:
jbatthegratefulgirlcooks

Author's signatureRecipe Source: My brain. This dish was a no brainer.

0 from 0 votes
Skillet Potatoes With Scallions And Parmesan
Prep Time
5 mins
Cook Time
15 mins
Total Time
20 mins
 

Skillet potatoes, cooked with garlic, scallions and Parmesan cheese, are an easy, delicious, and inexpensive side dish you will enjoy!

Category: Side Dishes
Cuisine: American
Keyword: skillet potatoes
Servings: 3 servings
Calories Per Serving: 320 kcal
Author: JB @ The Grateful Girl Cooks!
Ingredients
  • 5 red potatoes
  • water (enough to continue filling bottom of skillet during cooking time)
  • salt and pepper , to taste
  • 2 Tablespoons butter
  • 2 scallions (2 green onion stalks-green and white part), sliced
  • 1 teaspoon minced garlic
Instructions
  1. Slice potatoes into 1/2 inch slices.
  2. Pour enough water into large skillet to completely cover bottom of skillet by about an inch.
  3. Add potato slices to water. Heat on medium heat until fork-tender (approx. 15-20 minutes). Keep an eye on water level... add additional water, as needed, to ensure potatoes do not stick to bottom of pan as they cook.
  4. When potatoes are done, remove any remaining water from skillet. Add butter, salt, pepper, garlic, and chopped scallions to potatoes in skillet. Mix gently, to combine. Continue to spoon melted butter over the tops of the potatoes. Cook an additional 1-2 minutes.
  5. Remove potatoes from heat. Place into serving bowl, and immediately garnish with grated Parmesan cheese. The heat from the potatoes will melt the cheese. Taste, and add additional salt and pepper, if necessary.
  6. Serve, and enjoy!
Nutrition Facts
Skillet Potatoes With Scallions And Parmesan
Amount Per Serving (1 g)
Calories 320 Calories from Fat 72
% Daily Value*
Fat 8g12%
Saturated Fat 4g25%
Cholesterol 20mg7%
Sodium 132mg6%
Potassium 1637mg47%
Carbohydrates 57g19%
Fiber 6g25%
Sugar 4g4%
Protein 7g14%
Vitamin A 340IU7%
Vitamin C 32.6mg40%
Calcium 41mg4%
Iron 2.7mg15%
* Percent Daily Values are based on a 2000 calorie diet.

Here’s one more to pin on your Pinterest boards!Skillet potatoes, cooked with garlic, scallions and Parmesan cheese, are an easy, delicious, and inexpensive side dish you will enjoy!


Save

Save

Save

Save

Mom’s Marinated Cucumbers

Quick and easy, cold and crisp, Mom’s marinated cucumbers in vinaigrette provide a sweet crunch to salads, and are just as good eaten right out of the bowl!Quick and easy, cold and crisp, Mom's marinated cucumbers in vinaigrette provide a sweet crunch to salads, and are just as good eaten right out of the bowl!
When I was growing up, my Mom occasionally made batches of marinated cucumbers. We either could add them to a green salad, OR (as she preferred to do),  eat them… crispy and cold, right out of the container with a fork! Since I’ve been growing lots of cucumbers in our garden this year, it’s a perfect way to use some of our abundance.

This amazing little side dish is totally easy to prepare. Basically you mix up the marinade, slice up cucumbers, chop some red onion, mix it all together, then refrigerate for several hours so that the flavors come together beautifully!

That’s it! See how easy it is to make Mom’s marinated cucumbers? And these cucumbers are crisp, slightly sweet, and delicious! I’m glad to have so many from our little backyard garden!

Cucumber on vine in garden

Making Mom’s Marinated Cucumbers

To make mom’s marinated cucumbers, first peel and slice the cucumbers, then put them in a container that has a lid. Finely chop some red onion, and add to the cucumbers. This step only takes a few minutes.

Cucumber is peeled and sliced (on yellow cutting mat)
Mix the marinade ingredients in a small bowl until sugar dissolves. This takes about a minute to prepare.

Marinade for cucumbers in metal bowl
Pour the marinade on top of the cucumbers, then stir well to combine.

Marinade poured over sliced cucumbers in container
Refrigerate, Then Enjoy Mom’s Marinated Cucumbers!

Cover the container and refrigerate for at least 3-4 hours, stirring a couple of times to make sure cucumber slices are covered. When ready to serve, or gobble up, remove from refrigerator and go for it!

Mom's marinated cucumbers, in bowl in refrigerator

They are tasty right out of the container OR served on a crisp, green salad!  They are GOOD!!!!  Bet ya can’t eat just one of these!

Looking For More SIDE SALAD Recipes?

You can find ALL my recipes in the Recipe Index, located at the top of the page. I have some yummy side salad recipes you might want to check out, including:

Interested In More Recipes?

Thank you for visiting this website. I appreciate you using some of your valuable time to do soIf you’re interested, I publish a newsletter 2 times per month (1st and 15th) with all the latest recipes, and other fun info. I would be honored to have you join our growing list of subscribers, so you never miss a great recipe!
There is a Newsletter subscription box on the top right side (or bottom) of each blog post, depending on the device you use, where you can easily submit your e-mail address (only) to be included in my mailing list.

You Can Also Find Me On Social Media:
Facebook page: The Grateful Girl Cooks!
Pinterest: The Grateful Girl Cooks!
Instagram: jbatthegratefulgirlcooks

Author's signatureRecipe Source: My Mom

0 from 0 votes
Mom's Marinated Cucumbers
Prep Time
10 mins
Cook Time
0 mins
Total Time
10 mins
 
Quick and easy, cold and crisp, Mom's marinated cucumbers in vinaigrette provide a sweet crunch to salads, and are just as good eaten right out of the bowl!
Category: Side Dish, Vegetable
Cuisine: American
Keyword: Mom's marinated cucumbers
Servings: 8 4 cups total (approx.)
Calories Per Serving: 146 kcal
Author: JB @ The Grateful Girl Cooks!
Ingredients
  • 1/2 cup vegetable oil
  • 1/2 cup white vinegar
  • 3/4 cup granulated sugar
  • 1/4 teaspoon (each) Salt & Pepper , to taste (guessing I would say about 1/4 teaspoon each)
  • 3 large large cucumbers , peeled and sliced
  • 1/4 medium medium red onion , finely chopped
Instructions
  1. Peel and slice cucumbers; place in a container that has a lid. Finely chop red onion; add to cucumbers.

  2. Whisk together the oil, vinegar, sugar, salt and pepper until sugar is dissolved. Pour marinade over the cucumbers. Stir well to combine. Cover and refrigerate cucumbers for at least 3-4 hours, stirring occasionally. Enjoy.

Recipe Notes

Please note: The 10 minute prep time is "active" prep time. I did not include the 3-4 hours "inactive" refrigeration time necessary for all flavors to permeate and come together. Please plan accordingly.

Nutrition Facts
Mom's Marinated Cucumbers
Amount Per Serving (0.5 cups)
Calories 146 Calories from Fat 54
% Daily Value*
Fat 6g9%
Saturated Fat 5g31%
Sodium 75mg3%
Potassium 147mg4%
Carbohydrates 21g7%
Sugar 20g22%
Vitamin A 75IU2%
Vitamin C 3.6mg4%
Calcium 15mg2%
Iron 0.2mg1%
* Percent Daily Values are based on a 2000 calorie diet.

Here’s one more to pin on your Pinterest boards!Quick and easy, cold and crisp, Mom's marinated cucumbers in vinaigrette provide a sweet crunch to salads, and are just as good eaten right out of the bowl!


Save

Save

Grilled Summer Veggies

Grilled Summer Veggies, with zucchini, yellow squash, carrots, onion, green and red peppers and green beans are cooked on BBQ, then topped w/ Parmesan cheese!Grilled Summer Veggies, with zucchini, yellow squash, carrots, onion, green and red peppers and green beans are cooked on BBQ, then topped w/ Parmesan cheese!

The HOT summer continues here in the great Pacific Northwest! We are still using our BBQ grill a lot, as we try to keep our kitchen (and home) cool! Today I want to share a recipe I make quite frequently in the summertime- Grilled Summer Veggies!

Scroll Down For A Printable Recipe Card At The Bottom Of The Page

Making Grilled Summer Veggies Is EASY

This recipe is really, really easy.  All that is involved in the prep work for this delicious side dish is slicing and cutting up the veggies. I even was able to use some homegrown veggies from our garden as part of this dish (yee haw!)


Summer veggies are sliced, and ready to be grilled.Once the veggies are sliced and chopped, put them into a large bowl. I used zucchini, yellow squash, red onion, green and red pepper, green beans (even a few yellow fillet beans from the garden), and baby carrots.

You can certainly add in additional veggies to make this dish “your own”. That’s the best way, right? You’ve got to like what you’re cooking!

Cut veggies are placed in large bowl to mix with seasonings.Time To Season The Veggies

Season the veggies with olive oil, salt, pepper, Parmesan cheese, garlic powder, and Italian seasoning. Give them a good toss, to fully coat the veggies with the seasoning.

Summe veggies are seasoned with olive oil, Parmesan cheese and Italian spices before grilling.

Use A BBQ Grill Safe Basket

After the veggies and seasonings are combined, put them into a BBQ-safe grill pan (we got one for about $8 at a home improvement warehouse). NOTE: If you don’t have access to a grill pan, use a cast iron skillet on your BBQ to cook these, but watch out… the skillet will get REALLY hot!).

The grill pan we used has a handle to carry it that detaches once you get it on the BBQ grill, then reattaches to lift pan off the grill once done. Pretty handy to use!

Veggies are placed into a BBQ-grill pan for cooking.Cook the veggies on a medium-hot grill for about 15 minutes or so, stirring often. My husband was the “Grill-Meister and Stirrer-Extraordinaire” for this dish!

Grilled Summer Veggies on the BBQ, being stirred while they cook.Some of the veggies will get a nice char on them or get slightly golden brown… that’s great! Just remember to stir them occasionally so they don’t burn! We love cooking veggies on our Weber grill, cause the smoky smell permeates the vegetables, and gives them such a wonderful flavor!

Summer veggies grilling on the BBQ.Serve The Grilled Summer Veggies

Once the veggies are done (fork-tender), we bring them inside and top them with grated Parmesan cheese, and serve them up, straight out of the grill pan! YUM!

Grilled Summer Veggies are sprinkled with grated Parmesan cheese before serving.Sure hope you will give this EASY recipe a try. These grilled summer veggies are a wonderful accompaniment to most meat dishes. I think you and your family will love them! You might also like to see how to grill corn on the cob on the BBQ! That’s another easy way to cook veggies!

Have a great day!  Thanks for stopping by today, and come back soon. May you find beauty all around you today. Hope you’re looking for it!

Looking For More VEGGIE Recipes?

You can find all my recipes in the Recipe Index, located at the top of the page. I have a great variety of vegetable dishes, including:

Interested In More Recipes?

Thank you for visiting this website. I appreciate you using some of your valuable time to do soIf you’re interested, I publish a newsletter 2 times per month (1st and 15th) with all the latest recipes, and other fun info. I would be honored to have you join our growing list of subscribers, so you never miss a great recipe!
There is a Newsletter subscription box on the top right side (or bottom) of each blog post, depending on the device you use, where you can easily submit your e-mail address (only) to be included in my mailing list.

You Can Also Find Me On Social Media:

Facebook page: The Grateful Girl Cooks!
Pinterest:
The Grateful Girl Cooks!
Instagram:
jbatthegratefulgirlcooks

Author's signature

5 from 1 vote
Grilled Summer Veggies
Prep Time
10 mins
Cook Time
15 mins
Total Time
25 mins
 
Grilled Summer Veggies, with zucchini, yellow squash, carrots, onion, green and red peppers and green beans are cooked on BBQ, then topped w/ Parmesan cheese!
Category: Side Dish, Vegetable Dish
Cuisine: American
Keyword: grilled summer veggies
Servings: 4 servings
Calories Per Serving: 163 kcal
Author: JB @ The Grateful Girl Cooks!
Ingredients
  • 1 zucchini , sliced
  • 1 yellow squash , sliced
  • 3 slices red onion (then quartered
  • 1/2 green bell pepper , cut into chunks
  • 1/2 red bell pepper , cut into chunks
  • green beans (I used about 10), ends trimmed and beans cut in half
  • 6-8 baby carrots , cut in half lengthwise
  • 1/4 cup Parmesan cheese
  • Salt and Pepper to taste
  • 3 Tablespoons olive oil
  • 1/2 teaspoon garlic powder
  • 1/2 teaspoon Italian seasoning
  • 2 teaspoons Grated Parmesan cheese (for garnish once veggies are cooked)
Instructions
  1. Prepare all veggies. Place into a large bowl.  Add seasoning ingredients: Parmesan cheese (shaker can kind), salt, pepper, olive oil, garlic powder, and Italian seasoning, Mix well to combine.

  2. Place veggies into a sprayed BBQ grill saute pan or into a cast iron skillet. Place pan onto a medium high BBQ grill. Cook for 15-18 minutes, stirring occasionally so the veggies don't burn.  When done, remove from heat (if using cast iron skillet it will be HOT... be careful!).

  3. Sprinkle grated Parmesan cheese over the top of the hot vegetables, and serve.  Enjoy!

Nutrition Facts
Grilled Summer Veggies
Amount Per Serving (1 (1/4 of total))
Calories 163 Calories from Fat 117
% Daily Value*
Fat 13g20%
Saturated Fat 2g13%
Cholesterol 6mg2%
Sodium 156mg7%
Potassium 364mg10%
Carbohydrates 7g2%
Fiber 2g8%
Sugar 4g4%
Protein 4g8%
Vitamin A 2855IU57%
Vitamin C 49.3mg60%
Calcium 125mg13%
Iron 0.8mg4%
* Percent Daily Values are based on a 2000 calorie diet.

Here’s one more to pin on your Pinterest boards!Grilled Summer Veggies, with zucchini, yellow squash, carrots, onion, green and red peppers and green beans are cooked on BBQ, then topped w/ Parmesan cheese!


Save

Save

Fresh Corn Sauté with Red Pepper and Onions

Fresh corn sauté, with red peppers, butter and onions is a quick, delicious and low calorie side dish, sure to be a big hit at your Summer BBQ!Fresh corn sauté, with red peppers, butter and onions is a quick, delicious and low calorie side dish, sure to be a big hit at your Summer BBQ!

I love summertime… and I LOVE fresh corn on the cob! A giant piece of fresh corn is one of my favorite foods of summer. This recipe for Fresh Corn Sauté with Red Pepper and Onions is absolutely, lip-smackin’ delicious. Did I also mention how SIMPLE this is to make? And how LOW IN CALORIES  and DELICIOUS it is, also? (ding, ding… we have a WINNER!)

This fresh corn sauté is a fantastic summer side dish! It only took me about ten minutes to prepare, from start to finish! I found the recipe in this month’s issue of Cooking Light Magazine, and knew I wanted to try it! Sure glad I did. This Fresh Corn Sauté only takes a few (fresh) ingredients, serves 4, and takes about 10 minutes to prepare. How awesome is that?

It’s kind of ironic that I am sharing so many photos of such a quick, easy dish, but hey… it’s a colorful dish, and I didn’t want to be selfish and NOT share… so here goes!

Scroll Down For A Printable Recipe Card At The Bottom Of The Page

Prepare The Corn

Cut the kernels off of 2 large ears of fresh corn, then chop green onions, and dice red peppers. Only takes a couple minutes. (see how easy so far?)

Corn, red pepper and green onions ready to cookFresh corn, cut from the cob and ready to cookHow To Make The Fresh Corn Sauté

Melt a bit of butter in a large skillet. That’s a no brainer, right?

Melting butter in large skillet, to saute cornAdd the fresh corn kernels to the skillet. Sauté the corn for 2 minutes, on medium-high heat.

Fresh corn kernels are cooked in large skillet with butter
Add the chopped green onions and the diced red peppers. Whew… so hard. Are you sweating yet?

Chopped red bell pepper and green onions are added to corn in skillet
Season The Corn

Now it’s time to add simple seasonings to this dish. Add salt and pepper to the corn and veggies in the skillet. You can add more or less to suit your own taste, if desired. Stir together, to combine all ingredients.

Salt and pepper are added to corn, peppers and green onions
Sauté for 2 more minutes, or until the fresh corn is crisp-tender. Hope you’re not too tired at this point (insert sarcastic grin).

Corn, peppers and green onions are sauteed for a couple minutes.
Serve The Fresh Corn Sauté

Remove the corn from skillet onto a serving plate. Look at how gorgeous those colors are!!!

Fresh corn saute with red pepper and onions is served on white platter
Serve this dish hot, and enjoy the work of your hands. The recipe makes 4 servings (1/2 cup per serving). This summer side dish is delicious, crispy, and full of summer goodness! YUM!

Corn, with red peppers and green onions on serving platter with spoon

Hope you enjoy this fresh corn sauté! We sure did! Have a GREAT day, and please come back again soon!

If you are a veggie lover, be sure and check out my recipes for Garlic Infused Roasted Asparagus, Summer Vegetable Tian, Summer Squash Bacon Saute, P.F. Chang’s Spicy Green Beans, or any of my recipes listed in the Recipe Index at the top of the page.

Interested In More Recipes?

Thank you for visiting this website. I appreciate you using some of your valuable time to do soIf you’re interested, I publish a newsletter 2 times per month (1st and 15th) with all the latest recipes, and other fun info. I would be honored to have you join our growing list of subscribers, so you never miss a great recipe!
There is a Newsletter subscription box on the top right side (or bottom) of each blog post, depending on the device you use, where you can easily submit your e-mail address (only) to be included in my mailing list.

You Can Also Find Me On Social Media:

Facebook page: The Grateful Girl Cooks!
Pinterest:
The Grateful Girl Cooks!
Instagram:
jbatthegratefulgirlcooks

Author's signatureRecipe source: Cooking Light Magazine, August 2015 issue, page 42.

0 from 0 votes
Fresh Corn Sauté with Red Pepper and Onions
Prep Time
5 mins
Cook Time
5 mins
Total Time
10 mins
 

Fresh corn sauté, with red peppers, butter and onions is a quick, delicious and low calorie side dish, sure to be a big hit at your Summer BBQ!

Category: Side Dish
Cuisine: American
Keyword: fresh corn saute
Servings: 4 servings
Calories Per Serving: 121 kcal
Author: JB @ The Grateful Girl Cooks!
Ingredients
  • 2 Tablespoons butter
  • 2 cups fresh corn kernels (I used 2 large ears of corn)
  • 1/4 cup chopped green onions (approx. 1 stalk-green and white parts)
  • 1/4 cup diced red bell pepper
  • 1/4 teaspoon salt
  • 1/4 teaspoon ground black pepper
Instructions
  1. With a sharp knife, cut the kernels off of ears of corn (shucked and de-silked)
  2. Melt butter in large skillet over medium to high heat.
  3. Add fresh corn kernels to the skillet. Cook them for 2 minutes on medium-high.
  4. Add the chopped green onions, diced red bell pepper, salt and pepper. Stir to combine.
  5. Cook for 2-3 more minutes, or until the corn is crisp, but tender.
  6. Serve while hot, and enjoy!
Nutrition Facts
Fresh Corn Sauté with Red Pepper and Onions
Amount Per Serving (1 g)
Calories 121 Calories from Fat 54
% Daily Value*
Fat 6g9%
Saturated Fat 3g19%
Cholesterol 15mg5%
Sodium 208mg9%
Potassium 244mg7%
Carbohydrates 15g5%
Fiber 1g4%
Sugar 5g6%
Protein 2g4%
Vitamin A 675IU14%
Vitamin C 18.3mg22%
Calcium 5mg1%
Iron 0.5mg3%
* Percent Daily Values are based on a 2000 calorie diet.

Here’s one more to pin on your Pinterest boards!Fresh corn sauté, with red peppers, butter and onions is a quick, delicious and low calorie side dish, sure to be a big hit at your Summer BBQ!

Save

Save

Save

Purple Coleslaw

Purple coleslaw, with homemade poppyseed dressing, is a quick, easy salad that’s perfect for BBQ’s! Slaw turns deep purple the longer it refrigerates.Purple coleslaw, with homemade poppyseed dressing, is a quick, easy salad that's perfect for BBQ's! Slaw turns deep purple the longer it refrigerates.
I happen to love coleslaw, and the crunch of the cabbage, and the creamy, slightly sweet dressing. Coleslaw is so easy to make, and I like the way this Purple Coleslaw deepens in it’s purple color the longer it is mixed together. More color on my plate!

It’s easy to go to the produce section and buy pre-shredded coleslaw mixes. Also it is easy to go to the salad dressing section and buy a pre-made coleslaw dressing. Mix them together and poof! Coleslaw. Well, I totally “get” the convenience of it, but I think it’s fun being able to make a great coleslaw using fresh produce. I also enjoy making my own “not out of the bottle” coleslaw dressing.

Scroll Down For A Printable Recipe Card At The Bottom Of The Page

Why Does It Turn Purple?

Store bought coleslaw mixes usually have lots of shredded green cabbage, shredded carrots and a teensy,tiny bit of purple cabbage. I like to make my own coleslaw THAT way, but I also love this recipe which adds a much larger amount of purple cabbage.

This larger amount of purple cabbage ultimately colors the dressing purple the longer the coleslaw is mixed together. It’s kinda fun to serve a purple coleslaw, and it’s a breeze to make my own!

How To Make Purple Coleslaw

First you shred two cups of purple cabbage into a large mixing bowl. I use a mandolin, but you can also do this with a cheese grater.

The purple cabbage is shredded on a mandoline or box grater.Shredded purple cabbage in bowl.
Now shred the green cabbage and some carrots into the same bowl.

Green cabbage is shredded on a mandoline or box grater.
Now you will have all the coleslaw veggies in the large mixing bowl. See how EASY that is?

Grated purple and green cabbage, plus carrots in bowl.
Mix these colorful purple coleslaw ingredients together. See how pretty it is already?

Green and purple cabbage, plus carrot shreds are mixed together in large bowl.
Make The Dressing For The Purple Coleslaw

The coleslaw dressing has light mayonnaise, apple cider vinegar, poppyseeds, and a little salt, pepper and sugar. Mix these ingredients together in a small bowl. That’s IT!

The poppyseed salad dressing is easy to make for this slaw.
Add the dressing to the bowl with the purple coleslaw, and stir well, to combine.

A poppyseed dressing is added to the purple coleslaw, and mixed in.
Refrigerate The Purple Coleslaw For Best Flavor (And Color)

Cover the coleslaw with plastic wrap and refrigerate for at least an hour (the longer the better), so the flavors can come together. When you are ready to serve, give it a good stir, and dig in. Refrigerate leftovers.

NOTE: The longer you keep the purple coleslaw refrigerated (and stirred), the more purple the dressing will become, as the deep purple color from the cabbage mixes with the dressing. It’s kind of a unique touch for a delicious homemade coleslaw.

The longer the purple coleslaw is refrigerated, the deeper the color becomes.
This is a perfect side dish for summer BBQ’s. We really enjoy this great purple coleslaw. Sure hope you will give it a try. Have a great week!

Looking For More COLESLAW Recipes?

You can find ALL my recipes in the Recipe Index, located at the top of the page. I have lots of great salads you’ll enjoy, including these other coleslaw recipes:

Interested In More Recipes?

Thank you for visiting this website. I appreciate you using some of your valuable time to do soIf you’re interested, I publish a newsletter 2 times per month (1st and 15th) with all the latest recipes, and other fun info. I would be honored to have you join our growing list of subscribers, so you never miss a great recipe!
There is a Newsletter subscription box on the top right side (or bottom) of each blog post, depending on the device you use, where you can easily submit your e-mail address (only) to be included in my mailing list.

You Can Also Find Me On Social Media:

Facebook page: The Grateful Girl Cooks!
Pinterest:
The Grateful Girl Cooks!
Instagram:
jbatthegratefulgirlcooks

Recipe source: My brain and lots of experimenting…

Author's signature

0 from 0 votes
Purple Coleslaw
Prep Time
15 mins
Cook Time
0 mins
Total Time
15 mins
 

Purple coleslaw, with homemade poppyseed dressing, is a quick, easy salad that's perfect for BBQ's! Slaw turns deep purple the longer it refrigerates.

Category: Side Dish
Cuisine: American
Keyword: purple coleslaw
Servings: 6 (1/2 cup) servings
Calories Per Serving: 288 kcal
Author: JB @ The Grateful Girl Cooks!
Ingredients
For Coleslaw:
  • 2 cups shredded green cabbage
  • 1 cup shredded purple cabbage
  • 1/2 cup shredded carrots
For Coleslaw Dressing:
  • 1 cup mayonnaise
  • 2 Tablespoons apple cider vinegar
  • 1/4 teaspoon salt
  • 1/4 teaspoon pepper
  • 1 teaspoon poppyseeds
  • 2 Tablespoons granulated sugar
Instructions
  1. Shred green cabbage, purple cabbage, and carrots. Place into a large mixing bowl. Mix well, to combine.
  2. In a small mixing bowl, combine the mayonnaise, apple cider vinegar, salt, pepper, poppyseeds, and granulated sugar. Mix well, to thoroughly combine.
  3. Add the dressing to the slaw mixture. Stir well until all veggies are coated with dressing. Cover coleslaw with plastic wrap; place in refrigerator for a minimum of 1 hour (preferably longer), so that flavors come together and the slaw is very cold.
  4. Serve, and enjoy!
Recipe Notes

Prep time does not include inactive refrigeration time. The longer the cole slaw is refrigerated, the better it is, and the more PURPLE it becomes!

Nutrition Facts
Purple Coleslaw
Amount Per Serving (1 g)
Calories 288 Calories from Fat 252
% Daily Value*
Fat 28g43%
Saturated Fat 4g25%
Cholesterol 15mg5%
Sodium 349mg15%
Potassium 117mg3%
Carbohydrates 7g2%
Fiber 1g4%
Sugar 6g7%
Protein 1g2%
Vitamin A 1995IU40%
Vitamin C 17.7mg21%
Calcium 30mg3%
Iron 0.4mg2%
* Percent Daily Values are based on a 2000 calorie diet.

Here’s one more to pin on your Pinterest boards!Purple coleslaw, with homemade poppyseed dressing, is a quick, easy salad that's perfect for BBQ's! Slaw turns deep purple the longer it refrigerates.


Save

Save

Creamy Deviled Eggs

You’ll love these yummy, creamy deviled eggs. These classic bite sized appetizers are so simple to prepare, and will be a big hit at any celebration or potluck.You'll love these yummy, creamy deviled eggs. These classic bite sized appetizers are so simple to prepare, and will be a big hit at any celebration or potluck.
We really enjoyed having our family over for Easter brunch. I made a variety of different foods but when our sons arrived, the first thing they grabbed were the Creamy Deviled Eggs! Sneaky Ninjas! I guess I’d forgotten how much they love ’em.

We only have creamy deviled eggs a couple times a year, but they’re always a big hit! I’m pretty sure deviled eggs are the kind of food that everyone has their own method of making, or memory of how they should taste in their mind.

When I was growing up, I didn’t care for deviled eggs too much. My mom put diced onions and sweet pickle relish in them, so I was never the one grabbing them at family celebrations. As an adult however, I’ve discovered I really like deviled eggs made the simple, basic way I am sharing today.

Now I’ve been making ’em this way for over 35 years! So… for the sake of my sons having the way I make them down in writing long after I’m gone, I’m posting it here on the ol’ blog for their sake.

Scroll Down For A Printable Recipe Card At The Bottom Of The Page

Start By Boiling the Eggs

There must be a million ways to do this, but here’s the way I do it. Place the eggs in a large pan. Cover them fully with water.

Turn the heat to high, set a timer for 23 minutes, and walk away. (not too far away, like another city, but you get the idea, right?)

6 eggs cooking in water in saucepanEggs boiling in water in pan
As soon as they are done, immediately drain off the boiling hot water, and fill the pan with cold water. After about a minute, drain the water off and fill pan back up with cold water.

Hot water being poured off of eggs from panRinsing hot boiled eggs with cold water
Take each egg, and crack it all around the shell on the kitchen counter, then toss it back into the water (before peeling it). I crack all the eggs I will be using for the recipe and put them back into the water right after cracking them.

Letting the eggs sit with the shells “cracked” in water for a minute or two lets water seep into the cracks of the eggshell between the shell and the egg, which makes peeling them very easy!

Once they are all cracked, peel each one. Roll the egg between your hands to loosen the shells first, then peel.

Hand holding a cracked hard boiled egg over saucepan

Okay-  Now It’s Time To Make Some Creamy Deviled Eggs!

Once peeled and rinsed, carefully cut the eggs in half, length-wise, with a sharp knife.

6 hard boiled egg halves on white countertop
Use a teaspoon to carefully remove the egg yolk from the egg and place yolks into a small mixing bowl. To do this, turn egg yolk side down, gently pull back the egg white, then slide a teaspoon into it and pull out the yellow yolk.

Boom. Gravity takes the yolk right down into the bowl without a lot of work.

Removing egg yolk from hard boiled egg
Making The Filling For Creamy Deviled Eggs Is EASY

For this recipe I made 12 deviled eggs. Add three large heaping spoonfuls of mayonnaise and about a ½ teaspoon of yellow table mustard, salt & pepper (to taste) to the egg yolks.

Mayonnaise and mustard added to egg yolks
Smash the egg yolks with the back of a spoon or fork, and then mix the filling by hand until it is nice and creamy. You can also use an electric mixer if you want!

Egg yolks, mayo and mustard mixed together in silver mixing bowl
Carefully fill the empty eggs by spooning filling into the egg cavity. Fill each of the egg cavities first, then go back and add any extra filling to the top of the eggs.

Some people like to “pipe” the filling in, using a pastry bag for fancy looking eggs, but I like this easy (and less to clean up) way the best!

Spooning deviled egg filling into hard boiled egg whites
Ready For Serving

Once the eggs are all filled, garnish the creamy deviled eggs by sprinkling paprika and dried parsley flakes on top of each one.

Place the eggs in a covered container and refrigerate (a couple hours is best) until ready to serve. Enjoy!

Creamy deviled eggs with paprika and parsley garnish on platter

That’s it! I think you will find it very easy to make these delicious appetizers! Have a wonderful day!

Looking For More APPETIZER Recipes?

You can find all of my recipes in the Recipe Index, which is located at the top of the page. I have quite a few appetizer recipes, including:

Want More Recipes? Get My FREE Newsletter!

I publish a newsletter 2 times per month (1st and 15th) with lots of recipes, tips, etc..
Would you like to join our growing list of subscribers?

There is a Newsletter subscription box on the top right (or bottom) of each blog post, depending on the device you use.
You can submit your e-mail address there, to be added to my mailing list.

Find Me On Social Media:

Facebook page: The Grateful Girl Cooks!
Pinterest:
The Grateful Girl Cooks!
Instagram:
jbatthegratefulgirlcooks

Author's signature

Adapted 40 years ago from my Mom’s recipe

↓↓ PRINTABLE RECIPE BELOW ↓↓

0 from 0 votes
Creamy Deviled Eggs
Prep Time
10 mins
Cook Time
20 mins
Total Time
30 mins
 
You'll love these yummy, creamy deviled eggs. These classic bite sized appetizers are so simple to prepare, and will be a big hit at any celebration or potluck.
Category: Appetizer
Cuisine: American
Keyword: deviled eggs
Servings: 12 deviled eggs
Calories Per Serving: 50 kcal
Author: JB @ The Grateful Girl Cooks!
Ingredients
  • 6 large eggs , hard boiled (approx. 20 min)
  • 3 Tablespoons very large Tablespoons mayonnaise
  • 1/2 teaspoon prepared yellow mustard
  • salt and pepper , to taste
  • paprika (for use as a garnish)
  • dried parsley flakes (for use as a garnish)
Instructions
  1. Hard boil eggs. Peel, rinse. Cut eggs in half lengthwise. Carefully scoop out the yolk into a small bowl.

  2. Add the mayonnaise and mustard to egg yolk mixture. Season with salt and pepper (add a bit at a time... season to taste)

  3. Using electric mixer or a large spoon, completely mash and mix the ingredients together until mixture is smooth.
  4. Spoon or pipe mixture into eggs. Sprinkle with paprika and dried parsley flakes for garnish. Put eggs on serving plate in covered container. Refrigerate for a couple hours, until ready to serve. Enjoy!

Recipe Notes

The time for hard-boiling the eggs (23 minutes) is included in the prep time.

Nutrition Facts
Creamy Deviled Eggs
Amount Per Serving (1 egg half)
Calories 50 Calories from Fat 18
% Daily Value*
Fat 2g3%
Cholesterol 81mg27%
Sodium 33mg1%
Potassium 30mg1%
Protein 2g4%
Vitamin A 120IU2%
Calcium 12mg1%
Iron 0.4mg2%
* Percent Daily Values are based on a 2000 calorie diet.

Here’s one more to pin on your Pinterest boards!You'll love these yummy, creamy deviled eggs. These classic bite sized appetizers are so simple to prepare, and will be a big hit at any celebration or potluck.

Save

Save

Save

Save

Fruit Kabobs

Asked to bring fruit to a brunch or potluck? Why not bring fresh FRUIT KABOBS! Colorful fruit cubes on skewers are portable, delicious, and EASY! Asked to bring fruit to a brunch or potluck? Why not bring fresh FRUIT KABOBS! Colorful fruit cubes on skewers are portable, delicious, and EASY! 

It’s officially Spring in the Pacific Northwest… the temperatures are warming up a bit, we have enjoyed glorious days of sunshine and warmth, followed by days of clouds and rain. No complaints here, but I am really getting excited for backyard BBQ’s and family gatherings (birthdays, holidays, etc.) which are just around the corner!

If you’re the “lucky” person who is asked to bring fruit to a celebration, brunch, picnic or potluck meal, maybe you’d be interested in this simple idea… FRUIT KABOBS! Perfectly portable, delicious, and EASY! Your guests can grab a skewer of beautiful fresh fruit… healthy AND easy peasy!

Fruit Kabobs Are Always A Big Hit At Brunches!

I’ve made these many times over the years, for as little as 4 people, up to almost 50 people.  Fruit Kabobs look cute, and are very easy for guests to add to their plate. You can adapt the kabobs to whatever fruit you enjoy.

For these fruit kabobs, I used fresh blueberries, cantaloupe, kiwi, pineapple, and strawberries, all layered onto wooden skewers. Wooden skewers are available in most grocery stores and are inexpensive.

Making Fruit Kabobs Ahead Of Time

Sliced bananas can also be used on kabobs, but you will need to cut and skewer them right before you serve, so they don’t turn brown. Using the fruit shown (w/out bananas), I was able to make the skewers up several hours before we served them at an Easter brunch.

If making ahead, cover the fruit kabobs platter with plastic wrap, and refrigerate until it’s time to eat!

Fruit kabobs, being served at a brunch.
There’s no need for a fruit kabobs “recipe”, and no need for any dipping sauces. Make them colorful, ripe, and bite-sized, and you’ll have a popular side dish! The natural sweetness of the fruit is a perfect low calorie dish for any gathering!

Hope you will try this simple, easy way to serve fruit “salad” in a different format! Your family or friends will love fruit kabobs! Have a great day!

Looking For More KABOB Recipes?

You can find all of my recipes in the Recipe Index, located at the top of the page. A few kabob recipes you might enjoy include:

Interested In More Recipes?

Thank you for visiting this website. I appreciate you using some of your valuable time to do soIf you’re interested, I publish a newsletter 2 times per month (1st and 15th) with all the latest recipes, and other fun info. I would be honored to have you join our growing list of subscribers, so you never miss a great recipe!
There is a Newsletter subscription box on the top right side (or bottom) of each blog post, depending on the device you use, where you can easily submit your e-mail address (only) to be included in my mailing list.

You Can Also Find Me On Social Media:

Facebook page: The Grateful Girl Cooks!
Pinterest:
The Grateful Girl Cooks!
Instagram:
jbatthegratefulgirlcooks

Author's signature

Here’s one more to pin on your Pinterest boards!Asked to bring fruit to a brunch or potluck? Why not bring fresh FRUIT KABOBS! Colorful fruit cubes on skewers are portable, delicious, and EASY!

Save

Save

Save

Ken’s Garlic Bread

Ken’s Garlic Bread is an easy, crunchy, side dish for salads, soup or main courses. Broiled baguette has Parmesan, garlic, butter, paprika & parsley!Ken's Garlic Bread is an easy, crunchy, tasty side dish for salads, soup or main courses. Broiled baguette has Parmesan, garlic, butter, paprika and parsley!
I named this “recipe” after my husband, Ken… a total bread-lover, who ALWAYS enjoys this garlic bread with a meal. Seriously… the guy can put away the garlic bread. Therefore I named it “Ken’s Garlic Bread”. Amen.

I felt rather foolish thinking I could put this garlic bread “recipe” (if you can call it that) on my blog, but then I realized there’s people who suffer in silence, somberly eating a plain, ordinary, buttered slice of bread, while our family scarfs down completely delicious, crispy, flavor-filled garlic bread! Yeah… if you believe that, I’ve got some swampland down in Florida for ya!

Family Traditions… Even For Garlic Bread!

I finally decided… why NOT put our tried and true Ken’s garlic bread “recipe” out there?  (Hey… it IS my blog, right?)  I get it… most people have “their way” of making garlic bread, and that’s awesome. Well, this is our family’s way. Maybe you will like it as much as we do. Maybe one of our grown sons has been laying awake wondering HOW does Mom make that good garlic bread we always used to have for dinner?

That is why I posted this recipe for my dear sweet husband Ken’s garlic bread. And believe it or not… there really is no “recipe”. Just some pictures that will show you what we do. Nine times out of 10 we start with sourdough bread, but French bread is a good runner up.

Use pre-sliced bread, or slice an entire loaf or a small baguette in half horizontally (lengthwise)… whatever you want! You can use virtually any kind of bread, and chances are, you’re gonna like it!  Follow these easy directions, then cook the bread on a rack under your oven broiler. That’s it!!

How To Make Ken’s Garlic Bread

Here’s how: Slice the loaf or baguette in half length-wise with a serrated knife, and do the following:

Yep, that’s right… I used the kind of parmesan cheese that comes in the green can for this version. Both “shaker can parmesan” and fresh grated Parmesan cheese are perfect for this bread. I keep both around my home, but wrote this recipe using the type of Parmesan cheese that most people commonly have in their home. Guess you’ll have to choose which kind to use.

Bread is buttered, then sprinkled with Parmesan cheese.

Lightly sprinkle with garlic powder. Don’t be too heavy handed, folks! We don’t need to chase away any vampires today!

Bread is then sprinkled lightly with garlic powder.

Now lightly sprinkle Ken’s garlic bread with paprika…

Garlic bread is sprinkled lightly with paprika.

Lightly sprinkle with dried parsley. Now put Ken’s garlic bread on a rack under the broiler. Keep an eye on it so it doesn’t burn… You want it to look nice and golden brown…

Garlic bread is sprinkled with dried parsley flakes.

Time To Eat Ken’s Garlic Bread!

And there ya have it! Congratulations. You made my hubby Ken’s favorite garlic bread. Aren’t you proud? Now insert bread into your mouth and enjoy!

Ken's garlic bread is golden and toasty after broiling in the oven!

Hope you will give this a try… It’s DEFINITELY not rocket science, and it works like a charm every time. Absolutely delicious! ENJOY!

Looking For More BREAD Recipes?

You can find all of my recipes in the Recipe Index, located at the top of the page. A few of our favorite bread recipes, (perfect for accompanying a variety of dishes) include:

Interested In More Recipes?

Thank you for visiting this website. I appreciate you using some of your valuable time to do soIf you’re interested, I publish a newsletter 2 times per month (1st and 15th) with all the latest recipes, and other fun info. I would be honored to have you join our growing list of subscribers, so you never miss a great recipe! 

There is a Newsletter subscription box on the top right side (or bottom) of each blog post, depending on the device you use, where you can easily submit your e-mail address (only) to be included in my mailing list.

You Can Also Find Me On Social Media:

Facebook page: The Grateful Girl Cooks!
Pinterest:
The Grateful Girl Cooks!
Instagram:
jbatthegratefulgirlcooks

Have a GREAT day!

Author's signature

Here’s one more to pin on your Pinterest boards!Ken's Garlic Bread is an easy, crunchy, tasty side dish for salads, soup or main courses. Broiled baguette has Parmesan, garlic, butter, paprika and parsley!

Save

Save