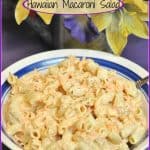
Category: Side Dishes

Red Lobster Cheddar Biscuits

It’s EASY to make this yummy copycat version of the popular cheesy, buttery Red Lobster Cheddar Biscuits at home in under 30 minutes.It's EASY to make this yummy copycat version of the popular cheesy, buttery Red Lobster Cheddar Biscuits at home in under 30 minutes.
I love the warm cheddar biscuits that are served to you before a meal at a famous national restaurant .  I seriously think I could eat quite a few of these copycat Red Lobster Cheddar Biscuits, if push came to shove.

Truth: It would NOT take a lot of “shoving” to get me to eat lots of them! They give new meaning to the words “comfort food”… ha ha!

Did you know these cheddar biscuits are TOTALLY EASY to make at home?  Yes… from start to finger-licking finish, these warm and buttery biscuit bites of cheddar and garlic goodness can be on your table in about 30 minutes or less.

The cheddar biscuits are as simple to make as mixing up the dough, dropping them onto a baking sheet and baking them! Simple to make, and amazingly GOOD (bet you can’t eat just one)!

This recipe makes 10 of these delicious biscuits, so there will be plenty to go around. Here’s how to make them.

Scroll Down For A Printable Recipe Card At The Bottom Of The Page

How To Make Cheddar Biscuits

Preheat your oven to 450 degrees. In a medium bowl, stir the biscuit mix, garlic powder and cayenne pepper.

Biscuit mix and spices are combined in a mixing bowl.

Add grated cheese and milk to bowl; stir together until a soft dough forms.

Grated cheese and milk are added to the dry ingredients in the bowl.

TIP: For a well rounded biscuit, spoon the dough into a measuring cup, THEN transfer it to the baking sheet (see below). Measure about 1/4 cup of batter into measuring cup.

Batter is scooped into a 1/4 cup measuring cup.

Spoon the dough out onto a greased baking sheet  (or a baking sheet covered with parchment paper). 

Smooth the tops of the dough down a bit with the back of a spoon. This will help prevent hard points from forming on the top of the biscuits.

Dough for the Red Lobster Cheddar Biscuits is placed on baking sheet.

Bake The Cheddar Biscuits

Bake at 450 degrees for 8-10 minutes. The tops of the biscuits should be golden brown when done. While the biscuits are cooking in the oven, melt the butter in a small pan; stir in the garlic powder.

Once you remove the biscuits from the oven, brush the garlic butter on top of the biscuits using a pastry brush. Sprinkle the crushed parsley flakes on top to garnish. Serve biscuits hot…and ENJOY!

Garlic butter and parsley are added to Red Lobster Cheddar Biscuits after baking.

Hope you like them! They are a great addition to most meals, and guess what?  They’re WONDERFUL!  Have a fantastic day, friends.

Looking For More BREAD Recipes?

You can find all my recipes in the Recipe Index, located at the top of the page. I have quite a few bread recipes you’ll enjoy, including:

Want More Recipes? Get My FREE Newsletter!

I publish a newsletter 2 times per month (1st and 15th) with lots of recipes, tips, etc..
Would you like to join our growing list of subscribers?

There is a Newsletter subscription box on the top right (or bottom) of each blog post, depending on the device you use.
You can submit your e-mail address there, to be added to my mailing list.

Find Me On Social Media:

Facebook page: The Grateful Girl Cooks!
Pinterest:
The Grateful Girl Cooks!
Instagram:
jbatthegratefulgirlcooks

Author's signatureRecipe Adapted From: Ron Douglas, in the cookbook “America’s Most Wanted Recipes” (published 2009), page 186.

↓↓ PRINTABLE RECIPE BELOW ↓↓

0 from 0 votes
Red Lobster Cheddar Biscuits
Prep Time
10 mins
Cook Time
10 mins
Total Time
20 mins
 
It's EASY to make this yummy copycat version of the popular cheesy, buttery Red Lobster Cheddar Biscuits at home in under 30 minutes.
Category: Bread, Side Dish
Cuisine: American
Keyword: cheddar biscuits
Servings: 10 biscuits
Calories Per Serving: 174 kcal
Author: JB @ The Grateful Girl Cooks!
Ingredients
  • 2 cups biscuit mix (such as Bisquick)
  • teaspoons garlic powder
  • ¼ cayenne pepper
  • 1/2 cup shredded cheddar cheese
  • 2/3 cup milk
For topping:
  • 4 Tablespoons (1/2 cube) butter
  • 1/4 teaspoon garlic powder
  • Parsley flakes , for garnishing
Instructions
  1. Preheat oven to 450 degrees.
  2. In a medium bowl, stir the biscuit mix, garlic powder, cayenne pepper, grated cheese and milk together until a soft dough forms.
  3. Spoon the dough into 1/4 cup measuring cup, then onto a greased baking sheet (or parchment paper covered baking sheet). Smooth the tops of the dough down a bit with the back of a spoon. This will help prevent hard points from forming on top of the biscuits.
  4. Bake at 450 degrees for 8-10 minutes. The tops of the biscuits should be golden brown.
  5. While the biscuits are cooking in the oven, melt the butter in a small pan; stir in the garlic powder. Once you remove the biscuits from the oven, brush the butter on top, using a pastry brush. Sprinkle the crushed parsley flakes on top to garnish. Serve biscuits hot...and ENJOY!
Nutrition Facts
Red Lobster Cheddar Biscuits
Amount Per Serving (1 biscuit)
Calories 174 Calories from Fat 90
% Daily Value*
Fat 10g15%
Saturated Fat 5g31%
Cholesterol 19mg6%
Sodium 388mg17%
Potassium 73mg2%
Carbohydrates 16g5%
Sugar 3g3%
Protein 3g6%
Vitamin A 250IU5%
Calcium 105mg11%
Iron 0.7mg4%
* Percent Daily Values are based on a 2000 calorie diet.

Here’s one more to pin on your Pinterest boards!It's EASY to make this yummy copycat version of the popular cheesy, buttery Red Lobster Cheddar Biscuits at home in under 30 minutes.


Save

Save

Swiss Chard With Onions And Garlic

You’ll enjoy this flavor filled, easy to prepare veggie side dish that features pan-seared, garden fresh Swiss Chard with onions and garlic.You'll enjoy this flavor filled, easy to prepare veggie side dish that features pan-seared, garden fresh Swiss Chard with onions and garlic.
Swiss Chard with Onions and Garlic is a quick, easy and HEALTHY side dish I made last night with our grilled chicken dinner.  I stir-fried rainbow colored chard with onions and garlic, and boy, was it good!

I had never eaten Swiss Chard until a year ago, when I decided to add it to my raised bed garden and give it a shot. That was a great idea (if I say so myself)!  I planted seeds for Rainbow Chard last Spring (Rainbow Chard just means there are different color stems on the plants).

We are STILL enjoying some of the Swiss chard I planted last year from seed…isn’t that crazy?! I planted chard seeds from a .99 cent packet …My chard plants survived the winter rain and snow and we had some for dinner last night in MAY! Talk about a good investment…yeehaw!

Scroll Down For A Printable Recipe Card At The Bottom Of The Page

Is Swiss Chard Good for You?

Yes! My husband and I loved this side dish! Chard is crazy good for you, too. It is low-fat, full of fiber, iron and potassium, to name just a few reasons why you should give this veggie a try. Simple, “good for you”, and full of flavor!

We grow a rainbow variety of Swiss chard in our little back yard garden. Here’s where the unsuspecting chard in the skillet was yesterday morning (my garden – the tall plants in this photo).

Swiss chard, growing in our little raised bed garden.
Here’s where some of that chard was yesterday afternoon (my kitchen) and what it looked like after washing the leaves and stems. It had NO idea I was going to COOK it the following day!

The Swiss chard leaves are rinsed and drained well, before cooking.

Preparing Swiss Chard With Onions And Garlic

There are not too many ingredients for this quick stir fry, and that’s a good thing. Simple is good!

Minced garlic, and Swiss chard with onions are used to make this dish.

The minced garlic is added as the chard is cooking down a bit in the skillet.

The chard is cooked in skillet until it wilts down to half the size.

See how much the Swiss chard cooks down by the time it’s done? You THINK it will be a lot of Swiss chard with onions, but it ends up being about half the starting amount in the pan, once cooked. Be sure to serve the Swiss chard immediately while still hot. You can season it with salt and pepper, if desired to suit your own personal taste.

The Swiss Chard With Onions And Garlic is finished cooking, and is ready to serve.

Hope you will consider trying this recipe for Swiss chard with onions and garlic. It really IS a very delicious way to “eat your veggies”. If you enjoyed this dish, be sure to check out my recipe for Swiss Chard with Bacon and Mushrooms. Have a great day!

Looking For More Veggie Dishes?

You can find all of my vegetable dishes in the Recipe Index, located at the top of the page. I have many delicious veggie dishes, including:

Interested In More Recipes?

Thank you for visiting this website. I appreciate you using some of your valuable time to do soIf you’re interested, I publish a newsletter 2 times per month (1st and 15th) with all the latest recipes, and other fun info. I would be honored to have you join our growing list of subscribers, so you never miss a great recipe!
There is a Newsletter subscription box on the top right side (or bottom) of each blog post, depending on the device you use, where you can easily submit your e-mail address (only) to be included in my mailing list.

You Can Also Find Me On Social Media:
Facebook page: The Grateful Girl Cooks!
Pinterest: The Grateful Girl Cooks!
Instagram: jbatthegratefulgirlcooks

  Author's signature

Recipe Source (My head…this is how I cook kale, also…ridiculously easy!)

↓↓ PRINTABLE RECIPE BELOW ↓↓

0 from 0 votes
Swiss Chard With Onions And Garlic
Prep Time
5 mins
Cook Time
10 mins
Total Time
15 mins
 
You'll enjoy this flavor filled, easy to prepare veggie side dish that features pan-seared, garden fresh Swiss Chard with onions and garlic.
Category: Side Dishes, Vegetable Dish
Cuisine: American
Keyword: swiss chard with onions
Servings: 3
Calories Per Serving: 107 kcal
Author: JB @ The Grateful Girl Cooks!
Ingredients
  • 1 large bunch of Swiss Chard (it LOOKS like a lot, but it will really cook down- trust me!)
  • 2 Tablespoons olive oil
  • 1/3 cup chopped onion
  • 2 cloves of garlic , minced
  • 1/2 teaspoon bacon "drippings" (this is completely optional, but does lend a nice flavor)
Instructions
  1. Wash the chard very well. Shake chard to dry it slightly, but leave a bit of the water on the leaves. Chop the stem and leaves into 2 inch pieces.

  2. In a large skillet, heat the olive oil on medium heat. Add the chopped onions and saute for a couple minutes. Add the chard stalks; cook for a couple of minutes, then add the leaves and the garlic. If the leaves don't all fit in the pan, don't panic...just let them cook for a minute (as they cook it will "shrink" substantially), then add the rest. Continue to saute the chard until the leaves begin to wilt (a couple minutes. You will be surprised how much the chard reduces in size.

  3. Serve the sauteed chard warm. Enjoy this healthy side dish!!!
Nutrition Facts
Swiss Chard With Onions And Garlic
Amount Per Serving (1 g)
Calories 107 Calories from Fat 90
% Daily Value*
Fat 10g15%
Saturated Fat 1g6%
Sodium 104mg5%
Potassium 207mg6%
Carbohydrates 4g1%
Fiber 1g4%
Sugar 1g1%
Protein 1g2%
Vitamin A 2935IU59%
Vitamin C 16.3mg20%
Calcium 32mg3%
Iron 0.9mg5%
* Percent Daily Values are based on a 2000 calorie diet.

Here’s one more to pin on your Pinterest boards!You'll enjoy this flavor filled, easy to prepare veggie side dish that features pan-seared, garden fresh Swiss Chard with onions and garlic.


Save

Save

Southwestern Black Bean Salad

You’ll LOVE this fantastic Southwestern Black Bean Salad, with corn, tomatoes, and avocado! It’s easy, flavorful, and under 90 calories per serving!You'll LOVE this fantastic Southwestern Black Bean Salad, with corn, tomatoes, and avocado! It's easy, flavorful, and under 90 calories per serving!

Happy Cinco De Mayo! Yesterday our family celebrated our youngest son’s 27th birthday with a Taco and Enchilada Night. One of the side dishes I prepared was this Southwestern Black Bean and Corn Salad…it was the first time I had prepared it, and I am positive I will be making it again!

I found the original recipe for this Southwestern Black Bean Salad on Skinnytaste.com. If you’ve never visited this website, I would encourage you to do so. The blog author, Gina, creates wonderfully tasty, low-fat dishes that are sure to please every palate! Every recipe she posts has the caloric value, Weight Watcher Points, etc. so you know exactly what you are eating, calorie-wise! I love it!

Scroll Down For A Printable Recipe Card At The Bottom Of The Page

Some Quick Info On The Southwestern Black Bean Salad

I hope you will give this quick, easy to make (and full of fiber) dish a try. It is very versatile: great as a side salad, or could be used as an appetizer, with tortilla chips. The Southwestern black bean salad recipe makes 6 1/2 cups, which translates to 13 half cup servings at approximately 80-89 calories per serving.

The Southwestern black bean salad is served, covered in a lime and olive oil dressing.

The added bonus is that Southwestern black bean salad is so fresh tasting and DELICIOUS! I think you will enjoy it, especially on a warm Spring or Summer day!

Looking For More SALAD Recipes?

You can find all of my salad recipes in the Recipe Index, located at the top of the page. A few family favorites include:

Interested In More Recipes?

Thank you for visiting this website. I appreciate you using some of your valuable time to do soIf you’re interested, I publish a newsletter 2 times per month (1st and 15th) with all the latest recipes, and other fun info. I would be honored to have you join our growing list of subscribers, so you never miss a great recipe!
There is a Newsletter subscription box on the top right side (or bottom) of each blog post, depending on the device you use, where you can easily submit your e-mail address (only) to be included in my mailing list.

You Can Also Find Me On Social Media:
Facebook page: The Grateful Girl Cooks!
Pinterest: The Grateful Girl Cooks!
Instagram: jbatthegratefulgirlcooks

Author's SignatureRecipe Source: http://www.skinnytaste.com/2009/06/southwestern-black-bean-salad.html

↓↓ PRINTABLE RECIPE BELOW ↓↓

0 from 0 votes
Southwestern Black Bean Salad
Prep Time
15 mins
Cook Time
0 mins
Total Time
15 mins
 

You'll LOVE this fantastic Southwestern Black Bean Salad, with corn, tomatoes, and avocado! It's easy, flavorful, and under 90 calories per serving!

Category: Salads
Cuisine: Southwestern
Keyword: Southwestern black bean salad
Servings: 13 (1/2 cup servings)
Calories Per Serving: 89 kcal
Author: JB @ The Grateful Girl Cooks!
Ingredients
  • 15.5 ounces black beans , 1 can black beans, rinsed and drained
  • 9 oz. cooked corn , fresh (grilled), or frozen (thawed)
  • 1 medium tomato , chopped
  • 1/3 cup red onion , chopped
  • 1 stem scallion (green onion) , chopped
  • 1 small jalapeno , finely diced
  • 2 Tablespoons fresh minced cilantro (or more to taste)
  • Salt and pepper (to taste)
  • 2 limes (the juice from)
  • 1 Tablespoon extra virgin olive oil
  • 1 small avocado , diced
Instructions
  1. Combine the first 8 ingredients in a large bowl (beans, corn, tomato, onion, scallion, jalapeno, cilantro, salt and pepper).
  2. In a separate bowl, mix the lime juice and the olive oil together until blended. Pour over salad and mix well.
  3. Refrigerate for 30 minutes prior to serving.
  4. Add the diced avocado right before you serve the salad.
  5. ENJOY!
Nutrition Facts
Southwestern Black Bean Salad
Amount Per Serving (1 (1/2 cup per serving))
Calories 89 Calories from Fat 36
% Daily Value*
Fat 4g6%
Saturated Fat 1g6%
Sodium 132mg6%
Potassium 256mg7%
Carbohydrates 12g4%
Fiber 4g17%
Sugar 2g2%
Protein 3g6%
Vitamin A 170IU3%
Vitamin C 7.8mg9%
Calcium 16mg2%
Iron 0.8mg4%
* Percent Daily Values are based on a 2000 calorie diet.

Here’s one more to pin on your Pinterest boards!You'll LOVE this fantastic Southwestern Black Bean Salad, with corn, tomatoes, and avocado! It's easy, flavorful, and under 90 calories per serving!


Save

Save

Crunchy Homemade Onion Rings

Restaurant quality crunchy homemade onion rings are so good, and they’re easy to make! Grill a burger and enjoy it with this classic side dish!
Restaurant quality crunchy homemade onion rings are so good, and they're easy to make! Grill a burger and enjoy it with this classic side dish!
I have a confession. I LOVE onion rings…really crunchy onion rings, AND I even dip them in ketchup. Forgive me. I can’t help myself. Thank goodness I only order them once or twice or twelve times a year.

Scroll Down For A Printable Recipe Card At The Bottom Of The Page

Here’s My Story And I’m Sticking to It!

So, here’s the story: It was a gorgeous day here in Oregon. My husband was helping a friend move into an apartment today. I was staying inside because I have been a bit sick with a cold for a couple of days. I really wanted to make something new…something I’ve never made before.

In a moment of sheer madness (maybe it was the cold?), I decided to try and make crunchy homemade onion rings. How hard could THAT be, right? I did a quick search for recipes and settled on one I found on Pinterest from Six Sisters’ Stuff, and off to the kitchen (kleenex in hand-achoo!) I went.

Homemade onion rings in a red and white tray
Before I even knew what happened, the crunchy homemade onion rings were done! Simple and delicious! Naturally I HAD to try one for the sake of quality control. Hmmm…nibble, nibble, nibble. Oh man…these things were GREAT! I might have sampled a couple others before stopping (thankfully there is no photographic evidence…whew). Using great self discipline, I waited until my husband got home to cook the rest.

Guess what? He LOVED them! He munched on the onion rings while grilling our tri-tip dinner – perfect!  I even made these for a big outdoor BBQ with family and friends. The crunchy homemade onion rings were served on a large platter as an appetizer. On the side were 3 serving bowls containing BBQ sauce, Ranch dressing, and ketchup on the side, for dipping! They were a huge hit!

How To Make Crunchy Homemade Onion Rings

Separate the onion slices into rings; set them aside. In a medium sized bowl, whisk together the flour, baking powder, cayenne pepper, seasoning salt, and the “regular” salt. Take the onion rings (a few at a time) and dip them in the flour mixture until coated on all sides; set them aside again.

Sliced onions are tossed with flour before cooking.
Add the eggs and milk to the remaining flour mixture. Whisk until combined well. (Mixture will be thick). This is the batter for the onion rings.

Eggs are whisked into onion ring batter.
Now pour the bread crumbs into another medium sized bowl.

Bread crumbs are placed into a small bowl to coat onion rings
Take the floured onion rings (two or three at a time works best) and dip them into the flour batter. Coat each ring completely, then remove each ring (I used a fork to lift them out of batter) and let the batter drip off as much as possible. Now place the onion ring into the bread crumbs. Using the fork, gently toss the crumbs to coat the ring evenly; flip and coat the other side.

Cook The Onion Rings

If you are certain the oil has reached 375 degrees, then carefully place 4-5 rings at a time in the hot oil. Fry the rings for 2-3 minutes, making sure to flip the rings over half way through the cooking time. Fry until golden brown.

Battered onion rings are fried in hot oil
Remove the onion rings to a paper-towel lined plate when done, to drain. Season each batch of rings with salt, after removing from oil. Make sure oil is at temperature before adding next batch of onion rings. Repeat the process until done. Serve and enjoy!

Fried onion rings, ready to eat!
They look really good, huh?  Wait until you taste them! YUM!

Tray of crunchy homemade onion rings, ready to eat!

I hope you will give these a try…the crunchy homemade onion rings were fantastic! (I even froze some of the rings once coated and breaded…we’ll see if they fry up as well, after being frozen. An experiment of mine for another day)  Update: They froze well in a resealable freezer bag! Cooked perfectly!

If you enjoy dishes like this, you’ll enjoy my recipes for Baked Parmesan Zucchini FriesCajun Tater Tots with Dipping Sauce, or Crispy Homemade French Fries! Be sure to check out ALL of my recipes in the Recipe Index, which is located at the top of the page. Have a great day.

Interested In More Recipes?

Thank you for visiting this website. I appreciate you using some of your valuable time to do soIf you’re interested, I publish a newsletter 2 times per month (1st and 15th) with all the latest recipes, and other fun info. I would be honored to have you join our growing list of subscribers, so you never miss a great recipe!
There is a Newsletter subscription box on the top right side (or bottom) of each blog post, depending on the device you use, where you can easily submit your e-mail address (only) to be included in my mailing list.

You Can Also Find Me On Social Media:
Facebook page: The Grateful Girl Cooks!
Pinterest: The Grateful Girl Cooks!
Instagram: jbatthegratefulgirlcooks

Have a fantastic day!

Author's signatureRecipe Adapted From: http://www.sixsistersstuff.com/2013/06/restaurant-style-onion-rings-recipe.html

0 from 0 votes
Crunchy Homemade Onion Rings
Prep Time
15 mins
Cook Time
15 mins
Total Time
30 mins
 

Restaurant quality crunchy homemade onion rings are so good, and they're easy to make! Grill a burger and enjoy it with this classic side dish!

Category: Appetizer
Cuisine: American
Keyword: crunchy homemade onion rings
Servings: 4 servings
Calories Per Serving: 414 kcal
Author: JB @ The Grateful Girl Cooks!
Ingredients
  • 1 quart vegetable oil (strain and save the leftover oil for another batch-keep sealed in refrigerator)
  • 1 large vidalia onion , cut into 1/4" slices
  • 1 1/2 cups all purpose flour
  • 1 teaspoon baking powder
  • 1 teaspoon salt
  • 2 eggs
  • 1 cup milk
  • 1 1/2 cup dry bread crumbs
  • 1/4 teaspoon cayenne pepper
  • 1/4 teaspoon seasoning salt
  • salt , to taste (after rings are cooked)
Instructions
  1. In a deep-fryer, large pot or electric skillet, heat the oil to 375 degrees. (I used an electric skillet; if using pot, make sure to use a cooking thermometer to determine proper heating). It is really important to make sure the oil is heated accurately so the onion rings will brown and "crunch up" properly.
  2. Separate the onion slices into rings; set them aside.
  3. In a medium sized bowl, whisk together the flour, baking powder, cayenne pepper, seasoning salt and the "regular" salt. Take the onion rings (a few at a time) and dip them in the flour mixture until coated on all sides; set them aside again.

  4. Add the eggs and milk to the remaining flour mixture. Whisk until combined well. (Mixture will be thick)
  5. Pour the bread crumbs into another medium sized bowl.
  6. Take the floured onion rings (two or three at a time works best) and dip them into the flour batter. Coat each ring completely, then remove each ring (I used a fork to lift them out of batter) and let the batter drip off as much as possible. Now place the onion ring into the bread crumbs. Using the fork, gently toss the crumbs to coat the ring evenly; flip and coat the other side.
  7. If you are certain the oil has reached 375 degrees, then carefully place 4-5 rings at a time in the hot oil. Fry the rings for 2-3 minutes, making sure to flip the rings over half way through the cooking time. Fry until golden brown. Remove the onion rings to a paper-towel lined plate when done, to drain. Season each batch of rings with salt after removing from oil.

  8. Make sure oil is at temperature before adding next batch of onion rings. Repeat the process until all rings are cooked. Serve (with dipping sauce on the side), and enjoy!

Nutrition Facts
Crunchy Homemade Onion Rings
Amount Per Serving (1 serving)
Calories 414 Calories from Fat 45
% Daily Value*
Fat 5g8%
Saturated Fat 1g6%
Cholesterol 84mg28%
Sodium 1088mg47%
Potassium 447mg13%
Carbohydrates 74g25%
Fiber 3g13%
Sugar 9g10%
Protein 15g30%
Vitamin A 285IU6%
Vitamin C 4mg5%
Calcium 227mg23%
Iron 4.8mg27%
* Percent Daily Values are based on a 2000 calorie diet.

Here’s one more to pin on your Pinterest boards!Restaurant quality crunchy homemade onion rings are so good, and they're easy to make! Grill a burger and enjoy it with this classic side dish!


Save

Save

Asian Kale Slaw

Asian kale slaw is a delicious, healthy side dish with kale, cabbage, carrots, green onions and almonds, in a fantastic Asian inspired sauce! This side dish is a nice twist on traditional coleslaw.Asian kale slaw is a delicious, healthy side dish with kale, cabbage, carrots, green onions and almonds, in a fantastic Asian inspired sauce!
 
Here’s a delicious recipe for Asian kale slaw. KALE is becoming known as the superfood of the garden!  This tasty salad features kale, cabbage, carrots, green onions, and almonds, tossed in a fantastic tasting Asian sauce.
 
Scroll Down For A Printable Recipe Card At The Bottom Of The Page

Using Up My Garden Kale

Yesterday I picked a “boatload” of kale in my backyard garden. It has survived the rain, ice and snow of this past winter and is still “kicking”.
 
That envelope of Kale seeds I bought for 99 cents last March has MORE than paid for itself this past year! Here’s the small amount of fresh kale I picked yesterday.

Raw kale from garden for Asian kale slaw, on dish towel drying.

So once again I found myself with fresh picked kale, looking for a new, creative way to enjoy this wonder-veggie, straight from our garden. I found this recipe for “coleslaw” (with an Asian twist) on Pinterest, and decided to give it a try.

I made Asian kale slaw yesterday afternoon (only took about 15 minutes prep) and served it with our dinner. My husband and I LOVED it! We had the slaw on the side with a chicken dinner, and it tasted wonderful!

The slaw on dinner plate, served with chicken and potatoes.

What Is IN Asian Kale Slaw?

The ingredients for the Asian kale slaw are chopped and sliced, and placed in a salad bowl. The slaw has grated carrots, kale, shredded purple cabbage, and sliced green onions. The simple Asian sauce that covers all the ingredients really makes this kale slaw shine!

The ingredients for the Asian kale slaw in large mixing bowl.

Making The Salad Dressing For Asian Kale Slaw Is EASY!

This Asian flavored slaw dressing is incredibly easy to mix up. The sauce will be used as the salad dressing for the Asian kale slaw.

There are several ingredients in the dressing, including lime juice, sesame oil, soy sauce, ginger, etc., which gives this salad it’s distinctive Asian flavor. The salad is tossed with the dressing, then refrigerated for 15-20 minutes, until chilled.

Salad dressing for salad is mixed in yellow bowl.

The finished Asian kale slaw is garnished with sliced almonds, sesame seeds and sea salt, and is served chilled. The flavor of the salad dressing coats the entire bowl of slaw with great flavor!

Kale slaw served with sliced almonds and sesame seeds as garnish.

Asian kale slaw is an amazingly wonderful, crunchy and delicious side salad I really hope you will enjoy. Even though my old photos aren’t the best quality, I hope you will still consider trying this delicious salad!

It’s also a great way to “eat your veggies” (as my Mom used to say to me and my sisters). Yum! Have a GREAT day!

Looking For Other SALAD Recipes?

You can find all of my recipes in the Recipe Index, located at the top of the page. A few favorite side salad recipes include:

Interested In More Recipes?

Thank you for visiting this website. I appreciate you using some of your valuable time to do soIf you’re interested, I publish a newsletter 2 times per month (1st and 15th) with all the latest recipes, and other fun info. I would be honored to have you join our growing list of subscribers, so you never miss a great recipe!
There is a Newsletter subscription box on the top right side (or bottom) of each blog post, depending on the device you use, where you can easily submit your e-mail address (only) to be included in my mailing list.

You Can Also Find Me On Social Media:
Facebook page: The Grateful Girl Cooks!
Pinterest: The Grateful Girl Cooks!
Instagram: jbatthegratefulgirlcooks

Author's signature

Recipe Source: http://www.tasteloveandnourish.com/2013/07/19/asian-kale-slaw/

↓↓ PRINTABLE RECIPE BELOW ↓↓

0 from 0 votes
Asian Kale Slaw
Prep Time
30 mins
Cook Time
0 mins
Total Time
30 mins
 

Asian kale slaw is a delicious, healthy side dish with kale, cabbage, carrots, green onions and almonds, in a fantastic Asian inspired sauce!

Category: Salad
Cuisine: Asian
Keyword: Asian kale slaw
Servings: 8 servings
Calories Per Serving: 128 kcal
Author: JB @ The Grateful Girl Cooks!
Ingredients
For the slaw:
  • 1 bunch curly kale , shredded/cut into thin strips
  • 1/2 head red/purple cabbage , shredded
  • 3-4 medium carrots , shredded
  • 4 green onions , sliced thin (green and white parts)
For the dressing:
  • 1/4 cup soy sauce
  • 3 Tablespoons lime juice
  • 1 Tablespoon fresh grated ginger
  • 3 Tablespoons apple cider vinegar
  • 2 Tablespoons dark brown sugar
  • 1/2 teaspoon sesame oil
  • 1 Tablespoon vegetable oil
  • 1 Tablespoon sesame seeds , lightly toasted (dry "toast" them in a skillet for a couple minutes)
  • 1/2 cup almond slivers , toasted (same method as sesame seeds)
  • 1/4 teaspoon sea salt
Instructions
  1. Using a knife, thinly slice/shred the kale leaves, removing/discarding the large, thick stems. **Don't use a food processor for this, as it will shred the kale too fine** Place sliced kale into salad bowl.

  2. Thinly slice/shred red cabbage and green onions. Add to kale in bowl. Grate carrots into bowl, using a hand/box grater.

  3. In a small bowl, combine the soy sauce, lime juice, ginger, apple cider vinegar, brown sugar, sesame oil and vegetable oil. Mix well to combine. Pour dressing over the shredded slaw. Toss slaw until coated; cover and refrigerate for at least 15-20 minutes. Once chilled, the slaw is ready to serve!

  4. When ready to serve, sprinkle the top of the slaw with toasted sesame seeds, almond slices and sea salt. Toss the salad again. SERVE AND ENJOY!

Recipe Notes

*Recipe can be easily halved for smaller amounts.

Nutrition Facts
Asian Kale Slaw
Amount Per Serving (1 serving)
Calories 128 Calories from Fat 63
% Daily Value*
Fat 7g11%
Saturated Fat 1g6%
Sodium 516mg22%
Potassium 386mg11%
Carbohydrates 14g5%
Fiber 3g13%
Sugar 6g7%
Protein 4g8%
Vitamin A 6090IU122%
Vitamin C 53.5mg65%
Calcium 97mg10%
Iron 1.5mg8%
* Percent Daily Values are based on a 2000 calorie diet.

Here’s one more to pin on your Pinterest boards!Asian kale slaw is a delicious, healthy side dish with kale, cabbage, carrots, green onions and almonds, in a fantastic Asian inspired sauce!


Save

Save

Oven Roasted Herb Potatoes

Oven roasted herb potatoes with garlic, spices, olive oil and Parmesan cheese are easy to make, and are delicious on the side with most main dishes.Oven roasted herb potatoes with garlic, spices, olive oil and Parmesan cheese are easy to make, and are delicious on the side with most main dishes.
I have been using this recipe for Oven Roasted Herb Potatoes for almost 20 years, since receiving it from my friend Carla. It’s a definite family favorite, so I want to share it here on the old blog!

Scroll Down For A Printable Recipe Card At The Bottom Of The Page

Carla prepared these oven roasted herb potatoes for my husband and I one night as a side dish with dinner in their home. They were wonderful!  No surprise… anything Carla cooks is wonderful.

Sharing a meal with our friends Allan and Carla.

My husband and I became dear friends with Carla and her husband Allan through our church in central California, where my husband was a Music Pastor for 5 years. We love and treasure their friendship very much!

We shared life, deep conversations, laughter, family vacations (both families had two sons the same age) and many meals with these dear friends while we lived there. So glad she shared this great recipe for oven roasted herb potatoes with me!

Making Oven Roasted Herb Potatoes Is EASY!

Making these delicious potatoes is easy. I enjoy using red potatoes, but you could certainly use small butterball or Yukon potatoes, as well. These are some of the red potatoes I grew in our garden. They are the perfect size for this simple recipe!

We enjoy using red potatoes for this recipe for oven roasted herb potatoes.

Potatoes are sliced into rounds, and then cut again into bite sized pieces. Drizzle the potatoes with olive oil, and then season with spices and Parmesan cheese. Toss them to ensure the potatoes are coated with oil and spices. Now the potatoes are ready for the oven. EASY!

These roasted potatoes are so good!. Nearly 20 years later and I’m STILL making them! They are ridiculously easy to prepare, yet FULL of flavor…a perfect side-dish for any meat entree! I sure hope you will give them a try, and I think you’ll be surprised at how good they are!

Thanks for stopping by today, and I invite you to come back soon for more family-friendly recipes. Take care, may God bless you, and have a GREAT day!

Looking For More Recipes Using POTATOES?

You can find all of my recipes in the Recipe Index, which is located at the top of the page. A few potato recipes you might enjoy include:

Interested In More Recipes?

Thank you for visiting this website. I appreciate you using some of your valuable time to do soIf you’re interested, I publish a newsletter 2 times per month (1st and 15th) with all the latest recipes, and other fun info. I would be honored to have you join our growing list of subscribers, so you never miss a great recipe!
There is a Newsletter subscription box on the top right side (or bottom) of each blog post, depending on the device you use, where you can easily submit your e-mail address (only) to be included in my mailing list.

You Can Also Find Me On Social Media:
Facebook page: The Grateful Girl Cooks!
Pinterest: The Grateful Girl Cooks!
Instagram: jbatthegratefulgirlcooks

Author's signatureRecipe source: Carla Merrill

↓↓ PRINTABLE RECIPE BELOW ↓↓

0 from 0 votes
Oven Roasted Herb Potatoes
Prep Time
5 mins
Cook Time
45 mins
Total Time
50 mins
 

Oven roasted herb potatoes with garlic, spices, olive oil and Parmesan cheese are easy to make, and are delicious on the side with most main dishes.

Category: Side Dish, Vegetable Dish
Cuisine: American
Keyword: oven roasted herb potatoes
Servings: 4 servings
Calories Per Serving: 365 kcal
Author: JB @ The Grateful Girl Cooks!
Ingredients
  • 6 medium unpeeled red potatoes
  • 1/4 cup olive oil
  • 4 Tablespoons Parmesan cheese , grated
  • 1 teaspoon salt
  • 1/2 teaspoon garlic powder
  • 1/2 teaspoon paprika
  • 1/4 teaspoon black pepper
Instructions
  1. Wash potatoes. Leave the peel ON. Slice into 1/2 inch "round" slices, then cut each slice in half. Place potatoes in a large mixing bowl.
  2. In a small bowl, mix the rest of the ingredients. Drizzle all over the potatoes, covering them completely.
  3. Place potatoes (and any extra spices left in mixing bowl in a 9x13 baking pan. Bake at 425 degrees for 45-50 minutes, or until potatoes are slightly browned and tender. ENJOY! See how easy this recipe is????

Nutrition Facts
Oven Roasted Herb Potatoes
Amount Per Serving (1 (1/4 of total))
Calories 365 Calories from Fat 135
% Daily Value*
Fat 15g23%
Saturated Fat 3g19%
Cholesterol 3mg1%
Sodium 720mg31%
Potassium 1454mg42%
Carbohydrates 51g17%
Fiber 6g25%
Sugar 4g4%
Protein 8g16%
Vitamin A 185IU4%
Vitamin C 27.5mg33%
Calcium 91mg9%
Iron 2.5mg14%
* Percent Daily Values are based on a 2000 calorie diet.

Here’s one more to pin on your Pinterest boards!Oven roasted herb potatoes with garlic, spices, olive oil and Parmesan cheese are easy to make, and are delicious on the side with most main dishes.


Save

Save

Fiesta Rice

Fiesta Rice is a totally EASY, hearty, and delicious side dish made with white rice, black beans, corn, tomatoes, scallions, cilantro and lime juice.Fiesta Rice is a totally EASY, hearty, and delicious side dish made with white rice, black beans, corn, tomatoes, scallions, cilantro and lime juice.
This fiesta rice just might be one of the easiest side dishes ever created. Really. It’s almost too easy to call it a “recipe”, but yet it is! Guess what? It is DELICIOUS!

I discovered the recipe on Pinterest, and found it to be a perfect accompaniment for Taco Night! The flavors in the fiesta rice are a refreshingly nice change from my recipe for Spanish Rice that I have made and served over the years.

Scroll Down For A Printable Recipe Card At The Bottom Of The Page

Fiesta Rice Is So Easy To Make

Basically to make fiesta rice, all you will need to do is cook rice, and then add the remaining ingredients and mix them all together. That’s it!

This rice is so good, I suppose you COULD just eat it right out of the bowl before it gets to the table. Not that I would ever do such a despicable thing (*cough, cough). Didn’t take photos other than the finished product, because, honestly, it’s SO EASY!

Fiesta rice is a great side dish, and it’s super easy if you already have leftover cooked rice to use. This would be delicious paired with chicken, pork, shrimp.

You could also morph it into a yummy burrito bowl, and add some barbacoa shredded beef, etc.! Hope you enjoy it!

Looking For More Mexican-Style Dishes?

You can find all of my recipes in the Recipe Index, which is located at the top of the page. I have a good variety of Mexican-style dishes (and side dishes), including:

Want More Recipes? Get My FREE Newsletter!

I publish a newsletter 2 times per month (1st and 15th) with lots of recipes, tips, etc..
Would you like to join our growing list of subscribers?

There is a Newsletter subscription box on the top right (or bottom) of each blog post, depending on the device you use.
You can submit your e-mail address there, to be added to my mailing list.

Find Me On Social Media:

Facebook page: The Grateful Girl Cooks!
Pinterest:
The Grateful Girl Cooks!
Instagram:
jbatthegratefulgirlcooks

Author's signature

Recipe Source: http://www.skinnytaste.com/2011/04/fiesta-lime-rice.html

↓↓ PRINTABLE RECIPE BELOW ↓↓

0 from 0 votes
Fiesta Rice
Prep Time
10 mins
Cook Time
25 mins
Total Time
35 mins
 

Fiesta Rice is a totally EASY, hearty, and delicious side dish made with white rice, black beans, corn, tomatoes, scallions, cilantro and lime juice.

Category: Side Dish
Cuisine: Mexican
Keyword: fiesta rice
Servings: 6 servings
Calories Per Serving: 295 kcal
Author: JB @ The Grateful Girl Cooks!
Ingredients
  • 1 1/2 cups cooked , long-grain rice
  • 1 can black beans-rinsed and heated
  • 1 cup corn (canned or frozen), heated
  • 1 large tomato , diced
  • 1 large scallion , finely diced
  • 2-4 Tablespoons chopped cilantro (I used 4)
  • 1 heaping Tablespoon fresh squeezed lime juice (I added an extra Tablespoon)
  • Salt (to taste)
Instructions
  1. Cook the rice.
  2. In a large serving bowl, mix the hot rice with the remaining ingredients (salt to taste).
  3. Toss and Serve.
  4. The End. Wasn't that EASY? Enjoy!
Nutrition Facts
Fiesta Rice
Amount Per Serving (1 g)
Calories 295 Calories from Fat 9
% Daily Value*
Fat 1g2%
Saturated Fat 1g6%
Sodium 5mg0%
Potassium 437mg12%
Carbohydrates 61g20%
Fiber 8g33%
Sugar 2g2%
Protein 11g22%
Vitamin A 330IU7%
Vitamin C 6.4mg8%
Calcium 35mg4%
Iron 2.1mg12%
* Percent Daily Values are based on a 2000 calorie diet.

Here’s one more to pin on your Pinterest boards!Fiesta Rice is a totally EASY, hearty, and delicious side dish made with white rice, black beans, corn, tomatoes, scallions, cilantro and lime juice.

Save

Save

Save

Save

Rainbow Jello Salad

A few boxes of jello, evaporated milk and water are all you need to make this colorful and delicious holiday rainbow jello salad for a crowd!A few boxes of jello, evaporated milk and water are all you need to make this colorful and delicious holiday rainbow jello salad for a crowd!

Whoa…that’s a LOT of jello! Yep, you got that right. This Rainbow Jello Salad has been taking it’s place at most of our Thanksgiving and/or holiday events for the past 30+ years.  This colorful, delicious salad could feed a small village, and it sure is pretty!

I was given this rainbow jello salad recipe by a sweet woman named Mary Alice Brannon about 35 years ago. I saw and tasted it for the first time when she brought it to a church potluck (don’t a large amount of unique recipes come from church potlucks?). This jello salad was so unique, I asked her for the recipe, and she gave it to me. Now I’ve been making this salad for over 30+ years! It’s practically become a tradition at our holiday gatherings!

Scroll Down For A Printable Recipe Card At The Bottom Of The Page

What Flavors Are In this Rainbow Jello Salad?

The recipe uses 7 different flavors of jello powder, one can of evaporated milk, and some water. That’s it! From top to bottom, the flavors of jello in the rainbow jello salad are: Black Cherry, Cherry, Lime, Lemon, Orange, Peach and Strawberry. Every other flavor has some of the evaporated milk in it, which slightly changes the color and texture of that layer!

Why I Make Rainbow Jello Salad The Day Before Serving It

It does takes a bit of time to make this salad, because each layer has to set up before adding the next layer, but don’t let that stop you! The sheer “jiggle power” and colorful rainbow this jello salad adds to any festive meal will be worth your time.

I usually make this rainbow jello salad the day before a big event or holiday meal. When I make it for Thanksgiving, I simply work on the layers throughout the day, as I scurry around my kitchen making other side dishes! It really isn’t hard at all to do this! The next day, when I am ready to serve it, all I need to do is unmold the salad, and add the whipped cream right before serving!

Rainbow jello salad has seven layers of alternating colors!

You Can Almost Feed A Small Village With Rainbow Jello Salad

This recipe makes a LOT of rainbow jello salad (16 servings), so here’s my public service warning (ha ha). This jello salad will feed a lot of people! Unless you want this quivering tower of rainbow jello salad looking at you for a week in your refrigerator, make sure a lot of people will be there to help eat it. Don’t say I didn’t warn you!

Rainbow jello salad with a whipped cream garnish is ready to eat!

This rainbow jello salad is not only colorful, it actually tastes good, too…who knew? I’m getting all jiggly just thinking about it. I hope you will give this rainbow jello salad a try at your next holiday or large family gathering! Have a great day.

Looking for More SALAD Recipes Kind Of Like This One?

You can find all my recipes in the Recipe Index, located at the top of the page. I have some salad recipes similar to this one you might enjoy, including:

Interested In More Recipes?

Thank you for visiting this website. I appreciate you using some of your valuable time to do soIf you’re interested, I publish a newsletter 2 times per month (1st and 15th) with all the latest recipes, and other fun info. I would be honored to have you join our growing list of subscribers, so you never miss a great recipe! 

There is a Newsletter subscription box on the top right side (or bottom) of each blog post, depending on the device you use, where you can easily submit your e-mail address (only) to be included in my mailing list.

You Can Also Find Me On Social Media:

Facebook page: The Grateful Girl Cooks!
Pinterest:
The Grateful Girl Cooks!
Instagram:
jbatthegratefulgirlcooks

Author's signature

↓↓ PRINTABLE RECIPE BELOW ↓↓

0 from 0 votes
Rainbow Jello Salad
Prep Time
3 hrs
Cook Time
0 mins
Total Time
3 hrs
 
A few boxes of jello, evaporated milk and water are all you need to make this colorful and delicious holiday rainbow jello salad for a crowd!
Category: Salad
Cuisine: American
Keyword: rainbow jello salad
Servings: 16 servings
Calories Per Serving: 172 kcal
Author: JB @ The Grateful Girl Cooks!
Ingredients
  • 1 can evaporated milk (13 oz.)
  • 7 boxes of jello (the small 3 oz. size)
  • (Flavors are---Black Cherry, Cherry, Lime, Lemon, Orange, Peach, and Strawberry)
  • Water
Instructions
  1. Use a 9x13 cake pan or a bundt pan (I always use a bundt pan).
  2. Alternate method 1 and 2 in preparing layers. Be sure jello is "set" before adding the next layer (very important). I usually make one layer, pour it into pan and while that layer is cooling (I actually put it in the refrigerator), I make up the next layer. By the time the first layer is set, you can add the now warm next layer on top, and so on. Here are the two methods:
  3. Method 1: Dissolve jello into 1 cup of boiling water, then add 1/2 cup cold water
  4. Method 2: Dissolve jello into 1 cup boiling water, then add 1/2 cup evaporated milk.
Build The Jello Salad In This EXACT Order:
  1. Black Cherry (Method 1)
  2. Cherry (Method 2)
  3. Lime (Method 1)
  4. Lemon (Method 2)
  5. Orange (Method 1)
  6. Peach (Method 2)
  7. Strawberry (Method 1)
  8. Refrigerate completed jello for at least 4 hours. When ready to serve, hold the bundt pan with two hands and lower it gently into a sink full of warm water (being careful not to fully submerge it!) Only let the water come up 3/4 OF THE WAY UP THE SIDES OF THE PAN. Hold it in the warm water for approx. 30-45 seconds. BE CAREFUL NOT TO LET THE WATER RUN OVER THE EDGE OF THE PAN. You should see the edges of the jello begin to detach from the sides of the pan. Place a serving platter over the top of bundt pan-using two hands firmly holding jello pan and platter together, quickly invert them at the same time (turn it upside down). Jello should release from the pan and land on platter in all it's jiggly glory. If it does not release, flip the pan and platter back over and put jello pan back in the water for a few more seconds, then give it another shot. Once removed, place jello onto serving platter. Garnish with whipped cream. Enjoy.

Nutrition Facts
Rainbow Jello Salad
Amount Per Serving (1 serving)
Calories 172 Calories from Fat 9
% Daily Value*
Fat 1g2%
Saturated Fat 1g6%
Cholesterol 6mg2%
Sodium 197mg9%
Potassium 72mg2%
Carbohydrates 35g12%
Sugar 34g38%
Protein 4g8%
Vitamin A 55IU1%
Vitamin C 0.4mg0%
Calcium 61mg6%
Iron 0.1mg1%
* Percent Daily Values are based on a 2000 calorie diet.

Here’s one more to pin on your Pinterest boards!A few boxes of jello, evaporated milk and water are all you need to make this colorful and delicious holiday rainbow jello salad for a crowd!


Save

Save