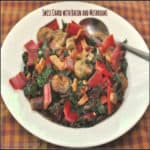
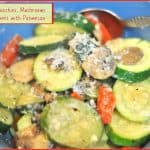
You’re going to enjoy Swiss Chard with Bacon and Mushrooms! This flavorful vegetable side dish also has onions and garlic, and is ready in under 20 minutes! 
I started growing rainbow chard in my garden several years ago, so I enjoy trying new ways to prepare it. Recently I cooked Swiss Chard with bacon and mushrooms, red onion, and garlic as a side dish for dinner, and was very pleased with the results. The addition of bacon, mushrooms, onion and garlic to Swiss chard made this quite a flavorful vegetable dish!
Scroll Down For A Printable Recipe Card At The Bottom Of The Page
What Is Swiss Chard?
Swiss chard is a leafy green vegetable that has been around for centuries. The chard develops large stalks, once mature. The leaves can be green or slightly red, and the stalks can vary in color, such as white, yellow or red. The leaves are very nutritious, and fresh young leaves can be eaten raw in salads.
For this recipe I used red chard, and did not use a published recipe. I used only my ideas for what might taste good paired with this veggie I grew in our backyard garden.

Prepare The Bacon
Stack bacon pieces on top of each other. Using a sharp knife, slice bacon into thin strips. Place bacon pieces (sliced) into a large skillet. Cook on medium-high heat, stirring occasionally, until bacon pieces begin to brown (3-4 minutes).
Leave all bacon grease in the skillet (this photo is from another recipe, but shows how I slice the bacon for quick cooking).

Cook The Swiss Chard
Add chard stems, sliced mushrooms and chopped red onion to the bacon and bacon drippings in the skillet. Continue to cook until chard stems become slightly tender (3-4 mins). Now add the chopped chard leaves, and stir to combine. Continue to cook on medium heat, stirring occasionally, until leaves have wilted and are cooked through (2-3 minutes).

Add minced garlic and stir to combine. Cook for 1 minute, being careful to not burn the garlic. Add salt and pepper, to taste.

Time To Eat Swiss Chard With Bacon And Mushrooms
Serve this Swiss chard immediately, while hot. It is a simple side dish to prepare that will compliment a variety of main dishes.

I cut the Swiss Chard stalks into fairly large slices as you can see from the photos, so if you prefer smaller bites, slice them to the thickness you prefer. Some folks prefer to leave the stalks out and only cook the leaves… whatever your preference is, GREAT!
Hope you will consider trying this recipe, and as always, I sincerely trust you will enjoy it! If you enjoy Swiss chard, be sure to check out my recipe for Swiss Chard with Onions and Garlic!
Looking For More Veggie Side Dish Recipes?
You can find all of my veggie side dish recipes in the Recipe Index, which is located at the top of the page. I have quite a few, including:
Interested In More Recipes?
Thank you for visiting this website. I appreciate you using some of your valuable time to do so. If you’re interested, I publish a newsletter 2 times per month (1st and 15th) with all the latest recipes, and other fun info. I would be honored to have you join our growing list of subscribers, so you never miss a great recipe!
There is a Newsletter subscription box on the top right side (or bottom) of each blog post, depending on the device you use, where you can easily submit your e-mail address (only) to be included in my mailing list.
You Can Also Find Me On Social Media:
Facebook page: The Grateful Girl Cooks!
Pinterest: The Grateful Girl Cooks!
Instagram: jbatthegratefulgirlcooks
Have a GREAT day!

↓↓ PRINTABLE RECIPE BELOW ↓↓
- 4-5 slices bacon , (cut into thin pieces before cooking)
- 8-10 mushrooms , sliced thin
- 1/4 cup red onion , chopped
- 3 Tablespoons bacon grease (approx. from cooked bacon)
- 1 head Swiss chard (I used red chard), chopped and divided (stems separated from leaves)
- 1 teaspoon minced garlic
- Salt and Pepper to taste
- Stack bacon pieces on top of each other. Using a sharp knife, slice into thin strips. Place bacon pieces (sliced) into a large skillet. Cook on medium-high heat, stirring occasionally, until bacon pieces begin to brown (3-4 minutes). Leave all bacon grease in the skillet.
- Add chard stems, sliced mushrooms and chopped red onion. Continue to cook until chard stems become slightly tender (3-4 mins).
- Add chopped chard leaves, and stir to combine. Continue to cook on medium heat, stirring occasionally, until leaves have wilted and are cooked through (2-3 minutes).
- Add minced garlic and stir to combine. Cook for 1 minute, being careful to not burn the garlic.
- Add salt and pepper to taste, then serve while hot.
Here’s another to pin to your Pinterest boards!
 is a healthy substitute for people wanting to avoid the carbs/starches in white or brown rice! c / The Grateful Girl Cooks!")


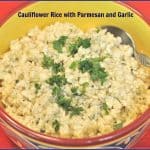
 is a trending, healthy substitute for people wanting to avoid the carbs/starches in white or brown rice! / The Grateful Girl Cooks!")


, easy and healthy side dish, featuring chickpeas (garbanzo beans), in a light lemon, olive oil, and garlic dressing.")


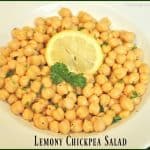
, easy and healthy side dish, featuring chickpeas (garbanzo beans), in a light lemon, olive oil, and garlic dressing. / The Grateful Girl Cooks!")


