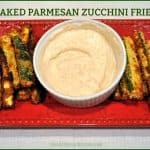
Baked Parmesan Zucchini Fries are a delicious side dish or appetizer! Baked until crispy, and served with dipping sauce, these “fries” will be a big hit! 
We think Baked Parmesan Zucchini Fries are a delicious family-friendly way to get kids (and adults) to EAT THEIR VEGGIES!
This appetizer is baked (not fried) to a crispy finish, and served with a cool, seasoned dipping sauce on the side. These “fries” won’t last long, as a side dish or an appetizer!
The zucchini is crispy on the outside and has lots of flavor because of the simply seasoned coating. They are really very easy to prepare, and it’s a great way to get more veggies into the food rotation!
It’s easy to get these veggies into everyone, in a fun way (especially if the kids like French fries)! Zucchini fries are delicious baked and eaten without any accompaniments, but I like to dip them in a tasty sauce (or ranch dressing).
Scroll Down For A Printable Recipe Card At the Bottom Of The Page
Making The Sauce/Dip For Baked Parmesan Zucchini Fries
This time I made up a quick and simple Mexican-spiced dip/sauce (with some of my favorite spices), to serve on the side.
Make the sauce by combining non-fat plain Greek yogurt with a Tablespoon of mayonnaise, then added cumin, garlic powder, chili powder, and paprika, and mixed until blended.
The dipping sauce has good Southwestern flavor, but is not too spicy, by the way! Make ahead, cover, and refrigerate until ready to use.

How To Cut Zucchini For Zucchini Fries
I used a green zucchini and a yellow zucchini to make the fries. After slicing the ends off, they were cut like this:
- #1 Cut each in half in the middle.
- #2 Slice each half in half lengthwise.
- #3 Cut those pieces into 4 lengthwise slices each (so they are wedges about 1/2 an inch wide).

In a small bowl, place two eggs. Lightly beat the eggs until they are fully combined. Place Panko crumbs and Parmesan cheese in a separate bowl.
Add the garlic powder, salt, pepper, paprika and Italian seasoning, and stir well, until combined.

Prepping Zucchini Fries For Baking
Dip the zucchini wedges, one at a time into the egg mixture to coat. Shake off excess egg back into bowl and then dip and roll in Panko mixture to coat all sides.

Place each coated piece of zucchini on a baking sheet which has been lined with aluminum foil, covered with non-stick spray.
Repeat until all the zucchini “fries” have been coated. Make sure to keep the wedges separated on foil.

Cooking The Baked Parmesan Zucchini Fries
Spray the top of the zucchini with cooking spray or lightly drizzle with olive oil. Bake in a preheated 425°F. oven for 22-25 minutes, flipping zucchini fries over, halfway through the cooking time.
When they are done, the zucchini should be crisp on the outside and lightly browned.

Time To Eat!
Transfer zucchini fries to a platter and serve with dipping sauce (if desired). They taste the very best when served hot, crispy, and fresh!


Serve, and enjoy this yummy finger food side dish (or appetizer!). The recipe can be easily doubled for a larger crowd (as written, the recipe makes 32 “fries”). Hope you enjoy these zucchini fries – we sure do!
Thanks for stopping by, and I invite you to come back again soon for more family-friendly recipes. Take care, may God bless you, and have a wonderful day.
Looking For More APPETIZER Recipes?
You can find ALL of my recipes in the Recipe Index, which is located at the top of the page. I have some delicious appetizer recipes to choose from including:
- Crispy Homemade French Fries
- Crunchy Onion Rings
- Apricot Pineapple Kielbasa Bites
- Classic Bruschetta
- Roasted Red Pepper Hummus
Want More Recipes? Get My FREE Newsletter!
I publish a newsletter 2 times per month (1st and 15th) with lots of recipes, tips, etc.
Would you like to join our growing list of subscribers?
There is a Newsletter subscription box on the top right (or bottom) of each blog post, depending on the device you use.
You can submit your e-mail address there, to be added to my mailing list.
Find Me On Social Media:
Facebook page: The Grateful Girl Cooks!
Pinterest: The Grateful Girl Cooks!
Instagram: jbatthegratefulgirlcooks

Zucchini Fries Recipe Source: Trish, at https://www.momontimeout.com/baked-parmesan-zucchini-fries-recipe/
↓↓ PRINTABLE RECIPE BELOW ↓↓
- 2 zucchini (medium sized- I used 1 green and 1 yellow)
- 2 eggs , beaten lightly
- 1/2 cup Panko bread crumbs
- 1/4 cup grated Parmesan cheese
- 1/4 teaspoon Italian seasoning
- 1/4 teaspoon garlic powder
- 1/4 teaspoon salt
- 1/4 teaspoon black pepper
- 1/4 teaspoon paprika
- 1/2 cup non-fat Greek yogurt (can substitute sour cream)
- 1 Tablespoon Mayonnaise
- 1/4 teaspoon EACH of spices (chili powder, ground cumin, garlic powder and paprika)
- Mix Greek yogurt, mayonnaise, cumin, garlic powder, chili powder, and paprika in small bowl until blended. Cover, and refrigerate until ready to use.
- Cut both ends off each zucchini (discard). Cut each zucchini in half across the middle, then cut each half in half lengthwise, then cut those pieces into 4 lengthwise slices each (so they are wedges about 1/2 an inch wide). You should have 32 wedges.
- In a bowl, lightly beat eggs until combined. Set aside.
- In another bowl, mix Panko crumbs, Parmesan cheese, garlic powder, salt, pepper, paprika and Italian seasoning until combined.
- Dip zucchini wedges, one at a time into the egg mixture to coat. Shake excess egg back into bowl, then dip and roll zucchini slice in Panko mixture to coat all sides. Place each coated piece of zucchini on baking sheet lined with foil, and sprayed lightly with non-stick spray. Repeat until all "fries" have been coated. Keep wedges separated. Spray the top of the zucchini with cooking spray, or lightly drizzle with olive oil.
- Bake in preheated 425 degree oven for 22-25 minutes, turning zucchini slices over, half way through cooking time. When done, zucchini should be crisp on the outside and lightly browned. Transfer zucchini fries to a platter, and serve with dipping sauce (if desired).
Here’s one more to pin on your Pinterest boards!


 / The Grateful Girl Cooks!")
 / The Grateful Girl Cooks!")
 / The Grateful Girl Cooks!")
 / The Grateful Girl Cooks!")
 / The Grateful Girl Cooks!")
 / The Grateful Girl Cooks!")
 / The Grateful Girl Cooks!")
 / The Grateful Girl Cooks!")


 is a healthy substitute for people wanting to avoid the carbs/starches in white or brown rice! c / The Grateful Girl Cooks!")


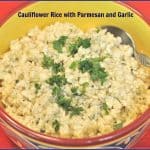
 is a trending, healthy substitute for people wanting to avoid the carbs/starches in white or brown rice! / The Grateful Girl Cooks!")


, easy and healthy side dish, featuring chickpeas (garbanzo beans), in a light lemon, olive oil, and garlic dressing.")


, easy and healthy side dish, featuring chickpeas (garbanzo beans), in a light lemon, olive oil, and garlic dressing. / The Grateful Girl Cooks!")