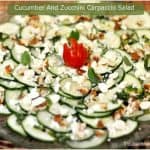
You’ll love this delicious cucumber and zucchini carpaccio salad, with feta cheese and pecans, drizzled with a light herb dressing!

Recently I used a birthday gift card I received to purchase a cookbook I had my eye on for a while: “Cristina Ferrare’s Big Bowl of Love”.
It is a great cookbook… and this cucumber and zucchini carpaccio salad is the FIRST recipe I made from the book. The salad is scrumptious, pretty to look at and would be a perfect brunch, potluck or party dish!
I wasn’t quite sure what to expect, but found the dressing (which features fresh dill, flat leaf parsley, and mint), and the addition of feta cheese, and toasted pecans make this a unique looking and absolutely delicious, fresh crunchy salad!
Scroll Down For A Printable Recipe Card At the Bottom Of The Page
What Exactly IS A “Carpaccio Salad”?
I thought the salad looked wonderful but was very curious what a “Carpaccio” salad actually was. Turns out the word Carpaccio (according to Wikipedia) originally referred to a dish utilizing extremely thin slices of raw meat, layered with white truffles or Parmesan cheese.
The dish was named after a Venetian painter named Vittore Carpaccio, who was well known for his paintings which prominently featured red and white tones. So, apparently this is why the red meat, and white truffles play a part.
Nowadays the term “carpaccio” can be used for any dish made with thinly sliced raw meat, fish or vegetables. THIS carpaccio salad uses fresh cucumbers and zucchini. Only veggies-no raw meat for me!
How To Prepare This Cucumber Zucchini Carpaccio Salad
Very thinly slice one large cucumber and one zucchini of equal size (I picked both from my garden-yeehaw!). I used a mandolin to thinly slice the veggies, which made it very easy.
However, if you are slicing the cucumbers and zucchini by hand, make sure you get the slices as thin as possible. Here are the cucumber slices, so you can see their “thin-ness”.

Here is my trusty mandolin (a gift from our oldest son), slicing the zucchini thinly. This is a great tool for this recipe!

Here are the finished cucumber and zucchini slices. The peel is left intact which adds color to the cucumber zucchini carpaccio salad.
 Arranging The Carpaccio Salad Veggies
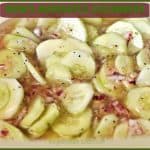
Begin in the center of a round serving plate and alternately arrange the slices (one cucumber, one zucchini, etc.), working outward around the circle.

Keep layering the veggies, one zucchini, one cucumber, and so on. Keep layering until all the veggies are distributed and the carpaccio salad looks like this (see photo below).

Prepare The Salad Dressing
Looks good already, doesn’t it? I think so! Mix the dressing, which includes, olive oil, lemon juice, rice wine vinegar, fresh mint, flat leaf parsley and dill (herbs were from our garden… nice).
 Toast The Pecans For The Salad
Toast chopped pecans in a “dry” skillet. A “dry skillet means you use no oil. Simply add the chopped pecans and heat them on medium-low for 3-4 minutes, keeping them stirred, until lightly toasted.

To Serve The Cucumber Zucchini Carpaccio Salad
Mix the dressing really well, then drizzle it over the top of the veggies, trying to cover them all. Sprinkle the top of the cucumber zucchini carpaccio salad with crumbled feta cheese, toasted pecans, and some cracked black pepper.
I also added a few small mint leaves and dill for garnish and then added a small red pear tomato (cut in quarters almost to bottom) from our garden, and that was it!
MAKE AHEAD TIP: If you want to make this up early, arrange the cucumbers and zucchini on plate, then cover and refrigerate. Right before serving, add the dressing, feta, pecans and black pepper. This is what it looked like at serving time! Pretty, huh?

Trust me – this carpaccio salad is amazing! The dressing is fresh, and the fresh herbs shine through, to make this such a wonderful, tasty, and beautiful salad.
Here… I saved a little bite on a fork for you to enjoy (see photo below)! You’re welcome.

I will most definitely be making this carpaccio salad again and really hope you will give it a try also, because it is so delicious!
Thanks for stopping by, and I invite you to come back again soon for more family friendly recipes. Take care, may God bless you, and have a wonderful day.
Looking For More SALAD Recipes?
You can find ALL of my recipes in the Recipe Index, which is located at the top of the page. I have some wonderful salad recipes to choose fom, including:
- Broccoli Salad
- Nanci’s 4-Bean Salad
- Potato Salad
- Southwestern Black Bean Salad
- Spiralized Carrot Salad in Lemon Ginger Dressing
Want More Recipes? Get My FREE Newsletter!
I publish a newsletter 2 times per month (1st and 15th) with lots of recipes, tips, etc.
Would you like to join our growing list of subscribers?
There is a Newsletter subscription box on the top right (or bottom) of each blog post, depending on the device you use.
You can submit your e-mail address there, to be added to my mailing list.
Find Me On Social Media:
Facebook page: The Grateful Girl Cooks!
Pinterest: The Grateful Girl Cooks!
Instagram: jbatthegratefulgirlcooks

Recipe source: “Cristina Ferrare’s Big Bowl Of Love”, page 54, copyright 2011, by Cristina Ferrare., Sterling Publishing Co., Inc.
↓↓ PRINTABLE RECIPE BELOW ↓↓
You'll love this delicious cucumber and zucchini carpaccio salad, with feta cheese and pecans, drizzled with a light herb dressing!
- 1/4 cup extra virgin olive oil
- 4 Tablespoons fresh squeezed lemon juice
- 1 Tablespoon rice wine vinegar
- 1 Tablespoon finely chopped fresh mint
- 2 teaspoons finely chopped fresh dill
- 1 Tablespoon finely chopped Italian flat leaf parsley
- 2 zucchini , sliced very thin
- 2 cucumbers , sliced very thin
- 1/2 teaspoon Kosher salt
- 1/2 cup feta cheese , crumbled
- 1/4 cup finely chopped roasted pecans (or walnuts)
- Freshly cracked black pepper
- In a small bowl, whisk the olive oil, lemon juice, rice wine vinegar, mint, dill and parsley together until well combined. Set salad dressing aside (or cover with plastic wrap and refrigerate if making ahead).
- To make the salad, very thinly slice the cucumbers and zucchini. Arrange the veggie slices on a large serving plate, by alternating cucumbers and zucchini. Work from the inside of the plate around the circle to the outside, filling the entire plate. Once the veggies are arranged, sprinkle lightly with salt. NOTE: If you are making this salad ahead of serving time, wrap the veggie plate with plastic wrap and refrigerate at this point. Add the rest (salad dressing, feta, pecans, etc. at serving time).
- When ready to serve, drizzle the salad dressing over the entire salad, trying to cover all the veggies lightly.
- Add the crumbled feta cheese, distributing over the top of the salad. Do the same with the toasted pecans (or walnuts), then finish with cracked black pepper.
- If desired, garnish salad with additional mint leaves or dill sprigs. I added a small red pear tomato (cut into quarters, sliced from top to bottom). Serve, and enjoy!!!
NOTE: For my husband and myself, I cut the SALAD ingredients in half (i.e. one cucumber, one zucchini, etc.), but kept the quantity of salad dressing the same. There was still enough salad for 3-4 small servings. Just an FYI.
Here’s one more to pin on your Pinterest boards!


 in under 30 minutes! / The Grateful Girl Cooks!")


