Month: March 2017

Easy Meatballs for Spaghetti

Learn how to make yummy, quick easy meatballs for spaghetti or other pasta (serves 4), using only one pound of ground beef!
I typically use Italian sausage links when I prepare spaghetti and sauce, but we also really enjoy our pasta with a fire roasted garlic marinara sauce and these easy meatballs, too!

Sometimes we just want spaghetti and meatballs- they really hit the spot! It’s completely easy to make 10-12 delicious Italian-seasoned meatballs using only one pound of hamburger meat and a few other readily available ingredients.

I’ve been making these easy meatballs for spaghetti this way for many, many years, and enjoy the minimal prep time involved!  You can even make a double batch of the meatballs and freeze them to use for another meal, which can save you precious time!  Here’s how easy it is to prepare them:

Scroll Down For A Printable Recipe Card At The Bottom Of The Page

Prepare The Easy Meatballs For Spaghetti

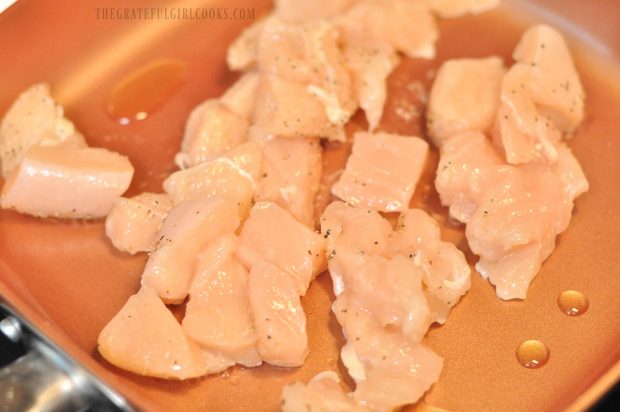
In medium sized bowl, combine ground beef, salt, pepper, garlic powder, oregano, diced onion, and freshly grated Parmesan cheese. Mix well, to combine ingredients.

Ground beef is mixed with Parmesan cheese, spices and onions.
Using your (clean) hands, grab a portion of the meat mixture and form it into a ball, rolling it between your hands.  The ones I made were about 2 inches wide, so I was able to get 10 fairly good-sized easy meatballs out of one pound of meat.

If you make ’em just a tad smaller, you should be able to make 12 or more meatballs. Set the meatballs (once formed) onto a plate or wax paper.

Form the ground beef mixture into small balls before cooking.

Brown The Meatballs For Spaghetti

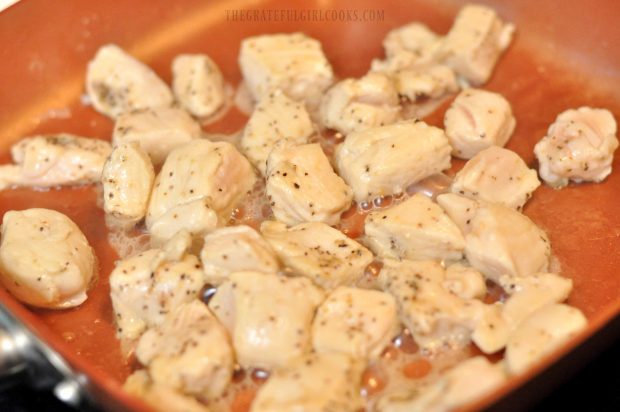
Heat 1 Tablespoon oil (vegetable or olive) in a large non-stick skillet on medium heat until oil and skillet are hot (but not smoking).  Add the meatballs carefully to the skillet. They should sizzle as they hit the hot oil.  Cook the meatballs until browned on the bottom, then carefully turn them over.

Continue to cook the meatballs until all sides are brown. They do NOT have to be completely cooked through – they will finish cooking in the sauce later. When done, transfer the meatballs to paper towels to absorb the grease.

Browning easy meatballs in skillet.The meat is browned on all sides in skillet.
Heat The Meatballs In Sauce

In a separate large saucepan, heat up spaghetti sauce (whatever kind of sauce you have on hand, whether it’s homemade or a purchased jar, just make sure you have enough sauce for 4 servings)!  Heat the sauce on medium-low.

Carefully add the meatballs to the sauce. Spoon sauce over the top of each meatball. Let the meatballs and sauce continue to cook (uncovered) on medium-low for about 25-30 minutes, occasionally spooning sauce over them as they cook.

Meatballs are placed in spaghetti sauce to finish cooking.The easy meatballs are covered with spaghetti sauce in pan to finish cooking.

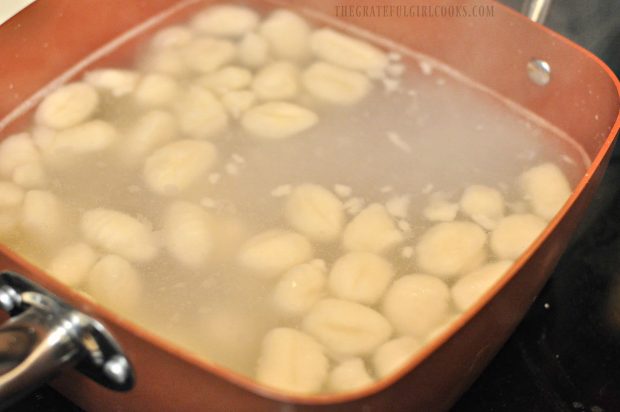
When meatballs are about halfway through cooking time, cook spaghetti noodles in separate pan, according to package directions. Drain pasta.  When they are done (and pasta is finished cooking), remove meatballs from spaghetti sauce (keep warm).

Serve Easy Meatballs For Spaghetti

Mix the cooked and drained pasta noodles with the hot spaghetti sauce.  Serve the pasta onto individual plates or into bowls. Spoon any leftover sauce onto the top of the pasta.  Top each serving with a few of these easy meatballs.  BOOM! Sprinkle the meatballs with some finely grated Parmesan cheese, and serve!

Easy meatballs for spaghetti are served in white bowl, and are ready to eat.

This really is an economical and delicious classic meal, with 4 healthy sized portions of meatballs for spaghetti using only one pound of ground beef!  Our oldest son popped in for a visit the day after I made this meal, and he enjoyed a big plate of leftover spaghetti and meatballs for lunch!  Yay for leftovers!

Hope you’ll give these delicious, easy meatballs a try! Thank you for stopping by, and I trust you will come back soon. Have a great day.

Looking For More MEATBALL Recipes?

You can find all of my recipes in the Recipe Index, located at the top of the page. I have several recipes featuring meatballs, including:

Interested In More Recipes?

Thank you for visiting this website. I appreciate you using some of your valuable time to do soIf you’re interested, I publish a newsletter 2 times per month (1st and 15th) with all the latest recipes, and other fun info. I would be honored to have you join our growing list of subscribers, so you never miss a great recipe!
There is a Newsletter subscription box on the top right side (or bottom) of each blog post, depending on the device you use, where you can easily submit your e-mail address (only) to be included in my mailing list.

You Can Also Find Me On Social Media:
Facebook page: The Grateful Girl Cooks!
Pinterest: The Grateful Girl Cooks!
Instagram: jbatthegratefulgirlcooks

Author's signature

0 from 0 votes
Easy Meatballs for Spaghetti
Prep Time
10 mins
Cook Time
30 mins
Total Time
40 mins
 

Learn how to make yummy, quick easy meatballs for spaghetti or other pasta (serves 4), using only one pound of ground beef!

Category: Entree
Cuisine: Italian
Keyword: meatballs
Servings: 4 (3 meatballs per serving)
Calories Per Serving: 382 kcal
Author: JB @ The Grateful Girl Cooks!
Ingredients
  • 1 pound ground beef
  • 1/2 teaspoon salt
  • 1/4 teaspoon black pepper
  • 1/4 teaspoon garlic powder
  • 1/4 teaspoon dried oregano
  • 1/2 cup diced white onion
  • 1/2 cup finely grated Parmesan cheese
  • 1 Tablespoon olive oil
  • Spaghetti noodles (enough for 4 servings)
  • Prepared Spaghetti Sauce (enough for 4 servings)
  • Additional finely grated Parmesan cheese , for garnish
Instructions
  1. In medium sized bowl, combine ground beef, salt, pepper, garlic powder, oregano, diced onion, and finely grated Parmesan cheese. Mix well to combine ingredients.
  2. Using clean hands, grab a portion of the meat mixture and form it into a ball, rolling it between your hands. You should be able to make 12 or more small meatballs. Set meatballs (once formed) onto a plate or wax paper.

  3. Heat 1 Tablespoon oil (vegetable or olive) in a large non-stick skillet. Heat on medium until oil and skillet are hot (but not smoking). Add meatballs. They should sizzle as they hit skillet. Cook until brown on bottom, then carefully turn over. Continue to cook until all sides are brown (meatballs do NOT have to be completely cooked through - they will finish cooking in sauce later). Transfer to paper towels to drain.

  4. In a separate large saucepan, heat up spaghetti sauce (enough sauce for 4 servings) on medium-low. Carefully add meatballs to sauce. Spoon sauce over the top of each meatball. Let meatballs and sauce continue to cook on medium-low for about 30 minutes, occasionally spooning more sauce over the meatballs as they cook.

  5. When meatballs are halfway through cooking time, cook spaghetti noodles in separate pan, according to package directions. Drain. When done, remove meatballs from spaghetti sauce (keep warm). Mix cooked, drained noodles with the hot spaghetti sauce. Serve up the pasta onto individual plates or into bowls. Spoon any leftover sauce onto pasta. Top each serving with 3 meatballs. Garnish with grated Parmesan cheese, and serve!

Recipe Notes

*Caloric calculation is for meatballs only (3 per serving). 

Nutrition Facts
Easy Meatballs for Spaghetti
Amount Per Serving (3 meatballs)
Calories 382 Calories from Fat 261
% Daily Value*
Fat 29g45%
Saturated Fat 11g69%
Cholesterol 91mg30%
Sodium 558mg24%
Potassium 351mg10%
Carbohydrates 2g1%
Protein 24g48%
Vitamin A 110IU2%
Vitamin C 1.5mg2%
Calcium 164mg16%
Iron 2.4mg13%
* Percent Daily Values are based on a 2000 calorie diet.

Here’s one more to pin on your Pinterest boards!Learn how to make yummy, quick easy meatballs for spaghetti or other pasta (serves 4), using only one pound of ground beef!


Save

Save

Save

Save

Save

Save

Save

Save

Save

Save

Save

Save

Save

Save

Save

Save

Save

Save

Save

Orange And Rosemary Glazed Salmon

This EASY recipe for orange rosemary glazed salmon (inspired by Cooking Light) is topped with a fresh citrus glaze, and is ready in about 20 minutes!This EASY recipe for orange rosemary glazed salmon (inspired by Cooking Light) is topped with a fresh citrus glaze, and is ready in about 20 minutes!
I tried a new recipe for Orange Rosemary Glazed Salmon the other evening for our dinner. Whoa! It tasted absolutely fantastic, so I want to share the recipe on my blog today. Hopefully you will be inspired to make this salmon for your own dinner… you won’t regret it!

My husband and I love salmon, so I am constantly on the search for new ways to prepare it. I found this recipe on Pinterest, and it is now quite possibly one of my favorite recipes for  salmon.  It’s SOOOO good!

The original recipe was inspired by Cooking Light, and features pan-seared salmon fillets covered with a fresh, thickened citrus glaze. It’s delicious, and so very easy to prepare!  The recipe makes 4 servings.

Scroll Down For A Printable Recipe Card At the Bottom Of The Page

How To Prepare Orange Rosemary Glazed Salmon

I only cooked 2 salmon fillets since only two of us were eating, but I kept the sauce amount the same as written (and saved the extra sauce for another time).  Here’s how to make this delicious orange rosemary glazed salmon:

Heat olive oil on medium-high heat in a large non-stick skillet. Salt and pepper salmon fillets on both sides. When olive oil is really hot (but not smoking), add the salmon to skillet (it should sizzle when it hits the pan).

Two salmon fillets searing in copper skillet

Cook the salmon fillets for 3-4 minutes, then carefully turn salmon over and cook the other side for 3-4 minutes until fully cooked.

When done and golden brown, remove the browned salmon from the skillet (leaving the hot oil in the skillet). Keep the cooked salmon warm.

Two golden brown seared salmon fillets in skillet

Make The Sauce For Orange Rosemary Glazed Salmon

Turn the heat under the skillet to medium-low. Add the minced garlic and rosemary, and cook, stirring often, for about 20-30 seconds.

Minced garlic and rosemary cooking in copper skillet

Pour 1/4 cup (4 Tablespoons) of chicken broth to the skillet. Stir the ingredients, to combine. Cook this on a low simmer until most of the liquid has reduced in volume.

Chicken broth being poured into orange glaze sauce in skillet

The next thing to do is to add the orange zest, lemon juice, honey and orange juice to the skillet. Stir to combine.

Now the orange sauce will begin to smell wonderful!

Orange juice being added to skillet for glaze

In small cup, stir together the remaining Tablespoon of chicken broth with the cornstarch until smooth. 

Pour this mixture into the skillet, stirring well, as it is added.  Season the sauce with salt and pepper, to taste.

Cornstarch and broth being added to orange sauce in pan

Bring the orange sauce to a boil. Boil it for one minute, stirring constantly. The sauce will thicken as it cooks.

Cooking sauce for orange rosemary glazed salmon.

Serve The Orange Rosemary Glazed Salmon

Return the cooked salmon back into the skillet with the sauce. Spoon some of the sauce over each piece to cover the salmon.

Two pieces of salmon with orange slices in skillet with sauce

Carefully remove the orange rosemary glazed salmon from the pan, and transfer to serving plates.  Spoon additional sauce over each piece, if desired (it’s good- highly recommend).

Garnish each orange rosemary glazed salmon fillet with a fresh rosemary sprig, and fresh orange slice, if desired. Serve, and enjoy this wonderful dinner!

Orange rosemary glazed salmon, green beans and rice on a beige plate.

A orange rosemary glazed salmon fillet on plate, with green beans and rice.

I really hope you will try this recipe for orange rosemary glazed salmon. The fresh citrus glaze tastes absolutely delicious on the salmon, and really enhances it. 

We said “this is REALLY good” several times while eating it, and I’m confident you will enjoy it, as well! Have a wonderful day.

Looking For More SALMON Recipes?

You can find all of my salmon recipes in the Recipe Index, located at the top of the page. I have lots of delicious recipes using salmon, including:

Interested In More Recipes?

Thank you for visiting this website. I appreciate you using some of your valuable time to do soIf you’re interested, I publish a newsletter 2 times per month (1st and 15th) with all the latest recipes, and other fun info. I would be honored to have you join our growing list of subscribers, so you never miss a great recipe!
There is a Newsletter subscription box on the top right side (or bottom) of each blog post, depending on the device you use, where you can easily submit your e-mail address (only) to be included in my mailing list.

You Can Also Find Me On Social Media:
Facebook page: The Grateful Girl Cooks!
Pinterest: The Grateful Girl Cooks!
Instagram: jbatthegratefulgirlcooks

Author's signature

Recipe Source:  http://www.cookingclassy.com/orange-rosemary-glazed-salmon/

0 from 0 votes
Orange And Rosemary Glazed Salmon
Prep Time
5 mins
Cook Time
15 mins
Total Time
20 mins
 
This EASY recipe for orange rosemary glazed salmon (inspired by Cooking Light) is topped with a fresh citrus glaze, and is ready in about 20 minutes!
Category: Entree-Seafood
Cuisine: American
Keyword: orange rosemary glazed salmon
Servings: 4 servings
Calories Per Serving: 336 kcal
Author: JB @ The Grateful Girl Cooks!
Ingredients
  • 2 teaspoons olive oil
  • 4 (6 ounce) skinless salmon fillets (about 1 inch thick)
  • Salt and ground black pepper
  • 2 cloves garlic , minced
  • teaspoons minced fresh rosemary
  • 5 Tablespoons chicken broth (divided-4 T. in one cup, 1 T. in another))
  • teaspoons orange zest
  • 2 teaspoons lemon juice
  • Tablespoons honey
  • 2/3 cup fresh squeezed orange juice
  • teaspoons cornstarch
  • 2 Oranges (thinly sliced) and sprigs of fresh rosemary for garnish (if desired)
Instructions
  1. Heat olive oil on medium-high heat in large non-stick skillet. Salt and pepper salmon fillets on both sides. When olive oil is hot (but not smoking), add salmon to skillet (it should sizzle when it hits the pan). Cook salmon for 3-4 minutes, then carefully turn salmon over and cook other side for 3-4 minutes, until fully cooked. When done and golden brown, remove salmon from skillet (leaving hot oil in the skillet). Keep salmon warm.
  2. Turn heat under skillet to medium-low. Add minced garlic and rosemary; stir and cook for about 20 seconds. Add 1/4 cup chicken broth (4 Tablespoons of the original 5). Stir well. Cook on a low simmer until most of liquid has reduced. Add orange zest, lemon juice, honey and orange juice to skillet. Stir.
  3. In small cup, stir together remaining Tablespoon of chicken broth with cornstarch. Pour into skillet, stirring as you add it. Add salt and pepper to taste.
  4. Bring mixture to a boil. Boil for one minute, stirring constantly. The sauce will thicken as it cooks. Return cooked salmon to skillet. Spoon sauce over each piece to cover. Garnish each fillet with a thin orange slice, and a sprig of fresh rosemary (if desired). Carefully remove salmon and transfer to individual serving plates. Spoon additional sauce over each piece. Serve and enjoy!
Nutrition Facts
Orange And Rosemary Glazed Salmon
Amount Per Serving (1 g)
Calories 336 Calories from Fat 108
% Daily Value*
Fat 12g18%
Saturated Fat 1g6%
Cholesterol 93mg31%
Sodium 144mg6%
Potassium 1020mg29%
Carbohydrates 19g6%
Fiber 2g8%
Sugar 15g17%
Protein 34g68%
Vitamin A 285IU6%
Vitamin C 53.6mg65%
Calcium 61mg6%
Iron 1.4mg8%
* Percent Daily Values are based on a 2000 calorie diet.

Here’s one more to pin on your Pinterest boards!This EASY recipe for orange rosemary glazed salmon (inspired by Cooking Light) is topped with a fresh citrus glaze, and is ready in about 20 minutes!


Save

Save

Save

Save

Save

Save

Save

Save

Save

Save

Save

Save

Save

Save

Save

Save

Chicken and Asparagus Risotto

Creamy chicken asparagus risotto, with Arborio rice, Parmesan cheese and mushrooms is a delicious, filling, “all in one” Italian inspired dish!Creamy chicken asparagus risotto, with Arborio rice, Parmesan cheese and mushrooms is a delicious, filling, "all in one" Italian inspired dish!

I recently made Chicken Asparagus Risotto for our dinner. And let me tell you… it tasted GOOD. Lip-smackin’ GOOD. Creamy Arborio rice, chicken breast, Parmesan cheese, asparagus and mushrooms all come together in this flavor-filled, delicious meal! We loved it!

I couldn’t get enough of this chicken asparagus risotto! Even the leftovers for lunch the next day were wonderful! If you love risotto, you might also enjoy my recipe for Mushroom Risotto with Pan-Seared Shrimp!

Scroll Down For A Printable Recipe Card At The Bottom Of The Page

What Kind Of Rice Is Used To Make Chicken Asparagus Risotto?

Did you know that risotto is made with Arborio rice, which is shorter and fatter than most grains of rice?  Arborio rice is almost exclusively used to make risotto, which is a Northern Italian classic dish.

To put it into very basic terms, risotto is rice which has been cooked in broth or stock with other ingredients to a creamy consistency.  It is one of the most common ways of cooking rice, and let me tell you, risotto is DELICIOUS!

The recipe for making chicken asparagus risotto is pretty straightforward. If you do the prep work right at the beginning, then this chicken asparagus risotto is a breeze to put together.  I used some baked chicken leftovers, which also saved some prep time!

Prepare The Asparagus

The first thing you will need to do is remove the woody ends of the asparagus stalks, and discard. Cut each of the stalks into 2″ pieces.

Place asparagus pieces into 1 inch of simmering water in skillet, and cook on medium high heat until asparagus is fork-tender, adding more water, if needed (about 10 minutes). Once cooked, you will need to drain the asparagus.

Prepare the Mushrooms And The Chicken

While the asparagus cooks, lightly sauté sliced the mushrooms in butter until tender, in a separate pan.

Cut the chicken into small bite sized pieces and cook. You can boil, broil, or grill it OR use rotisserie chicken or  leftovers. I used leftover chicken from my recipe for Homemade Shake And Bake Chicken). Set aside the cooked asparagus, mushrooms and chicken pieces. See NOTES section of printable recipe (below)for a quick way to cook chicken for this recipe.

Asparagus is cooked for risotto

Make The Risotto

Start the risotto by melting butter and olive oil in large saucepan over medium heat. Add chopped onion. Cook for 5 minutes, stirring the onions frequently.

Chopped onion is cooked in butter and olive oil for risotto

Add the Arborio rice to the cooked onions; stir frequently and continue cooking until the rice begins to turn a light golden brown color.

Arborio rice is added to cooked onions for risotto

Pour the white wine into the pan. Let this liquid come to a boil, then cook, stirring occasionally, until it has been absorbed into the rice.

White wine is added to risotto mixture in skillet

“Building In The Flavor” To The Risotto

Yes… the flavor is slowly “built in” to the risotto! Pour 1 cup of chicken stock (or broth) into the pan. Stir the risotto frequently, and keep the heat at a medium simmer.  Continue cooking the risotto until almost all of the liquid has been absorbed, then add 1/4 cup more of the broth, stirring well.

Repeat this process (rice absorbs liquid, add 1/4 cup more liquid) until all the broth is gone.  This should take between 20 and 25 minutes. (By adding the broth a little bit at a time then cooking until it has been absorbed, it allows the rice to get really creamy. Don’t rush this step!)

Chicken broth is added to risotto mixture cooking in the skillet

Finishing The Chicken Asparagus Risotto

After you’ve added the last portion of broth, but just before it is fully absorbed, add the cooked asparagus and mushrooms to the risotto. Continue cooking the risotto, letting the liquid finish being absorbed into the rice. When finished, the risotto should be creamy and tender.

Cooked asparagus and mushrooms added to risotto in skillet
Remove the pan from the heat.  Add the cooked chicken pieces to the creamy risotto. Now the chicken asparagus is looking good, and is close to being done!

Chicken breast chunks added to asparagus in creamy risotto
Add the freshly grated Parmesan cheese to the chicken asparagus risotto. Stir well, to combine all the ingredients fully.  Take a bite, and lightly season with salt and pepper, to suit your taste.

Fresh grated Parmesan cheese is added to risotto

Serve The Chicken Asparagus Risotto!

Make sure everything is fully heated through, then dish up the chicken asparagus risotto onto individual plates or into bowls. Garnish each serving with some finely grated Parmesan cheese and chopped fresh chives (or parsley), if desired. There you have it… a nice serving of chicken asparagus risotto!

Grab a fork, and prepare to be delighted! I really think you will love this creamy, flavor-filled chicken asparagus risotto!

Chicken asparagus risotto is served in white bowl

Chicken and asparagus risotto is garnished with Parmesan cheese and chives

Enjoy the creamy rice, chunks of chicken, Parmesan cheese, and the fresh asparagus in this comforting, filling dish. It truly tastes wonderful!  Sure hope you will consider trying this recipe for chicken asparagus risotto. We LOVE it, and hope you will, too!

Be sure to check out ALL of my recipes in the Recipe Index, which is located at the top of the page. Have a great day, and come back soon!

Interested In More Recipes?

Thank you for visiting this website. I appreciate you using some of your valuable time to do soIf you’re interested, I publish a newsletter 2 times per month (1st and 15th) with all the latest recipes, and other fun info. I would be honored to have you join our growing list of subscribers, so you never miss a great recipe!
There is a Newsletter subscription box on the top right side (or bottom) of each blog post, depending on the device you use, where you can easily submit your e-mail address (only) to be included in my mailing list.

You Can Also Find Me On Social Media:

Facebook page: The Grateful Girl Cooks!
Pinterest:
The Grateful Girl Cooks!
Instagram:
jbatthegratefulgirlcooks

Have a great day!

Author's signatureRecipe Adapted From: http://www.thegratefulgirlcooks.com/mushroom-risotto-with-pan-seared-shrimp/

0 from 0 votes
Chicken and Asparagus Risotto
Prep Time
15 mins
Cook Time
30 mins
Total Time
45 mins
 
Creamy chicken asparagus risotto, with Arborio rice, Parmesan cheese and mushrooms is a delicious, filling, "all in one" Italian inspired dish!
Category: Entree
Cuisine: Italian
Keyword: chicken asparagus risotto
Servings: 3 -4 servings
Calories Per Serving: 539 kcal
Author: JB @ The Grateful Girl Cooks!
Ingredients
For Add-ins:
  • 6-8 asparagus stalks (woody ends discarded, cut into 2 inch pieces), cooked until crisp-tender.
  • 2 pre-cooked lightly seasoned chicken breasts (baked, boiled, grilled,rotisserie), cut in 1-2" cubes.
  • 8 oz. package sliced mushrooms , (sautéed in 2 teaspoons butter)
For risotto:
  • 2 Tablespoons butter
  • 2 Tablespoons olive oil
  • 1 cup diced white onion
  • 1 cup Arborio rice (no substitutes)
  • 1/3 cup dry white wine
  • cups chicken stock (or broth)
  • 3/4 cup finely grated Parmesan cheese
  • Salt and Pepper , to taste
For garnish:
  • Additional Parmesan cheese
  • Fresh chives , sliced thin (may substitute chopped parsley, if desired)
Instructions
Do prep work first:
  1. Remove woody ends of the asparagus and discard. Cut remaining stalks into 2 inch pieces. Place asparagus pieces into 1 inch of simmering water in skillet, and cook on medium high heat until asparagus is fork-tender (about 10 minutes). Drain.
  2. While cooking asparagus, in separate pan lightly sauté sliced mushrooms in 2 teaspoons butter until tender.
  3. Cut and cook chicken into small bite sized pieces (boil, broil, grill OR use rotisserie chicken or leftovers. Set aside asparagus, mushrooms and cooked chicken.
To Prepare Risotto:
  1. Melt olive oil and butter in large saucepan over medium heat. Add chopped onion. Cook for 5 minutes, stirring frequently. Add Arborio rice to onions; stir constantly and cook until rice turns a light golden brown color. Add white wine. Let the liquid come to a boil, then cook until it has been absorbed into rice.
  2. Pour 1 cup of chicken stock (or broth) into pan. Stir frequently, and keep heat at a medium simmer. Continue cooking until almost all of the liquid has been absorbed, then add 1/4 cup more broth, stirring well. Continue this process (rice absorbs liquid, add 1/4 cup more liquid) until all broth is gone. This will take between 20 and 25 minutes. (By adding the broth a little bit at a time then cooking until it has been absorbed, it allows the rice to get really creamy. Don't rush this step!)
  3. After you've added the last portion of broth, but just before it's fully absorbed, add cooked asparagus and mushrooms and stir. Continue cooking, letting liquid finish being absorbed into rice. When finished, rice should be tender.
  4. Remove pan from the heat. Add cooked chicken to rice. Add freshly grated Parmesan cheese to rice. Stir to combine all ingredients. Taste, and lightly season with salt and pepper.
  5. Make sure everything is warm, then serve onto individual plates or bowls. Garnish with additional finely grated Parmesan cheese and chopped fresh chives (or parsley), if desired. Enjoy this chicken asparagus risotto!

Recipe Notes

If you do not have pre-cooked or leftover chicken, a quick way to get this done is to cut chicken breast into cubes, lightly season with salt and pepper, then quickly cook in a hot skillet (with a Tablespoon of olive oil) on medium-high heat. Will only take a few minutes.

Nutrition Facts
Chicken and Asparagus Risotto
Amount Per Serving (1 serving)
Calories 539 Calories from Fat 189
% Daily Value*
Fat 21g32%
Saturated Fat 8g50%
Cholesterol 72mg24%
Sodium 623mg27%
Potassium 729mg21%
Carbohydrates 52g17%
Fiber 3g13%
Sugar 6g7%
Protein 29g58%
Vitamin A 535IU11%
Vitamin C 6.4mg8%
Calcium 230mg23%
Iron 3.7mg21%
* Percent Daily Values are based on a 2000 calorie diet.

Here’s one more to pin on your Pinterest boards!Creamy chicken asparagus risotto, with Arborio rice, Parmesan cheese and mushrooms is a delicious, filling, "all in one" Italian inspired dish!


Save

Save

Save

Save

Save

Save

Save

Save

Save

Save

Save

Save

Save

Save

Save

Save

Save

Save

Trout In Lemon Garlic Butter Sauce

Fresh trout fillets are pan-seared and served with a light lemon, garlic, butter, and wine sauce for a delicious main course!Fresh trout fillets are pan-seared and served with a light lemon, garlic, butter, and wine sauce for a delicious main course!
If you or someone in your family had a great day fishing and you’re looking for a new recipe to cook all that fish, why not try this recipe for Trout In Lemon Garlic Butter Sauce?!

There are so many ways to cook trout. I decided to try this recipe I found on Pinterest, after my hubby bought a few trout at Costco. Ha Ha!  No fishing for him, except to fish through the seafood section, looking for fresh seafood.

Once home, he had to fillet the fish, debone them and chop their little heads off for me— ugh. There are just some things I will NOT do. Ha Ha! The method for preparing this recipe is simple. Here’s how to make the trout:

Scroll Down For A Printable Recipe Card At The Bottom Of The Page

Prepare The Trout

  NOTE: You will want to use boneless trout fillets (with the skin on one side) for this recipe. With the skin side down, lightly season the trout with salt and Italian seasoning (only on one side). 

Cook The Trout Fillets

Heat olive oil on medium heat in a LARGE skillet until hot, but not smoking.  Add the trout fillets, skin side UP to the hot oil.

The fish fillets are lightly seasoned before cooking.

Cook the trout for 4-5 minutes on medium heat, then carefully flip the fillets over to skin side DOWN. You might need to add a little bit more oil before turning them over, because you don’t want them to stick to skillet.  Cook an additional 3-4 minutes.

Let The Cooked Fish “Rest”

Once the fish is cooked, remove your skillet from the heat source. Cover the skillet with a lid, and let the cooked trout “rest” for 5-10 minutes. Leave the lid on the skillet.

Once the fish is done resting, carefully lift up each piece of trout and remove the skin from the bottom. It should peel off nicely. 

Discard skin, and carefully place fillets on a piece of foil and keep warm.  Do not clean out the skillet, because you want all the little tidbits and oils left in there!

Cooking the trout in oil, in a large skillet.

The fish fillets are turned over, halfway through cooking time.

Make A Lemon Garlic Butter Sauce For The Trout

To the oils left in the skillet, add minced garlic, fresh lemon juice and white wine. Cook this liquid for 1 minute on medium-low heat, stirring occasionally. Turn off the heat.

Add the butter and chopped fresh parsley to the skillet. Stir well, to combine, and continue cooking on low heat until the butter has melted.

Garlic, lemon juice and white wine are added to skillet to make sauce for the fish.

Butter and fresh parsley is added to the sauce in skillet.

Add The Cooked Trout To The Lemon Butter Garlic Sauce

Once the butter has melted and the sauce is creamy, gently add the trout fillets back into the skillet.  Spoon sauce over the top of the fish.

If necessary, reheat on low, just until fish reaches serving temperature.

Trout In Lemon Garlic Butter Sauce cooking in skillet.

Serve The Trout In Lemon Garlic Butter Sauce

Place the cooked trout onto individual serving plates.  Spoon a bit more of the sauce over each piece of fish. Sprinkle with the remaining chopped parsley for garnish… and serve!

A piece of Trout In Lemon Garlic Butter Sauce on a plate, with peas.

That’s it!  So now, whether you are fishing some of the great lakes in the United States OR fishing the seafood counter at a grocery store, you have a new way to prepare trout in lemon garlic butter sauce! 

If you have a smoker or Traeger grill, be sure to check out my recipe for Traeger Grill Smoked Trout. You might also enjoy my recipe for Pan-Seared Steelhead Trout, because it is delicious, too!

Thanks for stopping by today. I invite you to come back soon for more yummy recipes. Have a great day!

Looking For More SEAFOOD Recipes?

You can find all of my recipes in the Recipe Index, located at the top of the page. I have many recipes, including:

Interested In More Recipes?

Thank you for visiting this website. I appreciate you using some of your valuable time to do soIf you’re interested, I publish a newsletter 2 times per month (1st and 15th) with all the latest recipes, and other fun info. I would be honored to have you join our growing list of subscribers, so you never miss a great recipe!
There is a Newsletter subscription box on the top right side (or bottom) of each blog post, depending on the device you use, where you can easily submit your e-mail address (only) to be included in my mailing list.

You Can Also Find Me On Social Media:
Facebook page: The Grateful Girl Cooks!
Pinterest: The Grateful Girl Cooks!
Instagram: jbatthegratefulgirlcooks

Author's signature

Recipe Source: http://juliasalbum.com/2015/10/trout-with-garlic-lemon-butter-herb-sauce/

↓↓ PRINTABLE RECIPE BELOW ↓↓

0 from 0 votes
Trout In Lemon Garlic Butter Sauce
Prep Time
10 mins
Cook Time
20 mins
Total Time
30 mins
 

Fresh trout fillets are pan-seared and served with a light lemon, garlic, butter, and wine sauce for a delicious main course!

Category: Entree
Cuisine: American
Keyword: trout
Servings: 4 servings
Calories Per Serving: 379 kcal
Author: JB @ The Grateful Girl Cooks!
Ingredients
  • 3-4 Trout fillets (3-4 medium sized fillets, with skin on bottom or 2 LARGE)
  • 2 Tablespoons olive oil
  • Salt (to generously season fish)
  • teaspoons Italian seasoning
  • 4 cloves garlic , minced
  • 3 Tablespoons fresh squeezed lemon juice
  • 2-3 Tablespoons white wine
  • 2 Tablespoons butter (room temp)
  • 2 Tablespoons parsley (finely chopped), divided
Instructions
  1. With skin side down, lightly season the trout with salt and Italian seasoning (only on one side). Heat olive oil on medium heat in a LARGE skillet until hot, but not smoking. Add trout fillets, skin side UP, flesh side DOWN to hot oil. Cook for 4-5 minutes on medium, then carefully flip fillets over to skin side DOWN. You might need to add a little bit more oil before turning them over (you don't want them to stick to skillet). Cook an additional 3-4 minutes. Once fish is cooked, remove skillet from the heat source, cover the skillet with a lid, and let trout rest for 5-10 minutes (leaving cover on).
  2. Once the fish is done resting, carefully lift up each piece of fish and remove the skin from the bottom of the fish. It should peel off easily. Discard skin, and carefully place fillets on a piece of foil and keep warm. Do not clean out the skillet (you want all the little tidbits and oils left in there!)
  3. To the oils left in the skillet, add minced garlic, fresh lemon juice and white wine. Cook this for 1 minute on medium-low heat, stirring occasionally. Turn off heat. Add butter and 1 Tablespoon chopped fresh parsley. Stir to combine, and continue cooking on low until butter has melted.
  4. Once the butter has melted and the sauce is creamy, gently add trout fillets back into skillet. Spoon sauce over the top of fish. If necessary, reheat in skillet, until fish reaches serving temp (on low).
  5. Place trout onto individual serving plates. Spoon a bit more sauce over fish, sprinkle with remaining chopped parsley for garnish... and serve!
Nutrition Facts
Trout In Lemon Garlic Butter Sauce
Amount Per Serving (1 serving)
Calories 379 Calories from Fat 216
% Daily Value*
Fat 24g37%
Saturated Fat 6g38%
Cholesterol 113mg38%
Sodium 150mg7%
Potassium 657mg19%
Carbohydrates 2g1%
Protein 35g70%
Vitamin A 455IU9%
Vitamin C 8.8mg11%
Calcium 93mg9%
Iron 3mg17%
* Percent Daily Values are based on a 2000 calorie diet.

Here’s one more to pin on your Pinterest boards!Fresh trout fillets are pan-seared and served with a light lemon, garlic, butter, and wine sauce for a delicious main course!


Save

Save

Save

Save

Save

Save

Save

Save

Save

Save

Save

Mom’s Easy Chocolate Cake

Mom’s EASY Chocolate Cake, with chocolate frosting, is a delicious dessert for the whole family, and can be made from scratch in practically no time at all!Mom's EASY Chocolate Cake, with chocolate frosting, is a delicious dessert for the whole family, and can be made from scratch in practically no time at all!

 Today I want to share with you an old family favorite recipe for Mom’s Easy Chocolate Cake! It is super easy to make, and will be a big hit with everyone who gets to enjoy a piece I have such great memories of having this cake as I was growing up, and I have my sweet Mom to thank for that!

Scroll Down For A Printable Recipe Card At The Bottom Of The Page

Sweet Memories Of This Chocolate Cake

When I was growing up, occasionally my Mom would sneak back into the kitchen after dinner (while we were watching TV or doing homework) and whip up a delicious chocolate cake from scratch for our family of 5 as a surprise.  We LOVED it! Within a few minutes of the cake going into the oven, the smell coming out of our little kitchen would alert us to the surprise treat ahead for us!

What a great memory! We didn’t have a lot of money or a fancy home growing up, but my Mom sure could cook and make wonderful meals with simple items from our pantry.  I am grateful for the inspiration I have received from her, to this very day!

The cake is very simple to make, and so is the easy frosting!  Instead of waiting for the cake to “cool down” after it was finished baking, Mom would poke holes in the cake when it came out of the oven, and pour/spread the creamy chocolate frosting all over the cake. The frosting would drip down into the holes in the cake, so we had small tunnels of chocolate throughout our slices when we would eat it!  Oh boy… this is a GREAT tasting chocolate cake.  Here’s how to make it!

How To Make Mom’s Easy Chocolate Cake Batter

Cream together sugar, vegetable shortening and eggs in a large bowl, using an electric hand mixer or a stand mixer. Beat the ingredients well, for 2-3 minutes.

Sugar, eggs, and shortening mixed together for cake batter

In a separate large bowl, sift together the all purpose flour, cocoa, baking soda and salt.

Flour, cocoa, and other dry ingredients sifted for chocolate cake batter

Add the dry, sifted ingredients to the wet ingredients, along with 1 cup of buttermilk.  Once blended, slowly pour in 3/4 cup of boiling water, and a teaspoon of vanilla extract. Blend on low until batter is fully mixed together.

Time To Bake!

Pour the batter for Mom’s easy chocolate cake into a greased and floured 9×13 baking pan, and distribute the batter evenly. Bake the cake at 350 degrees for 35 minutes, or until a toothpick inserted into middle of cake comes out clean..

Mom's chocolate cake batter poured into pan

Make The Frosting

While the cake is baking, make up the frosting. Melt butter in saucepan on low heat.  Add cocoa powder and mix well with a spoon.  Add salt, vanilla, and milk; mix well.  Add the powdered sugar to the frosting ingredients. Mix until the frosting is not too thick, but “pourable”. Add additional milk to thin… or add additional powdered sugar to thicken, as needed.

4 photos showing chocolate frosting for cake being made

Frosting Mom’s Easy Chocolate Cake!

When Mom’s easy chocolate cake is done, remove the pan from the oven, and place pan on a wire rack. Let the cake rest for 2-3 minutes, then poke holes all over surface of cake every couple inches (I use a chopstick!).  Pour the chocolate frosting over the surface of Mom’s easy chocolate cake, and spread it out, to cover.Baked chocolate cake, in pan on wire rack, cooling down

Holes poked into cake once baked

Chocolate frosting poured over baked cake
When finished, Mom’s easy chocolate cake should look like this.  The frosting will be fairly “fluid” since the cake is still hot. Continue to spread the warm frosting over the holes as they “re-appear”. As the frosting oozes down into the cake, the holes on top surface will open up again.

Mom's easy cake is baked then frosted with chocolate icing

Time To EAT!

Let the frosting firm up and the cake cool down!  Once Mom’s easy chocolate cake is at room temperature, you can slice and serve it up!  It’s as simple as that! By the way, in the picture below the frosting looks darker than in previous photo. Don’t know what’s up with that- it IS the very same cake!.

Piece of Mom's chocolate cake on white plate with forkPiece of chocolate cake with frosting dripping through the middle

I have such vivid memories of enjoying Mom’s easy chocolate cake from my childhood. That MUST be where I got my love of cake from, right?  Ha Ha! Hope you will give this easy, simple and delicious recipe a try!  The chocolate cake and creamy chocolate frosting taste fantastic!  Thanks, Mom!

Looking For More CAKE Recipes?

You can find all of my recipes in the Recipe Index, located at the top of the page. My cake recipes are all delicious, and include:

Interested In More Recipes?

Thank you for visiting this website. I appreciate you using some of your valuable time to do soIf you’re interested, I publish a newsletter 2 times per month (1st and 15th) with all the latest recipes, and other fun info. I would be honored to have you join our growing list of subscribers, so you never miss a great recipe!
There is a Newsletter subscription box on the top right side (or bottom) of each blog post, depending on the device you use, where you can easily submit your e-mail address (only) to be included in my mailing list.

You Can Also Find Me On Social Media:

Facebook page: The Grateful Girl Cooks!
Pinterest:
The Grateful Girl Cooks!
Instagram:
jbatthegratefulgirlcooks

Author's signatureRecipe Source: My Mom

0 from 0 votes
Mom's Easy Chocolate Cake
Prep Time
10 mins
Cook Time
35 mins
Total Time
45 mins
 
Mom's EASY Chocolate Cake, with chocolate frosting, is a delicious dessert for the whole family, and can be made from scratch in practically no time at all!
Category: Dessert
Cuisine: American
Keyword: Mom's easy chocolate cake
Servings: 16 servings (9x13 cake)
Calories Per Serving: 363 kcal
Author: JB @ The Grateful Girl Cooks!
Ingredients
For Cake:
  • 2 cups granulated sugar
  • 2 eggs
  • 3/4 cup vegetable shortening
  • cups all purpose flour
  • 1/2 cup unsweetened cocoa powder
  • 2 teaspoons baking soda
  • 1/2 teaspoon salt
  • 1 cup buttermilk
  • 3/4 cup boiling water
  • 1 teaspoon vanilla
For Chocolate Frosting:
  • 3/4 cube butter
  • 4 Tablespoons unsweetened cocoa powder
  • Dash of salt
  • 1 teaspoon vanilla extract
  • 12 ounces powdered sugar (about 3/4 of a one pound box)
  • 1/4 to 1/2 cup milk (enough to make frosting pourable, but not too thin)
Instructions
  1. Preheat oven to 350 degrees. Lightly grease and flour a 9x13 cake pan.
  2. Cream together sugar, vegetable shortening and eggs, using an electric hand mixer or stand mixer. Beat well for 2-3 minutes.
  3. In a separate large bowl, sift together flour, cocoa, baking soda and salt. Add dry, sifted ingredients to the wet ingredients, along with 1 cup of buttermilk, and mix well on LOW speed.
  4. Once blended, slowly pour in 3/4 cup of boiling water, and a teaspoon of vanilla extract. Blend on low until batter is fully mixed together. Pour batter into a greased and floured 9x13 baking pan, and distribute batter evenly.
  5. Bake at 350 degrees for 35 minutes, or until toothpick inserted into middle of cake comes out clean.
To Make Frosting:
  1. While cake is baking, make frosting. Melt butter in saucepan on low heat. Add cocoa powder and mix well with a spoon. Add salt, vanilla, and milk; mix well. Add powdered sugar. Mix until frosting is not too thick, but "pourable". Add additional milk to thin... add additional powdered sugar to thicken, as needed.
  2. When cake is done, remove from oven. Let rest for 2-3 minutes, then poke holes over surface of cake every couple inches (I use a chopstick!). Pour frosting over surface of cake, and spread to cover. Let cake cool to room temperature, then slice and serve!
Nutrition Facts
Mom's Easy Chocolate Cake
Amount Per Serving (1 piece (1/16th))
Calories 363 Calories from Fat 99
% Daily Value*
Fat 11g17%
Saturated Fat 3g19%
Cholesterol 22mg7%
Sodium 238mg10%
Potassium 108mg3%
Carbohydrates 64g21%
Fiber 1g4%
Sugar 46g51%
Protein 3g6%
Vitamin A 55IU1%
Calcium 28mg3%
Iron 1.6mg9%
* Percent Daily Values are based on a 2000 calorie diet.

Here’s one more to pin on your Pinterest boards!Mom's EASY Chocolate Cake, with chocolate frosting, is a delicious dessert for the whole family, and can be made from scratch in practically no time at all!


Save

Save

Save

Save

Save

Save

Save

Save

Save

Save

Save

Save

Save

Save

Save

Save

How To Can Dried Beans

It’s easy and economical to use a pressure canner to can dried beans (pinto, garbanzo, black, etc.), for long term storage and convenience.It's easy and very economical to use a pressure canner to process and can dried beans (pinto, garbanzo, black, etc.), for long term storage and convenience.
In an effort to stock up my canned foods pantry a couple years ago, I decided to learn how to can dried beans.  The process is fairly simple using a pressure canner, and now my pantry stays well stocked with canned black beans, garbanzo beans, pinto beans, and others!

As I said, you will need to have a Pressure Canner to be able to can dried beans safely.  I went straight to one of my Ball Blue Books-Guide To Preserving for my instructions (I love their books!).  Here’s how easy it is to can dried beans:

Scroll Down For A Printable Recipe Card At The Bottom Of The Page

How To Can Dried Beans

First thing you need to do is prepare the beans (the picture below is pinto beans).  Wash the dried beans under cool water then drain.   Place them in a large saucepan.

Fill the pan with water until beans are fully covered by 2 inches of water above beans.  Bring it to a boil; boil for 2 minutes. Remove pan from the heat; let the beans soak uncovered for an hour.

Dried pinto beans ready to be used for canning!

Cook The Beans

After they have soaked for an hour, drain. Place drained beans back into a large saucepan, and add enough water to cover by two inches again. Bring the water to a boil, then reduce the heat to a very low boil. Cover the saucepan and let beans cook for 30 minutes.

Dried beans must be soaked in water before cooking.

While the beans are cooking, prepare the pressure canner, canning jars, lids and screw bands according to manufacturer instructions.  When beans are done cooking, pack the beans into prepared, hot jars. Leave 1 inch headspace in each jar.  Add 1/2 teaspoon salt to each jar.

Fill The Prepared Canning Jars

Ladle the hot cooking liquid or clean boiling water over the beans, being sure to still leave a 1 inch headspace.  Remove air bubbles from each jar, then take a wet paper towel and make sure the rims are clean. Center the flat lids on each of the jars, then tighten screw bands to fingertip tight.

Preparing canning jars to process dried beans.

Time To Can Dried Beans

Put the filled jars onto rack and into pressure canner (which has 2-3 inches of simmering water).  Put the canner lid on and lock it into place, Turn heat to medium-high. Let the steam vent for 10 minutes, then put the weighted gauge over vent. Process beans at 10 pounds pressure. Pint jars are processed for 1 hour, 15 minutes. Quart jars are processed for 1 hour, 30 minutes.

To can dried beans, you must use a pressure canner.
When processing time is completed, turn off heat and let the canner cool until it reaches zero pressure.  Wait 5 additional minutes, then carefully remove lid. Let the jars cool for 5-10 minutes, then carefully remove jars from canner using canning tongs.

After Processing

Place the hot jars onto a dish towel (try not to place jars directly onto kitchen counter. Variances in temperature could possibly cause jars to crack).  Let jars cool for 12 hours, then check to make sure they are properly sealed, then label and store in your pantry!

Garbanzo beans and pinto beans are canned and ready to store in pantry.

I’ve canned many jars since learning how to can dried beans. It is very convenient to not have to run to the grocery store when I need beans!  I’ve used the garbanzo beans for my homemade hummus, and the black and pinto beans in my homemade chili.

Pinto beans and black beans are canned and ready to store in pantry. Hope you will try to can dried beans, and enjoy stocking your pantry! It really is a fairly easy way to save lots of money, and to always have canned beans on hand!

Looking For More CANNING Recipes?

You can find all my recipes in the Recipe Index, located at the top of the page. I have some great canning recipes you might be interested in, including:

Interested In More Recipes?

Thank you for visiting this website. I appreciate you using some of your valuable time to do soIf you’re interested, I publish a newsletter 2 times per month (1st and 15th) with all the latest recipes, and other fun info. I would be honored to have you join our growing list of subscribers, so you never miss a great recipe!
There is a Newsletter subscription box on the top right side (or bottom) of each blog post, depending on the device you use, where you can easily submit your e-mail address (only) to be included in my mailing list.

You Can Also Find Me On Social Media:
Facebook page: The Grateful Girl Cooks!
Pinterest: The Grateful Girl Cooks!
Instagram: jbatthegratefulgirlcooks

Have a WONDERFUL day!

Author's signatureRecipe Source:  “Ball Blue Book – Guide To Preserving”, copyright 2014, Hearthmark, LLC, page 111.

0 from 0 votes
How To Can Dried Beans
Prep Time
1 hr 30 mins
Cook Time
1 hr 15 mins
Total Time
2 hrs 45 mins
 
It's easy and very economical to use a pressure canner to process and can dried beans (pinto, garbanzo, black, etc.), for long term storage and convenience.
Category: Canning
Cuisine: American
Keyword: can dried beans
Servings: 6 pints or 3 quarts
Calories Per Serving: 161 kcal
Author: JB @ The Grateful Girl Cooks!
Ingredients
  • 5 pounds dried beans (kidney, garbanzo, black, pinto Great Northern or cranberry)
  • Water , to fill jars
  • 3 teaspoons Salt
Instructions
  1. Wash dried beans under cool water, then drain. Place beans in a large saucepan. Fill pan with water until beans are fully covered by 2 inches of water (above beans). Bring to a boil; boil for 2 minutes. Remove pan from heat; let beans soak uncovered for an hour.
  2. After beans have soaked an hour, drain. Place drained beans back into large saucepan; add enough water to cover by two inches again. Bring to a boil, then reduce heat to a very low boil. Cover the saucepan and let beans cook for 30 minutes.
  3. While the beans are cooking, prepare pressure canner, canning jars, lids and screw bands according to manufacturer instructions. When beans are done cooking, pack beans into prepared hot jars. Leave 1 inch headspace in each jar. Add 1/2 teaspoon salt to each jar. Ladle hot cooking liquid or clean boiling water over beans, being sure to leave a 1 inch headspace. Remove air bubbles from jars, then take a wet paper towel and make sure rims are clean. Center the flat lids on jars, then tighten screw bands to fingertip tight.
  4. Put filled jars onto rack and into pressure canner (which has 2-3 inches of simmering water). Put canner lid on, lock it into place, Turn heat to medium-high. Let the steam vent for 10 minutes, then put the weighted gauge over vent. Process beans at 10 pounds pressure. Pint jars are processed for 1 hour, 15 minutes. Quart jars are processed for 1 hour, 30 minutes.
  5. When processing time is completed, turn off heat and let canner cool until it reaches zero pressure. Wait 5 additional minutes, then carefully remove lid. Let the jars cool in pan for 5-10 minutes, then carefully remove jars from canner using canning tongs. Place hot jars on a dish towel (don't put jars directly onto kitchen counter. Variances in temperature could cause jars to crack). Let jars cool for 12 hours, then check to make sure they are properly sealed, then label and store in your pantry!
Nutrition Facts
How To Can Dried Beans
Amount Per Serving (0.25 cups)
Calories 161
% Daily Value*
Sodium 147mg6%
Potassium 700mg20%
Carbohydrates 29g10%
Fiber 7g29%
Sugar 1g1%
Protein 10g20%
Vitamin A 10IU0%
Calcium 58mg6%
Iron 2.4mg13%
* Percent Daily Values are based on a 2000 calorie diet.

Here’s one more to pin on your Pinterest boards!It's easy and very economical to use a pressure canner to process and can dried beans (pinto, garbanzo, black, etc.), for long term storage and convenience.


Save

Save

Save

Save

Save

Save

Save

Save

Save

Save

Save

Save

Homemade Shake And Bake Chicken

Homemade Shake and Bake Chicken is an EASY, flavorful chicken entree using a quick copycat spice mixture. Chicken pieces are coated with spices, then baked!Homemade Shake and Bake Chicken is an EASY, flavorful chicken entree using a quick copycat spice mixture. Chicken pieces are coated with spices, then baked!

Anyone remember the catch-phrase “It’s Shake n’ Bake… and I helped!”?  I sure remember those TV commercials for shake and bake chicken. Years ago, I used this mixture for baked chicken.

Today I’d like to share with you a copycat version of how to easily make your own Homemade Shake and Bake Chicken! This copycat recipe for the spice mixture uses ingredients you probably already have in your kitchen! The original shake and bake chicken mix was a packet you could buy to help season chicken or pork.  All you needed to do was shake it on the chicken, then bake it! Talk about convenience!

Well, why not make it yourself, and save some money?  The spice mix is so easy to throw together, the chicken pieces are coated with it, then it’s baked until done. That’s it!

Scroll Down For A Printable Recipe Card At The Bottom Of The Page

Make The Spice Mix

To make the spice mix, flour, paprika, salt, garlic powder, thyme, and black pepper are mixed in a small bowl  until combined. The shake and bake chicken mix, as written, will coat 8 pieces of chicken. Once mixed, place the spice mixture in a gallon sized, resealable bag.

Spices are mixed together in bowl, for shake and bake chicken.

Prepare Homemade Shake And Bake Chicken For Cooking

Take the skin off the chicken (optional, but healthier). When I make the shake and bake chicken for these photos, I used chicken thighs and legs. Dip each of the chicken pieces, one at a time, in milk. Cover all sides with the milk.

Shake and bake chicken is first dipped in milk.

After dipping the chicken piece in milk, shake the excess off.  Place the chicken (one piece at a time) into the large resealable bag with the spice mix. Close and shake until the piece of chicken is coated on all sides. Repeat this process for each piece of chicken.

Shake and bake chicken is then tossed in the dry spice mixture to cover.

Spray a 13×9 inch baking sheet with non-stick spray. Place each of the coated shake and bake chicken pieces onto the pan. Be sure to leave a bit of space between each of the pieces.

Pieces of shake and bake chicken are placed onto baking sheet.

Time To Cook the Shake And Bake Chicken!

Cook the shake and bake chicken in a preheated 375 degree oven for 40 minutes. Large chicken breasts will need to cook a little bit longer to be fully cooked through.

Shake and bake chicken turns a golden brown color while baking.

Shake and bake chicken has finished cooking and is served, hot from the oven!

When the chicken is finished cooking, remove the pan from oven.  If any of the spice mix is still “dry” on top of the shake and bake chicken, simply brush some of the pan drippings onto the mix. This should wet the spice mix enough for a uniform look.

Serve, and enjoy this delicious shake and bake chicken with a side dish you enjoy!  It’s a completely SIMPLE and flavorful way to serve those you love a tasty dinner without a lot of fuss! Have a wonderful day, and may God bless you!

Looking For More CHICKEN Recipes?

You can find all my recipes in the Recipe Index, located at the top of the page. I have LOTS of delicious chicken recipes, including:

Interested In More Recipes?

Thank you for visiting this website. I appreciate you using some of your valuable time to do soIf you’re interested, I publish a newsletter 2 times per month (1st and 15th) with all the latest recipes, and other fun info. I would be honored to have you join our growing list of subscribers, so you never miss a great recipe!
There is a Newsletter subscription box on the top right side (or bottom) of each blog post, depending on the device you use, where you can easily submit your e-mail address (only) to be included in my mailing list.

You Can Also Find Me On Social Media:

Facebook page: The Grateful Girl Cooks!
Pinterest:
The Grateful Girl Cooks!
Instagram:
jbatthegratefulgirlcooks

Author's signature

Recipe Source: unknown (found on 3×5 index card written on years and years ago)

5 from 1 vote
Homemade Shake And Bake Chicken
Prep Time
5 mins
Cook Time
40 mins
Total Time
45 mins
 
Homemade Shake and Bake Chicken is an EASY, flavorful chicken entree using a quick copycat spice mixture. Chicken pieces are coated with spices, then baked!
Category: Entree
Cuisine: American
Keyword: shake and bake chicken
Servings: 8 servings
Calories Per Serving: 60 kcal
Author: JB @ The Grateful Girl Cooks!
Ingredients
For Spice Mixture:
  • 1 cup all purpose flour
  • 2 teaspoons paprika
  • 1 teaspoon salt
  • 1/2 teaspoon black pepper
  • 1 teaspoon garlic powder
  • 1 teaspoon dried thyme
For Chicken:
  • 8 pieces chicken (thighs and legs)
  • 1/2 cup milk
Instructions
  1. Preheat oven to 375 degrees F.
  2. Combine spice mix ingredients; stir well. Place into a plastic, gallon sized resealable bag.
  3. Dip one piece of chicken in milk at a time, and fully coat on all sides. Let excess drip off.
  4. Place piece of chicken into resealable bag with spice mix. Close top of bag and shake until chicken piece is completely coated. Place coated chicken onto a 13x9 inch baking sheet that has been sprayed with non-stick spray.
  5. Repeat process for rest of chicken, leaving a bit of space between each piece on baking sheet.
  6. Bake chicken at 375 degrees for 40 minutes (a bit longer if using chicken breasts-bone in). When done, remove from oven, and serve immediately.
Recipe Notes

NOTE: Caloric calculation is only for spice mix, since there are different pieces of chicken that may be used, all with differing caloric counts.

Nutrition Facts
Homemade Shake And Bake Chicken
Amount Per Serving (1 portion spice mix)
Calories 60
% Daily Value*
Sodium 291mg13%
Potassium 32mg1%
Carbohydrates 12g4%
Protein 1g2%
Vitamin A 245IU5%
Calcium 5mg1%
Iron 1mg6%
* Percent Daily Values are based on a 2000 calorie diet.

Here’s one more to pin on your Pinterest boards!Homemade Shake and Bake Chicken is an EASY, flavorful chicken entree using a quick copycat spice mixture. Chicken pieces are coated with spices, then baked!


Save

Save

Save

Save

Save

Save

Save

Save

Save

Save

Chicken, Parmesan & Spinach Gnocchi

Chicken Parmesan Spinach Gnocchi is an easy to make, 30 minute Italian dish with chicken, fluffy potato dumplings, Parmesan cheese sauce and spinach! Chicken Parmesan Spinach Gnocchi is an easy to make, 30 minute Italian entree with chicken, fluffy potato dumplings, Parmesan cheese sauce and spinach!
What do you get when you combine chicken, fluffy Italian potato dumplings, Parmesan cheese sauce and spinach into an easy meal? This recipe for Chicken Parmesan Spinach Gnocchi, that’s what… a simple, yet absolutely delicious entree!  If you’re a Vegetarian, you can simply leave the chicken out and still enjoy this wonderful dish!

I found the original recipe on Pinterest, and decided to fix it for dinner recently.  It was sooooo good!  This chicken parmesan spinach gnocchi recipe serves 4, and only takes about 30 minutes to prepare, from start to finish!

Talk about Italian comfort food! Whoa… the potato gnocchi are a classic Italian pasta, and the chicken breast chunks provide protein. In addition, the creamy Parmesan sauce is amazing, and the fresh spinach used in the recipe would make Popeye proud!

Scroll Down For A Printable Recipe Card At The Bottom Of the Page

How To Make Chicken Parmesan Spinach Gnocchi

Here’s how simple this recipe is to prepare:  Cut 2 boneless, skinless chicken breasts into bite sized pieces. Lightly season with salt, pepper, and garlic powder.  Heat olive oil in skillet on medium high heat.

Once oil is hot, add chicken and cook 3-4 minutes, turning occasionally until cooked through.  Remove chicken from skillet; keep warm.

Chicken, Parmesan & Spinach Gnocchi / The Grateful Girl Cooks!Chicken, Parmesan & Spinach Gnocchi / The Grateful Girl Cooks!Cook The Gnocchi

Prepare gnocchi according to package directions. Basically, you add them to boiling water, cook, and when they float to the surface they are done. This typically takes only a few minutes.  Drain the gnocchi. Set aside.

Chicken, Parmesan & Spinach Gnocchi / The Grateful Girl Cooks!Chicken, Parmesan & Spinach Gnocchi / The Grateful Girl Cooks!Prepare The Sauce

Place the empty pan back on the stove. Add butter to pan and heat on medium until melted. Add minced garlic and cook for 1 minute, stirring well.  Add flour; stir well to remove lumps and form a roux (thick paste).

Cook and stir for 30 seconds, just to “cook out” the raw flour taste. Add milk slowly to roux; stir or whisk it well to remove any remaining lumps. Cook this for 2-3 minutes only until the sauce has begun to thicken.

Chicken, Parmesan & Spinach Gnocchi / The Grateful Girl Cooks!
This is what the creamy sauce will look like, as it begins to thicken while cooking.

Chicken, Parmesan & Spinach Gnocchi / The Grateful Girl Cooks!
Time For Some “Add-Ins”

Stir in the chopped fresh spinach.  Cook for 3-4 minutes until the sauce has thickened and spinach has wilted.  Add Parmesan cheese and the cooked chicken into sauce. Stir well to combine.

You can add a bit more milk if the sauce is too thick. Taste the finished sauce, then season with additional salt and pepper, if necessary, to suit your personal taste preference.

Chicken, Parmesan & Spinach Gnocchi / The Grateful Girl Cooks!

Add The Gnocchi And Serve

Remove the pan from the heat, and add cooked, drained gnocchi. Gently stir until all ingredients are combined.  If necessary, reheat through on low. Serve the chicken parmesan spinach gnocchi immediately once it reaches the desired heat.

Chicken, Parmesan & Spinach Gnocchi / The Grateful Girl Cooks!
Serving Chicken, Parmesan & Spinach Gnocchi

I dish up the gnocchi onto individual serving plates, then garnish with a bit more grated Parmesan cheese (can never have too much Parmesan, right?). Serve, and enjoy this wonderful chicken dish! It’s creamy, has great flavor, and is delicious and filling!

If you enjoy this chicken parmesan spinach gnocchi, you will LOVE my “copycat” recipe for Olive Garden’s Chicken Gnocchi Soup or a recipe for Creamy Italian Sausage Gnocchi. They are both delicious, also!

Chicken, Parmesan & Spinach Gnocchi / The Grateful Girl Cooks!
I really hope you will consider making this chicken parmesan spinach gnocchi recipe. I think you will be surprised at just how simple it is to make, in such a short time.  Have a wonderful day… and be KIND as you journey through this 24 hours you’ve been given!

Be sure and check out ALL my recipes in the Recipe Index, which is located at the top of the page. I have a LOT of delicious, family-friendly recipes I’m confident you will enjoy

Interested In More Recipes?

Thank you for visiting this website. I appreciate you using some of your valuable time to do soIf you’re interested, I publish a newsletter 2 times per month (1st and 15th) with all the latest recipes, and other fun info. I would be honored to have you join our growing list of subscribers, so you never miss a great recipe!
There is a Newsletter subscription box on the top right side (or bottom) of each blog post, depending on the device you use, where you can easily submit your e-mail address (only) to be included in my mailing list.

You Can Also Find Me On Social Media:
Facebook page: The Grateful Girl Cooks!
Pinterest: The Grateful Girl Cooks!
Instagram: jbatthegratefulgirlcooks

Author's signature

Recipe Adapted From:  http://www.lifeasastrawberry.com/parmesan-spinach-gnocchi/

0 from 0 votes
Chicken, Parmesan & Spinach Gnocchi
Prep Time
10 mins
Cook Time
20 mins
Total Time
30 mins
 

Chicken Parmesan Spinach Gnocchi is an easy to make, 30 minute Italian entree with chicken, fluffy potato dumplings, Parmesan cheese sauce and spinach!

Category: Entree
Cuisine: Italian
Keyword: chicken parmesan spinach gnocchi
Servings: 4 servings
Calories Per Serving: 478 kcal
Author: JB @ The Grateful Girl Cooks!
Ingredients
  • 2 chicken breasts (boneless, skinless)
  • Salt , pepper and garlic powder (to lightly season chicken)
  • 1 Tablespoon olive oil
  • 16 ounces potato gnocchi (found in pasta section)
  • 2 Tablespoons butter
  • 1 clove garlic , minced
  • 2 Tablespoons all purpose flour
  • cups milk
  • 3 cups fresh spinach , chopped
  • Additional salt/pepper and milk , if necessary
  • 1 cup finely shredded Parmesan cheese (plus more for garnish, if desired)
Instructions
  1. Cut chicken into bite sized pieces. Lightly season with salt, pepper, and garlic powder. Heat olive oil in skillet on medium high heat. Once oil is hot, add chicken and cook 3-4 minutes, turning occasionally until cooked through. Remove chicken from skillet and keep warm.
  2. Prepare gnocchi according to pkg. directions (add to boiling water, cook, and when they float to surface they're done - 3-4 minutes). Drain gnocchi. Set aside. Place empty pan back on stove.
  3. Add butter to pan; heat on medium until melted. Add minced garlic; cook for 1 minute, stirring well. Add flour; whisk well to remove lumps and form a roux (thick paste). Cook and stir for 30-60 seconds to "cook out" flour taste. Add milk slowly to roux; stir well. Cook for 2-3 minutes only until sauce has begun to thicken.
  4. Add chopped spinach; stir well. Cook for 3-4 minutes until sauce has thickened and spinach has wilted. Add Parmesan cheese, then add cooked chicken to sauce. Stir well. Add a bit more milk if sauce is too thick. Taste sauce; season with additional salt and pepper, if necessary.
  5. Remove pan from heat; add cooked and drained gnocchi. Gently stir until all ingredients are combined. If necessary, reheat through on low. Serve immediately upon reaching desired heat.
  6. Serve, garnishing each portion with grated Parmesan cheese. Enjoy!
Nutrition Facts
Chicken, Parmesan & Spinach Gnocchi
Amount Per Serving (1 serving)
Calories 478 Calories from Fat 162
% Daily Value*
Fat 18g28%
Saturated Fat 9g56%
Cholesterol 71mg24%
Sodium 950mg41%
Potassium 468mg13%
Carbohydrates 48g16%
Fiber 3g13%
Sugar 4g4%
Protein 29g58%
Vitamin A 2640IU53%
Vitamin C 7.3mg9%
Calcium 436mg44%
Iron 5.3mg29%
* Percent Daily Values are based on a 2000 calorie diet.

Here’s one more to pin on your Pinterest boards!Chicken Parmesan Spinach Gnocchi is an easy to make, 30 minute Italian entree with chicken, fluffy potato dumplings, Parmesan cheese sauce and spinach!

Save

Save

Save

Save

Save

Save

Save

Save

Save

Save

Save

Save

Save

Save

Save

Save

Giant Chocolate Chip Cookie Pizza

Make a delicious, GIANT chocolate chip cookie pizza as a sweet, unique gift for a birthday or other occasion! Recipe serves 12!Make a delicious, GIANT chocolate chip cookie pizza as a sweet, unique gift for a birthday or other occasion! Recipe serves 12!
Wouldn’t it be fun to receive an absolutely delicious Giant Chocolate Chip Cookie Pizza for a birthday surprise? Sometimes I think it’s even more fun to GIVE one as a birthday surprise!

Scroll Down For A Printable Recipe Card At The Bottom Of The Page

Make A Giant Chocolate Chip Cookie Pizza As A Gift!

I made the giant cookie pizza, pictured above, as a birthday gift for a friend. The chocolate chip cookie pizza was placed inside a pizza box, and hand delivered right to her front doorstep. There was no tipping of the delivery driver necessary!  What a fun way to honor them in a unique way on their special day.

Giant cookie pizza, out of oven, and ready to be decorated!

This Chocolate Chip Cookie Pizza Is HUGE

The cookie itself is very easy to make, and it is BIG! This cookie is baked on a traditional 12 inch round pizza pan. It is a big dessert, which can be cut into 12 individual servings.

Once baked and cooled, the cookie is drizzled decoratively with semi-sweet chocolate and white chocolate for a finishing touch. Once the chocolate icing has firmed up, the cookie is ready to be served (or boxed up for delivery).

Fire Up The Birthday Candles!

Add some little birthday candles once the pizza box is opened, to make it an extra special birthday gift! This treat is so easy, and once delivered in a pizza box, it becomes a unique treat for a special friend or family member. 

The cookie can be sliced into 12 pie shaped wedges with a pizza cutter. Just remember… if your friend decides to eat the WHOLE cookie themselves, they’re going to need a HUGE glass of milk!

The chocolate chip cookie pizza, decorated with chocolate icing, and birthday candles!

Hope you try this recipe for this delicious, giant chocolate chip cookie pizza. It’s a fun and creative way to make a dessert cookie that actually serves 12 people!  Make it a special occasion to remember! By the way – if you enjoy BIG cookies, be sure to check out my recipe for Giant Sugar Cookies! Have a GREAT day!

Looking For More COOKIE Recipes?

You can find all of my recipes in the Recipe Index, located at the top of the page. I have some delicious cookie recipes you might enjoy, including:

Interested In More Recipes?

Thank you for visiting this website. I appreciate you using some of your valuable time to do soIf you’re interested, I publish a newsletter 2 times per month (1st and 15th) with all the latest recipes, and other fun info. I would be honored to have you join our growing list of subscribers, so you never miss a great recipe!
There is a Newsletter subscription box on the top right side (or bottom) of each blog post, depending on the device you use, where you can easily submit your e-mail address (only) to be included in my mailing list.

You Can Also Find Me On Social Media:
Facebook page: The Grateful Girl Cooks!
Pinterest: The Grateful Girl Cooks!
Instagram: jbatthegratefulgirlcooks

Have a FANTASTIC day!

Author's signature

Recipe Adapted From: http://sallysbakingaddiction.com/2016/06/27/chocolate-chip-cookie-pizza/

0 from 0 votes
Giant Chocolate Chip Cookie Pizza
Prep Time
10 mins
Cook Time
25 mins
Total Time
35 mins
 
Make a delicious, GIANT chocolate chip cookie pizza as a sweet, unique gift for a birthday or other occasion! Recipe serves 12!
Category: Dessert
Cuisine: American
Keyword: chocolate chip cookie pizza
Servings: 12 servings
Calories Per Serving: 454 kcal
Author: JB @ The Grateful Girl Cooks!
Ingredients
For Cookie Dough
  • 2 cups all purpose flour
  • 2 teaspoons cornstarch
  • 1 teaspoon baking soda
  • 1/2 teaspoon salt
  • 3/4 cup butter , room temp (1½ cubes)
  • 3/4 cup brown sugar , firmly packed (light or dark brown sugar is okay)
  • 1/4 cup granulated sugar
  • 1 large egg
  • 2 teaspoons vanilla extract
  • cups semi-sweet chocolate chips
For Decorative Drizzle:
  • 1/2 cup semi-sweet chocolate chips
  • 2 teaspoons vegetable shortening , divided (1 for semi-sweet, 1 for white chocolate)
  • 1/2 cup white chocolate chips
Instructions
To Make Cookie:
  1. Preheat your oven to 350 degrees F. Lightly coat a pizza pan with non-stick cooking spray.
  2. In medium bowl, mix flour, cornstarch, baking soda and salt together. Set bowl aside.
  3. Cream butter, brown sugar, and granulated sugar together on medium speed until well combined (about 2 minutes). Add egg; beat for 1 minute on high. Add vanilla extract, and beat well to combine.
  4. Add the flour mixture to the wet ingredients. Slowly mix on low until they are fully combined. Stir in the chocolate chips.
  5. Place the dough onto prepared pizza pan. Use a rubber spatula or your clean fingers to spread and flatten out the thick dough until the dough just about reaches the edges of pan.
  6. Bake cookie for 22-25 minutes. When done, the cookie should be lightly browned on top. If you want crispy edges on the cookie, let it bake a couple minutes longer. When done, remove pan to a wire rack and let cookie cool (still on the pan).
To Make Decorative Drizzle:
  1. Place semi-sweet chocolate chips and white chocolate chips in two separate bowls. Add 1 teaspoon vegetable shortening to each bowl. Microwave each on high for 30 seconds. Stir until smooth. If necessary, heat additional 15 seconds, then stir, until smooth. Do not over cook as the chocolate can burn. Drizzle the chocolate over the cooled cookie in a decorative pattern. Let chocolate firm up on pizza before wrapping as a gift or slicing. For packaging, place cookie on parchment paper (cut to fit) and place cookie "pizza" inside a clean pizza box.
Recipe Notes

Dough can be prepared ahead of time. Prepare dough as directed. Wrap dough in plastic wrap then cover with foil. May be stored 3 days in fridge or up to 3 months in freezer. If freezing, thaw dough in fridge before placing/spreading onto pizza pan.

Nutrition Facts
Giant Chocolate Chip Cookie Pizza
Amount Per Serving (1 slice)
Calories 454 Calories from Fat 225
% Daily Value*
Fat 25g38%
Saturated Fat 14g88%
Cholesterol 47mg16%
Sodium 308mg13%
Potassium 219mg6%
Carbohydrates 52g17%
Fiber 2g8%
Sugar 31g34%
Protein 4g8%
Vitamin A 385IU8%
Calcium 51mg5%
Iron 2.8mg16%
* Percent Daily Values are based on a 2000 calorie diet.

Here’s one more to pin on your Pinterest boards!Make a delicious, GIANT chocolate chip cookie pizza as a sweet, unique gift for a birthday or other occasion! Recipe serves 12!


Save

Save

Save

Save

Save

Save

Save

Save

Save

Save

Save

Save

Save

Save

Save

Save

Save