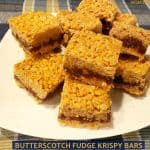
Butterscotch Fudge Krispy Bars are a yummy treat, with crunchy layers of puffed rice cereal, butterscotch chips, peanut butter and chocolate!

If you’re on the lookout for a great tasting dessert bar or snack, I would love to recommend to you these butterscotch fudge krispy bars! I first tried them over 25 years ago when my sweet friend Dawn made a batch and shared them with our family. After my first bite I was hooked! They are absolutely delicious (and addicting, I might add).
I finally got around to making and photographing these yummy bars again, to share her fantastic recipe on my blog. So I whipped up a batch, and “forced” myself to enjoy several of them… you know for “quality control”! Luckily for us (and our waistlines), our oldest son had evacuated to our home as a precaution during the recent Oregon wildfires, so he definitely helped gobble them up, too!
They are ALWAYS a huge hit, and I am happy to be sharing my friend’s easy recipe today. Here’s how to make ’em:
Scroll Down For A Printable Recipe Card At The Bottom Of The Page.
How To Make Butterscotch Fudge Krispy Bars
In a large saucepan, cook butterscotch chips and peanut butter on LOW heat only until melted, stirring continually. Remove the pan from the heat. Pour in the crisped rice cereal immediately. 

Stir well, to combine the ingredients. The mixture will be THICK. Just keep stirring until all the rice cereal is coated. While the mixture is still warm, divide it in half. Press HALF of the mixture into a well buttered or greased dish (use 8×8 dish if making as written, or a 9×13 dish for a double batch). Keep the other reserved half of this mixture in the saucepan, at room temp.
Use the back of a spoon to firmly press the mixture down into the pan to form a solid, dense layer. Set the pan with the krispy layer into the freezer to chill and solidify while you make the chocolate fudge layer.


Make The Chocolate Fudge Layer
Now it’s time to make the middle chocolate fudge layer. Use a double boiler for this step. No double boiler? Do this: Place a small pan with the chocolate chips on top of a larger pan (half full of gently boiling water) on the stove. The small pan will “rest” on top of the lightly boiling water of the larger pan. Be careful not to let any water from the bottom pan get into the chocolate chips or they will “seize up” (not good).
Stir the chocolate chips until they have fully melted, then remove the pan from the heat. Once the melted chocolate is off the heat, quickly stir in powdered sugar, butter and then water. Stir well, to melt the butter, and continue stirring until smooth.


Layer Fudge Filling And Then Butterscotch Krispy Mixture
Remove the dish with the krispy layer from the freezer, and immediately spread the chocolate fudge over the top. Use the back of a spoon, knife, or offset spatula to evenly spread the chocolate to fully cover the bottom layer.
Now take the reserved butterscotch krispy mixture, and carefully spread it over the fudge layer, fully covering the chocolate layer. Press this layer together to form a firm top layer. Now you have three distinct layers of butterscotch fudge krispy bars! Place the bars into a refrigerator to chill, until firm (about 30 minutes or so).


Time To Eat Some Butterscotch Fudge Krispy Bars!
Once the butterscotch fudge kripsy bars are fully chilled and firm, they can be cut into portions for serving. Crunchy, sweet, and flavored with chocolate, butterscotch and peanut butter, you’re gonna love them, and might regret not making a DOUBLE BATCH!!
This is such a yummy dessert (or snack). It’s truly hard to not devour them all! The bars hold their shape really well, and have amazing flavor! Store any leftovers, covered, at room temperature. They do not have to be refrigerated after they have been cut, and will stay wonderfully delicious for days!


I sure hope you will have the opportunity to make this dessert. I can’t say enough good things about these treats… they are an all around family favorite! Thank you for stopping by my blog today, and I trust God will bless you and those you love.
Looking For More Bar Cookie Recipes?
You can find all of my bar cookie recipes (and other desserts) in the Recipe Index, which is located at the top of the page. I have quite a few, including:
Don’t Miss A Recipe!
Thank you for visiting this website. I appreciate you using some of your valuable time to do so. If you’re interested, I publish a newsletter 2 times per month (1st and 15th) with all the latest recipes, and other fun info. I would be honored to have you join our growing list of subscribers, so you never miss a great recipe!
There is a Newsletter subscription box on the top right side (or bottom) of each blog post, depending on the device you use, where you can easily submit your e-mail address (only) to be included in my mailing list.
You Can Also Find Me On Social Media:
Facebook page: The Grateful Girl Cooks!
Pinterest: The Grateful Girl Cooks!
Instagram: jbatthegratefulgirlcooks

Original recipe source: my friend Dawn Lindquist
Butterscotch Fudge Krispy Bars are a yummy treat, with crunchy layers of puffed rice cereal, butterscotch chips, peanut butter and chocolate!
- 6 ounces butterscotch chips
- ½ cup creamy peanut butter
- 4 cups puffed rice cereal , (i.e.) Rice Krispies
- 6 ounces semi-sweet chocolate chips
- ½ cup powdered sugar
- 2 Tablespoons butter, softened
- 1 Tablespoon water
Layer #1-Butterscotch Krispy- In large saucepan, cook butterscotch chips and peanut butter on LOW heat until melted, stirring often. Remove pan from heat; add crisped rice cereal. Stir well, to combine until all cereal is coated. While warm, divide mixture in half. Press HALF of the mixture into a well buttered or greased dish, (setting aside other half of mixture in saucepan for later-Layer #3). Firmly press mixture down into dish to form solid layer. Set dish in freezer to chill/solidify.
Layer #2 Chocolate- Use double boiler OR place small pan with chocolate chips on top of larger pan (half full of gently boiling water) on stove. Small pan will "rest" on top of hot water in larger pan. Don't let water from the bottom pan get into chocolate chips. Stir chocolate until melted; remove pan from heat. Immediately stir in powdered sugar, butter and water, stirring until smooth. Remove dish with krispy layer from freezer; spread chocolate on top to fully cover.
Layer #3 Reserved Krispy Mixture- Take reserved butterscotch krispy mixture; spread it out to cover chocolate. Press krispy mixture together to form firm top layer. Chill bars in refrigerator until very firm (approx. 30 minutes).
Serve- Cut chilled bars into 16 servings (or 32, if doubling recipe), serve, and enjoy. Store leftovers (covered) at room temp.
Here’s one more to pin on your Pinterest boards!