White chocolate raspberry scones are delicious, easy to make treats, filled with white chocolate chips and raspberries, and topped with a sweet glaze.
It’s definitely a day for decadent White Chocolate Raspberry Scones and humongous cups of coffee. I’m sitting in my home office looking out at a forest filled with snow, and it has begun snowing again.
We are on Day 3 of what Portland locals call “Snowpacalypse 2014”. Tonight we are expecting a coating of ice on top of it all. Yippee.
My husband and I both have been sick (we’re on Day 4-ugh), so we’re content to be house-bound and off the slippery streets. However, there’s only so much napping and taking medicine that one girl can take, so off to the kitchen I went yesterday to find something to bake.
I ended up trying a new recipe for white chocolate raspberry scones. I mean- if you’re going to be sick and snowbound…make sure you have treats, right?
Yay For New Scone Recipes!
I found the original recipe on Pinterest, tweaked it a tiny bit, and voila! A new, tasty recipe for a delicious scone! I had raspberries in my freezer I picked this past summer and had a bag of white chocolate chips left over from Christmas baking. How convenient…it must be DESTINY!
The recipe was very easy, although my kitchen work surface did look like a murder scene (blasted raspberries) when I was done, but no big deal!
It just made it a bit more exciting! Hope you enjoy these tasty white chocolate raspberry scones! Here’s how to make them.
Scroll Down For A Printable Recipe Card At The Bottom Of The Page
How To Make White Chocolate Raspberry Scones
Cut the butter into the flour. I use a food processor to do this simple step, but you can also use a pastry blender by hand. When done, the butter should be about the size of peas.

Add the white chocolate chips and raspberries to the scone dough. Can you tell my raspberries were still frozen?

A Murder Scene? No- Just Scone Dough!
The top of the white chocolate raspberry scones dough looks like a murder scene. Ha Ha! Roll the scone dough out into a circle, then slice the dough into 8 pie-shaped wedges.
I use a pizza cutter to cut the dough into wedges because it cuts so easily through the dough, but a large sharp knife will also do the trick.

Bake The White Chocolate Raspberry Scones
Bake the scones at 350°F. for 25-30 minutes (mine were ready at the 25-minute mark-keep an eye on them). Bake until they are set and golden brown.
If you insert a toothpick into the top of a scone, it should come out batter-free. Remove the baking sheet from the oven and transfer it to a wire rack.

Make The Glaze/Icing
Make the glaze while the scones cool. Do this by stirring powdered sugar, vanilla and warm water together until the icing is smooth and lump-free.

Once the scones have completely cooled, drizzle the glaze over them! TIP: Place some foil or wax paper UNDER the wire rack to catch any drips while drizzling icing over the scones.
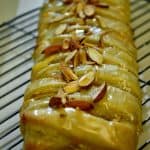
After the glaze on each one of the scones firms up, they are ready to be served and eaten!
Serve The Scones
These scones look pretty good, and wow- do they ever taste good, too! Pretty sure you will really enjoy this decadent treat! Now it’s time to eat one of these delicious scones!

Hope you enjoy these delicious white chocolate raspberry scones. We sure did, even while sick, and snowed in! They are so good!
Thank you for stopping by, and I invite you to come back again soon for more family-friendly recipes. Take care, may God bless you, and have a wonderful day.
Looking For More SCONE Recipes?
You can find ALL of my recipes in the Recipe Index, which is located at the top of the page. I have LOTS of yummy scone recipes (some shown below) to choose from, including:
- Cinnamon Chip Scones
- Cranberry Pistachio Scones
- Lemon Cream Scones
- Chocolate Chip Orange Scones
- Cranberry Orange Scones

Want More Recipes? Get My FREE Newsletter!
I publish a newsletter 2 times per month (1st and 15th) with lots of recipes, tips, etc.
Would you like to join our growing list of subscribers?
There is a Newsletter subscription box on the top right (or bottom) of each blog post, depending on the device you use.
You can submit your e-mail address there, to be added to my mailing list.
Find Me On Social Media:
Facebook page: The Grateful Girl Cooks!
Pinterest: The Grateful Girl Cooks!
Instagram: jbatthegratefulgirlcooks

↓↓ PRINTABLE RECIPE BELOW ↓↓

White chocolate raspberry scones are delicious, easy to make treats, filled with white chocolate chips and raspberries, and topped with a sweet glaze.
- 2 cups all-purpose flour
- 2 Tablespoons granulated sugar
- 1 Tablespoon baking powder
- 1/2 teaspoon salt
- 6 Tablespoons cold butter , cut into pieces
- 6 oz. raspberries (fresh or frozen will work-I mixed mine in while still frozen)
- 1/2 cup white chocolate chips
- 1 large egg
- 1 teaspoon vanilla extract
- 1/3 cup milk (or heavy cream-I used milk)
- 1 1/2 cups confectioner's sugar (powdered)
- 1/4 teaspoon vanilla extract
- 3-4 teaspoons warm water (to get glaze to correct "painting" consistency)
- 1/2 cup white chocolate chips + 1 teaspoon vegetable shortening- melted (microwave 30 seconds, stir, microwave 20 seconds stir.-don't let them burn!)
- Preheat oven to 350 degrees. Spray a baking sheet with non-stick spray.
- In the bowl of a food processor (or in a large bowl if making them by hand), combine all of the dry ingredients. Add the cold chunks of butter to the processor and pulse to cut in butter (or cut in by hand with a pastry cutter).
- In a separate bowl, mix the egg, milk (or heavy cream), and the vanilla; Mix these ingredients together, till well blended.
- Add the egg mixture to the dry ingredients and pulse till the dough comes together into a dough ball (If mixing by hand, stir and stir till you have a cohesive dough ball).
- Turn the dough ball onto a floured work surface (or into a large bowl) and GENTLY mix in the white chocolate chips and the raspberries by hand (might want to flour your hands) till blended. Note: Don't worry if it looks like a murder occurred at this point...it will all be okay. Really.
- With floured hands (sprinkle a bit more flour on dough if necessary, cause the dough is sticky), gently form the dough ball into a round "disc" approximately 8 inches across.
- Using a sharp knife or a pizza cutter (my weapon of choice!), cut the disc into 8 scones.
Gently pick up each scone and re-arrange them in a circle on the prepared baking sheet, with a bit of space between each one.
Bake the scones at 350 degrees for 25-30 minutes (mine were ready at the 25 minute mark-just keep an eye on them). Bake till golden brown.
- When done, remove from baking sheet to a wire rack, with parchment or foil underneath (to catch any drips from glaze icing). Let cool.
- While cooling, mix up the glaze ingredients. Once scones are completely cooled off, "paint" the icing over the tops of the scones, completely covering the surface; when that glaze hardens add the white chocolate drizzle in a decorative pattern. ENJOY!
Here’s one more to pin on your Pinterest boards!


, with cinnamon spiced and powdered sugar glazes! / The Grateful Girl Cooks!")


, with cinnamon spiced and powdered sugar glazes! / The Grateful Girl Cooks!")


