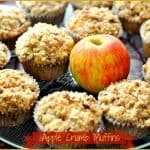
Category: Breads

Cinnamon Raisin Bread

Delicious Cinnamon Raisin Bread can be made by hand, or in a bread machine. A delicious loaf that tastes wonderful toasted or used for French toast!Delicious Cinnamon Raisin Bread can be made by hand, or in a bread machine. A delicious loaf that tastes wonderful toasted or used for French toast!

Does anyone out there love the smell of a fresh baked loaf of bread? I know I sure do. Well, how about a recipe for Cinnamon Raisin Bread… that extra burst of cinnamon flavor and chewy raisins, makes this a homemade bread loaf I’m pretty sure you will love!

I really enjoy baking bread, using a handy dandy bread machine that I received as a gift several years ago. It’s a real time saver for me to be able to dump the ingredients into the machine, turn it on, and walk away. I can come back a few hours later to a wonderful hot loaf of bread. Best part? The smell of that cinnamon raisin bread baking… don’t even get me started.

Scroll Down For A Printable Recipe Card At The Bottom Of The Page

Do I Have To Have A Bread Machine To Make This Cinnamon Raisin Bread?

NOPE! The good news here is that you DON’T have to own a bread machine to make this delicious loaf of cinnamon raisin bread. Aren’t you glad? You can make it all by hand (with a little help from a dough hook on a stand mixer or your own brute strength!)

This simple recipe transforms into a delicious soft cinnamon-raisin filled bread that is wonderful toasted or even used to make French Toast (my preferred way – oh yes…so good!).

Yes, it’s so easy, even our family monster “BIFF” can make it!

As you can see from this picture (below), our family monster, named BIFF, helped me make this loaf of cinnamon raisin bread. BIFF (in all his hideousness), makes random practical joke appearances throughout the year in our home. My dislike for Biff knows no limits… he creeps me out!

My practical joker husband once stuck scary BIFF into a huge Christmas wreath hanging over our fireplace in the living room. I hosted an entire cookie exchange party for 20 women in our home one evening BEFORE ever noticing it was hanging there, right by our Christmas tree… ugh!

At least this time BIFF didn’t surprise me in the refrigerator, our bed, my office chair or in our pantry, as he has previously! I have my sneaky, evil husband to thank for the heart attack it almost gave me, finding him there! Most people would hate this as much as me, right? Sigh.

Biff, our scary family FIEND, holding a loaf of cinnamon raisin bread.
Biff, our family FIEND, has been busy baking bread!

Soooo… BIFF and I hope you will enjoy this delicious recipe for Cinnamon Raisin Bread…it’s a keeper! Try making French toast with this bread. Thanks for stopping by today, and I hope you come back soon for more family-friendly recipes. Have a GREAT day.

Looking For More BAKED BREAD Recipes?

You can find all of my recipes in the Recipe Index, located at the top of the page. A few favorite baked bread recipes include:

Interested In More Recipes?

Thank you for visiting this website. I appreciate you using some of your valuable time to do soIf you’re interested, I publish a newsletter 2 times per month (1st and 15th) with all the latest recipes, and other fun info. I would be honored to have you join our growing list of subscribers, so you never miss a great recipe! 

There is a Newsletter subscription box on the top right side (or bottom) of each blog post, depending on the device you use, where you can easily submit your e-mail address (only) to be included in my mailing list.

You Can Also Find Me On Social Media:

Facebook page: The Grateful Girl Cooks!
Pinterest:
The Grateful Girl Cooks!
Instagram:
jbatthegratefulgirlcooks

Author's signature

Recipe Adapted From: http://www.momontimeout.com/2013/02/simply-divine-cinnamon-swirl-bread/

↓↓ PRINTABLE RECIPE BELOW ↓↓

0 from 0 votes
Cinnamon Raisin Bread
Prep Time
3 hrs 30 mins
Cook Time
30 mins
Total Time
4 hrs
 
Delicious Cinnamon Raisin Bread can be made by hand, or in a bread machine. A delicious loaf that tastes wonderful toasted or used for French toast!
Category: Bread
Cuisine: American
Keyword: cinnamon raisin bread
Servings: 10 slices (1 large loaf)
Calories Per Serving: 110 kcal
Author: JB @ The Grateful Girl Cooks!
Ingredients
  • 3/4 cup warm water
  • 2 1/4 teaspoons (1 packet) active dry yeast
  • 1/2 cup milk , warmed slightly
  • 3 1/2 Tablespoons butter , melted
  • 1 egg (at room temperature!)
  • 4 - 4 1/2 cups all-purpose flour
  • 1 3/4 teaspoons cinnamon
  • 1 teaspoon salt
  • 1/4 cup granulated sugar
  • 3/4 cup raisins
  • non-stick baking spray
Instructions
  1. In a small bowl, place the warm (not hot) water. Sprinkle the yeast over the top of the water. Let this stand for about 5 minutes. Bubbles should appear in the water (this lets you know the yeast is active)
  2. In a medium sized bowl, beat the milk, sugar, butter and room temp egg together.
  3. Add the yeast mixture to this.
  4. In a separate medium sized mixing bowl, place the flour, salt and cinnamon. Whisk to combine. Add 2 cups of flour mixture to the yeast and milk mixture. Beat until the batter is smooth.
  5. Add the remaining flour, mixture (a little at a time).
  6. Switch to a dough hook on a stand mixer and beat for an additional 5 minutes OR continue kneading the dough by hand for 5 minutes.
  7. Shape the dough into a smooth ball and place it in a large bowl that has been sprayed lightly with non-stick spray. Cover with a tea towel and let the dough rise for 1 1/2 hours or until doubled in size.
  8. Once doubled in size, punch down dough; ADD RAISINS, then knead it several times on a lightly floured work surface to fully combine raisins into the dough.
  9. Roll the dough out into a 9x15 inch rectangle. Starting with the narrow end, roll up the dough tightly. Pinch the edges together, to seal.
  10. Tuck the ends of the loaf under slightly, and carefully place the loaf into a 9x5 inch loaf pan that has been lightly sprayed with non-stick spray.
  11. Cover the dough with a tea towel, set in a warm place and let dough rise for an hour.
  12. Preheat oven to 350 degrees. Bake the bread for 30 minutes, or until the loaf is golden brown.
  13. Remove bread pan to a wire rack to cool. Let cool slightly before removing bread from pan. Enjoy!
Nutrition Facts
Cinnamon Raisin Bread
Amount Per Serving (1 slice)
Calories 110 Calories from Fat 45
% Daily Value*
Fat 5g8%
Saturated Fat 2g13%
Cholesterol 28mg9%
Sodium 283mg12%
Potassium 137mg4%
Carbohydrates 15g5%
Fiber 1g4%
Sugar 5g6%
Protein 2g4%
Vitamin A 165IU3%
Vitamin C 0.6mg1%
Calcium 24mg2%
Iron 0.5mg3%
* Percent Daily Values are based on a 2000 calorie diet.

Here’s one more to pin on your Pinterest boards!Delicious Cinnamon Raisin Bread can be made by hand, or in a bread machine. A delicious loaf that tastes wonderful toasted or used for French toast!


Save

Save

Carrot Zucchini Bread

Carrot Zucchini Bread is a wonderful tasting loaf of sweet bread, topped with a cream cheese and pecan frosting! This easy to make recipe yields two loaves!Carrot Zucchini Bread is a wonderful tasting loaf of sweet bread, topped with a cream cheese and pecan frosting! This easy to make recipe yields two loaves!

What do you get if carrot cake gets married to zucchini bread? This! Carrot Zucchini Bread. I found this recipe online and decided to try it and use up some of the frozen, grated zucchini hanging out in my freezer, leftover from our garden surplus. It was a great find.

I made this bread yesterday…the flavor combo of the zucchini, carrots, brown sugar and cinnamon is a winning one, for sure! Then to top it all off (quite literally!), the cream cheese pecan frosting is fantastic!

Scroll Down For A Printable Recipe Card At The Bottom Of The Page

Carrot Zucchini Bread Is Incredibly EASY To Make!

The batter for the carrot zucchini bread is easy to mix together. REALLY easy! 

Batter is mixed and ready, in bowl.

Divide the batter and add to floured loaf pans, then into the oven it goes to bake!

Carrot zucchini bread batter in loaf pan, ready to bake!

Here is the carrot zucchini bread, fresh from the oven, and cooling on a wire rack before frosting.

Carrot zucchini bread, baked and cooling on a wire rack.

Easy To Make Cream Cheese Frosting For Carrot Zucchini Bread

The cream cheese and pecan frosting is super easy to make, and goes PERFECTLY with this delicious bread. Wait until the loaves are completely cooled to room temperature before frosting.

Cream cheese and pecan frosting, for carrot zucchini bread.

Here is a finished, frosted loaf of carrot zucchini bread. I garnished it with a few tiny strips of dehydrated carrots, just for fun!

This loaf of carrot zucchini bread is frosted and ready to serve!

Ready To Slice And Enjoy

The bread is moist, and filled with FLAVOR!  LOOK – I cut a slice just for YOU!

A slice of carrot zucchini bread on a plate, with loaf in background.

The bread was easy to prepare, and very tasty! I had a slice this morning with my coffee. Delicious! I really think you and your family will LOVE this loaf of bread!

Once slice of carrot zucchini bread, on a plate.
The recipe, as written makes 2 loaves of carrot zucchini bread, and is easily cut in half in case you only want to make one loaf, so it’s a win-win!  You can also make two loaves, eat one, and share another with a friend, neighbor, or family member! Hope you will give this yummy bread a try…and hope you enjoy it as much as we did! Have a great day, and come back soon.

You can find ALL of my recipes in the Recipe Index, located at the top of the page. You might also enjoy my recipes for banana bread, apple cinnamon, pumpkin, or cinnamon raisin bread.

Interested In More Recipes?

Thank you for visiting this website. I appreciate you using some of your valuable time to do soIf you’re interested, I publish a newsletter 2 times per month (1st and 15th) with all the latest recipes, and other fun info. I would be honored to have you join our growing list of subscribers, so you never miss a great recipe!
There is a Newsletter subscription box on the top right side (or bottom) of each blog post, depending on the device you use, where you can easily submit your e-mail address (only) to be included in my mailing list.

You Can Also Find Me On Social Media:
Facebook page: The Grateful Girl Cooks!
Pinterest: The Grateful Girl Cooks!
Instagram: jbatthegratefulgirlcooks

Author's signatureRecipe Adapted From: http://www.howtoinstructions.us/carrot-zucchini-bread/#.U5MvNCi4mSq

↓↓ PRINTABLE RECIPE BELOW ↓↓

0 from 0 votes
Carrot Zucchini Bread
Prep Time
15 mins
Cook Time
50 mins
Total Time
1 hr 5 mins
 
Carrot Zucchini Bread is a wonderful tasting loaf of sweet bread, topped with a cream cheese and pecan frosting! This easy to make recipe yields two loaves!
Category: Bread/Breakfast
Cuisine: American
Keyword: carrot zucchini bread
Servings: 16 slices
Calories Per Serving: 407 kcal
Author: JB @ The Grateful Girl Cooks!
Ingredients
For bread:
  • 3 cups all purpose flour
  • 1 1/2 teaspoons baking powder
  • 3/4 teaspoon baking soda
  • 3/4 teaspoon salt
  • 1 3/4 teaspoons ground cinnamon
  • 1/4 teaspoon ground nutmeg
  • 3/4 cup granulated sugar
  • 3/4 cup packed brown sugar
  • 1/2 cup vegetable (or canola) oil
  • 6 Tablespoons unsweetened applesauce
  • 3 large eggs
  • 1 1/2 teaspoons vanilla extract
  • 1 1/2 cups finely shredded , peeled carrots (about 3 medium carrots)
  • 1 1/2 cups finely grated , shredded zucchini (and drained well, if using frozen)
For frosting:
  • 6 Tablespoons butter , softened
  • 5 oz. cream cheese , softened
  • 2 1/2 cups powdered sugar
  • 1/2 teaspoon vanilla extract
  • 1/2 cup chopped pecans (or walnuts, if desired)
Instructions
  1. Preheat oven to 350 degrees. While oven is preheating, coat 2 8x4 inch loaf pans with non stick baking spray, then lightly flour pans.
  2. In a large mixing bowl, whisk the flour, baking powder, baking soda, salt, cinnamon, and nutmeg together. Set aside.
  3. In another large mixing bowl place the granulated and brown sugars; whisk these until combined.
  4. Add the vegetable oil, applesauce, eggs, and vanilla to the sugar mixture; mix until well incorporated.
  5. Stir the shredded carrots and zucchini into this mixture.
  6. Add the flour mixture to the carrot zucchini mixing bowl all at once. Stir this only until combined.
  7. Divide the bread batter into the two loaf pans.
  8. Place loaf pans in oven. Bake at 350 degrees for 35 minutes, then without removing loaves from oven, quickly place a piece of aluminum foil over the top of each pan (to prevent too much browning), then continue baking the bread for an additional 15-20 minutes longer.
  9. Remove bread from oven when toothpick inserted in middle of loaves comes out clean.
  10. Allow the bread to cool in the loaf pan for another 5-10 minutes, then invert it onto a wire rack and let it finish cooling.
  11. While bread is cooling, make the cream cheese frosting: Using a hand mixer, whip the butter and cream cheese together in a medium sized mixing bowl. When smooth and fluffy, add the powdered sugar and the vanilla. Beat this mixture on medium high speed for 2-3 minutes, until it is light and fluffy.
  12. Frost cooled loaf with the cream cheese frosting, then top with chopped pecans. (I just added the pecans to the frosting, by the way...no big deal).
Recipe Notes

Recipe is easily halved. (just use 2 eggs instead of 1 1/2).

Nutrition Facts
Carrot Zucchini Bread
Amount Per Serving (1 slice)
Calories 407 Calories from Fat 153
% Daily Value*
Fat 17g26%
Saturated Fat 10g63%
Cholesterol 51mg17%
Sodium 251mg11%
Potassium 187mg5%
Carbohydrates 59g20%
Fiber 1g4%
Sugar 39g43%
Protein 4g8%
Vitamin A 2325IU47%
Vitamin C 2.8mg3%
Calcium 53mg5%
Iron 1.6mg9%
* Percent Daily Values are based on a 2000 calorie diet.

Here’s one more to pin on your Pinterest boards!Carrot Zucchini Bread is a wonderful tasting loaf of sweet bread, topped with a cream cheese and pecan frosting! This easy to make recipe yields two loaves!


Save

Mom’s Banana Nut Bread

Make Mom’s banana nut bread with pecans or walnuts. This easy, classic loaf is delicious, and makes 1 large loaf, or 3 small mini-loaves!
Make Mom's banana nut bread with pecans or walnuts. This easy, classic loaf is delicious, and makes 1 large loaf, or 3 small mini-loaves!
It seems like everyone has a recipe for banana bread. So do I… and it’s a recipe for my Mom’s Banana Nut Bread. I’ve made it for years using this recipe for over 35 years and it never disappoints! 

The 3×5 index card it is written on wins the award for most splatters! This recipe has been made too many times over the years to even count.

Whether it’s making one large loaf of banana nut bread, or splitting the batter up to make 3 small loaves, this is a very good, reliable recipe for classic banana nut bread.

Scroll Down For A Printable Recipe Card At The Bottom Of The Page

It’s Fun To Make Mini-Loaves Of Banana Nut Bread For Holiday Gifts

Sometimes at Christmas I make 9 small loaves at a time, for gifts to our neighbors. It then feels rather like a banana bread factory in my kitchen (but it sure smells good the day I make the loaves).

Mini-loaves of Mom's banana nut bread, ready to give as gifts!

For me, it’s always been about the over ripe bananas cluttering up the kitchen counter. That, alone is enough motivation to whip up a loaf or loaves of banana nut bread!

After all, over-ripe bananas are the “perfect” candidate for morphing into a tasty loaf of bread, right? Anyways, this is a very simple, straightforward recipe. It’s easy to make, and delicious to eat!

Remember to reduce the baking time if you will be making the smaller loaves. The instructions are for one standard sized (9×5) loaf. Hope you enjoy this tasty bread as much as we do!

An inside look at a loaf of Mom's banana bread.
Hope you enjoy this banana bread. It’s especially good, eaten warm with softened butter. If you really enjoy banana bread, be sure to check out another recipe on my blog for Banana Apricot Date Bread. YUM!

Thank you for stopping by today, and I invite you to come back soon for more family-friendly recipes. Take care, may God bless you, and have a GREAT day!

Looking For More “SWEET” BREAD Recipes?

You can find all of my bread recipes in the Recipe Index, located at the top of the page. A few favorites you might enjoy include:

Want More Recipes? Get My FREE Newsletter!

I publish a newsletter 2 times per month (1st and 15th) with lots of recipes, tips, etc..
Would you like to join our growing list of subscribers?

There is a Newsletter subscription box on the top right (or bottom) of each blog post, depending on the device you use.
You can submit your e-mail address there, to be added to my mailing list.

Find Me On Social Media:

Facebook page: The Grateful Girl Cooks!
Pinterest:
The Grateful Girl Cooks!
Instagram:
jbatthegratefulgirlcooks

Author's signature

Original Recipe Source: Unknown

↓↓ PRINTABLE RECIPE BELOW ↓↓

0 from 0 votes
Mom's Banana Nut Bread
Prep Time
10 mins
Cook Time
55 mins
Total Time
1 hr 5 mins
 

Make Mom's banana nut bread with pecans or walnuts. This easy, classic loaf is delicious, and makes 1 large loaf, or 3 small mini-loaves!

Category: Bread
Cuisine: American
Keyword: Mom's banana nut bread
Servings: 9 slices ( 1 lg. loaf or 3 small)
Calories Per Serving: 312 kcal
Author: JB @ The Grateful Girl Cooks!
Ingredients
  • 2 cups all purpose flour
  • 2 teaspoons baking powder
  • 1/2 teaspoon baking soda
  • 3/4 teaspoon salt
  • 1/2 cup granulated sugar
  • 1 cup walnuts or pecans , chopped
  • 1 large egg , beaten
  • 1/4 cup vegetable oil
  • 1 cup mashed very ripe bananas (approximately 2 medium sized bananas)
  • 1 Tablespoon fresh lemon juice
Instructions
  1. Sift the flour, baking powder, baking soda, salt and sugar together into a large mixing bowl. Add 3/4 cup of the chopped nuts to the dry ingredients.

  2. In a small bowl, combine the egg, vegetable oil, mashed up bananas, and lemon juice until well blended, then add to dry ingredients. Stir only until the flour is moistened and dry ingredients have been incorporated into batter.

  3. Pour batter into a greased/sprayed 9x5 inch loaf pan (or into 3 small prepared loaf pans). Sprinkle the remaining chopped nuts over the top of the loaf.

  4. Bake at 350 degrees for 55 minutes to 1 hour (large loaf) and approximately 35 minutes for small loaves. A toothpick inserted into middle of loaf should come out clean. Loaves should be golden brown on top. Enjoy!
Recipe Notes

Remember to bake for less time if making 3 small loaves!

Nutrition Facts
Mom's Banana Nut Bread
Amount Per Serving (1 slice (large loaf))
Calories 312 Calories from Fat 135
% Daily Value*
Fat 15g23%
Saturated Fat 5g31%
Cholesterol 18mg6%
Sodium 263mg11%
Potassium 277mg8%
Carbohydrates 40g13%
Fiber 2g8%
Sugar 14g16%
Protein 5g10%
Vitamin A 45IU1%
Vitamin C 3.1mg4%
Calcium 59mg6%
Iron 1.9mg11%
* Percent Daily Values are based on a 2000 calorie diet.

Here’s one more to pin on your Pinterest boards!Make Mom's banana nut bread with pecans or walnuts. This easy, classic loaf is delicious, and makes 1 large loaf, or 3 small mini-loaves!


Save

Save

Glazed Chocolate Doughnuts

These delicious glazed chocolate doughnuts are baked, not fried! Make fresh doughnuts from scratch in the comfort of your own home in under 20 minutes!These delicious glazed chocolate doughnuts are baked, not fried! Make fresh doughnuts from scratch in the comfort of your own home in under 20 minutes!

Who wants Glazed Chocolate Doughnuts? Me, Me, Me…Every now and then I can’t help myself…I want a doughnut! Now I know all about how “unhealthy” they are, but truth is, sometimes I just want a doughnut! The End. That’s why I enjoy making doughnuts from home. No need to run out in my pajamas to buy some. Nope… I can make them at home, fairly quickly!

I found a very simple and delicious chocolate doughnut recipe on Pinterest (where else?), thanks to Karly at Buns In My Oven, and made some of these doughnuts to stare at…I mean wolf down. These doughnuts were very dense with chocolate flavor and delicious.

Scroll Down For A Printable Recipe Card At The Bottom Of The Page

Making Doughnuts

In the past I have made doughnuts the “traditional way”, fried in oil. I made some delicious Glazed Pumpkin Buttermilk Doughnuts and Amish Apple Fritters (my second most-pinned recipe) using that method and they tasted amazing!

Collage of glazed pumpkin buttermilk doughnuts (L) and Amish apple fritters (R).

Baking Glazed Chocolate Doughnuts Instead Of Frying Them

Last year I bought an inexpensive doughnut pan on Amazon for about $7.50 (with a gift card I received for my birthday…SCORE!).

Pan used for baking glazed chocolate doughnuts.

The doughnut pan was not too expensive, but it gave me the option of BAKING doughnuts instead of FRYING them. Baking doughnuts is a very simple way to make this breakfast treat.

Doughnut batter is mixed, then poured into individual “wells” in a  doughnut pan. The doughnuts are then baked, and covered with icing once done! Baking glazed chocolate doughnuts instead of frying them is my way to enjoy a decadent treat occasionally! Cooking them in the oven helps to slightly reduce the number of calories in each doughnut!

Glazed chocolate doughnuts cooling on wire rack after being iced.
Another Benefit To Making Homemade Glazed Chocolate Doughnuts

Another added benefit to making the doughnuts at home is I saved money by making the glazed chocolate doughnuts myself! I was also quite proud I didn’t have to put on an evening gown and pumps to go to the doughnut shop or grocery store to buy them when the mood struck.

This recipe makes 10 glazed chocolate doughnuts, so I made them in 2 batches (since my doughnut pan only has 6 spots). I hope you will give these breakfast treats a try.  You can find all of my recipes in the Recipe Index, located at the top of the page. If you enjoy making BAKED doughnuts, you might also want to check out my recipe for Glazed Lemon Poppy Seed Doughnuts.

Interested In More Recipes?

Thank you for visiting this website. I appreciate you using some of your valuable time to do soIf you’re interested, I publish a newsletter 2 times per month (1st and 15th) with all the latest recipes, and other fun info. I would be honored to have you join our growing list of subscribers, so you never miss a great recipe!
There is a Newsletter subscription box on the top right side (or bottom) of each blog post, depending on the device you use, where you can easily submit your e-mail address (only) to be included in my mailing list.

You Can Also Find Me On Social Media:

Facebook page: The Grateful Girl Cooks!
Pinterest:
The Grateful Girl Cooks!
Instagram:
jbatthegratefulgirlcooks

Author's signatureRecipe Source: http://www.bunsinmyoven.com/2013/04/01/glazed-chocolate-donuts/

↓↓ PRINTABLE RECIPE BELOW ↓↓

0 from 0 votes
Glazed Chocolate Doughnuts
Prep Time
10 mins
Cook Time
8 mins
Total Time
18 mins
 
These delicious glazed chocolate doughnuts are baked, not fried! Make fresh doughnuts from scratch in the comfort of your own home in under 20 minutes!
Category: Breakfast
Cuisine: American
Keyword: glazed chocolate doughnuts
Servings: 10
Calories Per Serving: 255 kcal
Author: JB @ The Grateful Girl Cooks!
Ingredients
For the doughnuts:
  • 1 cup all purpose flour
  • 1/2 cup granulated sugar
  • 1/4 cup cocoa powder
  • 1/4 cup mini chocolate chips (Optional)
  • 1/2 teaspoon baking soda
  • 1/2 teaspoon vanilla extract
  • 1 egg
  • 6 Tablespoons sour cream
  • 1/4 cup milk
  • 1/4 cup vegetable oil
For the glaze:
  • 1 1/2 cups powdered sugar
  • 6 Tablespoons milk
  • 1 teaspoon vanilla extract
Instructions
  1. Preheat the oven to 375 degrees.
  2. Make the doughnuts: In a medium sized bowl, mix the flour, sugar, cocoa, chocolate chips, and baking soda together.
  3. In another bowl, beat the vanilla, egg, sour cream, milk, and oil until well incorporated. Add the wet ingredients to the bowl of dry ingredients. Stir only until combined.

  4. Spoon the batter (or pipe it) into a greased doughnut pan. Fill each "well" about 3/4 of the way full with batter. Bake doughnuts at 375 degrees for 8 minutes, or until the top of the doughnut springs back when touched.

  5. Remove doughnut pan from oven when done, and let the doughnuts cool IN THE PAN for 2-3 minutes before you remove them to wax paper. Repeat with another batch to finish batter. Let doughnuts cool before icing.

  6. Make The Glaze: Mix the powdered sugar, milk and vanilla in a small pan over low heat. Mix well to combine. Remove the pan from the heat. Pour glaze into a large bowl. Carefully hold a cooled doughnut and "dunk" it in the glaze to coat it; set glazed doughnut on a wire rack to let the glaze harden. Enjoy!

Nutrition Facts
Glazed Chocolate Doughnuts
Amount Per Serving (1 doughnut)
Calories 255 Calories from Fat 72
% Daily Value*
Fat 8g12%
Saturated Fat 6g38%
Cholesterol 21mg7%
Sodium 76mg3%
Potassium 87mg2%
Carbohydrates 43g14%
Fiber 1g4%
Sugar 31g34%
Protein 3g6%
Vitamin A 80IU2%
Calcium 40mg4%
Iron 1mg6%
* Percent Daily Values are based on a 2000 calorie diet.

Here’s one more to pin on your Pinterest boards!These delicious glazed chocolate doughnuts are baked, not fried! Make fresh doughnuts from scratch in the comfort of your own home in under 20 minutes!


Save

Save

Red Lobster Cheddar Biscuits

It’s EASY to make this yummy copycat version of the popular cheesy, buttery Red Lobster Cheddar Biscuits at home in under 30 minutes.It's EASY to make this yummy copycat version of the popular cheesy, buttery Red Lobster Cheddar Biscuits at home in under 30 minutes.
I love the warm cheddar biscuits that are served to you before a meal at a famous national restaurant .  I seriously think I could eat quite a few of these copycat Red Lobster Cheddar Biscuits, if push came to shove.

Truth: It would NOT take a lot of “shoving” to get me to eat lots of them! They give new meaning to the words “comfort food”… ha ha!

Did you know these cheddar biscuits are TOTALLY EASY to make at home?  Yes… from start to finger-licking finish, these warm and buttery biscuit bites of cheddar and garlic goodness can be on your table in about 30 minutes or less.

The cheddar biscuits are as simple to make as mixing up the dough, dropping them onto a baking sheet and baking them! Simple to make, and amazingly GOOD (bet you can’t eat just one)!

This recipe makes 10 of these delicious biscuits, so there will be plenty to go around. Here’s how to make them.

Scroll Down For A Printable Recipe Card At The Bottom Of The Page

How To Make Cheddar Biscuits

Preheat your oven to 450 degrees. In a medium bowl, stir the biscuit mix, garlic powder and cayenne pepper.

Biscuit mix and spices are combined in a mixing bowl.

Add grated cheese and milk to bowl; stir together until a soft dough forms.

Grated cheese and milk are added to the dry ingredients in the bowl.

TIP: For a well rounded biscuit, spoon the dough into a measuring cup, THEN transfer it to the baking sheet (see below). Measure about 1/4 cup of batter into measuring cup.

Batter is scooped into a 1/4 cup measuring cup.

Spoon the dough out onto a greased baking sheet  (or a baking sheet covered with parchment paper). 

Smooth the tops of the dough down a bit with the back of a spoon. This will help prevent hard points from forming on the top of the biscuits.

Dough for the Red Lobster Cheddar Biscuits is placed on baking sheet.

Bake The Cheddar Biscuits

Bake at 450 degrees for 8-10 minutes. The tops of the biscuits should be golden brown when done. While the biscuits are cooking in the oven, melt the butter in a small pan; stir in the garlic powder.

Once you remove the biscuits from the oven, brush the garlic butter on top of the biscuits using a pastry brush. Sprinkle the crushed parsley flakes on top to garnish. Serve biscuits hot…and ENJOY!

Garlic butter and parsley are added to Red Lobster Cheddar Biscuits after baking.

Hope you like them! They are a great addition to most meals, and guess what?  They’re WONDERFUL!  Have a fantastic day, friends.

Looking For More BREAD Recipes?

You can find all my recipes in the Recipe Index, located at the top of the page. I have quite a few bread recipes you’ll enjoy, including:

Want More Recipes? Get My FREE Newsletter!

I publish a newsletter 2 times per month (1st and 15th) with lots of recipes, tips, etc..
Would you like to join our growing list of subscribers?

There is a Newsletter subscription box on the top right (or bottom) of each blog post, depending on the device you use.
You can submit your e-mail address there, to be added to my mailing list.

Find Me On Social Media:

Facebook page: The Grateful Girl Cooks!
Pinterest:
The Grateful Girl Cooks!
Instagram:
jbatthegratefulgirlcooks

Author's signatureRecipe Adapted From: Ron Douglas, in the cookbook “America’s Most Wanted Recipes” (published 2009), page 186.

↓↓ PRINTABLE RECIPE BELOW ↓↓

0 from 0 votes
Red Lobster Cheddar Biscuits
Prep Time
10 mins
Cook Time
10 mins
Total Time
20 mins
 
It's EASY to make this yummy copycat version of the popular cheesy, buttery Red Lobster Cheddar Biscuits at home in under 30 minutes.
Category: Bread, Side Dish
Cuisine: American
Keyword: cheddar biscuits
Servings: 10 biscuits
Calories Per Serving: 174 kcal
Author: JB @ The Grateful Girl Cooks!
Ingredients
  • 2 cups biscuit mix (such as Bisquick)
  • teaspoons garlic powder
  • ¼ cayenne pepper
  • 1/2 cup shredded cheddar cheese
  • 2/3 cup milk
For topping:
  • 4 Tablespoons (1/2 cube) butter
  • 1/4 teaspoon garlic powder
  • Parsley flakes , for garnishing
Instructions
  1. Preheat oven to 450 degrees.
  2. In a medium bowl, stir the biscuit mix, garlic powder, cayenne pepper, grated cheese and milk together until a soft dough forms.
  3. Spoon the dough into 1/4 cup measuring cup, then onto a greased baking sheet (or parchment paper covered baking sheet). Smooth the tops of the dough down a bit with the back of a spoon. This will help prevent hard points from forming on top of the biscuits.
  4. Bake at 450 degrees for 8-10 minutes. The tops of the biscuits should be golden brown.
  5. While the biscuits are cooking in the oven, melt the butter in a small pan; stir in the garlic powder. Once you remove the biscuits from the oven, brush the butter on top, using a pastry brush. Sprinkle the crushed parsley flakes on top to garnish. Serve biscuits hot...and ENJOY!
Nutrition Facts
Red Lobster Cheddar Biscuits
Amount Per Serving (1 biscuit)
Calories 174 Calories from Fat 90
% Daily Value*
Fat 10g15%
Saturated Fat 5g31%
Cholesterol 19mg6%
Sodium 388mg17%
Potassium 73mg2%
Carbohydrates 16g5%
Sugar 3g3%
Protein 3g6%
Vitamin A 250IU5%
Calcium 105mg11%
Iron 0.7mg4%
* Percent Daily Values are based on a 2000 calorie diet.

Here’s one more to pin on your Pinterest boards!It's EASY to make this yummy copycat version of the popular cheesy, buttery Red Lobster Cheddar Biscuits at home in under 30 minutes.


Save

Save

Chocolate And Strawberry Napoleons

Chocolate Strawberry Napoleons are delicious layered desserts, with strawberries, creamy chocolate filling, puff pastry, and a chocolate drizzle. Chocolate Strawberry Napoleons are delicious layered desserts, with strawberries, creamy chocolate filling, puff pastry, and a chocolate drizzle.

A couple of years ago, my husband and I were having our sons and their girlfriends over for dinner. I was a bit stumped by what to serve for dessert, because I didn’t want to prepare the same old desserts I usually make. I ended up making Chocolate and Strawberry Napoleons!

This dessert was created, because I knew I wanted to try something different. My DEEP CONTEMPLATION of WHAT that could be lasted about 4 minutes. I decided to make something using puff pastry, and we ended up with… Chocolate and Strawberry Napoleons!

Several changes were made to a recipe I found on the box, tried to make it look “fancy pants”…and voila! A beautiful, classy looking dessert was made, that we all enjoyed! The recipe actually looks harder to make than it really is, and with only 7 or 8 ingredients, it’s not too expensive, either!   Here’s how to make this delicious dessert!

Scroll Down For A Printable Recipe Card At The Bottom Of The Page

Prepare Strawberries

In a small bowl, mix the sliced strawberries with granulated sugar and water. Stir until the sugar dissolves and ingredients are fully combined.

Set the strawberries aside, and let them sit for about 30 minutes, then drain off the juice. This process is called “macerating” the berries, and helps to sweeten them.

Fresh strawberries are mascerated in sugar and water for chocolate strawberry napoleons.

Make The Chocolate Filling

In a large mixing bowl, beat the heavy cream, confectioner’s sugar, cocoa powder and vanilla on high speed until soft peaks form. This “chocolate mousse” type mixture will become the filling for the chocolate strawberry napoleons! Cover and place in refrigerator, until ready to use.

Prepare The  Puff Pastry For Chocolate Strawberry Napoleons

Take the thawed pastry sheet and gently unfold it onto a lightly floured work surface. Cut the pastry (along the fold marks) into 3 strips. Now cut each of the strips into 4 rectangles.

NOTE: You will notice (in the photo below) that I FORGOT to cut the three strips of puff pastry into 4 rectangles each until AFTER I baked them.  TRUST ME – they are much easier to cut BEFORE you bake them and they get all nice and crispy!

Bake The Puff Pastry

Put the 12 pastry rectangles onto 2 baking sheets. Bake at 400 degrees for 10 minutes, or until the pastries turn golden brown. Remove pastries from oven and place on wire racks. Let these cool for about 10 minutes.

Once cooled, take a sharp knife and carefully split each pastry into 2 layers (horizontally, of course!). You should now have 24 pastry rectangles (you will use 3 for each serving). **See NOTE above, regarding photo below.

Baked puff pastry, ready to slice and fill for chocolate strawberry napoleons dessert.

Serving Chocolate Strawberry Napoleons

Place a bottom pastry layer onto each individual serving plate (8 total). Divide HALF of the chocolate filling between all 8 portions. Spoon chocolate filling, to cover (and kind of spill over sides).

Divide and spoon HALF of the strawberries over the chocolate filling on each portion. Top each dessert with another pastry layer. Repeat process with an additional layer of chocolate and strawberries for each dessert. Top each dessert off with another pastry rectangle (use an original “top” piece).

Dust the pastry and plate with sifted powdered sugar. Decoratively drizzle each portion with chocolate syrup (or melted and slightly cooled semi-sweet chocolate chips) and serve!

To serve, chocolate strawberry napoleons are dusted with powdered sugar and drizzled with chocolate.

Fresh strawberries, plus creamy chocolate filling, in between layers of flaky puff pastry, and drizzled with chocolate is so good. Yummm…what’s NOT to like?

Chocolate strawberry napoleons on plates, ready to serve to guests!

We REALLY enjoyed these chocolate strawberry napoleons for dessert! They are at their very best when served on the same day you made them!

Close up photo of a chocolate strawberry napoleon on a serving plate.

Sure hope you will give it a try. This easy to make dessert will be a treat for your guest’s eyes AND taste buds! Have a GREAT day!

Looking For More DESSERT Recipes?

You can find ALL my recipes in the Recipe Index, located at the top of the page. A few of our favorite dessert recipes include:

Interested In More Recipes?

Thank you for visiting this website. I appreciate you using some of your valuable time to do soIf you’re interested, I publish a newsletter 2 times per month (1st and 15th) with all the latest recipes, and other fun info. I would be honored to have you join our growing list of subscribers, so you never miss a great recipe!
There is a Newsletter subscription box on the top right side (or bottom) of each blog post, depending on the device you use, where you can easily submit your e-mail address (only) to be included in my mailing list.

You Can Also Find Me On Social Media:

Facebook page: The Grateful Girl Cooks!
Pinterest:
The Grateful Girl Cooks!
Instagram:
jbatthegratefulgirlcooks

Chocolate and Strawberry Napoleons

Recipe Adapted From: The back of the box of Pepperidge Farm Puff Pastry Sheets (☺)

↓↓ PRINTABLE RECIPE BELOW ↓↓

0 from 0 votes
Chocolate And Strawberry Napoleons
Prep Time
40 mins
Cook Time
10 mins
Total Time
50 mins
 
A delicious chocolate, strawberry, and cream-filled pastry sure to impress your guests!
Category: Desserts
Cuisine: American
Keyword: chocolate strawberry napoleons
Servings: 8
Calories Per Serving: 296 kcal
Author: JB @ The Grateful Girl Cooks!
Ingredients
  • 1 sheet Puff Pastry (1/2 of a 17.3 oz. box) , thawed
  • 1 cup heavy whipping cream (very cold)
  • 3 Tablespoons confectioner's (powdered) sugar
  • 1 teaspoon vanilla extract
  • 1/4 cup unsweetened cocoa powder
  • 2 cups fresh , sliced strawberries (do not use frozen for this recipe)
  • 1 Tablespoon granulated sugar
  • 1 teaspoon water
  • *Optional: Confectioner's Sugar and Chocolate Syrup (or melted and slightly cooled chocolate chips) for garnish (you know...to make it purdy!!!)
Instructions
  1. Preheat the oven to 400 degrees F.
  2. Prepare strawberries: In a small bowl, mix the sliced strawberries with the granulated sugar and the water. Stir until combined. Set aside and let them sit quietly for approx. 30 minutes, then drain off the juice. This process is called "mascerating" the berries. Set asdide , until ready to use.

  3. Prepare Chocolate Filling: In a large mixing bowl, beat the heavy cream, confectioner's sugar, cocoa powder and vanilla on high speed until soft peaks form. Cover and refrigerate, until ready to use.

  4. Take the thawed pastry sheet and gently unfold it onto a lightly floured work surface. Cut the pastry (along the fold marks) into 3 strips. Now cut each of the strips into 4 rectangles. Put the 12 pastry rectangles onto 2 baking sheets. Bake at 400 degrees for 10 minutes, or until the pastries turn golden brown. Remove pastries from oven and place on wire racks. Let these cool for about 10 minutes.

  5. Once cooled, take a sharp knife and carefully split each pastry into 2 layers (horizontally, of course!). You should now have 24 pastry rectangles (you will use 3 for each serving).

To Make The Napoleons:
  1. Place a bottom pastry layer onto each individual serving plate (8 total). Divide HALF of the chocolate filling between all 8 portions. Spoon chocolate filling, to cover (and kind of spill over sides).

  2. Divide and spoon HALF of the strawberries over the chocolate filling on each portion. Top each dessert with another pastry layer. Repeat process with an additional layer of chocolate and strawberries for each dessert. Top each dessert off with another pastry rectangle (use an original "top" piece).

To Garnish and Serve:
  1. Dust pastry and plate with sifted powdered sugar. Decoratively drizzle with chocolate syrup (or melted and slightly cooled semi-sweet chocolate chips-that's what I did) and serve! ENJOY!
Recipe Notes

Caloric calculation does not include optional chocolate and powdered sugar used to garnish finished dish.

Nutrition Facts
Chocolate And Strawberry Napoleons
Amount Per Serving (1 g)
Calories 296 Calories from Fat 207
% Daily Value*
Fat 23g35%
Saturated Fat 10g63%
Cholesterol 40mg13%
Sodium 88mg4%
Potassium 137mg4%
Carbohydrates 26g9%
Fiber 2g8%
Sugar 3g3%
Protein 3g6%
Vitamin A 435IU9%
Vitamin C 21.4mg26%
Calcium 32mg3%
Iron 1.3mg7%
* Percent Daily Values are based on a 2000 calorie diet.

Here’s one more to pin on your Pinterest boards!Chocolate Strawberry Napoleons are delicious layered desserts, with strawberries, creamy chocolate filling, puff pastry, and a chocolate drizzle.


Save

Honey Oat Bread

Honey Oat Bread is easy to make from scratch, without a bread machine! It’s a delicious loaf of bread topped with honey & oats- great for toast or sandwiches!Honey Oat Bread is easy to make from scratch, without a bread machine! It's a delicious loaf of bread topped with honey & oats- great for toast or sandwiches!
I tried a new homemade bread recipe… twice! Yes, this recipe for homemade Honey Oat Bread is THAT good, and you do not need a bread machine to make it from scratch! I found the recipe a couple of weeks ago, but have already made it twice…yum!

This honey oat bread was absolutely perfect! We ate it warm, straight from the oven with some butter, but we also enjoyed using it for toast and sandwiches. It has a great texture (light and fluffy-NOT dense), with just a tiny trace of sweetness (from the honey). My husband and I loved it, and know I will be making this honey oat bread often.

Hope you will give it a try…it’s really not that hard, but it sure is satisfying to smell the aroma of fresh, baked bread filling the house! It really is a wonderful homemade loaf of bread. I know you will love it! Here’s a few pics of the “process”:

Scroll Down For A Printable Recipe Card At The Bottom Of The Page

Making Honey Oat Bread

In the bowl of a stand mixer (or in a large bowl if making by hand), mix together the flour, oats, yeast and salt.

Oats, flour and other bread ingredients in metal mixing bowl

In a small separate bowl or pan, warm the milk so it’s hot enough to melt butter, but IS NOT boiling. Add the butter to the warm milk; stir it until melted.

Stir in the water and the honey. Mix well to combine them into the milk. Here’s a picture of when I added the honey to the melted butter.

Honey added to butter mixture in blue bowl

Beat the dough welll, using a stand mixer (or beaten very well by hand). Once dough is done (kneaded fully into a dough ball), place it in a large, lightly oiled bowl. Turn the dough over to make sure both sides are lightly coated.

Let The Dough Rise

Place a dish towel over the top of the bowl and set the honey oat bread dough aside in a warm place. Allow the dough to rise until doubled in size. This will take approx. 1/2 – 1 hour. Dough has been mixed, and is now rising.

Dough for honey oat bread is rising in glass bowl with dish towel on top

Once the dough has doubled in size, remove it from bowl and place dough on a clean, lightly floured work surface. Using your fingers, flatten the dough out into a 9×12 inch rectangle.

Honey oat bread dough is rolled into rectangle shape.

Form The Honey Oat Loaf

Tightly roll the dough (beginning from the long end) into a loaf shape. Tuck the ends of the loaf in. The honey oat bread dough is now rolled up into a loaf shape, and ready to go into a loaf pan.

Dough for honey oat bread is rolled into a loaf shape on cutting board

Layer a 9×5 inch bread pan with parchment paper, (First position one piece that goes width-wise and overlaps the top edges of the pan . See photo below- this will help you lift the bread from the pan when done. Put another piece of parchment paper on top of that which goes the length of the pan.

Carefully pick up the floppy loaf of dough and gently place it into the parchment-lined bread pan. Cover the bread pan with a dish towel and set in a warm place. Let the honey oat bread dough rise again until doubled in size (about an hour).

Honey Oat Bread dough is placed into loaf pan with parchment paper

Brush The Honey Oat Bread With Butter

When the dough has finished it’s second rise, brush the top of the loaf with the warmed honey. Completely brush the entire top of the loaf…gently!

Honey oat bread dough is brushed with honey.

Sprinkle oats over the entire top surface of the loaf of honey oat bread. Place the bread pan on the middle rack in the  preheated oven.

Rolled oats are sprinkled onto top of honey oat bread dough in loaf pan.

Bake The Bread

Bake the bread for 40-50 minutes, or until the bread is deep, golden brown.  Here is the honey oat bread, straight out of the oven, and out of the pan. Isn’t it gorgeous?

Honey Oat Bread, golden brown, cooling on wire rack.

Let the bread cool on a wire rack before slicing it! Here’s what the slices of the honey oat bread look like, once they have been cut. YUM!

Slices cut from honey oat bread on green plastic mat

Hope you will consider making this absolutely delicious homemade honey oat bread for yourself! You’re gonna LOVE it!

Looking For More Bread Baking Recipes?

You can find more bread recipes in the Recipe Index at the top of the page. You might enjoy some of my other bread recipes, including:

Interested In More Recipes?

Thank you for visiting this website. I appreciate you using some of your valuable time to do soIf you’re interested, I publish a newsletter 2 times per month (1st and 15th) with all the latest recipes, and other fun info. I would be honored to have you join our growing list of subscribers, so you never miss a great recipe!
There is a Newsletter subscription box on the top right side (or bottom) of each blog post, depending on the device you use, where you can easily submit your e-mail address (only) to be included in my mailing list.

You Can Also Find Me On Social Media:

Facebook page: The Grateful Girl Cooks!
Pinterest:
The Grateful Girl Cooks!
Instagram:
jbatthegratefulgirlcooks

Honey Oat Bread / The Grateful Girl Cooks!Recipe Source: Recipe Source:  http://bakingdom.com/2011/09/homemade-honey-oat-bread.html

0 from 0 votes
Honey Oat Bread
Prep Time
2 hrs
Cook Time
40 mins
Total Time
2 hrs 40 mins
 
Honey Oat Bread is easy to make from scratch, without a bread machine! It's a delicious loaf of bread topped with honey & oats- great for toast or sandwiches!
Category: Bread, Breakfast
Cuisine: American
Keyword: honey oat bread
Servings: 10 slices (1 loaf)
Calories Per Serving: 241 kcal
Author: JB @ The Grateful Girl Cooks!
Ingredients
For the bread:
  • 3 cups all-purpose flour
  • 3/4 cup oats (instant or old-fashioned will work-I used old-fashioned for my loaves)
  • 2 1/4 teaspoons. instant active yeast
  • 1 1/2 teaspoon salt
  • 1 cup milk (If you're vegan or dairy-free, use almond or soy milk-*Note* I have not tried this)
  • 1/4 cup lukewarm water
  • 2 Tablespoons unsalted butter (or margarine, if desired)
  • 1/4 cup honey (if vegan, use agave)
For bread topping:
  • 2 Tablespoons honey (or agave), warmed
  • 2 Tablespoons oats (uncooked)
Instructions
  1. In the bowl of a stand mixer (or in a large bowl if making by hand), mix together the flour, oats, yeast and salt.
  2. In a small separate bowl or pan, warm the milk so it's hot enough to melt butter, but IS NOT boiling. Add the butter to the warm milk; stir it until melted. Stir in the water and the honey. Mix well to combine.
  3. Pour the warm milk mixture into the flour mixture.
  4. Using the dough hook on your stand mixer, mix these ingredients until they come together to form a soft dough. Knead the dough in the mixer (still using the dough hook attachment) for approx. 10 minutes. If the dough is still really sticky after 5 minutes, then add in additional flour 1 TABLESPOON AT A TIME, mixing well after each addition until the dough is barely "tacky". (*NOTE: I found that I needed to add 5-6 additional TBSP of flour to get the right consistency...just be sure to only add one tablespoonful at a time. If by some chance you get the bread too dry, simply add 1 tsp. warm water at a time to remedy this).
  5. **If you are not using a stand mixture and are going to be kneading this by hand, just know that you will really have to keep your hands and work surface well-floured...dough will be VERY sticky at first).
  6. Once dough is "done", place it in a large, lightly oiled bowl. Turn the dough over to make sure both sides are lightly coated. Place a dish towel over the top of the bowl and set aside in a warm place. Allow the dough to rise until doubled in size (this will take approx. 1/2 - 1 hour).
  7. Once the dough has doubled in size, remove it from bowl and place dough on a clean, lightly floured work surface. Using your fingers, flatten the dough out into a 9x12 inch rectangle. Tightly roll the dough (beginning from the long end) into a loaf shape; tuck the ends of the loaf in.

  8. Layer a 9x5 inch bread pan with parchment paper (First position one piece that goes width-wise and overlaps the top edges of the pan (see photo on blog-this will help you lift the bread from the pan when done), then put one piece on top of that which is the length of the pan.
  9. Carefully pick up the floppy loaf of dough and gently place it into the parchment-lined bread pan. Cover the bread pan with a dish towel; let it rise again until doubled in size (about an hour).

  10. Toward the end of the rising time, preheat your oven to 350 degrees. While the oven is preheating, place an empty loaf pan (or casserole dish) on the bottom rack of the oven. In a small saucepan. bring 2 cups of water to a boil on your stove top.

  11. When the dough has finished it's second rise, brush the top of the loaf with the warmed honey. Completely brush the entire top of the loaf...gently! Sprinkle oats over the entire top surface of the loaf. Place the bread pan on the middle rack in the oven.

  12. Pour the boiling water into the empty pan on the bottom rack of the oven. Bake the bread for 40-50 minutes, or until the bread is deep, golden brown. (The internal temperature will be about 190 degrees, in case you're checking). Once done, carefully remove bread (and water pan) from oven. Let bread cool on a wire rack before slicing. Enjoy!

Nutrition Facts
Honey Oat Bread
Amount Per Serving (1 slice)
Calories 241 Calories from Fat 27
% Daily Value*
Fat 3g5%
Saturated Fat 1g6%
Cholesterol 7mg2%
Sodium 362mg16%
Potassium 132mg4%
Carbohydrates 46g15%
Fiber 2g8%
Sugar 11g12%
Protein 6g12%
Vitamin A 115IU2%
Calcium 38mg4%
Iron 2.1mg12%
* Percent Daily Values are based on a 2000 calorie diet.

Here’s one more to pin on your Pinterest boards!Honey Oat Bread is easy to make from scratch, without a bread machine! It's a delicious loaf of bread topped with honey & oats- great for toast or sandwiches!


Save

Save

Save

Blueberry Crumble Muffins

Blueberry crumble muffins are delicious breakfast treats, packed with blueberries (fresh or frozen) and a streusel topping! Perfect “on the go” breakfast!Blueberry crumble muffins are delicious breakfast treats, packed with blueberries (fresh or frozen) and a streusel topping! Perfect "on the go" breakfast!
I recently found this recipe for Blueberry Crumble Muffins on Pinterest, or as I love to call it…”My Online Recipe Box”. These muffins are absolutely FANTASTIC! Pass the coffee!

The recipe comes from Ashton, at “Something Swanky”, and I am grateful she shared her recipe with all of us. I made these delicious muffins a few days ago for breakfast for my husband and I, and am happy to report that they were delicious…and EASY…and did I mention delicious?

I’ve tried various blueberry muffin recipes over the years, some were good, some not so good. This one is GREAT! The recipe makes 12 muffins, which is practically enough to feed a small village, and they freeze well, so I wrapped half of them up really well and threw them in our freezer for another morning’s dining! I hope you will give this recipe a try. Mix them up and bake them when you have some extra time and enjoy them for days! Here’s a few pics from when I made them:

Scroll Down For A Printable Recipe Card At The Bottom Of The Page

Making Blueberry Crumble Muffins

The batter for the muffins is extremely simple to make. Seriously… it’s so very EASY!

Mixing up the batter for blueberry crumble muffins is EASY!

You can use fresh or frozen blueberries for this recipe. I used frozen berries (threw them into the muffin batter completely frozen) with no problem.

Frozen blueberries are added to muffin batter.

Divide the batter into muffin cups (in my beat up, but dearly loved muffin tin). I like to think of my grungy muffin tin as “well-used, and well-loved”.

Blueberry muffin batter is divided into paper muffin tin holders.

Get Ready For Baking

Add the crumble (streusel) topping to the top of each of the muffins before baking. Divide the topping evenly between the muffin cups.

A streusel crumble topping is added to top of blueberry muffin batter.

After the blueberry crumble muffins are done baking, let them cool on a wire rack for several minutes, then remove them from the pan.

Blueberry crumble muffins, right out of oven.

Time To Eat Some Blueberry Crumble Muffins

Here are the blueberry crumble muffins, right out of the oven, cooling on a wire rack. Let them cool down a bit before serving.

Blueberry crumble muffins, ready to eat.

Here’s a peek at the inside of one of the blueberry crumble muffins. Look at those blueberries! This yummy muffin is ready to eat!

See all the blueberries inside the blueberry crumble muffin?

Hope you will try making these delicious blueberry crumble muffins… they are so easy to make, and they really taste wonderful! Thanks for stopping by. Have a great day, and come back soon!

Looking For More MUFFIN Recipes?

You can find all of my recipes in the Recipe Index, located at the top of the page. I have lots of yummy muffin recipes you’re gonna love, including:

Interested In More Recipes?

Thank you for visiting this website. I appreciate you using some of your valuable time to do soIf you’re interested, I publish a newsletter 2 times per month (1st and 15th) with all the latest recipes, and other fun info. I would be honored to have you join our growing list of subscribers, so you never miss a great recipe!
There is a Newsletter subscription box on the top right side (or bottom) of each blog post, depending on the device you use, where you can easily submit your e-mail address (only) to be included in my mailing list.

You Can Also Find Me On Social Media:
Facebook page: The Grateful Girl Cooks!
Pinterest: The Grateful Girl Cooks!
Instagram: jbatthegratefulgirlcooks

Author's signatureRecipe Source: http://www.somethingswanky.com/blueberry-crumble-muffins/?utm_source=rss&utm_medium=rss&utm_campaign=blueberry-crumble-muffins

0 from 0 votes
Blueberry Crumble Muffins
Prep Time
15 mins
Cook Time
20 mins
Total Time
35 mins
 

Blueberry crumble muffins are delicious breakfast treats, packed with blueberries (fresh or frozen) and a streusel topping! Perfect "on the go" breakfast!

Category: Breakfast
Cuisine: American
Keyword: blueberry crumble muffins
Servings: 12 muffins
Calories Per Serving: 274 kcal
Author: JB @ The Grateful Girl Cooks!
Ingredients
For the muffin batter:
  • 3/4 cup milk
  • 1/4 cup vegetable oil
  • 1 large egg
  • 2 cups all-purpose flour
  • 1/2 cup granulated sugar
  • 2 teaspoon baking powder
  • 1/2 teaspoon salt
  • 1 cup fresh , frozen, or canned blueberries (I used frozen ones I picked last summer!)
For the crumble topping:
  • 3/4 cup all-purpose flour
  • 1/2 cup (1 cube) cold butter, cut into small pieces
  • 3 Tablespoons brown sugar
Instructions
  1. Preheat your oven to 400 degrees.
  2. Line a standard size muffin tin with paper cupcake liners. Lightly spray the muffin paper holders with non-stick cooking spray. (Yes...spray the paper, also!)
  3. Beat the milk, oil and egg together in a medium sized bowl.
  4. In a separate bowl, combine the flour, sugar, baking powder and salt. Whisk these dry ingredients together, then add to the milk and egg mixture. Stir this only until the batter forms (the batter will be lumpy).
  5. Gently fold the blueberries into the batter with a large spoon or spatula. So far so good, right?
  6. Divide your batter evenly into the 12 prepared muffin cups.
To prepare the "crumble topping" and finish muffins:
  1. Place the flour, cold butter pieces and brown sugar in a bowl. Using a pastry blender or a fork, cut (or "mash") these ingredients together until you end up with a crumbly mixture the size of small peas (now you know why it is called a "crumble". Brilliant).
  2. Sprinkle the crumble over the top of each muffin batter thingy (now I'm just getting technical...)
  3. Bake at 400 degrees for 20-25 minutes, or until a toothpick comes out clean.
  4. Remove muffins from oven; let them cool for 5-10 minutes before attempting to remove the paper wrappers. Then slice that warm blueberry muffin in half, slather some butter on that bad boy and dig in! Enjoy!
Nutrition Facts
Blueberry Crumble Muffins
Amount Per Serving (1 muffin)
Calories 274 Calories from Fat 117
% Daily Value*
Fat 13g20%
Saturated Fat 8g50%
Cholesterol 34mg11%
Sodium 178mg8%
Potassium 138mg4%
Carbohydrates 36g12%
Fiber 1g4%
Sugar 13g14%
Protein 4g8%
Vitamin A 290IU6%
Vitamin C 1.2mg1%
Calcium 58mg6%
Iron 1.5mg8%
* Percent Daily Values are based on a 2000 calorie diet.

Here is one more to pin on your Pinterest boards!Blueberry crumble muffins are delicious breakfast treats, packed with blueberries (fresh or frozen) and a streusel topping! Perfect "on the go" breakfast!

Save

Save

Save

Amish Apple Fritters

Amish Apple Fritters are delicious fried doughnuts, made from scratch with a simple batter, fresh apple chunks, cinnamon, and a sweet glaze. They are SO GOOD!Amish Apple Fritters are delicious crunchy fried doughnuts made from scratch with fresh apple chunks and cinnamon, and covered with a sweet glaze.

I have two little secrets… I am a “Morning Person”, and Apple Fritters are my favorite doughnuts! I LOVE these delicious, crunchy friend doughnuts! They’re made easily from scratch with a simple batter containing fresh apple chunks, cinnamon, and are covered with a sweet glaze.

For over 20 years, I had to be up at 5:30 A.M. every workday to leave by 6:30 to be in my office at 7:00 A.M., ready for a day’s work. Not entirely convenient for making apple fritters! Ha Ha. These days I find myself in a different season of life…no children at home to get up and out of bed before leaving…AND my commute to the office these days is no more than walking upstairs to my home office, where I work for my husband’s company.  My world has changed drastically!

My” new normal” is… instead of grabbing a large mug of coffee and shoving toast in my mouth while heading out the door as I did while working full-time, I now seem to revert to “boring” breakfasts such as oatmeal or toast and eggs. HOWEVER… I do love a great apple fritter, doughnut or pastry occasionally. I mean, really, who doesn’t??? (if we’re truth-telling here).

Scroll Down For A Printable Recipe Card At The Bottom Of The Page

How I Found This Recipe For Amish Apple Fritters

I love to try new recipes and learn new cooking techniques in the kitchen, AND my favorite doughnut of all time is the humble, yet glorious Apple Fritter. One day, while looking at recipes on Pinterest,  I saw one for these doughnuts, written by a great-grandmother named Polly.

I could tell I would like this easy recipe from the very beginning (aren’t ALL recipes written by great-grandmothers wonderful?)… so I made them, and sure enough…these fritters were amazing! Sometimes, a warm apple fritter and a strong cup of coffee are exactly what this old girl wants. Please notice I did not say what this old girl needs… now THAT’S another story, *cough, cough!

Hope you enjoy them…occasionally (wink wink)! Here’s how easy they are to make…you’ll be a doughnut maker in no time!

Apple fritter close up
 

How To Make Amish Apple Fritters

First, mix up the batter. In a large bowl (or the bowl to a stand mixer), cream the sugar and eggs for 1-2 minutes with an electric mixer. To this batter, add the flour, baking powder, cinnamon, salt and  milk. Mix these ingredients together well.

Mixing the batter for apple fritters

In a separate bowl, mix the chopped apples with the lemon juice. Using a spoon, add the apple mixture to the batter and stir well, to combine.

Apples being added to mixing bowl

Cooking Amish Apple Fritters

Heat vegetable oil to 375° F. in a large skillet or electric skillet. You will need a deep-fry thermometer or an electric skillet with temperature control. NOTE: It is very important to make sure the temperature is hot enough to fry the fritters correctly.

Once the oil is at 375° F, scoop out really large spoonfuls of the fritter batter (as big as you can get ’em!). Carefully slide the fritter into the hot oil, because that oil is HOT!

Dough being fried in oil in skillet

See in the photo below how the apple fritters are starting to turn golden brown? This is a GOOD thing. When they get to a true golden brown color, carefully turn the fritters over to the other side. This usually takes about 2-3 minutes for the first side.

I found it helpful to use two spoons to carefully flip the Amish apple fritters over.  Once they have been flipped over, continue cooking.

Fritters turned over to brown in the oil

How Long Do You Cook The Amish Apple Fritters?

The total cooking time for the Amish apple fritters is approximately 2-3 minutes on each side. NOTE: The cooking time may vary a bit, based on two things: the SIZE of the fritters you cook, and having the proper oil temperature to cook in.

When the fritters become nice and brown (see photo below) on both sides, then you know they will be ready and cooked through. You might need to flip them over again to make sure both sides are deeply browned.

Golden brown Amish Apple Fritters in hot oil almost done

IMPORTANT TIP: Once fritters are done, make sure that the oil temperature returns back to 375° F, before adding the next batch of Amish Apple Fritters to cook!

Once each batch of apple fritters are done, use a slotted spoon to remove them, one at a time, to a paper towel lined platter or wire rack to cool. You will need several layers of paper towels to absorb any remaining oil on the fritters.

Glazing Amish Apple Fritters

Now all you need to do is make the quick and easy glaze for the finished apple fritters! It is important to let ALL the fritters cool completely, before adding the glaze to them!

Mix up the glaze in a medium sized bowl. Use a pastry brush to “paint” it onto top and bottom of the cooled fritters. Let the icing firm up a bit, then these delicious Amish apple fritters are ready to eat, and enjoy!

Fritters coated with a glaze, resting on parchment paper

The Amish Apple Fritters Are Ready To Enjoy!

Pour yourself a great cup of hot coffee or tea… and take a bite out of one of those yummy Amish Apple Fritters!

Cup of coffee with one apple fritter on a plate

You can see the chunks of apples inside the fritter! The Amish apple fritters are crunchy on the outside, and nice and soft on the inside!

A fritter cut open to show the inside apples

Sure hope you enjoy these Amish apple fritters! We LOVED them. Have a GREAT day!

Looking For More DOUGHNUT Recipes?

You can find all of my recipes in the Recipe Index, located at the top of the page. A few of our favorite doughnut recipes are there, including:

Interested In More Recipes?

Thank you for visiting this website. I appreciate you using some of your valuable time to do soIf you’re interested, I publish a newsletter 2 times per month (1st and 15th) with all the latest recipes, and other fun info. I would be honored to have you join our growing list of subscribers, so you never miss a great recipe!
There is a Newsletter subscription box on the top right side (or bottom) of each blog post, depending on the device you use, where you can easily submit your e-mail address (only) to be included in my mailing list.

You Can Also Find Me On Social Media:

Facebook page: The Grateful Girl Cooks!
Pinterest:
The Grateful Girl Cooks!
Instagram:
jbatthegratefulgirlcooks

Author's signatureRecipe Adapted From: www.angelsinmygarden.blogspot.com/2011/06/amish-apple-fritters.html
 
4 from 3 votes
Amish Apple Fritters
Prep Time
15 mins
Cook Time
15 mins
Total Time
30 mins
 
Amish Apple Fritters are delicious fried doughnuts, made easily from scratch with a simple batter and fresh apple chunks, cinnamon, and a sweet glaze.
Category: Breakfast
Cuisine: American
Keyword: Amish apple fritters
Servings: 6 fritters
Calories Per Serving: 238 kcal
Author: JB @ The Grateful Girl Cooks!
Ingredients
For fritters:
  • 2 Tablespoons granulated sugar
  • 2 large eggs
  • 1 cup all-purpose flour
  • 2 tsp. baking powder
  • 1/2 tsp. cinnamon
  • 1/2 tsp. salt
  • 1/4 cup milk
  • 2 tsp. fresh lemon juice
  • 2-3 cups peeled , cored and chopped Granny Smith or Gravenstein apples (firm pie apples!)
  • Vegetable oil for deep-frying (approx. 4-5 cups- enough to come halfway up sides of pan or skillet)
For glaze:
  • 1 1/4 cups powdered sugar
  • 1/4 tsp. vanilla
  • 3-4 tsp. warm water (thin enough to make the glaze "paintable")
Instructions
  1. In a large bowl (or the bowl to a stand mixer), cream the sugar and eggs for 1-2 minutes with a mixer.
  2. To this, add the flour, baking powder, cinnamon, salt and milk. Mix these ingredients well.
  3. In a separate bowl, mix the chopped apples with the lemon juice. Using a spoon, add the apple mixture to the batter and stir well, to combine.
  4. Heat vegetable oil to 375 degrees (use a deep-fry thermometer or use an electric skillet with a temperature control). It is very important to make sure the temperature is hot enough to fry the fritters correctly.
  5. Once the oil is at 375 degrees, scoop out really large tablespoonfuls of the fritter batter (as big as you can get 'em!) and carefully and gently slide the fritter into the hot oil.
  6. When they get to a true golden brown color, carefully turn the fritters over to the other side (I used two spoons to carefully flip them) and continue cooking. (This should take approx. 2-3 minutes on each side).
  7. When the fritters become brown on both sides (you might have to flip them over again to make sure both sides are brown), then you know they will be ready and cooked through.
  8. Using a slotted spoon, remove the fritters, one at a time, to a paper-towel lined (several thicknesses) plate to drain and cool.
  9. To make a glaze for the tops of the fritters, mix together the powdered sugar, vanilla and water in a small bowl until you have a nice "paintable" glaze.
  10. Using a pastry brush, brush this glaze over the entire top of the fritter. Let glaze harden slightly, turn it over and "paint" the glaze on the bottom. Place glazed fritters on wire rack; let glaze harden, then serve.
Recipe Notes

If you do not like glaze on your fritters, the author of this recipe also suggests sprinkling the hot "right out of the fryer" fritters with powdered sugar and cinnamon. For mine, I used the glaze option and they were perfect.
Tip #1: These apple fritters are at their very best the first day you make them!
Tip #2: If using self-rising flour as substitute for all purpose flour, omit baking powder and salt from the recipe.
Tip #3: Once oil cools, strain it, store it in a container in refrigerator to use on another batch!

Nutrition Facts
Amish Apple Fritters
Amount Per Serving (1 fritter)
Calories 238 Calories from Fat 9
% Daily Value*
Fat 1g2%
Cholesterol 55mg18%
Sodium 187mg8%
Potassium 267mg8%
Carbohydrates 52g17%
Fiber 1g4%
Sugar 33g37%
Protein 4g8%
Vitamin A 120IU2%
Vitamin C 2.6mg3%
Calcium 101mg10%
Iron 1.4mg8%
* Percent Daily Values are based on a 2000 calorie diet.

Here’s one more to pin on your Pinterest boards!Amish Apple Fritters are delicious fried doughnuts, made easily from scratch with a simple batter and fresh apple chunks, cinnamon, and a sweet glaze.

Save

Save

Save

Save

Save

Save

Save

French Baguette

Nothing beats the smell of homemade, freshly baked bread! Enjoy a slice of a French Baguette, served warm with butter! Recipe makes 2 loaves.Nothing beats the smell of homemade, freshly baked bread! Enjoy a slice of a French Baguette, served warm with butter! Recipe makes 2 loaves.

I am so thankful God created us with a sense of SMELL, especially when there is a fresh baked French Baguette in the kitchen! The “good” smells that permeate the kitchen when bread is baking is always amazing!

Sometimes I think the world would be a lot more “black and white” if we did not have access to a sense of smell, “coloring” the world around us. Spring is here, and with it comes the smells of this season of renewal. We smell freshly mowed lawns, the outside air right after a long rain, and BBQ grills being fired up once again, etc. I truly love it!

Scroll Down For A Printable Recipe Card At The Bottom Of The Page

Love the Smell Of Bread Baking?

One of my all-time favorite smells, regardless of the season, is FRESH BAKED BREAD! Yum! There’s just nothing quite like the smell in our kitchen when a fresh loaf of homemade bread is baking. There is something so comforting and memory-filled to me about that smell. A french baguette beckons us to gather round (with the butter, of course!) and slather up a warm piece, as soon as it cools down enough to cut a slice.

I love to bake bread, and I found this easy recipe on Pinterest. Then I decided my life would be more complete if I could make learn to make a cute French baguette (ha ha!). The recipe has very few ingredients, and is super quick and easy to make.

Is It Difficult To Make A French Baguette?

From start to finish, it only takes an hour to make a French baguette (or two). That’s right…you heard me! Just mix everything up, form the loaves, and let the baguette dough rise for 30 minutes. I don’t have lots of photos, but it really is easy to prepare.

Once the dough has risen, throw it in the oven for 15 minutes, enjoy the smell as it bakes…and bam! Your French baguette is done! I hope you will give this simple recipe a try…a homemade French baguette is really quite delicious!

This recipe for a French Baguette will yield two loaves.

Have fun making your own French baguette or two! I really think you will find them quite delicious. Have a wonderful day, and please come back again soon.

Looking For More HOMEMADE BREAD Recipes?

You can find all of my recipes in the Recipe Index, located at the top of the page. A few homemade bread recipes you might enjoy include:

Interested In More Recipes?

Thank you for visiting this website. I appreciate you using some of your valuable time to do soIf you’re interested, I publish a newsletter 2 times per month (1st and 15th) with all the latest recipes, and other fun info. I would be honored to have you join our growing list of subscribers, so you never miss a great recipe!
There is a Newsletter subscription box on the top right side (or bottom) of each blog post, depending on the device you use, where you can easily submit your e-mail address (only) to be included in my mailing list.

You Can Also Find Me On Social Media:
Facebook page: The Grateful Girl Cooks!
Pinterest: The Grateful Girl Cooks!
Instagram: jbatthegratefulgirlcooks

Author's signature

Recipe Source: http://www.thesisterscafe.com/2010/04/baguette-2

↓↓ PRINTABLE RECIPE BELOW ↓↓

0 from 0 votes
French Baguette
Prep Time
1 hr 30 mins
Cook Time
15 mins
Total Time
1 hr 45 mins
 

Nothing beats the smell of homemade, freshly baked bread! Enjoy a slice of a French Baguette, served warm with butter! Recipe makes 2 loaves.

Category: Bread
Cuisine: American, French
Keyword: french baguette
Servings: 20 (2 loaves=10 slices per)
Calories Per Serving: 91 kcal
Author: JB @ The Grateful Girl Cooks!
Ingredients
  • 1 1/2 cups warm water
  • 1 1/2 Tablespoons (2 pkgs.) dry active yeast
  • 2 teaspoons granulated sugar
  • 3 1/4 cups all purpose flour
  • 2 teaspoons salt
  • 3-4 Tablespoons butter , melted (to brush on baguettes halfway through baking time)
Instructions
  1. Mix the warm water, yeast and granulated sugar in a small bowl. Let it sit (for approximately 5 minutes) until bubbles form on the top (this means the yeast is alive).
  2. Combine the flour and salt in a large mixing bowl. Slowly add in the yeast/water mixture. Mix this together, then knead (on a lightly floured work surface) for approximately 5 minutes, until the dough becomes a smooth ball. (You can also use a stand mixer with the dough hook for this step). Remove dough from bowl. Divide into 2 equal halves.

  3. Place dough halves on lightly floured work surface. Form each section into a baguette shape. To make your baguette shapes, do this: Roll each half of the dough into a rectangle (about 8-10 inches long); roll the rectangle up lengthwise. Pinch the end edges of the dough to seal.
  4. Place the baguettes on a lightly greased baking sheet, with seam side down. Cover with a dish towel; let rise for 30 minutes. When dough is near the end of the "rising" time, preheat oven to 450 degrees.

  5. Pour about 3/4 cup of water onto a separate cookie sheet (with edges, of course!). Place water-filled cookie sheet on the BOTTOM rack of oven (this will generate steam while baguette bakes).

  6. Using a very sharp knife (a serrated knife blade works great!), gently make a slash lengthwise down the middle of each baguette. Bake baguettes at 450 degrees for 15 minutes on MIDDLE rack (above water). Halfway through baking time, brush tops of baguettes with melted butter. Bread will be golden brown when done. Remove baguettes to a wire rack. When slightly cooled, grab some butter, cut a big slice... and go for it! Enjoy!

Recipe Notes

Recipe makes 2 loaves. Caloric calculation was made based on 10 slices per loaf.

Nutrition Facts
French Baguette
Amount Per Serving (1 slice)
Calories 91 Calories from Fat 9
% Daily Value*
Fat 1g2%
Saturated Fat 1g6%
Cholesterol 4mg1%
Sodium 248mg11%
Potassium 24mg1%
Carbohydrates 16g5%
Protein 2g4%
Vitamin A 50IU1%
Calcium 4mg0%
Iron 0.9mg5%
* Percent Daily Values are based on a 2000 calorie diet.

Here’s one more to pin on your Pinterest boards!Nothing beats the smell of homemade, freshly baked bread! Enjoy a slice of a French Baguette, served warm with butter! Recipe makes 2 loaves.

Save

Save