Nothing says “old school comfort food” like Mom’s Tuna Noodle Casserole! This classic dish has been around for years, is delicious, and easy on the budget!
If my Mom’s Tuna Noodle Casserole isn’t “Old School”, I don’t know what is! I’ve been sick for a few days, so “comfort food” and EASY were on the menu for one of our dinners.
Mom made this for our family as I was growing up. That was back in the 60’s when we were footloose and fancy-free kids, without a care in the world. You know- back in the day where we played outside for hours with our buddies, because we didn’t have computers or cell phones to stare at all day inside!
I think my mom probably made this tuna noodle casserole for us because it was a very economical and tasty way to feed our family of 5, but it also tasted GOOD! Nothing fancy… just yummy food (and the leftovers taste great, also!)
When I made this the other night, my husband’s first words were “Wow… this brings back childhood memories. My Mom used to make tuna noodle casseroles, also!”
I guess it must have been what Moms across America cooked back then. Here’s how to prepare this classic dish:
Scroll Down For A Printable Recipe Card At The Bottom Of The Page
How To Make Mom’s Tuna Noodle Casserole
In a large bowl, combine the cream of mushroom soup, sour cream, milk, salt, pepper, garlic powder, and grated Parmesan cheese. Stir to combine.

Add frozen peas (yes… still frozen!), sliced mushrooms, tuna, and grated cheddar cheese. Fold these in gently to the other ingredients in the bowl.

This is what the tuna noodle casserole ingredients looks like once all ingredients except noodles are folded in. It’s not pretty, but that’s okay!

Cook the Egg Noodles
Cook the egg noodles for 7 minutes in a large pot of boiling water. You can salt the water if you want, but it is not really necessary.

Drain the egg noodles well once done, then add the drained noodles to the rest of the ingredients. Stir to combine.

Pour ingredients into a 2 qt. baking dish that is coated with non-stick spray. Spread evenly in pan.

Crush some Ritz crackers in a baggie. I like to use a rolling pin to really break them down into crumbs.

Bake Mom’s Tuna Noodle Casserole
Spread the crushed cracker crumbs evenly over the top of the casserole, then bake, uncovered at 350°F. for 40 minutes.
When it is finished baking, the top of the casserole should be golden brown in color, and it should be bubbly around the edges.

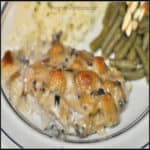
This is how it looks when it comes out of the oven. Let the casserole sit on a wire rack and cool for a few minutes before cutting into serving pieces.

Serve Mom’s Tuna Noodle Casserole
After casserole has “firmed” back up for a few minutes as it sits, slice the casserole with a sharp knife into pieces. Use a spatula to place piece onto individual plates.
Grab a fork, and enjoy this delicious comfort food meal, just how my mom used to make it!

Hope you enjoy this simple blast from the past! This tuna noodle casserole is easy to prepare, feeds quite a few, is easy on the budget, and it tastes great!
Thank you for stopping by, and I invite you to come back again soon for more family-friendly recipes. Take care, may God bless you, and have a wonderful day.
Looking For More Recipes Using TUNA?
You can find ALL of my recipes in the Recipe Index, which is located at the top of the page. I have several recipes using tuna to choose from, including:
- Tuna Pasta Salad
- “Old School” Tuna Cashew Casserole
- Quick and Easy Open-Faced Tuna Melts
- Tuscan Cannellini Tuna Salad
Want More Recipes? Get My FREE Newsletter!
I publish a newsletter 2 times per month (1st and 15th) with lots of recipes, tips, etc.
Would you like to join our growing list of subscribers?
There is a Newsletter subscription box on the top right (or bottom) of each blog post, depending on the device you use.
You can submit your e-mail address there, to be added to my mailing list.
Find Me On Social Media:
Facebook page: The Grateful Girl Cooks!
Pinterest: The Grateful Girl Cooks!
Instagram: jbatthegratefulgirlcooks
 Recipe Source: My Mom
↓↓ PRINTABLE RECIPE BELOW ↓↓

- 6 cups dry egg noodles (9 ounces)
- 1 can cream of mushroom soup
- 3/4 cup sour cream
- 1/2 cup milk
- 1/2 teaspoon salt
- 1/4 teaspoon black pepper
- 1/4 teaspoon garlic powder
- 1/4 cup grated Parmesan cheese
- 1 cup frozen peas (un-thawed)
- 1 can sliced mushrooms (7 ounces)
- 1 can albacore tuna , drained (6 ounces)
- 1 cup grated cheddar cheese
- 10-12 Ritz crackers (or Saltines, if you prefer)
- Preheat oven to 350 degrees.
In a large bowl, stir together the cream of mushroom soup, sour cream, milk, salt, pepper, garlic powder, and Parmesan cheese. Gently fold in the frozen peas, mushrooms, tuna, and cheddar cheese. Set aside.
- Cook egg noodles, according to pkg. instructions (add to boiling water, cook for 7 minutes). When done cooking, drain the noodles, and gently stir them into the rest of the ingredients until thoroughly combined.
Spray a 2 quart baking dish with non-stick spray. Pour in the casserole ingredients; spread evenly. Finely crush Ritz crackers into small crumbs (put them in a baggie and use a rolling pin to crush them). Once crushed, sprinkle crumbs over the top of the casserole.
Bake (uncovered) at 350 degrees for 40 minutes. Remove pan to a wire rack. Let it cool for a few minutes before slicing (letting it cool a bit will let you make better cuts, and make it easier to dish up!) Serve, and enjoy!
Here’s one more to pin on your Pinterest boards!


