Category: Lunch – Quick and Easy

Chicken Black Bean Quesadilla

You’ll love this easy, tasty, grilled Chicken Black Bean Quesadilla with salsa verde, corn, and cheddar cheese, served with lettuce, tomatoes and sour cream.
You'll love this easy grilled Chicken Black Bean Quesadilla with salsa verde, corn & cheddar cheese, served with lettuce, tomatoes and sour cream.

I don’t know about you, but we LOVE Mexican food in our home. We especially love tacos, enchiladas and quesadillas!  Sometimes people tend to think of quesadillas only as melted cheese on a flour tortilla, and call that a quesadilla.

While that type of quesadilla tastes okay, we like to serve them loaded with more ingredients at our house, to really make it a MEAL!  We’ve enjoyed these so many times over the years I can’t even begin to count! The cooking process for cooking a plain or loaded quesadilla is the same. I really think you’re gonna like eating this filling chicken black bean quesadilla a whole lot MORE than a plain one!

Occasionally I change up the recipe a bit, depending on what we have in the pantry at the moment. However, the core recipe I came up with over 30 years ago almost always stays the same.  I am glad to share it with you today!

Scroll Down For A Printable Recipe Card At The Bottom Of The Page

How To Make This Chicken Black Bean Quesadilla

Quesadillas are simple to make, taste absolutely delicious, and are a super simple dinner to throw together after a busy day! You can save time by using leftover cooked chicken breasts or a rotisserie chicken!

For each chicken black bean quesadilla, place grated cheddar cheese, sliced green onions and cooked chicken breast chunks onto ONE HALF of the flour tortilla. Once you have all the filling ingredients ready to go, it’s amazing how quickly you can throw several of these quesadillas together!

Cheese, chicken and green onions are placed on a flour tortilla half for chicken black bean quesadilla.

Evenly distribute the corn, black beans and a spoonful of the salsa verde sauce to each chicken black bean quesadilla.  Remember to leave one half of the tortilla bare.

Black beans and corn are added to tortilla for chicken black bean quesadilla.

Green sauce (salsa verde) is added to chicken black bean quesadilla.

Grilling The Chicken Black Bean Quesadilla

The empty half of the flour tortilla is folded up and over the toppings for the quesadilla. Each of the quesadilla halves are placed onto a lightly oiled grill (or large skillet) on medium low heat. NOTE: If using a large skillet, you may need to cook these in batches.

Cook each chicken black bean quesadilla for a few minutes on medium low heat until golden brown on the bottom.

Carefully turn each quesadilla to the other side using a spatula. Continue cooking until the bottom side has turned nice and golden brown as well. When done, the cheese should be melted and the other fillings should be heated through.

Each chicken black bean quesadilla is folded in half and place on griddle to cook.

Each chicken black bean quesadilla is turned to other side when golden brown during cooking.

Slicing The Chicken Black Bean Quesadilla

Once the chicken black bean quesadilla is done cooking, carefully remove two halves (at a time) to a cutting board or surface.

It’s been my experience that a pizza cutter (or a really sharp knife) works really well to slice the quesadilla into serving portions. Slice the quesadilla similar to how you would cut a pizza, into 3 slices per half.

Each chicken black bean quesadilla is sliced using a pizza cutter, when done.

Each chicken black bean quesadilla half is sliced into three pieces.

Garnishing The Chicken Black Bean Quesadilla For Serving

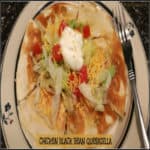
In the photo below I placed 2 quesadilla halves on a plate all together, to garnish and photograph the finished meal. It sure looks GOOD once it is “prettied up” a bit, right?

The grilled, sliced chicken black bean quesadilla is garnished with additional grated cheddar, shredded lettuce, diced fresh tomatoes, salsa verde sauce, and a dollop of sour cream! A typical serving would be 3 slices per person, but if you’re REALLY hungry (and don’t mind the extra calories), go for the whole thing!

Chicken black bean quesadilla is garnished with lettuce, tomato, sour cream and salsa verde.

You can see the chunks of chicken breasts, melted cheese and black beans inside a slice of the chicken black bean quesadilla! This is one great tasting quesadilla, whether you pick up each slice like pizza OR use a fork for each bite! Yum!

Side view of a slice of chicken black bean quesadilla.

I really hope you will give this recipe for a delicious chicken black bean quesadilla a try! The quesadillas are really easy to make, and they sure do taste GREAT! Have a fantastic day, friends. Make it a good one!

Looking For More Tex-Mex Recipes?

You can ALL of my recipes using the Recipe Index, located at the top of the page. Some of our favorite Tex-Mex recipes include:

Interested In More Recipes?

Thank you for visiting this website. I appreciate you using some of your valuable time to do soIf you’re interested, I publish a newsletter 2 times per month (1st and 15th) with all the latest recipes, and other fun info. I would be honored to have you join our growing list of subscribers, so you never miss a great recipe!
There is a Newsletter subscription box on the top right side (or bottom) of each blog post, depending on the device you use, where you can easily submit your e-mail address (only) to be included in my mailing list.

You Can Also Find Me On Social Media:

Facebook page: The Grateful Girl Cooks!
Pinterest:
The Grateful Girl Cooks!
Instagram:
jbatthegratefulgirlcooks

Have a GREAT day!

Author's signature

Recipe Source: my hungry brain…

↓↓ PRINTABLE RECIPE BELOW ↓↓

5 from 1 vote
Chicken Black Bean Quesadilla
Prep Time
10 mins
Cook Time
6 mins
Total Time
16 mins
 
You'll love this easy grilled Chicken Black Bean Quesadilla with salsa verde, corn & cheddar cheese, served with lettuce, tomatoes and sour cream.
Category: Entree
Cuisine: Mexican
Keyword: chicken black bean quesadilla
Servings: 4
Calories Per Serving: 394 kcal
Author: JB @ The Grateful Girl Cooks!
Ingredients
  • 4 flour tortillas
  • 1 cup shredded cheddar cheese
  • 2 boneless, skinless chicken breasts , pre-cooked
  • 1 stalk green onions , white and green parts
  • 6 Tablespoons whole kernel corn (canned) , drained
  • 6 Tablespoons black beans (canned) , drained
  • 4 Tablespoons salsa verde sauce , or substitute red salsa
  • cooking spray or vegetable oil , for grill or skillet
For Garnish (OPTIONAL):
  • 1/2 cup shredded cheddar cheese
  • 1 cup shredded iceberg lettuce
  • 1/2 cup fresh tomato , diced
  • 4 teaspoons salsa verde sauce
  • 4 Tablespoons sour cream
Instructions
  1. For each quesadilla, place grated cheddar cheese, sliced green onions and cooked chicken breast chunks onto ONE HALF of a flour tortilla. Evenly distribute corn, black beans and a spoonful of the salsa verde sauce to each quesadilla.  Leave one half of each tortilla bare.

  2. Fold empty half of tortilla up and over the toppings. Place each quesadilla half on a lightly oiled or sprayed flat grill (or large skillet) on medium low heat. NOTE: If using a large skillet, you may need to cook these in batches. Cook for a few minutes on medium low heat until golden brown on the bottom. Carefully turn each quesadilla to the other side, and continue cooking until the bottom is golden brown. When done, cheese should be melted and filling heated through. 

  3. Transfer each quesadilla to a cutting board. Slice each half into 3 pieces. Garnish with cheese, lettuce, diced tomatoes, salsa verde, and a dollop of sour cream! Serve, and enjoy!

Recipe Notes

Caloric calculation is for three quesadilla slices, and includes all garnish toppings (salsa verde, lettuce, cheese, tomatoes and sour cream).

Nutrition Facts
Chicken Black Bean Quesadilla
Amount Per Serving (1 (3 slices))
Calories 394 Calories from Fat 171
% Daily Value*
Fat 19g29%
Saturated Fat 10g63%
Cholesterol 84mg28%
Sodium 822mg36%
Potassium 507mg14%
Carbohydrates 26g9%
Fiber 3g13%
Sugar 4g4%
Protein 27g54%
Vitamin A 795IU16%
Vitamin C 4.4mg5%
Calcium 368mg37%
Iron 2.1mg12%
* Percent Daily Values are based on a 2000 calorie diet.

Here’s one more to pin on your Pinterest boards!You'll love this easy, tasty, grilled Chicken Black Bean Quesadilla with salsa verde, corn, and cheddar cheese, served with lettuce, tomatoes and sour cream.

English Muffin Mummy Pizzas

English Muffin Mummy Pizzas are a perfect Halloween treat for kids (or adults)! They’re cute, yummy, and VERY EASY to make, with only a few ingredients!
English Muffin Mummy Pizzas are a perfect Halloween treat for kids (or adults)! They're cute, yummy, and VERY EASY to make, with only a few ingredients!

With Halloween fast approaching, these English muffin mummy pizzas would be a FUN way to enjoy a quick lunch treat with the kids or grandkids! These EASY, tasty mini YUMMY MUMMY pizzas would be a fun project to do with your kids for Halloween! The kids can decorate their own English muffin mummy pizzas. What fun!

Scroll Down For A Printable Recipe Card At The Bottom Of The Page

Halloween Memories

I remember how memorable it was when our two sons were little (they’re grown men now) and would get dressed up for Halloween festivities. They were always SO incredibly excited!

This would be a fun dinner to serve before going Trick or Treating, or to serve a group of kids at a Harvest Party!  They will be talking about making their own MUMMY PIZZAS long after they’ve eaten them!

All YOU will need to do is a TINY bit of prep work (slice cheese and olives), let the kids decorate their pizzas, and then YOU can bake them! That’s it! Then, before you can say “FUNNY YUMMY MUMMY”, a “spooky” tasty lunch is served!

Time to feed these boys some English muffin mummy pizzas for their Halloween treat!

It’s EASY To Make English Muffin Mummy Pizzas!

The first thing you will need to do is split the English muffins in half. Place them on a parchment paper or silicone baking mat, cut side UP, on a 13×9 inch baking sheet.

Place a HEAPING Tablespoon of prepared pizza or spaghetti sauce onto each English muffin half. I used my homemade spaghetti sauce. Spread the sauce with a spoon, to cover the English muffin.

By the way, if you are ever interested in learning how to make homemade English muffins, my recipe is right here.

Pizza sauce is spread onto split, untoasted English muffins for mummy pizzas.

Since we ALL KNOW that mummies have eyes (right?), the next thing to do is slice the pimento-stuffed green olives into “eyeballs”. Position them toward the top of the English muffin mummy pizza.

Green olive eyes are added to English muffin mummy pizzas.

The next thing to do is position thin strips of mozzarella cheese on top, as if wrapping a mummy.  This is where the kids can really get creative! I used string cheese sticks, and carefully cut them into strips.

However, you can definitely use packaged mozzarella slices, or mozzarella slices cut from a large mozzarella ball (and then trimmed), to make this work for you. Best width is 1/4″.

Strips of mozzarella cheese are added to English muffin mummy pizzas.

Once the English muffin mummy pizzas are decorated and “mummified”, they are ready to put into the oven and bake!

Baking English Muffin Mummy Pizzas

Place the baking sheet in a preheated 400°F oven. The yummy mummies will need to bake between 8 and 12 minutes. They are done when the cheese has melted, and the muffins are heated through. Remove the baking sheet from the oven.

TIP: Let the English muffin mummy pizzas cool for a little bit before serving (especially to kids), because they will be very hot!

English muffin mummy pizzas on white plate, after baking in oven.

Here’s an up close photo of my English muffin mummy pizzas. I made the strips of cheese a bit wider than the recommended 1/4″ size, so a lot of the cheese melted together.

I think the pizza on the far left ended up looking a bit like Santa Claus, now that I think about it. Hmmm. Wrong season… wait your turn, Santa!

Close up picture of English muffin mummy pizzas on white plate, once baked.

Here’s hoping your family enjoys these cute little English muffin mummy pizzas! My hubby and I, (who are most definitely “big kids”) really do!

If you enjoy this cute treat, be sure and check out my recipes for Stuffed Jack O’ Lantern Peppers and Peanut Butter Rice Krispie Pumpkins! They are so cute, easy to make, and the kids will love them, too!

Have a GREAT day, and don’t forget- you can find ALL of my recipes in the Recipe Index, located at the top of the page.

Want More Recipes? Get My FREE Newsletter!

I publish a newsletter 2 times per month (1st and 15th) with lots of recipes, tips, etc..
Would you like to join our growing list of subscribers?

There is a Newsletter subscription box on the top right (or bottom) of each blog post, depending on the device you use.
You can submit your e-mail address there, to be added to my mailing list.

Find Me On Social Media:

Facebook page: The Grateful Girl Cooks!
Pinterest:
The Grateful Girl Cooks!
Instagram:
jbatthegratefulgirlcooks

Author's signature

Recipe Adapted From: https://www.veggiessavetheday.com/english-muffin-pizzas

↓↓ PRINTABLE RECIPE BELOW ↓↓

0 from 0 votes
English Muffin Mummy Pizzas
Prep Time
10 mins
Cook Time
10 mins
Total Time
20 mins
 
English Muffin Mummy Pizzas are a perfect Halloween treat for kids (or adults)! They're cute, yummy, and VERY EASY to make, with only a few ingredients!
Category: Lunch
Cuisine: Italian
Keyword: English muffin mummy pizzas
Servings: 4 (2 halves each)
Calories Per Serving: 211 kcal
Author: JB @ The Grateful Girl Cooks!
Ingredients
  • 4 English muffins , split in half
  • 6 Tablespoons pizza or spaghetti sauce , HEAPING Tablespoons
  • 8 green pimento-stuffed olives
  • 3 low fat mozzarella string cheese sticks SEE NOTE BELOW
Instructions
  1. Preheat oven to 400°F. Split English muffins in half. Place them on parchment paper or silicone baking mat, cut side UP, on a 13x9 inch baking sheet.

  2. Place a HEAPING Tablespoon of prepared pizza or spaghetti sauce onto each English muffin half. I used my homemade spaghetti sauce. Spread the sauce with a spoon, to cover muffin.
  3. Slice the pimento-stuffed green olives into "eyeballs". Position the sliced olives toward the top of the pizza.

  4. Position (layer) thin strips of mozzarella cheese on top, as if wrapping a mummy. Once decorated, they are ready to cook!

  5. Place the baking sheet in a preheated 400°F oven. The mummy pizzas will need to bake between 8 and 12 minutes. They are done when cheese has melted, and the muffins are heated through. Remove baking sheet from oven. Let pizzas cool for a little bit before serving (especially to kids), because they will be very hot! Enjoy!

Recipe Notes

NOTE: If using string cheese, carefully cut them into strips to fit.  You can also use packaged mozzarella slices, or slices from a large mozzarella ball. Recommendation is to slice mozzarella cheese strips 1/4" wide .

Nutrition Facts
English Muffin Mummy Pizzas
Amount Per Serving (1 )TWO halves))
Calories 211 Calories from Fat 54
% Daily Value*
Fat 6g9%
Saturated Fat 2g13%
Cholesterol 11mg4%
Sodium 671mg29%
Potassium 149mg4%
Carbohydrates 28g9%
Fiber 2g8%
Sugar 1g1%
Protein 9g18%
Vitamin A 130IU3%
Vitamin C 1.6mg2%
Calcium 52mg5%
Iron 0.7mg4%
* Percent Daily Values are based on a 2000 calorie diet.

Here’s one more to pin on your Pinterest boards!English Muffin Mummy Pizzas are a perfect Halloween treat for kids (or adults)! They're cute, yummy, and VERY EASY to make, with only a few ingredients!

Lemon Herb Couscous Salad

Lemon Herb Couscous Salad, with cucumbers, raisins, toasted pecans, dried cranberries, fresh herbs, tossed in a light lemon dressing is an easy to make, tasty side dish!
Lemon Herb Couscous Salad, w/ cucumbers, raisins, toasted pecans, dried cranberries, fresh herbs, tossed in a light lemon dressing is an easy, tasty side dish!

I found this recipe for Lemon Herb Couscous Salad online a while ago, and on a whim, decided to make it!  Whoa! This recipe uses Israeli Couscous (also called Pearl Couscous). It is different in shape and texture from traditional couscous. You can read about the differences here.

My husband and I loved this easy to prepare salad. We had it with dinner, then enjoyed the leftovers for days afterwards (recipe serves 8). We would both sneak into the refrigerator and grab a few bites for lunch or a quick snack. It’s SO GOOD!

The flavors in the lemon herb couscous salad seem to get better day by day, as the fresh herbs mingle. That’s great news, because this salad will keep for several days in the refrigerator, if covered well.

Scroll Down For A Printable Recipe Card At The Bottom Of The Page

How To Make Lemon Herb Couscous Salad

One of the things I find helpful is to prep the veggies and pecans before beginning. Once the veggies (English cucumber, tomatoes and fresh herbs) are chopped and diced, the recipe is easy peasy!

Vegetables are chopped and cut, ready to make lemon herb couscous salad.

How To Toast The Pecans Or Walnuts For This Salad

The pecans (or walnuts, if using) are very easy to “toast” before adding to the lemon herb couscous salad. Simply place chopped nuts into a dry skillet.

Cook the pecans on medium heat, stirring occasionally, until they become fragrant. This will take about 5-6 minutes. If you want to save time, you can cook the nuts while the couscous is cooking.

Pecans are lightly toasted in skillet before adding to lemon herb couscous salad.

Pearl couscous (also known as Israeli couscous) is used in this recipe.  To cook it, bring a large pot of salted water to a boil.

Add couscous; and then continue to cook for 8-10 minutes, stirring occasionally.

Couscous is cooked in water in pan for lemon herb couscous salad.

Make The Salad Dressing

While the couscous is cooking, make the lemon dressing. Whisk the ingredients together in a medium sized bowl.

The salad dressing contains olive oil, lemon juice, Dijon mustard, lemon zest, honey, salt and pepper. It is simple to make in about a minute, and has a very light, fresh taste!

The salad dressing is mixed together for lemon herb couscous salad.

Dress The Lemon Herb Couscous Salad

Once the couscous is finished cooking, drain it in a strainer. Immediately pour the warm couscous into a serving bowl, and pour the lemon salad dressing onto couscous.

The lemon herb couscous salad will absorb more of the salad dressing if combined while still warm. Stir, to fully combine the ingredients.

After pearl couscous is cooked, it is drained before adding to lemon herb salad.

Lemon herb salad dressing is poured over warm cooked couscous.

Put The Rest Of The Lemon Herb Couscous Salad Together

Once you have added the salad dressing, and mixed it in, it is time to add the other ingredients. Add diced tomatoes and English cucumber to bowl. Also add the toasted pecans, dried cranberries, raisins, and fresh chopped herbs.

The recipe for this lemon herb couscous salad calls for 1/2 cup of fresh chopped herbs. I used flat leaf parsley, basil (3-4 leaves), dill (2 Tablespoons) and 4 mint leaves.

You can use any combination of fresh herbs that you prefer, adding up to 1/2 cup total.

All ingredients have been added to lemon herb couscous salad. Time to mix it all together!

Once the lemon herb couscous salad is mixed together, it is ready to serve!  I transferred the salad to a pretty bowl, and garnished it with a sprig of fresh dill.

Is This Salad Eaten Hot Or Cold?

This lemon herb couscous salad can be eaten warm OR cold! The first night we ate it at room temperature with our dinner. Excellent!

I refrigerated the leftovers and we ate it cold for lunch the next day! Guess what?  It tastes GREAT both ways… warm or cold! 

The leftovers last for a few days, if refrigerated, and the flavors get even better with time!

Close up photo of lemon herb couscous salad in white bowl.

Lemon herb couscous salad in white bowl, with fresh dill garnish on top.

Time To EAT!

My husband and I absolutely LOVED this lemon herb couscous salad!  We had it as a side dish to accompany our dinner of Pan-Seared Creole Salmon and garlic bread. It was fantastic!

The salad is full of flavor, with chewy raisins. dried cranberries, and crunch from the English cucumber and toasted pecans.  Plus, the herb combination really makes this salad shine!

Lemon herb couscous salad is served with Creole salmon and garlic bread.

I hope you will consider making this Lemon Herb Couscous Salad for yourself! We really enjoyed it very much! If you enjoy it, too, be sure to check out my recipe for Cranberry Orange Israeli Couscous and Asian-Inspired Couscous. They are so good!

Have a wonderful day. May it be full of hope, joy, encouragement and blessings!

Interested In More Side Salad Recipes?

Be sure to check out my Recipe Index at the top of each page, to find ALL my recipes and more salad dishes like this one. The list includes recipes for Southwest Quinoa Salad, Tuna Pasta Salad, Black Bean, Corn and Tomato Salad, 4-Bean Salad, and Broccoli Salad, to name a few!

Want More Recipes? Get My FREE Newsletter!

I publish a newsletter 2 times per month (1st and 15th) with lots of recipes, tips, etc..
Would you like to join our growing list of subscribers?

There is a Newsletter subscription box on the top right (or bottom) of each blog post, depending on the device you use.
You can submit your e-mail address there, to be added to my mailing list.

Find Me On Social Media:

Facebook page: The Grateful Girl Cooks!
Pinterest:
The Grateful Girl Cooks!
Instagram:
jbatthegratefulgirlcooks

Author's signature

Original Recipe Source: Adam and Joanne Gallagher at  https://www.inspiredtaste.net/12689/lemon-and-herb-couscous-salad-recipe/

↓↓ PRINTABLE RECIPE BELOW ↓↓

0 from 0 votes
Lemon Herb Couscous Salad
Prep Time
10 mins
Cook Time
10 mins
Total Time
20 mins
 
Lemon Herb Couscous Salad, w/ cucumbers, raisins, toasted pecans, dried cranberries, fresh herbs, tossed in a light lemon dressing is an easy, tasty side dish!
Category: Salad
Cuisine: American
Keyword: lemon herb couscous salad
Servings: 8 servings
Calories Per Serving: 219 kcal
Author: JB @ The Grateful Girl Cooks!
Ingredients
For Salad Dressing:
  • 1/4 cup extra virgin olive oil
  • 1 teaspoon Dijon mustard
  • 1 teaspoon grated lemon zest
  • 4 Tablespoons lemon juice (fresh)
  • 1/2 teaspoon honey
  • 1/2 teaspoon salt
  • 1/4 teaspoon black pepper
For Salad:
  • cups dried Israeli Couscous (also called Pearl Couscous)
  • 1 medium English cucumber , diced
  • 1 large tomato , diced
  • 1/2 cup chopped fresh herbs (parsley, dill, mint, basil) , combined to make 1/2 cup total)
  • 1/4 cup chopped toasted pecans (or walnuts)
  • 1/8 cup dried cranberries
  • 1/8 cup raisins
Instructions
  1. Dice cucumber, tomato, and herbs, Toast chopped pecans by placing them into a dry skillet. Cook pecans on medium heat, stirring, until they become fragrant. This takes 5-6 minutes. Remove from heat when done (to save time, you can toast pecans while couscous is cooking).

  2. Bring a large pot of salted water to a boil. Add couscous; continue to cook for 8-10 minutes, stirring occasionally. While couscous is cooking, make the lemon dressing.

  3. Make salad dressing by whisking olive oil, Dijon, salt, pepper, lemon zest, lemon juice, and honey in a medium sized bowl.

  4. Once couscous has finished cooking, drain it (but do not rinse). Immediately pour warm couscous into a serving bowl. Pour salad dressing onto couscous. (the salad will absorb more of the salad dressing if combined while warm). Stir to fully combine.

  5. Add diced tomatoes, cucumber, toasted pecans, cranberries, raisins and chopped herbs to salad. NOTE: The recipe for this lemon herb couscous salad calls for 1/2 cup total of fresh chopped herbs. I used flat leaf parsley, basil (3-4 leaves), dill (2 Tablespoons) and 4 mint leaves. You can use any combination of fresh herbs that you prefer, adding up to 1/2 cup total. 

    Once the lemon herb couscous salad is mixed together, it is ready to serve!  Garnish salad, if desired, sprig of fresh dill or parsley. Serve and enjoy!

Nutrition Facts
Lemon Herb Couscous Salad
Amount Per Serving (1 (1 cup serving))
Calories 219 Calories from Fat 81
% Daily Value*
Fat 9g14%
Saturated Fat 1g6%
Sodium 158mg7%
Potassium 121mg3%
Carbohydrates 29g10%
Fiber 2g8%
Sugar 2g2%
Protein 4g8%
Vitamin A 345IU7%
Vitamin C 8.8mg11%
Calcium 15mg2%
Iron 0.8mg4%
* Percent Daily Values are based on a 2000 calorie diet.

Here’s one more to pin on your Pinterest boards!Lemon Herb Couscous Salad, w/ cucumbers, raisins, toasted pecans, dried cranberries, fresh herbs, tossed in a light lemon dressing is an easy, tasty side dish!

Turkey Ranch Rollups

Turkey Ranch Rollups are wrap sandwiches with turkey breast, roma tomatoes and baby spinach leaves, with a cream cheese ranch spread. They’re EASY to make, and perfect for school or work lunch boxes!
Turkey Ranch Rollups are wrap sandwiches with turkey breast, roma tomatoes and spinach with a cream cheese ranch spread. EASY to make; perfect for lunch boxes!

Well… school just started back in our area. We live several blocks away from the local elementary and middle school, so there were kids everywhere today, carrying their lunches in lunch boxes and backpacks!

This totally EASY quick recipe for turkey ranch rollups is perfect for lunches (kids OR adults… hint, hint). Make several up the night before, wrap them tightly, and the next morning the rollups are ready to drop into that favorite lunch box! Here’s how simple they are to make:

Scroll Down For A Printable Recipe Card At The Bottom Of The Page

How To Make Turkey Ranch Rollups

Spread whipped (or softened) cream cheese onto a flour tortilla. Spread almost all the way to the edges. Add a teaspoon of ranch dressing; spread over cream cheese.

Flour tortilla is spread with cream cheese and ranch dressing to make rollups.

Place two thin slices of deli style turkey breast on one side of tortilla (you can see these turkey slices were fairly wide). Add roma tomato slices (thinly sliced). Season lightly with salt and pepper, to taste.

Turkey slices and sliced roma tomatoes are place on flour tortilla for rollups.

Top with those HEALTHY (shhh, don’t tell the kids) baby spinach leaves. If you want, place a thin slice of the cheese of your choice on top of the spinach, trimmed to fit (optional). And for goodness sake, modify these rollups to make them your own. Simply add what you or your kids would enjoy (alfafa sprouts, bell peppers, etc). You really can’t hurt this rollup!

Baby spinach leaves are added to turkey ranch rollups.

Roll It Up And Refrigerate

TIGHTLY roll up the sandwich, tucking turkey, etc. in, as you roll. You want to get it tight and not loose. As soon as you get it rolled up, place it in plastic wrap, and seal, keeping it TIGHTLY rolled up. Repeat with additional turkey ranch rollups.

Place the plastic wrap sealed rollups in refrigerator. They are BEST if stored overnight in refrigerator. The cream cheese/ranch spread acts kind of like “glue” to hold the wrap together, once refrigerated.

Turkey ranch rollups are rolled tightly, then wrapped in plastic wrap and refrigerated.

Time To Eat Turkey Ranch Rollups

When ready to eat, either serve as one whole rollup (perfect for lunch boxes- leave them wrapped tightly in plastic wrap), OR unwrap, slice in half on a diagonal, and serve!

Turkey ranch rollups are cut in half, and are served with chips and apples.

Turkey ranch rollups - close up photo.

That’s it! Remember to tuck an ice pack of some kind in your child’s lunch to keep rollups (with meat and salad dressing) chilled! You probably already knew that, but it’s safe to remind everyone once again.

Hope you enjoy these delicious, easy to make lunch rollups. It’s so easy to make these up in the evening before bedtime. that way they are ready for you to grab for lunches for school or work the next day! Have a wonderful day.

Looking for More SANDWICH Recipes?

You can find all of my recipes in the Recipe Index, located at the top of the page. I have some yummy sandwich recipes, including:

Interested In More Recipes?

Thank you for visiting this website. I appreciate you using some of your valuable time to do soIf you’re interested, I publish a newsletter 2 times per month (1st and 15th) with all the latest recipes, and other fun info. I would be honored to have you join our growing list of subscribers, so you never miss a great recipe!
There is a Newsletter subscription box on the top right side (or bottom) of each blog post, depending on the device you use, where you can easily submit your e-mail address (only) to be included in my mailing list.

You Can Also Find Me On Social Media:

Facebook page: The Grateful Girl Cooks!
Pinterest:
The Grateful Girl Cooks!
Instagram:
jbatthegratefulgirlcooks

Author's signature

↓↓ PRINTABLE RECIPE BELOW ↓↓

0 from 0 votes
Turkey Ranch Rollups
Prep Time
5 mins
Cook Time
0 mins
Total Time
5 mins
 
Turkey Ranch Rollups are wrap sandwiches with turkey breast, roma tomatoes and spinach with a cream cheese ranch spread. They're EASY to make, and perfect for lunch boxes!
Category: Sandwich
Cuisine: American
Keyword: turkey ranch rollups
Servings: 2 rollups
Calories Per Serving: 179 kcal
Author: JB @ The Grateful Girl Cooks!
Ingredients
  • 2 flour tortillas
  • 2 Tablespoons whipped cream cheese
  • 2 teaspoons Ranch salad dressing
  • 4 slices deli turkey (thin slices)
  • 6 slices roma tomato (thin slices)
  • 1 pinch salt and pepper (to taste)
  • 1/2 cup baby spinach leaves
  • cheddar cheese (OPTIONAL)
Instructions
  1. For each rollup: Spread whipped (or softened) cream cheese onto a flour tortilla. Spread almost all the way to the edges. Add a teaspoon of ranch dressing; spread over cream cheese.

  2. Place two thin slices of deli style turkey breast on one side of tortilla. Add roma tomato slices (thinly sliced). Season lightly with salt and pepper, to taste. Top with baby spinach leaves. If you want, place a thin slice of the cheese of your choice on top of the spinach, trimmed to fit (optional).

  3. TIGHTLY roll up the sandwich, tucking turkey, etc. in as you roll. You want to get it tight and not loose. As soon as you get it rolled up, place it in plastic wrap, and seal, keeping it TIGHTLY rolled up. Repeat with additional rollups.  Place plastic wrap sealed rollups in refrigerator. They are BEST if stored overnight in refrigerator. The cream cheese/ranch spread acts kind of like a "glue" to hold the wrap together once refrigerated. When ready to serve, slice each rollup in half! Enjoy!

Nutrition Facts
Turkey Ranch Rollups
Amount Per Serving (1 rollup)
Calories 179 Calories from Fat 81
% Daily Value*
Fat 9g14%
Saturated Fat 3g19%
Cholesterol 22mg7%
Sodium 523mg23%
Potassium 140mg4%
Carbohydrates 17g6%
Sugar 2g2%
Protein 5g10%
Vitamin A 900IU18%
Vitamin C 2.1mg3%
Calcium 53mg5%
Iron 1.4mg8%
* Percent Daily Values are based on a 2000 calorie diet.

Here’s one more to pin on your Pinterest boards!Turkey Ranch Rollups are wrap sandwiches with turkey breast, roma tomatoes and spinach with a cream cheese ranch spread. EASY to make; perfect for lunch boxes!

Mediterranean Quinoa Salad

You’ll enjoy Mediterranean Quinoa Salad, with traditional Greek flavors of kalamata olives, feta cheese, roasted red peppers, and a simple dressing!You'll enjoy this Mediterranean Quinoa Salad, with traditional Greek flavors of kalamata olives, feta cheese, roasted red peppers, and a simple dressing!

I’ve been enjoying cooking with quinoa recently. Did you know that quinoa is believed to have originated in the northwest part of South America?

Cooked quinoa provides healthy nutrients similar to what is typically found in rice and wheat, contains proteins and fiber, and is gluten-free. It is commonly referred to as a superfood, and is so easy to prepare!

If you enjoy quinoa, I’m confident you’ll like this delicious salad! By the way, if you’re interested in using quinoa for breakfast, be sure to check out my recipe for Apricot Almond Breakfast Quinoa! Anyways, here’s how to make this Mediterranean Quinoa Salad.

Scroll Down For A Printable Recipe Card At The Bottom Of The Page

Cook The Quinoa

To make this delicious dish, you will first need to cook the quinoa (according to package instructions) in lightly salted boiling water until done.

Fluff the cooked quinoa with a fork once done. Set it aside until it has cooled down to room temperature.

Cooked quinoa in metal saucepan

Make The Salad Dressing

While the quinoa is cooking, make the simple salad dressing for the Mediterranean quinoa salad. Add the ingredients (olive oil, red wine vinegar, oregano, salt and pepper) to a small bowl.

Mix these ingredients well using a fork, until fully combined. Set dressing aside until ready to top the salad.

Salad dressing for quinoa in small metal bowl

Assemble The Mediterranean Quinoa Salad

Place all the salad ingredients into a large mixing or serving bowl.  Isn’t it colorful? The salad has quinoa, roasted red peppers, corn, cilantro, red onion, feta cheese and kalamata olives.

Give the salad dressing a quick stir and pour over the salad ingredients.  Gently mix the Mediterranean quinoa salad together so the dressing coats everything well.

Quinoa, feta, olives, corn, etc. in salad bowl

Pouring salad dressing over veggies in salad bowl

Time To EAT!

Once the salad has been mixed, it’s ready to serve! See how easy that was? And it REALLY tastes great!

Mixing salad ingredients with a fork in a white bowl

Mediterranean Quinoa Salad is a fantastic side dish for a variety of meals. We enjoyed it with pan-seared creole salmon, and a small spinach salad, and it tasted wonderful! 

This would also be a tasty light lunch, as well, and just for the record, the leftovers were just as good the next day!

Spoonful of salad over bowl

If you enjoy quinoa, you might also enjoy my recipes for Southwest Quinoa Salad, Quinoa Enchilada Casserole (meatless), or a delicious Shrimp, Quinoa & Veggie Bowl.

Hope you will consider trying this recipe, and as always, I hope you will enjoy it! Don’t forget to check out ALL my recipes in the Recipe Index, located at the top of the page.

Take care, and may God bless you and surround you with His love today and always!

Want More Recipes? Get My FREE Newsletter!

I publish a newsletter 2 times per month (1st and 15th) with lots of recipes, tips, etc..
Would you like to join our growing list of subscribers?

There is a Newsletter subscription box on the top right (or bottom) of each blog post, depending on the device you use.
You can submit your e-mail address there, to be added to my mailing list.

Find Me On Social Media:

Facebook page: The Grateful Girl Cooks!
Pinterest:
The Grateful Girl Cooks!
Instagram:
jbatthegratefulgirlcooks

Author's signature

Recipe Source: https://cooktoria.com/recipe/mediterranean-quinoa-salad/

↓↓ PRINTABLE RECIPE BELOW ↓↓

0 from 0 votes
Mediterranean Quinoa Salad
Prep Time
10 mins
Cook Time
15 mins
Total Time
25 mins
 

This simple Quinoa Salad is filled with Mediterranean flavors! Easy to prepare, this is a fantastic tasting salad or side dish to serve for lunch or dinner!

Category: Salad/Side Dish
Cuisine: Mediterranean
Keyword: Mediterranean quinoa salad
Servings: 4 Servings
Calories Per Serving: 295 kcal
Author: JB @ The Grateful Girl Cooks!
Ingredients
For Salad:
  • 1/2 cup quinoa , uncooked
  • 1 cup kalamata olives , pitted, sliced
  • 1 cup corn kernels , fresh or canned
  • 1 cup roasted red peppers , sliced
  • 2/3 cup feta cheese , fat free
  • 1/2 cup red onion , diced
  • 1/2 cup cilantro , chopped
For Salad Dressing:
  • 2 Tablespoons olive oil , extra virgin
  • 2 teaspoons red wine vinegar
  • 1 teaspoon dried oregano
  • 1/4 teaspoon salt and pepper , to taste
Instructions
  1. Cook quinoa in lightly salted water according to package instructions (approx 12-15 minutes).  When done, drain, then set aside to let quinoa cool.

  2. Mix salad dressing ingredients together in a small bowl until fully blended.

  3. Place all salad ingredients in a large mixing bowl. Pour salad dressing over the top. Mix all ingredients gently until dressing has been incorporated into salad. Serve, and enjoy!

Nutrition Facts
Mediterranean Quinoa Salad
Amount Per Serving (1 g)
Calories 295 Calories from Fat 171
% Daily Value*
Fat 19g29%
Saturated Fat 5g31%
Cholesterol 22mg7%
Sodium 1507mg66%
Potassium 267mg8%
Carbohydrates 24g8%
Fiber 3g13%
Sugar 2g2%
Protein 8g16%
Vitamin A 575IU12%
Vitamin C 17.5mg21%
Calcium 165mg17%
Iron 1.8mg10%
* Percent Daily Values are based on a 2000 calorie diet.

Here’s one more for your Pinterest boardsYou'll enjoy Mediterranean Quinoa Salad, with traditional Greek flavors of kalamata olives, feta cheese, roasted red peppers, and a simple dressing!

Triple Berry Banana Smoothie

A Triple Berry Banana Smoothie is a delicious treat, with raspberries, blueberries, blackberries, banana, spinach, orange juice, and Greek yogurt!

Do you enjoy cold, fresh fruit smoothies? We sure do at our house! Recently for lunch I made a Triple Berry Banana Smoothie, which included blended frozen raspberries, blueberries, and blackberries with a banana, orange juice, Greek yogurt and spinach! It was DELICIOUS!

Here in the Portland, Oregon area, we’ve been experiencing many days with temperatures in the low 30’s this Winter. I realize that sounds like a “heat wave” to others experiencing absolutely frigid temps, heavy snowfall and blizzard conditions, BUT… it still was COLD.

So in spite of everything my brain told me NOT to do on a freezing cold day, I made a really COLD fruit smoothie for lunch… ha ha! And guess what? IT WAS WONDERFUL!

Scroll Down For A Printable Recipe Card At The Bottom Of The Page

What’s IN A Triple Berry Banana Smoothie?

The smoothie couldn’t be easier to make!  Here are the cast of characters… frozen berries (3 kinds- blueberry, blackberry and raspberry, bought in a fruit medley bag at Costco. I added non-fat plain Greek yogurt (a good source of protein), a handful of fresh baby spinach (trust me- the kids will NEVER know there’s a veggie in there!), a banana, and a small amount of orange juice.

It’s EASY To Make This Smoothie!

All the ingredients are placed into a blender and mixed until it is smooth! That’s it!  There is enough to make 2 (8 ounce) smoothies, or 4 little smoothies (for the kids). By using frozen berries there is no need to add ice to make the smoothie cold (which can possibly water down the drink).

All the ingredients used to make a triple berry banana smoothie!

Looking For Other Smoothie Recipes?

If you are a lover of fruit smoothies, I would also recommend checking out my recipes for Orange Julius (copycat), Blueberry, Banana and Kale Smoothie, or a Super Creamy Chocolate Peanut Butter Smoothie! They all taste wonderful, and are very easy to prepare!

You might also enjoy this Orange Julius (copycat).

Maybe you would also enjoy this Blueberry, Banana, and Kale Smoothie.

This Super Creamy Chocolate Peanut Butter Smoothie is another smoothie that is delicious.

A Triple Berry Banana Smoothie Is SO EASY To Make

But for now, let’s go back to THIS incredible tasting triple berry banana smoothie! Once it is well blended, pour yourself a great big glass full, and ENJOY this yummy, filling drink! The best part is that it only takes a couple minutes to make, tastes GREAT, and is nice and cold from those frozen berries! Lip-smackin’ good!

One serving of the triple berry banana smoothie.

Hope you enjoy this triple berry banana smoothie! We sure did! The recipe for the triple berry smoothie is easily doubled, and can be easily adapted to use other berries you may enjoy.  It was a very light lunch for me that day, but it left me filling full and satisfied. 

Thank you for stopping by, and I hope you will come back again soon. Don’t forget to check out ALL my recipes in the Recipe Index, located at the top of the page. Have a wonderful day!

Interested In More Recipes?

Thank you for visiting this website. I appreciate you using some of your valuable time to do soIf you’re interested, I publish a newsletter 2 times per month (1st and 15th) with all the latest recipes, and other fun info. I would be honored to have you join our growing list of subscribers, so you never miss a great recipe! 

There is a Newsletter subscription box on the top right side (or bottom) of each blog post, depending on the device you use, where you can easily submit your e-mail address (only) to be included in my mailing list.

You Can Also Find Me On Social Media:

Facebook page: The Grateful Girl Cooks!
Pinterest:
The Grateful Girl Cooks!
Instagram:
jbatthegratefulgirlcooks

Author's signature

↓↓ PRINTABLE RECIPE BELOW ↓↓

0 from 0 votes
Triple Berry Banana Smoothie
Prep Time
3 mins
Cook Time
0 mins
Total Time
3 mins
 

A Triple Berry Banana Smoothie is a delicious treat, with raspberries, blueberries, blackberries, banana, spinach, orange juice, and Greek yogurt!

Category: Beverage, Breakfast
Cuisine: American
Keyword: triple berry banana smoothie
Servings: 2 (8 ounce) servings
Calories Per Serving: 160 kcal
Author: JB @ The Grateful Girl Cooks!
Ingredients
  • 2 cups frozen berry medley (blueberries, blackberries, raspberries)
  • 1 large banana
  • 1 large handful fresh baby spinach leaves (approx. 1½ cups)
  • 3 heaping Tablespoons non-fat Greek yogurt
  • 1/2 cup orange juice (I used commercially prepared)
Instructions
  1. Place all ingredients in blender. Make sure berries (or banana) are frozen before adding. By using frozen fruit, you avoid having to add ice cubes to the drink to make it cold, which can water it down.
  2. Process ingredients until well blended and smooth.
  3. Pour into glasses and serve!
Recipe Notes

Recipe yields approximately 2 (8 ounce) servings) or 4 (1/2 cup) servings.

Nutrition Facts
Triple Berry Banana Smoothie
Amount Per Serving (1 serving (8 ounce))
Calories 160 Calories from Fat 9
% Daily Value*
Fat 1g2%
Sodium 3mg0%
Potassium 418mg12%
Carbohydrates 38g13%
Fiber 5g21%
Sugar 25g28%
Protein 1g2%
Vitamin A 280IU6%
Vitamin C 40mg48%
Calcium 19mg2%
Iron 0.6mg3%
* Percent Daily Values are based on a 2000 calorie diet.

Here’s one more to pin on your Pinterest boards!A Triple Berry Banana Smoothie is a delicious treat, with raspberries, blueberries, blackberries, banana, spinach, orange juice, and Greek yogurt!


Easy Stovetop Macaroni and Cheese

Easy Stovetop Macaroni and cheese is a creamy, delicious, family-friendly comfort food – quick and easy to make in 15 minutes!
Easy Stovetop Macaroni and cheese is a creamy, delicious, family-friendly comfort food - quick and easy to make in 15 minutes!

A friend of ours had surgery recently and I was grateful for the opportunity to take her family dinner once she returned home from the hospital.  My husband grilled some chicken and one of the side dishes I made was this easy macaroni and cheese. I really hoped her two children would enjoy this creamy, cheesy side dish!

A second batch was made for my husband and I because it tasted so GOOD (Yep… I sampled it when I made it for my friends… quality-control)!  The recipe is incredibly simple to make, and if you enjoy satisfying comfort foods, you’ll enjoy this mac and cheese.

My theory is that you can never go wrong with a basic cheese sauce and pasta! Creamy, cheesy, satisfying and delicious are words used to describe this family-friendly recipe for macaroni and cheese! Here’s how easy it is to make this simple dish!

Scroll Down For A Printable Recipe Card At The Bottom Of The Page

How To Make Easy Stovetop Macaroni and Cheese

Cook elbow macaroni (or other small shaped pasta) according to package directions.  While pasta is cooking, in a separate sauce pan, melt butter and stir in flour, salt, onion and garlic powders until well blended.

Melting butter to begin making sauce for macaroni and cheese.

Add milk to pan. Cook on medium-high heat, stirring (or whisking) often, until the mixture comes to a boil.  Turn heat down to low, and continue to simmer (stirring often), until the sauce has thickened. This should take about 2 minutes.

Once sauce has thickened, remove pan from heat. Immediately stir in the grated cheddar cheese and a couple dashes of hot pepper sauce (or more if you like the heat). Stir until cheese has completely melted.

Cooking sauce for macaroni and cheese.

When the pasta has finished cooking, drain, then immediately place hot pasta back into the pan you used to cook it.

Macaroni noodles are cooked before adding cheese sauce.

Time to Add the Sauce

Pour hot, thickened cheese sauce over the hot drained pasta, and stir well to combine.

Cheese sauce is poured over hot macaroni in pan.

Taste test…add additional salt (and pepper), if desired.  I added an extra handful of cheddar cheese at this point, as well (but that is completely optional… we are big cheese lovers!). Stir well to make sure the easy stovetop macaroni and cheese is fully coated with the yummy sauce.

Macaroni and cheese is stirred well, to coat everything with sauce.

That’s all there is to it!  Serve the macaroni and cheese while it is hot… and enjoy a bowl of this creamy, satisfying comfort food! If you like mac and cheese, perhaps you would also be interested in a Pasta, Ham and Gruyere Cheese Casserole (baked), or a Cheesy Ham, Spinach and Macaroni Bake.

NOTE: The leftovers are really good, too. Store in an air-tight container in refrigerator. Before you reheat, you might need to add a tiny bit of milk and stir, to “re-vitalize” it!

Easy Stovetop Macaroni and Cheese served hot, in a bowl.

I hope you can see how EASY it is to make this side dish OR main dish in no time at all!  If you cook the pasta at the same time you’re making the sauce, the whole “cheesy” meal can be ready in about 15 minutes… perfect for a main course, a side dish, or a quick lunch!

I hope you will consider giving this recipe a try!  Be sure to check out ALL my recipes in the Recipe Index, which is located at the top of the page. Have a great day.

Interested In More Recipes?

   Thank you for visiting this website. I appreciate you using some of your valuable time to do soIf you’re interested, I publish a newsletter 2 times per month (1st and 15th) with all the latest recipes, and other fun info. I would be honored to have you join our growing list of subscribers, so you never miss a great recipe!
   There is a Newsletter subscription box on the top right side (or bottom) of each blog post, depending on the device you use, where you can easily submit your e-mail address (only) to be included in my mailing list.

You Can Also Find Me On Social Media:

Facebook page: The Grateful Girl Cooks!
Pinterest:
The Grateful Girl Cooks!
Instagram:
jbatthegratefulgirlcooks

Author's signature

0 from 0 votes
Easy Stovetop Macaroni and Cheese
Prep Time
15 mins
Cook Time
0 mins
Total Time
15 mins
 

Easy Stovetop Macaroni and cheese is a creamy, delicious, family-friendly comfort food - quick and easy to make in 15 minutes!

Category: Entree
Cuisine: American
Keyword: macaroni and cheese
Servings: 6 small servings
Calories Per Serving: 449 kcal
Author: JB @ The Grateful Girl Cooks!
Ingredients
  • 3 cups uncooked elbow macaroni
  • 1 Tablespoon butter
  • 1/4 cup all purpose flour
  • 3/4 teaspoon salt
  • 1/2 teaspoon onion powder
  • 1/4 teaspoon garlic powder
  • 2 cups low-fat milk
  • cups shredded sharp cheddar cheese
  • couple dashes of hot pepper sauce (approx 1/8 teaspoon)
Instructions
  1. Cook elbow macaroni (or other small shaped pasta) according to package directions.
  2. While pasta is cooking, in a separate sauce pan, melt butter; stir in flour, salt, onion and garlic powders until well blended. Add milk to pan. Cook on medium-high heat, stirring (or whisking) often, until mixture comes to a boil. Turn heat down to low; continue to simmer (stirring often), until sauce has thickened. This should take about 2 minutes. Once sauce has thickened, remove pan from heat. Immediately stir in grated cheese and a couple dashes of hot pepper sauce (or more if you like the heat). Stir until cheese has completely melted.
  3. When pasta has finished cooking, drain, then immediately place pasta back into the pan you used to cook it. Pour the hot, thickened cheese sauce over the hot drained pasta, and stir well to combine. Taste test...add additional salt, if desired. I added an extra handful of cheddar cheese at this point, as well (but that is optional. Stir well to make sure pasta is fully coated with cheese sauce. Serve the macaroni and cheese while it's hot... and enjoy!
Recipe Notes

Serving size is about a cup. If you wish to make this dish lower in calories, consider substituting fat-free skim milk and low-fat cheddar cheese for the ingredients listed.

Nutrition Facts
Easy Stovetop Macaroni and Cheese
Amount Per Serving (1 serving)
Calories 449 Calories from Fat 117
% Daily Value*
Fat 13g20%
Saturated Fat 8g50%
Cholesterol 40mg13%
Sodium 524mg23%
Potassium 293mg8%
Carbohydrates 60g20%
Fiber 2g8%
Sugar 6g7%
Protein 19g38%
Vitamin A 420IU8%
Vitamin C 0.2mg0%
Calcium 313mg31%
Iron 1.4mg8%
* Percent Daily Values are based on a 2000 calorie diet.

Here’s one more to pin on your Pinterest boards!Easy Stovetop Macaroni and cheese is a creamy, delicious, family-friendly comfort food - quick and easy to make in 15 minutes!

BBQ Chicken Tortilla Pizza

You’re gonna LOVE this BBQ Chicken Tortilla Pizza! Chicken, BBQ sauce, red onion, cilantro and cheese on a baked flour tortilla make a yummy thin crust pizza!You're gonna LOVE this BBQ Chicken Tortilla Pizza! Chicken, BBQ sauce, red onion, cilantro and cheese on a baked flour tortilla make a yummy thin crust pizza!

If you enjoy thin-crust pizza, chances are you will LOVE this BBQ Chicken Tortilla Pizza!  That’s right… the crust is a baked flour tortilla! Tender chunks of chicken, sweet and spicy  BBQ sauce, red onions, cilantro and cheeses combine to make this one amazing tasting dish!

Recently I had an idea to try using a flour tortilla to make a pizza.  I also knew I wanted to make a BBQ sauce based pizza with chicken, red onion, etc. There was no recipe for me to use, but I just made it up as I went along.

Guess what? This BBQ chicken tortilla pizza turned out ABSOLUTELY FANTASTIC! I’m not kidding, we LOVED this pizza! Who knew? Here’s how to make this yummy meal:

Scroll Down For A Printable Recipe Card At the Bottom Of The Page

How To Make A BBQ Chicken Tortilla Pizza

Begin by baking medium sized flour tortillas at 350 degrees on the middle rack of an oven until they are fairly crisp all over. This will take about 10 minutes. Make sure to flip each one over halfway through baking to ensure each tortilla is crisp all over, including in the middle.

Turn the oven to broil. Place the crisp tortillas on the middle rack, about 6 inches from the broiler for 1 minute to slightly brown them.

Tortillas are baked until crispy for pizza crust.

Assembling The BBQ Chicken Tortilla Pizza

Once the tortillas are crisp, spread each tortilla with BBQ sauce (about 1½ to 2 Tablespoons sauce per tortilla). Spread the sauce to within an inch of the edge of the tortilla. This is the BBQ sauce I used to make the BBQ chicken tortilla pizza (photo below), but your favorite BBQ sauce  will be just fine!

Baked tortillas are spread with BBQ sauce first for pizza topping.

Place thin slices of cooked chicken and red onion slices on top of the BBQ sauce. I used leftover cooked chicken breast for the pizza (thighs would also be fantastic).

Cooked chicken pieces and red onion slices top the tortilla pizza.

Sprinkle grated Mozzarella cheese and some sharp cheddar cheese on top of each BBQ chicken tortilla pizza, then garnish with a few cilantro leaves.

BBQ chicken tortilla pizza topped with cheeses and cilantro.

Bake The Pizza

Put the pizzas on a large baking sheet on the middle rack of a preheated 350 degree oven. Bake the BBQ chicken tortilla pizza for 5-6 minutes, until the cheese has melted.

BBQ Chicken Tortilla Pizza hot from the oven.

Carefully slide the pizzas off of the baking sheet, and slice each one into 4 pieces with a pizza cutter. Now the BBQ chicken tortilla pizza is ready to EAT!

We gobbled them up like little piggies because they were sooooo good! The slices will hold their shape easily if the tortillas are nice and crisp before baking.  Go ahead… grab a slice!

BBQ Chicken Tortilla Pizza is sliced with a pizza cutter.

The slightly sweet and spicy taste of the BBQ sauce lends itself well to chicken, red onions and cilantro.  My husband and I were both completely thrilled with the taste of this crazy tortilla pizza!

I really hope you will consider trying this simple recipe… for me it was ridiculously easy and super quick to make, due in part to leftover cooked chicken and extra flour tortillas!  I can hardly wait to make these again for a quick dinner! Have a GREAT day!

Looking For More Pizza Recipes?

You can find all of my recipes in the Recipe Index, located at the top of the page.  You may enjoy a few pizza recipes I have published on my blog, including:

Interested In More Recipes?

Thank you for visiting this website. I appreciate you using some of your valuable time to do soIf you’re interested, I publish a newsletter 2 times per month (1st and 15th) with all the latest recipes, and other fun info. I would be honored to have you join our growing list of subscribers, so you never miss a great recipe!
There is a Newsletter subscription box on the top right side (or bottom) of each blog post, depending on the device you use, where you can easily submit your e-mail address (only) to be included in my mailing list.

You Can Also Find Me On Social Media:

Facebook page: The Grateful Girl Cooks!
Pinterest:
The Grateful Girl Cooks!
Instagram:
jbatthegratefulgirlcooks

Author's signature

0 from 0 votes
BBQ Chicken Tortilla Pizza
Prep Time
10 mins
Cook Time
5 mins
Total Time
15 mins
 
You're gonna LOVE this BBQ Chicken Tortilla Pizza! Chicken, BBQ sauce, red onion, cilantro and cheese on a baked flour tortilla make a yummy thin crust pizza!
Category: Entree
Cuisine: Italian
Keyword: bbq chicken tortilla pizza
Servings: 2 servings
Calories Per Serving: 484 kcal
Author: JB @ The Grateful Girl Cooks!
Ingredients
  • 2 medium flour tortillas
  • 3-4 Tablespoons BBQ sauce , divided
  • 1 large COOKED chicken breast , seasoned with salt/pepper, cut in thin slices, divided
  • thin slices red onion (as many as desired)
  • 1 cup grated mozzarella cheese , divided
  • 1/2 cup grated sharp cheddar cheese , divided
  • 1/4 cup (approximately a handful) cilantro leaves, divided
Instructions
  1. Preheat oven to 350 degrees. Bake flour tortillas on middle rack of oven until fairly crisp all over (approx 10 min) Flip over halfway through baking to ensure each tortilla is crisp all over (especially the middle). Put them under broiler for 1 minute to slightly brown (keeping them on the middle rack not too close to heating element).
  2. Once crisp, remove from oven. Spread each tortilla with BBQ sauce to about an inch from the edge (about 1½-2 Tablespoons sauce per tortilla, or more if desired). Add thin slices of cooked chicken and red onion slices, add grated Mozzarella and cheddar cheese, then sprinkle with a few cilantro leaves.
  3. Place pizzas on a large baking sheet on middle rack of oven; bake at 350 degrees for 5-6 minutes, until cheese has melted. Remove from heat, and cut into slices. Serve and enjoy!
Recipe Notes

May substitute two cooked chicken thighs thinly sliced, for chicken breast.

Nutrition Facts
BBQ Chicken Tortilla Pizza
Amount Per Serving (1 pizza)
Calories 484 Calories from Fat 216
% Daily Value*
Fat 24g37%
Saturated Fat 12g75%
Cholesterol 96mg32%
Sodium 1085mg47%
Potassium 397mg11%
Carbohydrates 28g9%
Sugar 10g11%
Protein 36g72%
Vitamin A 820IU16%
Vitamin C 1.2mg1%
Calcium 657mg66%
Iron 1.7mg9%
* Percent Daily Values are based on a 2000 calorie diet.

Here’s one more to pin on your Pinterest boards!You're gonna LOVE this BBQ Chicken Tortilla Pizza! Chicken, BBQ sauce, red onion, cilantro and cheese on a baked flour tortilla make a yummy thin crust pizza!

Portobello Bleu Cheese Burger

Looking for a flavorful “meatless” burger? Try this marinated Portobello Bleu Cheese Burger, with grilled onions, bleu cheese, and creamy Dijon sauce!Looking for a flavorful "meatless" burger? Try this marinated Portobello Bleu Cheese Burger, with grilled onions, bleu cheese, and creamy Dijon sauce!

You’ve gotta try this delicious Portobello Bleu Cheese Burger! The “meatless” sandwich is easy to make, and tastes wonderful.  Your “Meatless Mondays” will never be the same, with this recipe in your toolbox!!

Now I have to start this blog post by saying that I have never had a portobello burger before. Ever. I’ve had my fair share of of meatless burgers, like black bean  (thanks to one of our sons who is a vegetarian), but never a burger patty made out of a huge portobello mushroom. I love portobello mushrooms, and yes, they are known for their “meaty” taste, but until I tried this recipe, the concept had eluded me. Until now.

I found the recipe on Pinterest for the basic burger part of the recipe, then tweaked the recipe a bit to let me marinate the mushroom before cooking, which gave it additional flavor! I’m a traditional beef burger girl all the way, but was open to trying a meatless version.  The result? A tasty burger, which my husband and I really enjoyed!  Even if you’re not a vegetarian, you will probably enjoy this flavor-filled sandwich.

Scroll Down For A Printable Recipe Card At The Bottom Of The Page

Make The Sauce For The Portobello Bleu Cheese Burger

The first thing you will need to do is make a sauce for the finished burgers.  In a small bowl, combine plain Greek yogurt, olive oil, minced garlic cloves, dijon mustard, dried basil, parsley and salt. Mix the ingredients well, then cover the bowl and refrigerate the portobello bleu cheese burger sauce until you’re ready to use it. Easy!

Mixing up the dijon sauce for a portobello bleu cheese burger.

Prepare The Mushrooms

Wipe mushrooms clean with a damp cloth. Remove stems and gills from underside of mushroom. Clean the gills out by carefully running a small spoon around the underside of the mushroom. Discard the stems and gills, because you won’t need them!

This is what the portobello mushroom caps looked like before they were marinated. Each mushroom is about 4 inches wide (which is perfect size for a standard hamburger bun)!

Two large portobello mushrooms for burgers, ready to marinate.

Make The Marinade For The Portobello Mushrooms

Make a simple marinade for the mushrooms by mixing together olive oil, balsamic vinegar, dried basil, garlic powder, onion powder, and a pinch of salt. Pour the marinade over prepared portobello mushrooms, turning to cover, and let them sit in the marinade for 20 minutes (with mushroom top face down in the marinade most of the time).

The marinade is ready for the portobello mushrooms.

Cook The Portobello Mushrooms

Heat a large skillet on medium-high.  Lightly brush the skillet with olive oil. Add the marinated mushrooms and red onion slices to the hot skillet. Cook the mushrooms for approximately 4 minutes per side, until they are tender and they begin to release their juices.  Cook the onions until they are tender and lightly browned.

Marinated portobello mushrooms and some red onion slices are cooked for burgers.

While the mushrooms cook, split and lightly butter each half of the hamburger buns. Grill them, butter side down in a skillet, until toasted and lightly browned.

Buns are lightly toasted in skillet for portobello bleu cheese burgers.

Assemble The Portobello Bleu Cheese Burger

To assemble each portobello bleu cheese burger, spread a Tablespoon of the herb sauce on the bottom side of a toasted bun.

Dijon sauce is spread on toasted bun for the portobello bleu cheese burger.

Top the bun with the cooked red onion. Place the cooked mushroom on top of the onions with the top (smooth side) down.

Cooked portobello mushroom and blue cheese crumbles are added to hamburger bun.

Sprinkle with some of the bleu cheese crumbles, then cover with a lettuce leaf. Cover the top with the bun, and this delicious portobello bleu cheese burger is ready to eat!

The portobello bleu cheese burger is covered with lettuce and top bun, and is ready to eat!

Hope you enjoy this delicious portobello bleu cheese burger. It is a tasty alternative to a traditional beef burger!  We really enjoyed it and were pleasantly surprised by it’s great flavor! Have a great day.

Looking For More MEATLESS Meals?

You can find all of my recipes in the Recipe Index, located at the top of the page. A few favorites include:

Interested In More Recipes?

Thank you for visiting this website. I appreciate you using some of your valuable time to do soIf you’re interested, I publish a newsletter 2 times per month (1st and 15th) with all the latest recipes, and other fun info. I would be honored to have you join our growing list of subscribers, so you never miss a great recipe!
There is a Newsletter subscription box on the top right side (or bottom) of each blog post, depending on the device you use, where you can easily submit your e-mail address (only) to be included in my mailing list.

You Can Also Find Me On Social Media:

Facebook page: The Grateful Girl Cooks!
Pinterest:
The Grateful Girl Cooks!
Instagram:
jbatthegratefulgirlcooks

Author's signature

Recipe Adapted From: https://www.cleaneatingmag.com/recipes/grilled-portobello-burgers-with-blue-cheese-creamy-dijon

↓↓ PRINTABLE RECIPE BELOW ↓↓

0 from 0 votes
Portobello Bleu Cheese Burger
Prep Time
25 mins
Cook Time
10 mins
Total Time
35 mins
 
Looking for a flavorful "meatless" burger? Try this marinated Portobello Bleu Cheese Burger, with grilled onions, bleu cheese, and creamy Dijon sauce!
Category: Dinner, Vegetarian
Cuisine: American
Keyword: portobello bleu cheese burger
Servings: 2 burgers
Calories Per Serving: 532 kcal
Author: JB @ The Grateful Girl Cooks!
Ingredients
  • 2 large portobello mushrooms (wiped clean, stems and gills removed)
  • 2 slices red onion
  • Tablespoons olive oil
  • 2 kaiser rolls (or hamburger buns)
  • Butter (for toasting buns)
  • 1/4 cup bleu cheese (crumbled)
  • 2 Romaine lettuce leaves
For Mushroom Marinade:
  • 2 Tablespoons olive oil
  • 2 Tablespoons balsamic vinegar
  • 1/8 teaspoon onion powder
  • 1/4 teaspoon garlic powder
  • 1/4 teaspoon dried basil
For Burger Sauce:
  • 1 Tablespoon plain Greek yogurt
  • 1 teaspoon Dijon mustard
  • 1/2 Tablespoon olive oil
  • cloves garlic , minced
  • 1 teaspoon dried basil
  • Pinch of salt
Instructions
  1. Make the sauce for the finished burgers. In a small bowl, combine plain Greek yogurt, olive oil, minced garlic cloves, dijon mustard, dried basil and salt. Mix well, then refrigerate (covered) until ready to use.
  2. Wipe mushrooms clean with a damp cloth. Remove stems and gills from underside of mushroom. Clean the gills out by carefully running a small spoon around the underside of the mushroom. Discard gills. Make marinade for mushrooms by mixing together olive oil, balsamic vinegar, dried basil, garlic powder and a pinch of salt. Pour marinade over prepared portobello mushrooms, turning to cover; let them sit in marinade for 20 minutes (with mushroom top face down in marinade most of the time).
  3. Heat a skillet on medium-high. Lightly brush skillet with the olive oil. Add mushrooms and red onion slices to hot skillet. Cook mushrooms 4 minutes per side, until tender. Cook onions until tender and lightly browned.
  4. While mushrooms cook, split and lightly butter each cut side of hamburger buns. Grill them, butter side down in a skillet, until toasted and lightly browned.
  5. To assemble burgers, spread a Tablespoon of the dijon sauce on the bottom side of a toasted bun. Top with cooked red onion, then put the cooked mushroom on top of onions with the top (smooth side) down. Sprinkle with bleu cheese crumbles, then cover with lettuce leaf. Top with bun, and it's ready to eat!
Nutrition Facts
Portobello Bleu Cheese Burger
Amount Per Serving (1 burger)
Calories 532 Calories from Fat 360
% Daily Value*
Fat 40g62%
Saturated Fat 11g69%
Cholesterol 28mg9%
Sodium 547mg24%
Potassium 511mg15%
Carbohydrates 31g10%
Fiber 3g13%
Sugar 8g9%
Protein 11g22%
Vitamin A 2745IU55%
Vitamin C 3.4mg4%
Calcium 192mg19%
Iron 2.7mg15%
* Percent Daily Values are based on a 2000 calorie diet.

Here’s one more to pin on your Pinterest boards!Looking for a flavorful "meatless" burger? Try this marinated Portobello Bleu Cheese Burger, with grilled onions, bleu cheese, and creamy Dijon sauce!

Grilled “Elvis Special” Sandwich

A Grilled “Elvis Special” Sandwich is a hunk, a hunk of burnin’ love! Peanut butter, banana, and chocolate cooked on buttered bread would even make Elvis proud!A Grilled "Elvis Special" Sandwich is a hunk, a hunk of burnin' love! Peanut butter, banana, and chocolate cooked on buttered bread would even make Elvis proud!
Fact:  Elvis Presley loved peanut butter and banana sandwiches. I decided to morph that combo and make a Grilled Elvis Special Sandwich – a grilled banana, peanut butter AND chocolate sandwich.

If Elvis were still around he would probably say “Thank You…Thank You Very Much“.  Then he’d take a big bite, and swivel his hips (to work off the calories, no doubt).

Scroll Down For A Printable Recipe Card At The Bottom Of The Page

Experimenting With This Sandwich!

I wasn’t sure just HOW this sandwich would taste, but I was in an experimenting mood one day. Creamy peanut butter and “smashed” banana is something my grandma used to eat all the time. Trust me, she ate this all the time (especially when she took out her false teeth, ha ha).

I was thinking about that when it hit me (an idea, NOT the sandwich). My thought was “what if I GRILLED the sandwich AND added a few chocolate chips to really take it to the next level”?  I mean… chocolate goes good with bananas and chocolate goes good with peanut butter, so how could this NOT work?

Well, thankfully… it DID WORK. It actually was VERY GOOD! Who knew?  In the words of Elvis… “I’m All Shook Up”!  So that’s how this goofy good, Grilled Elvis Special Sandwich came to be. Truth. Amen. And now… you can make this sandwich, too!

How To Make A Grilled Elvis Special Sandwich

Start with a large ripe banana (this recipe makes TWO sandwiches). Cut the banana into chunks and put it into a bowl with the peanut butter. Use a fork to smash the banana and mix the two ingredients together.  The banana should be smashed until it is almost creamy, with little pieces.

Ripe banana and peanut butter are mashed together for this "Elvis Special" Sandwich.

Butter the slices of bread just like you’re going to make a grilled cheese sandwich. Butter one side of each piece of bread.

Bread is buttered on one side before grilling the "Elvis Special" sandwich.

Spread half of the peanut butter/banana mixture onto the UNBUTTERED side of a piece of bread.  Sprinkle with a small amount of chocolate chips (15-20).

Peanut butter banana mixture with chocolate chips on this "Elvis Special" sandwich before grilling.

Time For The Grill

Place the sandwich buttered side down into a hot skillet on medium low heat. Cover the sandwich with the other piece of bread (buttered side facing UP).

Grilled "Elvis Special" Sandwich is cooked in a small skillet.

Grill until the bottom side of the sandwich is golden brown. Carefully turn the sandwich over with a spatula. Cook the other side until it is golden brown, also.

Grilled "Elvis Special" Sandwich is cooked until golden brown on both sides.

Time to Eat The Grilled “Elvis Special” Sandwich!

Remove the grilled sandwich from skillet. Cut it in half diagonally… and serve! Grab a cup of milk to drink, and a paper napkin! This Elvis Special Sandwich might get messy – but it’s a GOOD messy! Enjoy!

Grilled "Elvis Special" Sandwich is sliced in half, and topped with sliced bananas to serve.

Looking For More SANDWICH Recipes?

I sincerely hope you enjoy this Grilled Elvis Special Sandwich! If you are interested in other sandwich recipes, I hope you will check out Grilled Patty Melts, BBQ Shredded Pork, and Mediterranean Chicken Sandwiches. You might also enjoy my Grilled Thai PB & J Sandwich, or a Fried Chicken Spicy Mayo & Slaw Sandwich.

You can find ALL of my recipes in the Recipe Index, which is located at the top of the page. Hope you have a wonderful day. I sincerely hope you find moments of peace and encouragement in your day. May you also seek to be a peacemaker, and encourager of others, as well.

Interested In More Recipes?

Thank you for visiting this website. I appreciate you using some of your valuable time to do soIf you’re interested, I publish a newsletter 2 times per month (1st and 15th) with all the latest recipes, and other fun info. I would be honored to have you join our growing list of subscribers, so you never miss a great recipe!
There is a Newsletter subscription box on the top right side (or bottom) of each blog post, depending on the device you use, where you can easily submit your e-mail address (only) to be included in my mailing list.

You Can Also Find Me On Social Media:

Facebook page: The Grateful Girl Cooks!
Pinterest:
The Grateful Girl Cooks!
Instagram:
jbatthegratefulgirlcooks

Grilled "Elvis Special" Sandwich / The Grateful Girl Cooks!

0 from 0 votes
Grilled "Elvis Special" Sandwich
Prep Time
5 mins
Cook Time
5 mins
Total Time
10 mins
 
A Grilled "Elvis Special" Sandwich is a hunk, a hunk of burnin' love! Peanut butter, banana, and chocolate cooked on buttered bread would even make Elvis proud!
Category: Sandwich
Cuisine: American
Keyword: Elvis special sandwich
Servings: 2 sandwiches
Calories Per Serving: 511 kcal
Author: JB @ The Grateful Girl Cooks!
Ingredients
  • 1 large banana (or two small)
  • 2 Tablespoons creamy peanut butter (generous Tablespoons)
  • 1/4 cup Chocolate chips ( approx 15-20 per sandwich)
  • 4 slices good quality bread
  • 2 Tablespoons Butter , softened (to spread on one side of each piece of bread)
Instructions
  1. In a small bowl, mash banana and peanut butter together, using a fork, until mixture is creamy with small pieces of banana.

  2. Spread one side of each of piece of bread with soft (room temp) butter. Place two pieces of bread, butter side down in a skillet (on medium heat).

  3. Spread the peanut butter/banana mixture onto bread in skillet. Sprinkle chocolate chips on top of peanut butter/banana mixture. Place remaining piece of bread on top of each sandwich, butter side UP.
  4. Grill sandwich on medium heat until bottom of sandwich is golden brown. Carefully turn each sandwich over using a spatula, and continue cooking until other side is golden brown.
  5. Remove sandwich to serving plate. Cut diagonally, and serve! Can garnish sandwich with sliced bananas, if desired.

Nutrition Facts
Grilled "Elvis Special" Sandwich
Amount Per Serving (1 sandwich)
Calories 511 Calories from Fat 234
% Daily Value*
Fat 26g40%
Saturated Fat 12g75%
Cholesterol 33mg11%
Sodium 479mg21%
Potassium 416mg12%
Carbohydrates 59g20%
Fiber 5g21%
Sugar 26g29%
Protein 11g22%
Vitamin A 440IU9%
Vitamin C 5.1mg6%
Calcium 110mg11%
Iron 2.7mg15%
* Percent Daily Values are based on a 2000 calorie diet.

Here’s one more to pin on your Pinterest boards!A Grilled "Elvis Special" Sandwich is a hunk, a hunk of burnin' love! Peanut butter, banana, and chocolate cooked on buttered bread would even make Elvis proud!


Save

Save

Save