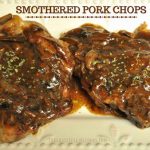
Smothered Pork Chops are pan-seared, then baked until tender and smothered in a rich, thick onion gravy. Full of flavor, you will LOVE these glazed chops!
Smothered Pork Chops, how I love thee! Pan-seared, bone-in pork chops, baked until tender, and smothered in a rich, thick onion gravy. How could I NOT love you?
I found this recipe for smothered pork chops in a cookbook I got for my birthday. The photo in the cookbook LOOKED really good, and the recipe sounded wonderful, so I gave it a try. Wow… were they ever YUMMY! Tender and packed with flavor, this pork chop dinner for two was a winner!
There are a few steps involved in making these smothered pork chops, but it’s actually easy to prepare if you prep everything before beginning. You will LOVE the finished dish! The recipe, as written, serves two, but is EASILY doubled. Here’s how to make this delicious pork dish:
Scroll Down for A Printable Recipe Card At the Bottom Of The Page
How To Make Smothered Pork Chops
Preheat oven to 300° F. While oven is preheating, mix paprika, onion powder, salt, pepper, and cayenne pepper in a small bowl. Pat the pork chops dry with a paper towel, then rub both sides with spice mix, to evenly cover meat.

Place the oil in an ovenproof 10 inch skillet. Heat oil on medium-high heat until it just begins to smoke. Place the chops into the skillet and cook each side 3-5 minutes until well browned. Transfer the chops to a plate and keep warm, but DO NOT clean out skillet.

Add butter to the skillet and melt, on medium heat. Add the onion slices; cook them for 8-10 minutes until well browned.

Once the onions have browned fully, stir the thyme and minced garlic into the skillet. Cook, stirring constantly for 30 seconds.

Add Broth To Make The Sauce
Add 1/2 cup beef broth (reserve the remaining Tablespoon of broth called for in recipe) and the bay leaf to the skillet. Stir well, making sure to scrape up all those browned bits from the bottom of the skillet (flavor-packed!). Bring this liquid mixture to a simmer in the skillet.

Bake The Smothered Pork Chops
Place the chops (and any juices that have accumulated on the plate) back into the skillet. Spoon a bit of the sauce over the chops. Cover the skillet, and place the smothered pork chops into the preheated oven. Bake for 1½ hours, until the pork is tender.

Making The Sauce AFTER The Pork Chops Have Baked
When the pork chops are done, carefully remove the hot skillet from the oven. Place the chops onto a serving platter, and cover with foil to keep them warm. Pour the liquid from the skillet through a strainer into a medium bowl.
Throw away the bay leaf, then place the remaining onions into a small bowl. As you can see in the photo below, those are onions in the strainer. The liquid has been strained through, into the bowl under the strainer.

Let the liquid settle for a couple minutes, then remove any accumulated fat from the surface of the liquid with a large spoon. Measure out 1/3 cup of the liquid and put it back into the (still hot) skillet. Bring this to a low simmer.
In a small bowl, whisk together the remaining Tablespoon of beef broth, and the cornstarch until smooth. Add this mixture to the skillet, and whisk to combine. The sauce will thicken slightly as you continue to cook it. Stir the sauce for about a minute. Once slightly thickened, add the onions to the sauce, then season with additional salt and pepper, to taste.


Time To EAT!
Spoon the sauce over the smothered pork chops, and serve! The meat will be extremely tender, and full of FLAVOR!

I hope you will consider making this recipe. We absolutely LOVED it! Don’t be put off by the low and slow baking time- that is what makes the pork chops so tender! If you enjoyed these pork chops, be sure to check out my recipe for Creamy Honey Dijon Pork Chops! They’re sooo good!
While the smothered pork chops baked, I was able to get the dishes cleaned up and make the side dishes, with no time constraints! I’m very grateful to have found this recipe, and thankful to be able to share it with YOU!
Looking For More PORK CHOP Recipes?
You can find all of my pork chop recipes in the Recipe Index, located at the top of the page. I have some delicious ones, including:
Interested In More Recipes?
Thank you for visiting this website. I appreciate you using some of your valuable time to do so. If you’re interested, I publish a newsletter 2 times per month (1st and 15th) with all the latest recipes, and other fun info. I would be honored to have you join our growing list of subscribers, so you never miss a great recipe!
There is a Newsletter subscription box on the top right side (or bottom) of each blog post, depending on the device you use, where you can easily submit your e-mail address (only) to be included in my mailing list.
You Can Also Find Me On Social Media:
Facebook page: The Grateful Girl Cooks!
Pinterest: The Grateful Girl Cooks!
Instagram: jbatthegratefulgirlcooks

Recipe Adapted From: The cookbook: “The Complete Cooking For Two Cookbook, Published 2014 by The Editors at America’s Test Kitchen, pages 151-152.
Smothered Pork Chops are pan-seared, then baked until tender and smothered in a rich, thick onion gravy. Full of flavor, you will LOVE these glazed chops!
Category: Entree
Cuisine: American
Keyword: smothered pork chops
Servings: 2 servings
Calories Per Serving: 434 kcal
Author: JB @ The Grateful Girl Cooks!
- 1/4 teaspoon paprika
- 1/2 teaspoon onion powder
- 1/4 teaspoon (each) salt and pepper
- 1/8 teaspoon cayenne pepper
- 2 (8-10 oz. each) bone-in pork chops (about 3/4-1 inch thick)
- 1 Tablespoon vegetable oil
- 1 Tablespoon butter
- 1 large brown onion , halved (top to bottom), sliced thin
- 1 clove garlic , minced
- 1/2 teaspoon fresh thyme, minced , or 1/8th teaspoon dried
- 1/2 cup plus 1 Tablespoon beef broth
- 1 bay leaf
- 3/4 teaspoon cornstarch
Preheat oven to 300° F. Mix paprika, onion powder, salt, pepper, and cayenne pepper in a bowl. Pat pork chops dry with a paper towel, then rub both sides with spice mix, to evenly cover meat.
Heat oil in an ovenproof 10 inch skillet on medium-high heat until it barely begins to smoke. Place chops into skillet and cook each side 3-5 minutes until well browned. Transfer chops to a plate; keep warm. Do NOT clean out skillet.
Add butter to same skillet; melt using medium heat. Add onion slices; cook for 8-10 minutes until well browned. Once browned, stir thyme and garlic into skillet. Cook and stir for 30 seconds. Add 1/2 cup beef broth (reserve remaining Tablespoon broth called for in recipe) and bay leaf to skillet. Stir well, scraping browned bits from bottom of skillet (flavor-packed!). Bring to a simmer.
Place chops (and any juices accumulated on plate) back into skillet. Spoon sauce over chops. Cover skillet, and place into oven. Bake for 1½ hours, until pork is tender.
When done, carefully remove hot skillet from oven. Place chops onto a plate; cover with foil to keep warm. Pour the liquid from skillet through a strainer into a medium bowl. Throw away the bay leaf, then place onions into a small bowl. Let liquid in bowl settle a couple minutes, then remove any accumulated fat from surface with a spoon.
Measure out 1/3 cup of the liquid; put it back into skillet. Bring to a low simmer. In a small bowl, whisk the reserved Tablespoon of beef broth and cornstarch until smooth. Add this to skillet, and whisk to combine. The sauce will thicken slightly as you cook and stir, for about a minute. Once slightly thickened, stir onions back into to sauce; season with salt and pepper, to taste. Place chops on plate, and spoon sauce over the top. Serve, and enjoy!
Nutrition Facts
Smothered Pork Chops
Amount Per Serving (1 chop with gravy)
Calories 434 Calories from Fat 252
% Daily Value*
Fat 28g43%
Saturated Fat 14g88%
Cholesterol 132mg44%
Sodium 660mg29%
Potassium 696mg20%
Carbohydrates 7g2%
Sugar 2g2%
Protein 36g72%
Vitamin A 325IU7%
Vitamin C 5.4mg7%
Calcium 45mg5%
Iron 1.3mg7%
* Percent Daily Values are based on a 2000 calorie diet.
Here’s one more to pin on your Pinterest boards!


. / The Grateful Girl Cooks!")


. / The Grateful Girl Cooks!")