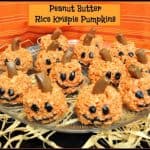
Make these yummy Fall or Halloween themed Peanut Butter Rice Krispie Pumpkins in only 20 minutes! Kids will love making these easy treats!
Fall is in the air… time to decorate pumpkins! How about making some EASY, cute and tasty Peanut Butter Rice Krispie Pumpkins in about 20 minutes?
I found a recipe on Pinterest for these cute little pumpkins and knew I had to make them! Looking at them, I thought they were the perfect Fall treat.
I love the original Rice Krispy treats, so a peanut butter flavored one that LOOKED like a cute little Halloween pumpkin- yes, please! They were incredibly EASY to make, taste delicious, and you really can’t mess them up!
Scroll Down For A Printable Recipe Cad At the Bottom Of The Page
How To Make These Pumpkin Rice Krispie Treats
Place peanut butter and butter in a medium sized saucepan. Heat on medium heat for 3 minutes, stirring occasionally with wooden spoon (use wooden spoon because mixture won’t stick to it as much).

Add marshmallows and the food coloring. Stir until the marshmallows have completely melted and mixture is smooth and sticky.


Remove pan from heat; stir in the Rice Krispy cereal. Stir very well with wooden spoon (put some muscle into it!), until completely mixed together and mixture is orange in color.

Forming The Peanut Butter Rice Krispie Pumpkins
Using wax paper (or powder free latex gloves), scoop out rice krispie mixture (just “guesstimate” – you need to get 12 pumpkins out of the mixture!).
Roll each portion into a round little ball. Immediately push a tootsie roll midgee into the top of “pumpkin” to act as the stem. TIP: Having 12 tootsie rolls unwrapped before beginning makes it so much faster!
Place pumpkin onto wax paper to cool. Later, once the tootsie roll has warmed a bit from the hot Rice Krispy mixture, you can bend it a little to make a more realistic looking “stem”. Repeat process until you have made 12 pumpkins.

Time To Decorate!
Once the peanut butter rice krispie pumpkins have cooled completely, decorate them any way you wish with frosting, candy eyes, or leave them just the way they are! I used a toothpick to apply the frosting.


These Fall-themed peanut butter rice krispie pumpkins are a whimsical way to celebrate the season! They are delicious, and what could be more fun than to decorate a peanut butter flavored rice krispie treat pumpkin?!
All ages will love these cute treats. Sure hope you enjoy making them and gobbling them up! Thanks for stopping by, and please come back again soon for more family-friendly recipes.
Looking For More FALL-INSPIRED Recipes?
You can find ALL of my recipes in the Recipe Index, located at the top of the page. I have several Fall-inspired recipes you might enjoy, including:
Interested In More Recipes?
Thank you for visiting this website. I appreciate you using some of your valuable time to do so. If you’re interested, I publish a newsletter 2 times per month (1st and 15th) with all the latest recipes, and other fun info. I would be honored to have you join our growing list of subscribers, so you never miss a great recipe!
There is a Newsletter subscription box on the top right side (or bottom) of each blog post, depending on the device you use, where you can easily submit your e-mail address (only) to be included in my mailing list.
You Can Also Find Me On Social Media:
Facebook page: The Grateful Girl Cooks!
Pinterest: The Grateful Girl Cooks!
Instagram: jbatthegratefulgirlcooks

Recipe Source: https://www.savoryexperiments.com/peanut-butter-rice-krispie-treat-pumpkins/
↓↓ PRINTABLE RECIPE BELOW ↓↓
- 6 cups Rice Krispies cereal
- 3 Tablespoons butter
- 1 package (10 ounces) mini-marshmallows
- 1/2 cup creamy peanut butter
- 13 drops red food coloring
- 5 drops yellow food coloring
- 12 Tootsie Roll Midgees
- Optional- Prepared frosting for decorating (I used 1 cup powdered sugar, several drops of water and black food coloring-mixed them together to form a fairly thick frosting that wouldn't run)
- Place peanut butter and butter in a medium sized saucepan. Heat on medium heat for 3 minutes, stirring occasionally with wooden spoon (use wooden spoon because mixture won't stick as much).
- Add marshmallows and the food coloring. Stir until the marshmallows have completely melted and mixture is smooth and sticky.
- Remove pan from heat; stir in the Rice Krispies. Stir very well with wooden spoon (put some muscle into it!), until completely mixed together and mixture is orange in color.
- Using wax paper (or powder free latex gloves), scoop out rice krispie mixture (just guesstimate-you need to get 12 pumpkins out of the mixture!). Roll each portion into a round little ball. Immediately push a tootsie roll midgee into the top of "pumpkin" to act as the stem. Place pumpkin onto wax paper to cool. Later, once the tootsie roll has warmed a bit from the hot rice krispie mixture, you can bend it a little to make a more realistic looking "stem".
- Repeat process until you have made 12 pumpkins. Once pumpkins have cooled completely, decorate them any way you wish with frosting, or leave them just the way they are! (I used a toothpick to apply the frosting). Enjoy!
Here’s one more to pin on your Pinterest boards!


