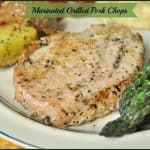
Category: Pork

Pasta, Ham and Gruyere Casserole

Pasta, Ham and Gruyere Casserole is a hearty, delicious & simple dish, with egg noodles, Gruyere cheese, peas, spices and ham baked in a creamy sauce. Pasta, Ham and Gruyere Casserole is a hearty, delicious & simple dish, with egg noodles, Gruyere cheese, peas, spices and ham baked in a creamy sauce.

Do you ever have those days when you get so busy with projects or other activities that when it gets to be dinner time, you realize you didn’t remember to plan anything or lay anything out from the freezer? Where you wish the dinner “fairies” would magically appear and fix dinner (and clean up) for you? Yep. I did that about a week ago. I racked my brain and ended up creating this this Pasta, Ham and Gruyere Cheese Casserole “on the fly” for a quick and easy dinner. Boy, was it good!

Before making this, I foraged to see what leftovers we had hanging around, and came up with this idea for a quick pasta based casserole, and guess what? It actually tasted great! Hooray for last minute throw-together dinners!!!!

Egg noodles and smokey flavored Gruyere cheese sauce is a great combo. Add to that some ham, a few peas, and a few more ingredients, and BAM! You’ve got yourself a quick casserole (like Mac n’ Cheese on steroids) that tastes so good! So I thought I would share this easy recipe on the ol’ blog today. Here’s how to make this simple dish:

Cook The Pasta First

First things first. Cook the egg noodles in boiling water per the package instructions until done. Once they are fully cooked, drain them well. Easy, right? While the noodles are cooking, you can make the cheese sauce.

Egg noodles are cooked according to package instructions, then drained.
Make The Creamy Cheese Sauce

While the noodles are cooking you can make the cheese sauce. In a large saucepan melt the butter, and then add the flour, garlic powder and onion powder. Whisk these ingredients together, and cook for about a minute on low heat.

Add the Gruyere cheese and milk to the pan. Cook the sauce on low heat, stirring often, until cheese has melted, and the mixture thickens. Once the sauce has thickened, pour in the whipping cream, stir to fully blend, and then season with salt and pepper, to taste.

Butter, milk, spices and cheese are slowly cooked in pan.Add Ham, Frozen Peas and Noodles To Sauce

Once you have the sauce seasoned to taste with the salt and pepper, add the pieces of ham. “Leftover” Ham. Hooray for leftovers!

Ham chunks are added to the hot cheese sauce for this casserole.
After adding the ham, toss in the frozen peas. Yep. Just throw them in frozen. There’s no need to thaw them at all! They will thaw quickly in the hot cheese sauce.

Frozen peas are added to the hot cheese sauce.
Now add the cooked and drained egg noodles, and stir gently, to combine and fully coat the noodles with the cheese sauce.

The cooked, drained egg noodles are then added to the ham, peas and cheese sauce.Time To Bake The Pasta, Ham and Gruyere Casserole

Spray an 8×8 baking dish with non-stick spray and pour the combined pasta and sauce into the dish. Grate additional Gruyere cheese onto the top of the casserole. Sprinkle with the bread crumbs, cover the dish with aluminum foil, and place the pasta, ham and Gruyere casserole into a preheated 350°F oven.

Casserole is topped with Gruyere cheese and bread crumbs before baking.
Bake the pasta, ham and Gruyere casserole for 30 minutes. When done, it should be bubbly around the edges, and golden brown on top. Remove the dish from the oven and carefully remove foil. When it comes out of the oven 30 minutes later, it should look like this:

Pasta, Ham and Gruyere Casserole hot out of the oven, and golden brown.Time To Eat!

I recommend letting the casserole cool for just a minute or two, to make it easier to dish up, then dish it up! The pasta tastes fantastic (I credit the smokey taste of that Gruyere Cheese!). We enjoyed it this time with some of the green beans I canned last summer (from our garden).

The leftover casserole for lunch the next day was wonderful, as well. Store the casserole covered in the refrigerator for up to 2-3 days. This recipe makes 4 servings, but could very easily be doubled.

A portion of the pasta, ham and Gruyere casserole with green beans on the side.
Hope you will give pasta, ham and Gruyere casserole a try. It’s EASY and DELICIOUS! Have a great day.

Interested In More Recipes?

Thank you for visiting this website. I appreciate you using some of your valuable time to do soIf you’re interested, I publish a newsletter 2 times per month (1st and 15th) with all the latest recipes, and other fun info. I would be honored to have you join our growing list of subscribers, so you never miss a great recipe!
There is a Newsletter subscription box on the top right side (or bottom) of each blog post, depending on the device you use, where you can easily submit your e-mail address (only) to be included in my mailing list.

You Can Also Find Me On Social Media:

Facebook page: The Grateful Girl Cooks!
Pinterest:
The Grateful Girl Cooks!
Instagram:
jbatthegratefulgirlcooks

Author's signatureRecipe Source: My brain, while hungry!

5 from 1 vote
Pasta, Ham and Gruyere Casserole
Prep Time
15 mins
Cook Time
30 mins
Total Time
45 mins
 

Pasta, Ham and Gruyere Casserole is a hearty, delicious & simple dish, with egg noodles, Gruyere cheese, peas, spices and ham baked in a creamy sauce.

Category: Entree
Cuisine: American
Keyword: pasta, ham and gruyere casserole
Servings: 4 servings
Calories Per Serving: 420 kcal
Author: JB @ The Grateful Girl Cooks!
Ingredients
  • 2 cups egg noodles (or any pasta you prefer)
  • 2 Tablespoons butter
  • 2 Tablespoons all purpose flour
  • 1/8 teaspoon garlic powder
  • 1/8 teaspoon onion powder
  • 1/2 cup milk
  • 1 cup cup grated Gruyere cheese
  • 1/3 cup whipping cream
  • salt and pepper (to taste)
  • 1 cup chopped ham
  • 1/3 cup peas (frozen are fine)
  • Additional 1/4 cup grated Gruyere cheese (for garnish)
  • 2 Tablespoons bread crumbs (for garnish)
  • Non-stick spray (for baking dish)
Instructions
  1. Preheat oven to 350 degrees. Spray an 8"x8" baking dish with non-stick spray. Set aside.

  2. Cook pasta according to pkg. instructions. Drain. Set aside.
  3. While pasta is cooking, prepare cheese sauce. Melt butter in large pan (or skillet). Whisk in flour, garlic powder and onion powder. Cook for about a minute. Add milk. Stir until fully combined and sauce has thickened. Add a cup of grated cheese. Stir to combine. Cook on low until cheese has fully melted. Add whipping cream. Stir to fully combine. Continue cooking on LOW, but do not let mixture come to a boil. Season to taste with salt and pepper.

  4. Add ham pieces. Add peas. Stir gently to combine. Add cooked and drained pasta. Stir gently until pasta is coated with sauce. Pour pasta and sauce into prepared 8x8 baking dish. Cover the top of casserole with additional grated cheese, then sprinkle with bread crumbs.

  5. Cover baking dish with aluminum foil. Cut a tiny hole in top of foil to vent, then bake casserole in 350 degree oven for 30 minutes. When done, and cheese is bubbly, remove to a wire rack for a minute or two to slightly cool, then serve. Enjoy!
Nutrition Facts
Pasta, Ham and Gruyere Casserole
Amount Per Serving (1 g)
Calories 420 Calories from Fat 234
% Daily Value*
Fat 26g40%
Saturated Fat 15g94%
Cholesterol 112mg37%
Sodium 594mg26%
Potassium 167mg5%
Carbohydrates 24g8%
Fiber 1g4%
Sugar 3g3%
Protein 20g40%
Vitamin A 920IU18%
Vitamin C 4.9mg6%
Calcium 400mg40%
Iron 1.2mg7%
* Percent Daily Values are based on a 2000 calorie diet.

Here’s one more to pin on your Pinterest boards!Pasta, Ham and Gruyere Casserole is a hearty, delicious & simple dish, with egg noodles, Gruyere cheese, peas, spices and ham baked in a creamy sauce.


Save

Save

BBQ Shredded Pork Hoagies with Spicy Slaw

Classic BBQ Shredded Pork Hoagies, topped with a slightly spicy and crunchy slaw. This is a great way to use leftover pork to make a new lunch or dinner!Classic BBQ Shredded Pork Hoagies, topped with a slightly spicy and crunchy slaw. This is a great way to use leftover pork to make a new lunch or dinner!
Do you like leftovers? We like them, but sometimes it can get “old” eating leftovers (even if original recipe was fantastic!). Such was the case a few weeks ago, so I “morphed” the leftovers from a pork roast into  BBQ Shredded Pork Hoagies with Spicy Slaw. YUM.

We had leftovers from a  Pork Tenderloin with Cranberry-Raspberry Sauce recently.  Since there was a bit of pork still waiting to be eaten (there’s only 2 of us), I decided to morph the leftover pork into a completely new meal!

That’s how we ended up with these delicious BBQ Shredded Pork Hoagies with Spicy Slaw. The spicy slaw recipe is from a previous recipe I posted for a Fried Chicken, Spicy Mayo and Slaw Sandwich.

Scroll Down For A Printable Recipe Card At the Bottom Of the Page

How I Made The BBQ Shredded Pork Hoagies

I took the leftover pork slices and added lots of BBQ sauce. Then I threw it all back into my slow cooker and let it cook all day (at least 5-6 hours).

Note: ANY leftover boneless pork chops or pork roast will work fine!  You can also BUY precooked BBQ pork if you want. This would allow you to skip this next part, but this is how I did it (to use up our leftovers).

The leftover pork had some of the sauce from the pork tenderloin left on it. You can also see some of the leftover cranberries, too. I threw the pork slices into the crock pot, along with the BBQ sauce and a tiny bit of water. You can see a few of the cranberries floating around in this photo.

Pieces of pork for BBQ shredded pork hoagies, cooking in crock pot.

After the meat and sauce had cooked for 5-6 hours I easily shredded the pork (with two forks) and added even more BBQ sauce.

Shredding meat and bbq sauce for BBQ shredded pork hoagies with two forks

Another Way To Make The Shredded Pork Without Using A Crock Pot

You can always shred leftover pieces of tender pork roast (without any sauce on it), THEN add the BBQ sauce. That way, you don’t have to use a crock pot.

All you need to do is mix the plain shredded pork with BBQ sauce and heat, before making the hoagies. The picture below shows this plain, unadorned shredded pork.

Shredded pieces of pork roast for BBQ shredded pork hoagies

Making The Spicy Slaw For Sandwich

Once pork is shredded, coated with BBQ sauce and reheated, all you need to do is prepare the spicy slaw mixture. Make the spicy slaw by mixing ingredients in a small bowl. There are only 5 simple ingredients, and it is EASY to make! Refrigerate slaw until you’re ready to put it on the hoagies!

Spicy coleslaw for BBQ shredded pork hoagies, in small metal bowl

To Make BBQ Shredded Pork Hoagies

Spread some hoagie rolls with butter, then lightly grill them until golden brown and slightly crisp.  This will help the bread to not get too soggy, once you add the BBQ shredded pork.

Grilling hoagie rolls in skillet, for BBQ shredded pork hoagies.

Top the toasted hoagie rolls with hot shredded BBQ pork, then add the cold, spicy slaw.

BBQ shredded pork hoagies with spicy slaw.

If desired, you can slice the BBQ shredded pork hoagies in half.  Serve this delicious sandwich hot, and enjoy!!!

BBQ shredded pork hoagies, cut in half on a plate

Hope you enjoy these BBQ shredded pork hoagies! It’s a great way to use leftover pork, without having to toss it or have it dry out in the refrigerator!

Looking For More SANDWICH Recipes?

You can find ALL of my recipes in the Recipe Index, located at the top of the page. I have some sandwich recipes that you’ll enjoy, including:

Interested In More Recipes?

Thank you for visiting this website. I appreciate you using some of your valuable time to do soIf you’re interested, I publish a newsletter 2 times per month (1st and 15th) with all the latest recipes, and other fun info. I would be honored to have you join our growing list of subscribers, so you never miss a great recipe!
There is a Newsletter subscription box on the top right side (or bottom) of each blog post, depending on the device you use, where you can easily submit your e-mail address (only) to be included in my mailing list.

You Can Also Find Me On Social Media:

Facebook page: The Grateful Girl Cooks!
Pinterest:
The Grateful Girl Cooks!
Instagram:
jbatthegratefulgirlcooks

Author's signature

0 from 0 votes
BBQ Shredded Pork Hoagies with Spicy Slaw
Prep Time
20 mins
Cook Time
15 mins
Total Time
35 mins
 
Classic BBQ Shredded Pork Hoagies, topped with a slightly spicy and crunchy slaw. This is a great way to use leftover pork to make a new lunch or dinner!
Category: Sandwich
Cuisine: American
Keyword: BBQ shredded pork hoagies
Servings: 4 sandwiches
Calories Per Serving: 615 kcal
Author: JB @ The Grateful Girl Cooks!
Ingredients
  • Shredded pork (quantity-as much or as little as you wish)
  • BBQ sauce (enough to fully saturate the amount of shredded pork you will use)
  • 4 Hoagie rolls (one per sandwich)
  • 4 Tablespoons Butter (to spread on rolls before grilling)
For spicy slaw:
  • 1 garlic clove , finely chopped
  • 1/2 small red onion , thinly sliced, chopped
  • 1 jalapeno , finely chopped
  • 4 cups thinly sliced green cabbage
  • 1/2 cup Bread and Butter pickle slices , plus 1/4 cup pickle juice from jar
Instructions
  1. Cook pork or leftover pork in slow cooker for several hours until completely tender. Using two forks, shred the pork. Put back into slow cooker and add sufficient BBQ sauce to completely coat meat. Heat thoroughly (can also heat the shredded BBQ pork in microwave, if desired).
  2. Make spicy slaw while pork is heating: Mix all slaw ingredients in a small bowl; toss to combine, then cover and refrigerate until ready to build the sandwiches.
  3. Spread each half of the hoagie rolls with butter. Grill until they are golden brown.
  4. Place grilled roll on serving dish. Spread hot BBQ shredded pork on top of one half of the roll. Spoon some cold spicy slaw evenly over the pork. Place top bun on the hoagie, and serve!
  5. Enjoy!
Recipe Notes

Cook time varies. Cooking time shown is based on having pre-cooked pork available when you start this recipe. Once you have the precooked, shredded pork coated with BBQ sauce and hot, you can have the sandwiches finished in about 10 minutes.
My other advice is to try and make the spicy slaw several hours before serving. The flavors really develop well, the longer it is refrigerated!

Nutrition Facts
BBQ Shredded Pork Hoagies with Spicy Slaw
Amount Per Serving (1 sandwich)
Calories 615
* Percent Daily Values are based on a 2000 calorie diet.

Here’s one more to pin on your Pinterest boards!Classic BBQ Shredded Pork Hoagies, topped with a slightly spicy and crunchy slaw. This is a great way to use leftover pork to make a new lunch or dinner!


Save

Baked Pork Chops with Stuffing

Baked pork chops with stuffing, topped with a creamy mushroom sauce is comfort food at it’s best! They’re easy to make, and the chops are tender and delicious!Baked pork chops with stuffing, topped with a creamy mushroom sauce is comfort food at it's best! They're easy to make, and the chops are tender and delicious!
Ever have a dinner recipe you’ve made for years, have no clue where you got the recipe from, but it’s ALWAYS good? THIS recipe for Baked Pork Chops with Stuffing is one of them! I know  I’ve been making this recipe for over 20 years. Originally I copied it onto a 3×5 index card way back in the day, but don’t remember where I got the recipe from.

I made these baked pork chops for our dinner last night, and decided to share it on the ol’ blog today. They taste REALLY GOOD!

Baked pork chops with stuffing are “comfort food” at it’s easiest and best, folks. It only takes about 15 minutes of prep time to get them ready.  The pork chops are then baked for an hour.  While they are baking, you can paint your home, finish your thesis, jog 2-3 miles… whatever.

Scroll Down For A Printable Recipe Card At The Bottom Of The Page

Busy? Want To Make These Pork Chops Ahead Of Time?

Baked pork chops with stuffing are easy to make AND delicious! You can easily prep them ahead of time, too! The pork chops were prepped early in the day, then put into the refrigerator BEFORE baking.

About 1/2 hour before baking I took the pork chops out of the fridge, to take the chill off the meat. When ready to bake, I popped the dish into the oven. This would be a great dish for busy people to make. Prepare it early in the day, and have it ready to throw in the oven later.

It’s EASY To Make Baked Pork Chops With Stuffing

The pork chops are browned in a skillet, then topped with a simple “stuffing” (heh heh… the “stuffing” goes on TOP of the chops). I’m not sure why it is called “stuffing”. One of life’s great mysteries, I suppose.

It’s extremely easy to make the sauce, and pour it over the stuffing and chops. Once that is done, into the oven the dish goes. See? EASY! Now you can sit back and relax!

Making Baked Pork Chops With Stuffing

The “stuffing” is easy. Soft bread cubes are mixed with onion, butter, and spices. I use sourdough bread… crust and all. It’s very basic, but trust me… it will be delicious!

Stuffing for baked pork chops, made with soft bread cubes, butter and onions in small metal bowl

Pan-Sear The Pork Chops

Into a hot skillet the chops go, for a quick sear (to brown them). I prefer to use boneless pork chops, but bone-in chops will do just fine in this recipe, as well.

Pork chops are seared in skillet until lightly browned before baking.

Pork chops are quickly browned on both sides, then removed to a baking dish.

Pork chops are browned on both sides in skillet before being baked.

The “stuffing” is then piled on top of each pork chop.

Stuffing is placed on top of browned pork chops before baking.

Making The Sauce For The Baked Pork Chops With Stuffing

The sauce is heated through on the stove, on medium low heat. Best part? The sauce only has a few ingredients. EASY. The sauce is then poured over the stuffing and pork chops, then into the oven it goes for 1 hour!

Creamy mushroom sauce heating on stove top in skillet before toppng pork chops.

This is what it looks like when the chops with stuffing first come out of the oven. The top of the sauce and stuffing is golden brown and bubbly. Now all that’s left is to serve it up! The baked pork chops smell so good!

Bubbly sauce and stuffing on top of baked pork chops, right out of the oven.

Serving The Baked Pork Chops With Stuffing

Use a spatula to lift each pork chop out of the baking pan and onto individual plates. This helps to keep the stuffing intact on the baked pork chops. Now you are ready to eat! Yum. The chops were served with green beans and rice on the side.

Baked pork chops with stuffing on plate with green beans and rice on the side.

Sure hope you’ll give this recipe a try… I’m confident you will love it!  The pork chops come out of the oven very tender, and coated with a luscious stuffing and sauce. Trust me – make these pork chops! Congratulations! You’ve just made a fantastic, fairly inexpensive, and not too labor intensive meal!

Looking For More PORK Recipes?

You can find all of my recipes in the Recipe Index, located at the top of the page. I have lots of recipes that use pork, including:

Interested In More Recipes?

Thank you for visiting this website. I appreciate you using some of your valuable time to do soIf you’re interested, I publish a newsletter 2 times per month (1st and 15th) with all the latest recipes, and other fun info. I would be honored to have you join our growing list of subscribers, so you never miss a great recipe!
There is a Newsletter subscription box on the top right side (or bottom) of each blog post, depending on the device you use, where you can easily submit your e-mail address (only) to be included in my mailing list.

You Can Also Find Me On Social Media:

Facebook page: The Grateful Girl Cooks!
Pinterest:
The Grateful Girl Cooks!
Instagram:
jbatthegratefulgirlcooks

Author's signature

↓↓ PRINTABLE RECIPE BELOW ↓↓

0 from 0 votes
Baked Pork Chops with Stuffing
Prep Time
15 mins
Cook Time
1 hr
Total Time
1 hr 15 mins
 
Baked pork chops with stuffing, topped with a creamy mushroom sauce is comfort food at it's best! They're easy to make, and the chops are tender and delicious!
Category: Entree
Cuisine: American
Keyword: baked pork chops
Servings: 4 servings
Calories Per Serving: 345 kcal
Author: JB @ The Grateful Girl Cooks!
Ingredients
  • 4 boneless pork chops (or bone-in)
  • 2 Tablespoons olive oil
For stuffing:
  • 2 cups soft sourdough bread cubes (cut into small cubes-any bread will do...)
  • 2 Tablespoons brown onion , finely chopped
  • 2 Tablespoons butter , melted
  • 2 Tablespoons water
  • 1/2 teaspoon poultry seasoning (can substitute thyme, if desired)
For sauce:
  • 1 can cream of mushroom soup (undiluted)
  • 3-4 white button mushrooms , chopped
  • 1/3 cup cooking sherry (can substitute water, if desired)
Instructions
  1. Preheat oven to 350 degrees. Spray a 13x9 baking pan with non-stick spray.
  2. Heat the olive oil in a large skillet until very hot. Add the pork chops. Brown the chops on medium heat until browned on both sides. Remove chops from skillet; place in a single layer in prepared baking pan. Set aside.
  3. In a small bowl, mix the bread cubes, onion, melted butter, water, and poultry seasoning. Mix well to combine.
  4. Using the same skillet that you cooked the pork chops in, combine the can of soup, sherry (or water), and the chopped mushrooms. Heat through. Remove from heat.
  5. Place 1/4 of the stuffing mix on top of each chop. Pour (or ladle) the sauce mixture over the top of the stuffing and chops, to cover. Bake pork chops, uncovered, for 1 hour at 350 degrees. Serve, and enjoy!
Nutrition Facts
Baked Pork Chops with Stuffing
Amount Per Serving (1 pork chop)
Calories 345 Calories from Fat 153
% Daily Value*
Fat 17g26%
Saturated Fat 6g38%
Cholesterol 103mg34%
Sodium 191mg8%
Potassium 598mg17%
Carbohydrates 9g3%
Sugar 1g1%
Protein 32g64%
Vitamin A 175IU4%
Vitamin C 0.7mg1%
Calcium 13mg1%
Iron 1.4mg8%
* Percent Daily Values are based on a 2000 calorie diet.

Here’s one more to pin on your Pinterest boards!Baked pork chops with stuffing, topped with a creamy mushroom sauce is comfort food at it's best! They're easy to make, and the chops are tender and delicious!


Save

Pork Tenderloin with Cranberry-Raspberry Sauce

Pork Tenderloin with Cranberry-Raspberry sauce is marinated then slow roasted, and is served topped with a delicious cranberry raspberry wine sauce. This is a perfect dish to serve during the holidays (or any time you have access to fresh cranberries)!Pork Tenderloin with Cranberry-Raspberry sauce is marinated then slow roasted, and is served topped with a delicious cranberry/raspberry/wine sauce.
A couple of days ago I found another great recipe for Pork. I found this recipe for Pork Tenderloin with Cranberry-Raspberry Sauce on Pinterest, and decided it might be worth a try, to see if it tasted as good as it looked. Yep – It did.

 While the tenderloin is baking, you cook an amazing sauce, made from cranberries, raspberries, orange zest, butter, shallots, and red wine. The sauce smells wonderful as it is cooking.

The finished meal is not only nice to look at, but it actually tastes wonderful! This would be a great meal to serve company, or during the holidays. It’s simple enough to prepare, but it looks rather elegant when served. Maybe you will consider making this meal for your family or friends.

Make The Marinade For The Pork Tenderloin

Grating the lemon zest is the start to making a great marinade for the pork tenderloin.

Lemon zest is gathered to make pork tenderloin marinade.

A bit of Dijon mustard helps give the marinade a great flavor. Into the lemon juice it goes, then it’s mixed well, to combine.

Dijon mustard is added to lemon juice for pork marinade.

Marinade the pork tenderloin for several hours (or preferably overnight for best flavor). See the pieces of minced garlic and rosemary? 

Pork tenderloin marinades for a few hours before baking.

Make The Cranberry Raspberry Sauce 

TIP: Make the sauce after browning the tenderloin (see photos further below), and while the tenderloin is baking in the oven.

To make the sauce, cook chopped shallots in melted butter in a large skillet. The sauce sure smells good while this is cooking.

Chopped shallots cook in butter for cranberry sauce for pork tenderloin.

Add orange juice to the butter-cooked shallots in the skillet and continue to cook.

Orange juice added to shallots in sauce for pork tenderloin.

Now it’s time to add red wine, sugar and orange zest to the sauce. Stir well, to combine these ingredients.

Red wine, sugar, orange zest added to sauce for pork tenderloin.

Add the whole cranberries and raspberries to the sauce, and cook for 20 minutes to reduce and thicken the sauce.

Cranberries and raspberries added to pork tenderloin sauce.

After sauce has cooked for 20 minutes, the sauce should be reduced in volume, and slightly thickened.

I actually might have sampled the sauce once (at least 5 times) while it was cooking, to make sure it was “fit for consumption”. Somebody has to taste-test it, right???

I do what I can, to ensure any meal I prepare is going to be a good one…except for the nights we have a bowl of cereal for dinner. Then we’re on our own.

Cranberry-raspberry sauce for pork tenderloin cooking in skillet.

Pan Sear The Pork Tenderloin

Heat oil in a large oven-proof skillet (big enough to hold the entire pork tenderloin). Cook the pork until it has become browned on the bottom side, then carefully turn the tenderloin over.

Marinated pork tenderloin is seared in skillet.

Sear the other side of the meat until browned, then put the oven-proof skillet and meat into a preheated oven, to bake at 425°F for 30-40 minutes.

Pork tenderloin is seared on both sides before baking.

Serve The Pork Tenderloin With Cranberry Raspberry Sauce

Once pork is done roasting, remove it from the oven and let it rest for 10 minutes, before slicing and serving.

Slice the tenderloin, then spoon the cranberry-raspberry sauce over the top. Garnish with fresh parsley, if desired, and serve!

Baked pork tenderloin is served with cranberry-raspberry sauce on top.

Place a couple slices of pork on each plate to serve. Remember to spoon more of that delicious sauce on each serving! Enjoy!

I served the pork with a side of broccoli, and Smashed Potatoes with Mushrooms and Shallots. Yum!

Slices of pork tenderloin with sauce served on plate, with broccoli.

Hope you enjoy this pork tenderloin with cranberry-raspberry sauce! I trust you will enjoy eating it, and serving it to those you love! Have a wonderful day!

Looking For More PORK Recipes?

You can find all of my recipes in the Recipe Index, which is located at the top of the page. I have some wonderful PORK recipes to check out, including:

Interested In More Recipes?

Thank you for visiting this website. I appreciate you using some of your valuable time to do soIf you’re interested, I publish a newsletter 2 times per month (1st and 15th) with all the latest recipes, and other fun info. I would be honored to have you join our growing list of subscribers, so you never miss a great recipe!
There is a Newsletter subscription box on the top right side (or bottom) of each blog post, depending on the device you use, where you can easily submit your e-mail address (only) to be included in my mailing list.

You Can Also Find Me On Social Media:

Facebook page: The Grateful Girl Cooks!
Pinterest:
The Grateful Girl Cooks!
Instagram:
jbatthegratefulgirlcooks

Author's signatureRecipe Source: http://deliciousshots.blogspot.com/2011/11/pork-tenderloin.html

↓↓ PRINTABLE RECIPE BELOW ↓↓

0 from 0 votes
Pork Tenderloin with Cranberry-Raspberry Sauce
Prep Time
3 hrs
Cook Time
30 mins
Total Time
3 hrs 30 mins
 
Pork Tenderloin with Cranberry-Raspberry sauce is marinated then slow roasted, and is served topped with a delicious cranberry/raspberry/wine sauce.
Category: Entree
Cuisine: American
Keyword: pork tenderloin
Servings: 8 servings
Calories Per Serving: 429 kcal
Author: JB @ The Grateful Girl Cooks!
Ingredients
For the Pork Marinade:
  • 2 to 2 1/2 pound pork tenderloin
  • 4 garlic cloves , minced
  • 2 Tablespoons dijon mustard
  • 1/2 cup olive oil
  • 3 lemons , juiced and zested
  • 2 rosemary sprigs , or 1 Tablespoon dried rosemary
  • 1/4 teaspoon each , salt and pepper
  • 4 Tablespoons olive oil (for searing the tenderloin)
For the Cranberry-Raspberry Sauce:
  • 2 Tablespoons butter
  • 1 medium sized shallot , finely chopped
  • 1 cup red wine
  • 1/4 cup orange juice
  • The zest of 1 orange
  • 2 Tablespoons granulated sugar
  • 12 ounces raspberries , fresh or frozen
  • 1 cup of cranberries , fresh or frozen
Instructions
Make the marinade:
  1. In a medium sized bowl, whisk together the lemon juice, lemon zest, minced garlic, and the Dijon mustard. Add 1/2 cup olive oil to this mixture, while whisking to fully incorporate. Add 1/4 teaspoon salt, 1/4 teaspoon pepper, and rosemary. Mix well.
  2. Place the pork and the marinade in a large resealable plastic bag or container. Squeeze the air out and seal the bag or container. Marinate the pork in the refrigerator for at least 3-4 hours or overnight. Turn bag occasionally to make sure the pork is covered with the marinade. If using a flat container, occasionally spoon marinade over the pork.
  3. When pork has finished marinading, preheat the oven to 425 F.
  4. In a oven-proof saute pan, heat 4 tablespoons of olive oil over medium-high heat. Remove the tenderloin from the marinade. When oil is very hot, add the tenderloin to the hot oil. Sprinkle additional salt and pepper on the tenderloin. Do not move the pork for a few minutes in order to ensure a good sear! Sear both sides of the pork until golden brown. Place the pan in the oven and roast the pork for 30-40 minutes (adjust to less time if using smaller tenderloin) or until the meat registers 165 F. Take pork out of the oven, cover it with aluminum foil. Let the covered pork rest for 10 minutes before slicing (this helps to keep the juice in the meat, not all over the platter).
While the meat is cooking, make the cranberry-raspberry sauce:
  1. In a large non-stick skillet, melt the butter. Add the chopped shallots. Cook shallots for about 3-4 minutes, until softened. Add the orange juice, orange zest, red wine, and sugar to the pan. Mix well; continue cooking on low heat until sugar dissolves. Add the cranberries and raspberries to the pan. Cook over medium heat until sauce reduces and thickens (about 20 minutes). Stir sauce occasionally.

  2. When roast is done and has "rested", slice into serving portions, place meat on serving platter, and spoon the warm sauce over the top of the pork slices. Garnish with fresh parsley, if desired. Enjoy!

Recipe Notes

Note that the lengthy prep time is not "Active" prep time. The length is to allow the pork marinating time.

Also remember to adjust down the cooking time if you are using a smaller pork tenderloin. Smaller tenderloins will cook in 20-25 minutes. Just gauge by the internal temperature of the pork.

Nutrition Facts
Pork Tenderloin with Cranberry-Raspberry Sauce
Amount Per Serving (1 slice w/ sauce)
Calories 429 Calories from Fat 243
% Daily Value*
Fat 27g42%
Saturated Fat 6g38%
Cholesterol 81mg27%
Sodium 203mg9%
Potassium 651mg19%
Carbohydrates 16g5%
Fiber 4g17%
Sugar 7g8%
Protein 24g48%
Vitamin A 140IU3%
Vitamin C 38.9mg47%
Calcium 35mg4%
Iron 2mg11%
* Percent Daily Values are based on a 2000 calorie diet.

Here’s one more to pin on your Pinterest boards!Pork Tenderloin with Cranberry-Raspberry sauce is marinated then slow roasted, and is served topped with a delicious cranberry/raspberry/wine sauce.

.

Save

Save

Pork Tamales

Homemade Shredded Pork Tamales topped with a “made from scratch” California chile sauce, are a delicious classic Mexican dish that you will LOVE!Homemade Shredded Pork Tamales topped with a "made from scratch" California chile sauce, are a delicious classic Mexican dish that you will LOVE!
So… this year for Christmas Eve, I came up with a plan to try making pork tamales. I didn’t have a backup plan in case I failed miserably, but that didn’t stop me from taking the plunge into the big, daunting world of “homemade pork tamales”.

Scroll Down For A Printable Recipe Card At The Bottom Of The Page

Whose Crazy Idea Was This Anyways?

Why I had the hair-brained idea of breaking from our Christmas Eve traditional Italian meal and attempting to make tamales for the FIRST TIME is anybody’s guess. Oh well. I am happy to report that we DID NOT have to eat at a fast food place on Christmas Eve. These tamales turned out to be incredible (what a relief!).

I was definitely out of my “comfort zone” in the kitchen, but one thing I am constantly learning (thanks to my friend Shari, who inspires me always!), is to become more “fearless”. This has taught me to experiment more with new recipes and foods. This is one “experiment” I am thrilled to have tried.

I found a recipe for shredded pork tamales on Pinterest, and thought it sounded good. The author of the recipe said she was given this “authentic” recipe by a woman she met at an international market in the Mexican foods aisle (how bad can that be, right?). The recipe sounded good to me, so I decided to give making tamales a try. I actually cooked the pork roast in my crock pot and made the chile sauce the day before I made the tamales, so a large part of the prep was done ahead of time.

Making Pork Tamales Was A Fun Challenge For Me

The recipe is fairly easy to follow. Truthfully I think the hardest part was trying to tie the tamales up at the end before steaming them. Since I have mastered the art of tying my shoelaces, I found it amazing that it was “harder than I thought it was” to wrangle those tamales!  I persevered, fought the good fight with strands of corn husks and finally managed to get those beautiful tamales tied up. Yippee, and Olé!!! (Note: you don’t have to tie them, if you don’t want… I just think it holds them together much better while they are cooking!)

I hope you will give these a try. They are truly, wonderfully delicious. The recipe makes 16-18 tamales. We ate some, had more for leftovers, and froze some for another meal. I DEFINITELY recommend this recipe, and will be making these again. Here’s a few pictures from the process:

Some Photos Of the “Process”

First thing I had to do was purchase corn husks and masa at the local grocery store in the Mexican food section. Easy peasy!

Corn husks and masa for pork tamales

I cooked the pork roast, onion, garlic & spices in a slow-cooker for 6 hours the day before I made the tamales. Here it is right at the beginning of the cook time.

Pork roast is cooked with onions and garlic

Once the pork is fully cooked, it must be shredded. Here is some of the fully cooked, seasoned, shredded pork ready to put into tamales.

Shredded pork ready for filling tamales

Making The Chile Sauce

The chile sauce is made using dried California chile pods. This was kind of cool. This mixture turned a dark color once it was done cooking.

Cooking California chile pods to make sauce for tamales

After the chile sauce has been cooked, cooled, and strained, it is added to shredded pork. Sour cream is then added to the leftover sauce, turning it into a light brown color.This will be used to spoon over the finished tamales once they have been removed from their husks. (Sorry for the photo quality…)

Sour cream has been added to chile sauce for tamales

Getting Ready To Cook The Pork Tamales

Pork tamales are filled, the bottoms folded up and under, and the husks are secured with a long pliable strand of corn husk. I think they look cute! The one in the middle escaped and had to be re-tied.

Stuffed Pork tamales are filled and tied before cooking

The tops of the tamales remain open, and the  tamales are then placed standing upright into a steamer basket in a large stockpot, and are steamed for 1 hour.

Pork tamales are steamed for one hour

Time To Eat Pork Tamales!

When the tamales are done cooking, you remove the husks, place them on serving plates and spoon some of the chile sauce over the tops. Muy delicioso!!!!!

Shredded pork tamales are served with chile sauce on top

I’m not kidding you when I say these shredded pork tamales were absolutely delicious!  I felt very accomplished to have made these for the first time, and plan to make many more.  I was even able to tightly wrap some of them and freeze them for another day (and they were still good!).

It is a bit of a process to make these pork tamales, but honestly, it was worth every single minute! We LOVED them! I hope you will consider trying this recipe.

Looking For More Mexican-Inspired Recipes?

You can find all my recipes in the Recipe Index, located at the top of the page. I have quite a few Mexican-inspired recipes for you to enjoy, including:

Interested In More Recipes?

Thank you for visiting this website. I appreciate you using some of your valuable time to do soIf you’re interested, I publish a newsletter 2 times per month (1st and 15th) with all the latest recipes, and other fun info. I would be honored to have you join our growing list of subscribers, so you never miss a great recipe!
There is a Newsletter subscription box on the top right side (or bottom) of each blog post, depending on the device you use, where you can easily submit your e-mail address (only) to be included in my mailing list.

You Can Also Find Me On Social Media:
Facebook page: The Grateful Girl Cooks!
Pinterest: The Grateful Girl Cooks!
Instagram: jbatthegratefulgirlcooks

Have a great day!

Author's signatureRecipe Source: http://allrecipes.com/Recipe/Real-Homemade-Tamales/Detail.aspx?event8=1&prop24=SR_Title&e11=real%20homemade%20tamales&e8=Quick%20Search&event10=1&e7=Home%20Page&soid=sr_results_p1i1

↓↓ PRINTABLE RECIPE BELOW ↓↓

0 from 0 votes
Pork Tamales
Prep Time
1 hr
Cook Time
7 hrs
Total Time
8 hrs
 
Homemade Shredded Pork Tamales topped with a "made from scratch" California chile sauce, are a delicious classic Mexican dish that you will LOVE!
Category: Entree
Cuisine: Mexican
Keyword: pork tamales
Servings: 16 tamales
Calories Per Serving: 194 kcal
Author: JB @ The Grateful Girl Cooks!
Ingredients
For Tamale Filling:
  • 1 1/4 pounds pork loin or pork roast
  • 1 large brown onion , chopped
  • 1 teaspoon minced garlic
  • 1/2 teaspoon cumin
  • 1/2 teaspoon chili powder
For Chile Sauce:
  • 4 dried California chile pods (found in Mexican food aisle in most grocery stores)
  • 2 1/2 cups water
  • 1 1/2 teaspoons salt
For Tamale Dough:
  • 2 cups masa harina
  • 1 (10.5 ounce) can beef broth
  • 1 teaspoon baking powder
  • 1/2 teaspoon salt
  • 2/3 cup lard or shortening (I used vegetable shortening)
  • 1 (8 ounce) package dried corn husks
  • 3/4 cup sour cream (add this to extra chili sauce and drizzle over tamales once removed from husk)
Instructions
  1. Place the pork into a Dutch oven or into a crock pot with the onion, garlic, cumin, chili powder and water. IF USING DUTCH OVEN, make sure pork is covered with water. bring water to a boil, reduce heat and cook pork on simmer for about 2 hours, or until the meat is cooked all the way through. IF USING CROCK POT, add about 1 1/2 cups water and cook for 6 hours on high. When meat is done, remove to plate and set aside to cool slightly.
  2. While meat is cooling, make the sauce: Wearing rubber gloves, remove seeds and stems from dried chile pods (trust me, you want to wear gloves). Put the de-seeded chile pods into a small saucepan with 2 cups of water. Simmer the chiles for 20 minutes, uncovered. Remove pan from heat; let cool. Place the chiles and cooking water into a blender or food processor and blend until it becomes smooth. Run the sauce through a strainer to remove any leftover chile pods. Stir the salt into the sauce, then set the sauce aside (If making the sauce ahead of serving, refrigerate it overnight, then bring to room temp before serving!).
  3. Using 2 forks, shred the cooked pork into a bowl. Add 1 cup of the chile sauce to the meat. Mix.
  4. Soak the corn husks in a large tub or pan of HOT water. Let them soak for at least 15-20 minutes, so they become pliable. While they are soaking, make up the Tamale dough:
  5. In a large bowl, or the base of a stand mixer, mix the shortening (or lard) with 1 Tablespoon of the beef broth. Mix this until it becomes fluffy. In a separate bowl, combine the masa harina, salt and baking powder. Stir these dry ingredients into the shortening. Add a more beef broth, a little at a time, and continue stirring until the dough becomes "spongy" (kind of like a thick peanut butter consistency.
  6. Fill the tamale husks one at a time. Remove corn husk from water, dry it off, then spread the dough over the corn husks. Dough should not reach the bottom or the top of the husk ( I left about 2 inches on bottom, 2 inches on top, and 1/2 inch on each side. The dough should be between 1/4 - 1/2 inch thickness. I kind of made a rectangle shape out of the dough (wetting my fingers to spread it out was a big help!). Once the dough is spread evenly onto the husk, spoon 1 heaping Tablespoon of shredded pork filling into the center, lengthwise (like filling a burrito) Fold the sides of the husk together in towards the center, fold the bottom part under and back, then tie the bottom part of the tamale with a long strand of another moist corn husk.

  7. Repeat process with each tamale. Carefully stand the tamales up on top of a steamer basket in a large stockpot. Steam them (covered) for 1 hour. Remove from heat.
  8. While tamales are cooking, mix the extra chile sauce with 3/4 cup sour cream until creamy; set aside (do not refrigerate).
  9. To serve: Remove the tamales you are serving from their husks and place on serving plate. Spoon the chile sauce over the tops of the hot tamales. Serve.
Recipe Notes

Note that the cook time shown is for crockpot cooking of the pork roast. Time is dramatically cut if you cook it in dutch oven. Freeze or refrigerate extra tamales in their husks. I totally recommend cooking the meat the day prior to making the tamales. Then all you have to do is make sauce, dough, assemble tamales, and cook.

Nutrition Facts
Pork Tamales
Amount Per Serving (1 tamale (w/ sauce))
Calories 194 Calories from Fat 99
% Daily Value*
Fat 11g17%
Saturated Fat 3g19%
Cholesterol 26mg9%
Sodium 387mg17%
Potassium 240mg7%
Carbohydrates 12g4%
Fiber 1g4%
Protein 9g18%
Vitamin A 120IU2%
Vitamin C 0.7mg1%
Calcium 50mg5%
Iron 1.4mg8%
* Percent Daily Values are based on a 2000 calorie diet.

Here’s one more to pin on your Pinterest boards!Homemade Shredded Pork Tamales topped with a "made from scratch" California chile sauce, are a delicious classic Mexican dish that you will LOVE!


Save

Save

Save

Pinto Beans And Ham

Pinto Beans and Ham is an easy, economical way to make a big pot full of tasty, filling, pinto beans and leftover ham, flavored with onion and garlic!Pinto Beans and Ham is an easy, economical way to make a big pot full of tasty, filling, pinto beans and shredded leftover ham, flavored with onion and garlic!
Well, here’s my first post in 2015. Nothing fancy or glamorous, but this meal is sure inexpensive, FILLING, and delicious! If you’ve ever had extra ham or ham bones left over after a meal, then this recipe for Pinto Beans And Ham is perfect for you!

This dish (besides being quite economical) is also totally easy to prepare, so consider that a win-win! Only a few ingredients are necessary to make a big soup pot full of these tasty, filling, tender pinto beans and shredded pieces of ham, flavored with salt/pepper, cumin, onion and garlic!

Scroll Down For A Printable Recipe Card At The Bottom Of The Page

Make A Pot Of Pinto Beans And Ham With Leftover Ham

I prepare this meal often, usually any time we have leftover ham (always after a holiday like Christmas or Easter, and in the cold winter months). The recipe makes about 8 servings, so there is always enough left over for other meals.

Leftover ham is perfect to use in this soup.

If you have a large ham bone from a ham hanging around (with pieces of meat still attached), that’s PERFECT! If not, then just use slices of ham, cut into small chunks. The long cooking time will help the meat to be pulled off the bone or shredded easily!

Pinto beans can be found in just about every single grocery store in the country, and are quite cheap. Buy dry pinto beans (in a bag). They will cook and soften during the cooking process.

Dried pinto beans are used to make this recipe.

Why The Beans Need To Cook for So Long

The long cooking time helps the beans to soften. Find another activity to do while they are cooking, and just check on them every hour or so to make sure there is enough liquid in the pan, and give them a good stir!

During the last part of the cooking time, the liquid will begin to thicken. This is a GOOD thing! The ham also becomes very tender, so it is easy (especially if you added big chunks), to pull it apart into smaller pieces or shreds.

Pinto beans and ham is served!

Your house will smell GREAT while these pinto beans and ham are cooking! We love to eat this thick bowl of “soup” with some Copycat Marie Callender’s Cornbread or warm, buttered flour tortillas on the side… yum!

Cornbread goes perfectly with pinto beans and ham

When all is said and done, you will end up with a nice sized pot of pinto beans and ham, and not have to sped a lot on it, especially if you start with leftover ham!

If you like pinto beans or need other ways to use dried pintos, be sure and check out my blog post on how to can dried beans or how to make refried beans in the crockpot. Both recipes start with dried pinto beans!

Hope you’ll give this humble recipe for pinto beans and ham a try. I think you’re gonna love them! Sometimes simple can be so good! Thanks for stopping by, and come back soon. Be sure to check out ALL my recipes in the Recipe Index, located at the top of the page.

Interested In More Recipes?

Thank you for visiting this website. I appreciate you using some of your valuable time to do soIf you’re interested, I publish a newsletter 2 times per month (1st and 15th) with all the latest recipes, and other fun info. I would be honored to have you join our growing list of subscribers, so you never miss a great recipe!
There is a Newsletter subscription box on the top right side (or bottom) of each blog post, depending on the device you use, where you can easily submit your e-mail address (only) to be included in my mailing list.

You Can Also Find Me On Social Media:
Facebook page: The Grateful Girl Cooks!
Pinterest: The Grateful Girl Cooks!
Instagram: jbatthegratefulgirlcooks

Author's signature

↓↓ PRINTABLE RECIPE BELOW ↓↓

0 from 0 votes
Pinto Beans And Ham
Prep Time
5 mins
Cook Time
4 hrs
Total Time
4 hrs 5 mins
 
Pinto Beans and Ham is an easy, economical way to make a big pot full of tasty, filling, pinto beans and shredded leftover ham, flavored with onion and garlic!
Category: Entree
Cuisine: American
Keyword: pinto beans and ham
Servings: 8 servings
Calories Per Serving: 289 kcal
Author: JB @ The Grateful Girl Cooks!
Ingredients
  • 1 bag pinto beans (regular sized - about 2-3 cups)
  • 1 large leftover ham bone (with meat attached), OR 2 cups chopped cooked ham
  • 1 medium brown onion , chopped
  • 1 heaping Tablespoon minced garlic
  • 1/4 teaspoon cumin
  • 1 teaspoon salt
  • 1 teaspoon black pepper
  • Water
  • Additional Salt/Pepper , to taste (I usually have to add more before serving)
Instructions
  1. Rinse the pinto beans in a strainer. Place beans into a large stockpot. Cover completely with water.
  2. Add ham bone (or chopped ham). Add additional water, if necessary to more than cover the beans and ham.
  3. Add onion, garlic, salt, pepper, and cumin.
  4. Bring water to a boil. Reduce heat to medium-low heat. Let beans cook for approximately 4 hours. For first half of cooking time, keep a lid on the beans, but with lid vented. After about 2 hours, remove the lid and continue cooking, uncovered for remainder of time. As water level begins to reduce, add a bit more water back into the pot so that beans remain submerged during cooking time.
  5. Check beans to make sure they are fully softened. Remove ham bone from pot; remove any ham meat from bone and add the ham back into the pot.
  6. Taste test the beans when fully cooked. Mixture will thicken slightly as the amount of water reduces through the long cooking time. Season with additional salt and pepper, to taste.
  7. Serve hot with some cornbread or tortillas on the side, and enjoy!
Nutrition Facts
Pinto Beans And Ham
Amount Per Serving (1 serving (1/8th of total))
Calories 289 Calories from Fat 9
% Daily Value*
Fat 1g2%
Cholesterol 15mg5%
Sodium 671mg29%
Potassium 1028mg29%
Carbohydrates 47g16%
Fiber 11g46%
Sugar 2g2%
Protein 20g40%
Vitamin C 5.9mg7%
Calcium 87mg9%
Iron 3.9mg22%
* Percent Daily Values are based on a 2000 calorie diet.

Here’s one more to pin on your Pinterest boards!Pinto Beans and Ham is an easy, economical way to make a big pot full of tasty, filling, pinto beans and shredded leftover ham, flavored with onion and garlic!


Save

Save

Crock Pot Parmesan Honey Pork Roast

Make a delicious Parmesan Honey Pork Roast in a crock pot, and enjoy tender meat coated in a flavorful soy, honey, garlic, and Parmesan sauce.Make a delicious Parmesan Honey Pork Roast in a crock pot, and enjoy tender meat coated in a flavorful soy, honey, garlic, and Parmesan sauce.
It’s a rainy morning here in Oregon. I’m sitting here in my home office writing the Pork Roast I cooked in my crock pot recently, and I’m getting hungry! We loved this new pork roast recipe I found on Pinterest, from Six Sisters Stuff. What cracks me up about the picture I took of our meal is that, while I normally add color to our meal, with salad or veggies, this one is hysterical looking.

The night I made Parmesan honey pork roast, my husband asked for baked beans to go with the meat and mashed potatoes, so everything I served us that night was BROWN. I should have re-named this meal “The Entirely Brown Meal”. Oh well- even though the color scheme on our plates was beyond boring, at least it tasted fantastic!

The pork roast only took 10 minutes to get ready, then cooked all day in my crock pot. By dinnertime the house smelled wonderful and all I had to do was slice it, make a quick gravy with the juices, and serve it. How hard is that?

Scroll Down For A Printable Recipe Card At The Bottom Of The Page

Why We Enjoy This Crock Pot Parmesan Honey Pork Roast

The sauce is wonderful. It’s made with Parmesan cheese, honey, basil, garlic, soy sauce, etc. The meat is packed with flavor and is amazingly tender! All the juice remaining in the crock pot is made into a wonderfully delicious gravy to spoon over the pork (and mashed potatoes on the side).

Sure think you’re gonna love this easy meal as much as we did. I hope you will give it a try! But for heaven’s sake… get some color on that plate!!! Here area few pics.

Making The Pork Roast

Here is the pork roast, already in the crock pot. Now all it needs is the spice mixture to give it some flavor!

The pork roast in the crock pot, waiting to be seasoned.

This a picture of all the spices and other sauce ingredients, ready to be combined.

A seasoning sauce made up of spices, honey, garlic, etc. is mixed to put on the pork roast.

the spices are all mixed together and are ready to put onto the pork roast before cooking…

Seasoning sauce is mixed, and ready to add to crock pot with pork roast.

Ready To Cook The Parmesan Honey Pork Roast

After being coated with spice mix, the Parmesan honey pork roast is cooked in a crock pot until fully cooked and nice and tender.

The parmesan honey pork roast is coated with the spice sauce.

The crock pot parmesan honey pork roast is almost fully cooked, and is looking good. It also smells quite wonderful!

Crock pot parmesan honey pork roast is almost done cooking.

Once fully cooked, the parmesan honey pork roast rests for a couple minutes, then it’s ready to slice. Yum!

Ready to slice and serve this tender parmesan honey pork roast.

Hope you will consider making this delicious parmesan honey pork roast! It definitely tastes very good, and is really tender, because of the slow cooking in the crock pot! Thanks for stopping by today- I hope you will come back soon.

Looking For More PORK Recipes?

You can find ALL of my pork recipes in the Recipe Index, located at the top of the page. I have some absolutely delicious pork recipes for you to enjoy, including:

Interested In More Recipes?

Thank you for visiting this website. I appreciate you using some of your valuable time to do soIf you’re interested, I publish a newsletter 2 times per month (1st and 15th) with all the latest recipes, and other fun info. I would be honored to have you join our growing list of subscribers, so you never miss a great recipe!
There is a Newsletter subscription box on the top right side (or bottom) of each blog post, depending on the device you use, where you can easily submit your e-mail address (only) to be included in my mailing list.

You Can Also Find Me On Social Media:

Facebook page: The Grateful Girl Cooks!
Pinterest:
The Grateful Girl Cooks!
Instagram:
jbatthegratefulgirlcooks

Author's signatureOriginal Recipe Source: http://www.sixsistersstuff.com/2011/12/slow-cooker-parmesan-honey-pork-roast.html

↓↓ PRINTABLE RECIPE BELOW ↓↓

0 from 0 votes
Crock Pot Parmesan Honey Pork Roast
Prep Time
10 mins
Cook Time
6 hrs
Total Time
6 hrs 10 mins
 

Make a delicious Parmesan Honey Pork Roast in a crock pot, and enjoy tender meat coated in a flavorful soy, honey, garlic, and Parmesan sauce.

Category: Entree
Cuisine: American
Keyword: pork roast
Servings: 5 servings
Calories Per Serving: 595 kcal
Author: JB @ The Grateful Girl Cooks!
Ingredients
  • 1 (2-3 pound) boneless pork roast
  • 2/3 cup grated Parmesan cheese
  • 1/2 cup honey
  • 3 Tablespoons soy sauce
  • 2 Tablespoons dried basil
  • 2 Tablespoons minced garlic
  • 2 Tablespoons olive oil
  • 1/2 teaspoon salt
  • 2 Tablespoons cornstarch
  • 1/4 cup cold water
Instructions
To prepare/cook the pork roast:
  1. Lightly spray a crock pot with a non-stick cooking spray. Place the pork roast in the crock pot.
  2. In a small bowl, place the Parmesan cheese, honey, soy sauce, basil, garlic, olive oil and salt. Mix these ingredients well until fully combined. Pour this mixture over the surface of the pork roast to cover.
  3. Place the lid on the crock pot. Cook the pork roast for 6-7 hours on LOW (or until meat thermometer reaches 160 degrees).
  4. Once the meat is done cooking, CAREFULLY remove the pork roast from crock pot and place it onto a serving dish. Place aluminum foil over top of the roast to keep it warm while you make the gravy.
To make the gravy:
  1. Skim the fat off the top of the cooking juice left in crock pot. Place the juices into a medium sized saucepan. Cook the juices on medium heat until they come to a boil. In a separate small bowl, mix the cornstarch into the cold water. Mix well to remove any lumps, until mixture is smooth. Whisk the cornstarch mixture into the boiling juices. Make sure the gravy comes to a boil again, then cook and stir it for approximately 2 minutes (or until it thickens up!).
  2. Remove foil from pork roast, then cut into slices. Place slices onto individual plates and spoon some of the gravy over the meat. (I also served mashed potatoes with the gravy on top...they were a delicious side dish with the pork, and especially with the flavorful gravy!)
  3. Enjoy!
Nutrition Facts
Crock Pot Parmesan Honey Pork Roast
Amount Per Serving (1 (1/5 of total))
Calories 595 Calories from Fat 180
% Daily Value*
Fat 20g31%
Saturated Fat 6g38%
Cholesterol 183mg61%
Sodium 893mg39%
Potassium 1124mg32%
Carbohydrates 34g11%
Sugar 28g31%
Protein 67g134%
Vitamin A 125IU3%
Vitamin C 1.2mg1%
Calcium 205mg21%
Iron 3.4mg19%
* Percent Daily Values are based on a 2000 calorie diet.

Here’s one more to pin on your Pinterest boards!Make a delicious Parmesan Honey Pork Roast in a crock pot, and enjoy tender meat coated in a flavorful soy, honey, garlic, and Parmesan sauce.


Save

Save

Pork Tenderloin With Apples And Apple Cider Sauce

Pork tenderloin with apples features tender pork cutlets with cooked apples, drizzled with a lovely apple cider sauce. Delicious!Pork tenderloin with apples features tender pork cutlets with cooked apples, drizzled with a lovely apple cider sauce. Delicious!
This recipe for Pork Tenderloin With Apples And Apple Cider Sauce has FALL written all over it! It’s surprising how well pork and apples go together! My husband and I had dinner recently at a friend’s home. Our friend Shari prepared a wonderful meal for us and it was FANTASTIC! It was absolutely delicious, and a wonderful recipe that was perfect for a cool, Fall evening.

This week we have a friend (a friend for 40 years) staying with us in our home. Her first night here, I decided to try making this recipe for our own dinner. I found the original recipe online at Epicurious, and prepared it for us. Miracle of miracles, it turned out GREAT (guess even little old me can’t hurt a good recipe, right?)

The original recipe from Bon Appétit, calls for Calvados, which is an apple brandy from France. I didn’t have any, and didn’t want to go buy an entire bottle for the small amount needed, so I substituted dry white wine (which I did have), and it turned out fine, as well. I followed the rest of the instructions as written, and was very pleased with the results (as was our guest).

Scroll Down For A Printable Recipe Card At The Bottom Of The Page

How To Make Pork Tenderloin With Apples

Pounding pork slices out with a meat mallet is a great stress reliever, yes? This helps to tenderize the pork.

Pounding the pork thin with a meat mallet helps tenderize the meat.

Peel and slice Golden Delicious apples, then they are ready to cook.

Golden delicious apples are peeled and sliced before cooking.

Apple slices are cooked in butter in a large skillet.

Cooking the apples in melted butter in a skillet.

When the apples are light golden brown, they are removed from the skillet.

Apples are cooked in a large skillet until golden brown on the outside.

Cooking The Pork Cutlets

Pork tenderloin cutlets are cooked in melted butter for a few minutes on each side.

The pork cutlets are cooked in melted butter in a hot skillet.

Halfway through the cooking time, they are turned to the other side to finish cooking. They are so thin, they only need to cook a few minutes on each side.

Pork cutlets are cooked on both sides in butter in a large skillet.

Preparing The Apple Cider Sauce

After removing the cooked pork cutlets, an apple cider sauce is made in the same skillet. Wine or Calvados is used to deglaze the skillet, then shallots and thyme are added to the mixture.

Shallots, thyme and wine are added to the sauce in the skillet.

Apple cider and whipping cream are then added to the sauce, and stirred to incorporate them into the sauce. By now the sauce is looking  and smelling delicious!

Apple cider and whipping cream are added to the sauce for the pork cutlets.

The finished pork tenderloin with apples is surrounded by lots of cooked, tender apples. It is then covered with the apple cider sauce, and is now ready to serve.

Apple cider sauce is poured over the cooked pork tenderloin with apples.

Pork tenderloin with apples is served. We usually give a couple of slices per person. Spoon some of the sauce on top of the pork, and serve, accompanied by apples on the side. We also like this dish with mashed potatoes on the side (with some of the sauce on top). Dig In!

The pork tenderloin with apples is served with mashed potatoes and a salad.

Sure hope you will give this wonderful meal a try. I know I will definitely make this again and again. It’s really very simple to make, and is full of flavor!

Looking For More PORK Recipes?

You can find ALL of my recipes in the Recipe Index, located at the top of the page. I have many delicious pork recipes for you to enjoy, including:

Interested In More Recipes?

Thank you for visiting this website. I appreciate you using some of your valuable time to do soIf you’re interested, I publish a newsletter 2 times per month (1st and 15th) with all the latest recipes, and other fun info. I would be honored to have you join our growing list of subscribers, so you never miss a great recipe!
There is a Newsletter subscription box on the top right side (or bottom) of each blog post, depending on the device you use, where you can easily submit your e-mail address (only) to be included in my mailing list.

You Can Also Find Me On Social Media:

Facebook page: The Grateful Girl Cooks!
Pinterest:
The Grateful Girl Cooks!
Instagram:
jbatthegratefulgirlcooks

Author's signatureRecipe Slightly Adapted From: http://www.epicurious.com/recipes/food/views/Pork-with-Apples-Calvados-and-Apple-Cider-1797

↓↓ PRINTABLE RECIPE BELOW ↓↓

0 from 0 votes
Pork Tenderloin With Apples And Apple Cider Sauce
Prep Time
15 mins
Cook Time
20 mins
Total Time
35 mins
 

Pork tenderloin with apples features tender pork cutlets with cooked apples, drizzled with a lovely apple cider sauce. Delicious!

Category: Entree
Cuisine: American
Keyword: pork tenderloin
Servings: 4 servings
Calories Per Serving: 595 kcal
Author: JB @ The Grateful Girl Cooks!
Ingredients
For the pork and apples:
  • 1 lb. pork tenderloin , cut into 1 inch thick slices
  • Salt & pepper (to season pork)
  • 5 Tablespoons butter
  • 3 medium Golden Delicious apples , (peeled, cored, sliced into 1/3 inch thick slices)
  • 1 1/2 teaspoons granulated sugar
For the Apple Cider Sauce:
  • 2 large shallots , chopped
  • 1 Tablespoon fresh thyme , chopped (or use 1 teaspoon dried)
  • 1/4 cup Calvados or other apple brandy (I substituted 1/4 cup dry white wine)
  • 1 cup heavy whipping cream
  • 1/4 cup apple cider (not apple juice)
Instructions
  1. Put the pork slices between two sheets of plastic wrap. Pound them out, one at a time, until they are about 1/4 inch thick. Set aside.
  2. In a large skillet over medium-high heat, melt 2 Tablespoons of butter. Add the apple slices, then sprinkle the slices with the sugar. Saute the apple slices until they are golden brown, on both sides (approximately 5-6 minutes). Remove apples from skillet and set aside. Cover and keep warm.
  3. Add 2 Tablespoons butter back into the large skillet. Melt butter over high heat. Season the pork with salt and pepper. Add pork slices to the hot skillet. Cook the slices until they are lightly browned and cooked through (about 3 minutes per side). Cook pork in batches, if necessary. Once pork has cooked through on both sides, remove to a platter, cover and keep warm. DO NOT CLEAN SKILLET OUT!
  4. Melt 1 Tablespoon butter over medium heat in the same skillet you cooked the pork in. Add the chopped shallots and thyme; saute these for 2 minutes.
  5. Add the Calvados (if using) or the white wine to the shallots, butter and thyme. Boil until the liquid is reduced to a glaze like consistency, scraping up the browned bits into the sauce as you go.
  6. Stir in the apple cider and whipping cream. Cook until the mixture thickens to sauce consistency (about 2-3 minutes). Lightly season with salt and pepper, to taste.
  7. Reheat the apples in another skillet or microwave, if necessary.
  8. Place pork slices on platter. Spoon the sauce over the top of the pork slices. Top with the apple slices, or place the apple slices around the pork.
  9. Serve and enjoy. This dish is perfect with mashed potatoes on the side. Use some of the apple cider sauce on top (like gravy) of the mashed potatoes for a perfect entree!
Nutrition Facts
Pork Tenderloin With Apples And Apple Cider Sauce
Amount Per Serving (1 g)
Calories 595 Calories from Fat 360
% Daily Value*
Fat 40g62%
Saturated Fat 24g150%
Cholesterol 192mg64%
Sodium 210mg9%
Potassium 703mg20%
Carbohydrates 26g9%
Fiber 3g13%
Sugar 18g20%
Protein 25g50%
Vitamin A 1470IU29%
Vitamin C 10.4mg13%
Calcium 70mg7%
Iron 1.7mg9%
* Percent Daily Values are based on a 2000 calorie diet.

Here’s one more to pin on your Pinterest boards!Pork tenderloin with apples features tender pork cutlets with cooked apples, drizzled with a lovely apple cider sauce. Delicious!


Save

Save

Grilled Ham Salad With Peaches And Goat Cheese

Looking for a filling salad? You’ll love Grilled Ham Salad on spring greens, with fresh peaches, goat cheese, toasted pecans, and balsamic dressing.Looking for a filling entree salad? You'll love this Grilled Ham Salad on spring greens, with fresh peaches, goat cheese, toasted pecans, and balsamic dressing.

One of the gifts I received for Mother’s Day this year was a subscription to Food Network Magazine. That’s where I discovered this recipe for Grilled Ham Salad With Peaches and Goat Cheese.  I was thumbing through the September 2014 issue that recently and saw the recipe for a grilled ham salad, with peaches. It got my attention), because it sounded so different from other salads I’ve made.

The combination of ham and fresh peach slices sounded interesting to me. Guess what? They go WELL together! Who knew? Plus… just about ANYTHING with fresh peaches has to be wonderful, right?

Scroll Down For A Printable Recipe Card At The Bottom Of The Page

Fresh peaches being sliced for grilled ham salad.

Well, my curiosity got the best of me and I ended up making this salad for dinner for my husband and myself a couple of nights ago. Even as I was making it, I truthfully wasn’t sure we would like it… but guess what? We both LOVED it! It was WAY better than I thought it would be, and THAT was a great surprise!

What’s IN A Grilled Ham Salad?

The grilled ham salad is a filling entree for dinner. You’ve got your meat (ham), dairy (creamy goat cheese), peaches (fruit), toasted pecans and lots of lettuce (veggies). Top it off with a homemade balsamic dressing and how could you NOT love a salad like this?

I only tweaked the original recipe just a bit. This grilled ham salad is quick to throw together, easy on the eyes, and completely delicious! I hope you will give this delicious salad a try.

Is This Grilled Ham Salad Hard To Make?

The answer is no. This grilled ham salad is not difficult at all to prepare. Ham slices are quickly grilled (indoor or outdoor), peaches are sliced, dressing is whisked together, and a delicious salad is created! It truly is a very easy salad to make!

Here’s a photo of the grilled ham salad with peaches and goat cheese (shown below), ready to eat. YUM! Sometimes just taking a chance on a new recipe ends up being a great decision when you find a GREAT tasting meal!  This grilled ham salad would be a wonderful dish to serve on a hot day!

Grilled Ham Salad With Peaches And Goat Cheese is a filling entree salad.

Hope you will consider making this grilled ham salad. I think you will be surprised with how good it tastes! Have a great day, and thank you for stopping by. Please come back again soon.

Looking For More MAIN COURSE SALADS?

You can find all of my recipes in the Recipe Index, located at the top of the page. A few main course salads you might enjoy include:

Interested In More Recipes?

Thank you for visiting this website. I appreciate you using some of your valuable time to do soIf you’re interested, I publish a newsletter 2 times per month (1st and 15th) with all the latest recipes, and other fun info. I would be honored to have you join our growing list of subscribers, so you never miss a great recipe!
There is a Newsletter subscription box on the top right side (or bottom) of each blog post, depending on the device you use, where you can easily submit your e-mail address (only) to be included in my mailing list.

You Can Also Find Me On Social Media:

Facebook page: The Grateful Girl Cooks!
Pinterest:
The Grateful Girl Cooks!
Instagram:
jbatthegratefulgirlcooks

Author's signature

Recipe Adapted From: Food Network Magazine, September 2014 issue, pg. 82

↓↓ PRINTABLE RECIPE BELOW ↓↓

0 from 0 votes
Grilled Ham Salad With Peaches And Goat Cheese
Prep Time
20 mins
Cook Time
6 mins
Total Time
26 mins
 
Looking for a filling entree salad? You'll love this Grilled Ham Salad on spring greens, with fresh peaches, goat cheese, toasted pecans, and balsamic dressing.
Category: Salad
Cuisine: American
Keyword: grilled ham salad
Servings: 4
Calories Per Serving: 649 kcal
Author: JB @ The Grateful Girl Cooks!
Ingredients
  • 1/2 cup pecans , chopped
  • 1/3 cup olive oil (plus more for grill)
  • 2 - 1 inch thick slices ham (approx. 7 oz. each)
  • 2 Tablespoons balsamic vinegar
  • 1 Tablespoon honey
  • 2 teaspoons Dijon mustard
  • 1 1/2 Tablespoons Chives , chopped
  • 1/2 Tablespoon Tarragon (I used dried)
  • 1 shallot , finely minced
  • 3 fresh peaches , peeled, pitted, and sliced into 1/2 inch wedges
  • 8 cups fresh spring greens
  • 1 pinch Salt and black pepper , to taste
  • 4 ounces goat cheese , crumbled
Instructions
  1. Preheat a grill to medium heat. (I used an indoor grill to prepare the ham)
  2. Brush the grill lightly with olive oil. Place the ham slices on the grill; heat through (about 2-3 minutes per side). Remove the ham when heated through; set aside to cool, then slice into 1/2 inch strips. Set aside.

  3. Lightly toast chopped pecans over medium high heat in a dry skillet. Stir pecans occasionally, until toasted (about 5-6 minutes). Be careful to not let them burn. Set pecans aside to cool.

  4. In a small bowl, whisk together the balsamic vinegar, honey, Dijon mustard, herbs and shallot. Slowly whisk the olive oil into the mixture; Mix until emulsified.

  5. Place salad greens, pecans, ham, and peaches in salad bowl. Add the salad dressing and GENTLY toss. Season with salt and pepper to taste. Arrange salad onto serving plates, and top with crumbled goat cheese. Serve and enjoy!

Recipe Notes

**Original recipe uses 2 Tablespoons of sherry vinegar or white balsamic vinegar (instead of the regular balsamic vinegar I used).**

Nutrition Facts
Grilled Ham Salad With Peaches And Goat Cheese
Amount Per Serving (1 g)
Calories 649 Calories from Fat 450
% Daily Value*
Fat 50g77%
Saturated Fat 13g81%
Cholesterol 74mg25%
Sodium 1344mg58%
Potassium 742mg21%
Carbohydrates 22g7%
Fiber 3g13%
Sugar 16g18%
Protein 30g60%
Vitamin A 1655IU33%
Vitamin C 27.6mg33%
Calcium 82mg8%
Iron 3mg17%
* Percent Daily Values are based on a 2000 calorie diet.

Here’s one more to pin on your Pinterest boards!Looking for a filling entree salad? You'll love this Grilled Ham Salad on spring greens, with fresh peaches, goat cheese, toasted pecans, and balsamic dressing.


Save

Save

Sweet N’ Sticky Polska Kielbasa

Sweet n’ Sticky Polska Kielbasa only has TWO ingredients, and is an EASY and delicious family friendly recipe, using pork or beef kielbasa sausage!
Sweet n' Sticky Polska Kielbasa only has TWO ingredients, and is an EASY and delicious family friendly recipe, using pork or beef kielbasa sausage!
Yep…you heard me right, friends. This recipe for sweet n’ sticky polska kielbasa only has 2 ingredients, and is very budget friendly to make! How cool is that?

Scroll Down For A Printable Recipe Card At The Bottom Of The Page

What Does Polska Kielbasa Mean?

Did you know that Polska Kielbasa means Polish Sausage? It is one of the most traditional foods served at Polish weddings. There are many different varieties available in grocery stores throughout the United States, and most are fairly inexpensive. You can read more about this common sausage here.

How We First Tried This Recipe For Polska Kielbasa

Almost 30 years ago my husband and I rented a room in our home to a college age friend of ours, named Kip. One night he offered to cook us dinner, and this polska kielbasa is the dish he cooked for us, along with mashed potatoes.

When I heard what “secret” ingredient he was going to cook the sausage in, I couldn’t believe my ears! It sounded completely crazy to me…but guess what?  This sweet n’ sticky polska kielbasa was absolutely delicious!

So What Is The Secret Ingredient For Sweet n’ Sticky Polska Kielbasa?

Want to know what the secret ingredient is?  COKE or PEPSI. Yep. The sugars in the cola transform into a sticky sweet glaze that coats the kielbasa slices. So good… and we’ve been making it ever since… true story.

This recipe only has two ingredients. Kielbasa (beef or pork) and Coke (or Pepsi). The only really important thing to remember is to never use a diet soda for this recipe because you have to use real, sweetened soda so the sugars in the soda will caramelize and coat the meat slices.

Can you believe it? This might possibly be the world’s simplest dinner. The caramelized sweet n’ sticky coating on the kielbasa is truly wonderful! And talk about easy? Unbelievable, but true.

Look How EASY It Is To Make Sweet n’ Sticky Polska Kielbasa

First you will need to cut the polska kielbasa into 1/2″ slices. You can use either beef or pork kielbasa to make this dish. This ring of polska kielska only cost us $2.50 on sale. Since the only other ingredient is one can of cola, you can see how INEXPENSIVE this meal can be to feed four people!

Polska kielbasa is cut into 1" slices on yellow cutting mat.

Here is the polska kielbasa all sliced, and ready to go into a hot skillet!  See how very easy this is so far?

The polska kielbasa is all sliced and ready to cook!

Brown The Kielbasa

Cook the sliced polska kielbasa in a large skillet, on medium high heat. Cook until it starts to brown on all sides, stirring often. Make sure both sides of the sausage get lightly browned. Once the kielbasa is lightly browned on both sides, pour in 3/4 can of regular cola (NOT DIET!).

Cooking polska kielbasa slices in a large skillet until lightly browned.

Why Do I Have To Use REGULAR Cola And Not Diet Cola?

The reason you want to use REGULAR cola is because the sugar present in this drink is what caramelizes during cooking. This caramelization is what coats the polska kielbasa with a sweet n’ sticky glaze. This adds wonderful flavor to the sausage!

Cola is poured into skillet with polska kielbasa slices.

How Long Do I Cook The Polska Kielbasa?

Continue to cook the kielbasa and cola on medium heat, stirring often. Continue to cook until the sauce has reduced, thickened, and coated the sausage pieces with a syrupy glaze. There should be almost no liquid left in skillet, once done. This usually takes about 20 minutes to finish.

Sweet n' sticky polska kielbasa is cooked until cola caramelizes onto meat.

Now it’s ready to serve! See how shiny that kielbasa looks? It’s that yummy sweet n’ sticky glaze coating each piece of the polska kielbasa. YUM.

Time To Eat Some Sweet n’ Sticky Kielbasa!

Serve this sweet n’ sticky polska kielbasa with mashed potatoes and a veggie, and you’ve got yourself a scrumptious, family-friendly dinner! Best part besides how it tastes? It is SO VERY EASY to double this recipe, in case you have a large family!

Close up photo of the sweet n' sticky polska kielbasa slices on plate.

Hope you’ll try this sweet n’ sticky polska kielbasa dish. Everyone I’ve made it for always loves it!  It REALLY tastes good, and is very convenient to fix when you don’t want to mess with a long, complicated recipe after a long day! If you enjoy polska kielbasa, be sure and check out my recipes for Apricot Pineapple Kielbasa Bites and Smoked Sausage Veggie Rice Skillet! It’s really good, too!

Thanks for stopping by, and I hope you will come back again soon. Be sure to check out ALL of my recipes in the Recipe Index, which is located at the top of the page. Have a GREAT day!

Interested In More Recipes?

Thank you for visiting this website. I appreciate you using some of your valuable time to do soIf you’re interested, I publish a newsletter 2 times per month (1st and 15th) with all the latest recipes, and other fun info. I would be honored to have you join our growing list of subscribers, so you never miss a great recipe! 

There is a Newsletter subscription box on the top right side (or bottom) of each blog post, depending on the device you use, where you can easily submit your e-mail address (only) to be included in my mailing list.

You Can Also Find Me On Social Media:

Facebook page: The Grateful Girl Cooks!
Pinterest:
The Grateful Girl Cooks!
Instagram:
jbatthegratefulgirlcooks

Author's signature

Original Recipe Source: Kevin (Kip) Ecton

↓↓ PRINTABLE RECIPE BELOW ↓↓

0 from 0 votes
Sweet N' Sticky Polska Kielbasa
Prep Time
5 mins
Cook Time
20 mins
Total Time
25 mins
 
Sweet n' Sticky Polska Kielbasa only has TWO ingredients, and is an EASY and delicious family friendly recipe, using pork or beef kielbasa sausage!
Category: Dinner, Entree
Cuisine: American
Keyword: polska kielbasa
Servings: 4
Calories Per Serving: 393 kcal
Author: JB @ The Grateful Girl Cooks!
Ingredients
  • 1 pound package polska kielbasa (beef or pork)
  • 9 ounces cola (3/4 of 12 ounce can) (regular, sweetened cola, NOT diet!)
Instructions
  1. Slice the entire kielbasa into 1/2 inch wide slices. Place them in a skillet and sauté on medium high heat for about 3-4 minutes, stirring occasionally, until the both sides of the kielbasa begin to lightly brown.

  2. Pour 3/4 of the can of cola into the skillet (total of 9 ounces). Cook on medium heat, stirring occasionally, until all the liquid has reduced, thickened, and glazed the meat (about 20 min.). All the liquid should be gone from the skillet.

  3. Remove kielbasa from skillet and serve hot, alongside a serving of mashed potatoes and a veggie. Enjoy!
Nutrition Facts
Sweet N' Sticky Polska Kielbasa
Amount Per Serving (1 serving)
Calories 393 Calories from Fat 288
% Daily Value*
Fat 32g49%
Saturated Fat 11g69%
Cholesterol 79mg26%
Sodium 995mg43%
Potassium 268mg8%
Carbohydrates 7g2%
Sugar 5g6%
Protein 16g32%
Vitamin C 1.2mg1%
Calcium 14mg1%
Iron 1.7mg9%
* Percent Daily Values are based on a 2000 calorie diet.

Here’s one more to pin on your Pinterest boards!Sweet n' Sticky Polska Kielbasa only has TWO ingredients, and is an EASY and delicious family friendly recipe, using pork or beef kielbasa sausage!

Save

Save

Save