Month: June 2015

Purple Coleslaw

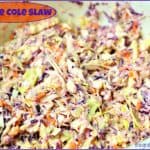
Purple coleslaw, with homemade poppyseed dressing, is a quick, easy salad that’s perfect for BBQ’s! Slaw turns deep purple the longer it refrigerates.Purple coleslaw, with homemade poppyseed dressing, is a quick, easy salad that's perfect for BBQ's! Slaw turns deep purple the longer it refrigerates.
I happen to love coleslaw, and the crunch of the cabbage, and the creamy, slightly sweet dressing. Coleslaw is so easy to make, and I like the way this Purple Coleslaw deepens in it’s purple color the longer it is mixed together. More color on my plate!

It’s easy to go to the produce section and buy pre-shredded coleslaw mixes. Also it is easy to go to the salad dressing section and buy a pre-made coleslaw dressing. Mix them together and poof! Coleslaw. Well, I totally “get” the convenience of it, but I think it’s fun being able to make a great coleslaw using fresh produce. I also enjoy making my own “not out of the bottle” coleslaw dressing.

Scroll Down For A Printable Recipe Card At The Bottom Of The Page

Why Does It Turn Purple?

Store bought coleslaw mixes usually have lots of shredded green cabbage, shredded carrots and a teensy,tiny bit of purple cabbage. I like to make my own coleslaw THAT way, but I also love this recipe which adds a much larger amount of purple cabbage.

This larger amount of purple cabbage ultimately colors the dressing purple the longer the coleslaw is mixed together. It’s kinda fun to serve a purple coleslaw, and it’s a breeze to make my own!

How To Make Purple Coleslaw

First you shred two cups of purple cabbage into a large mixing bowl. I use a mandolin, but you can also do this with a cheese grater.

The purple cabbage is shredded on a mandoline or box grater.Shredded purple cabbage in bowl.
Now shred the green cabbage and some carrots into the same bowl.

Green cabbage is shredded on a mandoline or box grater.
Now you will have all the coleslaw veggies in the large mixing bowl. See how EASY that is?

Grated purple and green cabbage, plus carrots in bowl.
Mix these colorful purple coleslaw ingredients together. See how pretty it is already?

Green and purple cabbage, plus carrot shreds are mixed together in large bowl.
Make The Dressing For The Purple Coleslaw

The coleslaw dressing has light mayonnaise, apple cider vinegar, poppyseeds, and a little salt, pepper and sugar. Mix these ingredients together in a small bowl. That’s IT!

The poppyseed salad dressing is easy to make for this slaw.
Add the dressing to the bowl with the purple coleslaw, and stir well, to combine.

A poppyseed dressing is added to the purple coleslaw, and mixed in.
Refrigerate The Purple Coleslaw For Best Flavor (And Color)

Cover the coleslaw with plastic wrap and refrigerate for at least an hour (the longer the better), so the flavors can come together. When you are ready to serve, give it a good stir, and dig in. Refrigerate leftovers.

NOTE: The longer you keep the purple coleslaw refrigerated (and stirred), the more purple the dressing will become, as the deep purple color from the cabbage mixes with the dressing. It’s kind of a unique touch for a delicious homemade coleslaw.

The longer the purple coleslaw is refrigerated, the deeper the color becomes.
This is a perfect side dish for summer BBQ’s. We really enjoy this great purple coleslaw. Sure hope you will give it a try. Have a great week!

Looking For More COLESLAW Recipes?

You can find ALL my recipes in the Recipe Index, located at the top of the page. I have lots of great salads you’ll enjoy, including these other coleslaw recipes:

Interested In More Recipes?

Thank you for visiting this website. I appreciate you using some of your valuable time to do soIf you’re interested, I publish a newsletter 2 times per month (1st and 15th) with all the latest recipes, and other fun info. I would be honored to have you join our growing list of subscribers, so you never miss a great recipe!
There is a Newsletter subscription box on the top right side (or bottom) of each blog post, depending on the device you use, where you can easily submit your e-mail address (only) to be included in my mailing list.

You Can Also Find Me On Social Media:

Facebook page: The Grateful Girl Cooks!
Pinterest:
The Grateful Girl Cooks!
Instagram:
jbatthegratefulgirlcooks

Recipe source: My brain and lots of experimenting…

Author's signature

0 from 0 votes
Purple Coleslaw
Prep Time
15 mins
Cook Time
0 mins
Total Time
15 mins
 

Purple coleslaw, with homemade poppyseed dressing, is a quick, easy salad that's perfect for BBQ's! Slaw turns deep purple the longer it refrigerates.

Category: Side Dish
Cuisine: American
Keyword: purple coleslaw
Servings: 6 (1/2 cup) servings
Calories Per Serving: 288 kcal
Author: JB @ The Grateful Girl Cooks!
Ingredients
For Coleslaw:
  • 2 cups shredded green cabbage
  • 1 cup shredded purple cabbage
  • 1/2 cup shredded carrots
For Coleslaw Dressing:
  • 1 cup mayonnaise
  • 2 Tablespoons apple cider vinegar
  • 1/4 teaspoon salt
  • 1/4 teaspoon pepper
  • 1 teaspoon poppyseeds
  • 2 Tablespoons granulated sugar
Instructions
  1. Shred green cabbage, purple cabbage, and carrots. Place into a large mixing bowl. Mix well, to combine.
  2. In a small mixing bowl, combine the mayonnaise, apple cider vinegar, salt, pepper, poppyseeds, and granulated sugar. Mix well, to thoroughly combine.
  3. Add the dressing to the slaw mixture. Stir well until all veggies are coated with dressing. Cover coleslaw with plastic wrap; place in refrigerator for a minimum of 1 hour (preferably longer), so that flavors come together and the slaw is very cold.
  4. Serve, and enjoy!
Recipe Notes

Prep time does not include inactive refrigeration time. The longer the cole slaw is refrigerated, the better it is, and the more PURPLE it becomes!

Nutrition Facts
Purple Coleslaw
Amount Per Serving (1 g)
Calories 288 Calories from Fat 252
% Daily Value*
Fat 28g43%
Saturated Fat 4g25%
Cholesterol 15mg5%
Sodium 349mg15%
Potassium 117mg3%
Carbohydrates 7g2%
Fiber 1g4%
Sugar 6g7%
Protein 1g2%
Vitamin A 1995IU40%
Vitamin C 17.7mg21%
Calcium 30mg3%
Iron 0.4mg2%
* Percent Daily Values are based on a 2000 calorie diet.

Here’s one more to pin on your Pinterest boards!Purple coleslaw, with homemade poppyseed dressing, is a quick, easy salad that's perfect for BBQ's! Slaw turns deep purple the longer it refrigerates.


Save

Save

Make Grilled Pizzas On Your BBQ!

Learn how easy it is to make grilled pizzas on your BBQ grill, which helps keep your kitchen cool in the Summer!Learn how easy it is to make grilled pizzas on your BBQ grill, which helps keep your kitchen cool this Summer!
Want to beat the heat in the kitchen this summer? Why not make grilled pizzas on your BBQ grill? That way you can kill two birds with one stone… keep the ol’ kitchen cool, AND enjoy a great homemade pizza!

I heard someone say they loved grilled pizzas right off the BBQ grill. Wait… What? It sounded like a great cooking experiment so I decided to give it a try. Result? Completely awesome!  It’s really much easier than I thought it would be! Get your hands on some pizza dough. Purchase it at the grocery store or make your own.

Scroll Down For A Printable Recipe Card At The Bottom Of The Page

Make Or Purchase Pizza Dough

I like to make my own grilled pizza dough. If you want to see the recipe for the dough I use, you can find it on my blog post for “Make It Yourself! Pepperoni Pizza”. The most important tip about this way of making pizza is to have all the pizza toppings ready to go (chopped, diced, etc.) before you put the dough on the grill!

Make the pizza dough (or open the package of pre-made dough – whatever). When done, divide dough into 6-8 little balls (if wanting small individual sized pizzas) OR (as in my pictures), divide dough into 2 medium sized dough balls. Roll or stretch dough out into a round shape (don’t worry if they’re not perfectly round shaped… no biggie).

Pizza dough rising for grilled pizzas

Time To Make Grilled Pizzas On Your BBQ!

Heat your BBQ grill on medium high heat. Brush olive oil (important-don’t forget this step – this will keep dough from sticking to grill, and will crisp the dough up a bit!!!) on both sides of the circle-shaped pizza dough. Carefully slide the pizza dough onto the grill rack.

Cook dough for 3-4 minutes on the first side. The bottom should be lightly browned and have grill marks. The top of the dough will look done. Carefully remove dough and turn it upside down (*GRILLED SIDE UP) onto a cutting board.

Quickly add the sauce and toppings to your pizza. If you’re feeling brave, just flip the pizza over and add the sauce and toppings while it is on the grill. (that was too hot for me…I just had a wood cutting board outside and transferred it back and forth. Worked like a charm.

Pizza dough is removed from BBQ and toppings are added, then back onto BBQ grill
Carefully slide pizzas back onto grill and continue to cook for 3-4 minutes. We put the lid on the BBQ, which helped the cheese melt. The bottom of the dough should be lightly browned.

Grilled pizzas made on the BBQ are ready to slice and eat!

Remove pizzas from grill, slice and serve, with any last minute garnishes. Serve immediately… enjoy!

Grilled pizza sliced and served... straight off the BBQ grill!
We loved the taste of the grilled pizzas… and I personally loved the fact that our kitchen stayed cool! We loved our grilled BBQ chicken pizza, and our veggie delight pizza, and look forward to making this easy dinner again this summer. It sure helps to keep our kitchen cool!

I am not posting a printable recipe because everyone likes different kinds of pizza, toppings, sauces, AND pizza dough. I simply wanted to describe the “how-to’s” of grilling fresh pizzas on a BBQ so anyone could do it themselves! Hope you will give it a try!

Looking for More PIZZA Recipes?

You can find ALL my recipes in the Recipe Index, located at the top of the page. I have a variety of pizza recipes, which include:

Interested In More Recipes?

Thank you for visiting this website. I appreciate you using some of your valuable time to do soIf you’re interested, I publish a newsletter 2 times per month (1st and 15th) with all the latest recipes, and other fun info. I would be honored to have you join our growing list of subscribers, so you never miss a great recipe! 

There is a Newsletter subscription box on the top right side (or bottom) of each blog post, depending on the device you use, where you can easily submit your e-mail address (only) to be included in my mailing list.

You Can Also Find Me On Social Media:

Facebook page: The Grateful Girl Cooks!
Pinterest:
The Grateful Girl Cooks!
Instagram:
jbatthegratefulgirlcooks

Have a great day.

Author's signature

Here’s one more to pin on your Pinterest boards!Learn how easy it is to make grilled pizzas on your BBQ grill, which helps keep your kitchen cool this Summer!

Save

Save

Quick and Easy Open Faced Tuna Melts

It’s been unusually HOT in the Pacific Northwest for the past several weeks. Temps are supposed to hover near 100 degrees this coming weekend, which is “not the norm” for late June in Oregon. We want quick  and easy meals (don’t want to heat up the kitchen cooking). Enter our “go-to” standby… Quick and Easy Open Faced Tuna Melts!!!!Quick and Easy Open Faced Tuna Melts / The Grateful Girl Cooks!
These open faced tuna melts are ridiculously easy… so easy in fact, that I’m not even gonna post the “recipe”. They actually are delicious, and are very quick to prepare!

First you toast some English muffins. I used sourdough (delicious!). Allow for one half or two halves per serving. Once toasted, place some cheese (gruyere, smoky gouda, or cheddar) on top of the muffin. (I have used all of these cheeses in the past. Pictures are with Smoky Gouda.

Quick and Easy Open Faced Tuna Melts / The Grateful Girl Cooks!
Put some tuna on top to cover the muffin. (Use the tuna you prefer, mixed up with whatever you like in your tuna salad). All I used for mine was one can (one can is enough for 4 half muffins) of albacore tuna, mixed with mayonnaise. That’s it!  But for goodness sake, make your tuna the way you like it!

Quick and Easy Open Faced Tuna Melts / The Grateful Girl Cooks!
Slice some really good ripe tomatoes and put a slice on top of each muffin. Sprinkle with a pinch of salt, pepper, dried parsley and dried basil. Just a touch.

Quick and Easy Open Faced Tuna Melts / The Grateful Girl Cooks!
Put the english muffins on a wire rack and place under a broiler. DO NOT put them directly under the broiler. Put them on the middle rack of your oven.

It will take a few minutes to broil them, but by putting them on the middle rack, instead of directly under the broiler, all the ingredients will have a chance to get hot, and that cheese on the bottom will melt.

Remove from broiler when cheese is bubbly and the tuna has just started to lightly turn golden.

Quick and Easy Open Faced Tuna Melts / The Grateful Girl Cooks!
Remove tuna melts from wire rack with a spatula. Place on serving plates. I like to put some red leaf lettuce leaves under the tuna melts just for some added color, to make it look good, but that is totally optional.

You can either pick them up and eat them or cut them with knife and fork… whatever suits you! They’re really delicious! Sure hope you’ll give ’em a try. Good for a quick, filling lunch, or dinner on a really HOT evening! Been making these for years and years, and have never been disappointed!

Quick and Easy Open Faced Tuna Melts / The Grateful Girl Cooks!Have a wonderful week… may you feel gratitude for all you experience this week, and above all else…may you deeply know just how much God loves you!

Interested In More Recipes?

Thank you for visiting this website. I appreciate you using some of your valuable time to do soIf you’re interested, I publish a newsletter 2 times per month (1st and 15th) with all the latest recipes, and other fun info. I would be honored to have you join our growing list of subscribers, so you never miss a great recipe!

There is a Newsletter subscription box on the top right side (or bottom) of each blog post, depending on the device you use, where you can easily submit your e-mail address (only) to be included in my mailing list.

You Can Also Find Me On Social Media:
Facebook page: The Grateful Girl Cooks!
Pinterest: The Grateful Girl Cooks!
Instagram: jbatthegratefulgirlcooks

Quick and Easy Open Faced Tuna Melts / The Grateful Girl Cooks!


Here’s one more to pin on your Pinterest boards!Quick and Easy Open Faced Tuna Melts / The Grateful Girl Cooks!

Save

Save

Homemade Peach Ice Cream

Fresh peaches and peach nectar bring flavor to delicious homemade peach ice cream (a Food Network recipe), easily made in an ice cream machine!Fresh peaches and peach nectar bring flavor to delicious homemade peach ice cream (a Food Network recipe), easily made in an ice cream machine!
It’s officially SUMMER!!! Time for BBQ’s with friends, lots of sunshine, starlit evenings hanging out on our back deck, ping pong tournaments, and Homemade Peach Ice Cream!  What could be better than a big old bowl of frozen peachy goodness on a hot summer day?

I found this recipe from Patrick and Gina Neely on The Food Network’s website a couple years ago, and thought I would give it a try! I love experimenting with new recipes for homemade ice cream, and this one sounded like a winner!

Scroll Down For A Printable Recipe Card At The Bottom Of The Page

Top Homemade Peach Ice Cream With Pecan Praline Sauce!

Their recipe for homemade peach ice cream also included instructions for a wonderful pecan and praline topping. This praline topping is the perfect accompaniment to the ice cream! It is called Southern Praline Sauce and it tastes fantastic, served warm over this homemade peach ice cream!

A praline sauce is made to add to the top of each scoop of homemade peach ice cream!

Preparing The Homemade Peach Ice Cream

The peaches are peeled, pitted, sliced and then chopped, which is about the only “difficult” thing about this recipe… ha ha! After that, cook the peaches with other ingredients, then blend and let it cool. When that is done, freeze the homemade peach ice cream to creamy perfection in an ice cream maker!

Fresh peaches are peeled, pitted, sliced and then chopped to add to ice cream base.

Time To Freeze The Ice Cream!

Add the ice cream mixture to an ice cream machine and process, according to manufacturer instructions. The recipe will yield approximately 1.5 quarts, for about 6 servings. Once finished, I put the semi-firm ice cream into a covered container, and place it back into my refrigerator’s freezer. This helps it freeze and firm up a little bit more (1-2 hours), for best texture!

I use a Cuisinart ice cream machine to make homemade peach ice cream.

Time To Eat!

When you are ready to serve, just scoop it right up. The homemade peach ice cream tastes really good, especially when topped with the praline sauce, which is a yummy addition of flavor!

Homemade Peach Ice Cream topped with a praline sauce, in a glass dish.
Whether you make the praline sauce or not, this peach ice cream is fabulous! The recipe uses fresh peaches, peach nectar, and sour cream, etc., so you KNOW it has to be yummy! I was fortunate to use some of the fresh juicy peaches I picked at a local farm to make this ice cream!

Fresh peaches were picked and used to make homemade peach ice cream!
Anyways… this is a great recipe, all you ice cream lovers out there. If you’re looking for a good recipe for Homemade Peach Ice Cream to add to your summer enjoyment, this is one I recommend, as well as my recipe for Perfectly Peachy Ice Cream. Hope you’ll give it a try. It’s amazing!

Looking For More ICE CREAM Recipes?

You can find all of my recipes in the Recipe Index, located at the top of the page. I have quite a few recipes for homemade ice cream, including:

Interested In More Recipes?

Thank you for visiting this website. I appreciate you using some of your valuable time to do soIf you’re interested, I publish a newsletter 2 times per month (1st and 15th) with all the latest recipes, and other fun info. I would be honored to have you join our growing list of subscribers, so you never miss a great recipe!
There is a Newsletter subscription box on the top right side (or bottom) of each blog post, depending on the device you use, where you can easily submit your e-mail address (only) to be included in my mailing list.

You Can Also Find Me On Social Media:

Facebook page: The Grateful Girl Cooks!
Pinterest:
The Grateful Girl Cooks!
Instagram:
jbatthegratefulgirlcooks

Author's signaturePeach Ice Cream Recipe Source: http://www.foodnetwork.com/recipes/patrick-and-gina-neely/neelys-homemade-peach-ice-cream-recipe.html

0 from 0 votes
Homemade Peach Ice Cream
Prep Time
30 mins
Cook Time
10 mins
Total Time
40 mins
 

Fresh peaches and peach nectar bring flavor to delicious homemade peach ice cream (a Food Network recipe), easily made in an ice cream machine!

Category: Dessert
Cuisine: American
Keyword: peach ice cream
Servings: 6 servings (1.5 qts.)
Calories Per Serving: 487 kcal
Author: JB @ The Grateful Girl Cooks!
Ingredients
  • 5 large ripe peaches , peeled, pitted, chopped
  • ¼ cup water
  • 12 ounces peach nectar (I used Kerns brand- found in juice aisle)
  • 1 cup granulated sugar
  • ½ cup sour cream
  • 1 pint heavy whipping cream
  • 1/4 teaspoon vanilla extract
  • 2 teaspoons lemon juice
Instructions
  1. Put the chopped peaches into a medium saucepan. Add water and canned peach nectar to the peaches. Stir to combine. Cook on medium heat until peaches have softened and cooked (about 10 minutes). Remove pan from heat. Drain off the peach juice (you can discard the leftover juice). Pour the peaches into a large mixing bowl. Stir in the granulated sugar, then let the peaches sit for awhile, so they cool back down to room temperature.

  2. Once peaches have cooled to room temp., add in sour cream, whipping cream, vanilla extract, and lemon juice. Blend well, using an immersion blender, food processor, or a blender (might have to do in batches).

  3. Pour peach mixture into the canister of your ice cream freezer and freeze, according to your particular manufacturer's instructions. When done, put the ice cream in a covered container and freeze for a couple hours to firm it up a bit.
  4. OPTIONAL: If desired, serve with warm Southern Praline Sauce over the top of the ice cream (see link in post for recipe). Serve, and enjoy!

Nutrition Facts
Homemade Peach Ice Cream
Amount Per Serving (1 (1/6th of total))
Calories 487 Calories from Fat 297
% Daily Value*
Fat 33g51%
Saturated Fat 20g125%
Cholesterol 117mg39%
Sodium 45mg2%
Potassium 323mg9%
Carbohydrates 48g16%
Fiber 1g4%
Sugar 44g49%
Protein 3g6%
Vitamin A 1685IU34%
Vitamin C 9.6mg12%
Calcium 80mg8%
Iron 0.3mg2%
* Percent Daily Values are based on a 2000 calorie diet.

Here’s one more to pin on your Pinterest boards!Fresh peaches and peach nectar bring flavor to delicious homemade peach ice cream (a Food Network recipe), easily made in an ice cream machine!


Save

Save

Homemade Hamburger Buns

Learn how to make homemade hamburger buns from scratch! The recipe makes 15 buns, which are perfect for burgers and other sandwiches!Learn how to make homemade hamburger buns from scratch! The recipe makes 15 buns, which are perfect for burgers and other sandwiches!
To be truthful, my first thought when I saw a recipe for making homemade hamburger buns was WHY? Why would anyone want to go to all the trouble to make their own, when you can just run to the store and buy them fairly cheaply? Then I realized the answer. Because we want to learn how, and simply because we can. That’s it. Why not learn something NEW?  So, I tried my hand at making them.

For me I realized that I simply wanted to try making my own (for the very first time), and that alone was enough reason. I did it JUST BECAUSE I WANTED TO LEARN. I’m glad I learned how to make them. These hamburger buns were really good!

Scroll Down For A Printable Recipe Card At The Bottom Of The Page

Make The Dough For Homemade Hamburger Buns

Start by mixing up the dough in a stand mixer. It’s easy. You can also mix the dough by hand, if you don’t have access to a stand mixer. Really. It’s not that hard.

Homemade Hamburger Buns / The Grateful Girl Cooks!
Once a dough ball has been formed, cover the dough and let it sit in a warm place for half an hour.

Homemade Hamburger Buns / The Grateful Girl Cooks!
After half an hour, the homemade hamburger buns dough has risen, and should look similar to this:

Homemade Hamburger Buns / The Grateful Girl Cooks!
Shaping The Dough

Pull off pieces of dough (15 total), and then shape each piece into a ball in your hands. Stretch the seams of the dough under, to the bottom of the ball.

Homemade Hamburger Buns / The Grateful Girl Cooks!
Place the dough balls onto a couple of large cookie sheets, leaving some space in between each one. Cover the dough balls with parchment paper or aluminum foil (I used foil). Once they are covered, put another cookie sheet on top of the foil. This will help the buns not to rise too much.

Homemade Hamburger Buns / The Grateful Girl Cooks!
Press down a bit on the top cookie sheet, which helps to flatten out the dough balls. Let the dough balls rise (with the foil still on top) for another 45 minutes.

Homemade Hamburger Buns / The Grateful Girl Cooks!
Prepare The Dough For Homemade Hamburger Buns For Baking

After the homemade hamburger buns (dough) have risen again, cut an X onto the top of each bun with a very sharp knife. Only cut slightly through the top of the dough and  NOT cut all the way through.

Homemade Hamburger Buns / The Grateful Girl Cooks!
Brush the tops of the dough balls with an egg wash (egg and milk). By the way, I hope you appreciate my “very much USED, GNARLY cookie sheets” (victims of too many recipes). After the hamburger buns are brushed with egg wash, sprinkle them with sesame seeds.

Homemade Hamburger Buns / The Grateful Girl Cooks!

Bake The Homemade Hamburger Buns

Bake the hamburger buns in a 400 degree oven for about 15 minutes, until they are light brown in color. Aren’t they CUTE?

Homemade Hamburger Buns / The Grateful Girl Cooks!
This is what they look like on the inside, after being sliced and on the outside. They look pretty good, don’t they?

Homemade Hamburger Buns / The Grateful Girl Cooks!
The only thing left to do is grill some burgers, and enjoy these homemade hamburger buns! They are wonderful (the buns AND the burgers)!!! If you need a couple side dishes to go with the burgers, may I suggest serving some delicious potato salad, crispy homemade french fries or onion rings? YUM!

Homemade Hamburger Buns / The Grateful Girl Cooks!

Maybe you like to try new recipes, too (like me!). If you do, I hope you will give this recipe a try! I think you will enjoy these hamburger buns. Here’s to a summer full of good BBQ’s!

Looking For More Homemade BREAD Recipes?

You can find ALL my recipes in the Recipe Index, located at the top of the page. I have some delicious homemade bread recipes, including:

Interested In More Recipes?

Thank you for visiting this website. I appreciate you using some of your valuable time to do soIf you’re interested, I publish a newsletter 2 times per month (1st and 15th) with all the latest recipes, and other fun info. I would be honored to have you join our growing list of subscribers, so you never miss a great recipe! 

There is a Newsletter subscription box on the top right side (or bottom) of each blog post, depending on the device you use, where you can easily submit your e-mail address (only) to be included in my mailing list.

You Can Also Find Me On Social Media:

Facebook page: The Grateful Girl Cooks!
Pinterest:
The Grateful Girl Cooks!
Instagram:
jbatthegratefulgirlcooks

Homemade Hamburger Buns / The Grateful Girl Cooks!Recipe Source: http://www.mennonitegirlscancook.ca/2010/08/hamburger-and-hot-dog-buns.html

0 from 0 votes
Homemade Hamburger Buns
Prep Time
1 hr 40 mins
Cook Time
15 mins
Total Time
1 hr 55 mins
 
Learn how to make homemade hamburger buns from scratch! The recipe makes 15 buns, which are perfect for burgers and other sandwiches!
Category: Bread
Cuisine: American
Keyword: homemade hamburger buns
Servings: 15 buns
Calories Per Serving: 164 kcal
Author: JB @ The Grateful Girl Cooks!
Ingredients
  • 2 Tablespoons instant yeast
  • 2 1/2 cups multigrain flour
  • 2 Tablespoons vegetable oil
  • 2 Tablespoons granulated sugar
  • 2 teaspoons salt
  • 2 cups hot tap water
  • 2 cups white all purpose flour
  • 1 large egg + 2 Tablespoons milk (beaten lightly - to brush on top of buns prior to baking)
  • Sesame seeds (optional), for sprinkling on top of buns prior to baking)
Instructions
  1. In a large bowl (or bowl of an electric stand mixer), combine the instant yeast and multigrain flour.
  2. Add vegetable oil granulated sugar, and salt.
  3. Stir in the white flour and the hot tap water. If using mixer, mix until dough forms ball that pulls away from sides of bowl (several minutes). (If using your hands, mix ingredients together to work everything together. Knead dough lightly to form ball).
  4. Once dough ball has been formed, cover bowl, set aside and let dough rest for 30 minutes.
  5. Divide dough into equal sized pieces, by squeezing off portions. (the number of buns is dependent on how large or small you make them. If making small (slider size) buns, you should get close to 2 dozen. If making larger buns, expect to get around 15 or so. Shape the dough into balls, stretching the dough so most of the "seams" are on the bottom of the ball.
  6. Place dough balls onto two cookie sheets. Leave a couple inches between each one. Place a layer of parchment paper or aluminum foil on top, to cover. Place a cookie sheet on top of paper or foil. Press down with the top cookie sheet to help flatten out the dough balls. Remove top cookie sheet, but leave paper or foil on. Let the dough rise for about 45 minutes.
  7. Remove foil after dough has risen. Bake in a preheated 400 F degree oven for about 15 minutes, or until the buns are golden brown.
  8. Remove from oven; let cool a bit, then serve!
Recipe Notes

I made the buns larger than slider size, so this recipe yielded 15 buns.

Nutrition Facts
Homemade Hamburger Buns
Amount Per Serving (1 bun)
Calories 164 Calories from Fat 18
% Daily Value*
Fat 2g3%
Saturated Fat 1g6%
Cholesterol 10mg3%
Sodium 315mg14%
Potassium 49mg1%
Carbohydrates 30g10%
Fiber 1g4%
Sugar 1g1%
Protein 4g8%
Vitamin A 15IU0%
Calcium 7mg1%
Iron 1.8mg10%
* Percent Daily Values are based on a 2000 calorie diet.

Here’s one more to pin on your Pinterest boards!Learn how to make homemade hamburger buns from scratch! The recipe makes 15 buns, which are perfect for burgers and other sandwiches!


Save

Save

Chicken Salad

This easy to prepare, delicious chicken salad, with cranberries, celery and pecans can be eaten as is, or served in pita bread or rolls for a great sandwich.This easy to prepare, delicious chicken salad, with cranberries, celery and pecans can be eaten as is, or served in pita bread or rolls for a great sandwich.
We’ve had lots of sunshine and hot weather the past several weeks in the Pacific Northwest. A few nights ago I decided to make my old standby recipe for Chicken Salad, serve it with some fresh pineapple, strawberries, and cantaloupe, and have dinner out on our back deck.

This was a perfect entree salad on a hot night! I was even able to use some of the red leaf lettuce from our garden to serve the salad on- whoo-hoo!  I’ve been making chicken salad this way for over 25 years. I’ve never had a recipe that I’ve used, so I had to be deliberate about writing it down this time, so I could post the right quantities for this blog post.

We really enjoy the salad, with chunks of chicken breast, crisp celery, the sweet chewy raisins, dried cranberries, red onion and crunchy pecans! This salad is really easy to make, too! Quick and easy, it’s my idea of a perfect meal! Here’s how to make it:

Scroll Down For A Printable Recipe Card At The Bottom Of The Page

Cook The Chicken Breasts

The first thing you need to do is cook the chicken. Put frozen chicken breasts (yep-right out of the freezer) into a large pan. Cover them with water, bring water to a boil, then cook on high heat for about 45-50 minutes (until fully cooked). *Note: I use 4 chicken breasts, but this picture shows 5 because I was cooking an extra one for another recipe.

Cooking chicken breasts to make chicken salad
When the chicken has finished cooking, remove the chicken breasts from the water and let the pieces cool a little. Once the chicken has cooled enough to handle, cut the pieces into 1 inch cubes and set aside.

Preparing The Chicken Salad

While the chicken is cooking, chop the pecans, celery and red onion, and place them into a medium sized bowl, along with the raisins and dried cranberries.

Pecans, raisins, red onion and celery ready to add to chicken salad.
Place the chunks of cooked chicken breast into the bowl with the other ingredients.

Cooked chicken breast chunks added to salad ingredients in bowl.
Add the mayonnaise to the bowl, and then season the chicken salad with salt and pepper. Give it a good stir to mix it all together (making sure it is all coated). Give it a taste, then add more salt and pepper, if necessary to suit your taste preference.

Ingredients are mixed with condiments and seasoning to make chicken salad.

Serving The Chicken Salad

Cover the chicken salad with plastic wrap and refrigerate it for about 2-3 hours. We feel this salad is at it’s best served nice and cold, plus the flavors have had time to develop.  Once the salad has fully chilled, it’s ready to serve! By the way… it tastes GREAT on sandwiches, too. I love to stuff a pita full of this chicken salad!  Yum.

Chicken salad can be served in pita bread for sandwiches.
Delicious, stuffed with chicken salad!

My absolute favorite way to serve this is… just as it is!!!!! When ready to serve, I place red lettuce leaves onto a serving plate, then arrange the chicken salad on top, for a nice presentation.

Chicken salad, served on top of red leaf lettuce.
This chicken salad is a great quick bite for lunch OR for a light dinner! I sure hope you will try making this for yourself… it’s really delicious! Hope you have a wonderful day and enjoy each minute of life you are blessed with!

Looking For More Chicken Salad Recipes?

You can find all of my recipes in the Recipe Index, located at the top of the page. I have a few chicken salad recipes, including:

Interested In More Recipes?

Thank you for visiting this website. I appreciate you using some of your valuable time to do soIf you’re interested, I publish a newsletter 2 times per month (1st and 15th) with all the latest recipes, and other fun info. I would be honored to have you join our growing list of subscribers, so you never miss a great recipe!
There is a Newsletter subscription box on the top right side (or bottom) of each blog post, depending on the device you use, where you can easily submit your e-mail address (only) to be included in my mailing list.

You Can Also Find Me On Social Media:

Facebook page: The Grateful Girl Cooks!
Pinterest:
The Grateful Girl Cooks!
Instagram:
jbatthegratefulgirlcooks

Author's signature

0 from 0 votes
Chicken Salad
Prep Time
45 mins
Cook Time
0 mins
Total Time
45 mins
 
This easy to prepare, delicious chicken salad, with cranberries, celery and pecans can be eaten as is, or served in pita bread or rolls for a great sandwich.
Category: Entree Salad
Cuisine: American
Keyword: chicken salad
Servings: 8 small servings
Calories Per Serving: 467 kcal
Author: JB @ The Grateful Girl Cooks!
Ingredients
  • 4 boneless , skinless chicken breasts (frozen)
  • 1 1/2 cups diced celery (I use 3 stalks-slice each stalk in thirds lengthwise, then chop)
  • 1 cup chopped pecans (can also use walnuts)
  • 3/4 cup raisins
  • 1/4 cup dried cranberries
  • 1/2 cup diced red onion
  • 1 1/3 cups mayonnaise
  • salt and pepper , to taste (approx. 1/2 teaspoon salt, 1/4 teaspoon pepper-more, as needed)
  • Red leaf lettuce leaves (to serve salad on top of-this is optional, but it looks pretty!)
Instructions
  1. Place frozen chicken breasts into a large saucepan. Cover completely with water. Cook on HIGH for 45-50 minutes (until chicken is done). Remove from heat. Remove chicken to a cutting board and let cool.
  2. In a large salad bowl, place the celery, pecans, raisins, dried cranberries, and red onion.
  3. Once the chicken has cooled off (to the touch), cut it into 1 inch cubes. Add the chicken to the salad bowl.
  4. Add the mayonnaise, salt and pepper. Mix well to combine all ingredients.
  5. Taste salad. Add additional salt and pepper, to suit your taste. I usually have to add a bit more. When ready, cover salad with plastic wrap, and place in refrigerator to chill for 2-3 hours or more (the longer the flavors have time to come together, the better!)
  6. When ready to serve, place a few red leaf lettuce leaves onto serving plate. Arrange salad into a mound in the center of the lettuce. Serve, and enjoy!
  7. Keep leftovers covered and refrigerated. Will keep for several days!
Recipe Notes

Prep time includes time for cooking the chicken, but does not include refrigeration time.

Nutrition Facts
Chicken Salad
Amount Per Serving (1 serving)
Calories 467 Calories from Fat 351
% Daily Value*
Fat 39g60%
Saturated Fat 5g31%
Cholesterol 51mg17%
Sodium 321mg14%
Potassium 433mg12%
Carbohydrates 16g5%
Fiber 2g8%
Sugar 4g4%
Protein 14g28%
Vitamin A 210IU4%
Vitamin C 2.1mg3%
Calcium 27mg3%
Iron 1mg6%
* Percent Daily Values are based on a 2000 calorie diet.

Here’s one more to pin on your Pinterest boards!This easy to prepare, delicious chicken salad, with cranberries, celery and pecans can be eaten as is, or served in pita bread or rolls for a great sandwich.

Save

Save

Save

Save

Tropical Watermelon Sorbet With Lime Semifreddo

Tropical watermelon sorbet with a creamy lime semifreddo on top is a 2 layered frozen dessert, w/ lots of FLAVOR! A perfect dessert to enjoy on a hot summer night!Tropical watermelon sorbet with a creamy lime semifreddo is a 2 layered frozen dessert, w/ lots of FLAVOR! A PERFECT dessert on a hot summer night!
A few years ago I was searching for a dessert featuring watermelon, for a “Watermelon-Themed” dinner party we attended. All the courses prepared for the dinner had to include watermelon!  One of the desserts I brought was this amazing Tropical Watermelon Sorbet with Lime Semifreddo!

Scroll Down For A Printable Recipe Card At The Bottom Of The Page

Ever Been To A “WATERMELON” Themed Dinner Party?

Our “watermelon-Themed dinner party ( for three couples) was so much fun! Each part of the dinner had to include watermelon, from drinks, appetizers, and main courses, to the desserts. We all contributed to the dinner, and all of us enjoyed it immensely!

Some pictures from a watermelon themed dinner we enjoyed.

Here is a copy (below) of our menu from this watermelon-themed dinner! We loved all these unique watermelon-themed foods and drinks! The night we enjoyed this tropical watermelon sorbet with lime semifreddo, I drizzled some homemade watermelon “sauce” over the dessert, but that is NOT necessary.

The menu for our watermelon themed dinner, which included tropical watermelon sorbet.

How I Created This Watermelon Sorbet And Lime Semifreddo

I created this frozen treat by using a recipe for watermelon sorbet (from Giada DeLaurentiis of the Food Network). This was paired with another recipe (from Serious Eats) I wanted to try for Lime Semifreddo. It sounded good to me, that combining these two recipes into one would make a GREAT frozen dessert! I was right. It tastes fabulous!

How Watermelon Sorbet And Lime Semifreddo Is Made

I only took the ONE picture (which is a TOTAL bummer), but the instructions below will get you from Point A to Point B with no problem. Basically what I did was make the tropical watermelon sorbet, and freeze it in a round cake pan.

Then I made the lime semifreddo, and spread it on top of the frozen watermelon sorbet. Both were then frozen together. At serving time, I cut the frozen dessert into pie shaped wedges. Each wedge is served with a twist of fresh lime on top.

The tropical watermelon sorbet gets it’s flavor from watermelon, pineapple juice, lime juice and ginger ale. It’s wonderful! If you’ve never heard of semifreddo before (neither had I BEFORE making this), you will LOVE it! Think ice cream on steroids.

What IS Semifreddo?

“Semifreddo” is Italian, and means “half-cold”. Kind of like ice cream. Because of the air and sugar in it, the semifreddo maintains a soft, creamy texture even after being frozen. A true semifreddo will never get rock hard like ice cream does in the freezer – YAY!).

The lime flavor is magnificent in this semifreddo…light and fresh-tasting! Layer it with some yummy tropical watermelon sorbet, and you’ve got a refreshing, frozen dessert!

Watermelon is the chief ingredient for this dessert!

The combination of the two recipes into one was a great pairing of summertime flavors (in my humble opinion!  Seriously DELICIOUS, COLD, AND REFRESHINGLY LIGHT on a hot summer’s night! I really hope you will give this frozen dessert a try. It’s best if you make it the day before you want to serve it, so that everything freezes well together.

Don’t let the length of the prep time stop you from trying this. The tropical watermelon sorbet actually only takes a few minutes to make, and the lime semifreddo can be made in under half an hour. Most of the prep time is inactive “waiting for the stuff to freeze” time. Enjoy!

Looking For More Sorbet Or Ice Cream Recipes?

You can find ALL my recipes in the Recipe Index, located at the top of the page. I have a nice variety of sorbet and ice cream recipes, including:

Interested In More Recipes?

Thank you for visiting this website. I appreciate you using some of your valuable time to do soIf you’re interested, I publish a newsletter 2 times per month (1st and 15th) with all the latest recipes, and other fun info. I would be honored to have you join our growing list of subscribers, so you never miss a great recipe!
There is a Newsletter subscription box on the top right side (or bottom) of each blog post, depending on the device you use, where you can easily submit your e-mail address (only) to be included in my mailing list.

You Can Also Find Me On Social Media:

Facebook page: The Grateful Girl Cooks!
Pinterest:
The Grateful Girl Cooks!
Instagram:
jbatthegratefulgirlcooks

Author's signatureRecipe Source for Tropical Watermelon Sorbet: http://www.foodnetwork.com/recipes/giada-de-laurentiis/tropical-watermelon-sorbet-recipe.html

Recipe Source for Lime Semifreddo: http://www.seriouseats.com/recipes/2011/04/lime-semifreddo-with-pretzel-crust-recipe.html

↓↓ PRINTABLE RECIPE BELOW ↓↓

0 from 0 votes
Tropical Watermelon Sorbet With Lime Semifreddo
Prep Time
1 hr
Cook Time
0 mins
Freezing Time
8 hrs
Total Time
9 hrs
 

Tropical watermelon sorbet with a creamy lime semifreddo is a 2 layered frozen dessert, w/ lots of FLAVOR! A PERFECT dessert on a hot summer night!

Category: Dessert
Cuisine: American
Keyword: watermelon sorbet
Servings: 8 servings
Calories Per Serving: 386 kcal
Author: JB @ The Grateful Girl Cooks!
Ingredients
For the Tropical Watermelon Sorbet:
  • cups (seedless watermelon (fruit cut into 1 inch pieces for a yield of 3 1/2 cups)
  • 6 ounce (6 ounce) can pineapple juice, chilled well
  • 3/4 cup ginger ale , chilled well
  • 1/3 cup fresh lime juice (approximately 3 large limes)
  • 1/2 cup Grenadine syrup (I used Rose's)
For the Lime Semifreddo:
  • 1 (14 ounce) can sweetened condensed milk
  • 1/2 cup fresh lime juice (approx. 4 limes)
  • 2 teaspoons finely grated lime zest
  • 1 cup granulated sugar
  • 1/4 cup water
  • 2 Tablespoons light corn syrup
  • 4 large egg whites (at room temperature)
  • 1/4 teaspoon salt
Instructions
  1. Make the watermelon sorbet first: Combine the chilled watermelon pieces, pineapple juice, ginger ale, lime juice, and grenadine syrup in a blender (may have to work in batches). Blend until smooth. Pour mixture into an ice cream maker; freeze, according to your manufacturer's instructions. (between 25 and 30 minutes). I spooned the frozen sorbet out of the ice cream machine into a round 9 inch cake pan. Spread the sorbet out to level it out. Cover, and freeze until solid. (I froze mine for several hours before adding the semifreddo to the top of it.

  2. Make the Lime Semifreddo (after the sorbet has frozen for several hours): In a medium bowl, whisk the sweetened condensed milk, lime juice and finely grated lime zest until mixture is smooth. Set bowl aside.

  3. In a medium sized, heavy-duty saucepan, place the granulated sugar, water, and corn syrup. Stir well, to combine. Heat this mixture on medium-low until sugar is dissolved. Then increase the heat to medium-high; Bring the syrup to a boil, continue boiling and stirring (occasionally) until the mixture registers 240 degrees F on a candy thermometer (this will take between 8 and 10 minutes)
  4. While the syrup is boiling, beat the room temperature egg whites and salt with an electric mixer (with a whisk attachment) on medium speed for about a minute. Increase mixer speed to medium-high; whisk the egg whites until soft peaks form (about 2-3 minutes). When the egg whites are at soft peak stage (and with mixer running at medium-high speed), SLOWLY drizzle the corn syrup mixture to the egg whites. Continue mixing for about 7 minutes more. When ready, the outside of the mixing bowl should be cool to the touch, and the egg whites will be thick and glossy looking. Mix about 1/3 of the meringue mixture (with electric beaters) into the bowl of reserved lime mixture. FOLD IN THE REMAINING MERINGUE, with a rubber spatula until well blended.

  5. Remove watermelon sorbet from freezer. Evenly spread the lime semifreddo over the entire surface of the sorbet. Cover loosely with plastic wrap. Place pan back into freezer, and freeze for at least 8 hours.
  6. When ready to serve, remove plastic wrap, and carefully slice into pie shaped wedges, and place onto serving plates. Garnish with a twist of fresh lime, and serve! Enjoy!
Recipe Notes

***Please note that the long prep time for this recipe really is how long the dessert will be frozen. Most of this is inactive prep time. The sorbet only takes a few minutes to prepare; the lime semifreddo can be made in about half an hour.

Nutrition Facts
Tropical Watermelon Sorbet With Lime Semifreddo
Amount Per Serving (1 serving)
Calories 386 Calories from Fat 36
% Daily Value*
Fat 4g6%
Saturated Fat 2g13%
Cholesterol 16mg5%
Sodium 174mg8%
Potassium 345mg10%
Carbohydrates 83g28%
Sugar 76g84%
Protein 6g12%
Vitamin A 520IU10%
Vitamin C 16.5mg20%
Calcium 153mg15%
Iron 0.4mg2%
* Percent Daily Values are based on a 2000 calorie diet.

Here’s one more to pin on your Pinterest boards!Tropical watermelon sorbet with a creamy lime semifreddo is a 2 layered frozen dessert, w/ lots of FLAVOR! A PERFECT dessert on a hot summer night!


Save

Save

Save

Lentil Stew

Hearty, healthy and delicious, you will love this low calorie, thick homemade lentil stew for an easy and inexpensive lunch or dinner!Hearty, healthy and delicious, you will love this low calorie, thick homemade lentil stew for an easy and inexpensive lunch or dinner!
Well, this was a happy experiment. It was my first time cooking lentils! I guess I’m behind the times, but I kept hearing about how inexpensive, nutritious, and filling lentils were, so I started looking to see what goes into a good, thick Lentil Stew. Then I made my own version!

I must have looked at 25 different ways to make lentil soup or stew. I finally decided to just make my own version and add a variety of ingredients (like carrots, celery, thyme, dill, garlic, etc) I found on various recipes that sounded like they would be good additions.

The only HARD part about making this stew was I had to remember to write all the ingredients down as I made it, so I could actually remember what I did. Do you ever do that? Let’s just say that one hand was stirring the pot, one hand was writing it all down, and I suppose I might have used my FEET to take the pictures… somehow I got it done, and guess what? This hearty lentil stew is GOOD!

Scroll Down For a Printable Recipe Card At the Bottom Of The Page

Lentils Are A Healthy Protein-Filled Legume

On a side note… did you know that lentils (a legume) contain the 3rd highest protein of any legume? True. Lentils are inexpensive AND highly nutritious. That can be considered a win-win kind of main ingredient.

How To Make Delicious Lentil Stew

The first thing to do is cook the chopped onions for a few minutes in a bit of olive oil. The onions are cooked until they have softened.

Cooking onions in red pot for lentil stew
Once onions have softened, add the lentils. It’s important to rinse and drain the lentils in a colander BEFORE adding! Brown rice is then added to the soup pot, along with 5 cups water. Give the ingredients a good stir after adding the rice.

Lentils, water and brown rice added to stew
Add a large cube of chicken bouillon to the stew, crumbling it up, as you add. TIP FOR VEGETARIANS: If you want to make this a completely vegetarian stew, leave the chicken bouillon out or add vegetable bouillon.

I personally enjoy the flavor the chicken bouillon adds, but it certainly won’t hurt the lentil stew if you omit it.

Chicken bouillon used to flavor lentil stewTime To Cook the Lentil Stew

Add the chopped celery, carrots, flat leaf parsley, thyme, dill, salt, oregano, seasoning salt, and minced garlic to the pot. Bring the lentil stew to a boil, then reduce the heat. Cook the stew on a low simmer for about 45-50 minutes, stirring occasionally.

Chopped celery, carrots, and spices added to soup pot
After the stew has cooked for about 45 minutes, the rice and lentils will be softened. A lot of the broth will have absorbed. Now the mixture will look more like a thickened soup or stew. TIP: I served the lentil stew in it’s thickened form. If you want it to be more “soup-like” (more broth liquid), simply add a cup of water during the last 10 minutes of cook time.

Lentil Stew ready to serve!Ready to EAT!

To serve, divide the hot lentil stew into serving bowls. Garnish each bowl of soup with chopped parsley, if desired. Serve the soup with some crusty slices of bread, and you’ve got yourself a hearty meal!

Even without meat, the combination of lentils and brown rice combine to make sure all essential amino acids are provided to make a complete protein dish. The lentil stew leftovers are pretty amazing, also (just sayin’).

Lentil Stew in bowl, with garlic bread on side
This was an easy meal to make, and my husband and I enjoyed the leftovers for lunch over the course of several days. Sure hope you will give this delicious lentil stew a try… I think you will be surprised at just how good it is! Have a great day!

Looking For More SOUP OR STEW Recipes?

Interested In More Recipes?

Thank you for visiting this website. I appreciate you using some of your valuable time to do soIf you’re interested, I publish a newsletter 2 times per month (1st and 15th) with all the latest recipes, and other fun info. I would be honored to have you join our growing list of subscribers, so you never miss a great recipe! 

There is a Newsletter subscription box on the top right side (or bottom) of each blog post, depending on the device you use, where you can easily submit your e-mail address (only) to be included in my mailing list.

You Can Also Find Me On Social Media:

Facebook page: The Grateful Girl Cooks!
Pinterest:
The Grateful Girl Cooks!
Instagram:
jbatthegratefulgirlcooks

Author's signature

0 from 0 votes
Lentil Stew
Prep Time
10 mins
Cook Time
45 mins
Total Time
55 mins
 

Hearty, healthy and delicious, you will love this low calorie, thick homemade lentil stew for an easy and inexpensive lunch or dinner!

Category: Dinner, Main Dish, Soup
Cuisine: American
Keyword: lentil stew
Servings: 8 servings
Calories Per Serving: 151 kcal
Author: JB @ The Grateful Girl Cooks!
Ingredients
  • 1 Tablespoon olive oil
  • 1 medium brown onion , chopped
  • 5 cups water
  • 1 cup brown lentils (rinsed)
  • 1/3 cup brown rice (uncooked)
  • 1 large chicken bouillon cube (can omit if making this vegetarian)
  • 2 cups chopped carrots
  • 2 celery stalks , chopped small
  • 1/4 teaspoon dried thyme
  • 1 1/4 teaspoons salt
  • 1/4 teaspoon dried oregano
  • 1 Tablespoon chopped flat leaf parsley
  • 1/4 teaspoon dried dill
  • 1/4 teaspoon seasoning salt
  • 1 teaspoon minced garlic
  • Dried parsley (OPTIONAL-to sprinkle on stew as a garnish before serving)
Instructions
  1. In a large soup pot, cook the chopped onion in olive oil until onions have softened (3-4 minutes).
  2. Add 5 cups water, rinsed lentils, brown rice, and crumbled chicken bouillon cube.
  3. Add the rest of the ingredients.
  4. Bring soup mixture to a full boil, then reduce the heat to a low simmer.
  5. Continue to cook the stew for 45-50 minutes (covered) on low, stirring occasionally. Uncover the stew the last 10 minutes of cooking time.(*If you want the stew to have more broth, simply add in another cup of water during the last 10 minutes of cooking time).
  6. Taste. Season with additional salt/pepper, if desired.
  7. Ladle the hot stew into serving bowls. Sprinkle with dried parsley (optional).
  8. Serve with some good crusty bread, and ENJOY!
Nutrition Facts
Lentil Stew
Amount Per Serving (1 serving)
Calories 151 Calories from Fat 18
% Daily Value*
Fat 2g3%
Sodium 588mg26%
Potassium 398mg11%
Carbohydrates 25g8%
Fiber 8g33%
Sugar 2g2%
Protein 7g14%
Vitamin A 5440IU109%
Vitamin C 5mg6%
Calcium 34mg3%
Iron 2.2mg12%
* Percent Daily Values are based on a 2000 calorie diet.

Here’s one more to pin on your Pinterest boards!Hearty, healthy and delicious, you will love this low calorie, thick homemade lentil stew for an easy and inexpensive lunch or dinner!


Save

Save

Pork Paprikash

Pork Paprikash is a classic Hungarian pork dish in a flavorful sauce, served over bow-tie pasta or egg noodles, and on the dinner table in under half an hour!Pork Paprikash is a classic Hungarian pork dish in a flavorful sauce, served over bow-tie pasta or egg noodles, and on the dinner table in under half an hour!

I recently tried a recipe for Pork Paprikash that I found on Pinterest. I’d never made the dish before, but was looking for a traditional dish that uses Hungarian sweet paprika (which I received as a gift from a friend).

My husband and I LOVED this meal of pork paprikash with it’s amazing flavors. I just gotta say, I was practically GIDDY with excitement over how quick and easy it was to prepare!

Scroll Down For A Printable Recipe Card At The Bottom Of The Page

Where Does Pork Paprikash Get Its Name?

The dish gets its name from the generous use of paprika (in Hungarian it is “paprikás”). It can be prepared with either chicken or pork. I prepared it using boneless pork, cut into bite-sized cubes.

It is typically served with egg noodles, but I used bow-tie pasta this time, because it is what I had in the pantry. This is such a quick meal to prepare… it only took about 25 minutes, from start to finish! The Hungarian paprika can be found in most spice sections at the grocery store (FYI).

How To Make Pork Paprikash

Tip: Bring a pot of salted water to a boil, so that you can cook the pasta noodles while you are preparing the pork paprikash. Once the pork is done, serve it on top of the cooked noodles.

Cut the boneless pork into bite sized pieces. Season it lightly with salt and pepper.

Boneless pork seasoned with salt and pepper is used to make pork paprikash.
Heat olive oil in a large skillet. Add the pieces of pork, and cook for about 4 minutes, turning to brown all sides.

Pork cubes for pork paprikash, cooking in oil in silver skilletPork cubes browning in skillet, to be used in pork paprikash.
Once the pork is browned on all sides, remove pork from the skillet. Set aside. Add more olive oil to skillet, and reduce heat to medium. Sauté the chopped onions, garlic, salt and pepper until onions are softened (about 3-4 minutes).

Onions and garlic used in pork paprikash sauce, cooking in skillet.
Make The Sauce

Measure out the flour, tomato paste, thyme, and paprika to the skillet. Stir the ingredients together, and cook for one more minute.

Spices and tomato paste added to cooked onions in skillet to make pork paprikash sauce.
Add the chicken stock into the skillet. Whisk to combine it fully with the other sauce ingredients. Add the vinegar, and bring the sauce to a boil.

Chicken stock added to pork paprikash sauce in skillet
Return the Pork To the Skillet

Transfer the cooked pork back into the skillet, and stir to combine. Reduce the heat under the skillet, and simmer the pork paprikash for 5 minutes.

The pork paprikash, simmering in skillet.
By now the pork paprikash is looking and smelling really good. After cooking the pork and sauce for 5 minutes, remove the pan from the heat. Stir in the sour cream. Mix well, to combine. This yummy pork paprikash is just about ready to serve!

Sour cream is added to pork paprikash in skillet.
Time To Serve the Pork Paprikash

By now your pasta noodles should be done cooking. Drain them and place onto serving platter or individual plates. Spoon the pork paprikash over the pasta. You can garnish the dish with some chopped fresh or dried parsley, if desired. Serve this dish nice and hot, and enjoy!

Pork paprikash and noodles on a plate with peas.
Sure hope you will give this delicious pork paprikash dinner a try! We had it with a side of peas, fresh from our garden on the side (the first picking of the Spring!). This easy, flavor-filled pork paprikash was a delicious meal, and we’ll be having it again!

Looking For More PORK Recipes?

If you’re looking for other pork recipes, be sure to check out all of mine in the Recipe Index at the top of the page. These recipes include:

Interested In More Recipes?

Thank you for visiting this website. I appreciate you using some of your valuable time to do soIf you’re interested, I publish a newsletter 2 times per month (1st and 15th) with all the latest recipes, and other fun info. I would be honored to have you join our growing list of subscribers, so you never miss a great recipe! 

There is a Newsletter subscription box on the top right side (or bottom) of each blog post, depending on the device you use, where you can easily submit your e-mail address (only) to be included in my mailing list.

You Can Also Find Me On Social Media:

Facebook page: The Grateful Girl Cooks!
Pinterest:
The Grateful Girl Cooks!
Instagram:
jbatthegratefulgirlcooks

Author's signatureRecipe Source: http://dinnersdishesanddesserts.com/pork-tenderloin-paprikash/

0 from 0 votes
Pork Paprikash
Prep Time
10 mins
Cook Time
15 mins
Total Time
25 mins
 
Pork Paprikash is a classic Hungarian pork dish in a flavorful sauce, served over bow-tie pasta or egg noodles, and on the dinner table in under half an hour!
Category: Entree
Cuisine: Hungarian
Keyword: pork paprikash
Servings: 4 servings
Calories Per Serving: 357 kcal
Author: JB @ The Grateful Girl Cooks!
Ingredients
  • 1 lb. pork tenderloin (or boneless pork chops), cut into 1 inch cubes
  • 1/2 teaspoon salt
  • 1/2 teaspoon finely ground black pepper
  • 2 teaspoons olive oil (for cooking meat)
  • 1 Tablespoon olive oil (for cooking onions, etc.)
  • 1 1/2 cups chopped brown onions
  • 2 teaspoons minced garlic
  • 2 Tablespoons all purpose flour
  • 2 Tablespoons tomato paste
  • 1/2 teaspoon dried thyme
  • 1 teaspoon Hungarian sweet paprika (found in most spice sections at grocery store)
  • 1 1/2 cups chicken stock
  • 1 Tablespoon apple cider vinegar
  • 3 Tablespoons sour cream
  • Egg noodles (or bow tie pasta) -prepare per pkg. instructions while pork is cooking!
Instructions
  1. Cut the pork into cubes. Season with salt and pepper.
  2. Heat 2 teaspoons olive oil in large skillet. When skillet and oil are hot, add the pork pieces; cook the pork for about 4 minutes, turning to brown the meat on all sides. When browned, remove the pork from skillet. Set aside.
  3. Turn the heat down to medium. Add 1 Tablespoon olive oil back into the skillet. Add the chopped onions, garlic, salt and pepper. Stir and cook for 3 minutes, or until onions have softened up, then add minced garlic and cook for one more minute, stirring constantly.
  4. Add flour, tomato paste, dried thyme, and paprika to onion mixture. Stir together; cook for one minute.
  5. Pour in the chicken stock; use a whisk to mix the ingredients into a sauce. Add the apple cider vinegar; bring the mixture to a boil.
  6. Once sauce begins to boil, reduce the heat to low, and add the pork cubes back into the sauce. Stir to coat the pork with sauce. Simmer for 5 minutes.
  7. Remove skillet from heat. Stir in sour cream. Mix sauce well to fully incorporate sour cream.
  8. Place cooked and drained egg noodles (or bow tie pasta) onto serving platter or individual plates. Spoon the pork and sauce over the pasta. Serve while hot... and enjoy!
Nutrition Facts
Pork Paprikash
Amount Per Serving (1 g)
Calories 357 Calories from Fat 117
% Daily Value*
Fat 13g20%
Saturated Fat 3g19%
Cholesterol 97mg32%
Sodium 556mg24%
Potassium 779mg22%
Carbohydrates 28g9%
Fiber 2g8%
Sugar 5g6%
Protein 30g60%
Vitamin A 425IU9%
Vitamin C 6.7mg8%
Calcium 45mg5%
Iron 2.4mg13%
* Percent Daily Values are based on a 2000 calorie diet.

Here’s one more to pin on your Pinterest boards!

Pork Paprikash is a classic Hungarian pork dish in a flavorful sauce, served over bow-tie pasta or egg noodles, and on the dinner table in under half an hour!


Save

Save

Homemade Strawberry Ice Cream

Thick, cold and creamy homemade strawberry ice cream is packed with fresh strawberries and is the perfect dessert treat, any time of year!Thick, cold and creamy homemade strawberry ice cream is packed with fresh strawberries and is the perfect dessert treat, any time of year!

Summer is just around the corner… I’m ready for warm days, sitting out on the back deck in the evenings by the firepit, BBQs with friends… and HOMEMADE STRAWBERRY ICE CREAM!

I grew up in hot and sunny Southern California, where making homemade ice cream was practically an art form in our family. My parents loved to make homemade ice cream, and my mom had several favorite recipes she would make, during the heat of the summer. I can still picture my Dad sitting on top of newspapers and bath towels on top of the old crank-style ice cream maker, to help keep the ice cream cold (while it firmed up) after freezing. Such great memories!

Nowadays (in the often rainy Pacific Northwest), I pull out my indoor electric ice cream maker (no salt or ice necessary). I can whip up a batch of homemade ice cream in about 20 minutes! Such was the case with this homemade strawberry ice cream!

My indoor ice cream machine

My husband bought a flat of local strawberries at a roadside stands recently, and asked me if I could make homemade strawberry ice cream with some of them. I don’t make strawberry ice cream too often, but I tried it anyways. Let me tell you… it was DELICIOUS!

Scroll Down For A Printable Recipe Card At The Bottom Of The Page

Making Homemade Strawberry Ice Cream

First you will need to clean, de-stem and slice those gorgeous strawberries. Add 1 Tablespoon granulated sugar, and stir to combine until sugar has dissolved. Let the strawberries sit for about 15 minutes. This is known as mascerating the fruit. The sugar will help to draw out some of the juice from the strawberries.

Once the strawberries have softened up, lightly mash them with a potato masher. Doing this will help to break them up a bit.

Sliced strawberries in metal bowl, ready to make homemade strawberry ice cream!
Whisk the whipping cream, milk, sugar, and vanilla together in a large bowl. Stir or whisk until the sugar has dissolved, then add the strawberries (and their juice).

Mashed strawberry mixture added to whipping cream and sugar.

Once you’ve added the strawberries and their juice, continue to lightly whisk until ingredients are fully combined. Now the homemade strawberry ice cream base will turn pink.

Homemade strawberry ice cream mixture ready to put into machine

Ready To Freeze The Ice Cream!

Once the ice cream base has been combined, pour it into the canister of an ice cream machine. The homemade strawberry ice cream is processed for about 20 minutes. When done, the homemade strawberry ice cream will be fairly thick, and will have increased in volume. You can see the chunks of fresh strawberries in the ice cream!

Homemade strawberry ice cream in machine, almost ready!

Spoonful of homemade strawberry ice cream, in cannister.
Transfer the homemade strawberry ice cream into a covered container (with a lid). Place container into freezer.  Let the ice cream firm up for a couple hours in the freezer.

When you are ready to eat it, remove container from freezer. Scoop out some delicious homemade strawberry ice cream.  If you want, you can add some more sliced strawberries to the top. Fantastic! This homemade strawberry ice cream recipe, as written, makes 1 1/2 quarts. The ingredients are easy to double, so remember to do that if using a standard-sized ice cream maker.

Homemade strawberry ice cream, in dish with strawberry topping
Bring on summer… Bring on homemade strawberry ice cream! It’s a wonderful summertime treat! (who am I kidding here – ice cream is good ANY old time of the year, right?) Enjoy this delicious, creamy dessert! Hope you have a wonderful day… may God bless you.

Looking For More Homemade Ice Cream Recipes?

I have many homemade ice cream recipes on this blog. You can find them all in the Recipe Index, located at the top of the page. A few of the flavors include:

Interested In More Recipes?

Thank you for visiting this website. I appreciate you using some of your valuable time to do soIf you’re interested, I publish a newsletter 2 times per month (1st and 15th) with all the latest recipes, and other fun info. I would be honored to have you join our growing list of subscribers, so you never miss a great recipe!
There is a Newsletter subscription box on the top right side (or bottom) of each blog post, depending on the device you use, where you can easily submit your e-mail address (only) to be included in my mailing list.

You Can Also Find Me On Social Media:

Facebook page: The Grateful Girl Cooks!
Pinterest:
The Grateful Girl Cooks!
Instagram:
jbatthegratefulgirlcooks

Author's signatureRecipe Source: Krups Ice Cream and Sorbet Maker Handbook (for vanilla base)

0 from 0 votes
Homemade Strawberry Ice Cream
Prep Time
20 mins
Cook Time
0 mins
Freezing Time
20 mins
Total Time
40 mins
 
Thick, cold and creamy homemade strawberry ice cream is packed with fresh strawberries and is the perfect dessert treat, any time of year!
Category: Dessert
Cuisine: American
Keyword: homemade strawberry ice cream
Servings: 12 1/2 cup servings (1½ quarts total)
Calories Per Serving: 204 kcal
Author: JB @ The Grateful Girl Cooks!
Ingredients
  • 1 ½ cups sliced fresh strawberries
  • 1 Tablespoon granulated sugar
  • 2 cups heavy whipping cream
  • 1 cup milk
  • ¾ cup granulated sugar
  • teaspoons vanilla extract
Instructions
  1. Combine strawberries and 1 Tablespoon granulated sugar in medium bowl. Mash with a potato masher to break up the strawberries a bit. Let sit for about 15 minutes.
  2. In a large bowl, whisk together the whipping cream, milk, granulated sugar and vanilla extract until sugar has dissolved.
  3. Add strawberries to ice cream mixture. Stir well to combine. Pour into canister of ice cream maker, and freeze according to manufacturer's instructions.
  4. When done, remove ice cream to a freezable covered container. Place in freezer to firm up, for about 2 hours.
  5. Serve, and enjoy!
Nutrition Facts
Homemade Strawberry Ice Cream
Amount Per Serving (0.5 cup)
Calories 204 Calories from Fat 126
% Daily Value*
Fat 14g22%
Saturated Fat 9g56%
Cholesterol 55mg18%
Sodium 24mg1%
Potassium 86mg2%
Carbohydrates 17g6%
Sugar 15g17%
Protein 1g2%
Vitamin A 620IU12%
Vitamin C 10.8mg13%
Calcium 53mg5%
Iron 0.1mg1%
* Percent Daily Values are based on a 2000 calorie diet.

Here’s one more to pin on your Pinterest boards!Thick, cold and creamy homemade strawberry ice cream is packed with fresh strawberries and is the perfect dessert treat, any time of year!

Save

Save