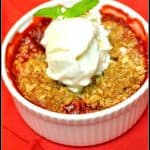
Delicious strawberry cobbler (in individual servings), featuring fresh strawberries and a buttery crumb topping, will be a family dessert favorite!, featuring fresh strawberries and a buttery crumb topping, will be a family dessert favorite! / The Grateful Girl Cooks!")
My husband surprised me with a flat of fresh picked Hood strawberries this past weekend, locally grown in the Pacific Northwest. Absolutely the best strawberry there is! These little gems are perfect for making Strawberry Cobbler, if you ask me!
I was in the middle of several HUGE projects (pressure washing deck and patio, painting deck, refinishing a garden bench/staining it), etc. My brain went into overtime, because I had to figure out what to do with all those strawberries, before they went bad.
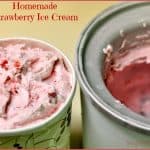
Because I was determined, I finished my projects, and into the kitchen I went. The first thing I made was homemade strawberry ice cream (my hubby’s request), then some strawberry jam, and this absolutely delicious STRAWBERRY COBBLER!
I found the recipe on Pinterest (thank you Joan, at “Chocolate Chocolate And More”), and it sounded really good. I’ve made many cobblers before, but never a STRAWBERRY cobbler. Yum. The recipe is VERY easy, and before I knew it, we had 4 ramekins of delicious cobbler, bursting with the flavor of fresh strawberries! Here’s how to make this great dessert!
Scroll Down For A Printable Recipe Card At The Bottom Of The Page
How To Make Individual Sized Strawberry Cobbler In Ramekins
Place quartered strawberries and sugar into a saucepan. (Note: I mashed them just a bit with a potato masher – not too much… just enough to get the strawberry juice flowing-this step is optional).
Let the strawberries and sugar hang out together for about 20 minutes. Because I mashed the ripe strawberries way too much, there was a lot of juice. Try NOT to mash them too much, for more intact strawberries.

Heat the strawberry mixture for about 5 minutes on medium heat. While they are heating, mix up a slurry of cornstarch and cold water, and then add it to the heated strawberry mixture. This will act as the thickening agent for the fruit in the strawberry cobbler.


Filling the Ramekins
Stir the strawberry mixture together and continue to cook, stirring often, until the strawberries come to a boil. Remove the pan from the heat, then evenly divide the strawberry mixture into 4 ramekins. Place the filled ramekins on a foil-lined baking sheet. TIP: The aluminum foil will catch any drips if the cobbler bubbles over the top, and will make your cleanup a LOT easier!
Although this picture below doesn’t quite capture it, there really are a LOT of strawberry chunks in there!

Make The Crumb Topping For Strawberry Cobbler
Place the crumb topping ingredients in a small bowl. Mix up the ingredients with a pastry blender or two forks, and blend until the crumbs are about the size of peas.


Evenly distribute the crumb topping over the tops of the strawberry cobbler in all 4 ramekins.

Time To Bake
Once all the ramekins all have crumb topping, put the foil-lined baking sheet with the ramekins into a preheated 350° F. oven, and bake for 25 minutes. When done, carefully remove the strawberry cobbler from the oven. Transfer the ramekins to a wire rack to finish cooling. The cobblers will look something like the photo below, and will smell GOOD!
 Serving The Strawberry Cobbler
Let the strawberry cobbler cool down for a few minutes, and then add a small scoop of homemade or store bought vanilla ice cream to each dessert. You can also garnish each cobbler with a sprig of mint, for presentation. This is optional, but adds color and fancies up the dessert a bit!

The only thing left to do at this point is to grab a spoon, and take a big ol’ bite of this delicious strawberry cobbler. It’s soooo good!

Sure hope you’ll give this easy recipe for strawberry cobbler in individual servings a try! I think you will be glad you did! Thanks for stopping by. Have a great day, and come back soon.
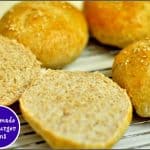
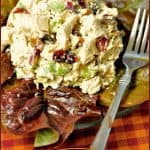
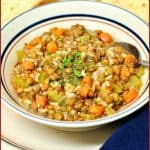
Looking For More COBBLER Recipes?
You can find all of my recipes in the Recipe Index, located at the top of the page. I have quite a few cobbler recipes, including:
Interested In More Recipes?
Thank you for visiting this website. I appreciate you using some of your valuable time to do so. If you’re interested, I publish a newsletter 2 times per month (1st and 15th) with all the latest recipes, and other fun info. I would be honored to have you join our growing list of subscribers, so you never miss a great recipe!
There is a Newsletter subscription box on the top right side (or bottom) of each blog post, depending on the device you use, where you can easily submit your e-mail address (only) to be included in my mailing list.
You Can Also Find Me On Social Media:
Facebook page: The Grateful Girl Cooks!
Pinterest: The Grateful Girl Cooks!
Instagram: jbatthegratefulgirlcooks
 Recipe Source: http://chocolatechocolateandmore.com/fresh-strawberry-cobbler/
Delicious strawberry cobbler (in individual servings), featuring fresh strawberries and a buttery crumb topping, will be a family dessert favorite!
Category: Dessert
Cuisine: American
Keyword: strawberry cobbler
Servings: 4 servings
Calories Per Serving: 383 kcal
Author: JB @ The Grateful Girl Cooks!
- 4-5 cups strawberries (fresh), cut into quarters
- 1/4 cup granulated sugar
- 4 teaspoons cornstarch
- 4 teaspoons cold water
- 1/2 cup brown sugar (light or dark)
- 1/2 cup quick cooking oats
- 1/3 cup all purpose flour
- 1/4 cup butter , softened
- Vanilla Ice Cream (for topping cobbler- optional, but recommended!)
- Mint sprigs (for garnish-optional)
Preheat oven to 350 degrees F.
Clean, de-stem and hull strawberries. Slice into quarters. Place strawberries and granulated sugar in a medium sized saucepan. Stir to combine, then let sit for about 20 minutes. After 20 minutes, place pan on stove and heat strawberries on medium heat for 5 minutes.
While strawberries are heating, combine cornstarch and cold water in a small bowl. Whisk well to fully combine (and dissolve the cornstarch...no lumps!) Pour cornstarch mixture into the strawberries. Stir. Continue heating (and stirring) the strawberries until mixture begins to boil. Remove pan from the heat. Divide strawberry mixture into 4 ramekins. Set aside.
To make the crumb topping, place brown sugar, oats, flour and butter in s small bowl. Cut ingredients together with a pastry blender (or two forks), until it becomes small crumbles. Evenly distribute crumb topping over the top of all 4 strawberry-filled ramekins (cover the tops completely). Put ramekins on a baking sheet that is covered with parchment paper, a silicone mat, or aluminum foil. This helps catch any drips that may or may not occur (depending on how full the ramekins are).
Bake cobbler at 350 degrees for approximately 25 minutes. When done, topping should be golden brown, and bubbly around the edges. Remove from oven. Let cobbler cool 5-10 minutes before serving. Add a scoop of vanilla ice cream, garnish with a sprig of mint, dig in... and ENJOY!!!
You do not need to lightly mash the strawberries as I did (to extract more juice). Just omit that step and add the quartered strawberries to the saucepan with the granulated sugar. It's all good.
Nutrition Facts
Strawberry Cobbler
Amount Per Serving (1 serving)
Calories 383 Calories from Fat 108
% Daily Value*
Fat 12g18%
Saturated Fat 7g44%
Cholesterol 30mg10%
Sodium 111mg5%
Potassium 303mg9%
Carbohydrates 67g22%
Fiber 4g17%
Sugar 46g51%
Protein 3g6%
Vitamin A 370IU7%
Vitamin C 84.6mg103%
Calcium 54mg5%
Iron 1.7mg9%
* Percent Daily Values are based on a 2000 calorie diet.
Here’s one more to pin on your Pinterest boards!, featuring fresh strawberries and a buttery crumb topping, will be a family dessert favorite! / The Grateful Girl Cooks!")
Save
Save
Save


 Have a wonderful week… may you feel gratitude for all you experience this week, and above all else…may you deeply know just how much God loves you!
, easily made in an ice cream machine! / The Grateful Girl Cooks!")


, easily made in an ice cream machine! / The Grateful Girl Cooks!")


