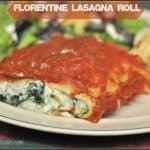
Chocolate Creme Brulee

Chocolate creme brulee is a delicious flavor variation on a classic dessert, complete with crispy sugar crust to crack into. Recipe makes 4 servings.Chocolate creme brulee is a delicious flavor variation on a classic dessert, complete with crispy sugar crust to crack into. Recipe makes 4 servings.
My husband LOVES Creme Brulee. He also LOVES chocolate. So when I found this recipe for Chocolate Creme Brulee, how could I go wrong? Chocolate AND Creme Brulee???… whoa. That’s a winning combo, in my book!

I found the original recipe on Pinterest a while ago, and finally decided to try a chocolate version of this classic dessert. My husband had just finished taking a few more continuing ed. classes to renew his Real Estate Appraisal License once again. I wanted to celebrate with one of his favorite desserts! He was pleasantly surprised… and enjoyed these very much!

If you like creme brulee, I highly recommend this delicious chocolate version. Perhaps you would like to make a non-chocolate version? Check out one of my recipe for Classic Creme Brulee! I think you will love it!

Scroll Down For A Printable Recipe Card At The Bottom Of The Page

Do I Need Special Equipment To Make Chocolate Creme Brulee?

This delicious treat is a nice and easy, yet impressive dessert to serve to those you love. I have a creme brulee set (a birthday present from years ago). I’ve given directions which include a way for you to make this without specialty pans. All you will need are four 6oz. ramekins and a cake pan (with sides).

To make the hardened sugar top, I use a chef’s kitchen blowtorch. That is not necessary, because you can also use your oven broiler to do this. The instructions are in the printable recipe.

Chocolate Creme Brulee Is Easy To Make

Making this treat is pretty easy! A chocolate custard-style base is cooked and then poured into ramekins and baked. Once baked, the desserts are refrigerated until very cold.

Here are 4 ramekins filled with chocolate creme brulee, straight out of the oven. They are now ready to refrigerate until they have fully chilled. Later we will sprinkle the top of each dish with granulated sugar and take a blow torch to them. THAT’S where the magic happens!

Four ramekins of brulee, out of the oven after baking.

The Crisp Sugar Top Is Fun To Crack Into On Creme Brulee

This dessert is so easy to prepare, and there’s nothing more fun than to crack into the hardened sugar “shell” on top. Granulated sugar is heated with a cook’s blowtorch and it forms a hard shell on top. Now to crack into it, and enjoy every bite!

The creme brulee has a hardened sugar topping.

See how the torched/broiled sugar topping cracks? Do you see all that delicious chocolate creme brulee underneath it? YUM.

Cracking through the sugar crust, to see the chocolate creme brulee underneath.

Sure hope you enjoy this delicious chocolate creme brulee dessert! Have a GREAT day, and stop by again soon!

Looking for More DESSERT Recipes?

You can find all of my recipes in the Recipe Index, located at the top of the page. I have LOTS of wonderful dessert recipes, including:

Interested In More Recipes?

Thank you for visiting this website. I appreciate you using some of your valuable time to do soIf you’re interested, I publish a newsletter 2 times per month (1st and 15th) with all the latest recipes, and other fun info. I would be honored to have you join our growing list of subscribers, so you never miss a great recipe!
There is a Newsletter subscription box on the top right side (or bottom) of each blog post, depending on the device you use, where you can easily submit your e-mail address (only) to be included in my mailing list.

You Can Also Find Me On Social Media:

Facebook page: The Grateful Girl Cooks!
Pinterest:
The Grateful Girl Cooks!
Instagram:
jbatthegratefulgirlcooks

Author's signature

Recipe Source: http://www.melangery.com/2013/02/chocolate-creme-brulee-have-most.html

↓↓ PRINTABLE RECIPE BELOW ↓↓

0 from 0 votes
Chocolate Creme Brulee
Prep Time
15 mins
Cook Time
25 mins
Total Time
40 mins
 

Chocolate creme brulee is a delicious flavor variation on a classic dessert, complete with crispy sugar crust to crack into. Recipe makes 4 servings.

Category: Dessert
Cuisine: American
Keyword: chocolate creme brulee
Servings: 4 servings
Calories Per Serving: 674 kcal
Author: JB @ The Grateful Girl Cooks!
Ingredients
  • 2 cups heavy whipping cream
  • 1/4 cup granulated sugar
  • 1 pinch salt
  • 3 oz. bittersweet chocolate , finely chopped
  • 1 teaspoon vanilla extract
  • 3 egg yolks
  • 4 Tablespoons granulated sugar (For garnishing the top of the cooked creme brulee)
Instructions
  1. Preheat oven to 300 degrees. Bring a large pot of water to a full boil. While the water is boiling, prepare the recipe.

  2. Place the finely chopped chocolate pieces into a heatproof bowl.
  3. Add the whipping cream, 1/4 cup sugar, and the salt to a saucepan. Stir and cook over medium heat for approximately 5 minutes (until you can see the steam beginning to rise). Do not boil. Remove the hot cream mixture and pour it over the chocolate pieces. Let it stand for a couple minutes, then whisk it to combine. Mixture should be smooth.
  4. Beat the egg yolks and vanilla in a medium sized bowl until smooth. Slowly and in a very thin stream, pour (just a little at a time) the hot chocolate mixture into egg yolk mixture, whisking constantly. You don't want the eggs to scramble, so do this slowly and stir continually. Once mixture is fully incorporated and smooth, pour the mixture into four 6 oz. ramekins.

  5. Using A Standard Creme Brulee Pan And Rack? Prepare the recipe. Place ramekins and rack in pan. Place the pan onto a middle baking rack. Now carefully pour the boiling water into the pan (but NOT into the ramekins!). Pour the boiling water in the pan until it reaches about half way up the sides of the ramekins. Loosely cover the entire pan with aluminum foil. Bake in a 300 degree oven for 25-30 minutes. The custard should just be "set" at this point.

  6. Preparing This Without A Creme Brulee Pan And Rack? Take a dish towel and get it damp. Lay it in the bottom of a baking pan (with sides). The damp towel is there so ramekins don't move around while baking. Place ramekins on towel in pan. Now carefully pour the boiling water into the pan (but NOT into the ramekins!). Place the pan onto a middle baking rack. Pour the boiling water in the pan until it reaches about half way up the sides of the ramekins. Loosely cover the entire pan with aluminum foil. Bake in a 300 degree oven for 25-30 minutes. The custard should just be "set" at this point.

  7. Remove baking pan from oven; and remove ramekins from pan. Chill ramekins for 4-6 hours (can even chill overnight!), to ensure they are fully "set" and cold. Right before serving, sprinkle 1 Tablespoon granulated sugar over the top of each ramekin. Use a kitchen torch to brown/crystallize the top OR place under the oven broiler to brown (about 2-3 minutes). If broiling, keep a close eye on the dessert, so it won't burn. Enjoy!

Nutrition Facts
Chocolate Creme Brulee
Amount Per Serving (1 serving)
Calories 674 Calories from Fat 495
% Daily Value*
Fat 55g85%
Saturated Fat 33g206%
Cholesterol 310mg103%
Sodium 63mg3%
Potassium 224mg6%
Carbohydrates 39g13%
Fiber 1g4%
Sugar 32g36%
Protein 5g10%
Vitamin A 1945IU39%
Vitamin C 0.7mg1%
Calcium 108mg11%
Iron 1.7mg9%
* Percent Daily Values are based on a 2000 calorie diet.

Here’s one more to pin on your Pinterest boards!Chocolate creme brulee is a delicious flavor variation on a classic dessert, complete with crispy sugar crust to crack into. Recipe makes 4 servings.


Save

Save

Save

Save

Banana Crumb Muffins

You’re gonna love these delicious Banana Crumb Muffins, with a surprise cream cheese filling! Easy to make, they will be a family favorite breakfast or snack!You're gonna love these delicious Banana Crumb Muffins, with a surprise cream cheese filling! Easy to make, they will be a family favorite breakfast or snack!What’s a girl to do when her husband is out of state at a seminar and she can’t sleep? Make these amazing Banana Crumb Muffins (with a surprise cream cheese filling) at 5:00 AM for breakfast… that’s what!

I found this recipe for banana crumb muffins on a blog that I love… “The Café Sucré Farine”, and thought I would give these muffins a try. I highly recommend this website and it’s author, Chris Scheuer. She is very creative, and posts wonderful recipes, along with great photography by her husband, Scott!

Back to my story… I woke up very early after only 3 hours sleep  and decided to whip up these muffins. They sounded wonderful, and I loved the idea of cream cheese filling inside the muffins, along with a crumbly topping.

Scroll Down For A Printable Recipe Card At The Bottom Of The Page

If You Enjoy Banana Bread, You Will Enjoy Banana Crumb Muffins

I compare these banana crumb muffins to a really, REALLY good banana nut bread… on steroids. They are soooo delicious!

The muffins are made with a layer of banana batter, a surprise layer of cream cheese filling, and another layer of banana batter. For a finishing touch, the banana crumb muffins are crowned with a brown sugar, cinnamon and pecan crumb mixture on top. Here’s a photo of the banana crumb muffins, hot and  fresh from the oven… looking GOOD!

Banana muffins with crumb topping on wire rack

Once the paper baking wrapper has been removed, you can see the three layers, plus the crumb topping!

Side view of banana crumb muffin on plate

My favorite way to eat these delicious banana crumb muffins is warm, with a touch of butter… Yum! You are gonna LOVE these muffin treats!

Banana crumb muffins cut in half with butter inside

By the way, if you enjoy muffins, you might enjoy other delicious recipes on my blog for Blueberry Crumble Muffins, Cranberry Orange Muffins, or Triple Chocolate Zucchini Muffins, to name a few! Be sure and check out the Recipe Index with ALL of my blog recipes! The Recipe Index is located at the top of the page.

I enthusiastically recommend these moist, delicious Banana Crumb Muffins for breakfast OR a light snack! The recipe as written makes 12 muffins, and they freeze well. Hope you will give them a try! Have a GREAT day, friends! Get in that kitchen and whip up a batch of these muffins. You won’t regret it!

Interested In More Recipes?

Thank you for visiting this website. I appreciate you using some of your valuable time to do soIf you’re interested, I publish a newsletter 2 times per month (1st and 15th) with all the latest recipes, and other fun info. I would be honored to have you join our growing list of subscribers, so you never miss a great recipe!
There is a Newsletter subscription box on the top right side (or bottom) of each blog post, depending on the device you use, where you can easily submit your e-mail address (only) to be included in my mailing list.

You Can Also Find Me On Social Media:

Facebook page: The Grateful Girl Cooks!
Pinterest:
The Grateful Girl Cooks!
Instagram:
jbatthegratefulgirlcooks

Author's signatureRecipe Source: http://thecafesucrefarine.com/2011/04/banana-crumb-muffins/

↓↓ PRINTABLE RECIPE BELOW ↓↓

0 from 0 votes
Banana Crumb Muffins
Prep Time
15 mins
Cook Time
18 mins
Total Time
33 mins
 

You're gonna love these delicious Banana Crumb Muffins, with a surprise cream cheese filling! Easy to make, they will be a family favorite breakfast or snack!

Category: Breakfast
Cuisine: American
Keyword: banana crumb muffins
Servings: 12 muffins
Calories Per Serving: 283 kcal
Author: JB @ The Grateful Girl Cooks!
Ingredients
For Muffins:
  • 1 1/2 cups all-purpose flour
  • 1 teaspoon baking soda
  • 1 teaspoon baking powder
  • 1/2 teaspoon salt
  • 3 very ripe bananas , mashed
  • 3/4 cup granulated sugar
  • 1 egg , slightly beaten
  • 1/3 cup butter , melted
For Cream Cheese Filling:
  • 4 oz. cream cheese , softened
  • 3 Tablespoons granulated sugar
  • 1 Tablespoon flour
  • 1/2 teaspoon vanilla
  • 1 egg , slightly beaten
For Crumble Topping:
  • 2 Tablespoons packed brown sugar
  • 4 Tablespoons all-purpose flour
  • 2 Tablespoons old-fashioned oats
  • 2 Tablespoons finely chopped pecans or walnuts
  • 1/2 teaspoon cinnamon
  • pinch of salt
  • 2 Tablespoons butter , melted
Instructions
  1. Preheat oven to 375 degrees. Line a standard muffin tin with 12 muffin wrappers or spray lightly with a non stick spray.
  2. Prepare the muffin batter in a large bowl: Mix the 1 1/2 cups flour, baking soda, powder and salt together. In a separate bowl, beat the bananas, sugar, egg and melted butter. Add the banana mixture to the dry ingredients and mix only until ingredients are combined and moist. Do not over mix. Set aside.
  3. Make the Cream Cheese Filling: In a separate bowl, mix together the softened cream cheese, sugar, flour, egg and vanilla. Mix these ingredients until well blended. Set aside.
  4. Make the Crumb Topping: Mix together brown sugar, flour, oats, cinnamon and butter in a small bowl. Use a fork to combine; mix until the ingredients becomes small crumbs. Set aside.
  5. To prepare/layer the muffins: Spoon half of the muffin batter into the bottom of the prepared muffin cups. Top muffin batter with a Tablespoon of the cream cheese filling. Top cream cheese filling with the remaining half of muffin batter. There should be three layers: muffin batter, cream cheese filling, muffin batter. Sprinkle the top of each muffin with crumb topping to cover. Total of four layers!
  6. Bake the muffins in a 375 degree oven for 18-20 minutes (mine took 20), or until a toothpick inserted into middle of the muffin comes out clean. Remove pan to a wire rack to cool. Enjoy!
Recipe Notes

**TIP: Once you remove the muffins from oven, If the muffin is spilling over the top of the pan, simply take a butter knife and gently but quickly push the muffin back into the pan on all of it's sides. This tends to round the muffin off and make for a prettier presentation. The recipe's author suggested this and I did it... it works!

Nutrition Facts
Banana Crumb Muffins
Amount Per Serving (1 muffin)
Calories 283 Calories from Fat 108
% Daily Value*
Fat 12g18%
Saturated Fat 6g38%
Cholesterol 56mg19%
Sodium 292mg13%
Potassium 189mg5%
Carbohydrates 40g13%
Fiber 1g4%
Sugar 21g23%
Protein 4g8%
Vitamin A 400IU8%
Vitamin C 2.6mg3%
Calcium 36mg4%
Iron 1.2mg7%
* Percent Daily Values are based on a 2000 calorie diet.

Here’s one more to pin on your Pinterest boards!You're gonna love these delicious Banana Crumb Muffins, with a surprise cream cheese filling! Easy to make, they will be a family favorite breakfast or snack!


Save

Save

Save

Mom’s Chicken Parmigiana

Mom’s Chicken Parmigiana is a classic dish! Breaded chicken breasts are browned, then baked, topped w/ Italian sauce, Parmesan and mozzarella cheeses!Mom's Chicken Parmigiana is a classic dish! Breaded chicken breasts are browned, then baked, topped w/ Italian sauce, Parmesan and mozzarella cheeses!

I love my Mom’s recipe for Chicken Parmigiana. Really, really, really love it. I love my Mom more, but that’s a completely different story. Mom’s Chicken Parmigiana is an absolutely fantastic Italian dish!

My mom first made this classic Italian dish for me YEARS ago. I have no idea where she got the recipe… all I know is that it is fantastic! I’ve made Mom’s chicken parmigiana for years now, and it never disappoints!

About 10 years ago I prepared this delicious meal for about 35 hungry friends at a retreat, and it received rave reviews!

Mom’s chicken parmigiana is actually pretty easy to prepare, and the smell in the kitchen as the sauce is being cooked… oh my goodness! The chicken is “fork tender” and full of good old Italian flavor! The pasta sauce is totally easy to prepare, as well.

Scroll Down For A Printable Recipe Card At The Bottom Of The Page

Making Mom’s Chicken Parmigiana Is Fairly Easy

Flatten boneless, skinless chicken breasts to about 1/2″ thick, then season with salt and pepper. Dip the chicken pieces in an egg/milk mixture, then an Italian bread crumbs mixture. Brown the breaded chicken breasts in a skillet, in butter and olive oil.

Make a homemade Italian-style tomato sauce (it’s simple). Layer a bit of the sauce in the bottom of baking dish before adding the chicken on top. Spoon more sauce on top of each piece of chicken.

Top the chicken with Parmesan and mozzarella cheeses, and then bake Mom’s chicken parmigiana for about 20 minutes.

Combine the remaining Italian style tomato sauce with cooked angel hair pasta (or spaghetti noodles), and serve, alongside the chicken. Mom’s chicken parmigiana is perfectly cooked, tender, and tastes delicious!

Pasta and asparagus are served alongside Mom's chicken parmigiana.

I’ve never taken photos of Mom’s chicken parmigiana while actually preparing it (my bad), so unfortunately you only get to see the finished product. Trust me, this dish is easy to make! If you can follow basic directions, you can do this!

You just might thank me for the amazing aromas in your kitchen as you cook this meal. Hope you will “get your Italian on” and give this classic Italian dish a try. I think you’re gonna love Mom’s Chicken Parmigiana!

Looking For More CHICKEN Recipes?

You can find all of my recipes in the Recipe Index, located at the top of the page. I have LOTS of chicken recipes, including:

Want More Recipes? Get My FREE Newsletter!

I publish a newsletter 2 times per month (1st and 15th) with lots of recipes, tips, etc..
Would you like to join our growing list of subscribers?

There is a Newsletter subscription box on the top right (or bottom) of each blog post, depending on the device you use.
You can submit your e-mail address there, to be added to my mailing list.

Find Me On Social Media:

Facebook page: The Grateful Girl Cooks!
Pinterest:
The Grateful Girl Cooks!
Instagram:
jbatthegratefulgirlcooks

Author's signatureRecipe Source: Mom (original source is unknown)

↓↓ PRINTABLE RECIPE BELOW ↓↓

0 from 0 votes
Mom's Chicken Parmigiana
Prep Time
25 mins
Cook Time
20 mins
Total Time
45 mins
 

Mom's Chicken Parmigiana is a classic dish! Breaded chicken breasts are browned, then baked, topped w/ Italian sauce, Parmesan and mozzarella cheeses!

Category: Entree
Cuisine: Italian
Keyword: chicken parmigiana
Servings: 4 servings
Calories Per Serving: 924 kcal
Author: JB @ The Grateful Girl Cooks!
Ingredients
For the Sauce:
  • 28 ounces large can Italian chopped tomatoes ,do not drain
  • 1/2 medium brown onion , finely chopped
  • 5 garlic cloves , minced
  • 6-7 leaves fresh basil leaves (1/4 cup), chopped
  • 1 Tablespoon Italian seasoning (or more, to taste)
  • Salt , to taste
  • 8 ounces Angel Hair Pasta (enough for 4 small servings)
For Chicken Parmigiana:
  • 4 boneless chicken breasts
  • salt and pepper (to season chicken breasts)
  • 2 large eggs
  • 3/4 cup milk
  • 1 1/2 cups Italian bread crumbs
  • 3 Tablespoons olive oil
  • 2 Tablespoons butter
  • 1/4 cup grated parmesan cheese
  • cups mozzarella cheese , or four 1/2 inch slices
Instructions
  1. Preheat oven to 350 degrees.
  2. Prepare the sauce: Melt the butter and olive oil in a large skillet. Saute the chopped onion and crushed garlic in the olive oil and butter for a few minutes, being careful not to burn the garlic. Add the can of Italian tomatoes. Cook for approximately 10 minutes until heated through. Add the chopped basil and Italian seasoning. Remove from heat.

  3. Pound chicken breasts with a meat mallet between layers of plastic wrap or a large zip lock bag until thinner (the chicken, not YOU). They should end up being about 1/2 inch thick, if possible.
  4. Put two eggs in medium sized bowl; beat slightly. Add milk; stir to combine. Place Italian bread crumbs onto a dinner plate and spread to cover plate.

  5. Salt and pepper chicken breasts. Dredge one chicken breast at a time into the egg/milk mixture. Let excess egg mixture drip off back into bowl. Dredge each piece of chicken into Italian bread crumbs to coat all sides of chicken. Place each piece of chicken onto a baking sheet once completely coated.

  6. Heat butter and olive oil in large skillet. Once oil is very hot, add the chicken breasts (may have to do this in 2 batches due to size of chicken). Brown chicken for 3-4 minutes per side. Remove from skillet. Chicken does not have to be fully cooked at this point, because it will bake in oven.
  7. Place a thin layer of prepared pasta sauce on the bottom of a 9x13 baking pan (just enough to keep chicken from sticking... save the rest for the the top of chicken and the pasta!). Lay the browned chicken breasts in single layer on top of the sauce, then sprinkle chicken with grated parmesan cheese. Place a large spoonful of pasta sauce on top of the chicken breast, followed by the slice of mozzarella cheese. Bake in 350 degree oven for approximately 20 minutes, or until cheese is bubbly on top.

  8. While chicken is baking, prepare angel hair pasta, per package directions. Add remaining sauce to cooked pasta, and serve alongside the chicken parmigiana when done. Enjoy!

Nutrition Facts
Mom's Chicken Parmigiana
Amount Per Serving (1 breast + pasta)
Calories 924 Calories from Fat 342
% Daily Value*
Fat 38g58%
Saturated Fat 14g88%
Cholesterol 236mg79%
Sodium 1490mg65%
Potassium 1203mg34%
Carbohydrates 88g29%
Fiber 6g25%
Sugar 12g13%
Protein 56g112%
Vitamin A 1155IU23%
Vitamin C 23.2mg28%
Calcium 540mg54%
Iron 6.6mg37%
* Percent Daily Values are based on a 2000 calorie diet.

Here’s one more to pin on your Pinterest boards!Mom's Chicken Parmigiana is a classic dish! Breaded chicken breasts are browned, then baked, topped w/ Italian sauce, Parmesan and mozzarella cheeses!


Save

Save

Save

Save

Crunchy Garlic Dill Pickles

Make Garlic Dill Pickles the “old-fashioned way” or use more current way (water bath) to can a few jars of pickles with summer’s bounty.Make Garlic Dill Pickles the "old-fashioned way" or use more current way (water bath) to can a few jars of pickles with summer's bounty.

Well… here’s our new favorite pickle… these homemade Crunchy Garlic Dill Pickles!  Even if you’ve never made pickles before… have no fear! You will only need a few things to make some yummy pickles. These jars of pickles, once sealed properly, will be shelf stable for quite awhile. Then when you need a new jar of pickles, just pull a jar out of your pantry, refrigerate, then enjoy! They are so good!

I grew our own pickling cucumbers this summer. I am so glad I did. Last summer my friend Sandy gave me some of her pickling cucumbers from her huge garden to make pickles. It inspired me to try growing them this year in our little backyard garden… so I did! I only grew 3 plants, but it was more than enough for about 12 or 13 jars of pickles.

Scroll Down For A Printable Recipe Card At The Bottom Of The Page

Growing pickling cucumbers to make crunchy garlic dill pickles.
Yahoo! Of course you can always find pickling cucumbers (you know, the cute little ones grown especially for pickle-making!) at your local grocery store or a Farmer’s Market when they’re in season and plentiful during the hot summer months.

Making Garlic Dill Pickles The Old-Fashioned Way

Okay… back to the recipe. This method is the old-fashioned way to make these pickles. Basically you slice the ends off the cukes (yes, both ends), slice them into spears, chips (horizontally) or into sandwich slices (vertically), making sure you have enough cut slices to fill 6 pint-sized cleaned and hot canning jars (12 oz.). Add a bit of minced garlic and dill seed.

Let the jars sit in a 250 degree oven (I place filled jars onto a tea towel lined cookie sheet) until they are hot and ready to fill with a boiling hot brine. Then when everything is really hot (including the lids and seals heated separately), you pour the brine over the pickle slices, remove air bubbles, wipe the rims to make sure you have a good clean seal, pop the lids and rings on, and seal to fingertip tightness.

Once the lids and bands are on, invert the jars for 5 minutes, then turn right side up again. Let the jars cool on the counter (on a towel, to prevent breakage). You should hear the seals “pop” to indicate the jars have safely sealed, while they cool. If the jars do not seal properly, they must be refrigerated, as they cannot be stored safely for any length of time in a pantry.

**Then comes the hard part. You have to let the pickles “cure” for about 2 weeks before you open the jar and taste them. IT IS WORTH THE WAIT! Trust me.

NOTE: **This old-fashioned process (above) has worked on every jar I’ve made of these pickles. HOWEVER,  if you wish to can the pickles using a water bath process (which is the safest, most current and recommended process for canning safety), see below.

Canning The Garlic Dill Pickles In A Water Bath Canner

For the most current and recommended method to safely can these pickles, follow USDA recommended guidelines. Pint jars of the garlic dill pickles are filled, leaving 1/2″ headspace, air bubbles are removed, rims cleaned, etc. The jars should be processed in a hot water bath canner for 15 minutes.

Follow all current safe canning guidelines to prepare, jars, rings, and flat lids, if you will be canning these pickles in a water bath.

Jars of processed crunchy garlic dill pickles cooling down after processing.
I made long sandwich slices and round hamburger slices…

I made pickles (using both methods) this summer, and I’ve already made several new batches as more of my cucumbers have ripened. I  keep any extra brine I had leftover (if I wasn’t making the full recipe) in the refrigerator and then use it within a couple weeks for a new batch.

 These pickles are really very easy to make, and I just KNOW you’re gonna love them. By the way, if you enjoy pickles, be sure to check out my recipe for delicious bread and butter pickles!

Interested In More Recipes?

Thank you for visiting this website. I appreciate you using some of your valuable time to do soIf you’re interested, I publish a newsletter 2 times per month (1st and 15th) with all the latest recipes, and other fun info. I would be honored to have you join our growing list of subscribers, so you never miss a great recipe!
There is a Newsletter subscription box on the top right side (or bottom) of each blog post, depending on the device you use, where you can easily submit your e-mail address (only) to be included in my mailing list.

You Can Also Find Me On Social Media:

Facebook page: The Grateful Girl Cooks!
Pinterest:
The Grateful Girl Cooks!
Instagram:
jbatthegratefulgirlcooks

Author's signatureRecipe Source: unknown

↓↓ PRINTABLE RECIPE BELOW ↓↓

4 from 3 votes
Crunchy Garlic Dill Pickles
Prep Time
25 mins
Cook Time
15 mins
Total Time
40 mins
 

Make Garlic Dill Pickles the "old-fashioned way" or use more current way (water bath) to can a few jars of pickles with summer's bounty.

Category: Condiments
Cuisine: American
Keyword: garlic dill pickles
Servings: 6 pints
Calories Per Serving: 166 kcal
Author: JB @ The Grateful Girl Cooks!
Ingredients
  • 1/2 cup canning salt
  • 4 1/2 cups white vinegar
  • 8 cups water
  • 6 teaspoons minced garlic
  • 5 Tablespoons (approx.) dill seed (not dill weed, but dill seed)
  • enough pickling cucumbers to fill 6 pint canning jars (depending on size, approx.18-20)
Instructions
  1. Preheat oven to 250 degrees. Wash canning jars in hot, soapy water. Place the clean jars upside down onto a tea towel lined cookie sheet (with edges) in the oven to keep them hot.
  2. Place flat lid seals and rings in a small bowl. Set aside.
  3. Wash the cucumbers, slice a piece off of each end (stem and bottom) of the cucumber, and discard, then slice your cucumbers into spears, chips, or lengthwise into sandwich slices. Pack the pickle slices into the hot jars (be careful when removing hot jars. I recommend canning tongs to hold the jars securely). I find it helpful to turn the jar sideways and slip the sandwich slices in... it helps them to stand up better in the jar.
  4. Add a teaspoon of minced garlic and 3/4 Tablespoon of dill seeds to each jar.
  5. When jar is filled (I remove one jar at a time from oven), place filled jar back in oven while filling another jar. You want the jars to stay really hot so that when you add boiling brine, the jars will seal properly.
  6. In a large saucepan, heat the vinegar, canning salt and water to boiling, stirring to dissolve salt.
  7. While the vinegar/water/salt brine is coming to a boil, in a separate bowl pour some **almost to boiling** water (plain "not quite boiling" water, NOT the brine) over the canning lids and rings. Let them sit in the very hot water for 5 minutes to soften the rubber seals.
  8. Once brine is boiling, remove jars from oven (be sure to place hot jars on a tea towel to avoid breakage). Pour boiling liquid into each jar, filling to within 1/2 inch from top (pickles must be covered with brine). Remove the air bubbles in each jar by inserting a plastic knife or canning tool down the sides of each jar. Add more brine, if needed to cover pickles. Leave about 1/2 inch head space in jar. Quickly wipe the rims of each jar with a clean towel to make sure the rim is dry and clean. Place flat lid on, then screw down canning ring to finger tight. Immediately invert the jars on the towel. Let them sit for 5 minutes, then turn them right side up again. Listen for the clicking sound to know the jars have sealed.
  9. **If you want to water bath can the jars, once filled and jar lids and rings are tightened, place them in a water bath canner and process for 15 minutes, following USDA canning guidelines and manufacturer instructions for your canner..
  10. Once the jars are all processed and sealed, leave them alone on the tea towel to cool. As they cool, you should hear the "clicking sound" of the jars sealing while cooling. Once completely cooled and sealed properly, store them in a cool, dark pantry for two weeks (to let the brine fully incorporate into the pickles, then refrigerate jar and enjoy. You might want to label each jar with the date they will be "ready", so you will know when you can enjoy them!
Recipe Notes

From start to finish, the jars stay in the oven for about 20 minutes to make sure they are hot before adding the boiling brine. The last thing you want is to have the jar crack.
Once pickles have "cured" for two weeks and you are ready to bust into a jar of these, refrigerate the jar for several hours before opening...they are at their best cold!

Nutrition Facts
Crunchy Garlic Dill Pickles
Amount Per Serving (1 pint jar of pickles)
Calories 166 Calories from Fat 18
% Daily Value*
Fat 2g3%
Sodium 9454mg411%
Potassium 1309mg37%
Carbohydrates 24g8%
Fiber 7g29%
Sugar 12g13%
Protein 6g12%
Vitamin A 650IU13%
Vitamin C 31.5mg38%
Calcium 236mg24%
Iron 3.1mg17%
* Percent Daily Values are based on a 2000 calorie diet.

Here’s one more to pin on your Pinterest boards!Make Garlic Dill Pickles the "old-fashioned way" or use more current way (water bath) to can a few jars of pickles with summer's bounty.


Save

Save

Date Roll Cookies

Date roll cookies are sweet, soft and chewy slice and bake cookies, featuring a simple rolled cookie dough with a cooked date and pecan filling.Date roll cookies are sweet, soft and chewy slice and bake cookies, featuring a simple rolled cookie dough with a cooked date and pecan filling.
My Mother-In-Law Elsie made these delicious, soft and chewy Date Roll Cookies all the time, and in her memory I decided to make them and post the recipe!

She always made them for her family, and she made them for her friends! Elsie traditionally made her date roll cookies for us at Christmas, and mailed them from whatever state she lived in at the time. These cookies are THE cookie I will always associate with her.  When I see them or the recipe, I cannot help but think of Elsie.

She’s been in heaven for a couple of years now, but I still make these date roll cookies occasionally (usually at Christmas time, in her honor). They are soft, chewy and delicious… and my husband and I love them. I hope you will, also!

Scroll Down For A Printable Recipe Card At The Bottom Of The Page

Date Roll Cookies Are Easy To Prepare

A simple cookie dough is made and rolled out. A date and nut filling is cooked, then spread over the dough, and then it is rolled into log shapes. The dough logs for the date roll cookies are refrigerated until really firm, then the cookies are sliced and baked!

The date roll cookies are very easy to make… the length of time specified in the recipe below is inclusive of “chilling the dough” time. I usually make the dough in the morning, and come back to it later in the day to slice and bake. No big deal.

The date roll cookies are baked, and ready to eat!

I hope you will consider making these delicious date roll cookies. They are easy to make, and are really delicious, soft and chewy! Thank you for stopping by today, and I hope you will come back again soon. Have a GREAT day!

Looking For More COOKIE Recipes?

You can find all of my cookie recipes in the Recipe Index, located at the top of the page. I have lots of cookie recipes, including:

Interested In More Recipes?

Thank you for visiting this website. I appreciate you using some of your valuable time to do soIf you’re interested, I publish a newsletter 2 times per month (1st and 15th) with all the latest recipes, and other fun info. I would be honored to have you join our growing list of subscribers, so you never miss a great recipe! 

There is a Newsletter subscription box on the top right side (or bottom) of each blog post, depending on the device you use, where you can easily submit your e-mail address (only) to be included in my mailing list.

You Can Also Find Me On Social Media:

Facebook page: The Grateful Girl Cooks!
Pinterest:
The Grateful Girl Cooks!
Instagram:
jbatthegratefulgirlcooks

Author's signatureRecipe Source: My mother-in-law (don’t have a clue where she got the recipe many, many years ago)

↓↓ PRINTABLE RECIPE BELOW ↓↓

0 from 0 votes
Date Roll Cookies
Prep Time
2 hrs
Cook Time
10 mins
Total Time
2 hrs 10 mins
 
Date roll cookies are sweet, soft and chewy slice and bake cookies, featuring a simple rolled cookie dough with a cooked date and pecan filling.
Category: Cookies
Cuisine: American
Keyword: date roll cookies
Servings: 36 cookies (approx.)
Calories Per Serving: 215 kcal
Author: JB @ The Grateful Girl Cooks!
Ingredients
For the cookie dough:
  • 1 cup butter , melted, cooled to room temp
  • 4 cups all purpose flour
  • 2 cups brown sugar
  • 2 teaspoons baking soda
  • 1 teaspoon salt
  • 1/2 teaspoon cinnamon
  • 3 eggs , beaten slightly
For the filling:
  • 1 pound dates , chopped
  • 1 cup granulated sugar
  • 1/2 cup water
  • 1/2 cup chopped walnuts or pecans
Instructions
  1. To prepare the filling: In a medium saucepan on medium-low heat, cook the filling ingredients until soft and thick (the dates will break down as you cook). Stir the mixture constantly as you cook, so the filling won't burn. Remove from heat, but keep the mixture "warm" until ready to spread onto dough.
  2. To prepare the cookie dough: In a large bowl, mix the eggs with the melted, room temperature butter. Add the dry ingredients; mix well to combine thoroughly. Divide the dough in half. On a lightly floured work surface, roll each half of the dough (one at a time) into a rectangle. Dough should be about 1/4 inch thick. Your dough will end up being 6-7 inches wide, as well. Shape into a distinct rectangle, using your fingers to shape the dough.

  3. Spread half of the warm (not hot!) date filling over the entire surface of the dough. Roll the dough up tightly starting from the long side of the dough. Once rolled into a log shape, carefully place the roll onto a baking sheet. Repeat process with other half of dough. Cover the two rolls with saran wrap or foil, and chill them in the refrigerator for an hour and a half. (At this point, if you want to save one of the rolls of dough for another time, simply wrap it in saran and foil; place back in refrigerator (will last for a couple weeks) or freezer (longer storage). This dough freezes well)

  4. When ready to bake, preheat oven to 350 degrees. Slice the dough roll into thin slices (1/4 - 1/2 inch). Place slices 2 inches apart on ungreased baking sheet. Bake at 350 degrees for 8-10 minutes. Don't overbake. When done, carefully remove baking sheet to a wire rack. Let cookies cool for 5 minutes, then remove from pan to the wire rack. Enjoy!

Recipe Notes

**The long prep times included chilling the dough time.These only take a few minutes to make once dough is chilled.
Make as many or as few of these delicious cookies as you wish. If you want to make a few at a time, cut as many slices as you want; put the rest of the dough back in freezer or refrigerator. If freezing the dough, remember to thaw completely before baking, but slice dough while partially frozen for best results.

Nutrition Facts
Date Roll Cookies
Amount Per Serving (1 cookie)
Calories 215 Calories from Fat 54
% Daily Value*
Fat 6g9%
Saturated Fat 3g19%
Cholesterol 27mg9%
Sodium 179mg8%
Potassium 127mg4%
Carbohydrates 37g12%
Fiber 1g4%
Sugar 25g28%
Protein 2g4%
Vitamin A 175IU4%
Vitamin C 0.1mg0%
Calcium 22mg2%
Iron 1mg6%
* Percent Daily Values are based on a 2000 calorie diet.

Here’s one more to pin on your Pinterest boards!Date roll cookies are sweet, soft and chewy slice and bake cookies, featuring a simple rolled cookie dough with a cooked date and pecan filling.


Save

Save

Make Your Own Taco Seasoning Mix

It’s easy to make up a large batch of taco seasoning mix- perfect Mexican spices for ground beef, chicken or pork to use in tacos, taco salads, etc. It's easy to make up a large batch of taco seasoning mix... perfect Mexican spices for ground beef, chicken or pork to use in tacos, taco salads, etc.
Years ago I got tired of buying the packages of commercially prepared seasoning mixes and started adding my own spices to ground beef, pork or chicken when we ate tacos or taco salads. Today I’d like show you how to make your own taco seasoning mix very easily.

I used to haul out various jars of spices each time I made it and then haul them all back to the cupboard when I was done. Then I found a “copycat” recipe (a copycat version of Lawry’s Taco Seasoning mix) in one of my “Top Secret Recipe” books by Todd Wilbur (I have several of his books and LOVE them).

I took his basic “recipe” for the mix, multiplied it by 12 and ended up with quite a nice supply of taco seasoning, which I store in an old spice canister.  Since we eat tacos quite often (they’re my FAVORITE), it’s handy to have a ready supply of seasoning mix around whenever I need it.

Scroll Down For A Printable Recipe Card At The Bottom Of The Page

How Do You Season Meat With The Taco Seasoning Mix?

It’s easy, because all you do when you want to use it is to add 2/3 cup water to 3 Tablespoons of the mix and the pound of meat, cook for 7-10 minutes and bam! You’re done… and the meat tastes GREAT!

How easy is that? Sure is great to mix this taco seasoning mix all up ONCE and not have to haul all the spices out of the cupboard each and every time we have tacos! Hope you give it a try. It will save you some bucks and valuable time in the long run (and quite possibly a trip to the grocery store!) My photo is a bit blurry, but it’s the only one I took of the seasoning spices before mixing. Oh well.

Spices in bowl used to make the seasoning mix.

How Do You USE This Taco Seasoning Mix To Season Taco Meat?

Add 3 Tablespoons of the taco seasoning mix to browned/drained meat. This photo is using hamburger meat, but the taco seasoning mix is delicious on shredded chicken or pork, too!

The taco seasoning mix is added to a pound of browned hamburger meat.

Add 2/3 cup of water. Cook the taco mixture for 7-10 minutes, until the water has cooked down and been absorbed into the meat.  Now your taco meat is fully seasoned and ready to use!

Cooking the seasoned meat in a skillet, for tacos.

Use Taco Seasoning Mix On A Variety Of Meals

Ready to eat! This time we used the taco mix seasoning to make the seasoned ground beef for taco salads.YUM!

A taco salad was made, using the taco seasoning mix on the meat.

We use the taco seasoning mix all the time when we fix our tacos! The seasoning on the meat is wonderful, and I’m confident you’ll enjoy it, too.

The mix tastes great on the meat for homemade tacos.

I hope you will consider making up a batch of this taco seasoning mix to have around YOUR home. Truthfully, I’m pretty sure you will NOT regret it!

Looking For Other SPICE MIX Recipes?

You can find all of my recipes in the Recipe Index, located at the top of the page. A couple favorite spice mixes include:

Interested In More Recipes?

Thank you for visiting this website. I appreciate you using some of your valuable time to do soIf you’re interested, I publish a newsletter 2 times per month (1st and 15th) with all the latest recipes, and other fun info. I would be honored to have you join our growing list of subscribers, so you never miss a great recipe!
There is a Newsletter subscription box on the top right side (or bottom) of each blog post, depending on the device you use, where you can easily submit your e-mail address (only) to be included in my mailing list.

You Can Also Find Me On Social Media:

Facebook page: The Grateful Girl Cooks!
Pinterest:
The Grateful Girl Cooks!
Instagram:
jbatthegratefulgirlcooks

Make Your Own Taco Seasoning Mix / The Grateful Girl Cooks!Recipe Source: “Even More Top Secret Recipes”, by Todd Wilbur, published by the Penguin Group, 2002 (pages. 118-119)

**The recipe I am posting is the original recipe for enough seasoning mix for one pound of meat. Multiply it for the quantity you wish to have on hand. I found it easiest to make a whole bunch (for 12 meals) at one time.

↓↓ PRINTABLE RECIPE BELOW ↓↓

0 from 0 votes
Make Your Own Taco Seasoning Mix
Prep Time
5 mins
Cook Time
0 mins
Total Time
5 mins
 
It's easy to make up a large batch of taco seasong mix... perfect Mexican spices for ground beef, chicken or pork to use in tacos, taco salads, etc.
Category: Seasonings
Cuisine: Mexican
Keyword: taco seasoning mix
Servings: 1 (3 Tablespoons)
Calories Per Serving: 59 kcal
Author: JB @ The Grateful Girl Cooks!
Ingredients
  • 1 Tablespoon flour
  • 1 teaspoon chili powder
  • 1 teaspoon paprika
  • 3/4 teaspoon salt
  • 3/4 teaspoon minced onion
  • 1/2 teaspoon cumin
  • 1/4 teaspoon cayenne pepper
  • 1/4 teaspoon garlic powder
  • 1/8 teaspoon ground oregano
Instructions
  1. Mix all the ingredients together in a bowl.
  2. To prepare: Brown hamburger meat in a skillet until fully cooked. Drain the grease.
  3. Add the spice mix (or use 3 Tablespoons if you prepared quite a bit of the mix).
  4. Add 2/3 cup water to the meat and spice mixture. Stir to combine. Bring mixture to a boil, then reduce the heat to a low setting and cook, uncovered for 7-10 minutes. Stir occasionally.
  5. Remove from heat. Spoon the seasoned meat into warm tortillas, taco shells, or onto a salad.
  6. Enjoy!
Recipe Notes

NOTE: Quantity listed is equivalent to one envelope of store bought mix. Ingredients as listed when added to a pound of meat (hamburger meat, shredded pork or chicken) will make enough seasoned meat filling for 12 tacos (3 Tablespoons meat each).
*I multiplied the quantity by 12 to get a large quantity of seasoning mix.

Nutrition Facts
Make Your Own Taco Seasoning Mix
Amount Per Serving (1 (3 Tablespoons))
Calories 59
% Daily Value*
Sodium 1781mg77%
Potassium 144mg4%
Carbohydrates 12g4%
Fiber 1g4%
Sugar 1g1%
Protein 2g4%
Vitamin A 1785IU36%
Vitamin C 2.8mg3%
Iron 1.8mg10%
* Percent Daily Values are based on a 2000 calorie diet.

Here’s one more to pin on your Pinterest boards!It's easy to make a large batch of taco seasoning mix - the perfect Mexican spices for ground beef, chicken or pork to use in tacos, taco salads, etc.


Save

Save

Homemade Breakfast Sausage Patties

It’s EASY to make eight delicious Homemade Breakfast Sausage Patties for breakfast from scratch, using ground turkey or pork!It's EASY to make eight delicious Homemade Breakfast Sausage Patties for breakfast from scratch, using ground turkey or pork!
So… in my never ending quest experimenting with new recipes, I decided to try making Homemade Breakfast Sausage Patties from scratch. I found the recipe via Pinterest via Martha Stewart via Lucinda Scala Quinn’s book “Mad Hungry”. Did ya get all that? Ha Ha… it takes a village.

When I was growing up my Mom used to make eggs and sausage for us about once a week. She always made sausage patties by hand (using a one pound “chub” from her favorite “name brand”). As a “busy” adult, I usually end up buying link sausage instead of patties, the kind you simply “brown and serve”.

But, when I saw this recipe, I decided to see what making homemade breakfast sausage patties “from scratch” was all about. I knew I could control the ingredients and leave out some of the unpronounceable “add ins” typically found in mass produced name brand products for longer life.

Scroll Down For A Printable Recipe Card At The Bottom Of The Page

Okay… How Do I Make Homemade Breakfast Sausage?

The original recipe called for ground pork (which is my personal favorite), but I had a pound of ground turkey that I was itching to use, so I substituted turkey in this recipe for a healthier version. The sausage patties turned out very good, and I would definitely make this recipe again. Hope you will give it a try!

First things first… get all the ingredients (spices) together to add to the ground meat. Let’s do this!

Spices for homemade sausage patties

After mixing the ingredients, form the sausage patties (with clean hands, of course!). Place them onto foil or wax paper after making each one.

Breakfast sausage patties formed in palm of hand

Cooking Homemade Breakfast Sausage Patties

Place the homemade breakfast sausage patties in a lightly oiled, hot skillet. I cooked several sausages at a time, then repeated the process for the remaining sausage patties.

6 breakfast sausage patties cooking in skillet

Carefully turn the patties over about half way through cooking time and continue cooking until the homemade breakfast sausage patties are cooked all the way through..

Browned homemade breakfast sausage patties cooking in skillet.

Once done, transfer the cooked sausage patties to a paper towel so any extra grease is absorbed. Once they drain a bit, they are done, and ready to eat!

One of the homemade breakfast sausage patties, up close.

I prepared these homemade breakfast sausage patties one fine morning, and ended up using them to make sausage, egg and cheese biscuits. The sausage patty was added to a fluffy biscuit, along with sliced cheddar cheese and a fried egg. It was delicious!

If you enjoy breakfast sandwiches, I hope you will check out my recipes for:

How Many Homemade Breakfast Sausage Patties Does This Make?

The recipe made 8 small sausage patties and only took about 25 minutes or so to make from start to finish!  I ended up freezing half of the cooked sausage patties, to save for another breakfast.

Breakfast sausage patty on biscuit with egg and cheese

Hope you will give this easy recipe for homemade breakfast sausage a try. The calorie calculation was based on using ground turkey for the sausage. The recipe is easily adapted for using ground pork, but the calorie count will be slightly higher.  Have a fantastic day, and be sure to check out ALL my recipes in the Recipe Index, located at the top of the page.

Interested In More Recipes?

Thank you for visiting this website. I appreciate you using some of your valuable time to do soIf you’re interested, I publish a newsletter 2 times per month (1st and 15th) with all the latest recipes, and other fun info. I would be honored to have you join our growing list of subscribers, so you never miss a great recipe!
There is a Newsletter subscription box on the top right side (or bottom) of each blog post, depending on the device you use, where you can easily submit your e-mail address (only) to be included in my mailing list.

You Can Also Find Me On Social Media:
Facebook page: The Grateful Girl Cooks!
Pinterest: The Grateful Girl Cooks!
Instagram: jbatthegratefulgirlcooks

Author's signatureRecipe Adapted from: http://www.marthastewart.com/341904/simple-homemade-sausage-patties

↓↓ PRINTABLE RECIPE BELOW ↓↓

0 from 0 votes
Homemade Breakfast Sausage Patties
Prep Time
15 mins
Cook Time
10 mins
Total Time
25 mins
 

It's EASY to make eight delicious Homemade Breakfast Sausage Patties for breakfast from scratch, using ground turkey or pork!

Category: Breakfast
Cuisine: American
Keyword: homemade breakfast sausage
Servings: 8 sausage patties
Calories Per Serving: 72 kcal
Author: JB @ The Grateful Girl Cooks!
Ingredients
  • 1 pound ground turkey or ground pork
  • 1 clove garlic , minced
  • 1 Tablespoon dried sage , crumbled
  • 3/4 teaspoon dried thyme
  • 1/2 teaspoon dried fennel , crushed
  • 1 pinch of ground nutmeg
  • 1 1/2 teaspoons coarse salt
  • 1/2 teaspoon freshly ground black pepper
  • 1 large egg white
  • 2 teaspoons vegetable oil (for cooking the sausage patties in)
Instructions
  1. In a medium sized bowl, combine all the ingredients except vegetable oil. Mix thoroughly. Cover the bowl; refrigerate for 15 minutes.
  2. To make the patties: Rinse your hands in really cold water (this helps to make it easier to make the patties without it sticking as much). Divide the meat into 8 patties. Shape each patty into a 2 1/2 inch wide disk.
  3. If you don't want to cook all the patties at once, you can refrigerate the patties or freeze them until you want to use them.
  4. If cooking immediately, heat a large skillet or griddle over high heat. Add the vegetable oil and continue heating. Place the sausages in hot skillet or griddle. Fry them about 4 minutes on each side until golden brown. Carefully turn patties over and repeat until cooked through and lightly browned on both sides.
  5. When done, remove sausages to paper towels to briefly drain. Serve immediately.
  6. Cooked sausage patties can be cooled and wrapped and frozen for use at another time, if desired. Microwave sausage patties (in paper towels) to re-heat
Recipe Notes

NOTE:**Caloric calculation was based on the use of ground turkey.

Nutrition Facts
Homemade Breakfast Sausage Patties
Amount Per Serving (1 sausage pattie)
Calories 72 Calories from Fat 9
% Daily Value*
Fat 1g2%
Cholesterol 31mg10%
Sodium 471mg20%
Potassium 178mg5%
Protein 13g26%
Vitamin A 30IU1%
Vitamin C 0.1mg0%
Calcium 11mg1%
Iron 0.7mg4%
* Percent Daily Values are based on a 2000 calorie diet.

Here’s one more to pin on your Pinterest boards!It's EASY to make eight delicious Homemade Breakfast Sausage Patties for breakfast from scratch, using ground turkey or pork!


Save

Save

Asian Lemon Chicken Strips

Asian Lemon Chicken Strips are cooked until crispy, then coated in an Asian-inspired, sweet and sticky, lemon glaze in this delicious, restaurant-quality dish!Asian Lemon Chicken Strips are cooked until crispy, then coated in an Asian-inspired, sweet and sticky, lemon glaze in this delicious, restaurant-quality dish!
Oh my goodness! I recently found a FANTASTIC recipe for Asian Lemon Chicken Strips on Pinterest, and had to share it with you!  Don’t they look scrumptious???? I made these for my husband and I last night for dinner, and they were fantastic.

WOW, WOW, WOW!! They are absolutely lip-smackin’ delicious! To quote my husband: “Wow, these really look and taste like something you’d order at a Chinese restaurant”.

The recipe itself is pretty straightforward. Directions are easy to follow and can be prepared (4 servings) in as little as 40 minutes! Crispy chicken strips coated in a sweet, sticky, lemon glaze… yet not too lemony, not too sticky, not too sweet. How can you go wrong? And did I mention just how delicious they are (repeat as needed)????  No, seriously…you need to make these. You won’t be sorry!

Scroll Down For A Printable Recipe Card At The Bottom Of The Page

Prepare The Chicken Strips

Here’s how easy they are to prepare: I used 3 large chicken breasts and cut them in long strips. Season the chicken strips with salt and pepper.

Dredge each of the chicken strips, one at a time into flour to coat, then dip into buttermilk, then back into the flour to coat. Set aside, and continue until all pieces of chicken are coated.

Raw chicken breast strips on platter

Raw, floured chicken strips on cookie sheet

Make The Asian Lemon Glaze For The Chicken Strips

Make up the sauce mixture and heat it in saucepan while you are cooking the chicken strips. It’s as easy as putting the Asian inspired sauce ingredients in a pan, and cooking it for a short time!

Lemon sauce and spoon in small bowl

Cook The Chicken Strips

Heat oil in a large skillet until it is very hot (but not smoking). Carefully place the chicken pieces into the hot oil. You should hear them sizzle when they hit the oil.

Cook the chicken strips, turning after a few minutes, until lightly browned on all sides and cooked all the way through.

Strips of chicken frying in oil in skillet

Drain the cooked chicken strips on paper towels.

Fried chicken pieces draining on paper towel

Transfer the hot, thickened Asian lemon glaze to a skillet, then add the chicken strips, one at a time. Gently turn to coat with sauce on all sides. Use a spoon and tongs to fully coat chicken pieces.

Piece of chicken being covered with Asian lemon sauce in skillet

Time To Serve The Asian Lemon Chicken Strips!

Removed Asian lemon chicken strips to serving dish, garnished with toasted sesame seeds and some chopped green onion, and VOILA! Time to eat!

Lemon chicken strips garnished with green onions

I really hope you will give this easy-to-prepare delicious recipe a try…I think you’re gonna LOVE it! Have a great day, and come back soon for more yummy recipes.

Looking For More CHICKEN Recipes?

You can find all of my recipes in the Recipe Index, located at the top of the page. I have LOTS of delicious recipes for chicken, including:

Interested In More Recipes?

Thank you for visiting this website. I appreciate you using some of your valuable time to do soIf you’re interested, I publish a newsletter 2 times per month (1st and 15th) with all the latest recipes, and other fun info. I would be honored to have you join our growing list of subscribers, so you never miss a great recipe!
There is a Newsletter subscription box on the top right side (or bottom) of each blog post, depending on the device you use, where you can easily submit your e-mail address (only) to be included in my mailing list.

You Can Also Find Me On Social Media:

Facebook page: The Grateful Girl Cooks!
Pinterest:
The Grateful Girl Cooks!
Instagram:
jbatthegratefulgirlcooks

Author's signatureOriginal recipe source: http://damndelicious.net/2014/02/15/asian-lemon-chicken-tenders/

↓↓ PRINTABLE RECIPE BELOW ↓↓

0 from 0 votes
Asian Lemon Chicken Strips
Prep Time
15 mins
Cook Time
20 mins
Total Time
35 mins
 

Asian Lemon Chicken Strips are cooked until crispy, then coated in an Asian-inspired, sweet and sticky, lemon glaze in this delicious, restaurant-quality dish!

Category: Entree
Cuisine: Chinese
Keyword: Asian lemon chicken strips
Servings: 4 servings (2 strips per)
Calories Per Serving: 375 kcal
Author: JB @ The Grateful Girl Cooks!
Ingredients
For the chicken strips:
  • 1 cup vegetable oil
  • 4 boneless skinless chicken breasts , cut lengthwise into strips
  • Salt and pepper , to season
  • 1 1/2 cups all-purpose flour
  • 1 cup buttermilk
For the lemon glaze:
  • 1/2 cup honey
  • 1/3 cup soy sauce
  • 1/4 cup pineapple juice
  • 1/4 cup brown sugar , packed
  • Juice of one lemon (I added the zest from the lemon to the sauce, also)
  • 2 Tablespoons apple cider vinegar
  • 2 Tablespoons olive oil
  • 1 teaspoon ground black pepper
  • 1/2 teaspoon garlic powder
For garnish:
  • 1 teaspoon toasted sesame seeds
  • 1 sliced green onion (green stem only)
Instructions
  1. Place all the sauce ingredients in a saucepan. Stir to combine. Heat on medium; bring sauce to a rolling boil, then reduce the heat and simmer, uncovered, for 15-20 minutes, stirring occasionally. The mixture will slightly thicken. Cook the sauce while cooking the chicken strips.
  2. Season the chicken strips with salt and pepper. Dredge the chicken strips, (one at a time) in flour to completely cover. then dip the strip into buttermilk to cover. Let the excess buttermilk drip off, then dredge the chicken strip in the flour again, making sure the flour fully coats the chicken. Set strips aside on a baking sheet, and continue with the remaining strips.
  3. Heat the vegetable oil in a large skillet until very hot (but not smoking). Once the oil is hot, add the chicken strips to the skillet. You may have to cook 3-4 at a time due to space limitations. Cook, then turn chicken after a few minutes on each side, to ensure all sides are golden brown. Once the chicken is golden brown and fully cooked, transfer the chicken strips to paper towels to drain. Continue with rest of chicken until done.
  4. Transfer the sauce into a clean skillet. Carefully (using tongs) place chicken strips (one at a time) into the hot sauce, turning gently to coat all sides. Remove chicken to serving dish. Repeat with next chicken strip. When all chicken strips are done, sprinkle tops with toasted sesame seeds and sliced green onion stems. Serve immediately, and enjoy!
Recipe Notes

Tip:: To "toast" sesame seeds: Place about a teaspoon into a dry skillet. Heat on medium, stirring constantly for a few minutes until the seeds turn a light brown. Remove from skillet to cool.

Nutrition Facts
Asian Lemon Chicken Strips
Amount Per Serving (1 serving)
Calories 375
* Percent Daily Values are based on a 2000 calorie diet.

Here’s one more to pin on your Pinterest boards!Asian Lemon Chicken Strips are cooked until crispy, then coated in an Asian-inspired, sweet and sticky, lemon glaze in this delicious, restaurant-quality dish!


Save

Save

Save

Save

Save

Skinny Chunky Monkey Cookies

Skinny Chunky Monkey Cookies are easy to make, low calorie baked treats with oats, applesauce, peanut butter, bananas and cocoa powder.Skinny Chunky Monkey Cookies are easy to make, low calorie baked treats with oats, applesauce, peanut butter, bananas and cocoa powder.

I found an interesting recipe online for Skinny Chunky Monkey Cookies. The recipe contains no butter, no sugar, no flour, and no oil. Hmmm… it sounded interesting, so I decided to check it out. I figured it was about time for me to make something that was low on sugar intake, and relatively “healthy”.

These little skinny chunky monkey cookies fit the bill for a nice, “not too sweet”, flavorful bites of goodness! Ripe bananas provide all the sweetness for these low calorie treats!

These “completely easy to make” cookies can also be eaten as a tasty breakfast cookie. This is because they are made from oats, bananas, unsweetened applesauce, cocoa powder and a bit of peanut butter. The recipe made 18 small cookies, and they were pretty tasty!

Scroll Down For A Printable Recipe Card At The Bottom Of The Page

How To Make Skinny Chunky Monkey Cookies

First you mash up some really ripe bananas in a large bowl. Once that’s done, it’s time to add the rest of the ingredients. Stir all of this together until the ingredients are fully blended. See how EASY this is?

Bananas, oats, cocoa, peanut butter, applesauce & vanilla are mixed together.

This is what the cookie batter will look like after mixing it up. Once it’s fully mixed, let the batter “rest” for for about 15 minutes. Preheat your oven to 350°F while the cookie batter is “resting”.

The batter for the skinny chunky monkey cookies is mixed, and ready to bake.

Time To Bake These Cookies!

By now your oven should be preheated to 350°F . Drop the batter by Tablespoonfuls onto an ungreased baking sheet, leaving space between each dollop. Bake the skinny chunky monkey cookies for about 10-12 minutes.

All the cookie batter is dropped by spoonfuls onto a baking sheet.

Ready To Serve/Eat The Cookies

Once the cookies are finished baking, remove the cookie sheet from the oven. Let the cookies sit for a minute, and then transfer them with a spatula to a wire rack to finish cooling. Grab a cookie after it has completely cooled (they taste best at room temp!), and enjoy!

Skinny Chunky Monkey Cookies cooling on a wire rack before they are eaten.

I hope you will give this recipe a try. They would be a great addition to a child’s lunchbox (especially since they are not packed full of sugar)!  Sure hope you enjoy these simple skinny chunky monkey cookies. Have a great day!

Looking For More COOKIE Recipes?

You can find ALL of my cookie recipes in the Recipe Index, located at the top of the page. A few favorites of ours include:

Interested In More Recipes?

Thank you for visiting this website. I appreciate you using some of your valuable time to do soIf you’re interested, I publish a newsletter 2 times per month (1st and 15th) with all the latest recipes, and other fun info. I would be honored to have you join our growing list of subscribers, so you never miss a great recipe! 

There is a Newsletter subscription box on the top right side (or bottom) of each blog post, depending on the device you use, where you can easily submit your e-mail address (only) to be included in my mailing list.

You Can Also Find Me On Social Media:

Facebook page: The Grateful Girl Cooks!
Pinterest:
The Grateful Girl Cooks!
Instagram:
jbatthegratefulgirlcooks

Author's signatureOriginal recipe source: http://www.sixsistersstuff.com/2012/05/skinny-chunky-monkey-cookies-recipe.html

↓↓ PRINTABLE RECIPE BELOW ↓↓

0 from 0 votes
Skinny Chunky Monkey Cookies
Prep Time
5 mins
Cook Time
10 mins
Total Time
15 mins
 

Skinny Chunky Monkey Cookies are easy to make, low calorie baked treats with oats, applesauce, peanut butter, bananas and cocoa powder.

Category: Cookies
Cuisine: American
Keyword: chunky monkey cookies
Servings: 18
Calories Per Serving: 77 kcal
Author: JB @ The Grateful Girl Cooks!
Ingredients
  • 3 ripe bananas , mashed
  • 2 cups old fashioned oats
  • 1/4 cup peanut butter (I used crunchy, but either will work just fine)
  • 1/4 cup cocoa powder
  • 1/3 cup unsweetened applesauce
  • 1 teaspoon vanilla
Instructions
  1. Preheat oven to 350 degrees F.
  2. Mash bananas in medium sized bowl. Add the rest of the ingredients to the mashed bananas. Mix well to combine. Let batter rest for 15 minutes.

  3. Drop by Tablespoonfuls onto a ungreased baking sheet. Bake for 10-12 minutes. Remove cookies to a wire rack when done. Let cool to room temp before serving (they taste better that way!) Enjoy!

Nutrition Facts
Skinny Chunky Monkey Cookies
Amount Per Serving (1 cookie)
Calories 77 Calories from Fat 18
% Daily Value*
Fat 2g3%
Sodium 17mg1%
Potassium 147mg4%
Carbohydrates 12g4%
Fiber 2g8%
Sugar 3g3%
Protein 2g4%
Vitamin A 15IU0%
Vitamin C 1.7mg2%
Calcium 9mg1%
Iron 0.7mg4%
* Percent Daily Values are based on a 2000 calorie diet.

Here’s one more to pin on your Pinterest boards!Skinny Chunky Monkey Cookies are easy to make, low calorie baked treats with oats, applesauce, peanut butter, bananas and cocoa powder.


Save

Save

Save

Orange Meringue Kisses

Light, airy and crisp, these chocolate dipped Orange Meringue Kisses are a fancy “cookie” you will enjoy! Easy prep, and a long, low temp. bake time.Light, airy and crisp, these chocolate dipped Orange Meringue Kisses are a fancy "cookie" you will enjoy! Easy prep, and a long, low temp. bake time.

Today I am sharing a delicious recipe I found online a few years ago for Orange Meringue Kisses (from Saveur Magazine). These light meringues with a hint of orange are fantastic!

Do you like to eat meringues? I do. There’s something about a “light as air cookie” with a crunchy exterior that I find quite lovely! The original recipe called for sandwiching two of the meringues together with a “glue” of white chocolate, but I decided to let them stand on their own as a single meringue.

I fancied them up a bit by dipping the bottoms of the meringue in a semi-sweet chocolate mixture. Once that hardened, I drizzled then with more chocolate (semi-sweet and white). Chocolate and orange is a favorite flavor combination of mine, and this pairing proved to be no exception. Delicious!

Scroll Down For A Printable Recipe Card At The Bottom Of The Page

Make Orange Meringue Kisses With A Few Ingredients

With only a few very basic ingredients, you can make these delicious orange meringues in no time at all. They are very easy to make! The majority of the time needed to make these crispy light cookies is simply letting them cook slowly in the oven. While they’re cooking on a really low temp, you can relax, or work on other projects. How easy is that?

 Meringues Bake And Then Are Decorated With Chocolate

Here is a photo of what the orange meringue kisses looked like straight out of the oven. They are ready to eat as soon as they cool, but I like to embellish them! Nothing too fancy, but now we will fancy them up a bit!

The orange meringue kisses are piped onto baking sheet and baked slowly.

Decorating Orange Meringue Kisses

First, “paint” the bottoms of the meringues with melted chocolate. Let them dry, then dip half of the meringue in chocolate. Place the “painted” meringues on wax paper to let the chocolate firm up. Semi-sweet chocolate AND white chocolate chips were to used to drizzle on the orange meringue kisses.

Orange meringue kisses are dipped in chocolate after baking.

Once the semi-sweet chocolate hardens, drizzle a bit of melted white chocolate over the tops. I even experimented with the shapes of the meringues (as you can see in this photo). When the chocolate firms up and hardens, the meringue cookies are ready to enjoy! You will be surprised how light, airy, and crunchy they are!

The meringues are dipped in chocolate and drizzled with more chocolate.

I really hope you will enjoy making AND eating these crunchy orange and chocolate flavored meringues. Remember to keep them in an airtight container, to ensure maximum crispness! Sure hope you enjoy them! Have a great day.

If you enjoy these treats, be sure to check out my recipe for Raspberry Chocolate Meringues! They are absolutely delicious, too! You can find ALL of my dessert recipes in the Recipe Index, located at the top of the page.

Interested In More Recipes?

Thank you for visiting this website. I appreciate you using some of your valuable time to do soIf you’re interested, I publish a newsletter 2 times per month (1st and 15th) with all the latest recipes, and other fun info. I would be honored to have you join our growing list of subscribers, so you never miss a great recipe!
There is a Newsletter subscription box on the top right side (or bottom) of each blog post, depending on the device you use, where you can easily submit your e-mail address (only) to be included in my mailing list.

You Can Also Find Me On Social Media:

Facebook page: The Grateful Girl Cooks!
Pinterest:
The Grateful Girl Cooks!
Instagram:
jbatthegratefulgirlcooks

Author's signatureRecipe Adapted From: http://www.saveur.com/article/Recipes/White-Chocolate-and-Orange-Meringues

↓↓ PRINTABLE RECIPE BELOW ↓↓

0 from 0 votes
Orange Meringue Kisses
Prep Time
15 mins
Cook Time
2 hrs
Total Time
2 hrs 15 mins
 

Light, airy and crisp, these chocolate dipped Orange Meringue Kisses are a fancy "cookie" you will enjoy! Easy prep, and a long, low temp. bake time.

Category: Cookies
Cuisine: American
Keyword: orange meringue kisses
Servings: 36 cookies
Calories Per Serving: 53 kcal
Author: JB @ The Grateful Girl Cooks!
Ingredients
For Meringues:
  • 3/4 cup granulated sugar
  • 4 egg whites
  • 2 teaspoons orange extract
  • 10 drops yellow food coloring
  • 2 drops red food coloring
For Garnish:
  • 6 oz. semi-sweet chocolate chips , melted
  • 1 teaspoon vegetable shortening (melted, with the chocolate chips)
  • 1/4 cup white chocolate chips , melted
Instructions
  1. Preheat oven to 200 degrees F.
  2. In a medium bowl, place the sugar and the egg whites. Whisk this mixture in the bowl, over a saucepan of simmering water. Be careful not to get any water into the bowl. Continue stirring until the mixture reaches 140 degrees on an instant read thermometer. Once the mixture reaches correct temp., remove the bowl from the pan.
  3. Beat the egg white/sugar mixture with a hand mixer for about 6 minutes, or until it has cooled down.
  4. Once egg white mixture is cool, add the orange extract and the drops of food coloring; Beat until the colors are well combined.
  5. Spoon the meringue into a pastry bag that has a 3/8" star tip on it. Pipe the meringue mix into 1" circles onto a baking sheet lined with parchment paper.
  6. Bake at 200 degrees for approximately 2 hours, or until the meringues are crisp and dry. Once they are at this point, just turn off the oven; let the meringues finish cooling completely in the oven before removing. Place on wire rack to cool.
  7. Melt the chocolate chips and the shortening in the microwave (30 seconds-remove, stir...repeat for 20 seconds,if necessary, stir. Be careful not to burn chocolate.
  8. Using a pastry brush, "paint" the chocolate onto the bottoms of the meringues. Let dry. Paint the chocolate onto one side of the meringues. Let harden.
  9. Melt white chocolate the same method as for chocolate chips. Drizzle white chocolate over the hardened semi-sweet chocolate. Enjoy!
Recipe Notes

Store in covered container. When exposed to air too long, meringues can become "tacky" and lose their crispness.

Nutrition Facts
Orange Meringue Kisses
Amount Per Serving (1 cookie)
Calories 53 Calories from Fat 18
% Daily Value*
Fat 2g3%
Saturated Fat 1g6%
Sodium 7mg0%
Potassium 35mg1%
Carbohydrates 7g2%
Sugar 6g7%
Calcium 5mg1%
Iron 0.3mg2%
* Percent Daily Values are based on a 2000 calorie diet.

Here’s one more to pin on your Pinterest boards!Light, airy and crisp, these chocolate dipped Orange Meringue Kisses are a fancy "cookie" you will enjoy! Easy prep, and a long, low temp. bake time.


Save

Save