Month: March 2021

Homemade Balsamic Vinaigrette

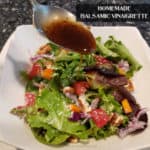
It’s EASY to make Homemade Balsamic Vinaigrette, with only a few simple ingredients! This is a tasty way to top a favorite mixed green salad!
It's EASY to make Homemade Balsamic Vinaigrette, with only a few simple ingredients! This is a tasty way to top a favorite mixed green salad!

I love to make salad dressings from scratch. Over the years I’ve found some wonderful tasting recipes which I’ve added to this blog as time permits. Today I want to share with you a SUPER EASY recipe for homemade balsamic vinaigrette. I found the original recipe years ago in one of my cookbooks. It tastes wonderful, and I think you will love it! The recipe yield almost a cup of vinaigrette, so there is enough for quite a few salads.

Using fairly common ingredients, it only takes a few minutes to mix up a batch, which is incredibly convenient. Perfect for mixed green salads, this is a “go to” easy dressing to make in a pinch, or if you’re just wanting to try a new variety of salad dressing. Save yourself a trip to the grocery store, and make this dressing in the comfort of your own home in about 5 minutes or less!

Scroll Down For A Printable Recipe Card At The Bottom Of The Page

What Ingredients Will I Need?

The ingredients you will need to make this vinaigrette are fairly common household ingredients. They are olive oil, balsamic vinegar, lemon juice, minced garlic, sugar, salt, pepper, and dried basil.

NOTE: If you have fresh basil available you can substitute that for dried basil. If you use fresh basil you will need a bit more in quantity than dried, but I have noted that amount in the printable recipe card. 

Common ingredients are used to make homemade balsamic vinaigrette.

How To Make Homemade Balsamic Vinaigrette

Making this homemade balsamic vinaigrette couldn’t be any easier! Be sure to use a container with a secure-fitting lid. I like to use a pint jar when I make this. This recipe yields almost a cup of vinaigrette, so a pint jar is just the right size for the dressing. A pint jar holds approximately 8 ounces of liquid, and can be used to mix and store the salad dressing.

Measure the ingredients for the homemade balsamic vinaigrette into the container you are using. Securely attach the lid, and holding the lid on tight, shake the jar (or container) for a minute or two to fully combine the ingredients.

All ingredients for the vinaigrette are put in a pint jar before mixing.A pint jar is used to mix up the homemade balsamic vinaigrette.

Drizzle the homemade balsamic vinaigrette over your favorite mixed green salad. Store any leftover vinaigrette, covered, in the refrigerator.

As the salad dressing chills in the fridge, it may thicken slightly. The next time you want to use it, simply take it out of the fridge a few minutes before using, and give it a good shake to re-mix.

The vinaigrette is drizzled onto a mixed green salad.

That’s it! See how easy it was to make homemade balsamic vinaigrette from scratch? This salad dressing has great flavor, and is a quick way to make your own salad dressing right in your own kitchen!

Homemade Balsamic Vinaigrette used on mixed green salad.

Thanks for stopping by today. I hope you have the opportunity to make this salad dressing sometime. It really is quite delicious! Take care, and come back again soon, ok?

Looking For More Salad Dressing Recipes?

You can find all of my salad dressing recipes in the Recipe Index, located at the top of the page. I have quite a few I believe you will enjoy, including:

Interested In More Recipes?

Thank you for visiting this website. I appreciate you using some of your valuable time to do soIf you’re interested, I publish a newsletter 2 times per month (1st and 15th) with all the latest recipes, and other fun info. I would be honored to have you join our growing list of subscribers, so you never miss a great recipe!
There is a Newsletter subscription box on the top right side (or bottom) of each blog post, depending on the device you use, where you can easily submit your e-mail address (only) to be included in my mailing list.

You Can Also Find Me On Social Media:

Facebook page: The Grateful Girl Cooks!
Pinterest:
The Grateful Girl Cooks!
Instagram:
jbatthegratefulgirlcooks

Author's signature

Original recipe source: The cookbook “What’s For Dinner?”, by Maryana Vollstedt, page 55, published by Chronicle Books, 1997

0 from 0 votes
Homemade Balsamic Vinaigrette
Prep Time
5 mins
Cook Time
0 mins
Total Time
5 mins
 

It's EASY to make Homemade Balsamic Vinaigrette, with only a few simple ingredients! This is a tasty way to top a favorite mixed green salad!

Category: Salad Dressing
Cuisine: American
Keyword: homemade balsamic vinaigrette
Servings: 15 Tablespoons
Calories Per Serving: 89 kcal
Author: JB @ The Grateful Girl Cooks!
Ingredients
  • cup extra virgin olive oil
  • 3 Tablespoons balsamic vinegar
  • 2 teaspoons fresh lemon juice
  • 1 clove garlic minced
  • ¼ teaspoon dried basil or 1 Tablespoon fresh, chopped
  • ½ teaspoon granulated sugar
  • ½ teaspoon salt
  • teaspoon black pepper
Instructions
  1. Measure all ingredients into the container you are using (container needs to hold at least 8 ounces). Securely attach the lid, and holding the lid on tight, shake the jar (or container) for a minute or two to fully combine the ingredients.

  2. Drizzle vinaigrette on a favorite green salad, serve and enjoy!

  3. Store unused vinaigrette in an airtight, covered container in the refrigerator. Before each use, remove from fridge a few minutes beforehand, and shake very well, to re-combine ingredients.

Nutrition Facts
Homemade Balsamic Vinaigrette
Amount Per Serving (1 Tablespoon)
Calories 89 Calories from Fat 90
% Daily Value*
Fat 10g15%
Saturated Fat 1g6%
Sodium 79mg3%
Potassium 6mg0%
Carbohydrates 1g0%
Fiber 1g4%
Sugar 1g1%
Protein 1g2%
Vitamin A 1IU0%
Vitamin C 1mg1%
Calcium 2mg0%
Iron 1mg6%
* Percent Daily Values are based on a 2000 calorie diet.

Here’s one more to pin on your Pinterest boards!It's EASY to make Homemade Balsamic Vinaigrette, with only a few simple ingredients! This is a tasty way to top a favorite mixed green salad!

Lemon Pasta And Peas

Lemon Pasta and Peas is an easy, delicious, meatless dish. Pasta and peas, with lemon juice, olive oil, garlic and Parmesan will be a big hit!

I received two new cookbooks from my family this past Christmas to add to my cookbook collection. Both cookbooks were written by the same couple (Steve and Kathy Doocy), and had been on top of the best seller list at one time or another. It was fun to read the stories behind the foods and mark some of the recipes I wanted to try.

This recipe for lemon pasta and peas is the first one I tried from “The Happy In A Hurry Cook Book”. The Doocy’s originally got the recipe  from their friend Madeleine (it’s her “go to” pasta dish). It is a simple, meatless dish, can be made quickly (under 20 minutes), and has wonderful flavor. We enjoyed it with a slice of rotisserie chicken on the side (my hubby wanted some protein).

Once the pasta is almost fully cooked, you add frozen peas to the pasta water in the pan (which quickly cooks them!). The remaining ingredients (the flavor factor) are then added to the cooked, drained pasta and peas.  That’s it… see how EASY this meal is to make?! Here’s how to make this simple dish:

Scroll Down For A Printable Recipe At The Bottom Of The Page

Cook The Pasta And Peas

The first thing you need to do is bring a large pan of salted water to a boil. Once the water has come to a boil, add the pasta to the pan, and cook. TIP: You will need to cook the pasta for 1 minute less than the pkg. directions tell you for al dente.

Add the frozen peas (yes, still FROZEN) to the pan of boiling pasta. Let them cook for 2 more minutes right in there with the pasta. NOTE: The recipe calls for using one (12 oz.) bag of frozen peas. If you would prefer LESS peas in this dish, simply add HALF the bag.

Spaghetti noodles cooking for the lemon pasta and peas dish.Frozen peas are added directly into the boiling pasta and water.

Remove one cup of the hot pasta water, and set it aside for later. Pour the pasta and peas into a strainer or colander, and drain the remaining water from the pan, but do not rinse. Return the hot drained pasta and peas to the pan, and immediately begin seasoning the dish (off of the heat).

A cup of boiling pasta water is reserved to use later in the dish.

Seasoning The Lemon Pasta And Peas For Serving

While the drained pasta is still hot, add olive oil, fresh lemon juice, and minced garlic, tossing to coat the pasta and peas well. Once combined, add the grated Parmesan cheese, salt and pepper, and give it another good toss to combine.

Now you will add a little bit of the reserved hot starchy pasta water. Give the pasta good stir as you add the water. This will help the pasta to not be dry, and help to melt the Parmesan cheese. You won’t need to use all of the pasta water… just use enough to coat the pasta to your liking, ok?

Olive oil, lemon juice and garlic are added to drained pasta and peas.Parmesan cheese, salt & pepper added to drained pasta and peas.

Time To Enjoy Lemon Pasta And Peas

Now the lemon pasta and peas are ready to serve (while they’re still hot). If you find that the pasta has cooled down too much, simply reheat it quickly in the microwave. Serve immediately, and enjoy this easy, delicious pasta dish!

Lemon pasta and peas ready to serve while hot.

Don’t Want It To Be Meatless?

If you want to add protein to the dish, add a slice or two of rotisserie chicken on the side. You could also add cooked, cubed chicken or pork into the pasta as well. Whatever makes you happy! My hubby asked for some protein with his, so I added a slice of rotisserie chicken breast on the side.

A piece of rotisserie chicken, served on the side of lemon pasta and peas.

I hope you enjoy this recipe for lemon pasta and peas. Any leftovers will keep for several days in the refrigerator, stored in an airtight container, and can be reheated easily in a microwave. Thank you for stopping by, and I hope you will come back soon!

Looking For More PASTA Recipes?

You can find all of my blog recipes in the Recipe Index, located at the top of the page. I have quite a few delicious pasta recipes, including:

Interested In More Recipes?

Thank you for visiting this website. I appreciate you using some of your valuable time to do soIf you’re interested, I publish a newsletter 2 times per month (1st and 15th) with all the latest recipes, and other fun info. I would be honored to have you join our growing list of subscribers, so you never miss a great recipe!
There is a Newsletter subscription box on the top right side (or bottom) of each blog post, depending on the device you use, where you can easily submit your e-mail address (only) to be included in my mailing list.

You Can Also Find Me On Social Media:

Facebook page: The Grateful Girl Cooks!
Pinterest:
The Grateful Girl Cooks!
Instagram:
jbatthegratefulgirlcooks

Author's signature

Original recipe source: “The Happy In A Hurry Cook Book”, by Steve and Kathy Doocy, page 163, published by William Morrow, 2020

0 from 0 votes
Lemon Pasta and Peas
Prep Time
5 mins
Cook Time
15 mins
Total Time
20 mins
 

Lemon Pasta and Peas is an easy, delicious, meatless dish. Pasta and peas, with lemon juice, olive oil, garlic and Parmesan will be a big hit!

Category: Dinner, Pasta
Cuisine: Italian
Keyword: lemon pasta and peas
Servings: 6
Calories Per Serving: 449 kcal
Author: JB @ The Grateful Girl Cooks!
Ingredients
  • 1 pound spaghetti pasta
  • 12 ounces frozen sweet green peas
  • ½ cup fresh lemon juice approx. 2-3 lemons
  • 3 Tablespoons olive oil
  • 2 large garlic cloves minced
  • ¾ cup grated Parmesan cheese or Pecorino Romano
  • ½ teaspoon salt
  • ½ teaspoon ground black pepper
Instructions
  1. Bring a large pan of salted water to a boil on medium-high heat. Once water boils, add pasta and cook. Note: cook pasta for 1 minute less than pkg. directions tell you for al dente. Add frozen peas (yes, still FROZEN) and let them cook 2 minutes, in with the pasta.

  2. Remove 1 cup of hot pasta water; set aside. Pour pasta/peas into a strainer; drain remaining water from pan. Do not rinse pasta. Return hot drained pasta/peas to pan (off the heat).

  3. Add olive oil, fresh lemon juice, and minced garlic to pasta, tossing or stirring to coat. Now add Parmesan cheese, salt, black pepper, and toss to combine. pour in a little bit of reserved hot pasta water; stir, then add more as needed, to melt cheese and help pasta to not be dry. You won't need to use all of the pasta water.

  4. Serve immediately while hot, and enjoy this easy, delicious pasta dish!

Nutrition Facts
Lemon Pasta and Peas
Amount Per Serving (1 (1/6 of total))
Calories 449 Calories from Fat 108
% Daily Value*
Fat 12g18%
Saturated Fat 3g19%
Cholesterol 11mg4%
Sodium 393mg17%
Potassium 350mg10%
Carbohydrates 67g22%
Fiber 5g21%
Sugar 6g7%
Protein 18g36%
Vitamin A 544IU11%
Vitamin C 31mg38%
Calcium 173mg17%
Iron 2mg11%
* Percent Daily Values are based on a 2000 calorie diet.

Here’s one more to pin on your Pinterest boards!Lemon Pasta and Peas is an easy, delicious, meatless dish. Pasta and peas, with lemon juice, olive oil, garlic and Parmesan will be a big hit!

Popcorn Italiano

Popcorn Italiano is an easy, Italian-inspired snack. Popped corn is seasoned with butter, Parmesan cheese and Italian seasonings, then baked.
Popcorn Italiano is an easy Italian-inspired snack. Popped corn is seasoned with butter, Parmesan cheese and Italian seasonings, then baked.

Popcorn is one of my “go to” snacks. Usually we just have it drizzled with butter and salt… you know, the old-fashioned way! Sometimes I like to add Parmesan cheese to the mix, and that tastes great, too! I think it’s kind of FUN to experiment with different flavors on popcorn!

Today I want to share a simple, but yummy recipe with you for Popcorn Italiano! I found the recipe years ago in one of my old Taste Of Home magazines, and gave it a try out of curiosity. YUM! Plain popped popcorn is combined with butter, Parmesan cheese and a few Italian-inspired spices. After it’s well-seasoned, it’s baked for a short time, which cooks and crisps up the buttery, cheesy seasoning onto the popcorn.

If you like to try new things, try this yummy popcorn. It’s really good, and has lots of flavor! Here’s how to make this tasty, easy snack:

Scroll Down For A Printable Recipe Card At The Bottom Of the Page

Pop The Popcorn First

Begin by preheating your oven to 350°F. You will want the oven ready to go once the popcorn has been popped and seasoned.

For this recipe you will need 2½ quarts of popped popcorn. Pop the popcorn (hot air popcorn maker, stovetop saucepan or microwave), using your preferred method. If you’re making this in a saucepan or hot air popcorn maker, start with 1/3 cup un-popped kernels. This will give you the amount of popped popcorn you need for this recipe. Set the finished popcorn aside while you prepare the seasoned butter sauce. 

NOTE: I’ve never made this recipe using microwavable popcorn. However, if using microwave popcorn, use PLAIN, unbuttered popcorn. You will most likely need a couple of bags (about 10 cups total popped popcorn) to give you the equivalent of 2½ quarts of popped popcorn.

Plain popped popcorn in a bowl, ready for buttery seasoning sauce.

Make The Sauce And Season The Popcorn

Now it’s time to make the buttery Italian seasoning for the popcorn. Melt butter in a small saucepan, then remove the pan from the heat. Add grated Parmesan cheese and spices (garlic powder, oregano, basil, onion powder, and salt) to the butter. Stir until fully combined.

Melted butter, Parmesan cheese and Italian spices in saucepan.Buttery Italian-inspired sauce is ready to pour over popped popcorn.

Pour all of the warm sauce over the popcorn and mix well, stirring as you go, until the popcorn has been well coated.

Seasoned butter is drizzled over popped popcorn and stirred to combine.

Bake The Popcorn Italiano

Pour the seasoned popcorn into a 13 x 9″ baking pan. Bake the Popcorn Italiano for 13 minutes, giving it a quick stir halfway through the baking time. Once done baking, remove the pan from the oven and transfer the seasoned popcorn into a serving bowl (or bowls). It will be hot, crispy and the flavors will be “sealed” and browned onto the popcorn.

Popcorn Italiano is baked for 13-15 minutes in a 13"x9" pan.

That’s it! Serve this flavorful popcorn Italiano hot, and enjoy this crunchy snack. You will definitely get the “taste” of delicious Italian flavors in every bite of this popcorn. 

Time to eat some crunchy, tasty Popcorn Italiano!A close up of the Popcorn Italiano shows the seasoning on the pieces.

Thank you for stopping by and checking out this fun, unique recipe for Popcorn Italiano. It really does taste good, and I hope you enjoy it. Come back soon, and have a great day.

Looking For More SNACK Recipes?

Yu can find all of my recipes in the Recipe Index, which is located at the top of the page.. I have quite a few snack and appetizer recipes you might enjoy, including:

Interested In More Recipes?

Thank you for visiting this website. I appreciate you using some of your valuable time to do soIf you’re interested, I publish a newsletter 2 times per month (1st and 15th) with all the latest recipes, and other fun info. I would be honored to have you join our growing list of subscribers, so you never miss a great recipe!
There is a Newsletter subscription box on the top right side (or bottom) of each blog post, depending on the device you use, where you can easily submit your e-mail address (only) to be included in my mailing list.

You Can Also Find Me On Social Media:

Facebook page: The Grateful Girl Cooks!
Pinterest:
The Grateful Girl Cooks!
Instagram:
jbatthegratefulgirlcooks

Author's signature

Original recipe source: “Taste of Home” magazine, Sept./Oct. 1998 issue, page 54, published by Reiman Publications

0 from 0 votes
Popcorn Italiano
Prep Time
7 mins
Cook Time
13 mins
Total Time
20 mins
 

Popcorn Italiano is an easy Italian-inspired snack. Popped corn is seasoned with butter, Parmesan cheese and Italian seasonings, then baked.

Category: Appetizer/Snack
Cuisine: American
Keyword: popcorn Italiano
Servings: 5 (2 cups per serving)
Calories Per Serving: 165 kcal
Author: JB @ The Grateful Girl Cooks!
Ingredients
  • cup popcorn kernels = 2½ quarts popped
  • 5 Tablespoons butter
  • ¼ cup grated Parmesan cheese
  • ½ teaspoon dried oregano
  • ½ teaspoon garlic powder
  • ½ teaspoon dried basil
  • ¼ teaspoon onion powder
  • ¼ teaspoon salt
Instructions
  1. Preheat oven to 350°F.

  2. You will need 2½ quarts of popped popcorn. Pop the popcorn (hot air popcorn maker, stovetop saucepan or microwave), using your preferred method. NOTE: If making in saucepan or hot air popcorn maker, start with 1/3 cup un-popped kernels. This will produce the amount of popped popcorn needed. if using microwave popcorn, use PLAIN, unbuttered popcorn. You will need 10 cups total popped popcorn to give you amount needed. Set popped popcorn aside when done. 

  3. Melt butter in a small saucepan; remove pan from heat. Add grated Parmesan cheese, garlic powder, oregano, basil, onion powder and salt. Stir until fully combined. Drizzle sauce over popcorn and stir to combine, until popcorn is well coated.

  4. Pour seasoned popcorn into a 13 x 9" baking pan. Bake 13 minutes, giving it a stir halfway through baking time. Once done, remove pan from oven; transfer hot popcorn into serving bowl (or bowls). Serve immediately and enjoy!

Recipe Notes

NOTE: If popping corn from scratch you will need to use 1/3 cup of popcorn kernels to yield 2.5 quarts popped popcorn.  If using microwave popcorn, you will need 10 cups of plain, unbuttered popped popcorn to equal 2.5 quarts.

Nutrition Facts
Popcorn Italiano
Amount Per Serving (1 (2 cup serving))
Calories 165 Calories from Fat 117
% Daily Value*
Fat 13g20%
Saturated Fat 8g50%
Trans Fat 1g
Cholesterol 35mg12%
Sodium 294mg13%
Potassium 49mg1%
Carbohydrates 9g3%
Fiber 2g8%
Sugar 1g1%
Protein 3g6%
Vitamin A 397IU8%
Vitamin C 1mg1%
Calcium 65mg7%
Iron 1mg6%
* Percent Daily Values are based on a 2000 calorie diet.

Here’s one more to pin on your Pinterest boards!Popcorn Italiano is an easy Italian-inspired snack. Popped corn is seasoned with butter, Parmesan cheese and Italian seasonings, then baked.

Navy Bean Soup

Navy Bean Soup is delicious and filling! Slowly cooked dried navy beans, carrots, garlic, celery, onion, broth & spices create a robust soup.

Do you enjoy soup? We really do, especially in the cold of winter when a big bowl of piping hot soup takes the chill off the day! Today I want to share with you a recipe that I originally found in an old Italian cookbook of mine (from Williams-Sonoma). It is really tasty, warming, and filling.

The recipe uses dried navy beans, so the only “downside” (if there is one), is that it will take some time to soak and cook the beans until they have slightly softened. Typically I soak the beans early in the day, then add them to the soup later and then let the soup cook low and slow to infuse the beans with flavor, and to soften them perfectly! It’s inactive prep time, so you do other things while they soak!

So… as long as you plan ahead a little bit, you will have no problems making this absolutely DELICIOUS navy bean soup. Yes… it will take a bit of your time on your part, but it is worth it! Don’t forget, a lot of the time involved is inactive time (soaking, cooking, etc.) Let me show you how to make navy bean soup:

Scroll Down For A Printable Recipe Card At The Bottom Of The Page

Prepare The Navy Beans

Bags of navy beans can be found in most grocery stores, and are a very economical main ingredient for the soup. Because this recipe calls for dried navy beans, that means you’ll need to plan ahead to soak them (which helps soften them).  I usually do this step early in the day, so the beans have several hours to soak.

To do this, first rinse the navy beans in a strainer. Once rinsed, place the beans in a large bowl and completely cover with water. Let them soak for at least 3 hours, and then drain.

Dried navy beans are soaked in water for hours to soften them.

Ready To Cook the Navy Bean Soup

Okay… the beans have soaked. Now it’s time to start making the soup. Place olive oil into a large soup pot, and let it get warm (on medium heat). Add chopped celery, carrots and onion to the pot, and cook for about 8-10 minutes (stirring occasionally) until the veggies have softened.

Once the veggie have softened, add minced garlic and minced fresh rosemary to the pot, and stir  to combine. Cook this mixture for a couple minutes, stirring often so the garlic doesn’t burn.

Carrots, celery and onion are cooked in olive oil in a large soup pot.

Add the chicken stock (or vegetable stock) and the drained, softened navy beans to the pot. Stir to combine, and then bring it to a boil on MEDIUM heat. Once boiling, reduce the heat to LOW, and let the navy bean soup simmer for about 1½ hours, uncovered. You will know it is done when the beans are soft to the bite, and the liquid has reduced in quantity. Let the soup cool for 5 minutes.

Chicken stock, navy beans and seasonings are cooked in soup pot.Beans have softened and liquid has reduced in the navy bean soup.

Thickening The Navy Bean Soup

Now you’re ready for the last step… thickening the navy bean soup for eating! It’s EASY. Remove about 1/3 of the bean mixture and place it in a blender (or food processor). Process the bean/soup mixture until it becomes a puree, smooth in texture.

Return the pureed bean mix to the soup pot, and stir well, to fully incorporate the puree into the soup. This will really help thicken the soup! Gently reheat the soup until it’s hot enough to serve. Season the navy bean soup with salt and black pepper, to suit your personal taste.

Some beans are pureed, then added back into the navy bean soup.Pureed navy beans will help thicken the soup.

Garnish, Serve, and Enjoy!

Once you have the soup seasoned to your liking, it is time to serve/ Ladle the navy bean soup into individual serving bowls. Garnish each portion with chopped parsley and grated Parmesan cheese. Serve piping hot, and enjoy this thick, creamy and delicious soup!

Bowl of navy bean soup, garnished with Parmesan cheese and parsley.Taking a spoonful of thick navy bean soup from a white bowl.

I really hope you have a chance to make and enjoy eating this soup. We sure enjoy it, and trust you will, too! Thank you for stopping by, and sincerely hope you will come back soon. Have a GREAT day!

Looking For More SOUP Recipes?

You can find all of my soup recipes in the Recipe Index, located at the top of the page. I have lots of delicious soup recipes, including:

Interested In More Recipes?

Thank you for visiting this website. I appreciate you using some of your valuable time to do soIf you’re interested, I publish a newsletter 2 times per month (1st and 15th) with all the latest recipes, and other fun info. I would be honored to have you join our growing list of subscribers, so you never miss a great recipe!
There is a Newsletter subscription box on the top right side (or bottom) of each blog post, depending on the device you use, where you can easily submit your e-mail address (only) to be included in my mailing list.

You Can Also Find Me On Social Media:

Facebook page: The Grateful Girl Cooks!
Pinterest:
The Grateful Girl Cooks!
Instagram:
jbatthegratefulgirlcooks

Author's signature

Original recipe source: The cookbook “Williams-Sonoma Italian Favorites”, page 22, published in 2004 by Oxmoor House and Williams-Sonoma, Inc.

0 from 0 votes
Navy Bean Soup
Prep Time
10 mins
Cook Time
1 hr 30 mins
Inactive (Bean Soaking Time)
3 hrs
Total Time
4 hrs 40 mins
 

Navy Bean Soup is delicious and filling! Slowly cooked dried navy beans, carrots, garlic, celery, onion, broth & spices create a robust soup.

Category: Main Course, Soup
Cuisine: American
Keyword: navy bean soup
Servings: 6
Calories Per Serving: 332 kcal
Author: JB @ The Grateful Girl Cooks!
Ingredients
  • cups small navy beans (dried)
  • 3 Tablespoons olive oil
  • 1 medium yellow onion , finely chopped
  • 1 large carrot , peeled/finely chopped
  • 1 stalk celery , finely chopped
  • 2 cloves garlic , minced
  • 1 teaspoon fresh rosemary , minced
  • 7 cups low-sodium chicken broth , or vegetable broth
  • salt & pepper, to taste
To Garnish:
  • ½ cup grated Parmesan cheese
  • 1 Tablespoon Italian flat leaf parsley , chopped
Instructions
  1. Rinse beans in a strainer. Once rinsed, place beans in large bowl; cover completely with water. Let beans soak at least 3 hours; drain.

  2. Once beans have soaked at least 3 hours: Place olive oil into a large soup pot; heat oil until warm on medium heat. Add celery, carrots and onion; cook 8-10 minutes (stirring occasionally) until veggies have softened. Add garlic and rosemary; stir  to combine. Cook 2 minutes, stirring often, so garlic doesn't burn.

  3. Add chicken stock (or vegetable stock or water) and the drained beans. Stir to combine, and bring to a boil on MEDIUM heat. Once boiling, reduce heat to LOW; simmer soup gently for 1½ hours, uncovered. It is done when beans are soft to the bite., and liquid has reduced. Let cool for 5 minutes.

  4. Remove about 1/3 of the bean mixture; place in a blender (or food processor). Process bean/soup mixture until it becomes a smooth puree. Return puree to soup; stir well, to mix puree into soup. Gently reheat soup until hot. Season with salt and pepper, to taste.

  5. Ladle hot soup into serving bowls. Garnish each portion with chopped parsley and grated Parmesan cheese. Serve, and enjoy!

Recipe Notes

NOTE: If you do not have access to chicken or vegetable broth, you can substitute 7 cups water. However... the flavor will be much better using the broth.

Nutrition Facts
Navy Bean Soup
Amount Per Serving (1 (1/6 of total))
Calories 332 Calories from Fat 108
% Daily Value*
Fat 12g18%
Saturated Fat 3g19%
Cholesterol 7mg2%
Sodium 227mg10%
Potassium 950mg27%
Carbohydrates 39g13%
Fiber 13g54%
Sugar 4g4%
Protein 21g42%
Vitamin A 2108IU42%
Vitamin C 3mg4%
Calcium 193mg19%
Iron 4mg22%
* Percent Daily Values are based on a 2000 calorie diet.

Here’s one more to pin on your Pinterest boards!Navy Bean Soup is delicious and filling! Slowly cooked dried navy beans, carrots, garlic, celery, onion, broth & spices create a robust soup.

Mint Brownie Pie

Mint Brownie Pie is a perfect St. Patrick’s Day (or any other day) dessert! Mint cream cheese filling tops a brownie base. Easy and yummy!
Mint Brownie Pie is a perfect St. Patrick's Day (or any other day) dessert! Mint cream cheese filling tops a brownie base. Easy and yummy!

If you’re looking for a fantastic dessert to have on St. Patrick’s Day, or Christmas, OR any other day of the year, may I suggest this mint brownie pie? It tastes wonderful, due to a brownie layer on bottom and a creamy mint filling on top! It is sooo good!

A couple of months ago I made (and photographed) this delicious dessert, and was able to share quite a few pieces with several of our neighbors.

It was so yummy I could have eaten the entire thing by myself (seriously!)… but my husband and I decided to share this treat (and the calories) with others!

I had the recipe because it came from one of my “Taste of Home” magazines (from 1999) that I have saved for many, many years. This mint brownie pie is a favorite, and decided this was the time to share the recipe on my blog. Here’s how to make it:

Scroll Down For A Printable Recipe Card At The Bottom Of The Page

Prepare The Brownie Base Layer

The first thing (after preheating your oven) you will do is make a brownie base for the dessert. To do this, melt butter and unsweetened chocolate in a medium saucepan, stirring often.

Once melted, add granulated sugar, and stir well, to fully blend ingredients. Remove the pan from the heat.

Unsweetened chocolate and butter are melted in a saucepan.Granulated sugar is added to the melted chocolate and butter in saucepan.

Whisk 2 eggs and vanilla extract in a small bowl, and add this to the chocolate mixture. Mix well, to combine. Stir in  flour, a little at a time. Continue to stir after each addition until all the flour has been blended into the chocolate.

Whisked eggs and vanilla extract are added to chocolate in saucepan.Flour is stirred into the chocolate mixture, a little at a time.

Bake The Brownie Base

Pour the mint brownie pie batter into a greased (bottom and sides) 9″ springform pan. Place the pan on the middle rack of a preheated oven.

Bake at 350° F. for 18-20 minutes OR until a toothpick inserted in the middle of the brownie pie comes out clean and free of batter.

Remove the mint brownie pie from the oven and let it cool (still in pan) on a wire rack. Do not open the pan or remove the brownie base from the pan.

Mint brownie pie batter is poured into a greased springform pan.After baking, the mint brownie pie chocolate layer cools in the pan on a wire rack.

Make The Mint Cream Cheese Topping

Now it’s time to make the mint cream cheese topping while the brownie base cools to room temperature. Using an electric mixer, beat softened cream cheese and sugar until it becomes smooth.

Add green food coloring (if using) and peppermint extract to the cream cheese filling, and mix well until combined and all color has blended in. The food coloring is optional, but I recommend it, especially if you’re making this dessert for St. Patrick’s Day!

Use a few drops or as much as you wish to achieve a mint green color. Once the filling is fully tinted and blended, gently fold in whipped topping.

When the brownie layer has completely cooled, gently add the mint cream cheese filling on top. Spread the filling to cover the entire top surface. Cover the pan, and refrigerate the mint brownie pie for one hour (at least).

Whipped topping is gently folded into the green tinted cream cheese filling.The mint cream cheese filling is spread on the surface of the mint brownie pie.

Refrigerate Then Decorate The Mint Brownie Pie!

After the mint brownie pie has been chilled in the refrigerator for at least an hour, it’s ready to remove from the springform pan and decorate for serving. Run a butter knife all the way around between the pan and the pie to assist in releasing the pie from the pan.

Melt chocolate chips and drizzle the chocolate decoratively over the surface of the mint brownie pie, any way you wish.

I also like to pipe stabilized whipped cream (which holds its shape for days) on top and sprinkle with finely grated chocolate. Those are optional, but really do make the dessert look great.

If you’re using aerosol whipped cream, spray onto individual pieces just before serving, as it will not hold it’s shape for any length of time.

Melted chocolate is drizzled decoratively over the top of the mint brownie pie.Whipped cream is piped on top of the mint brownie pie and grated chocolate is added for garnish.

Grab A Slice Of Mint Brownie Pie… And Dig In!

Slice the mint brownie pie into 10 wedges, serve… and enjoy this decadent dessert! I’m confident you and those you love will really love this yummy treat!

The dense, fudgy bottom layer, and the creamy, mint cream cheese topping makes a wonderful treat for the ol’ taste buds. YUM!

A slice of mint brownie pie, served on a white plate.

Thank you for stopping by to check out this scrumptious recipe. If you’re looking for more St. Patrick’s day dishes, check out my recipes for Irish Chocolate Pots de Créme, Irish Soda Bread, Guinness Baked Cheese Dip, Irish Colcannon With Bacon, and Corned Beef and Cabbage.

I hope you will be able to come back again soon for more family-friendly recipes. Have a GREAT day, and may God bless you.

Looking For More DESSERT Recipes?

You can find more dessert recipes in my Recipe Index, which is located located at the top of this page. I have many dessert recipes you will really love, including:

Want More Recipes? Get My FREE Newsletter!

I publish a newsletter 2 times per month (1st and 15th) with lots of recipes, tips, etc..
Would you like to join our growing list of subscribers?

There is a Newsletter subscription box on the top right (or bottom) of each blog post, depending on the device you use.
You can submit your e-mail address there, to be added to my mailing list.

Find Me On Social Media:

Facebook page: The Grateful Girl Cooks!
Pinterest:
The Grateful Girl Cooks!
Instagram:
jbatthegratefulgirlcooks

Author's signature

Original recipe source: “Taste of Home” magazine, February/March 1999 edition, page 67, published by Reiman Publications, Inc.

↓↓ PRINTABLE RECIPE BELOW ↓↓

0 from 0 votes
Mint Brownie Pie
Prep Time
15 mins
Cook Time
20 mins
Inactive Refrigeration Time
1 hr
Total Time
1 hr 35 mins
 

Mint Brownie Pie is a perfect St. Patrick's Day (or any other day) dessert! Mint cream cheese filling tops a brownie base. Easy and yummy!

Category: Dessert
Cuisine: American
Keyword: mint brownie pie
Servings: 10 slices
Calories Per Serving: 362 kcal
Author: JB @ The Grateful Girl Cooks!
Ingredients
For Brownie Layer:
  • 6 Tablespoons butter (no substitutes)
  • 2 ounces unsweetened chocolate (2 one oz. squares)
  • 1 cup granulated sugar
  • 2 large eggs
  • ½ teaspoon vanilla extract
  • ½ cup all purpose flour
Mint Cream Cheese Layer:
  • 8 ounces cream cheese , softened
  • ¾ cup granulated sugar
  • ½ teaspoon peppermint extract
  • green food coloring (optional, but recommended)
  • 8 ounces frozen whipped topping, thawed
For Decorating:
  • ¼ cup semi-sweet chocolate chips , melted
  • 2 teaspoons vegetable shortening
  • Piped whipped cream and grated chocolate (optional)
Instructions
  1. Melt butter and unsweetened chocolate in medium saucepan, stirring often. Once melted, add granulated sugar, and stir to fully blend ingredients. Remove pan from heat. Whisk eggs and vanilla extract in small bowl; add to chocolate mixture. Stir well, to combine. Stir in flour, a little at a time. Stir after each addition until all flour has been blended into chocolate.

  2. Pour batter into greased (bottom and sides) 9" springform pan. Place pan on middle rack in preheated oven. Bake at 350° F. for 18-20 minutes OR until a toothpick inserted in middle of brownie layer comes out clean. Remove from the oven and let cool (still in pan) on a wire rack. Do not remove brownie base from pan.

  3. Make mint cream cheese topping while brownie layer cools. Using an electric mixer, beat softened cream cheese and sugar until it becomes smooth. Add green food coloring (if using) and peppermint extract to cream cheese; mix well until combined and all color is blended in. Use a few drops or as much as you wish to achieve a mint green color. Once filling is tinted and blended, gently fold in whipped topping. When brownie layer is completely cooled, add cream cheese filling on top. Spread filling to cover top surface. Cover pan; refrigerate for one hour (at least).

  4. Remove chilled dessert from refrigerator. Release dessert from springform pan and decorate for serving. Melt chocolate chips; drizzle chocolate decoratively over surface of pie, any way you wish. Slice into wedges and serve. NOTE: I also decorate top with piped on stabilized whipped cream (which holds its shape for days) and sprinkle with finely grated chocolate. Those are optional, but really make the dessert look great. If using aerosol whipped cream, spray onto individual pieces just before serving, as it will not hold it's shape for any length of time. Store leftovers, covered, in refrigerator.

Nutrition Facts
Mint Brownie Pie
Amount Per Serving (1 slice)
Calories 362 Calories from Fat 153
% Daily Value*
Fat 17g26%
Saturated Fat 10g63%
Trans Fat 1g
Cholesterol 34mg11%
Sodium 185mg8%
Potassium 163mg5%
Carbohydrates 51g17%
Fiber 2g8%
Sugar 42g47%
Protein 4g8%
Vitamin A 377IU8%
Calcium 70mg7%
Iron 2mg11%
* Percent Daily Values are based on a 2000 calorie diet.

Here’s one more to pin on your Pinterest boards!Mint Brownie Pie is a perfect St. Patricks Day (or any other day) dessert! Mint cream cheese filling tops a brownie base. Easy and yummy!

Corned Beef And Cabbage

What’s more Irish than Corned Beef and Cabbage? Baked with cabbage, red potatoes, carrots and onions, this St. Patrick’s Day meal is yummy!What's more Irish than Corned Beef and Cabbage? Baked with cabbage, red potatoes, carrots and onions, this St. Patrick's Day meal is yummy!

Top of the morning to ya! (said in my most perfect Irish brogue-ha ha!). Today I want to share the recipe for a simple, classic meal of corned beef and cabbage. With a few red potatoes, carrots and onions tossed in for good measure, this really is an all in one holiday meal. It’s also very easy to prepare.

Over the years I have used the directions on the package of corned beef to prepare this dish, and have made only a couple very minor changes to this traditional Irish dinner.

The best part? You don’t even have to be Irish to enjoy it!  You can “pretend” for the day with this simple meal. My husband really enjoys this meal and asked me to make it again last year, so I grabbed my camera and took some photos as I cooked it!

The trick is to cook it low and slow, for tender corned beef. Here’s how to make this simple recipe for corned beef and cabbage:

Scroll Down For A Printable Recipe Card At The Bottom Of The Page

Prepare The Corned Beef

This recipe calls for a “standard-sized 3 pound piece of corned beef. Most packages of corned beef come with a cute little spice packet. If yours does not, you can use a Tablespoon of pickling spice (found in spice section at grocery store).

Place the meat on a large sheet of heavy duty foil inside of a large baking dish (9″ x13” works well).

Sprinkle the meat with the spices. NOTE: The meat will be cooked with the fatty side up. It is fairly common to sprinkle the spices on the fat side, however I have found I prefer it sprinkled on the meat side, with only a tiny bit sprinkled on the fat side. It is your choice.

Spices cover the surface of a corned beef, ready for baking.The seasoned corned beef is wrapped in foil, fat-side up.

Baking The Corned Beef And Cabbage

Once the meat has been seasoned, place it fat side UP in the foil, and seal the foil packet tightly. Place the baking dish with the foil-wrapped corned beef on the middle rack of a preheated 300°F. oven. 

Wrapped tightly in foil, the corned beef is ready for baking.

Bake the corned beef for 1½ hours, then remove the pan from the oven. Carefully open the foil pouch, and place carrots, onion wedges and whole, unpeeled red potatoes around the edges of the corned beef. Seal the pouch back up, and cook for 30 more minutes.

Red potatoes, baby carrots and onion wedges are place around the corned beef.

Remove the pouch from the oven again, and add the 4 quartered pieces of cabbage around the edges of the corned beef. Re-seal the foil pouch, and place it back in the oven. Bake for another 1½ hours, or until the corned beef has an internal temperature of of 145°F.

Remove the corned beef and cabbage from the oven, carefully turn the corned beef over so the meat side is UP, and then let it rest for 5 minutes before slicing.

Cabbage quarters are added to the corned beef and it is baked more.The corned beef and cabbage is fully baked and ready to serve.

Serving The Corned Beef And Cabbage

After the meat has rested 5 minutes, slice the meat (fat side down), and serve with the carrots, potatoes, and onions on the side. You can cut the cabbage wedges in half (for 6+ servings), if desired, or serve the whole quarter piece (for 4 servings).

Spoon some of the accumulated juices over the meat and vegetables, for extra flavor. Season the veggies to taste with salt and pepper.

And there you have it… a simple meal in honor of St. Patrick’s Day… corned beef and cabbage. Hope you enjoy it!

Slices of the corned beef are ready for serving.Corned beef and cabbage served with potatoes, onions and carrots.

I hope you have the opportunity to make corned beef and cabbage some day. It’s fun to celebrate the St. Patrick’s Day holiday with traditional Irish foods.

Why not start the meal of with a delicious appetizer? Guinness Baked Cheese Dip is a great place to start! Next, serve the corned beef and cabbage with delicious Irish Colcannon With Bacon and slices of warm Irish Soda Bread on the side.

While you’re at it, what would a good feast be without dessert? Finish off your Irish dinner with easy, decadent Irish Chocolate Pots de Creme for a delectable, sweet treat!

Thanks for stopping by. I hope you enjoy this recipe, and trust you will come back soon for more family recipes. Have a GREAT day!

Want More Recipes? Get My FREE Newsletter!

I publish a newsletter 2 times per month (1st and 15th) with lots of recipes, tips, etc..
Would you like to join our growing list of subscribers?

There is a Newsletter subscription box on the top right (or bottom) of each blog post, depending on the device you use.
You can submit your e-mail address there, to be added to my mailing list.

Find Me On Social Media:

Facebook page: The Grateful Girl Cooks!
Pinterest:
The Grateful Girl Cooks!
Instagram:
jbatthegratefulgirlcooks

Author's signature

Recipe adapted from: a store-bought bag of corned beef

↓↓ PRINTABLE RECIPE BELOW ↓↓

0 from 0 votes
Corned Beef And Cabbage
Prep Time
15 mins
Cook Time
3 hrs 30 mins
Total Time
3 hrs 45 mins
 

What's more Irish than Corned Beef and Cabbage? Baked with cabbage, red potatoes, carrots and onions, this St. Patrick's Day meal is yummy!

Category: Main Course
Cuisine: Irish
Keyword: corned beef and cabbage, St. Patrick's Day
Servings: 6
Calories Per Serving: 647 kcal
Author: JB @ The Grateful Girl Cooks!
Ingredients
  • 3 pounds packaged corned beef (+ spice packet) (see note below)
  • 6 medium red potatoes , do not peel
  • 20 baby carrots , or 3 large peeled carrots-cut into 2" chunks
  • 1 large yellow onion
  • 1 medium green cabbage , cut into quarters
Instructions
  1. Preheat oven to 300°F.

  2. Place corned beef on aluminum foil inside of a large baking dish (9" x13" works well). Sprinkle meat with contents of spice packet (or substitute 1 T. pickling spice). NOTE: meat is cooked fat side up. It is fairly common to sprinkle spices on the fat side, however I prefer it sprinkled on the meat side. It's your choice. Place seasoned meat on foil, fat side UP; seal foil packet tightly. Place baking dish on middle rack of oven. 

  3. Bake for 1½ hours, then remove from oven. Carefully open foil pouch; place carrots, onions and potatoes around the outer edges of the corned beef. Seal the pouch, and cook for 30 more minutes. Remove baking dish again; add cabbage wedges around the corned beef. Re-seal foil; place dish back in oven. Bake for 1½ hours, or until corned beef has reached an internal temperature of 145°F. Remove dish from oven; turn corned beef over so meat side is UP; let meat rest 5 minutes before slicing.

  4. Slice corned beef (fat side down); serve with carrots, potatoes, onions, and cabbage on the side. *Cut cabbage wedges in half (for 6+ servings), or serve the whole quarter piece (for 4 servings). Spoon accumulated juices in foil packet over the meat and vegetables, for extra flavor. Season veggies to taste with salt and pepper. Enjoy!

Recipe Notes

NOTE: If corned beef did not come with a spice packet, use 1 Tablespoon of pickling spice as a substitute.

Nutrition Facts
Corned Beef And Cabbage
Amount Per Serving (1 (1/6 of total))
Calories 647 Calories from Fat 306
% Daily Value*
Fat 34g52%
Saturated Fat 11g69%
Cholesterol 122mg41%
Sodium 2829mg123%
Potassium 1947mg56%
Carbohydrates 46g15%
Fiber 8g33%
Sugar 9g10%
Protein 40g80%
Vitamin A 721IU14%
Vitamin C 137mg166%
Calcium 105mg11%
Iron 6mg33%
* Percent Daily Values are based on a 2000 calorie diet.

Here’s one more to pin on your Pinterest boards!What's more Irish than Corned Beef and Cabbage? Baked with cabbage, red potatoes, carrots and onions, this St. Patrick's Day meal is yummy!

Quiche Lorraine

Quiche Lorraine is delicious for breakfast, lunch or dinner! Easy to make, and filled with bacon, eggs, and cheese… you’re gonna love it!
Quiche Lorraine is delicious for breakfast, lunch or dinner! Easy to make, and filled with bacon, eggs, and cheese... you're gonna love it!

Quiche Lorraine is a versatile, easy and delicious dish, which can be enjoyed as a main dish or as a side dish! I’ve always wondered “just WHO is Lorraine, and why is HER quiche so famous?” So I did a little bit of research to find out the history of this yummy dish.

Quiche Lorraine’s Origins

Turns out, LORRAINE isn’t a woman (who knew?). It is a region in France that borders Germany. The story goes that in medieval times, this region (originally called Lothringen) was under German rule, and a recipe for a savory cake was created there.

The French word “quiche” is derived from the German word “kuchen”, which basically means “cake”. Many years later, after the region had returned to French rule, the “Quiche Lorraine” recipe was “enhanced”, and became the name of this beloved dish.

There are multitudes of quiche recipes with a variety of ingredients created throughout the world, but the Quiche Lorraine remains the most famous and loved. Apparently chef Julia Child is often credited for exposing  America to this classic dish, which typically includes pie crust, eggs, bacon (or other meat), and cheese.

We love this dish because it is so EASY to make, and tastes absolutely wonderful! This is my “go-to” favorite quiche, and I’ve been making it for over 40 years! Here’s how to make it:

Scroll Down For A Printable Recipe Card At The Bottom Of The Page

A Word About The Pie Crust

For this recipe you can use a homemade 9″ pie shell OR a purchased deep-dish pie shell. Either type will work just fine for this recipe.

Obviously a purchased pie shell is quicker and more convenient, but I like to use my Mom’s recipe for homemade pie crusts. 

Arrange the prepared pie dough in a 9″ pie pan, and crimp the edges to form a crust. Use the tines of a fork to prick the bottom and sides of the crust (as shown below).

A 9-inch unbaked deep dish pie shell is pricked with a fork before adding ingredients.

Making The Quiche Lorraine Is EASY!

Preheat your oven to 425°F., and then begin putting this quiche together. It’s EASY!  Place the cooked, crumbled crispy bacon on the bottom of the pie shell, spreading to cover. Add the chopped onions, and then top it off with grated Swiss cheese.

Cooked, crumbled bacon and chopped onions are added to pie shell.Grated Swiss cheese is added to the quiche ingredients in pie shell.

Whisk whipping cream, eggs, sugar, salt and cayenne pepper together in a medium bowl, until they’re fully combined. Pour this liquid over the ingredients in the pie shell. The pie shell will be very full!

Carefully give the ingredients a tiny bit of a stir, bringing some of the bacon, onion and cheese up to the surface. You don’t have to mix it up real well, just enough to combine the ingredients. Now it’s time to bake your Quiche Lorraine!

Eggs, whipping cream and spices are whisked for the Quiche Lorraine.Egg and cream mixture is poured over bacon, onion and cheese in pie shell.

Baking The Quiche Loraine

Carefully place the Quiche Lorraine on the middle rack of a preheated 425°F. oven. Be careful to not slosh it around, because it will be full (just a helpful tip!). Bake at 425°F. for 15 minutes, turn the oven down to 300°F. and continue cooking it for 30 more minutes.

You’ll know it’s done when the top is golden brown and a knife inserted into the middle comes out clean. Transfer the quiche to a wire rack to cool down a bit (still in pie pan). You’ll be able to see how puffy the quiche is, from the hot air inside.

The top of the quiche will “flatten” as the air dissipates inside while it cools, and that is what it is supposed to do!

Quiche Lorraine is ready to bake in a hot oven.Top of the quiche is golden brown after baking.Hot air puffs up the Quiche Lorraine after baking.

Ready To Eat!

Once the top of the quiche has flattened and it has cooled for 10-15 minutes, it’s ready to slice and enjoy! The Quiche Lorraine can be eaten hot, warm, cold, OR at room temperature, whichever way you prefer.

Slice the quiche into 8 portions (or 6 if you want larger pieces!), serve, and enjoy! It’s filled with GREAT flavor, lots of cheese, and yummy bacon. We love this quiche, and have it for breakfast, lunch OR dinner!

Cover and store any leftovers in the refrigerator for up to 4-5 days. You can easily microwave leftover pieces of quiche to bring them back to the temperature you prefer! 

A slice of quiche is removed, revealing bacon and onions inside.A slice of Quiche Lorraine, with fresh fruit on the side.

I really hope you will try this quiche, because it is so good! It is by far the most famous of all quiches, and is a great dish to have around, for a delicious dinner, lunch or breakfast!

Thank you for stopping by, and I invite you to come back soon for more family-friendly recipes. Take care, and I hope you have a great day. 

Looking For More QUICHE Recipes?

You can find all of my blog recipes in the Recipe Index, located at the top of the page. I recommend all of my quiche recipes, which include:

Want More Recipes? Get My FREE Newsletter!

I publish a newsletter 2 times per month (1st and 15th) with lots of recipes, tips, etc..
Would you like to join our growing list of subscribers?

There is a Newsletter subscription box on the top right (or bottom) of each blog post, depending on the device you use.
You can submit your e-mail address there, to be added to my mailing list.

Find Me On Social Media:

Facebook page: The Grateful Girl Cooks!
Pinterest:
The Grateful Girl Cooks!
Instagram:
jbatthegratefulgirlcooks

Author's signature

Original recipe source: unknown (had the handwritten recipe for over 40 years- no author noted)

↓↓ PRINTABLE RECIPE BELOW ↓↓

0 from 0 votes
Quiche Lorraine
Prep Time
10 mins
Cook Time
45 mins
Total Time
55 mins
 

Quiche Lorraine is delicious for breakfast, lunch or dinner! Easy to make, and filled with bacon, eggs, and cheese... you're gonna love it!

Category: Breakfast, Dinner, Lunch
Cuisine: American
Keyword: quiche lorraine
Servings: 8 slices
Calories Per Serving: 388 kcal
Author: JB @ The Grateful Girl Cooks!
Ingredients
  • 1 9" deep dish pie shell (uncooked) (homemade or store-bought)
  • 8 slices cooked bacon (cooked crisp/crumbled)
  • cup yellow onion (finely chopped)
  • 1 cup grated Swiss cheese
  • 2 cups heavy whipping cream
  • 4 large eggs
  • ¼ teaspoon granulated sugar
  • ¾ teaspoon salt
  • teaspoon cayenne pepper
Instructions
  1. Preheat oven to 425°F.

  2. Use a homemade 9" pie shell OR a purchased deep-dish pie shell. Arrange pie dough in a 9" pie pan; crimp edges to form crust. Use the tines of a fork to prick bottom and sides of the dough. Place cooked, crumbled bacon on bottom of pie shell, spreading to cover. Add onions and Swiss cheese.

  3. In medium bowl, whisk the whipping cream, eggs, sugar, salt and cayenne pepper until combined. Pour over ingredients in pie shell (it will be full). Carefully give ingredients a stir, bringing some bacon, onion and cheese up to the surface.

  4. Carefully place quiche on middle rack of preheated oven. Bake at 425°F. for 15 minutes, turn the oven down to 300°F. and continue cooking it for 30 more minutes. It's done when the top is golden brown and knife inserted into the middle comes out clean. Transfer quiche to wire rack to cool (still in pan). Quiche will be puffy, from the hot air inside. The top of the quiche will "flatten" as air dissipates inside while quiche cools.

  5. After cooling 10-15 minutes, it's ready to slice. Quiche can be eaten hot, warm, cold, OR at room temperature, whichever way you prefer. Slice into 8 portions (or 6 if you want larger pieces), serve and enjoy! Cover leftovers well; can refrigerate for up to 4-5 days. Reheat quiche slices in microwave (to temp. you prefer).

Nutrition Facts
Quiche Lorraine
Amount Per Serving (1 slice *1/8 of total))
Calories 388 Calories from Fat 333
% Daily Value*
Fat 37g57%
Saturated Fat 20g125%
Trans Fat 1g
Cholesterol 201mg67%
Sodium 448mg19%
Potassium 144mg4%
Carbohydrates 4g1%
Fiber 1g4%
Sugar 1g1%
Protein 11g22%
Vitamin A 1143IU23%
Vitamin C 1mg1%
Calcium 162mg16%
Iron 1mg6%
* Percent Daily Values are based on a 2000 calorie diet.

Here’s one more to pin on your Pinterest boards!Quiche Lorraine is delicious for breakfast, lunch or dinner! Easy to make, and filled with bacon, eggs, and cheese... you're gonna love it!


Parmesan Garlic Potato Wedges

You’re gonna love these absolutely tender, delicious, Italian-seasoned Parmesan Garlic Potato Wedges. They’re easy to make, and baked to perfection.
You're gonna love these absolutely tender, delicious, Italian-seasoned Parmesan Garlic Potato Wedges. Easy to make, and baked to perfection.

Anyone out there love potatoes? We sure do! Whether they’re mashed, baked, grilled or fried, we love the humble potato. Today I want to share with you a wonderful way to season and bake potato wedges. I found the recipe online several years ago, and they’re delicious! These potatoes will compliment a variety of meat dishes, so they’re a wonderful choice for a simple, flavorful side dish.

The recipe is for Parmesan garlic potato wedges (using russet potatoes), and they are so EASY to prepare. This recipe will make enough for about 4-6 servings. The potato wedges are well-seasoned, and then they’re baked until soft and tender, and let me tell you… they taste GREAT! Here’s how to make them:

Scroll Down For A Printable Recipe Card At The Bottom Of The Page

Prepare The Potatoes For Baking

The first thing you need to do is preheat your oven to 375°F, and grease or spray a 9″x13″ baking sheet (set aside). Okay… now let’s get these potatoes ready for baking! Scrub the outside of the potatoes clean, but leave the peel on. Cut each potato in half lengthwise, then cut each half into 3 wedges. Try to keep the wedges about the same thickness in size, so they will all cook consistently in the same amount of time.

Place the potato wedges in a large bowl, and drizzle with olive oil. Toss them to coat with oil, then add grated Parmesan cheese, and toss again to coat the potatoes with cheese.

Unpeeled potatoes are sliced into wedges before baking.Potato wedges are drizzled with olive oil, and tossed to coat.Grated Parmesan cheese is added to, and tossed with the potato wedges.

Make The Seasoning Mix

Measure garlic powder, Italian seasoning and salt into a small bowl, then stir to combine. NOTE: If you want to make your own Italian seasoning, here is how I make mine. Sprinkle the seasoning mix over the potato wedges, tossing again to cover the potatoes with the spices.

A seasoning mix is made combining Italian seasoning, garlic powder and salt.Seasoning mix is tossed with the potato wedges to coat them in spices.

Time To Bake The Parmesan Garlic Potato Wedges

Hooray- now it’s time to bake these tasty spuds! Remember that greased baking sheet you set aside earlier? Yep… grab it, and place the seasoned potato wedges (peel side down) on it, in a single layer.

Bake the potatoes at 375°F. for between 25-35 minutes. Check for doneness at the 25 minute mark. They are ready when they can easily be pierced with a fork or knife (very tender), and are light golden brown in color.

The Parmesan garlic potato wedges are baked in a single layer, skin side down.

Time To Eat!

Once they have finished baking, they are ready to eat. Place the Parmesan Garlic Potato Wedges on a serving platter, and sprinkle them with chopped parsley or cilantro. You can also serve them with a dipping sauce if you want, but that is completely optional. We like them just the way they are, to be honest!

The potato wedges are so delicious… the Parmesan cheese and other spices give each bite incredible flavor! I’m confident you’ll enjoy this easy side dish that pairs especially well with chicken, beef or pork. YUM!

Parmesan garlic potato wedges are garnished with cilantro or parsley before serving.A close up of the spices on the baked Parmesan garlic potato wedges.

Thank you for visiting my blog, and appreciate the time you took to do so. I really hope you will have the opportunity to make these delicious potato wedges for yourself or those you love. Have a great day, and I trust you will come back soon for more recipes.

Looking For More POTATO Recipes?

You can find all of the recipes from my blog in the Recipe Index, which is located at the top of the page. I have several recipes featuring potatoes, including:

Interested In More Recipes?

Thank you for visiting this website. I appreciate you using some of your valuable time to do soIf you’re interested, I publish a newsletter 2 times per month (1st and 15th) with all the latest recipes, and other fun info. I would be honored to have you join our growing list of subscribers, so you never miss a great recipe!
There is a Newsletter subscription box on the top right side (or bottom) of each blog post, depending on the device you use, where you can easily submit your e-mail address (only) to be included in my mailing list.

You Can Also Find Me On Social Media:

Facebook page: The Grateful Girl Cooks!
Pinterest:
The Grateful Girl Cooks!
Instagram:
jbatthegratefulgirlcooks

Author's signature

Original recipe source: Tiffany, at http://www.lecremedelacrumb.com/baked-garlic-parmesan-potato-wedges/

0 from 0 votes
Parmesan Garlic Potato Wedges
Prep Time
10 mins
Cook Time
30 mins
Total Time
40 mins
 

You're gonna love these absolutely tender, delicious, Italian-seasoned Parmesan Garlic Potato Wedges. Easy to make, and baked to perfection.

Category: Appetizer, Side Dish, Vegetable Dish
Cuisine: American
Keyword: Parmesan garlic potato wedges
Servings: 6 (4 wedges per serving)
Calories Per Serving: 236 kcal
Author: JB @ The Grateful Girl Cooks!
Ingredients
  • 4 medium russet potatoes
  • 4 Tablespoons olive oil
  • ½ cup grated Parmesan cheese
  • 2 teaspoons Italian seasoning
  • 2 teaspoons salt
  • 2 teaspoons garlic powder
  • OPTIONAL: chopped parsley or cilantro for garnish
Instructions
  1. Preheat oven to 375°F, and grease/spray a 9"x13" baking sheet (set aside).

  2. Scrub outside of potatoes clean, but leave the peel ON. Slice each potato in half lengthwise, then cut each half into 3 long wedges. Try to keep wedges about the same thickness, so they cook consistently.

  3. Place potatoes in a large bowl. Drizzle with olive oil, and toss to coat them with oil. Add grated Parmesan cheese, and toss again. Measure garlic powder, Italian seasoning and salt into a small bowl; stir to combine. Sprinkle seasoning mix over potato wedges, tossing to cover potatoes with spices.

  4. Place potato wedges (peel side down) in a single layer on prepared baking sheet. Bake at 375°F. for 25-35 minutes. Check for doneness at 25 minute mark (cause oven temps can vary). Potatoes are ready when they can easily be pierced with a fork or knife (very tender), and are light golden brown in color. When done, remove from oven, and garnish with chopped parsley or cilantro, if desired. Serve, and enjoy!

Recipe Notes

NOTE: Suggestions for optional dipping sauces are ranch or bleu cheese dressing, if desired.

Nutrition Facts
Parmesan Garlic Potato Wedges
Amount Per Serving (1 (4 wedges))
Calories 236 Calories from Fat 108
% Daily Value*
Fat 12g18%
Saturated Fat 3g19%
Cholesterol 7mg2%
Sodium 911mg40%
Potassium 623mg18%
Carbohydrates 27g9%
Fiber 2g8%
Sugar 1g1%
Protein 6g12%
Vitamin A 85IU2%
Vitamin C 8mg10%
Calcium 123mg12%
Iron 2mg11%
* Percent Daily Values are based on a 2000 calorie diet.

Here’s one more to pin on your Pinterest boards!You're gonna love these absolutely tender, delicious, Italian-seasoned Parmesan Garlic Potato Wedges. Easy to make, and baked to perfection.