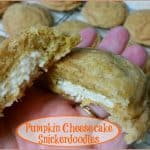
Category: Desserts

DIY – Mom’s Pie Crust!

Mom’s pie crust is a family favorite! Here’s a step-by-step tutorial on how to make a delicious, flaky pie crust from scratch in about 10 minutes!Mom's pie crust is a family favorite! Here's a step-by-step tutorial on how to make a delicious, flaky pie crust from scratch in about 10 minutes!
A few days ago I made a Dutch Crumb Apple Pie.  It dawned on me that I should post my “tried and true” pie crust recipe. This recipe came from my Mom over 40 years ago and I’ve been using it ever since! A good pie crust always makes a pie exceptional!

I actually think I can make a homemade, flaky pie crust in less time than it takes to drive to the grocery store, buy a pre-made one, then drive home, AND it’s a great pie crust!

Scroll Down For A Printable Recipe Card At The Bottom Of The Page

Mom’s Pie Crust Is My “Go To”!

This recipe has been used for all my pies, including Toll House Pie, Strawberry Rhubarb Pie, Old-Fashioned Banana Cream Pie, and my Dutch Crumb Apple Pie, as well as many other pies and tarts.  I’m posting pics of the way I make Mom’s pie crust, just in case you are remotely interested in SEEING the process.

Note: For 38 of the last 40 years, I mixed up the dough by using a hand held pastry blender (works great). My sister in law gave me her really old food processor a couple years ago, and now I use that (just an FYI-this crust can be made both ways!). Anyhow… here’s how I whip up a pie crust:

How To Make Mom’s Pie Crust

Measure the flour, salt, and shortening into a food processor. Pulse until shortening is about the size of peas. Drizzle ice cold water into the mixture, and process until fully combined. Note: This can ALL be done by hand with a pastry blender if you do not have a food processor.

Flour, salt, and shortening in a food processor to make pie crust dough.
Once fully combined, the dough will come together into a ball.  Gather all the little pieces up into the dough and shape this mixture into a nice, round ball.

Dough for Mom's pie crust comes together in a ball, once processed.

Time To Roll Out The Dough

Place the dough ball onto a lightly floured work surface. Roll it out to a large circle that is bigger than your pie plate.

Rolling out the dough larger than a pie pan.

Take the pie pan you will be using and invert it onto the dough. Cut around it with a knife, leaving an extra inch around the outside.

Cutting the pie crust out with a knife using an inverted pie pan for measuring.

If you want (this is optional), you can add leftover pieces of dough to spots where  pie crust has cracks around the outside edge   Press firmly to make sure dough bonds together.

Patches can be made to cracked pie dough.

Transfer Mom’s Pie Crust To Pan

Carefully fold the crust circle in half like this: Don’t worry if there are still a couple cracks in the outside edges, because they can all be patched.

Crust dough is folded in half for transferring to pan.

Gently lift up the dough and place it into your pie pan like this:

Dough is transferred to a pie pan, and then unfolded.

Carefully unfold the dough. Prick the dough on the bottom and the sides with the tines of a fork. Do this because it helps prevent the pie crust from puffing up while baking.

A fork is used to pierce the dough to keep it from puffing up while baking.

Fold any excess dough under the edges (towards the back – kind of doubling it up) and press the dough together firmly to form a bonded, thicker edge. This should be higher than the edge of your pie pan.

Dough in pan is ready to make the crust.

Time To “Crimp” The Crust

Now it’s time to “crimp the crust”. Use your non-dominant hand like this (shown below).  Use the thumb of your dominant hand to insert dough between your two fingers to form the crimped crust all the way around the pie. (sorry- I had to use my right hand to take the picture. Use your imagination for my huge right thumb).

Crimping the crust to shape it for the pie.

When you have gone around the entire edge of the pie, it should look like this:

Mom's pie crust is finished and ready for filling and then baking.
Fill With Your Favorite Pie Filling And Bake

Fill Mom’s pie crust with your pie filling of choice, and bake as directed. I’ve also used this crust for my Toll House Pie, Strawberry Pie, and Peach Pie, to name a few! 

**If you are making a pie that requires a top crust, hope you remembered to double this recipe. Lay the top crust over the pie filling, THEN fold the top edge over the bottom edge, and crimp the edges together to seal around the edges of pie, etc.. Remember to cut a couple slits in the top of the pie crust (if using a top crust) to “vent”**.

Strawberry pie is made, using this homemade pie crust recipe.

I know that’s a lot of pictures, but really… once you get the technique down, a homemade pie crust can be made from scratch in about 10 minutes! Hope you’ll give this one a try. I’ve used Mom’s Pie Crust recipe literally hundreds of times over the years, and have never been disappointed.

Thank you for stopping by today, and I hope you come back again soon. Be sure to check out ALL of my recipes in the Recipe Index, located at the top of the page. Have a great day.

Interested In More Recipes?

Thank you for visiting this website. I appreciate you using some of your valuable time to do soIf you’re interested, I publish a newsletter 2 times per month (1st and 15th) with all the latest recipes, and other fun info. I would be honored to have you join our growing list of subscribers, so you never miss a great recipe!
There is a Newsletter subscription box on the top right side (or bottom) of each blog post, depending on the device you use, where you can easily submit your e-mail address (only) to be included in my mailing list.

You Can Also Find Me On Social Media:

Facebook page: The Grateful Girl Cooks!
Pinterest:
The Grateful Girl Cooks!
Instagram:
jbatthegratefulgirlcooks

Have a GREAT day!

Author's signatureRecipe Source: My Mom

0 from 0 votes
DIY - Mom's Pie Crust!
Prep Time
10 mins
Cook Time
0 mins
Total Time
10 mins
 

Mom's pie crust is a family favorite! Here's a step-by-step tutorial on how to make a delicious, flaky pie crust from scratch in about 10 minutes!

Category: Dessert
Cuisine: American
Keyword: homemade pie crust, Mom's pie crust
Servings: 1 pie crust
Calories Per Serving: 1059 kcal
Author: JB @ The Grateful Girl Cooks!
Ingredients
For ONE pie crust:
  • 1 cup unsifted all purpose flour
  • 1/2 teaspoon salt
  • 1/3 cup vegetable shortening
  • 3-4 Tablespoons ice cold water
For TWO pie crusts:
  • 2 cups unsifted all purpose flour
  • 1 teaspoon salt
  • 2/3 cup vegetable shortening
  • 5-7 Tablespoons ice cold water
Instructions
  1. Place flour, salt and shortening in food processor (or large bowl, if mixing by hand). Cut in shortening: Pulse in food processor. Use a pastry blender (if mixing by hand).

  2. Drizzle in ice cold water. Mix/process until well combined and mixture can be formed into a ball. (Start with the least amount of water and add more, if necessary).
  3. Place dough ball onto lightly floured surface. Roll out dough. Cut to fit. Place crust into pie pan. Pierce pie dough with tines of fork on bottom and sides of dough in pan. Form crimped edge.
  4. Fill with pie filling of your choice. Bake, according to your favorite pie recipe's instructions.

Nutrition Facts
DIY - Mom's Pie Crust!
Amount Per Serving (1 crust)
Calories 1059 Calories from Fat 630
% Daily Value*
Fat 70g108%
Saturated Fat 17g106%
Sodium 1170mg51%
Potassium 134mg4%
Carbohydrates 95g32%
Fiber 3g13%
Sugar 1g1%
Protein 13g26%
Calcium 19mg2%
Iron 5.8mg32%
* Percent Daily Values are based on a 2000 calorie diet.

Here’s one more to pin on your Pinterest boards!Mom's pie crust is a family favorite! Here's a step-by-step tutorial on how to make a delicious, flaky pie crust from scratch in about 10 minutes!


Save

Save

Spring Flower Sugar Cookies

Celebrate the season with this easy recipe for absolutely delicious Spring Flower Sugar Cookies, decorated with Royal Icing.Celebrate the season with this easy recipe for absolutely delicious Spring Flower Sugar Cookies, decorated with Royal Icing.

Springtime in the Pacific Northwest means flowers blooming everywhere… what a wonderful re-awakening, after a cold, barren Winter! What better way to celebrate the beginning of this new season than these delicious, frosted Spring Flower Sugar Cookies!

I’ve never been a great cookie decorator, but am trying to learn more tips and tricks necessary to make pretty cut-out sugar cookies. I’ve made Fall and Christmas decorated cookies since that time, using this same recipe. They’re always great!

Scroll Down for a Printable Recipe Card At The Bottom Of The Page

These Cookies Are Great To Take To A Party

I made these cookies last year for an Easter potluck we were invited to. They were a big hit! As you can see in the photo below, I also made Lemon Curd Filled Won Ton Cups, Chocolate Dream Cups with Raspberry Mousse, and Chocolate Chip Cheesecake-Swirl Brownie Bites!

Spring flower sugar cookies on table with other Easter desserts,

I found the recipe for the cookies and icing on a website called Glorious Treats. The website has lots of tips (and good info. for people who want to learn “how” to decorate cookies), including the recipe for these cookies and icing.

These spring flower sugar cookies are absolutely delicious, especially when cut into pretty designs and decorated with Royal Icing!  The cookies are very easy to prepare… you can use ANY cookie cutter you have available to create your very own masterpieces!

For me the hardest part was learning “how” to outline the cookies, then flooding them with different colors. It takes a steady hand and practice (and believe me… I am a work in progress!) All in all, I was pleased with how these decorated cookies (one of my first attempts) turned out.

How To Make Spring Flower Sugar Cookies

First, stir the flour and baking powder together in a bowl and set aside. EASY.

Flour and baking soda in bowl, for dough to make Spring flower sugar cookies.
Beat the butter and sugar together for a few minutes (using an electric mixer), until mixture is thoroughly creamed and fluffy. Add the egg and vanilla, and beat again. Once blended, the flour mixture is added to the batter. The dough is then mixed until all ingredients have been incorporated.

Butter in mixer with sugar, used to make dough for Spring flower sugar cookies.
Once the dough is done, it is kneaded, then refrigerated for 2 hours to get really cold!

The dough for Spring flower sugar cookies is resting on parchment paper.
Rolling And Cutting Spring Flower Sugar Cookies

The dough for the Spring flower sugar cookies is placed onto a lightly floured work surface and rolled out to about a 1/3 inch thickness.

Dough for the Spring flower sugar cookies is rolled out before cutting.
Use a cookie cutter to cut out the shapes you desire. I used the flower cookie cutter shown below, but you can use any flower shaped cookie cutter you wish.

Place the cut out cookie dough onto lined baking sheets, then refrigerate for a few minutes. This quick refrigeration will help the Spring flower sugar cookies hold their shape while cooking. Once chilled, bake the cookies for for 8-10 minutes, but do not let them get browned.

Flower shaped cookie cutter used to cut dough for Spring flower sugar cookies.

Make The Royal Icing For The Spring Flower Sugar Cookies

While the cookies were baking, I prepared the royal icing. To make this icing, beat meringue powder, powdered sugar and warm water until stiff peaks formed. This is the meringue powder I used for the icing. I bought it at a local craft store (Michael’s). A lot of grocery stores carry this product, as well.

Meringue powder used for icing to decorate Spring flower sugar cookies.
Once the icing was the right consistency, I divided it out into bowls, then added food coloring (I used gel food coloring), until it was the color I wanted.

Yellow and green royal icing in bowls, to decorate Spring flower sugar cookies.

Decorating Spring Flower Sugar Cookies

I used a thicker consistency icing to pipe (using a pastry bag) the edges on the flowers like shown in the photo below. The icing has to be thick enough not to run, because it will be the “barrier” that holds the thinner icing that will fill the flowers later.

Yellow Royal icing is piped on edges of Spring flower sugar cookies on rack.
Let the icing dry (about 30 minutes), then thin the icing out a bit more. A teensy drop of red coloring was added to turn the icing slightly darker yellow (toward orange color). This thinner consistency icing was “flooded” in between all the thicker outlines (I used a toothpick to help fill in all the nooks and crannies) like shown in the photo below:

Light orange icing added to the Spring flower sugar cookies.
The cookies were set aside to let the icing dry. Once dry, I added the green center portion right in the middle of the flower cookie, then let that dry, also.

Green icing added to center of one of the Spring flower sugar cookies.
Time To Eat Spring Flower Sugar Cookies

Once all the cookies were dry (the icing will get hard after a couple hours-that is a good thing!), the cookies are ready to eat. Trust me- these cookies are GOOD!

Decorated Spring Flower Sugar cookies, on wire rack.
Wouldn’t a basket of sweet Spring Flower Sugar Cookies brighten someone’s day?

Basket of Spring flower sugar cookies.

I hope you will try making these delicious Spring flower sugar cookies. Enjoy using your own cookie cutters and imagination to create wonderful cookies for any celebration! Have a GREAT day!

Looking For More COOKIE Recipes?

You can find all of my recipes in the Recipe Index, located at the top of the page. A few favorite cookie recipes include:

Interested In More Recipes?

Thank you for visiting this website. I appreciate you using some of your valuable time to do soIf you’re interested, I publish a newsletter 2 times per month (1st and 15th) with all the latest recipes, and other fun info. I would be honored to have you join our growing list of subscribers, so you never miss a great recipe! 

There is a Newsletter subscription box on the top right side (or bottom) of each blog post, depending on the device you use, where you can easily submit your e-mail address (only) to be included in my mailing list.

You Can Also Find Me On Social Media:

Facebook page: The Grateful Girl Cooks!
Pinterest:
The Grateful Girl Cooks!
Instagram:
jbatthegratefulgirlcooks

Author's signatureRecipe Source for Cookies: http://www.glorioustreats.com/2010/03/making-sugar-cookies-recipe-and-tips.html
Recipe Source for Royal Icing: http://www.glorioustreats.com/2010/10/decorating-sugar-cookies-from-start-to-finish-part-2.html

0 from 0 votes
Spring Flower Sugar Cookies
Prep Time
2 hrs 30 mins
Cook Time
8 mins
Total Time
2 hrs 38 mins
 

Celebrate the season with this easy recipe for delicious Spring Flower Sugar Cookies, decorated with Royal Icing.

Category: Cookies
Cuisine: American
Keyword: spring flower sugar cookies
Servings: 30 - 2 1/2 inch cookies)
Calories Per Serving: 190 kcal
Author: JB @ The Grateful Girl Cooks!
Ingredients
For cookie dough:
  • 3 cups all purpose flour
  • 1 teaspoon baking powder
  • 1 cup (2 cubes) unsalted butter (at room temperature)
  • 1 cup granulated sugar
  • 1 large egg
  • 1 teaspoon vanilla extract
  • Parchment paper
For the Royal Icing:
  • 4 Tablespoons meringue powder
  • 4 cups powdered sugar
  • 6 Tablespoons warm water
  • Food coloring , as desired
Instructions
To make cookies:
  1. Stir flour and baking powder together in bowl, then set aside.
  2. Using an electric mixer, cream the butter and sugar together for about 3 minutes. Add the egg and vanilla extract; continue to beat for an additional minute.
  3. Slowly add the flour mixture (a bit at a time) to the butter mixture; mix this until all the flour is mixed in, and the dough begins to form ball and pull away from the side of the bowl.
  4. Remove dough ball from mixer bowl and put it on parchment paper. Knead the dough with your hands 3-4 times. Put the dough into a sealed bag or container; refrigerate it for 2 hours (or into freezer for 25 minutes)
  5. A few minutes before you get the chilled dough out of refrigerator, preheat your oven to 350 degrees.
  6. Remove HALF of the dough (let the rest stay in fridge). Put dough on lightly floured work surface. Roll dough out to 1/3 inch thickness.
  7. Cut the dough out with your favorite cookie cutters. Place cookies on prepared baking sheet (I bake these on parchment paper). Try to get same-sized cookie shapes on each sheet to ensure even cooking. Put the baking sheet (with cookies) into refrigerator for 3-5 minutes (this will help them keep their shape).
  8. Bake cookies at 350 degrees for 8-10 minutes. Bake just until they just start to look golden. Remove from oven; let cookies cool for a minute or two on the pan, then carefully remove to a wire rack to finish cooling. Once the cookies are totally cooled, they can be decorated.
For the royal icing:
  1. Measure meringue powder and powdered sugar into mixing bowl. Add 6 Tablespoons warm water. Beat until stiff peaks form. Divide icing out into bowls; add food coloring, as desired. Add additional water (1 teaspoon at a time) until you get the right consistency.
  2. FOR OUTLINING/EDGING: thin with warm water until icing reaches a "corn syrup" thickness (or slightly thicker). Pipe the icing around the border of your design. Let icing dry (half an hour) before flooding the inside of the outlined area.
  3. FOR FLOODING INSIDE THE OUTLINE: Add additional water to thin icing out. Pipe icing inside outline borders. It should slowly thin out inside border. Use a toothpick to help fill in the space.
  4. Let icing completely dry before serving (let dry several hours!). ENJOY!
Recipe Notes

Cookie baking times may vary slightly, depending on the size of the cookie.
This recipe makes approximately 30, 2 1/2 inch cookies or 16 3 1/2 inch cookies.
FYI-The prep time is the time necessary to make the cookies. It does not include decorating time. Sometimes I bake the cookies one day and decorate the next.

Nutrition Facts
Spring Flower Sugar Cookies
Amount Per Serving (1 cookie)
Calories 190 Calories from Fat 54
% Daily Value*
Fat 6g9%
Saturated Fat 3g19%
Cholesterol 21mg7%
Sodium 3mg0%
Potassium 30mg1%
Carbohydrates 32g11%
Sugar 22g24%
Protein 1g2%
Vitamin A 195IU4%
Calcium 10mg1%
Iron 0.6mg3%
* Percent Daily Values are based on a 2000 calorie diet.

Here’s one more to pin on your Pinterest boards!Celebrate the season with this easy recipe for delicious Spring Flower Sugar Cookies, decorated with Royal Icing.


Save

Save

Save

Save

Hummingbird Cake

This easy to prepare hummingbird cake is perfect for breakfast, brunch or dessert. With pineapple, bananas, nuts, and coconut, it’s a moist, delicious treat!Hummingbird Cake / The Grateful Girl Cooks!

If you’re looking for a completely easy to prepare and delicious “cake” to serve at your upcoming Easter brunch, or just looking for a new dessert recipe…then I have the recipe for YOU! This Hummingbird Cake can easily double as a coffeecake OR as a dessert cake!

I have been making this cake for over 30 years. Many many years ago I wrote the recipe down on a 3×5 card, but didn’t write down WHERE I found the original recipe (oops).

Scroll Down for A Printable Recipe Card At The Bottom Of The Page

*PUBLIC SERVICE ANNOUNCEMENT:

No hummingbirds were harmed in the making of this cake. Just in case you were wondering! Don’t even have a single clue why it is called a hummingbird cake.

That said… hummingbird cake is a wonderful, moist cake, filled with pineapple, bananas, coconut and nuts. Not too sweet… it’s just right! It’s a perfect cake for grabbing a slice to eat for breakfast, afternoon tea, OR dessert! It’s so good by itself that it doesn’t even need frosting!

Hummingbird Cake Is EASY To Make!

The recipe is simple! If you can stir, then you can make this. It can be made in ONE BOWL, and the only requirement is that you mix the ingredients by hand! Super easy to make, and absolutely delicious! Hummingbird cake would be a perfect dish to fix for any holiday brunch or get together, AND it can feed a small village. The hummingbird cake yields 12-15 servings, depending on thickness of slices.

How To Make Hummingbird Cake

Mix together the oil, sugar, eggs and vanilla in a large bowl. This is a thick batter, so there’s no need to get out an electric mixer. Just stir! Hummingbird cake has a thick batter, but it’s easy to mix up.

Oil and eggs mixed in bowl, for hummingbird cake
Now sift in the dry ingredients (flour, cinnamon, baking soda and salt). Stir well to combine.

Flour and spices sifted into bowl
The batter will be very thick (that’s why you stir the batter), and will look like this:

Thick Batter for cake, in bowl
Drain the crushed pineapple, and chop the bananas and nuts. Add them, along with flaked coconut to the cake batter. Thoroughly mix all the ingredients together.

Pineapple, coconut, nuts and banana added to cake batter
Time To Bake The Cake

Grease and flour a standard sized bundt pan very well. Spoon the cake batter into the bundt pan, then level the batter around the pan. Bake the cake in a preheated 300°F oven for 90 minutes. Once the hummingbird cake is done, let the cake cool (in the pan) for about 10 minutes.

Hummingbird cake batter in bundt pan, ready to bake
To Remove Hummingbird Cake From Pan

Carefully invert the cake onto a serving plate. Put the serving plate on top of the bundt pan. Hold both the serving plate and the bundt pan securely together, using both hands. Carefully flip cake over. The hummingbird cake should remove easily from pan, if you greased and floured your pan well before baking. It should look like this, once removed from bundt pan:

Baked cake on serving platter
Make The Glaze

The hummingbird cake is perfect for serving just like this! However… if you want it to LOOK prettier, let the cake cool completely. Make a simple glaze for the cake while it cools. Mix together the powdered sugar, vanilla and water in a small bowl, until you have a glaze. You can drizzle the glaze decoratively over the top of the cake, shown in the photo below.

Finished hummingbird cake with decorative icing
There you have it… Hummingbird Cake!  Let the cake cool completely and then slice a piece. The cake is perfect for a breakfast, brunch, dessert, snack, or ANY time, for that matter!

Hummingbird Cake on platter, with Easter bunny behind it
Time to EAT!

The hummingbird cake is moist, and filled with flavor, without a lot of hard work. How perfect is that?

Close up look at inside of cake
Pour yourself a cup of coffee or tea, slice a piece of this delicious hummingbird cake. I hope you love it.

One slice of hummingbird cake on a plate

Hope you have a wonderful day! I trust you will enjoy this delicious recipe, and share it with those you love. Enjoy!

Looking for More COFFEECAKE Recipes?

You can find ALL my recipes in the Recipe Index, located at the top of the page. If you enjoy coffeecakes like we do, be sure and check out my other recipes, including:

Interested In More Recipes?

Thank you for visiting this website. I appreciate you using some of your valuable time to do soIf you’re interested, I publish a newsletter 2 times per month (1st and 15th) with all the latest recipes, and other fun info. I would be honored to have you join our growing list of subscribers, so you never miss a great recipe!
There is a Newsletter subscription box on the top right side (or bottom) of each blog post, depending on the device you use, where you can easily submit your e-mail address (only) to be included in my mailing list.

You Can Also Find Me On Social Media:

Facebook page: The Grateful Girl Cooks!
Pinterest:
The Grateful Girl Cooks!
Instagram:
jbatthegratefulgirlcooks

Author's signatureOriginal Recipe Source: Unknown (had the recipe on 3×5 card for over 30 years)

0 from 0 votes
Hummingbird Cake
Prep Time
15 mins
Cook Time
1 hr 30 mins
Total Time
1 hr 45 mins
 

This easy to prepare hummingbird cake is perfect for breakfast, brunch or dessert. With pineapple, bananas, nuts, and coconut, it's a moist, delicious treat!

Category: Breakfast, Brunch, Dessert or Coffeecake
Cuisine: American
Keyword: hummingbird cake
Servings: 12 servings
Calories Per Serving: 448 kcal
Author: JB @ The Grateful Girl Cooks!
Ingredients
For cake:
  • 1 1/2 cups vegetable oil
  • 2 eggs
  • 2 cups granulated sugar
  • 1 teaspoon vanilla extract
  • 3 cups all purpose flour
  • 1 teaspoon cinnamon
  • 1 teaspoon baking soda
  • 1/2 teaspoon salt
  • 1 (8 ounce) can crushed pineapple (drained)
  • 1 cup chopped pecans or walnuts
  • 2 bananas , chopped
  • 1/2 cup shredded coconut
For glaze:
  • 1 1/2 cups powdered sugar
  • 1/2 teaspoon vanilla extract
  • water (add a few drops at a time until glaze is "drizzle-able)
Instructions
  1. Preheat oven to 300 degrees. NOTE: Mix all ingredients for this recipe by hand, because this is a very THICK batter.

  2. In a large bowl, mix the oil, sugar, eggs, and vanilla, until combined.

  3. Sift the dry ingredients (flour, cinnamon, baking soda and salt) into the mixing bowl with the oil/sugar mixture. Stir well, to thoroughly combine. Add drained crushed pineapple, chopped bananas (small chunks), nuts, and coconut. Stir well until all ingredients are fully incorporated into batter.

  4. Generously grease and flour a large bundt pan. Spoon in the batter, making sure to level off the batter around the pan. Bake at 300 degrees for 90 minutes. Remove cake pan to a wire rack to cool for 10 minutes. Carefully invert the cake onto serving platter. Let cool.

  5. Prepare glaze by mixing the powdered sugar and vanilla in a small bowl. Add a few drops of water at a time, stirring until glaze is "drizzle-able". Drizzle the glaze decoratively over the top of the cake. Let glaze firm up, then serve cake at room temperature. Enjoy!

Recipe Notes

The cake only takes about 15 minutes active time to prepare and get into the oven. The rest of the baking time is inactive time. Go do something fun!

Nutrition Facts
Hummingbird Cake
Amount Per Serving (1 slice)
Calories 448 Calories from Fat 99
% Daily Value*
Fat 11g17%
Saturated Fat 4g25%
Cholesterol 27mg9%
Sodium 210mg9%
Potassium 193mg6%
Carbohydrates 82g27%
Fiber 2g8%
Sugar 55g61%
Protein 6g12%
Vitamin A 60IU1%
Vitamin C 3.6mg4%
Calcium 24mg2%
Iron 2.1mg12%
* Percent Daily Values are based on a 2000 calorie diet.

Here’s one more to pin on your Pinterest boards!This easy to prepare hummingbird cake is perfect for breakfast, brunch or dessert. With pineapple, bananas, nuts, and coconut, it's a moist, delicious treat!


Save

Save

Save

Save

Jumbo Chocolate Chip Banana Muffins

Make 6 jumbo chocolate chip banana muffins (or 12 standard sized)! You’ll enjoy these yummy muffins, topped with chocolate chips, graham cracker crumbs & vanilla glaze.Make 6 jumbo chocolate chip banana muffins (or 12 standard sized)! Yummy muffins, topped with chocolate chips, graham cracker crumbs & vanilla glaze.
Spring is on the way… it’s wonderful seeing changes in the landscape around our neighborhood. Leaves are beginning to unfurl on the trees, daffodils and crocuses are blooming everywhere, and the weather has been truly amazing. What a blessing!

We’ve enjoyed a bit warmer Winter here in northwest Oregon than we’re used to. As a result, nature is “springing to life” a bit earlier than normal. It’s amazing what other parts of our country have been dealing with, weather-wise this Winter. I made these Jumbo Chocolate Chip Banana Muffins last week for breakfast. A delicious muffin AND a couple cups of strong coffee and, you guessed it – we were “springing to life”.

Scroll Down For A Printable Recipe Card At The Bottom Of The Page

Making Jumbo Chocolate Chip Banana Muffins

I used a basic recipe for the muffins from a Banana Crumb Muffin recipe I posted last September. Some tweaks of the recipe were made, by adding chocolate chips to the batter, and graham cracker crumbs to the top, along with a few more chocolate chips! After baking, the muffins are drizzled with a simple glaze.

To make them LARGE in size, the muffins are baked in a jumbo sized muffin pan (only holds 6 muffins). However, the recipe can be easily adapted to make in a standard (12 servings) muffin tin. The muffins are easy to make, and the finished chocolate chip banana muffins are truly delicious!

Prepare The Batter

It’s quite easy to make the batter. Mix the flour, baking soda, powder and salt together in a large mixing bowl. Beat the bananas, sugar, egg and melted butter in a separate bowl. The two bowls of ingredients are then combined to make the muffin batter, and the chocolate chips are stirred in.

The batter is ready to put into muffin cups for baking.

Fill The Muffin Tins

Spoon the batter for the chocolate chip banana muffins into a lightly sprayed muffin tin. Add enough batter until the muffin cups are slightly over 1/2 full.

Muffin cups are filled with the batter.
Sprinkle the top of each muffin with crushed graham cracker crumbs, followed by a few more chocolate chips.

Chocolate chips and graham cracker crumbs are placed on top of the batter before baking.

Time To Bake The Chocolate Chip Banana Muffins!

Now the muffins are ready to bake! Bake six jumbo sized muffins for about 30-35 minutes, or until a toothpick inserted into the middle of a muffin comes out clean. Remove muffins to wire rack to cool.

If you are making twelve standard sized muffins, remember to reduce the cooking time to between 18-20 minutes, or until a toothpick inserted into the middle of a muffin comes out clean. Remove muffins to a wire rack to cool.

After baking, the chocolate chip banana muffins cool on a wire rack before glazing.

Make The Glaze For The Chocolate Chip Banana Muffins

Mix up the powdered sugar/vanilla/lemon glaze in a small bowl. Once the chocolate chip banana muffins have cooled, drizzle the glaze over the tops of the muffins. Let the icing firm up before serving. TIP: Place a piece of wax paper UNDER the wire rack before glazing the muffins. This will make your cleanup much easier!

Muffins are drizzled with vanilla glaze after baking.Once the icing has firmed up, you can enjoy one of these muffins! Hope you enjoy making and eating these jumbo chocolate chip banana muffins. We sure did!

A chocolate chip banana muffin, sliced in half, on a plate.

Hope you enjoy these delicious muffins for breakfast or a quick snack! If you’re looking for more muffin recipes, be sure to check out my Recipe Index, located at the top of the page. Have a GREAT day!

Looking For More MUFFIN Recipes?

You can find all my recipes in the Recipe Index, located at the top of the page. I have lots of delicious muffin recipes for you to check out, including:

Interested In More Recipes?

Thank you for visiting this website. I appreciate you using some of your valuable time to do soIf you’re interested, I publish a newsletter 2 times per month (1st and 15th) with all the latest recipes, and other fun info. I would be honored to have you join our growing list of subscribers, so you never miss a great recipe!
There is a Newsletter subscription box on the top right side (or bottom) of each blog post, depending on the device you use, where you can easily submit your e-mail address (only) to be included in my mailing list.

You Can Also Find Me On Social Media:
Facebook page: The Grateful Girl Cooks!
Pinterest: The Grateful Girl Cooks!
Instagram: jbatthegratefulgirlcooks

Author's signatureRecipe Adapted from:  http://thecafesucrefarine.com/2011/04/banana-crumb-muffins/

0 from 0 votes
Jumbo Chocolate Chip-Banana Muffins
Prep Time
15 mins
Cook Time
30 mins
Total Time
45 mins
 

Make 6 jumbo chocolate chip banana muffins (or 12 standard sized)! Yummy muffins, topped with chocolate chips, graham cracker crumbs & vanilla glaze.

Category: Breakfast
Cuisine: American
Keyword: chocolate chip banana muffins
Servings: 6 large or 12 regular
Calories Per Serving: 614 kcal
Author: JB @ The Grateful Girl Cooks!
Ingredients
For the muffins:
  • 1 1/2 cups all purpose flour
  • 1 teaspoon baking soda
  • 1 teaspoon baking powder
  • 1/2 teaspoon salt
  • 3 very ripe bananas , mashed
  • 3/4 cup granulated sugar
  • 1 egg , slightly beaten
  • 1/3 cup butter , melted
  • 1 cup chocolate chips (I used semi-sweet)
  • 1/3 cup finely crushed graham crackers
For the glaze:
  • 1 cup powdered sugar
  • 1/4 teaspoon vanilla extract
  • few drops of fresh lemon juice (plus more, if necessary to thin glaze)
Instructions
  1. Preheat oven to 375 degrees. Lightly spray muffin tin with non-stick spray OR line muffin tin with paper muffin wrappers.
  2. In a large bowl, mix the flour, baking soda, baking powder, and salt together. Set aside.
  3. In a separate bowl, beat the bananas, sugar, egg, and melted butter together until smooth. Add the banana mixture to the flour mixture. Stir to combine only until batter is well combined and moist. Gently stir in chocolate chips. Be careful not to over-mix. Spoon the batter into prepared muffin cups. Fill slightly over 1/2 full.
  4. Finely crush the graham crackers in a plastic zip-loc bag. I use a rolling pin to do this. Sprinkle the tops of the muffins with the crumbs. Add a few more chocolate chips to the top of the muffins, and slightly press them down into the batter.
  5. Bake at 375 degrees for approximately 30-35 minutes (oven temps vary). You will know they are done when a toothpick inserted into middle of muffin comes out dry. Remove muffins to a wire rack to cool.
  6. Mix up the glaze while the muffins are cooling. Stir well. If mixture is too thick, add additional drops of lemon juice (or water) to thin it out. You want the glaze to not be runny, but thick enough to drizzle. If you get it too thin, just add additional powdered sugar. Once the muffins have cooled off, drizzle the glaze over the tops of the muffins. Let them sit for a few more minutes so the glaze can firm up, then serve. Enjoy!
Recipe Notes

If making these in a regular (12 serving) muffin tin, remember to reduce the cooking time! About 18-20 minutes should be about the right cooking time for smaller muffins.

Caloric calculation made based on a LARGE muffin.

Nutrition Facts
Jumbo Chocolate Chip-Banana Muffins
Amount Per Serving (1 LARGE muffin)
Calories 614 Calories from Fat 162
% Daily Value*
Fat 18g28%
Saturated Fat 11g69%
Cholesterol 58mg19%
Sodium 532mg23%
Potassium 330mg9%
Carbohydrates 107g36%
Fiber 3g13%
Sugar 71g79%
Protein 6g12%
Vitamin A 460IU9%
Vitamin C 5.5mg7%
Calcium 82mg8%
Iron 2.4mg13%
* Percent Daily Values are based on a 2000 calorie diet.

Here’s one more to pin on your Pinterest boards!Make 6 jumbo chocolate chip banana muffins (or 12 standard sized)! Yummy muffins, topped with chocolate chips, graham cracker crumbs & vanilla glaze.


Save

Save

Chocolate Peanut Butter Ice Cream

Grab the ol’ ice cream maker and enjoy a scoop of this delicious, cold and creamy chocolate peanut butter ice cream! You’re gonna love it!Grab the ol' ice cream maker and enjoy a scoop of this delicious, cold and creamy chocolate peanut butter ice cream! You're gonna love it!
Chocolate peanut butter ice cream is such a great flavor combo!  I tried to capture that “yummi-ness” one summer while experimenting with homemade ice cream flavors, and tasting them, too!. Somebody has to do it, right?

Scroll Down For A Printable Recipe Card At The Bottom Of The Page

Making Chocolate Peanut Butter Ice Cream Is Easy!

I took a basic chocolate ice cream recipe from the book that came with our ice cream maker, and incorporated some creamy peanut butter into the mix. The result was really wonderful.  Making this ice cream is really a no brainer, if I’m being truthful.

I added some peanut butter to the ice cream mixture, poured it into my ice cream maker. About 5 minutes before it was done freezing, I added more peanut butter (in small bits) to the ice cream. By adding bits of peanut butter to the mostly finished ice cream, it allowed for it to be spread throughout the ice cream.  Easy-Peasy!

My trusty old machine used to make chocolate peanut butter ice cream.

The end result was a wonderful taste treat on a hot, summer’s day! And surprise, surprise! This chocolate peanut butter ice cream is even good in Winter, Spring, and Fall!

Hope you will consider giving this recipe a try! If you like ice cream, AND you like chocolate and peanut butter. I am confident you will enjoy it!

Looking For More ICE CREAM Recipes?

A collage of ice cream photos from my blog recipes.

You can find all of my recipes in the Recipe Index, located at the top of the page. A few favorite ice cream recipes include:

Interested In More Recipes?

Thank you for visiting this website. I appreciate you using some of your valuable time to do soIf you’re interested, I publish a newsletter 2 times per month (1st and 15th) with all the latest recipes, and other fun info. I would be honored to have you join our growing list of subscribers, so you never miss a great recipe!
There is a Newsletter subscription box on the top right side (or bottom) of each blog post, depending on the device you use, where you can easily submit your e-mail address (only) to be included in my mailing list.

You Can Also Find Me On Social Media:

Facebook page: The Grateful Girl Cooks!
Pinterest:
The Grateful Girl Cooks!
Instagram:
jbatthegratefulgirlcooks

Author's signatureRecipe slightly adapted from: Cuisinart Automatic Frozen Yogurt-Ice Cream & Sorbet Maker Instruction and Recipe Booklet, page 4

3 from 1 vote
Chocolate Peanut Butter Ice Cream
Prep Time
1 hr 30 mins
Cook Time
0 mins
Total Time
1 hr 30 mins
 

Grab the ol' ice cream maker and enjoy a scoop of this delicious, cold and creamy chocolate peanut butter ice cream! You're gonna love it!

Category: Dessert
Cuisine: American
Keyword: chocolate peanut butter ice cream
Servings: 12 (1/2 cup) servings
Calories Per Serving: 315 kcal
Author: JB @ The Grateful Girl Cooks!
Ingredients
  • 1 cup whole milk
  • 1/2 cup granulated sugar
  • 8 ounces semi-sweet chocolate chips
  • 2 Tablespoons peanut butter
  • 2 cups heavy whipping cream (very COLD)
  • 1 teaspoon vanilla extract
  • 1 heaping Tablespoon peanut butter (added in bits right before ice cream is finished)
Instructions
  1. In a small saucepan, heat the milk until it has begun to bubble around the edges of the pan (but not a full rolling boil). You want it hot, but not boiling.
  2. Using a food processor or blender, pulse the granulated sugar and chocolate pieces together, until the chocolate is finely chopped up. Add the 2 Tablespoons of peanut butter, then add the hot milk.
  3. Process until the mixture is well blended, and the mixture is fairly smooth.
  4. Pour the mixture into a large bowl, and let it cool COMPLETELY. Once mixture is cool, stir in the whipping cream and the vanilla extract. Cover ice cream mixture with plastic wrap and put into the refrigerator for at least an hour (the longer time, the better- you want it cold).
  5. When thoroughly chilled, remove mixture from refrigerator. Turn on the ice cream maker, and pour the cold ice cream mixture into the canister. Freezer per manufacturer's instructions (usually about 25 minutes). About 5 minutes BEFORE the ice cream is done, add the final heaping Tablespoon of peanut butter, (in small amounts at a time), to the ice cream.
  6. When ice cream is done, and has thickened, transfer to a covered container and place in freezer for an hour or two to firm up and "ripen".
Recipe Notes

Note that most of the "prep" time is inactive time, while mixture is refrigerating or firming up in freezer. I found it easiest to make up the ice cream and refrigerate it early in the day. I then made the ice cream right before dinner, then it was "ready and firmed up" for dessert a couple hours later!

Nutrition Facts
Chocolate Peanut Butter Ice Cream
Amount Per Serving (1 serving (1/2 cup))
Calories 315 Calories from Fat 216
% Daily Value*
Fat 24g37%
Saturated Fat 14g88%
Cholesterol 57mg19%
Sodium 44mg2%
Potassium 189mg5%
Carbohydrates 21g7%
Fiber 1g4%
Sugar 16g18%
Protein 3g6%
Vitamin A 625IU13%
Vitamin C 0.2mg0%
Calcium 62mg6%
Iron 1.3mg7%
* Percent Daily Values are based on a 2000 calorie diet.

Here’s one more to pin on your Pinterest boards!Grab the ol' ice cream maker and enjoy a scoop of this delicious, cold and creamy chocolate peanut butter ice cream! You're gonna love it!


Save

Save

Save

Oatmeal Raisin Cookies

This traditional recipe for soft, chewy Oatmeal Raisin Cookies is easy to prepare. The cookies are absolutely delicious, and the recipe makes 4 dozen. You’re gonna LOVE ’em!This traditional recipe for soft, chewy Oatmeal Raisin Cookies is easy to prepare. The cookies are absolutely delicious, and the recipe makes 4 dozen.
I love good old-fashioned Oatmeal Raisin Cookies. Do you? In the past couple years I’ve realized that I don’t make as many cookies as I used to when our sons were young and living in our home.

All that said… every now and then, a delicious cookie is a perfect little munchie my husband and I love to snack on! Sometimes we go a little crazy and eat 2 or 3! Ha Ha!

These classic oatmeal raisin cookies are a cinch to make, and I’m confident you’ll enjoy them, too!

Scroll down For A Printable Recipe Card At The Bottom Of The Page

Yummy Old-Fashioned Oatmeal Raisin Cookies

These Oatmeal Raisin Cookies are some of my favorites. I’ve seen a lot of “updated” recipes over the years for this simple cookie. Some versions use egg whites, applesauce, bananas, artificial sugar or agave, etc..

Those new variations may be absolutely delicious, but I find we still like the old-fashioned version for these oatmeal raisin cookies the best!

I started making oatmeal raisin cookies over 30 years ago when I tried a recipe that was printed on a container of oatmeal. The real stars of this show are the old fashioned oats and chewy raisins! They were an instant family favorite!

I’ve been using the same old recipe I wrote down on a 3×5 card ever since then (and that’s a long time!). It is definitely tried and true!

The stars of this cookie recipe: old fashioned oats and raisins!

How Many Oatmeal Raisin Cookies Will this Recipe Make?

The recipe is very simple to make, and will yield about 4 dozen of these delicious oatmeal raisin cookies. They’re golden-brown, chewy, and taste wonderful.

I hope you enjoy these oatmeal raisin cookies as much as I do, too! They’re a tasty snack that are sure to please almost everyone.

Oatmeal raisin cookies on wire rack, ready to eat!

Looking For More Cookie Recipes?

If you like these oatmeal raisin cookies, perhaps you would be interested in some of my other cookie recipes! Hint… I have a lot. Can you tell we love cookies?

You can find ALL of my recipes in the Recipe Index, which is located at the top of the page. I have quite a few delicious cookie recipes for you to check out, including:

Interested In More Recipes?

Thank you for visiting this website. I appreciate you using some of your valuable time to do soIf you’re interested, I publish a newsletter 2 times per month (1st and 15th) with all the latest recipes, and other fun info. I would be honored to have you join our growing list of subscribers, so you never miss a great recipe!
There is a Newsletter subscription box on the top right side (or bottom) of each blog post, depending on the device you use, where you can easily submit your e-mail address (only) to be included in my mailing list.

You Can Also Find Me On Social Media:

Facebook page: The Grateful Girl Cooks!
Pinterest:
The Grateful Girl Cooks!
Instagram:
jbatthegratefulgirlcooks

Author's signature

0 from 0 votes
Oatmeal Raisin Cookies
Prep Time
15 mins
Cook Time
8 mins
Total Time
23 mins
 
This traditional recipe for soft, chewy Oatmeal Raisin Cookies is easy to prepare. The cookies are absolutely delicious, and the recipe makes 4 dozen.
Category: Cookies
Cuisine: American
Keyword: oatmeal raisin cookies
Servings: 48 cookies (approx.)
Calories Per Serving: 95 kcal
Author: JB @ The Grateful Girl Cooks!
Ingredients
  • 14 Tablespoons butter (1 cube + 6 Tablespoons) , softened
  • 3/4 cup brown sugar , packed
  • 1/2 cup granulated sugar
  • 2 eggs
  • 1 teaspoon vanilla extract
  • 1 1/2 cups all-purpose flour
  • 1 teaspoon baking soda
  • 1 1/4 teaspoons cinnamon
  • 1/2 teaspoon salt
  • 3 cups old fashioned oats , uncooked
  • 1 cup raisins
Instructions
  1. Preheat oven to 350 degrees.
  2. In a large bowl, using electric beaters, mix together softened butter, brown sugar and granulated sugar until smooth and creamy. Add eggs and the vanilla extract to the butter mixture.

  3. In a medium sized bowl, whisk together the flour, baking soda, cinnamon, and salt. Once combined, add the flour mixture to the butter mixture. Mix well, to combine. Stir in oats and raisins. Mix all ingredients well, until thoroughly combined. Drop cookie dough by rounded Tablespoonfuls onto an ungreased baking sheet, leaving about an inch between cookies.

  4. Bake cookies for 8-10 minutes, or until light brown. Remove cookies from oven, but leave on cookie sheet for 1 minute to slightly cool, then remove cookies to a wire rack to completely cool. Store cookies in a covered container. Enjoy!

Nutrition Facts
Oatmeal Raisin Cookies
Amount Per Serving (1 cookie)
Calories 95 Calories from Fat 27
% Daily Value*
Fat 3g5%
Saturated Fat 2g13%
Cholesterol 15mg5%
Sodium 81mg4%
Potassium 55mg2%
Carbohydrates 14g5%
Sugar 5g6%
Protein 1g2%
Vitamin A 110IU2%
Vitamin C 0.2mg0%
Calcium 9mg1%
Iron 0.5mg3%
* Percent Daily Values are based on a 2000 calorie diet.

Here’s one more to pin on your Pinterest boards!This traditional recipe for soft, chewy Oatmeal Raisin Cookies is easy to prepare. The cookies are absolutely delicious, and the recipe makes 4 dozen.


Save

Save

Blueberry Ice Cream

Grab the ol’ ice cream maker and get ready to make some creamy and delicious homemade blueberry ice cream, filled with lots of yummy blueberries!Grab the ol' ice cream maker and get ready to make some creamy and delicious homemade blueberry ice cream, filled with lots of yummy blueberries!
Two years ago I made blueberry ice cream as part of an Ice Cream Experiment, where I made many different varieties of ice cream with my Cuisinart ice cream maker over the course of the summer.  We really enjoyed this ice cream, and I loved using some of the blueberries I picked at a local U-Pick Farm and had stored in our freezer.

I experimented with grinding frozen blueberries and sugar in my food processor until liquified. This was done, as opposed to the more “traditional” method of cooking them until the blueberries “pop” and make a thick sauce. My wish was to have little bits of “fresh, uncooked” blueberries throughout the ice cream. It worked!

This was a very easy to prepare ice cream. I also added in a block of cream cheese, to enhance to the flavor and creamy thickness of this delicious ice cream, and I’m very glad I did!

Scroll Down For A Printable Recipe Card At The Bottom Of The Page

Blueberries Ready For The Picking!

Here are the blueberries at my local U-Pick Farm, in their natural state… before I got to them! Fresh blueberries, ready for the picking!

Blueberries ready to pick to make homemade blueberry ice cream!

Yeehaw! Here are the blueberries after I got to them. Look at all of them! That’s not bad, for 1½  hours of my time at our local U-Pick Farm.

These are the fresh blueberries I picked at a local farm.

I also ended up using some of the blueberry ice cream in another recipe, which we took to a friend’s home. It was a blueberry ice cream tart, and it was so yummy! I sure hope you will give this yummy blueberry ice cream a try… and really hope you enjoy it!  I think the color of this ice cream is amazing!

One scoop of blueberry ice cream, in a glass dish.

Blueberry ice cream is good year round, and so I really hope you will try this recipe out! Have a great day!

Looking For More ICE CREAM Recipes?

You can find all of my recipes for ice cream in the Recipe Index, located at the top of the page. A few favorites include:

Interested In More Recipes?

Thank you for visiting this website. I appreciate you using some of your valuable time to do soIf you’re interested, I publish a newsletter 2 times per month (1st and 15th) with all the latest recipes, and other fun info. I would be honored to have you join our growing list of subscribers, so you never miss a great recipe!
There is a Newsletter subscription box on the top right side (or bottom) of each blog post, depending on the device you use, where you can easily submit your e-mail address (only) to be included in my mailing list.

You Can Also Find Me On Social Media:

Facebook page: The Grateful Girl Cooks!
Pinterest:
The Grateful Girl Cooks!
Instagram:
jbatthegratefulgirlcooks

Author's signature

Recipe source: my brain, prior to “brain-freeze” (Ice cream induced!)

↓↓ PRINTABLE RECIPE BELOW ↓↓

0 from 0 votes
Blueberry Ice Cream
Prep Time
25 mins
Cook Time
0 mins
Freezing time
2 hrs
Total Time
2 hrs 25 mins
 

Grab the ol' ice cream maker and get ready to make some creamy and delicious homemade blueberry ice cream, filled with lots of yummy blueberries!

Category: Dessert
Cuisine: American
Keyword: blueberry ice cream
Servings: 8 servings
Calories Per Serving: 258 kcal
Author: JB @ The Grateful Girl Cooks!
Ingredients
  • 2 cups blueberries (fresh or frozen)
  • 1/2 cup granulated sugar
  • 8 oz. cream cheese
  • 1/2 teaspoon vanilla extract
  • 3/4 cup whole milk
  • 3/4 cup heavy whipping cream
  • 3 drops blue food coloring (this is optional...but it does enhance the color)
Instructions
  1. Place the blueberries and granulated sugar into a food processor or heavy duty blender. (If using frozen blueberries, put them in frozen... no need to defrost). Pulse or blend until liquified.
  2. Cut the cream cheese into chunks and add to the blueberry mixture. Add the vanilla extract. Mix until mixture is fairly smooth.
  3. Add milk to mixture. Mix until well blended. Pour mixture into large bowl.
  4. Lightly whisk in the heavy whipping cream, until well combined.
  5. Pour into ice cream maker canister. Freeze according to the manufacturer's instructions. Once done, remove to sealed container, and place in freezer for an hour or two to "ripen" and firm up.
  6. Scoop it up when ice cream is firm... and enjoy!
Nutrition Facts
Blueberry Ice Cream
Amount Per Serving (1 (1/2 cup) serving)
Calories 258 Calories from Fat 162
% Daily Value*
Fat 18g28%
Saturated Fat 11g69%
Cholesterol 64mg21%
Sodium 109mg5%
Potassium 114mg3%
Carbohydrates 20g7%
Sugar 18g20%
Protein 3g6%
Vitamin A 765IU15%
Vitamin C 3.7mg4%
Calcium 70mg7%
Iron 0.2mg1%
* Percent Daily Values are based on a 2000 calorie diet.

Here’s one more to pin on your Pinterest boards!Grab the ol' ice cream maker and get ready to make some creamy and delicious homemade blueberry ice cream, filled with lots of yummy blueberries!


Save

Chocolate Raspberry Sundae Sauce

Chocolate Raspberry Sundae Sauce is a great topping for ice cream or cake! Learn how to can this thick chocolate sauce for long term storage!Chocolate Raspberry Sundae Sauce is a perfect topping for ice cream or cake! Learn how to can this thick chocolate flavored sauce for long term storage!
Last year I found this recipe for Chocolate Raspberry Sundae Sauce in a book I received as a gift from my husband, called “Ball Complete Book of Home Preserving”.  It’s where I found this absolutely DELICIOUS recipe for this yummy dessert topping! The book has 400 different recipes for home canning that I am so excited about, since I love to make jams and jellies, and have now also begun pressure canning veggies from our garden. This chocolate raspberry sundae sauce is one of my more recent finds!

One of the recipes that caught my eye was this one. Chocolate Raspberry Sundae Sauce. Are you kidding me? I could hardly wait to try it out.  I made a batch last summer, after going raspberry picking at a local U-Pick farm. The recipe did not disappoint!

Scroll Down for A Printable Recipe Card At The Bottom Of The Page

Picking raspberries at a local farm to make chocolate raspberry sundae sauce!

Chocolate And Raspberry Flavors Are A Winning Combination!

The flavors of the raspberries and the chocolate come together well in this thick, sweet sauce. The sauce is fantastic served on top of ice cream, brownies, pound cake, cheesecake, etc. When serving it over ice cream, I warmed it up just a bit, and it was perfect!

I gave away several jars of this chocolate raspberry sundae sauce for birthdays and Christmas last year… guess I will need to make some more very soon!  If you are NOT canning it for long term storage, then make sure you keep the jars of sauce stored in refrigerator. It will only last short-term, but could still be given as gifts, or enjoyed with dessert!

I used some of these fresh raspberries that I picked for the sauce. Nothing beats the flavor of sun-kissed fresh raspberries!

Fresh raspberries ready to make sundae sauce!

Chocolate Raspberry Sundae Sauce Is Canned In A Water Bath Canner

Once the jars are filled per instructions (see printable recipe below), they are canned. This is a photo of the jars in my water bath canner, ready for processing. The process is simple and doesn’t take too much time to process jars of this sauce to make them stable enough for long term storage.

Loading jars of chocolate raspberry sauce into canner for processing.

Ready To Enjoy!

And there you have it… cute little jars of chocolate raspberry sundae sauce. It’s a perfect topping for ice cream or cake! I’ve even used it on cheesecake, with great results! You could even eat it straight from the jar (not that I have any experience with THAT- wink wink).

This chocolate raspberry sundae sauce is packed with decadent flavor, and I am sure you will love it!

Jar of chocolate raspberry sundae sauce ready to store in pantry.

See how thick the chocolate raspberry sundae sauce turns out? It really is delicious!!!

Sundae sauce is thick and rich, and tastes great on ice cream and cake.

Hope you will give this recipe for chocolate raspberry sundae sauce a try. You will love it! Thank you for stopping by, and I hope you will come back soon.

Looking For More SAUCE Recipes?

You can find all of my recipes in the Recipe Index, which is located at the top of the page. I have some wonderful recipes for a variety of sauces, including:

Interested In More Recipes?

Thank you for visiting this website. I appreciate you using some of your valuable time to do soIf you’re interested, I publish a newsletter 2 times per month (1st and 15th) with all the latest recipes, and other fun info. I would be honored to have you join our growing list of subscribers, so you never miss a great recipe!
There is a Newsletter subscription box on the top right side (or bottom) of each blog post, depending on the device you use, where you can easily submit your e-mail address (only) to be included in my mailing list.

You Can Also Find Me On Social Media:

Facebook page: The Grateful Girl Cooks!
Pinterest:
The Grateful Girl Cooks!
Instagram:
jbatthegratefulgirlcooks

Have a fantastic day!

Author's signatureRecipe Source: “Ball Complete Book of Home Preserving”, page 188, published by Robert Rose, Inc.

↓↓ PRINTABLE RECIPE BELOW ↓↓

0 from 0 votes
Chocolate Raspberry Sundae Sauce
Prep Time
15 mins
Cook Time
10 mins
Total Time
25 mins
 
Chocolate Raspberry Sundae Sauce is a perfect topping for ice cream or cake! Learn how to can this thick chocolate flavored sauce for long term storage!
Category: Dessert Sauce
Cuisine: American
Keyword: chocolate raspberry sundae sauce
Servings: 6 8 oz. jars
Calories Per Serving: 60 kcal
Author: JB @ The Grateful Girl Cooks!
Ingredients
  • 1/2 cup unsweetened cocoa powder
  • 1 package powdered pectin (1.75 ounces)
  • 4 1/2 cups crushed red raspberries
  • 4 Tablespoons fresh squeezed lemon juice
  • 6 3/4 cups granulated sugar
Instructions
  1. First, get your water bath canner, lids, and canning jars ready to go (per normal canning procedures for cleaning/heating jars and lids).
  2. Mix together the cocoa and pectin in a medium sized bowl until well combined. Set aside.
  3. Put the crushed raspberries and the lemon juice in a large stainless steel saucepan. Whisk in the pectin/cocoa mixture, until it dissolves. Turn your stovetop heat to high; bring this mixture to a full boil. Stir frequently.
  4. Once the fruit mixture is boiling, add the sugar all at one time. Stir to blend. Bring mixture to a full rolling boil; stir constantly so it doesn't burn. Boil it (a full, rolling boil) for 1 minute, then remove pan from heat, skim off any foam that has collected on top of the sauce, and discard.
  5. Ladle the HOT sauce into your hot, prepared jars. Be sure to leave 1/4 inch headspace. Remove any air bubbles that may be trapped in jar. Adjust the headspace (if needed). Add additional sauce if necessary to maintain 1/4' headspace. Wipe the rim of the jar to remove any residual sauce (to ensure a good seal). Center the lid on the jar, then screw the jar band down to finger-tip tight resistance.
  6. Carefully place the jars into your canner. Make sure the jars are completely covered with water (fill about an inch over the top of the jars). Bring the water in the canner to a boil, then cover, and process jars for 10 minutes. After 10 minutes, remove the canner lid. Wait an additional 5 minutes, then remove the jars to a dish towel to cool. Do not move the jars around while they cool. You should hear the jars make a "ping" sound several minutes later, as they seal.
  7. Once jars have sealed and are completely cooled, place them in storage or pantry.
Nutrition Facts
Chocolate Raspberry Sundae Sauce
Amount Per Serving (1 Tablespoon)
Calories 60
% Daily Value*
Sodium 1mg0%
Potassium 15mg0%
Carbohydrates 15g5%
Sugar 14g16%
Vitamin C 1.7mg2%
Calcium 2mg0%
Iron 0.1mg1%
* Percent Daily Values are based on a 2000 calorie diet.

Here’s one more to pin on your Pinterest boards!Chocolate Raspberry Sundae Sauce is a perfect topping for ice cream or cake! Learn how to can this thick chocolate flavored sauce for long term storage!


Save

Save

Save

Chocolate Dipped Frozen Banana Bites

Chocolate dipped frozen banana bites are sure to be a big hit with family or friends! A couple bites will help satisfy any sweet tooth!Frozen banana bites, dipped in chocolate, are sure to be a big hit with family or friends... just a couple pieces will satisfy your sweet tooth!
I love frozen chocolate bananas… and now I love making these chocolate dipped frozen banana bites!  Tiny bites of yumminess, that bring back lots of great memories!

Scroll Down For A Printable Recipe Card At The Bottom Of The Page

Chocolate Covered Frozen Bananas Bring Back Lots Of Memories

When our boys were little, we lived near Newport Beach, CA. We loved taking our boys every couple of weeks to Balboa Island (at Newport Beach) to feed the ducks! Our weekend or early evening walks would take us around the entire waterfront island.

We loved walking with our little boys, enjoying the sunshine AND gawking at the stunning multi-million dollar waterfront homes right next to the sidewalks we walked on. The sidewalks were also right next to the water in the bay! It was our CHEAP form of family entertainment, and our boys LOVED this fun family time!

Our walks around the island took quite a while (especially with two curious little boys AND hungry ducks!), as you can imagine. These family walks would always end up on the main street, which had lots of shops, restaurants, AND take out food stands!

We would end our adventure by purchasing  “Balboa Bars” (chocolate covered vanilla ice cream bars) or Chocolate Covered Frozen Bananas for each of us! My favorite treat was getting a frozen banana, and watching them dip it into a vat of melted chocolate! YUM!

How I Decided To Make This Bite-Size Frozen Treat

I have made frozen slices of bananas as snacks for several years, but decided recently that they would be even more delicious if the bite-sized slices were dipped in chocolate. I mean… who doesn’t enjoy a good chocolate dipped frozen banana at times, so I made some!

There were some semi-sweet and white chocolate chips left over in the pantry from a recent recipe, along with some butterscotch chips. I melted a little bit of EACH variety, and dipped some frozen banana slices into the chocolate to coat them, and then re-froze the banana slices. These chocolate dipped frozen banana bites are the result!

The results were wonderful! Here’s some photos and a few details showing how to make these frozen treats!

How To Make Chocolate Dipped Frozen Banana Bites

First you will need to slice up several bananas (I used 3). Place the slices in a single layer (not touching) on a large baking tray and freeze for 2 hours.

Sliced frozen bananas on a cookie sheet are ready to make chocolate dipped frozen banana bites.

Dipping the Frozen Banana Bites

Remove the frozen banana slices once solidly frozen. Melt the chocolate chips (whatever kind you like), and then completely coat each of the frozen banana slices.

The photo below shows me dipping the frozen banana bites into semi-sweet chocolate. Let the excess chocolate drip back into the bowl after dipping.

Melted semi-sweet chocolate is used to coat a frozen banana bite.

Place the covered frozen banana bites onto a baking sheet lined with wax paper. Refreeze the slices after coating with chocolate.

Decorating Chocolate Dipped Frozen Banana Bites

Once solidly frozen, you can decorate the tops of the chocolate dipped frozen banana bites, if desired. Drizzle some melted white chocolate and/or butterscotch chips over each one. Place back into the freezer for a final time. Freeze for a couple hours before serving!

These frozen chocolate covered banana bites are drizzled with melted white chocolate and butterscotch chips.

I also coated some of the banana slices in white chocolate, then drizzled melted semi-sweet and butterscotch chips over the tops. Just remember to freeze coated slices for a couple hours before serving!

Frozen banana bites are dipped in semi sweet chocolate or white chocolate.

Here’s a closeup picture of one that was cut into, so you could see what the inside looks like… nothing but frozen banana! YUM!

This chocolate dipped frozen banana bite is cut in half, to show inside.

PERFECTION!  The chocolate dipped frozen banana bites are just the right size for a quick bite. Instead of eating an entire chocolate dipped frozen banana, I can eat just a couple slices and be deliriously happy! Hope you’ll give these a try. You (and most kids) will love ’em!

Looking For More Frozen Dessert Treats?

You can find all of my recipes in the Recipe Index, located at the top of the page. I have lots of frozen desserts, including:

Interested In More Recipes?

Thank you for visiting this website. I appreciate you using some of your valuable time to do soIf you’re interested, I publish a newsletter 2 times per month (1st and 15th) with all the latest recipes, and other fun info. I would be honored to have you join our growing list of subscribers, so you never miss a great recipe! 

There is a Newsletter subscription box on the top right side (or bottom) of each blog post, depending on the device you use, where you can easily submit your e-mail address (only) to be included in my mailing list.

You Can Also Find Me On Social Media:

Facebook page: The Grateful Girl Cooks!
Pinterest:
The Grateful Girl Cooks!
Instagram:
jbatthegratefulgirlcooks

Author's signature

Recipe source: My brain.

↓↓ PRINTABLE RECIPE BELOW ↓↓

0 from 0 votes
Chocolate Dipped Frozen Banana Bites
Prep Time
2 hrs
Cook Time
0 mins
Freezing Time (inactive)
2 hrs
Total Time
4 hrs
 

Chocolate dipped frozen banana bites are sure to be a big hit with family or friends! A couple bites will help satisfy any sweet tooth!

Category: Dessert
Cuisine: American
Keyword: chocolate dipped frozen banana
Servings: 15 servings (2 per serving)
Calories Per Serving: 102 kcal
Author: JB @ The Grateful Girl Cooks!
Ingredients
  • 3 medium bananas
  • 1 cup semi-sweet chocolate chips (or chocolate of your choice)
  • 1 heaping teaspoon vegetable shortening
  • Additional melted butterscotch chips or white chocolate chips for garnish (optional)
Instructions
  1. Peel and slice bananas into 1 inch slices. Place slices in a single layer (not touching) on a baking tray, and freeze for 2-3 hours.

  2. In a small microwaveable bowl, put the chocolate chips and vegetable shortening. Microwave on high for 30 seconds. STIR. Melt an additional 30 seconds. Remove chocolate mixture and stir until completely smooth.
  3. Dip each frozen slice of banana into melted chocolate. Remove from chocolate (a fork works well), letting excess chocolate drip back into bowl. Place banana bites onto parchment paper or aluminum foil lined baking sheet to harden. Repeat process with other banana slices. If desired, you can freeze banana bites until hard again, then drizzle with additional melted white chocolate or butterscotch.

  4. Place cookie tray back into freezer. Freeze chocolate dipped banana bites for 2 additional hours or until frozen solid. Once frozen solidly, they are ready to eat! Keep extra frozen banana bites in a sealed container in freezer. Enjoy!

Recipe Notes

No matter what kind of baking chip you use, the ratio is still the same: 1 cup chips to 1 heaping teaspoon vegetable shortening.

Nutrition Facts
Chocolate Dipped Frozen Banana Bites
Amount Per Serving (2 pieces)
Calories 102 Calories from Fat 36
% Daily Value*
Fat 4g6%
Saturated Fat 2g13%
Sodium 12mg1%
Potassium 152mg4%
Carbohydrates 14g5%
Fiber 1g4%
Sugar 9g10%
Vitamin A 20IU0%
Vitamin C 2.1mg3%
Calcium 9mg1%
Iron 0.8mg4%
* Percent Daily Values are based on a 2000 calorie diet.

Here’s one more to pin on your Pinterest boards!Chocolate dipped frozen banana bites are sure to be a big hit with family or friends! A couple bites will help satisfy any sweet tooth!

Save

Save

Save

Save

Save

Chocolate Crinkle Cookies

Chocolate Crinkle Cookies- How can you go wrong with easy to make chocolate, chocolate chip cookies that get all cute and “crinkly” when you bake ’em?Chocolate Crinkle Cookies- How can you go wrong with easy to make chocolate, chocolate chip cookies that get all cute and "crinkly" when you bake 'em?

I found a recipe for Chocolate Crinkle Cookies in a used cookbook I bought while on vacation last summer in Washington. I had to spend a whopping $2 dollars on it (great deal, right?), and found some great recipes in it, including this one for a simple, fudgy, chewy cookie.

If you like chocolate chip cookies, then you will enjoy this cookie! I love chocolate chip cookies AND finding great cookbooks at bargain basement prices to add to my ever increasing cookbook collection!

These cookies are very easy to make. Melted chocolate chips give the batter it’s dark brown color. The dough also contains whole chocolate chips, so basically it’s a 2 in 1 chocolate cookie. That’s why you will like these! Seriously…how can you go wrong with chocolate, chocolate chip cookies that get all cute and “crinkly” when you bake ’em?

Scroll Down for A Printable Recipe Card At The Bottom Of The Page

How To Make Chocolate Crinkle Cookies

These cookies are so easy to make. The first thing you will need to do is cream the butter and sugar, with an electric mixer.

Butter and granulated sugar are mixed to begin batter for chocolate crinkle cookies.

Next, melt the chocolate chips. I melted mine in the microwave. Cook on high for 30 seconds, stir well. If necessary, place back into microwave and cook and additional 30 seconds. Give them a good stir, and they should be fully melted.

Chocolate chips are melted to add to batter for chocolate crinkle cookies.

The next thing to do is mix in the melted chocolate with the batter. This is where the dough for these chocolate crinkle cookies starts to get GOOD!!!

Melted chocolate is added to batter for chocolate crinkle cookies.

The Batter For Chocolate Crinkle Cookies Is Starting To Come Together

The melted chocolate gives the batter a beautiful color. It is nice and brown in color. Now it’s time to add the remaining ingredients to the cookie batter.

After chocolate is added to cookie dough, the batter for chocolate crinkle cookies turns brown.

Now add the flour, a little at a time, to the batter. Mix the dough on slow, and continue adding flour until gone. Blend all the ingredients together.

Flour is added to chocolate crinkle cookies batter a little at a time, and mixed.

Now add the chocolate chips to the dough for chocolate crinkle cookies. The cookie dough batter is stirred, to combine.

Chocolate chips are added to the batter for the chocolate crinkle cookies.

Refrigerate the cookie dough for about 15 minutes. After you refrigerate the dough for a few minutes, the dough is much easier to roll into balls.

Shaping The Chocolate Crinkle Cookies

Shae the dough into 1½ inch balls, by rolling teaspoons of dough between your clean hands to shape into balls.. Place the balls of dough onto a large baking sheet, a couple inches apart, because they will spread out while cooking.

The dough for the chocolate crinkle cookies is rolled into small balls before baking.

Baking The Chocolate Crinkle Cookies

Bake the cookies for about 10-12 minutes at 350 degrees.  Here is one of the cookies straight out of the oven. Do you see how cute and crinkly they are? Let the cookies cool a bit before transferring them from the pan to a wire rack to finish cooling..

Chocolate crinkle cookies come out of the oven nice and wrinkly, and ready to eat!

To finish the chocolate crinkle cookies, sift a little bit of powdered sugar on top of each one!

Chocolate Crinkle Cookies are topped with sifted powdered sugar, to finish them off before eating.

Ready To Eat Some Chocolate Crinkle Cookies!

Once the cookies have a light dusting of sifted powdered sugar, they are ready to eat!  Pour yourself a cold glass of milk, and grab a couple delicious, chocolate crinkle cookies!

Chocolate Crinkle Cookies on a plate, ready to eat, with a cup of cold milk on the side.

Look at the inside of that cookie… YUM!!! I took one for the team and bit into one just so you could see the chocolate chips on the inside. You’re welcome!

The inside of the Chocolate Crinkle Cookies is chewy and fudgy!

I sure hope you will give this recipe for chocolate crinkle cookies a try. The recipe yields about 2 1/2 dozen cookies. They are scrumptious! Thank you for stopping by, and I hope you will come back soon for more recipes.

Looking For More Cookie Recipes?

If you enjoy these chocolate crinkle cookies, you might want to check out a few of my other cookies recipes. These include Butter Pecan Crisps, Flourless 3 Ingredient Peanut Butter, Butterscotch Chip, Oatmeal Raisin, Cinnamon Chip, Dipped Gingersnaps, Cranberry Orange Pinwheel, Chocolate Chip,Holiday Spritz, and many others. All of my cookie recipes can be found in the Recipe Index at the top of the page.

Interested In More Recipes?

Thank you for visiting this website. I appreciate you using some of your valuable time to do soIf you’re interested, I publish a newsletter 2 times per month (1st and 15th) with all the latest recipes, and other fun info. I would be honored to have you join our growing list of subscribers, so you never miss a great recipe! 

There is a Newsletter subscription box on the top right side (or bottom) of each blog post, depending on the device you use, where you can easily submit your e-mail address (only) to be included in my mailing list.

You Can Also Find Me On Social Media:

Facebook page: The Grateful Girl Cooks!
Pinterest:
The Grateful Girl Cooks!
Instagram:
jbatthegratefulgirlcooks

Author's signatureRecipe Source: The cookbook “Company’s Coming-Christmas Gifts From the Kitchen”, by Jean Paré, pg.31. Published by Company’s Coming Publishing Unlimited, 2006

↓↓ PRINTABLE RECIPE BELOW ↓↓

0 from 0 votes
Chocolate Crinkle Cookies
Prep Time
15 mins
Cook Time
12 mins
Total Time
27 mins
 
Chocolate Crinkle Cookies- How can you go wrong with easy to make chocolate, chocolate chip cookies that get all cute and "crinkly" when you bake 'em?
Category: Cookies
Cuisine: American
Keyword: chocolate crinkle cookies
Servings: 30 cookies (2.5 dzn)
Calories Per Serving: 145 kcal
Author: JB @ The Grateful Girl Cooks!
Ingredients
  • 6 Tablespoons butter , softened
  • 1 cup granulated sugar
  • 2 large eggs
  • 1 1/2 teaspoons vanilla extract
  • 1 cup semi-sweet chocolate chips
  • 1 1/2 cups all-purpose flour
  • 1 1/2 teaspoons baking powder
  • 1/4 teaspoon salt
  • 1 cup semi-sweet chocolate chips
  • 2 Tablespoons powdered sugar (for dusting finished cookies)
Instructions
  1. Preheat oven to 350 degrees.
  2. In a large bowl or base of a stand mixer, cream butter and granulated sugar until smooth. Add eggs, one at a time. Beat well after each egg. Add vanilla and beat until batter is smooth.

  3. In a microwave safe bowl, place 1 cup chocolate chips. Heat on high in microwave for 30 seconds. Stir well. Put back in microwave for another 30 seconds. Remove, and stir until chocolate is smooth. (You can also melt chocolate chips in saucepan over low heat). Add melted chocolate to batter mixture. Continue beating until smooth.

  4. In separate bowl, whisk together flour, baking powder and salt. Add this to batter, in small increments, until flour is fully incorporated. Stir in remaining 1 cup of chocolate chips. Mix dough well. Set dough in refrigerator for 10 minutes (to slightly firm up).

  5. Roll cookie dough into 1 1/2 inch balls. Place dough balls on a greased cookie sheet, about 1 inch apart. Bake at 350 degrees for 10-12 minutes, or until edges are firm. The centers may still be a bit soft, but that's okay. Remove cookies from oven. Let them stay on cookie sheets and cool for about 5 minutes before attempting to remove them. Place cookies on wire racks to cool completely. Using a sieve or sifter, sift powdered sugar over the top of cooled cookies. Serve, and enjoy!

Nutrition Facts
Chocolate Crinkle Cookies
Amount Per Serving (1 cookie)
Calories 145 Calories from Fat 63
% Daily Value*
Fat 7g11%
Saturated Fat 4g25%
Cholesterol 17mg6%
Sodium 45mg2%
Potassium 98mg3%
Carbohydrates 18g6%
Fiber 1g4%
Sugar 11g12%
Protein 1g2%
Vitamin A 90IU2%
Calcium 19mg2%
Iron 1.1mg6%
* Percent Daily Values are based on a 2000 calorie diet.

Here’s one more to pin on your Pinterest boards!Chocolate Crinkle Cookies- How can you go wrong with easy to make chocolate, chocolate chip cookies that get all cute and "crinkly" when you bake 'em?

Save

Save

Save