Celebrate the season with this easy recipe for absolutely delicious Spring Flower Sugar Cookies, decorated with Royal Icing.
Springtime in the Pacific Northwest means flowers blooming everywhere and what a wonderful re-awakening it is, after a cold, barren Winter!
What better way to celebrate the beginning of this new season than these delicious, frosted Spring Flower Sugar Cookies!
I’ve never been a great cookie decorator, but am trying to learn more tips and tricks necessary to make pretty cut-out sugar cookies. I’ve made Fall and Christmas decorated cookies since that time, using this same recipe. They’re always great!
Scroll Down For A Printable Recipe Card At The Bottom Of The Page
Great To Take To A Party
I made these cookies last year for an Easter potluck we were invited to. They were a big hit and were quickly gobbled up along with the other goodies available.
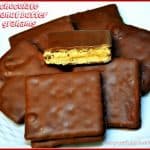
As you can see in the photo below, I also made Lemon Curd Filled Won Ton Cups, Chocolate Dream Cups with Raspberry Mousse, and Chocolate Chip Cheesecake-Swirl Brownie Bites!

I found the recipe for the cookies and icing on a website called Glorious Treats. The website has lots of tips (and good info. for people who want to learn “how” to decorate cookies), including the recipe for these cookies and icing.
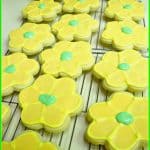
These spring flower sugar cookies are absolutely delicious, especially when cut into pretty designs and decorated with the always perfect Royal Icing!
The cookies are very easy to prepare… you can use ANY cookie cutter you have available to create your very own masterpieces!
For me the hardest part was learning “how” to outline the cookies, then flooding them with different colors. It takes a steady hand and practice (and believe me… I am a work in progress!)
All in all, I was pleased with how these decorated cookies (one of my first attempts) turned out.
How To Make Spring Flower Sugar Cookies
First, stir the flour and baking powder together in a bowl and set aside. EASY.

Beat the butter and sugar together for a few minutes (using an electric mixer), until mixture is thoroughly creamed and fluffy. Add the egg and vanilla and beat again.
Once blended, add the flour mixture to the batter. Mix the dough until all ingredients have been incorporated.

Once the dough is done, knead it well, then wrap and refrigerate the dough for 2 hours to get it nice and cold!
 Roll And Cut The Cookie Dough
Place the dough for the Spring flower sugar cookies on a lightly floured work surface and roll it out to about a 1/3-inch thickness.

Use a cookie cutter to cut out the shapes you desire. I used the flower cookie cutter shown below, but you can use any flower shaped cookie cutter you wish.
Place the cut-out cookie dough onto lined baking sheets, then refrigerate the dough for a few minutes. This quick refrigeration will help the Spring flower sugar cookies hold their shape while baking.
Once the dough is chilled, bake the cookies for 8-10 minutes, but do not let them get browned.

Make Royal Icing For Decorating Cookies
While the cookies were baking, I prepared the royal icing. To make this icing, beat meringue powder, powdered sugar and warm water until stiff peaks form.
This is the meringue powder (shown below) I used for the icing. I bought it at a local craft store (Michael’s). A lot of grocery stores carry this product, as well.

Once the icing was the right consistency, I divided it into bowls, then added food coloring (I used gel food coloring), until each one was the color I wanted.

Decorating Spring Flower Sugar Cookies
I used a thicker consistency icing to pipe (using a pastry bag) the edges on the flowers, as shown in the photo below.
The icing has to be thick enough not to run, because it will be the “barrier” that holds the thinner icing that will fill the flowers later.

Let the icing dry (about 30 minutes), then thin the icing out a bit more. A teensy drop of red coloring was added to turn the icing slightly darker yellow (toward orange color).
This thinner consistency icing is “flooded” in between all the thicker outlines, as shown in the photo below. You can use a toothpick to help fill in all the nooks and crannies.

Set the cookies aside to let the icing dry once they are decorated. Once dry, I add the green center portion right in the middle of the flower cookie, then let that dry, also.
 Enjoy Spring Flower Sugar Cookies
Once all the cookies are dry (the icing will get hard after a couple hours-that is a good thing!), the cookies are ready to eat. Trust me- these cookies are GOOD!

Wouldn’t a basket of sweet Spring Flower Sugar Cookies brighten someone’s day?

I hope you will try making these delicious Spring flower sugar cookies. Enjoy using your own cookie cutters and imagination to create wonderful cookies for any celebration!
Thanks for stopping by, and I invite you to come back again soon for more family-friendly recipes. Take care, may God bless you, and have a wonderful day.
Looking For More COOKIE Recipes?
You can find ALL of my recipes in the Recipe Index, which is located at the top of the page. I have lots of great cookie recipes to choose from, including:
Want More Recipes? Get My FREE Newsletter!
I publish a newsletter 2 times per month (1st and 15th) with lots of recipes, tips, etc.
Would you like to join our growing list of subscribers?
There is a Newsletter subscription box on the top right (or bottom) of each blog post, depending on the device you use.
You can submit your e-mail address there, to be added to my mailing list.
Find Me On Social Media:
Facebook page: The Grateful Girl Cooks!
Pinterest: The Grateful Girl Cooks!
Instagram: jbatthegratefulgirlcooks

Recipe Source for Cookies: http://www.glorioustreats.com/2010/03/making-sugar-cookies-recipe-and-tips.html
Recipe Source for Royal Icing: http://www.glorioustreats.com/2010/10/decorating-sugar-cookies-from-start-to-finish-part-2.html
↓↓ PRINTABLE RECIPE BELOW ↓↓
Celebrate the season with this easy recipe for delicious Spring Flower Sugar Cookies, decorated with Royal Icing.
Category: Cookies
Cuisine: American
Keyword: spring flower sugar cookies
Servings: 30 - 2 1/2 inch cookies)
Calories Per Serving: 190 kcal
Author: JB @ The Grateful Girl Cooks!
For cookie dough:
- 3 cups all purpose flour
- 1 teaspoon baking powder
- 1 cup (2 cubes) unsalted butter (at room temperature)
- 1 cup granulated sugar
- 1 large egg
- 1 teaspoon vanilla extract
- Parchment paper
For the Royal Icing:
- 4 Tablespoons meringue powder
- 4 cups powdered sugar
- 6 Tablespoons warm water
- Food coloring , as desired
To make cookies:
Stir flour and baking powder together in bowl, then set aside.
Using an electric mixer, cream the butter and sugar together for about 3 minutes. Add the egg and vanilla extract; continue to beat for an additional minute.
Slowly add the flour mixture (a bit at a time) to the butter mixture; mix this until all the flour is mixed in, and the dough begins to form ball and pull away from the side of the bowl.
Remove dough ball from mixer bowl and put it on parchment paper. Knead the dough with your hands 3-4 times. Put the dough into a sealed bag or container; refrigerate it for 2 hours (or into freezer for 25 minutes)
A few minutes before you get the chilled dough out of refrigerator, preheat your oven to 350 degrees.
Remove HALF of the dough (let the rest stay in fridge). Put dough on lightly floured work surface. Roll dough out to 1/3 inch thickness.
Cut the dough out with your favorite cookie cutters. Place cookies on prepared baking sheet (I bake these on parchment paper). Try to get same-sized cookie shapes on each sheet to ensure even cooking. Put the baking sheet (with cookies) into refrigerator for 3-5 minutes (this will help them keep their shape).
Bake cookies at 350 degrees for 8-10 minutes. Bake just until they just start to look golden. Remove from oven; let cookies cool for a minute or two on the pan, then carefully remove to a wire rack to finish cooling. Once the cookies are totally cooled, they can be decorated.
For the royal icing:
Measure meringue powder and powdered sugar into mixing bowl. Add 6 Tablespoons warm water. Beat until stiff peaks form. Divide icing out into bowls; add food coloring, as desired. Add additional water (1 teaspoon at a time) until you get the right consistency.
FOR OUTLINING/EDGING: thin with warm water until icing reaches a "corn syrup" thickness (or slightly thicker). Pipe the icing around the border of your design. Let icing dry (half an hour) before flooding the inside of the outlined area.
FOR FLOODING INSIDE THE OUTLINE: Add additional water to thin icing out. Pipe icing inside outline borders. It should slowly thin out inside border. Use a toothpick to help fill in the space.
Let icing completely dry before serving (let dry several hours!). ENJOY!
Cookie baking times may vary slightly, depending on the size of the cookie.
This recipe makes approximately 30, 2 1/2 inch cookies or 16 3 1/2 inch cookies.
FYI-The prep time is the time necessary to make the cookies. It does not include decorating time. Sometimes I bake the cookies one day and decorate the next.
Nutrition Facts
Spring Flower Sugar Cookies
Amount Per Serving (1 cookie)
Calories 190 Calories from Fat 54
% Daily Value*
Fat 6g9%
Saturated Fat 3g19%
Cholesterol 21mg7%
Sodium 3mg0%
Potassium 30mg1%
Carbohydrates 32g11%
Sugar 22g24%
Protein 1g2%
Vitamin A 195IU4%
Calcium 10mg1%
Iron 0.6mg3%
* Percent Daily Values are based on a 2000 calorie diet.
Here’s one more to pin on your Pinterest boards!
Save
Save
Save
Save


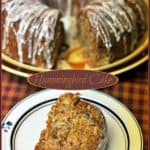

! Yummy muffins, topped with chocolate chips, graham cracker crumbs & vanilla glaze. / The Grateful Girl Cooks!")


! Yummy muffins, topped with chocolate chips, graham cracker crumbs & vanilla glaze. / The Grateful Girl Cooks!")


