Entertaining for the holidays? You will LOVE this creamy Chocolate Fudge Truffle Cheesecake with chocolate graham cracker crust and chocolate drizzle garnish!
Cheesecake is my favorite dessert. Ever. This recipe for Chocolate Fudge Truffle Cheesecake is one of my favorites! Creamy AND fudge-like… cheesecake AND chocolate?
How could you NOT love this dessert? So here you go… sure hope you enjoy it! I know we do!
Scroll Down For A Printable Recipe Card At The Bottom Of The Page
How I Created This Chocolate Fudge Truffle Cheesecake Recipe
Years ago, I was trying to come up with a recipe for chocolate cheesecake. I read through several recipes (none of which I remember 20+ years later) and combined various elements from 3 of them to create this recipe.
I’ve made this chocolate fudge truffle cheesecake with a chocolate graham cracker crust for so many special occasions over the past 2 decades, I can’t even count them.
I made this absolutely delicious cheesecake again for some friends who came over for dessert about a week ago, and decided it was time to put the old Chocolate Fudge Truffle recipe on my blog.
Here are the “basics” for making this cheesecake. The full detailed recipe is at the bottom of the page.
How To Make Chocolate Fudge Truffle Cheesecake
A chocolate graham cracker crust is made (easy). This crust is formed by patting down the crumbs firmly in the bottom of a springform pan. Here is the crust, ready for the chocolate fudge truffle cheesecake filling to be added on top.

Chocolate fudge truffle cheesecake filling is poured onto the chocolate graham crust. Now the cheesecake is ready to be baked in the oven!

This is what the cheesecake looked like, immediately after it came out of the oven. You can tell it has risen quite a bit during the baking. Let it cool, in the pan, on a wire rack.

Make The Topping For The Cheesecake
The next thing to do is mix up the sweetened sour cream topping for the cheesecake while it is cooling. This topping is simple to make with sour cream, vanilla and sugar, and is spread on top of the cooled cheesecake.

The surface of the cheesecake is already looking good, so far. Now it’s time to “fancy it up” a little bit by added chocolate swirled topping to the top of the dessert.
Decorate The Chocolate Fudge Truffle Cheesecake
It’s easy to make a simple melted chocolate glaze in a snap, then it is drizzled on top of the cheesecake in a decorative design.

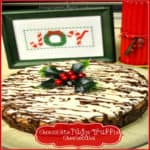
Here’s the finished chocolate fudge truffle cheesecake! It has been drizzled with chocolate and topped with a decorative holly leaf garnish!
After decorating, the cheesecake is thoroughly chilled until nice and cold, and then it’s ready to slice. Want to have a piece? It’s YUMMY GOOD.

You can also drizzle the serving plates with caramel and chocolate sauce if desired. The only thing left to do now is slice a piece and dig in!

We LOVE this rich, creamy decadent cheesecake, especially during the holidays! Hope you enjoy it, as well. I really hope you like it, too!
Thank you for stopping by, and I hope you will come back again soon. Take care, may God bless you, and have a great day!
Looking For More DESSERT Recipes?
You can find all of my recipes in the Recipe Index, located at the top of the page. I have LOTS of delicious dessert recipes, including:
- Chocolate Orange Truffles
- Lemon Panna Cotta with Raspberry-Orange Sauce
- Mint Brownie Pie
- Chocolate Raspberry Torte
- Apple Shortbread Tart
Want More Recipes? Get My FREE Newsletter!
I publish a newsletter 2 times per month (1st and 15th) with lots of recipes, tips, etc.
Would you like to join our growing list of subscribers?
There is a Newsletter subscription box on the top right (or bottom) of each blog post, depending on the device you use.
You can submit your e-mail address there, to be added to my mailing list.
Find Me On Social Media:
Facebook page: The Grateful Girl Cooks!
Pinterest: The Grateful Girl Cooks!
Instagram: jbatthegratefulgirlcooks

↓↓ PRINTABLE RECIPE BELOW ↓↓
- 1 sleeve graham crackers , crushed into fine crumbs
- 1/3 cup cocoa
- 1/3 cup granulated sugar
- 1/3 cup butter , melted
- 3 - 8 oz. pkgs. cream cheese , softened, at room temperature (important!)
- 2/3 cup granulated sugar
- 3 large eggs
- 12 oz. semi-sweet chocolate chips , melted, then cooled slightly
- 2 Tablespoons butter , melted, then cooled slightly
- 1 teaspoon vanilla extract
- 1 cup sour cream
- 1 1/2 teaspoons vanilla extract
- 1 1/2 teaspoons granulated sugar
- 1/2 cup semi-sweet chocolate chips
- 1 Tablespoon vegetable shortening
- Preheat oven to 325 degrees.
- Make the crust: Mix together the graham cracker crumbs, cocoa, sugar and melted butter in a small bowl, until well combined. Press this mixture into the bottom and 1 inch up the sides of a 9" springform pan. Press tightly into pan to form solid crust. Set aside.
- Make the cheesecake filling: Mix all cheesecake filling ingredients together. Beat with electric mixer until mixture is smooth and well combined. (Make sure cream cheese is room temp before making filling... this will help ensure no lumps...) Pour cheesecake mixture over the crust. Spread to level out the mixture. Bake the cheesecake for 55-65 minutes in 325 degree oven, until center is set on the cheesecake. IMPORTANT: Place a cake pan filled half way up with water, on the oven shelf below the cheesecake while it cooks!
- When cheesecake is done, remove to a wire rack. Let the cheesecake cool for about 10 minutes, then carefully release the sides from the springform pan. Let cheesecake completely cool to room temperature.
- While cheesecake is cooling, make the Cheesecake Topping: Mix the topping ingredients together in a small bowl (you can use a spoon for this... doesn't have to be beaten). Once cheesecake has completely cooled, evenly spread the topping over the top surface.
- Make the chocolate drizzle: Melt the chocolate chips and shortening in microwave on high for 30 seconds. Stir. Heat again for 30 seconds. Stir until completely smooth. Do not overcook or burn the chocolate. Let the smooth chocolate cool just a bit, then decoratively drizzle the chocolate over the Cheesecake topping.
- Refrigerate (uncovered) cheesecake for at least 8 hours or overnight. Slice and serve. Enjoy!.
Here’s one more to pin on your Pinterest boards! 


 Have fun in the kitchen this blessed season!


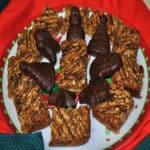


, dipped in chocolate are a unique, sweet treat to make and give to friends and family during the holidays! / The Grateful Girl Cooks!")


, dipped in chocolate are a unique, sweet treat to make and give to friends and family during the holidays! / The Grateful Girl Cooks!")