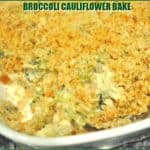
Pecan Chewies

Looking for a new recipe for bar cookies? How about trying this one for Pecan Chewies? They are buttery, chewy, simple to make, taste delicious, and the recipe makes two dozen… in hardly any time at all!Pecan Chewies are bar cookies that are absolutely buttery, chewy and delicious! You can make 2 dozen of these yummy family friendly treats in no time at all!
I found this recipe on Pinterest (thanks to Stacey at Southern Bite) and decided to make a batch, using some of the Texas pecans my Mom orders for us each year. It was a sacrifice making yummy bar cookies, but hey… someone’s gotta do it!

These Pecan Chewies are just that… a little bit chewy, not overly sweet, yet they are wonderfully buttery and delicious! They’re also incredibly easy to make! Here’s how to whip up 2 dozen in no time at all:

Scroll Down For A Printable Recipe Card At The Bottom Of The Page

Prepare The Batter

Preheat oven to 300 degrees F.  Spray a 13×9 inch cake pan with some non-stick baking spray before beginning.  Melt butter, and add it to a large bowl. Add granulated sugar and brown sugar, and mix it well by hand (no mixer needed!).  Add the beaten eggs, then the flour.

Stir the dough really well, until all ingredients are incorporated into batter and no lumps remain.  Next, add in the chopped pecans and vanilla.

Dough is made for pecan chewies...

Stir well, then evenly spread dough into prepared 13×9 inch baking pan.

Dough for the pecan chewies is spread in a 13x9" baking pan.

Baking The Pecan Chewies

Bake at 300 degrees F for between 40 and 50 minutes (oven temps vary).  Make sure to NOT over bake the bar cookies.  I checked mine at the 40 minute mark and they were done!  When done, remove pan to a wire rack and let the Pecan Chewies cool.  Once they are at room temperature, cut into 24 portions.

The pecan chewies are cut into 24 pieces.

That’s it! See how simple they were to make with only about 10 minutes work?  The bars all came out of the baking pan very easily, as well.  And they REALLY are good!  See those yummy chopped pecan pieces in them? YUM.

A plate full of pecan chewies, ready to eat.You can see the nuts in the bar cookies.

Time To Eat

Look- I even saved you one. Want a bite? I love that these bars are not overly sweet.  I “might” have even had one with my morning coffee this morning! I think you will really enjoy these chewy bar cookies, and there’s certainly enough to share!

Holding up the bar cookie for the camera to photograph up close.

I hope you enjoy this recipe. It’s always fun to try new recipes and I love it when I find a really GOOD one, like this! Speaking of good bar cookie recipes, check out my recipes for Chocolate Pecan Pie Bars, Blackberry Pie Bars, Lemon Bars or my decadent Best Brownies. I think you will LOVE them all! You can find ALL my recipes in the Recipe Index, located at the top of the page.

Have a wonderful day, and remember to be KIND to those you cross paths with today!  They may really need someone like YOU to encourage them!

Interested In More Recipes?

Thank you for visiting this website. I appreciate you using some of your valuable time to do soIf you’re interested, I publish a newsletter 2 times per month (1st and 15th) with all the latest recipes, and other fun info. I would be honored to have you join our growing list of subscribers, so you never miss a great recipe!
There is a Newsletter subscription box on the top right side (or bottom) of each blog post, depending on the device you use, where you can easily submit your e-mail address (only) to be included in my mailing list.

You Can Also Find Me On Social Media:
Facebook page: The Grateful Girl Cooks!
Pinterest: The Grateful Girl Cooks!
Instagram: jbatthegratefulgirlcooks

Author's signature

Recipe Source: http://southernbite.com/pecan-chewies/

0 from 0 votes
Pecan Chewies
Prep Time
10 mins
Cook Time
45 mins
Total Time
55 mins
 

Pecan Chewies are bar cookies that are absolutely buttery, chewy and delicious! You can make 2 dozen of these yummy family friendly treats in no time at all!

Category: Dessert
Cuisine: American
Keyword: pecan chewies
Servings: 24 bars
Calories Per Serving: 210 kcal
Author: JB @ The Grateful Girl Cooks!
Ingredients
  • 1 cup (2 cubes) butter
  • 1 cup granulated sugar
  • 1 cup firmly packed brown sugar (light or dark-I used dark)
  • 2 eggs , beaten well
  • 2 cups self-rising flour (See NOTES for self-rising flour substitution)
  • 1 cup chopped pecans
  • 2 teaspoons vanilla extract
Instructions
  1. Preheat oven to 300 degrees F. Spray a 13x9 inch cake pan (bottom and sides) with non-stick baking spray.
  2. Melt butter; add it to a large bowl. Add granulated sugar and brown sugar; mix well, by hand (no mixer needed!). Add beaten eggs, then the flour. Stir dough really well, until all ingredients are incorporated into batter and no lumps remain. Next add in the chopped pecans and vanilla extract. Stir well, then evenly spread dough into prepared 13x9 inch baking pan.
  3. Bake at 300 degrees for about 40 to 50 minutes (oven temps vary). Make sure NOT to over bake. I checked mine at the 40 minute mark and they were done! When done, remove pan to a wire rack and let the Pecan Chewies cool. Once at room temperature, cut into 24 portions. Serve, and enjoy!
Recipe Notes

If you do not have self-rising flour you can substitute 2 C all-purpose flour + 3 tsp. baking powder+1 tsp. salt.

Nutrition Facts
Pecan Chewies
Amount Per Serving (1 bar)
Calories 210 Calories from Fat 99
% Daily Value*
Fat 11g17%
Saturated Fat 5g31%
Cholesterol 33mg11%
Sodium 75mg3%
Potassium 48mg1%
Carbohydrates 25g8%
Sugar 17g19%
Protein 2g4%
Vitamin A 260IU5%
Vitamin C 0.1mg0%
Calcium 17mg2%
Iron 0.3mg2%
* Percent Daily Values are based on a 2000 calorie diet.

Here’s one more to pin on your Pinterest boards!Pecan Chewies are bar cookies that are absolutely buttery, chewy and delicious! You can make 2 dozen of these yummy family friendly treats in no time at all!

Save

Save

Save

Save

Save

Save

Save

Save

Save

Save

Save

Save

Save

Save

Save

Save

Save

Save

Save

Save

Save

Save

P.F. Chang’s Spicy Green Beans (copycat)

P.F. Chang’s spicy green beans are fresh green beans cooked in a flavorful Asian sauce, in this delicious restaurant copycat recipe!P.F. Chang's spicy green beans are fresh green beans cooked in a flavorful Asian sauce, in this delicious restaurant copycat recipe!

Looking for a tasty new way to serve those yummy summer green beans you get from the grocery store, Farmer’s Market or your own garden?  How about this delicious, quick and easy recipe for P.F. Chang’s Spicy Green Beans (copycat)?

I’ve grown my own green beans for years now, so I’m always on the lookout for new ways to cook and serve them.  I found this “copycat” recipe for spicy green beans on Pinterest, and decided to give it a try. You will be surprised how GOOD these green beans are!  The addition of an Asian pan sauce makes them “practically perfect in every way” (to coin a phrase from Mary Poppins).

Scroll Down For A Printable Recipe Card At The Bottom Of The Page

Are These Spicy Green Beans Difficult To Make?

Are these spicy green beans difficult to make? Absolutely NOT! All in all, the beans take only 5-6 minutes to cook… really!  The “hardest” thing you will have to do is snip the ends off the beans… ha ha! Here’s how to make delicious P.F. Chang’s Spicy Green Beans from the comfort of your own home:

Make The Asian Sauce

First make the Asian sauce by mixing the ingredients together in a small bowl, and then set aside until ready to put it in use. See how EASY that was?

An Asian inspired sauce is mixed in small bowl to add to green beans.
Pour the sesame oil into a large skillet or wok. NOTE: You can buy sesame oil in the Asian food section of most supermarkets. Turn the heat to medium high for about 30 seconds, and when the oil is hot, add the chopped green onions, minced garlic, and red pepper flakes.

Stir well, and cook for 30 seconds, stirring constantly. Be careful NOT to burn the garlic.

Sesame oil is used to add flavor to the cooked veggies in this dish.

Green onions, garlic and red pepper flakes are cooked in a skillet with sesame oil.
Time To Add The Fresh Green Beans!

Add the green beans to the skillet. Stir them constantly, and continue to cook them for 3-4 minutes, until they are almost fully cooked. The beans will turn a deeper green color as they cook.

Green beans are added to the skillet.

Add The Sauce To The Spicy Green Beans

When the green beans are done cooking, move them over to one side of the skillet. Give the Asian sauce a good stir, and then add it to the skillet. Stir well, and cook the sauce for 30 seconds (still on medium-high heat). Let the sauce come to a boil, then turn the heat to LOW. The sauce will thicken very slightly as it cooks.

Adding the Asian sauce to the spicy green beans in skillet.
Stir the sauce into the green beans to fully coat them.  Cook the spicy green beans and sauce for another 30 seconds, and then remove the skillet from the heat.

Spicy green beans finish cooking in the Asian sauce.

P.F. Chang’s Spicy Green Beans Are Ready To Serve!

Place the hot green beans and sauce onto serving plate or into a bowl, and garnish with sesame seeds (if using). Serve the spicy green beans while hot, and ENJOY!

The spicy green beans are sprinkled with sesame seeds and served.

Sesame seeds garnish the serving plate covered with P.F. Chang's Spicy Green Beans.

We enjoyed trying this recipe for spicy green beans. They are NOT too spicy at all, and have fantastic flavor!  I used only 1 pound of green beans, so if you are using 2 pounds of beans the quantity will be much larger than shown in my photos!

Hope you will consider trying this recipe. I trust you will find it just as delicious as we did! Have a great day, and please come back again soon!

Looking For More VEGETABLE SIDE DISHES?

You can find all of my vegetable dishes in the Recipe Index, located at the top of the page. A few recipes you might enjoy include:

Interested In More Recipes?

Thank you for visiting this website. I appreciate you using some of your valuable time to do soIf you’re interested, I publish a newsletter 2 times per month (1st and 15th) with all the latest recipes, and other fun info. I would be honored to have you join our growing list of subscribers, so you never miss a great recipe!
There is a Newsletter subscription box on the top right side (or bottom) of each blog post, depending on the device you use, where you can easily submit your e-mail address (only) to be included in my mailing list.

You Can Also Find Me On Social Media:
Facebook page: The Grateful Girl Cooks!
Pinterest: The Grateful Girl Cooks!
Instagram: jbatthegratefulgirlcooks

Author's signature

Recipe Source: http://domesticsuperhero.com/copycat-pf-changs-spicy-green-beans/

0 from 0 votes
P.F. Chang's Spicy Green Beans
Prep Time
10 mins
Cook Time
5 mins
Total Time
15 mins
 
P.F. Chang's spicy green beans are fresh green beans cooked in a flavorful Asian sauce, in this delicious restaurant copycat recipe!
Category: Side Dish, Vegetable Dish
Cuisine: Asian
Keyword: spicy green beans
Servings: 6 servings
Calories Per Serving: 75 kcal
Author: JB @ The Grateful Girl Cooks!
Ingredients
For Beans:
  • 1-2 pounds fresh green beans , ends trimmed and beans cut into 2 inch pieces
  • 2 green onions , chopped thin
  • 1 teaspoon red pepper flakes
  • 4 garlic cloves , minced
  • 2 Tablespoons sesame oil
For Asian Sauce:
  • 1/8 teaspoon salt
  • 1/8 teaspoon black pepper
  • 2 Tablespoons low sodium soy sauce
  • 1 Tablespoon rice vinegar
  • 1 teaspoon white granulated sugar
  • 1/4 cup water
  • Sesame Seeds , for garnish (optional)
Instructions
  1. Make the Asian sauce by mixing ingredients in a small bowl. Set the bowl aside until ready to use.
  2. Put sesame oil into a large skillet or wok. Turn heat to medium high for 30 seconds. To the hot oil add chopped green onions, minced garlic, and red pepper flakes. Stir well and cook for 30 seconds, stirring constantly and being careful NOT to burn the garlic.
  3. Add the green beans to the skillet. Stir constantly and cook for 3-4 minutes, until they are just about fully cooked. The beans will turn a deeper green color as they cook. When beans are done, move them over to one side of the skillet. Give the Asian sauce a good stir and add it to the skillet. Stir well, and cook the sauce for 30 seconds (still on medium-high heat); let the sauce come to a boil, then turn the heat to LOW. The sauce will thicken slightly. Stir the sauce into the green beans to coat. Cook beans and sauce for another 30 seconds, then remove skillet from heat.
  4. Place the hot green beans and sauce onto serving plate or in a bowl, and garnish with sesame seeds (if using). Serve the green beans while hot... and ENJOY!
Nutrition Facts
P.F. Chang's Spicy Green Beans
Amount Per Serving (1 serving)
Calories 75 Calories from Fat 36
% Daily Value*
Fat 4g6%
Sodium 237mg10%
Potassium 194mg6%
Carbohydrates 7g2%
Fiber 2g8%
Sugar 3g3%
Protein 1g2%
Vitamin A 660IU13%
Vitamin C 10.6mg13%
Calcium 34mg3%
Iron 1mg6%
* Percent Daily Values are based on a 2000 calorie diet.

Here’s one more to pin to your Pinterest boards!P.F. Chang's spicy green beans are fresh green beans cooked in a flavorful Asian sauce, in this delicious restaurant copycat recipe!

Save

Save

Save

Save

Save

Save

Save

Save

Save

Save

Save

Save

Save

Save

Shrimp Scampi

You’re gonna love shrimp scampi, a classic Italian dish, featuring shrimp cooked in a simple lemon, butter and garlic sauce, and served on pasta!You're gonna love shrimp scampi, a classic Italian dish, featuring shrimp cooked in a simple lemon, butter and garlic sauce, and served on pasta!
Large shrimp cooked with olive oil, butter, lemon juice and lots of garlic, and served with pasta… does that sound good to you? If it does, then you will LOVE this recipe for Shrimp Scampi!

Did you know that in the United States we have “National Shrimp Scampi Day”? It is celebrated each year on April 29th. Who knew?  I recently found this recipe from celebrity chef Ina Garten and decided to try it with some shrimp I had pulled out of our freezer.

I’d made shrimp scampi many times before, using a different recipe, but decided this one was the winning ticket, so I wanted to share on my blog! It is light… and DELICIOUS!!!! Did I mention that it’s really easy to make?  Here’s how:

Scroll Down For A Printable Recipe Card At The Bottom Of The Page

How To Make Shrimp Scampi

Place a little bit of vegetable oil into a large pot of boiling water.  Add the pasta and 1 Tablespoon salt. Cook per package instructions. While pasta is cooking, cook the shrimp.

Pasta cooking in large pot, in order to serve with the shrimp scampi.

To prepare the shrimp, melt butter and olive oil in large skillet over medium-low heat. Add the minced garlic and cook for 1 minute, stirring often to prevent the garlic from burning.

Butter, garlic and olive oil are heated in skillet before adding shrimp.

Cook The Shrimp

Add all of the shrimp, plus 1½ teaspoons salt, and ground black pepper to the skillet.

Seasoned shrimp are added to the butter and lemon shrimp scampi sauce.

Cook the shrimp scampi, stirring often, and cooking both sides. Continue to cook the shrimp for a total of about 5-6 minutes, until the shrimp turn pink in color.

 All of the seasoned shrimp are cooking in skillet.

Add chopped parsley, lemon zest, lemon slices, lemon juice, and red pepper flakes to the shrimp scampi. Stir well, to fully combine all the ingredients. Sorry the photo below is a bit blurry. I must have been in a hurry to eat!

Cooking the shrimp scampi with lemons, lemon zest and parsley in a skillet.

By now the pasta should be done cooking. Drain the cooked pasta, then place it back into the pot.  Add the shrimp scampi and the sauce to the pasta.  Mix the ingredients well, so that all the pasta is coated with sauce.

Serve The Shrimp Scampi

Serve the shrimp scampi at once, while hot, and enjoy the wonderful flavors of this classic Italian seafood dish! The recipe as written makes 3 large servings or 4 slightly smaller servings.

A portion of shrimp scampi is garnished with fresh parsley and lemon slices, to serve.

The shrimp scampi meal is served, and is ready in about 30 minutes!

The shrimp scampi tastes wonderful, due in part to the freshly squeezed lemon juice and zest, plus the flavorful minced garlic! I have a hunch you will absolutely LOVE this meal!

My husband and I had the leftovers the next day for lunch, and they tasted just as good as the night before!  Hope you will consider giving this recipe a try. It’s quick, easy and so incredibly good! Have a great day, and come back again soon.

Looking For More SHRIMP Recipes?

You can find ALL my recipes in the Recipe Index, located at the top of the page. I have some delicious shrimp recipes, including:

Interested In More Recipes?

Thank you for visiting this website. I appreciate you using some of your valuable time to do soIf you’re interested, I publish a newsletter 2 times per month (1st and 15th) with all the latest recipes, and other fun info. I would be honored to have you join our growing list of subscribers, so you never miss a great recipe!
There is a Newsletter subscription box on the top right side (or bottom) of each blog post, depending on the device you use, where you can easily submit your e-mail address (only) to be included in my mailing list.

You Can Also Find Me On Social Media:
Facebook page: The Grateful Girl Cooks!
Pinterest: The Grateful Girl Cooks!
Instagram: jbatthegratefulgirlcooks

Author's signature

Recipe Source:  http://www.foodnetwork.com/recipes/ina-garten/linguine-with-shrimp-scampi-recipe3-1916619

0 from 0 votes
Shrimp Scampi
Prep Time
15 mins
Cook Time
10 mins
Total Time
25 mins
 

You're gonna love shrimp scampi, a classic Italian dish, featuring shrimp cooked in a simple lemon, butter and garlic sauce, and served on pasta!

Category: Entree
Cuisine: Italian
Keyword: shrimp scampi
Servings: 3 servings
Calories Per Serving: 652 kcal
Author: JB @ The Grateful Girl Cooks!
Ingredients
  • 1 teaspoon Vegetable oil
  • 2 teaspoons salt (divided)
  • 1/2 pound linguini or spaghetti
  • 3 Tablespoons butter
  • Tablespoons olive oil
  • Tablespoons minced garlic (approx 4 large cloves)
  • 1 pound large shrimp , peeled and deveined
  • 1/4 teaspoon ground black pepper
  • 1/3 cup chopped fresh parsley leaves
  • Grated zest from 1/2 large lemon
  • 1/3 cup fresh squeezed lemon juice (approx. 2-3 lemons)
  • 1/4 lemon , thinly sliced into rounds
  • 1/8 teaspoon hot red pepper flakes
Instructions
  1. Place a teaspoon of vegetable oil and teaspoon of salt into a large pot of boiling water. Add the pasta. Cook per package instructions. While pasta is cooking, cook the shrimp.

  2. To prepare shrimp, melt butter and olive oil in large skillet on medium-low heat. Add the minced garlic and cook for 1 minute, stirring often to prevent the garlic from burning.
  3. Add shrimp; season with 1 teaspoon salt, and ground black pepper to the skillet. Cook, stirring often (and cooking both sides), for a total of about 5 minutes, until the shrimp turn pink in color. Remove skillet from the heat. Add chopped parsley, lemon juice, lemon slices, lemon zest, and the red pepper flakes. Stir well, to fully combine ingredients.

  4. By now the pasta should be done cooking. Drain pasta, then place pasta back into the pot. Add the shrimp and sauce to the pasta right away. Toss ingredients well, so that pasta is coated with sauce. Serve hot, and enjoy!
Nutrition Facts
Shrimp Scampi
Amount Per Serving (1 serving)
Calories 652 Calories from Fat 234
% Daily Value*
Fat 26g40%
Saturated Fat 9g56%
Cholesterol 411mg137%
Sodium 2060mg90%
Potassium 382mg11%
Carbohydrates 61g20%
Fiber 2g8%
Sugar 3g3%
Protein 41g82%
Vitamin A 935IU19%
Vitamin C 31.6mg38%
Calcium 255mg26%
Iron 4.8mg27%
* Percent Daily Values are based on a 2000 calorie diet.

Here’s one more to pin on your Pinterest boards!You're gonna love shrimp scampi, a classic Italian dish, featuring shrimp cooked in a simple lemon, butter and garlic sauce, and served on pasta!

Save

Save

Save

Save

Save

Save

Save

Save

Save

Easy Chicken Salad For Sandwiches

This easy copycat version of a famous East Coast chicken salad for sandwiches is convenient to have in the refrigerator for a quick meal!
This easy and delicious copycat version of a famous East Coast chicken salad is convenient to have in the refrigerator for a quick sandwich for lunch or dinner!
Do you enjoy chicken salad?  Today I want to share with you a wonderful recipe for Easy Chicken Salad For Sandwiches! It’s really yummy!

I enjoy having chicken salad made up and ready in the fridge during hot summers, so I can make chicken salad sandwiches for my family any time I want!

The original recipes comes from a website I enjoy called “A Family Feast”.  Martha and her husband Jack (the bloggers/cooks) have a wonderful website, Facebook and Pinterest pages that feature some fantastic recipes. I highly recommend their website (see recipe source below)!

Here’s how to make this delicious chicken salad for sandwiches.

Scroll Down For A Printable Recipe Card At The Bottom Of The Page

Why This Is Called A “Copycat” Recipe

The recipe is a copycat version of a brand of chicken salad for sandwiches marketed and sold on the East Coast.  While I have never tasted the original Willow Tree Chicken Salad, I found this recipe almost identical (minus the brown sugar/garlic powder) to the recipe my Mom’s been making for years.

That was enough for me to try it. so I decided to test this version out!  YUM! The chicken salad is very flavorful, and not too “mayonnaise-y” (new word!) once ingredients are combined.

It’s also fairly inexpensive to make, and very easy to prepare.  The recipe makes 4-6 servings, depending on how much chicken salad you use for each sandwich, and it tastes GOOD.

If you want to cut out some carbs and not use bread, simply place the chicken salad between lettuce leaves and roll up like a burrito to eat!   Here’s how to make this tasty chicken salad:

Shred The Meat For The Chicken Salad For Sandwiches

The recipe calls for cooked boneless, skinless chicken breast.  I simply boil the chicken breasts in water until done (the easy way), but however you cook the chicken is up to you.

Once the chicken is cooked, place the chicken breasts in a stand mixer (with the paddle attachment on). Shred the chicken on medium speed until it’s finely shredded.

If you want to shred the chicken by hand instead of using a mixer, simply use two forks.

Shredding chicken for salad in electric mixer

This is how it looks once done. You will have a nice big bowl of finely shredded chicken, and it only takes a couple of minutes!

Shredded chicken for sandwiches

Add The Rest Of The Ingredients

Add the rest of the ingredients to the shredded chicken (mayonnaise, celery, onion, brown sugar, garlic powder, salt and pepper).

Mayonnaise, onion, celery and spices added to shredded chicken

Stir all of the chicken salad ingredients well, until thoroughly blended. Take a bite, and add additional salt and/or pepper, to suit your taste.

Cover the chicken salad with plastic wrap, and keep it refrigerated until you are ready to make and serve the sandwiches.

Easy chicken salad ready for sandwiches

Chicken Salad For Sandwiches Is Now Ready To Eat!

When you’re ready to make sandwiches, place the chicken salad on top of lettuce leaves on sandwich bread, cut in half, and serve! That’s it!  Pretty easy, right?

Keep any leftovers covered in the refrigerator for up to 3-4 days. Now you can make delicious chicken salad sandwiches whenever you want!

Chicken salad sandwiches, served with corn chips and raspberries

I sure do love summer in Oregon!  It is such a blessing to have warmth, sunshine, and blue skies, especially after the wettest, gloomiest Winter and Spring I can recall in several years!

Having this chicken salad for sandwiches pre-made and ready is a welcome thing, so we can be outside enjoying the beauty of the Pacific Northwest! Thanks for stopping by, and have a great day!

Looking For More SANDWICH Recipes?

You can find ALL of my recipes in the Recipe Index, which is located at the top of the page. I have some wonderful and delicious sandwich recipes to check out, including:

Want More Recipes? Get My FREE Newsletter!

I publish a newsletter 2 times per month (1st and 15th) with lots of recipes, tips, etc..
Would you like to join our growing list of subscribers?

There is a Newsletter subscription box on the top right (or bottom) of each blog post, depending on the device you use.
You can submit your e-mail address there, to be added to my mailing list.

Find Me On Social Media:

Facebook page: The Grateful Girl Cooks!
Pinterest:
The Grateful Girl Cooks!
Instagram:
jbatthegratefulgirlcooks

Author's signature

Recipe Source: www.afamilyfeast.com/copycat-willow-tree-chicken-salad/

↓↓ PRINTABLE RECIPE BELOW ↓↓

0 from 0 votes
Easy Chicken Salad For Sandwiches
Prep Time
10 mins
Cook Time
0 mins
Total Time
10 mins
 

This easy and delicious copycat version of a famous East Coast chicken salad is convenient to have in the refrigerator for a quick sandwich for lunch or dinner!

Category: Sandwich
Cuisine: American
Keyword: chicken salad
Servings: 4 -6 servings
Calories Per Serving: 325 kcal
Author: JB @ The Grateful Girl Cooks!
Ingredients
  • 1 pound cooked chicken breast (boneless/skinless), shredded
  • 3/4 cup mayonnaise
  • 3 Tablespoons finely minced celery
  • 3 Tablespoons finely minced onion
  • 1 Tablespoon brown sugar
  • 1/8 teaspoon garlic powder
  • 1/4 teaspoon ground black pepper
  • 1/4 teaspoon salt (+ more to taste, as desired)
Instructions
  1. Place cooked boneless, skinless chicken breasts in a stand mixer (with paddle attachment on). Shred chicken on medium speed until finely shredded. If you want to shred by hand instead of using a mixer, use two forks.
  2. Add the rest of the ingredients to the shredded chicken (celery, onion, brown sugar, garlic powder, salt and pepper). Stir all ingredients well, until thoroughly blended. Take a bite; add additional salt and/or pepper, as desired. Cover salad with plastic wrap, and refrigerate until ready to serve.
  3. When ready to make sandwiches, place the chicken salad on top of lettuce leaves on sandwich bread, and serve! Keep leftover chicken salad covered in refrigerator for up to 3-4 days.
Recipe Notes

NOTE: Caloric calculation is based on 6 servings.
*Prep time does not include cooking time for chicken. I simply boiled the chicken in water until done, but however you pre-cook chicken is your choice.

Nutrition Facts
Easy Chicken Salad For Sandwiches
Amount Per Serving (1 serving)
Calories 325 Calories from Fat 207
% Daily Value*
Fat 23g35%
Saturated Fat 4g25%
Cholesterol 76mg25%
Sodium 334mg15%
Potassium 211mg6%
Carbohydrates 2g1%
Sugar 2g2%
Protein 23g46%
Vitamin A 50IU1%
Vitamin C 0.3mg0%
Calcium 14mg1%
Iron 0.8mg4%
* Percent Daily Values are based on a 2000 calorie diet.

Here’s one more to pin on your Pinterest boards!This easy and delicious copycat version of a famous East Coast chicken salad is convenient to have in the refrigerator for a quick sandwich for lunch or dinner!

Save

Save

Save

Save

Save

Save

Save

Save

Save

Save

Save

Save

Save

Save

Save

Cranberry Chicken

Cranberry Chicken is delicious and easy to make, with baked chicken breasts, whole cranberry sauce, onion soup mix, pecans and Catalina dressing.
If you’re looking for a completely simple, yet delicious new chicken recipe to try, may I suggest this one for Cranberry Chicken?

Chicken breasts are layered with whole cranberry sauce, onion soup mix, chopped pecans, dried cranberries, topped with Catalina dressing. It is baked until done, then served on steamed rice.

If that ingredient list sounds strange, you’re not alone. That was my reaction the first time I saw the ingredient list. Guess what? The ingredients for cranberry chicken may sound a bit odd, but the finished chicken dish tastes really good!

Here’s how to make cranberry chicken.

Scroll Down For A Printable Recipe Card At The Bottom Of The Page

How To Make Cranberry Chicken

This meal takes less than 10 minutes of prep work (how great is THAT?). The recipe is as simple as layering ingredients and baking.

First, spray a 9×13 baking pan with non stick spray. Place boneless, skinless chicken breasts in the pan in a single layer.

Chicken breasts are placed in a single layer in a baking dish.
Spread whole cranberry sauce evenly over chicken breasts, to cover. Who knew that raw chicken and cranberry sauce could look so festive? Ha Ha.

Whole cranberry sauce is spread over chicken breasts.Time To Do Some “Sprinkling”

Sprinkle the onion soup mix evenly over all that cranberry sauce. See how easy this is so far? Told you it was easy.

Onion soup mix is sprinkled over cranberry chicken.
Sprinkle some crunchy, chopped pecans evenly over the soup mix. Now this dish is almost done, and you’ve probably not gotten too worn out, right?

Chopped pecans are added to cranberry chicken dish.
Ready to “sprinkle” again? YEP. Evenly sprinkle the dried cranberries over the pecans.

Dried cranberries are added to cranberry chicken in baking dish.Add Catalina Dressing

Pour a bottle of Catalina dressing evenly over the top of the chicken.  I use my own Homemade Catalina Salad Dressing, but a regular sized bottle of store bought dressing works perfectly!

Catalina salad dressing is poured over cranberry chicken in baking dish.Bake The Cranberry Chicken

Lightly cover the pan with aluminum foil. Bake the cranberry chicken at 350 degrees F. for 45 minutes. 

Remove the foil, and continue baking the chicken for an additional 15 minutes. Remove the chicken from the oven. The chicken is done when cooked through to an internal temperature of 165°F.

This is what the cranberry chicken looked like when it was done and came out of the oven. Let it cool for 2-3 minutes before serving.

Cranberry chicken out of the oven after baking for one hour.Serve The Cranberry Chicken!

Serve the cranberry chicken on top of hot cooked rice, on individual serving plates (or a serving platter).

Spoon some of the extra sauce over the top of each piece of chicken, for added flavor. Now you’re ready to eat this delicious main dish.

Cranberry chicken is served over white rice.

That’s it!  Cranberry chicken really is such an easy recipe to prepare!  We enjoyed trying this chicken dish, and hope you will, too! My husband said the taste reminded him of Thanksgiving (must be those cranberries!).

Have a wonderful day, and remember… be kind, and seek to encourage those whom you encounter today. There’s no telling what hardship or troubles they might be facing, and YOU could be the person who makes a difference in their day!

Looking For More CHICKEN Recipes?

You can find ALL of my  recipes in the Recipe Index, which is located at the top of the page. I have LOTS of chicken recipes for you to check out, including:

Want More Recipes? Get My FREE Newsletter!

I publish a newsletter 2 times per month (1st and 15th) with lots of recipes, tips, etc..
Would you like to join our growing list of subscribers?

There is a Newsletter subscription box on the top right (or bottom) of each blog post, depending on the device you use.
You can submit your e-mail address there, to be added to my mailing list.

Find Me On Social Media:

Facebook page: The Grateful Girl Cooks!
Pinterest:
The Grateful Girl Cooks!
Instagram:
jbatthegratefulgirlcooks

Author's signature

Recipe Source:  https://favfamilyrecipes.com/cranberry-chicken/

↓↓ PRINTABLE RECIPE BELOW ↓↓

0 from 0 votes
Cranberry Chicken
Prep Time
5 mins
Cook Time
1 hr
Total Time
1 hr 5 mins
 

Cranberry Chicken is delicious and easy to make, with baked chicken breasts, whole cranberry sauce, onion soup mix, pecans and Catalina dressing.

Category: Entree
Cuisine: American
Keyword: cranberry chicken
Servings: 6 servings
Calories Per Serving: 574 kcal
Author: JB @ The Grateful Girl Cooks!
Ingredients
  • 3 large boneless , skinless chicken breasts, cut in half horizontally (or 6 small breasts)
  • 14 ounces whole berry cranberry sauce , 1 can
  • 2 ounces dry onion soup mix , 1 envelope
  • 1 cup chopped pecans
  • 1 cup dried cranberries
  • 8 ounces Catalina dressing
  • Cooked white or brown rice (to serve with chicken on top)
Instructions
  1. Spray a 9x13 or 10x12 baking pan with non stick spray. Place chicken in pan in single layer.
  2. Spread cranberry sauce evenly over chicken breasts. Sprinkle onion soup mix evenly over cranberry sauce. Sprinkle chopped pecans evenly over soup mix. Sprinkle dried cranberries evenly over pecans. Pour bottle of Catalina dressing evenly over pecans.
  3. Lightly cover pan with aluminum foil. Bake at 350 degrees for 45 minutes. Remove aluminum foil, and continue baking for an additional 15 minutes.
  4. Place chicken pieces on top of hot cooked rice on individual serving plates (or a serving platter). Spoon some of the extra sauce over the top of the chicken for added flavor. Serve, and enjoy!
Nutrition Facts
Cranberry Chicken
Amount Per Serving (1 piece)
Calories 574 Calories from Fat 252
% Daily Value*
Fat 28g43%
Saturated Fat 3g19%
Cholesterol 36mg12%
Sodium 1032mg45%
Potassium 308mg9%
Carbohydrates 67g22%
Fiber 3g13%
Sugar 58g64%
Protein 13g26%
Vitamin A 55IU1%
Vitamin C 2.2mg3%
Calcium 20mg2%
Iron 0.9mg5%
* Percent Daily Values are based on a 2000 calorie diet.

Here’s one more to pin on your Pinterest boards!Cranberry Chicken is delicious and easy to make, with baked chicken breasts, whole cranberry sauce, onion soup mix, pecans and Catalina dressing.

Save

Save

Save

Save

Save

Save

Save

Save

Happy Independence Day!

Happy Independence Day from our family to yours!  As someone who considers herself privileged to have  been raised in this great country, I am so grateful for the many freedoms I am fortunate enough to enjoy. As one writer puts it… we are the land of the free,  BECAUSE of the brave!

I’ve shared this independence day quote from Erma Bombeck before, but want to post it again, as it kind of sums up this day, where people all across our country gather together for BBQ’s, fun, and fireworks to celebrate the United States of America, and our founding fathers who put it all on the line for FREEDOM..Happy Independence Day / The Grateful Girl Cooks!
Have a fun, safe, and DELICIOUS celebration, friends.  We’ll be out of state on vacation, but we still plan (or my hubby, the Grill Master) on grilling something tasty, and enjoying this special day!

The Grill Master, busy at work. Should I tell him the lighter fluid goes on the briquets? Nah… he’s having way too much fun!

Happy Independence Day / The Grateful Girl Cooks!

Hope you light a few sparklers and have a happy Independence day!

Happy Independence Day!

Have a happy independence day celebration with family and friends. May God continue to bless America.

Author's signature

Save

Save

Save

Save

Save

Save

Save

West African Chicken and Peanut Stew

West African Chicken Peanut Stew features chicken, beans, tomatoes, corn and sweet potato in a peanut based sauce, served over steamed rice. West African Chicken Peanut Stew features chicken, beans, tomatoes, corn and sweet potato in a peanut based sauce, served over steamed rice. 
This unique, tasty and filling stew is quite popular on the west coast of Africa. I recently made this (new to us) recipe for West African Chicken Peanut Stew. After eating it, I decided to share the recipe on my blog, because it is a delicious, filling, easy to prepare, and unique dish!  I really think you will enjoy it.

When I first found the recipe in an old Bake-Off Contest cookbook from 1994, I wasn’t so sure that I wanted to try it. I just wasn’t sure of the flavor combos in this recipe, but I tried it anyway, and we really enjoyed it!

Here’s an interesting tidbit:  The original recipe called the peanuts “groundnuts”, because that is what a peanut is called on the western coast of Africa… who knew?

What is IN West African Chicken Peanut Stew?

This dish contains chicken, sweet potatoes, corn, white beans and onions, and is cooked in a tomato and peanut butter sauce with a few spices to give it a bit of “zing”.  I know what you’re probably thinking right about now after reading the ingredients… whaaaat?

That was my first gut reaction, as well. BUT… trust me, this actually is a wonderful, flavor-filled thick stew, and because you serve it over rice, it’s very filling, too!

Scroll Down For A Printable Recipe Card At The Bottom Of The Page

How To Make West African Chicken Peanut Stew

Heat oil in a large 4 quart heavy bottomed pan on medium-high heat. Once the oil is hot, add cubed chicken breast. Cook, stirring often until chicken is cooked through and no longer pink.

Chicken breasts are cubed, then pan-seared to make chicken peanut stew.

The chopped onion and garlic are the next things to go into the pot. Cook these ingredients, stirring them frequently for about 3 minutes, being careful to not let the garlic burn.

Minced garlic and chopped onions are added to the cooked chicken.

Add The Veggies

Place the diced tomatoes (undrained), white beans, corn, and cubed raw sweet potato into the pot. Stir them together, to combine.

White beans, corn, sweet potato and tomatoes are added to the chicken peanut stew.
Add the water, peanut butter, tomato paste, and remaining spices to the pan. Stir to combine, and bring this mixture to a boil.

Spices, peanut butter, and tomato paste are added to the pot.

Time To Let The Stew Cook!

Once it comes to a boil, reduce the heat to low. Cover the pan, and cook the stew for 30 minutes, or until the sweet potato chunks are tender. Stir the stew occasionally while it cooks. If the broth is too thick, add a bit more water, and stir to combine.

The African stew cooks until sweet potatoes are tender.

Serve The West African Chicken Peanut Stew

When the chicken peanut stew is done, serve it over hot white or brown rice. Garnish each serving with chopped fresh parsley and a few chopped peanuts (optional), and serve the dish while hot.

The recipe for chicken peanut stew makes 8 (1½ cup) servings.  That’s it!

The West African Chicken Peanut Stew is garnished with parsley and peanuts, and served on rice.

A white bowl containing rice, with chicken peanut stew on top.

I truly was pleasantly surprised at how good this dish was. My husband really loved it, too!  If you enjoy STEW, be sure to check out my recipe for Beef Stew… it is delicious!

Sure hope you will consider making this unique chicken peanut stew, and trust you will enjoy it! Have a great day.

Interested In More Recipes?

Thank you for visiting this website. I appreciate you using some of your valuable time to do soIf you’re interested, I publish a newsletter 2 times per month (1st and 15th) with all the latest recipes, and other fun info. I would be honored to have you join our growing list of subscribers, so you never miss a great recipe!
There is a Newsletter subscription box on the top right side (or bottom) of each blog post, depending on the device you use, where you can easily submit your e-mail address (only) to be included in my mailing list.

You Can Also Find Me On Social Media:
Facebook page: The Grateful Girl Cooks!
Pinterest: The Grateful Girl Cooks!
Instagram: jbatthegratefulgirlcooks

Author's signatureRecipe Adapted From: Pillsbury Classic Cookbooks- Bake-Off Coking & Baking Contest, published March 1994, The Pillsbury Company, page 28.

↓↓ PRINTABLE RECIPE BELOW ↓↓

0 from 0 votes
West African Chicken Peanut Stew
Prep Time
15 mins
Cook Time
30 mins
Total Time
45 mins
 

West African Chicken Peanut Stew features chicken, beans, tomatoes, corn and sweet potato in a peanut based sauce, served over steamed rice.

Category: Dinner
Cuisine: African
Keyword: African chicken peanut stew
Servings: 8 servings
Calories Per Serving: 360 kcal
Author: JB @ The Grateful Girl Cooks!
Ingredients
  • 2 boneless skinless chicken breasts , cut into 1/2 inch pieces
  • 1 Tablespoon peanut oil or vegetable oil
  • 1 medium brown onion , chopped
  • 1 garlic clove , minced
  • 1 (28 oz.) can diced tomatoes, undrained
  • 1 can (15.5 oz) Great Northern or Cannelini beans
  • 1 can (12 or 15.5 oz) whole kernel corn, drained
  • 1 sweet potato , peeled and chopped
  • 3/4 cup water
  • 1/3 cup peanut butter
  • 1 Tablespoon tomato paste
  • 1 teaspoon salt
  • 1 teaspoon chili powder
  • 1/2 teaspoon ground ginger
  • 1/2 teaspoon cayenne pepper
  • 3 cups hot cooked white or brown rice
Instructions
  1. Heat oil in a large 4 quart heavy bottomed pan on medium-high heat. Once oil is hot, add cubed chicken breast. Cook, stirring often until chicken is cooked through and no longer pink.
  2. Add chopped onion and garlic to pan. Cook, stirring frequently for about 3 minutes, being careful to not let the garlic burn.
  3. Add diced tomatoes (undrained), white beans, corn, and cubed raw sweet potato to pan. Stir to combine.
  4. Add water, peanut butter, tomato paste, and remaining spices to pan. Stir to combine. Bring mixture to a boil.
  5. Once mixture boils, reduce heat to low, cover pan and cook stew for 30 minutes (sweet potato should be tender). Stir occasionally. If stew is too thick, add just a bit more water.
  6. When stew is done, serve over hot white or brown rice. Garnish each serving with chopped fresh parsley and a few chopped peanuts (optional), and serve hot. The recipe makes 8 (1½ cup) servings.
Nutrition Facts
West African Chicken Peanut Stew
Amount Per Serving (1 serving (incl. rice))
Calories 360 Calories from Fat 81
% Daily Value*
Fat 9g14%
Saturated Fat 1g6%
Cholesterol 18mg6%
Sodium 624mg27%
Potassium 863mg25%
Carbohydrates 52g17%
Fiber 9g38%
Sugar 7g8%
Protein 18g36%
Vitamin A 2685IU54%
Vitamin C 12.9mg16%
Calcium 92mg9%
Iron 3.4mg19%
* Percent Daily Values are based on a 2000 calorie diet.

Here’s one more to pin on your Pinterest boards!West African Chicken Peanut Stew features chicken, beans, tomatoes, corn and sweet potato in a peanut based sauce, served over steamed rice.

Save

Save

Save

Save

Save

Save

Save

Save

Save

Jalapeño Cheddar Bagels

Make your own incredibly delicious jalapeño cheddar bagels from scratch! Bagels are much easier to make than you might think… pass the cream cheese!Make your own incredibly delicious jalapeño cheddar bagels from scratch! Bagels are much easier to make than you might think... pass the cream cheese!
Do you enjoy bagels? We sure do, in our home.  I love eating them AND making them, especially when they come out tasting as good as these homemade Jalapeño Cheddar Bagels!

I’ve made several types of bagels in the past (see list below).  I discovered that New York style bagels are much easier to make than you might think!  This time around, I decided to try my hand at making Jalapeño Cheddar bagels! YUM.

TIP: Make these delicious bagels when you have a little time on your hands, because the dough has to rise for a while.  Making homemade bagels is an economical way to make 8 great quality bagels, without ever having to leave your own home!

Scroll Down For A Printable Recipe Card At The Bottom Of The Page

Jalapeño Cheddar Bagels, cooling on wire rack after baking.

The Basic Method Used To Make Jalapeño Cheddar Bagels

When I made these jalapeño cheddar bagels, I didn’t take photos of the “how-to’s”, but if you wish to SEE how they are made, check out my step by step pics/tutorial for my New York Style Blueberry Bagels.  This will give you a good idea of the method involved to make bagels (they’re EASY).

Here’s the basic process: The jalapeño cheddar bagel dough is mixed, then left to rise. Once the dough has risen, it is divided into balls of dough. The dough balls are formed into bagel shapes, boiled, and then baked until done. By boiling AND baking, these jalapeño cheddar bagels transform into a nice looking, chewy bagel! That’s just the way a New York style bagel should be! YUM!

Who Wants A Delicious Bagel?

Adding finely chopped jalapeños and cheddar cheese give this variety of bagel wonderful, extra flavor! When you add a dollop or schmear of cream cheese on top, you’ve got bakery shop quality jalapeño cheddar bagels that can’t be beat! They are sooooo good! Here ya go…would you like one? I made extra, because I like to share!!!

Offering you a homemade jalapeño cheddar bagel to eat!
Jalapeño cheddar bagels are golden brown on the outside, and they are nice and chewy on the inside. Who wants to eat one? YES, PLEASE!

Jalapeño Cheddar Bagels on a wire rack, ready to eat.

I hope you will consider giving this recipe for jalapeño cheddar bagels a try. They are fairly easy to make, and taste wonderful!  Thanks for stopping by today, and I invite you to come back soon for more family friendly recipes.

Looking For More BAGEL Recipes?

If you enjoy making homemade bagels, then be sure to check out the other bagel recipes I have on this blog. They include:

Interested In More Recipes?

Thank you for visiting this website. I appreciate you using some of your valuable time to do soIf you’re interested, I publish a newsletter 2 times per month (1st and 15th) with all the latest recipes, and other fun info. I would be honored to have you join our growing list of subscribers, so you never miss a great recipe!
There is a Newsletter subscription box on the top right side (or bottom) of each blog post, depending on the device you use, where you can easily submit your e-mail address (only) to be included in my mailing list.

You Can Also Find Me On Social Media:

Facebook page: The Grateful Girl Cooks!
Pinterest:
The Grateful Girl Cooks!
Instagram:
jbatthegratefulgirlcooks

Author's signatureRecipe Source: My version of New York Blueberry bagels, with slight tweaks for the different ingredients (jalapeños and cheddar)

↓↓ PRINTABLE RECIPE BELOW ↓↓

5 from 1 vote
Jalapeño Cheddar Bagels
Prep Time
2 hrs 30 mins
Cook Time
20 mins
Total Time
2 hrs 50 mins
 
Make your own incredibly delicious jalapeño cheddar bagels from scratch! Bagels are much easier to make than you might think... pass the cream cheese!
Category: Bread/Breakfast
Cuisine: American
Keyword: jalapeno cheddar bagels
Servings: 8 bagels
Calories Per Serving: 269 kcal
Author: JB @ The Grateful Girl Cooks!
Ingredients
  • 0.25 ounces active dry yeast (1 envelope)
  • 2 Tablespoons granulated sugar
  • cups warm water , divided
  • cups all-purpose flour
  • teaspoons salt
  • 3 medium jalapeño peppers , de-seeded and diced
  • 4 ounces sharp cheddar cheese , grated, divided
Instructions
  1. In a small bowl, dissolve yeast and sugar in 1/2 cup of warm water. Let rest for 5 minutes. Little bubbles should form on the surface after 5 minutes, indicating the yeast is "alive".
  2. In large bowl or the bowl from a stand mixer, mix together salt and flour - making a "well" in the center of flour. Add yeast mixture and additional water to the flour. Gently fold in diced jalapeños and 3/4 of the grated cheddar cheese.
  3. Knead (either by hand or by using the dough hook on your stand mixer) until dough becomes soft and elastic (this could take approx. 5 + minutes).
  4. Cover the dough bowl with a dishtowel, set bowl in a warm place and let dough rise, until doubled in size (about 1-1½ hours). Turn risen dough out onto lightly floured surface (dust dough with flour so it is easier to work with).
  5. Divide dough into 8 balls (shape and pull the edges of dough to the underside of the ball for a smoother ball). With floured hands, take both of your thumbs and press into the center of each ball, forming a hole. Stretch hole to form a bagel shape (can pick up the bagel dough and enlarge the hole from the bottom). Once bagels have been formed, set aside; let dough rest for 30 minutes.
  6. While bagel dough is resting, preheat your oven to 425 degrees AND bring a large stock pot 3/4 full of water to a rolling boil.
  7. Place bagels 2-3 at a time in boiling water for 3-4 minutes, flipping them over halfway through cooking time (make sure they have floated to the top of the pan). Remove the bagels from water (I use 2 chopsticks), and place on an ungreased baking sheet. Repeat process with remaining bagels.
  8. Bake in a 425 degree oven for 10 minutes. Sprinkle remaining cheddar cheese on top of bagels, then continue baking for another 10 minutes or until you see they are golden brown on top (mine usually take a bit longer...just keep an eye on them). When done, remove from oven... and ENJOY!
Nutrition Facts
Jalapeño Cheddar Bagels
Amount Per Serving (1 bagel)
Calories 269 Calories from Fat 45
% Daily Value*
Fat 5g8%
Saturated Fat 3g19%
Cholesterol 14mg5%
Sodium 525mg23%
Potassium 85mg2%
Carbohydrates 45g15%
Fiber 1g4%
Sugar 3g3%
Protein 9g18%
Vitamin A 200IU4%
Vitamin C 6.2mg8%
Calcium 110mg11%
Iron 2.6mg14%
* Percent Daily Values are based on a 2000 calorie diet.

Here’s one more to pin on your Pinterest boards!Make your own incredibly delicious jalapeño cheddar bagels from scratch! Bagels are much easier to make than you might think... pass the cream cheese!

Save

Save

Save

Save

Save

Save

Save

Save

Save

Save

Save

Save

Save

Save

Maple and Cinnamon Spiced Nuts

Maple cinnamon spiced nuts are a great snack, featuring pecans, cashews and almonds coated with maple syrup, sugar and spices, then baked until done.Maple cinnamon spiced nuts are a great snack, featuring pecans, cashews and almonds coated with maple syrup, sugar and spices, then baked until done.
Recently I made a batch of Maple Cinnamon Spiced Nuts and served them at a birthday dinner for my husband.  Pecans, cashews and almonds are coated in a small amount of maple syrup and beaten egg white, then tossed with sugar, salt, nutmeg, cinnamon, cardamon and a touch of cayenne pepper, and  baked until done (and delicious!).

They were really quite good; we enjoyed them alongside other snacks/appetizers before dinner!  These maple cinnamon spiced nuts are really easy to make – here’s how:

Scroll Down For A Printable Recipe Card At The Bottom Of The Page

How To Make Male Cinnamon Spiced Nuts

Preheat oven to 350 degrees F.  Whisk granulated sugar, cinnamon, salt, cardamom, nutmeg, and cayenne pepper in a small bowl until spices are well blended. Set aside.

Cinnamon, sugar and spices in small mixing bowl

In a separate large bowl, beat or whisk the egg white with the maple syrup until the liquid is bubbly and frothy.

Beating egg whites to coat spiced nuts

Add pecans, cashews and almonds to the egg white mixture. Stir well, to fully coat the nuts with the egg white/maple syrup mixture.

Mixed nuts coated with egg whites before baking

Once the nuts are coated, add the spice mixture, and stir well, to fully coat the nuts with the spices.  Line a large (13×9) rimmed baking sheet with a layer of parchment paper.

Mixed nuts are coated with cinnamon, sugar and spice mixture
Bake The Maple Cinnamon Spiced Nuts

Pour the coated nut mixture out onto a parchment paper-lined baking sheet. Spread them out so they are in a single layer, separating them from each other as much as possible.  Place in oven and bake for 25-30 minutes, stirring every 10 minutes (then re-spread them out), so the nuts and sugar won’t burn.

Maple cinnamon coated spiced nuts are spread out to bake

When the maple cinnamon spice nuts are done baking in 25-30 minutes (mine took 25), they will be dark brown. Almost all of the liquid will have dried onto the nuts.  Spread the nuts out on a clean piece of parchment paper or aluminum foil to let them continue drying (and are not sticky).

Maple Cinnamon Spiced Nuts after baking and drying
Eat, Store, Or Give Away As Gifts!

Store the nuts in an airtight container.  You can serve them as a wonderful tasting snack OR the maple cinnamon spiced nuts would be a great gift for a friend any time of the year, when packaged in a cute mason jar or decorative container!

Maple Cinnamon Spiced Nuts served in white bowlMaple Cinnamon Spiced Nuts, wrapped in canning jar for gift giving

These Maple Cinnamon Spiced Nuts are delicious! Not too sweet, not too spicy… just right!  Sure hope you will give this recipe a try. I really appreciated how easy they were to make!

Looking For More SNACK Recipes?

You can find ALL my recipes in the Recipe Index, located at the top of the page. I have some delicious snack recipes featuring a variety of nuts, including:

Interested In More Recipes?

Thank you for visiting this website. I appreciate you using some of your valuable time to do soIf you’re interested, I publish a newsletter 2 times per month (1st and 15th) with all the latest recipes, and other fun info. I would be honored to have you join our growing list of subscribers, so you never miss a great recipe!
There is a Newsletter subscription box on the top right side (or bottom) of each blog post, depending on the device you use, where you can easily submit your e-mail address (only) to be included in my mailing list.

You Can Also Find Me On Social Media:
Facebook page: The Grateful Girl Cooks!
Pinterest: The Grateful Girl Cooks!
Instagram: jbatthegratefulgirlcooks

Author's signature

Recipe Adapted From: http://www.tablefortwoblog.com/maple-cinnamon-spiced-nuts/

0 from 0 votes
Maple and Cinnamon Spiced Nuts
Prep Time
5 mins
Cook Time
30 mins
Total Time
35 mins
 

Maple cinnamon spiced nuts are a great snack, featuring pecans, cashews and almonds coated with maple syrup, sugar and spices, then baked until done.

Category: Appetizer, Snack
Cuisine: American
Keyword: maple cinnamon spiced nuts
Servings: 9 (3 cups total)
Calories Per Serving: 295 kcal
Author: JB @ The Grateful Girl Cooks!
Ingredients
  • 1 egg white
  • 2 Tablespoons maple syrup
  • 2 cups pecans
  • 1/2 cup almonds
  • 1/2 cup cashews
  • 1/2 teaspoon salt
  • 1/2 cup granulated sugar
  • teaspoons ground cinnamon
  • 1/2 teaspoon cardamom (optional- I left it out)
  • 1/2 teaspoon nutmeg
  • 1/4 teaspoon cayenne pepper
Instructions
  1. Preheat your oven to 350 degrees F.
  2. Whisk granulated sugar, cinnamon, salt, cardamom, nutmeg, and cayenne pepper in a small bowl until spices are well blended. Set aside.
  3. In a separate large bowl, beat or whisk egg white with maple syrup until the liquid is bubbly and frothy.
  4. Add pecans, cashews and almonds to egg white mixture. Stir well, to fully coat the nuts with egg white/maple syrup mixture.
  5. Once the nuts are coated, add the spice mixture, and stir well, to fully coat the nuts with the spices. Line a large rimmed baking sheet with a layer of parchment paper.
  6. Pour the coated nut mixture out onto a parchment paper-lined large baking sheet. Spread them out so that they are in a single layer, and separate them from each other as much as possible. Place in oven and bake for 25-30 minutes, stirring every 10 minutes (then re-spread them out), so the nuts and sugar won't burn. When they are done in 25-30 minutes, they will be dark brown, and almost all of the liquid will have dried onto the nuts. Remove from oven, and spread the nuts out on a clean piece of parchment paper or aluminum foil to let them continue drying (and are not sticky). Store the nuts at room temperature in an airtight container. Enjoy!
Nutrition Facts
Maple and Cinnamon Spiced Nuts
Amount Per Serving (0.333 cups)
Calories 295 Calories from Fat 198
% Daily Value*
Fat 22g34%
Saturated Fat 2g13%
Sodium 136mg6%
Potassium 208mg6%
Carbohydrates 21g7%
Fiber 3g13%
Sugar 15g17%
Protein 5g10%
Vitamin A 35IU1%
Vitamin C 0.2mg0%
Calcium 47mg5%
Iron 1.4mg8%
* Percent Daily Values are based on a 2000 calorie diet.

Here’s one more to pin on your Pinterest boards!Maple cinnamon spiced nuts are a great snack, featuring pecans, cashews and almonds coated with maple syrup, sugar and spices, then baked until done.


Save

Save

Save

Save

Save

Save

Save

Save

Gingerbread Granola

Make gingerbread granola from scratch in 30 minutes! With cinnamon, ginger, cloves and molasses, you’ll love this as cereal, or a yogurt /ice cream topping!I recently whipped up a batch of Gingerbread Granola ( in about 30 minutes!), and have really enjoyed having it around our house for a quick breakfast cereal or snack.

I recently whipped up a batch of Gingerbread Granola ( in about 30 minutes!), and have really enjoyed having it around our house for a quick breakfast cereal or snack.

The original recipe came from Pinterest, and I made the granola for the first time a few days after finding it.  The recipe was very quick and easy to make, and took only about 30 minutes, from start to finish!

Scroll Down For A Printable Recipe Card At the Bottom Of The Page

How To Make Gingerbread Granola

It is very easy to make this delicious gingerbread granola, which features rolled oats, coconut, chopped nuts, dried cranberries (or raisins), cinnamon, molasses, ginger and cloves. There are a lot of traditional gingerbread spices in this simple granola!

In a large mixing bowl, whisk molasses, oil, salt, cinnamon, cloves and ginger together until mixture is fully blended.

Mixing molasses with spices to make gingerbread granola.

Add the old-fashioned rolled oats, coconut, and chopped pecans (or walnuts) to the molasses mixture. Stir until the ingredients for this gingerbread granola are fully coated.

Oats, coconut and chopped nuts are ready to add to the gingerbread granola mixture.

Evenly divide the mixture. Pour it onto two large rimmed baking sheets.  The reason to put it on TWO baking sheets is because spreading the mixture onto TWO sheets, enables the granola to cook quicker.

Bake The Gingerbread Granola

Spread the granola mixture out very well on both sheets.  Bake in a preheated 325 degree oven for 25 minutes. Stir the oats occasionally during the baking time, then re-spread the oats back out on the sheets, and continue baking.

Gingerbread Granola is baked in oven until golden brown.

The gingerbread granola is done when the oats have turned light brown. Mine took 25 minutes to bake to this stage. Your batch may take a couple minutes shorter or longer, because oven temps. vary. I recommend checking it at 20 minutes!

Stir Cranberries Into Gingerbread Granola

Once done, remove the gingerbread granola from oven, and stir in the dried cranberries (or raisins).  Be sure to let the granola cool completely to room temperature. Once the gingerbread granola has cooled completely, place it into an airtight container for storage.

Gingerbread Granola is done baking, and dried cranberries are added to mixture.

How To Store The Granola

Store the granola in canning jars or other airtight containers. This recipe makes enough to fill a quart sized jar and a pint sized jar. A serving size is about 1/2 cup, so you will have approximately 11 servings total.

Gingerbread Granola Is Great For Gift-Giving Or Other Uses

Gingerbread Granola would be a thoughtful gift to give to give a friend or family member, especially during the holidays. You could put a nice label and a decorative ribbon on the jar to make it look nice and festive!

Gingerbread Granola can be stored in canning jars.

This gingerbread flavored granola would also taste wonderful over ice cream or frozen yogurt, or mixed into a morning parfait with fruit and Greek yogurt!

Gingerbread granola can be used in yogurt parfaits.

It is very convenient to have this gingerbread granola around the house to enjoy as a delicious breakfast cereal with milk for breakfast. YUM.

Gingerbread Granola can be eaten with milk as a breakfast cereal.

Hope you will consider trying this recipe.  There are many possibilities for using this simple yet tasty granola! Have a blessed day! If you enjoy homemade granola, be sure to check out my recipes for Cranberry Almond Granola and Coconut Pecan Chocolate Chip Granola.

Thank you for stopping by today. Don’t forget- you can find ALL of my recipes in the Recipe Index, which is located at the top of the page. Have a great day, and come back soon.

Interested In More Recipes?

Thank you for visiting this website. I appreciate you using some of your valuable time to do soIf you’re interested, I publish a newsletter 2 times per month (1st and 15th) with all the latest recipes, and other fun info. I would be honored to have you join our growing list of subscribers, so you never miss a great recipe! 

There is a Newsletter subscription box on the top right side (or bottom) of each blog post, depending on the device you use, where you can easily submit your e-mail address (only) to be included in my mailing list.

You Can Also Find Me On Social Media:

Facebook page: The Grateful Girl Cooks!
Pinterest:
The Grateful Girl Cooks!
Instagram:
jbatthegratefulgirlcooks

Author's signature

Recipe Adapted From: http://kitchensimplicity.com/gingerbread-granola

0 from 0 votes
Gingerbread Granola
Prep Time
5 mins
Cook Time
25 mins
Total Time
30 mins
 
Make gingerbread granola from scratch in 30 minutes! With cinnamon, ginger, cloves and molasses, you'll love this as cereal, or a yogurt /ice cream topping!
Category: Breakfast
Cuisine: American
Keyword: gingerbread granola
Servings: 11 (½ cup servings)
Calories Per Serving: 267 kcal
Author: JB @ The Grateful Girl Cooks!
Ingredients
  • 1/3 cup molasses
  • 2 Tablespoons canola oil (or mild tasting oil)
  • 1/4 teaspoon salt
  • 1 teaspoon ground cinnamon
  • 3/4 teaspoon ground ginger
  • 1/4 teaspoon ground cloves
  • 3 cups rolled oats (old-fashioned, not instant)
  • 1 cup flaked coconut
  • 1 cup pecans (or walnuts), chopped
  • 1/2 cup dried cranberries (or raisins)
Instructions
  1. Preheat oven to 325 degrees F.
  2. In a large mixing bowl, add first 6 ingredients (molasses, oil, salt, cinnamon, ginger and cloves). Whisk these together until fully blended.
  3. Add rolled oats, coconut flakes and chopped nuts to molasses mixture; stir until oats, etc. are coated.
  4. Divide and spread mixture out evenly onto 2 large baking sheets (with rims). Bake at 325 degrees for 25-30 minutes. Stir oats occasionally (every 7-8 minutes), then redistribute them on baking sheets, and bake until the oats become light brown in color.
  5. Remove oats from oven and stir in dried cranberries (or raisins). Let the granola cool completely on the baking sheets before transferring to an airtight container, or serving. Enjoy!
Nutrition Facts
Gingerbread Granola
Amount Per Serving (0.5 cup)
Calories 267 Calories from Fat 135
% Daily Value*
Fat 15g23%
Saturated Fat 5g31%
Sodium 61mg3%
Potassium 308mg9%
Carbohydrates 30g10%
Fiber 4g17%
Sugar 12g13%
Protein 4g8%
Vitamin A 5IU0%
Vitamin C 0.2mg0%
Calcium 43mg4%
Iron 2mg11%
* Percent Daily Values are based on a 2000 calorie diet.

Here’s one more to post on your Pinterest boards!Make gingerbread granola from scratch in 30 minutes! With cinnamon, ginger, cloves and molasses, you'll love this as cereal, or a yogurt /ice cream topping!

Save

Save

Save

Save

Save

Save

Save

Save

Save