Garlic Ginger Sesame Marinated Chicken is delicious and easy to make! Chicken breasts are marinated in sauce, and cooked on a BBQ or indoor grill pan!

We eat a lot of chicken in our home. It is such a versatile type of food, because it can be fixed in so many different ways, with so many different flavor combos! Recently I made this delicious, but incredibly SIMPLE recipe for Garlic Ginger Sesame Marinated Chicken, and wanted to share it here.
This marinade I found in a cookbook was created for flank steak, but I thought it would taste great on chicken, as well, so I tried it! YUM! The recipe is super easy to make, and the end result is deliciously flavored chicken breasts! Boneless, skinless chicken breasts are marinated for at least an hour in an easy to make marinade.
After the chicken has marinated, all you do is cook the chicken on a bbq grill or on a griddle pan in the kitchen. EASY PEASY, right? For the photos below, I cooked the marinated chicken on a cast iron grill that was placed directly over a flame on my stove.
Scroll Down For A Printable Recipe Card At The Bottom Of The Page
Make The Marinade For The Chicken
Making the marinade is very simple to do. Place grated fresh ginger, toasted sesame oil, vegetable oil, minced green onion (scallions), and minced garlic cloves into a blender. Blend these ingredients for about 30 seconds, or until the mixture is fully blended and fairly smooth.


Pour (scraping the blender clean) the marinade into a large re-sealable bag or a shallow container. Add the boneless, skinless chicken breasts to the marinade, and turn to coat them completely with marinade. Seal or cover chicken, and place in refrigerator to marinate for AT LEAST 1 hour. I made mine up in the morning, so it marinated all day!
NOTE: The recipe, as written below in the printable recipe card, makes enough for 4 chicken breasts. As you can see from my photos, I only cooked 2 pieces of chicken, so I cut the marinade amount in half.


Cooking The Marinated Chicken
After marinated chicken has been in the refrigerator for at least an hour (or when you’re ready to cook it), spray a grill (off heat) with non-stick baking spray or brush with vegetable oil generously. Heat grill on medium-high temperature until it’s really hot, but not smoking.
Once the grill is really hot, carefully transfer the marinated chicken to the grill. You should hear it sizzle when it hits the grill. Once you place the chicken on the grill, do not disturb or move it. After about 8-10 minutes, carefully flip the chicken over to the other side.
How Long Do I Cook The Garlic Ginger Sesame Marinated Chicken?
For THICK chicken breasts: After 8-10 minutes, the bottom of the chicken breast should be nice and golden brown. After you flip the chicken over, set a timer for 8 minutes and check for internal temperature. I used thick breasts and they took 18 minutes total to fully cook.
For THIN chicken breasts: Thin cutlet type chicken breasts will obviously cook a LOT faster than thicker ones (they may only take 3-4 minutes per side).


TIP:**Cooking times will vary due to different thicknesses of chicken breasts. Check the internal temperature by inserting a meat thermometer into the thickest part of the breast. Chicken is done when the internal temp. is at 165° F.


Time To Enjoy This Delicious Chicken
Once the marinated chicken has fully cooked, Iet it “rest” for a couple minutes, to let the juices redistribute within the meat. this helps to keep the chicken “juicy”.
We enjoyed this chicken with steamed broccoli, red peppers, and cauliflower, and some rice on the side. The meal was simple, satisfying, and we loved the subtle marinade flavor on the chicken! It tasted delicious!

I really hope you will consider trying this recipe for garlic ginger sesame marinated chicken. It’s an easy chicken dish to make, especially if you marinade the chicken early in the day! Hope you enjoy a truly wonderful day.
Looking For More CHICKEN Recipes?
If you’re looking for more chicken recipes, be sure to check them all out in the Recipe Index, located at the top of the page (there’s a LOT of them!). A few family favorites include:
- Crunchy Buttermilk Fried Chicken
- Alice Springs Chicken (Outback Steakhouse copycat)
- Chicken Cutlets with Pecan Sauce
- Chicken Piccata
Interested In More Recipes?
Thank you for visiting this website. I appreciate you using some of your valuable time to do so. If you’re interested, I publish a newsletter 2 times per month (1st and 15th) with all the latest recipes, and other fun info. I would be honored to have you join our growing list of subscribers, so you never miss a great recipe!
There is a Newsletter subscription box on the top right side (or bottom) of each blog post, depending on the device you use, where you can easily submit your e-mail address (only) to be included in my mailing list.
You Can Also Find Me On Social Media:
Facebook page: The Grateful Girl Cooks!
Pinterest: The Grateful Girl Cooks!
Instagram: jbatthegratefulgirlcooks

Original source for marinade recipe: Page 501 in “The Complete America’s Test Kitchen TV Show Cookbook 2001-2019”, copyright 2018, published by America’s Test Kitchen.
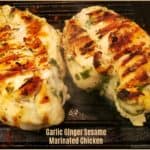
Garlic Ginger Sesame Marinated Chicken is delicious and easy to make! Chicken breasts are marinated in sauce, and cooked on a BBQ or indoor grill pan!
- 4 medium boneless, skinless chicken breasts
- 1/4 cup toasted sesame oil
- 2 Tablespoons vegetable oil
- 3 Tablespoons fresh ginger , finely grated
- 2 stems green onion , minced
- 3 Tablespoons garlic cloves , minced
Place grated fresh ginger, toasted sesame oil, vegetable oil, minced green onion (scallions), and minced garlic cloves into a blender. Blend these ingredients for about 30 seconds, or until mixture is fully blended and fairly smooth.
Pour (scraping blender clean) the marinade into a large re-sealable bag or shallow container. Add the chicken breasts to the marinade, and turn to coat them completely with marinade. Seal bag or cover container, and place in refrigerator to marinate for AT LEAST 1 hour.
After chicken has marinated for at least an hour, spray a grill (off heat) with non-stick baking spray or generously brush with oil. Heat grill on medium-high temperature until really hot, but not smoking. Transfer chicken to the grill. It should sizzle when it hits grill. Once chicken is on grill, do not disturb or move it. After about 8-10 minutes, flip chicken over to the other side. TIP:**Cooking times will vary due to different thicknesses of chicken breasts. Check the internal temperature by inserting a meat thermometer into thickest part of the breast. Chicken is done when internal temp. is 165° F. Remove chicken from grill and let it "rest" for a couple minutes, to let juices redistribute within the meat before serving.
For THICK chicken breasts: After 8-10 minutes, the bottom of the chicken breast should be nice and golden brown. After you flip the chicken over, set a timer for 8 minutes and check for internal temperature. I used thick breasts and they took 18 minutes total to fully cook.For THIN chicken breasts: Thin cutlet type chicken breasts will obviously cook a LOT faster than thicker ones (they may only take 3-4 minutes per side).
Serve... and enjoy!
Here’s one more to pin on your Pinterest boards!


 tastes great on cream cheese covered crackers or burgers! It's easy to can them for long term storage. / The Grateful Girl Cooks!")
 / The Grateful Girl Cooks!")
 / The Grateful Girl Cooks!")
 / The Grateful Girl Cooks!")
 / The Grateful Girl Cooks!")
 / The Grateful Girl Cooks!")
 / The Grateful Girl Cooks!")
 / The Grateful Girl Cooks!")

 tastes great on cream cheese covered crackers or burgers! It's easy to can them for long term storage. / The Grateful Girl Cooks!")


