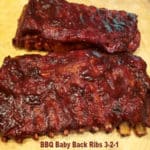
Make BBQ baby back ribs in “3-2-1” on a pellet grill. Ribs are smoked 3 hours, cooked in foil 2 hours, & grilled with sauce 1 hour! Easy & delicious.

This recipe for BBQ baby back ribs is fairly easy, especially with it’s easy to remember 3-2-1 game plan! My husband and I enjoyed these delicious ribs last month which were smoked, then cooked on our Traeger grill, and decided to share this recipe (also from Traeger) here on the blog.
Summer evenings and hot temperatures seem to pair very nicely with bbq ribs that are sloppy with sauce, and tender to the bite! YUM… BBQ baby back ribs are a definite favorite summer food of ours! Here’s how to make 3-2-1 bbq baby back ribs on a Traeger or pellet grill:
Scroll Down For A Printable Recipe Card At The Bottom Of The Page
Prepare The Baby Back Ribs For Smoking
The first part of Traeger’s 3-2-1- cooking method is to smoke the ribs for 3 hours, after seasoning them. Make sure to remove the silverskin (thin membrane) from the bone side of the ribs (if your grocery store butcher has not already done so). Pat the ribs dry with paper towels.

Mix mustard, ¼ cup apple juice, and worcestershire sauce together in a small bowl. Using a pastry brush, brush this sauce onto BOTH sides of each rib rack.
Lightly season (to taste) the racks of pork with your favorite pork and poultry rub spice mix. I used my homemade dry rub spice mix (for pork or chicken), and just sprinkled each rack with a decent covering of spice mix.


Step #1- BBQ Baby Back Ribs In The Smoker
Prepare your pellet grill according to manufacturer instructions. For a Traeger, fill the pellet hopper, and turn the temperature gauge to SMOKE. Leave lid open. Once a fire has been established and grill is smoking (about 4-5 minutes), turn the temperature gauge to 180° F. Let the grill preheat for 15 minutes with the lid closed.
Place the racks of bbq baby back ribs directly onto the grill grate, with the meat side facing up. Smoke the ribs for 3 hours, with the lid closed. Once done, transfer ribs off the grill onto a rimmed baking sheet, and take them into kitchen. Turn temperature setting up to to 225° F.


Prepare The Smoked Baby Back Ribs
Now for the next step! Pull off 4 long sheets of heavy duty foil. Put a rack of smoked ribs on top in the middle. Pull up the sides to surround the meat, because you will be adding liquid in a moment. Evenly distribute HALF of the brown sugar on top of the ribs. Drizzle the brown sugar with HALF of the honey, and HALF of the remaining apple juice (¼ cup).
Put another long piece of aluminum foil on top of the ribs, and close up all the foil, crimping the edges, so the packet is securely sealed. You don’t want it to leak! Repeat the process with the other rack of ribs.


Step #2- Put Foil-Wrapped BBQ Baby Back Ribs Back On Grill
Place the foil-wrapped racks of ribs back directly onto the grill grate. Close the lid, and cook the ribs for 2 hours at 225° F. After 2 hours have passed, carefully remove the foil off of the ribs. I did this in our kitchen, because there is a lot of juice in the foil packets. Discard the foil. Keep the ribs (just sayin’).


Step #3- Grill The BBQ Baby Back Ribs
Okay, now we’re ready for the final step in the 3-2-1 method. Once you’ve discarded the foil, brush your favorite BBQ sauce on both sides of each rack of ribs.
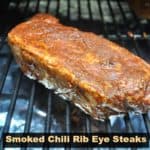
Place the ribs directly on the grill grate, and grill for 1 hour! They sure do look good right about now, right? Toward the end of the grilling time, we added asparagus (another recipe on the blog) to the grill, as well.

When done, transfer the bbq baby back ribs to a cutting board. Let them rest for about 5 minutes, then slice between the bones, and serve!


Sure hope you enjoy the ribs, cooked 3-2-1 Traeger style! We sure did. It’s an easy to remember method (smoke/braise/grill), and the bbq ribs were delicious! Have a nice day.
Looking for more TRAEGER Recipes?
You can find all of my recipes in the Recipe Index, located at the top of the page. I have several recipes for grilling meats (and desserts) on a Traeger, including:
Interested In More Recipes?
Thank you for visiting this website. I appreciate you using some of your valuable time to do so. If you’re interested, I publish a newsletter 2 times per month (1st and 15th) with all the latest recipes, and other fun info. I would be honored to have you join our growing list of subscribers, so you never miss a great recipe!
There is a Newsletter subscription box on the top right side (or bottom) of each blog post, depending on the device you use, where you can easily submit your e-mail address (only) to be included in my mailing list.
You Can Also Find Me On Social Media:
Facebook page: The Grateful Girl Cooks!
Pinterest: The Grateful Girl Cooks!
Instagram: jbatthegratefulgirlcooks

Original recipe source: https://www.traegergrills.com/recipes/pork/3-2-1-baby-back-ribs
↓↓ PRINTABLE RECIPE BELOW ↓↓
Make BBQ baby back ribs in "3-2-1" on a pellet grill. Ribs are smoked 3 hours, cooked in foil 2 hours, & grilled with sauce 1 hour! Easy & delicious.
- 2 racks baby back ribs
- ⅓ cup yellow mustard
- ½ cup apple juice divided use
- 1 Tablespoon worcestershire sauce
- Pork and Poultry Spice Rub (or homemade, to taste)
- ½ cup dark brown sugar
- 1 cup BBQ sauce (your favorite)
- ⅓ cup honey (warmed)
Prepare your pellet grill according to manufacturer instructions. For a Traeger, fill the pellet hopper, and turn the temperature gauge to SMOKE. Leave lid open. Once a fire has been established and grill is smoking (about 4-5 minutes), turn the temperature gauge to 180° F. Let the grill preheat for 15 minutes with the lid closed.
Step #1- BBQ Baby Back Ribs In The Smoker: Remove silverskin from ribs (if your grocery store butcher has not already done so). Pat ribs dry with paper towels. Mix mustard, ¼ cup apple juice, and worcestershire sauce together in a small bowl. Brush sauce onto BOTH sides of each rib rack. Lightly season (to taste) the ribs with your favorite pork and poultry rub spice mix. I used my homemade dry rub spice mix . Place racks of ribs directly onto the grill grate, with meat side facing up. Smoke ribs for 3 hours, with the lid closed. Once done, transfer ribs off of grill onto a rimmed baking sheet. Close lid. Turn temperature setting up to to 225° F.
Step #2- For each rack: Pull off 4 long sheets of heavy duty foil. Stack them on top of each other. Put one rack of smoked ribs on top in the middle. Pull up the sides to surround the meat, because you will be adding liquid. Evenly distribute HALF of the brown sugar on top of the ribs. Drizzle with HALF of the honey, and remaining ¼ cup of apple juice. Put another long piece of aluminum foil on top of the ribs, and tightly close up foil, crimping the edges, so the packet is securely sealed. You don't want it to leak! Repeat the process with the other rack of ribs. Place foil-wrapped ribs back directly onto grill grate. Close lid, and cook ribs for 2 hours at 225° F. After 2 hours, carefully remove foil off of the ribs. Do this in your kitchen, because there is a lot of juice in the foil. Discard foil.
Step #3- Brush your favorite BBQ sauce onto both sides of each rack of ribs. Place the ribs directly on the grill grate, and cook for 1 hour! When done, remove ribs from grill; let meat rest for 5 minutes, then slice, and enjoy!
Caloric calculation was based on 1/2 rack per serving (total of 4 servings). If you serve 6 with this recipe, the caloric calculation per serving comes out to approximately 653 calories per serving. These are best estimates, because the weight of each rack of ribs will vary, as well as the type of BBQ sauce used.
Here’s one more to pin on your Pinterest boards!


