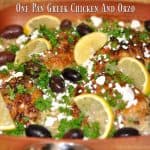
Merry Christmas 2015!

Merry Christmas 2015!

I love this quote from “How The Grinch Stole Christmas”, by Dr. Seuss:

 “And the Grinch, with his Grinch-feet ice cold in the snow, stood puzzling and puzzling, how could it be so? It came without ribbons. It came without tags. It came without packages, boxes or bags. And he puzzled and puzzled ’till his puzzler was sore. Then the Grinch thought of something he hadn’t before. What if Christmas, he thought, doesn’t come from a store. What if Christmas, perhaps, means a little bit more.”

Merry Christmas 2015!

Thank You!

Just a quick note to say thank you to all who have visited this blog in 2015. I am taking a two week break over the holidays to narrow my focus onto the TRUE meaning of this blessed season… the birth of Jesus.

My life has been forever changed because of His mercy, grace and unconditional love for me. I am so very GRATEFUL.  My hope and prayer is that this Christmas season holds special meaning for you, as well.

I look forward to a new year and sharing many delicious recipes in 2016 with you. God Bless!

Author's signature

Save

Save

Save

Save

Chili Spaghetti

Looking for a quick and easy pasta dinner with a Mexican twist? How about making a batch of Chili Spaghetti, with chili, green onions, cheese and sour cream?Looking for a quick and easy pasta dinner with a Mexican twist? How about making a batch of Chili Spaghetti, with chili, green onions, cheese and sour cream?
When you really think about it, traditional spaghetti has tomatoes, meat, tomato sauce, onions, garlic and cheese (Parmesan). It’s a straight up, not too hard ITALIAN-INSPIRED meal to prepare. Well- guess what? Many of those same ingredients are found in Chili (homemade or purchased), but with a completely different spices. So why NOT make a MEXICAN-INSPIRED spaghetti meal, right? Right.

If you enjoy chili, and you enjoy spaghetti, read on! This easy meal will be a perfect combo meal for you!  Making chili spaghetti is super simple, and it tastes so very good! The pasta dish is very filling, and full of flavor. My hubby and I love having this meal occasionally. If you are more into “regular” spaghetti, be sure and check out my recipes for Easy Spaghetti Sauce with Italian Sausage or Easy Meatballs for Spaghetti.

I make my Mom’s recipe for homemade chili  so I always seem to have some extra in the freezer. I use that for this recipe, but for crying out loud… if you don’t have homemade, just buy some good quality chili (meat and beans) to make this EASY!

How To Make Chili Spaghetti

Prepare pasta according to package directions. While the spaghetti noodles are cooking, heat up the chili in a large skillet. A couple minutes before the spaghetti has finished cooking, ladle out about 1/4 cup pasta water (this has starch in it), and stir it into the chili.

Cooking pasta for chili spaghetti.

Remove pasta from pan about one minute before it is done. Drain pasta well without rinsing, then add it to the skillet with the chili in it. Stir well or use tongs, to fully combine the chili and the spaghetti noodles.

Cooked pasta is added to chili to make chili spaghetti.

Continue to cook the chili spaghetti for a couple minutes until well coated and pasta is fully cooked through.

Chili Spaghetti is mixed and heated through, in large skillet.

Serving Chili Spaghetti

When done, transfer the pasta onto individual serving plates. Spoon a little leftover chili from pan onto pasta. Garnish the spaghetti chili with grated cheddar cheese, sliced green onions and a dollop of sour cream. Serve piping hot, and enjoy!

Note** If you are using store bought canned chili, be sure you have enough chili in the skillet to completely coat the spaghetti! You will also need to have some extra chili in the skillet to spoon on top of the pasta when you plate it!

Chili spaghetti is garnished with cheddar cheese, green onions and sour cream before serving.

No recipe is really needed for chili spaghetti. IT’S WAY TOO EASY!   Sure hope you will give this a try. It is a very easy meal to “throw together” on a busy day, when you are pressed for time, and the family is starving! Have a great weekend, friends. May you find moments of love, laughter, peace, and great JOY!

Looking For More PASTA Recipes?

You can find ALL of my recipes in the Recipe Index, located at the top of the page. I have lots of pasta recipes, including:

Interested In More Recipes?

Thank you for visiting this website. I appreciate you using some of your valuable time to do soIf you’re interested, I publish a newsletter 2 times per month (1st and 15th) with all the latest recipes, and other fun info. I would be honored to have you join our growing list of subscribers, so you never miss a great recipe! 

There is a Newsletter subscription box on the top right side (or bottom) of each blog post, depending on the device you use, where you can easily submit your e-mail address (only) to be included in my mailing list.

You Can Also Find Me On Social Media:

Facebook page: The Grateful Girl Cooks!
Pinterest:
The Grateful Girl Cooks!
Instagram:
jbatthegratefulgirlcooks

Author's signature

Here’s one more to pin on your Pinterest boards!Looking for a quick and easy pasta dinner with a Mexican twist? How about making a batch of Chili Spaghetti, with chili, green onions, cheese and sour cream?

Save

Save

Chex Mix Munchies – Made In The Microwave!

Chex Mix Munchies are a classic treat that has been updated to make in a microwave oven. Before you know it, you’ll be enjoying this crunchy snack!Chex Mix Munchies are a classic treat that has been updated to make in a microwave oven. Before you know it, you'll be enjoying this crunchy snack!
My Great Aunt used to make Chex Mix every year. It was a treat, as a young girl at Christmas time, to grab a big handful from what seemed like a never empty bowl of this snack when we visited her home.

My Great Aunt would make then bake her chex mix for hours before we arrived, then serve it to all of us hungry kids. That seems like a lot of work, so I am thankful for a much quicker method to make this delicious, classic snack!

Scroll Down For A Printable Recipe Card At The Bottom Of The Page

It’s Now A LOT Easier To Make Chex Mix Munchies!

Well, nowadays we can make Chex Mix Munchies in a microwave oven, in under 15 minutes! Ah yes… the wonders of modern technology! Instant satisfaction for those munchie cravings, without all the time it used to take to make them!

Making this great snack is as easy as mixing the ingredients together, mixing melted butter and spices, stirring, and cooking it in the microwave. Boom! Instant chex mix munchies! Our family polished off a huge bowl of chex mix munchies while playing cards! Holy cow! They are soooo yummy! Here’s how to make this classic appetizer in the microwave!

How To Make Chex Mix Munchies

Put ingredients in a large microwavable bowl. Bet you won’t even break into a sweat doing that!

Chex mix munchies getting ready to be microwaved.

Melt the butter in a small microwave-safe dish in the microwave.

Butter is melted to make sauce for chex mix munchies.

Mix up the spices and Worcestershire sauce in a separate bowl. Add this mixture to the melted butter, and stir to combine.

Worcestershire sauce and spices added to melted butter for chex mix.

Pour this seasoning mixture over the Chex mix munchies. Stir really well, and distribute sauce evenly over all the ingredients.

Sauce added to chex mix in bowl, then stirred to blend.

Time To Cook Them In The Microwave

Microwave the chex mix on high for 5-6 minutes, stirring the mixture well, every 2 minutes. When done, spread the Chex mix munchies out on paper towels, so they can cool completely.

Chex mix munchies are microwaved then cooled before serving.

Storing This Snack Mix

Once they’re completely cool, store the Chex Mix Munchies in an airtight covered container. That’s it, and see how easy it is to make this scrumptious, addictive snack?

Store the chex mix in an airtight resealable container.

The recipe for chex mix munchies makes about twenty four 1/2 cup servings. That’s plenty for everyone to eat, OR to package part of it up and give as gifts!! I really hope you enjoy these addicting snacks, and don’t say I didn’t warn you. They are scrumptious, and it will be hard to keep out of them!

Have a great day, and please come back again soon, for more yummy recipe ideas. Take care.

Looking For More SNACK Recipes?

You can find ALL my recipes in the Recipe Index, located at the top of the page. A few favorite snack recipes include:

Interested In More Recipes?

Thank you for visiting this website. I appreciate you using some of your valuable time to do soIf you’re interested, I publish a newsletter 2 times per month (1st and 15th) with all the latest recipes, and other fun info. I would be honored to have you join our growing list of subscribers, so you never miss a great recipe!
There is a Newsletter subscription box on the top right side (or bottom) of each blog post, depending on the device you use, where you can easily submit your e-mail address (only) to be included in my mailing list.

You Can Also Find Me On Social Media:

Facebook page: The Grateful Girl Cooks!
Pinterest:
The Grateful Girl Cooks!
Instagram:
jbatthegratefulgirlcooks

Have a fantastic day!

Author's signatureRecipe Adapted From: General Mills Recipe, “Original Chex Party Mix” (recipe on cereal box)

0 from 0 votes
Chex Mix Munchies - Made In The Microwave!
Prep Time
5 mins
Cook Time
6 mins
Total Time
11 mins
 
Chex Mix Munchies is a classic treat that has been updated to make in a microwave oven. Before you know it, you'll be enjoying this crunchy snack!
Category: Appetizer/Snack
Cuisine: American
Keyword: chex mix munchies
Servings: 24 servings (1/2 cup each)
Calories Per Serving: 212 kcal
Author: JB @ The Grateful Girl Cooks!
Ingredients
  • 3 cups Corn Chex cereal
  • 3 cups Rice Chex cereal
  • 3 cups Wheat Chex cereal
  • 1 cup Cheerios (I used Team Cheerios)
  • 1 cup mixed nuts
  • 1 1/2 cups stick pretzels (bit size)
  • 6 Tablespoons butter
  • 2 Tablespoons Worcestershire sauce
  • 1 1/2 teaspoons seasoning salt
  • 3/4 teaspoon garlic powder
  • 1/2 teaspoon onion powder
Instructions
  1. Put the cereals, nuts, pretzel sticks, and Cheerios in a large microwavable bowl. Set aside.
  2. Melt butter in a small microwavable bowl until melted (about 35-40 seconds on high). Stir in Worcestershire sauce, seasoning salt, garlic powder, and onion powder. When completely blended, pour this over the bowl of cereal mix.
  3. Microwave on high for 5-6 minutes (UNCOVERED). Every 2 minutes, stir the ingredients to continue coating everything. When done, spread the Chex Mix out on paper towel and let them cool completely.
  4. Once cool, store Chex Mix Munchies in a covered container.
Nutrition Facts
Chex Mix Munchies - Made In The Microwave!
Amount Per Serving (1 (1/2 cup serving))
Calories 212 Calories from Fat 54
% Daily Value*
Fat 6g9%
Saturated Fat 2g13%
Cholesterol 7mg2%
Sodium 483mg21%
Potassium 179mg5%
Carbohydrates 37g12%
Fiber 4g17%
Sugar 4g4%
Protein 5g10%
Vitamin A 620IU12%
Vitamin C 6mg7%
Calcium 99mg10%
Iron 12.2mg68%
* Percent Daily Values are based on a 2000 calorie diet.

Here’s one more to pin on your Pinterest boards!Chex Mix Munchies are a classic treat that has been updated to make in a microwave oven. Before you know it, you'll be enjoying this crunchy snack!


Save

Save

Save

Mom’s Refrigerator Fruitcake (it’s not THAT kind of fruitcake!)

So, let’s just say this right off the bat… I don’t like “traditional” fruitcake. You know – the “door-stopper” kind, the unfortunate victim of many jokes.  My Mom’s Refrigerator Fruitcake is not that kind of fruitcake.  THIS fruitcake is chewy and tastes more like candy. Amen.My Mom's Refrigerator Fruitcake is not THAT kind of fruitcake.  THIS fruitcake is chewy and tastes more like candy. Amen.
When I thought about what to name this post, I thought long and hard about calling it “fruitcake”, because many people despise fruitcake. My mom has been calling it fruitcake for as long as I can remember… BUT it tastes like candy
!

Mom’s refrigerator fruitcake is chewy, and yes, it has bits of cherries, pineapple and raisins in it, but it also has marshmallows, butter, pecans and graham cracker crumbs. It is dense, chewy and AMAZING…and most importantly, is not baked, and tastes NOTHING like that other stuff. Oh yeah- it’s gorgeous, also (like stained glass)! If you can melt butter, chop things, and know how to stir, YOU can make this recipe!

Scroll Down For A Printable Recipe Card At the Bottom Of The Page

Here’s How To Make Mom’s Refrigerator Fruitcake

You will need candied cherries (red and green), plus some candied pineapple. These are sold in most grocery stores around the holidays. The containers look like this:

Red and green candied cherries and pineapple are used for the fruitcake.

Chop up the red and green cherries, most of the pineapple and some pecans. Make sure to set aside a few red and green cherries (whole) to use for garnishing fruitcake later. Add the chopped fruit and pecans, along with raisins to a large bowl. Set it aside, and then admire it’s beauty!

Raisins and pecans are added to the candied fruit.

Pulverize the graham crackers into very fine crumbs. I used a food processor, but you can put them in re-sealable bag and use a rolling pin to crush them, as well. Just think of it as cooking therapy!  Set the graham cracker crumbs aside.

Graham crackers are pulverized into fine crumbs.

Very fine graham cracker crumbs will be added to the fruitcake mixture.

Get The Loaf Pans Prepared

Wrap 4 miniature loaf pans with aluminum foil. Note: My mom has always used empty juice cans to mold the fruitcake loaves (both ends removed, heavily buttered inside). I use aluminum foil covered mini-loaf pans.

Melt butter and really coat the inside surface of the foil (bottom AND sides). Cover it really well (to help prevent sticking). You will thank me. If using empty juice cans, no need to melt butter… just thoroughly coat entire inside of juice can with it. Set aside.

Mini loaf pans are lined with foil, then brushed with melted butter.

Making The Fruitcake

To make the fruitcake, melt 2 cubes (1 cup) of butter in a large, heavy bottomed stock pot.

Butter is melted in a large, heavy pan.

Once butter has melted, add a 16 ounce bag of marshmallows, and cook on medium low, stirring frequently until melted.

Miniature marshmallows are melted into the melted butter.

Marshmallows melting down in the pan with the butter

All of the marshmallows are almost blended into the melted butter.

Time To Add In All The GOOD Stuff!

When the marshmallows have fully melted, remove the pan from the heat. Add the candied fruit, nuts and raisins. Stir well to fully combine. This mixture WILL be thick. Just keep on stirring…

Candied fruit, nuts, and raisins added into melted butter/marshmallow mix.

All the candied fruit is stirred into the marshmallow mixture for the fruitcake.

Now add the graham cracker crumbs, and stir well. Now it will be REALLY thick. Mix until totally combined!

Finely ground graham cracker crumbs added to the fruitcake mixture in pan.

It should look like this once your arms have gotten a great workout from stirring it up! All the ingredients should be combined, and Mom’s refrigerator fruitcake mixture will be THICK.

All of the ingredients for Mom's refrigerator fruitcake are ready for loaf pans.

Divide The Fruitcake Mixture Into Prepared Loaf Pans

Divide the mixture evenly between containers while mixture is still warm. Pack it into the molds tightly to help shape the loaves. I find it really helpful to butter my fingers to help pack it in. Cover Mom’s refrigerator fruitcake with plastic wrap, and refrigerate at least 12 hours or overnight, to solidify the loaves.

Mom's refrigerator fruitcake is packed firmly into prepared mini loaf pans.

Decorate And Serve Mom’s Refrigerator Fruitcake

After refrigerating, carefully pull the fruitcake out of the pans and remove the foil. Mom’s refrigerator fruitcake should look like the fruitcake shown in the photo below. It will be a solid loaf.

After refrigeration, it becomes a thick, solid loaf of fruitcake.

Garnish each loaf with cherry halves like this, shown in the photo below. To serve, use a sharp knife to cut the fruitcake into thin slices. Yum! It is so good! Store Mom’s refrigerator fruitcake wrapped tightly in plastic wrap, in the refrigerator.

Mom's refrigerator fruitcake garnished with candied cherries, and sliced to serve.

I really hope you will consider making this delicious Christmas “fruitcake”. I think you will be pleasantly surprised at just how GOOD it is and how much NOT LIKE FRUITCAKE it really is! Mom’s refrigerator fruitcake makes wonderful gifts for friends, as well. Merry Christmas!

Thank you for stopping by, and I hope you will come back again soon. Take care, and have a wonderful day!

Looking For More “Christmas Goodie” Recipes?

You can find all of my Christmas goodies in the Recipe Index, located at the top of the page. I have a LOT you will enjoy, including:

Interested In More Recipes?

Thank you for visiting this website. I appreciate you using some of your valuable time to do soIf you’re interested, I publish a newsletter 2 times per month (1st and 15th) with all the latest recipes, and other fun info. I would be honored to have you join our growing list of subscribers, so you never miss a great recipe!
There is a Newsletter subscription box on the top right side (or bottom) of each blog post, depending on the device you use, where you can easily submit your e-mail address (only) to be included in my mailing list.

You Can Also Find Me On Social Media:

Facebook page: The Grateful Girl Cooks!
Pinterest:
The Grateful Girl Cooks!
Instagram:
jbatthegratefulgirlcooks

Author's signature

Recipe Source: My Mom (she’s been making this for over 50 years… have NO IDEA where she got this recipe!)

5 from 1 vote
Mom's Refrigerator Fruitcake (it's not THAT kind of fruitcake!)
Prep Time
30 mins
Cook Time
0 mins
Total Time
30 mins
 
Refrigerated, non-baked, non-traditional fruitcake, with pecans, cherries, pineapple, marshmallows, and graham crackers. This is more like CANDY!
Category: Dessert
Cuisine: American
Keyword: refrigerator fruitcake
Servings: 24 4 mini-loaves total
Calories Per Serving: 363 kcal
Author: JB @ The Grateful Girl Cooks!
Ingredients
  • 1 (8 oz.) container red candied cherries (chopped-but save a few whole ones for garnish)
  • 1 (8 oz.) container green candied cherries (chopped-but save a few whole ones for garnish)
  • 1 (8 oz.) container candied pineapple, chopped
  • 16 ounce bag mini marshmallows (or 48 large marshmallows)
  • 1 cup raisins
  • 1 1/2 cups chopped pecans (or walnuts)
  • 2 cubes butter (one cup total)
  • graham crackers (3 "sleeves" of graham crackers-1 pound)
  • Additional butter for "greasing" loaf pans.
Instructions
  1. Have all ingredients chopped, crushed, etc. before beginning recipe. Line loaf pans with aluminum foil (completely cover bottom and sides). Butter the bottom and side of each foil covered loaf pan with butter. Do not skimp on this part. A well buttered loaf pan will help the foil to NOT stick to the fruitcake at the end when ready to remove it! Set aside pans and prepped ingredients.
  2. Melt 2 cubes butter in a large heavy bottomed saucepan.
  3. Add marshmallows; continue heating (and stirring) on medium low heat until marshmallows are fully melted. Remove from heat.
  4. Add red and green cherries, pineapple, raisins, and nuts. Stir well.
  5. Add graham cracker crumbs. Stir really well, until all ingredients are fully combined (mixture will be very thick).
  6. Divide the mixture evenly (while still warm) into 4 prepared mini-loaf pans. Butter your fingers, press down and tightly compact the mixture into the loaf pan. When done (and mixture is tightly packed into pans), cover the pans with plastic wrap, and refrigerate for at least 12 hours. When done, remove each loaf from pan. Carefully remove aluminum foil. Garnish top of each fruitcake with half a red cherry and two halves green cherries.
  7. Slice with sharp knife into thin slices, serve and enjoy! Store fruitcakes in plastic wrap (in the refrigerator).
Recipe Notes

Each mini loaf = 6 slices. Prep time does NOT include 12 hours refrigeration necessary to solidify and firm up the fruitcake! 
If using juice cans as forms for fruitcake, butter insides very well with softened butter. No aluminum foil necessary!

Nutrition Facts
Mom's Refrigerator Fruitcake (it's not THAT kind of fruitcake!)
Amount Per Serving (1 slice)
Calories 363 Calories from Fat 126
% Daily Value*
Fat 14g22%
Saturated Fat 5g31%
Cholesterol 20mg7%
Sodium 208mg9%
Potassium 113mg3%
Carbohydrates 57g19%
Fiber 2g8%
Sugar 31g34%
Protein 2g4%
Vitamin A 240IU5%
Vitamin C 1.7mg2%
Calcium 29mg3%
Iron 1.3mg7%
* Percent Daily Values are based on a 2000 calorie diet.

Here’s one more to pin on your Pinterest boards!My Mom's Refrigerator Fruitcake is not THAT kind of fruitcake.  THIS fruitcake is chewy and tastes more like candy. Amen.


Save

Save

Save

Florentine Lasagna Roll

Florentine Lasagna Roll is a delicious, easy, meatless dish with spinach and cheese filled pasta, rolled & baked, covered in an Italian tomato sauce.Florentine Lasagna Roll is a delicious, easy, meatless dish with spinach and cheese filled pasta, rolled & baked, covered in an Italian tomato sauce.
I’ve been making this meatless Florentine Lasagna Roll for almost 20 years… for potlucks and delicious dinners with our family! Filled with spinach, three kinds of cheese, garlic and onion, then covered in a simple Italian flavored tomato sauce, this recipe is easy and FABULOUS!

Even though this meal is “meatless”, you don’t need it with three cheeses, spinach and fantastic Italian flavors shining through in this meal!

The recipe is “simple”; all you do is cook lasagna noodles, mix together a cheese and spinach filling and spread it over the noodles, roll it up, cover with an Italian-flavored tomato sauce and bake. Easy, right? Right. Anyone can make this great dish!  Here’s how:

Scroll Down for A Printable Recipe Card At The Bottom Of the Page

How To Make This Lasagna Roll

Cook the spinach according to package directions, and then drain it very well, to remove as much liquid as possible.

Draining cooked spinach for lasagna roll

In a medium sized bowl, combine cream cheese, Parmesan cheese, cooked and drained spinach, chopped onion, garlic cloves, black pepper, and egg.

Filling ingredients for florentine lasagna roll in white bowl

Mix well, to completely combine ingredients. Set aside.

Cheeses and spinach are combined, for filling lasagna rolls

Cook The Pasta

Cook the lasagna noodles according to package instructions. You need 10 cooked lasagna noodles for this recipe. I cook 12, in case any of them split or break. Think of it as pasta insurance. Once cooked, drain the noodles, then arrange them on a large sheet of wax paper, overlapping the long (curly) sides to form a rectangle.

Cooked lasagna noodles are layered into a rectangle shape

Prepare The Florentine Lasagna Roll

Once noodles are fully arranged, carefully spread the filling over the noodles. I put spoonfuls of the spinach filling over the noodles, then use the back of a spoon to spread out the filling.

Florentine filling is spread onto cooked lasagna noodles

Roll It Up!

Spread grated Mozzarella cheese all over the cheese/spinach filling, then carefully roll up the pasta and filling.

To roll it up: Using the wax paper to help, begin tightly rolling the noodles up (starting with the side of rectangle with straight pasta edges). Use the wax paper to help roll noodles tightly as you go. Tuck the noodle edges under as you complete the first roll,  so you have a tight, firm roll to begin with.

Lasagna noodles and filling are rolled up, using wax paper

I pulled back some of the wax paper as I rolled to show you what it should look like.

Forming the lasagna roll

When pasta is completely rolled up, place the finished roll on a large baking sheet (one with rimmed edges). Carefully remove the last bit of wax paper from underneath the roll. The lasagna roll should look like this (see photo below).

Pasta is completely rolled up into a long shape

Make The Sauce For The Florentine Lasagna Roll

Combine the sauce ingredients (tomato sauce, sugar, basil and oregano) in a medium bowl, and then stir to combine. .

Italian tomato sauce is mixed together for lasagna rolls

Spoon the sauce over the entire surface (top and sides) of the Florentine lasagna roll. Use all of the sauce.

Italian sauce is spooned over pasta roll

When completely covered with sauce, grate Parmesan cheese all over the top and sides of the roll.

Pasta roll is covered with Italian tomato sauce and Parmesan cheese

Time To Bake The Florentine Lasagna Roll

Bake in a preheated, 350 degree oven for 35 minutes. Remove the baking sheet from oven, and let the Florentine Lasagna Roll stand for 5 minutes before attempting to slice it.

Florentine lasagna roll is baked, then sliced

With a sharp knife cut slices of the Florentine Lasagna Roll, and place on individual serving plates with a large spatula. Serve with some crusty bread and a great salad, and BOOM! You’ve got yourself a great Italian “meatless” meal… just like that!

Florentine lasagna roll is served with salad and bread, on plate

Trust me… this meal is DELICIOUS. You won’t even miss having meat in it. The flavors are amazing, it’s really EASY to make, and looks quite nice, too! Sure hope you will give this recipe a try. I think you will be pleasantly surprised! If you enjoy Italian food, you might also be interested in Florentine Manicotti, which is delicious, and uses ricotta cheese in the filling.

Have a great day during this busy holiday season. My husband and I made an intentional decision to NOT fill up this holiday season with “busy-ness” and looking for “things” to entertain us, as our culture tends to promote. Instead, we are enjoying a simple holiday season this year, trying to focus on what Christmas really means to us… the birth of our Savior, Jesus. His humble birth changed everything, and for that we are GRATEFUL.

Looking for More ITALIAN Recipes?

You can find all of my recipes in the Recipe Index, located at the top of the page. I have a lot of great Italian dishes you’ll enjoy, including:

Interested In More Recipes?

Thank you for visiting this website. I appreciate you using some of your valuable time to do soIf you’re interested, I publish a newsletter 2 times per month (1st and 15th) with all the latest recipes, and other fun info. I would be honored to have you join our growing list of subscribers, so you never miss a great recipe!
There is a Newsletter subscription box on the top right side (or bottom) of each blog post, depending on the device you use, where you can easily submit your e-mail address (only) to be included in my mailing list.

You Can Also Find Me On Social Media:

Facebook page: The Grateful Girl Cooks!
Pinterest:
The Grateful Girl Cooks!
Instagram:
jbatthegratefulgirlcooks

Author's signature

Recipe Source: unknown (wrote recipe on a 3×5 card over 20 years ago- didn’t note where I got it from)

5 from 1 vote
Florentine Lasagna Roll
Prep Time
20 mins
Cook Time
35 mins
Total Time
55 mins
 
Florentine Lasagna Roll is a delicious, easy, meatless dish with spinach and 3 cheeses filled pasta, rolled, then covered in an Italian flavored tomato sauce.
Category: Entree
Cuisine: Italian
Keyword: lasagna roll
Servings: 6 servings
Calories Per Serving: 420 kcal
Author: JB @ The Grateful Girl Cooks!
Ingredients
  • 10 cooked lasagna noodles
For The Filling:
  • 10 ounces package frozen spinach , cooked, and well drained.
  • 8 ounces package cream cheese (room temp.)
  • 1/4 cup Parmesan cheese , grated
  • 1/4 cup chopped onion
  • 1/4 teaspoon black pepper
  • 1 clove garlic , minced
  • 1 large egg , slightly beaten
  • 1 cup grated Mozzarella cheese (do not add to filling-keep separate!)
For The Sauce:
  • 24 ounces tomato sauce
  • 1/2 teaspoon granulated sugar
  • 1/2 teaspoon dried basil
  • 1/4 teaspoon dried oregano
For garnish:
  • 1/4 cup grated Parmesan cheese
Instructions
To Make The Filling:
  1. Cook spinach according to package instructions. Drain well. In small bowl, combine cream cheese, cooked spinach, 1/4 cup Parmesan cheese, chopped onion, black pepper, minced garlic and egg. Stir well until mixture is fully combined. Set aside.
To Make Lasagna Roll:
  1. Cook lasagna noodles according to package instructions. Remove from heat; drain.
  2. On wax paper, arrange the noodles overlapping the long (curly) sides to form a large rectangle.
  3. Spread cheese/spinach filling over surface of noodles. Spread grated Mozzarella cheese over the cheese/spinach filling.
  4. Starting at short ends of the pasta (non curly), roll up the pasta (in jelly roll fashion), using the wax paper to help. Tuck the ends under and firm up the roll, as you roll it up, continuing to use the wax paper as a guide. When it is roll completely, carefully transfer (might have to use two spatulas) the roll to a large (9x13) baking sheet. Carefully remove the wax paper. Seam side should be down on the sheet.
To Make Sauce:
  1. In a small bowl, combine tomato sauce, sugar, basil and oregano. Stir to combine.
To Finish Roll:
  1. Spread the sauce over top and sides of entire lasagna roll. Grate Parmesan cheese over top of the roll. Bake in preheated oven at 350 degrees for 35 minutes. Remove baking sheet from oven. Let Lasagna Roll stand for 5 minutes before attempting to slice. Using a sharp knife, slice into serving sizes, and using a spatula, place slices onto individual serving plates. Enjoy!
Nutrition Facts
Florentine Lasagna Roll
Amount Per Serving (1 serving)
Calories 420 Calories from Fat 180
% Daily Value*
Fat 20g31%
Saturated Fat 11g69%
Cholesterol 85mg28%
Sodium 693mg30%
Potassium 469mg13%
Carbohydrates 39g13%
Fiber 4g17%
Sugar 5g6%
Protein 19g38%
Vitamin A 6495IU130%
Vitamin C 6.8mg8%
Calcium 351mg35%
Iron 3.2mg18%
* Percent Daily Values are based on a 2000 calorie diet.

Here’s one more to pin on your Pinterest boards!Florentine Lasagna Roll is a delicious, easy, meatless dish with spinach and cheese filled pasta, rolled & baked, covered in an Italian tomato sauce.

Save

Save

Brown Butter Green Beans with Toasted Almonds & Red Peppers

Brown Butter Green Beans is a festive vegetable side dish featuring fresh green beans cooked in browned butter, with toasted almonds and red bell peppers!Brown Butter Green Beans is a festive vegetable side dish featuring fresh green beans cooked in browned butter, with toasted almonds and red bell peppers!

If you need a delicious side dish, may I suggest this recipe for Brown Butter Green Beans with Toasted Almonds & Red Peppers? The recipe is easy, delicious, and perfect for any occasion.

I made these brown butter green beans as one of the side dishes for our Thanksgiving meal, but they would be great as a side dish any time of year! The flavor imparted by the browned butter sets these apart… they truly are delicious!

Scroll Down For A Printable Recipe Card At The Bottom Of The Page

How To Make Brown Butter Green Beans

Toast some sliced almonds in a dry skillet for about minutes, stirring occasionally. Be careful not to burn the almonds. Remove almonds from skillet; set on a paper towel to cool.

Toasting almonds in skillet.

Cook the fresh green beans in a large pot of salted water (medium-high) for about 5 minutes.

Green beans are cooked briefly in water, to begin making this side dish.

Add HALF of the chopped red peppers to the green beans. Cook for 1 more minute. Remove the pan from the heat, and drain the veggies. Set aside.

Chopped red bell pepper is added to green beans in water and cooked for one minute.

Brown The Butter

In a clean skillet, place 2 large Tablespoons butter. Cook the butter on medium heat for 2-3 minutes. Stir the butter frequently as it cooks, until the butter has browned. Do not burn the butter.

Butter is melted in large skillet for brown butter green beans.

Brown butter is ready for the green beans to be added to skillet.

Add the cooked green beans, red peppers and HALF of the toasted almonds to the brown butter in the skillet. Season the beans with salt and pepper, to taste. Stir well, to coat everything with the butter.  Continue to cook the beans for 1-2 minutes, until fully heated through.

Toasted almonds are added to the skillet with the brown butter green beans.

Time To Serve The Brown Butter Green Beans!

Pour the green beans (with the almonds and red peppers) into a serving bowl. Garnish the beans with the reserved half of the toasted almonds and red peppers (fresh, not cooked).

Brown Butter Green Beans with Toasted Almonds & Red Peppers are served in bowl.

Serve, and enjoy this delicious veggie side dish!  Have a wonderful day. Be kind to one another!

Looking For More VEGGIE Recipes?

You can find ALL of my recipes in the Recipe Index, located at the top of the page. I have LOTS of veggie recipes, including:

Interested In More Recipes?

Thank you for visiting this website. I appreciate you using some of your valuable time to do soIf you’re interested, I publish a newsletter 2 times per month (1st and 15th) with all the latest recipes, and other fun info. I would be honored to have you join our growing list of subscribers, so you never miss a great recipe!
There is a Newsletter subscription box on the top right side (or bottom) of each blog post, depending on the device you use, where you can easily submit your e-mail address (only) to be included in my mailing list.

You Can Also Find Me On Social Media:

Facebook page: The Grateful Girl Cooks!
Pinterest:
The Grateful Girl Cooks!
Instagram:
jbatthegratefulgirlcooks

Author's signatureRecipe Adapted From: http://www.acedarspoon.com/green-beans-with-brown-butter-and-toasted-almonds/

0 from 0 votes
Brown Butter Green Beans with Toasted Almonds & Red Peppers
Prep Time
10 mins
Cook Time
15 mins
Total Time
25 mins
 
Brown Butter Green Beans is a festive vegetable side dish featuring fresh green beans cooked in browned butter, with toasted almonds and red bell peppers!
Category: Side Dish, Vegetables
Cuisine: American
Keyword: brown butter green beans
Servings: 4 servings
Calories Per Serving: 139 kcal
Author: JB @ The Grateful Girl Cooks!
Ingredients
  • 1 pound fresh green beans (with ends trimmed)
  • 2 Tablespoons butter
  • 1/3 cup slivered almonds (toasted)
  • 3 Tablespoons chopped red pepper (divided)
  • Salt and Pepper , to taste
Instructions
  1. Toast sliced almonds in a dry skillet (medium-high heat) for about 3 minutes, stirring occasionally. Remove almonds from skillet; set on a paper towel to cool.
  2. Bring pan of salted water to a full boil. Cook the green beans (medium-high) for 5-6 minutes.
  3. Add HALF of the chopped red peppers to the beans, and cook for 1 additional minute. Remove from heat, and drain. Set aside.
  4. In a clean large skillet, place 2 large Tablespoons butter. Cook on medium-high heat 2-3 minutes, stirring frequently until the butter has browned and gives off a nutty aroma. Do not burn butter.
  5. Turn heat to low. Add cooked green beans, red peppers and HALF of the toasted almonds to the brown butter. Stir well, to coat everything with brown butter. Season with salt and pepper, to taste. Continue to cook for 1-2 minutes, until fully heated through.
  6. Pour into serving bowl. Garnish dish with reserved half of toasted almonds and red peppers (fresh, not cooked). Serve, and enjoy!
Nutrition Facts
Brown Butter Green Beans with Toasted Almonds & Red Peppers
Amount Per Serving (1 serving)
Calories 139 Calories from Fat 90
% Daily Value*
Fat 10g15%
Saturated Fat 3g19%
Cholesterol 15mg5%
Sodium 57mg2%
Potassium 317mg9%
Carbohydrates 10g3%
Fiber 4g17%
Sugar 4g4%
Protein 4g8%
Vitamin A 1175IU24%
Vitamin C 22.8mg28%
Calcium 66mg7%
Iron 1.5mg8%
* Percent Daily Values are based on a 2000 calorie diet.

Here’s one more to pin on your Pinterest boards!Brown Butter Green Beans is a festive vegetable side dish featuring fresh green beans cooked in browned butter, with toasted almonds and red bell peppers!

Save

Save

Save

Spiced Tea Mix

Spiced Tea Mix is perfect for gift giving during the holidays or for just sipping a cup of this orange-cinnamon-clove spiced tea by the Christmas tree!Spiced Tea Mix is perfect for gift giving during the holidays or just sipping a cup of this orange-cinnamon-clove spiced tea by the Christmas tree!
One of the Christmas memories I hold dear is the Spiced Tea Mix my Mom makes to give to friends and family! It’s so easy to make! Sitting in front of our Christmas tree, enjoying the lights and ornaments, while sipping a mug of this hot, fragrant orange-cinnamon-clove spiced tea is something I always enjoy!

Christmas decorations are the perfect setting for sipping spiced tea mix by the firelight..

This recipe makes approximately 36 ounces of spiced tea mix. I filled 3 pint sized jars… 1 jar to keep, and 2 jars to give away as gifts. I’ve heard it called “Russian Tea” before, but have NO CLUE why. Maybe people are “rushin” to drink it? (Get it? My complete fail at a joke). My apologies. Whatever you call this tea, just make it. It’s delicious!

Ingredients Used To Make Spiced Tea Mix

Here are the ingredients for the spice tea mix shown in a large bowl before being combined. They include Tang orange powdered drink mix, lemonade, instant tea, sugar, cinnamon and cloves.

Dry ingredients for spiced tea mix placed in large white bowl.

Shown in the photo below are the ingredients for the spiced tea mix after they have been mixed together.

Spiced Tea Mix in white bowl, after combining ingredients.

This next photo shows what the spiced tea mix looks like, once poured into jars. It looks pretty cool. The different layers of spices give each jar a unique look!

Spiced Tea Mix is placed in mason jars, for gift giving.

Spiced Tea Mix Is A Great Gift For Family And Friends

I enjoy giving his simple “homemade with love” Spiced Tea Mix as a gift to friends or family members. Place a simple bow on top, attach a cute gift card, and you will have a special homemade food gift for those you love!

Spiced Tea Mix in jars make a lovely gift for friends during the holidays!

Enjoy A Mug Of Hot Spiced Tea

When ready to enjoy a hot mug of this delicious spiced tea, stir 2 Tablespoons of the spiced tea mix into a mug of boiling water, stir until the sugar has dissolved and take a big sip! It’s perfect, and is filled with great flavor!

The mug in this photo (below) belonged to my mother-in-law and is special to me. She passed away and went to her heavenly home a few years ago. She is missed during the holidays, but she is thought of often, especially when I enjoy a hot delicious drink out of her old coffee mug.

A delicious beverage made with spiced tea mix, in a white mug.
I really wish you could smell AND taste this delicious drink. It’s so warm with spices, and full of citrus flavor! Hope you will consider making up a batch of spiced tea mix for your family and other loved ones this holiday season!

Looking for More HOT BEVERAGE Recipes?

You can find ALL my recipes in the Recipe Index, located at the top of the page. I have some really good hot beverages you might enjoy, including:

Interested In More Recipes?

Thank you for visiting this website. I appreciate you using some of your valuable time to do soIf you’re interested, I publish a newsletter 2 times per month (1st and 15th) with all the latest recipes, and other fun info. I would be honored to have you join our growing list of subscribers, so you never miss a great recipe!
There is a Newsletter subscription box on the top right side (or bottom) of each blog post, depending on the device you use, where you can easily submit your e-mail address (only) to be included in my mailing list.

You Can Also Find Me On Social Media:

Facebook page: The Grateful Girl Cooks!
Pinterest:
The Grateful Girl Cooks!
Instagram:
jbatthegratefulgirlcooks

Author's signature

Recipe Source: My Mom (years and years and years ago)

5 from 1 vote
Spiced Tea Mix
Prep Time
5 mins
Cook Time
0 mins
Total Time
5 mins
 
Spiced Tea Mix is perfect for gift giving during the holidays or just sipping a cup of this orange-cinnamon-clove spiced tea by the Christmas tree!
Category: Beverage
Cuisine: American
Keyword: spiced tea mix
Servings: 62 servings (2 Tablespoons per)
Calories Per Serving: 60 kcal
Author: JB @ The Grateful Girl Cooks!
Ingredients
  • 27 ounces Tang Instant Orange Drink Powder
  • 3 oz. Powdered Lemonade Mix
  • 1 1/4 cups granulated sugar
  • 1/2 cup instant tea granules
  • 1 teaspoon cinnamon
  • 1/2 teaspoon ground cloves
Instructions
To Make The Mix:
  1. Stir all ingredients together in large bowl until completely mixed.
  2. Store spiced tea mix in covered, airtight container.

To Make Tea:
  1. Place 2 rounded Tablespoons mix into a mug of boiling water. Stir well. Enjoy!
Nutrition Facts
Spiced Tea Mix
Amount Per Serving (2 Tablespoons)
Calories 60
% Daily Value*
Potassium 2mg0%
Carbohydrates 5g2%
Sugar 5g6%
Vitamin C 1.9mg2%
Calcium 2mg0%
* Percent Daily Values are based on a 2000 calorie diet.

Here’s one more to pin on your Pinterest boards!Spiced Tea Mix is perfect for gift giving during the holidays or just sipping a cup of this orange-cinnamon-clove spiced tea by the Christmas tree!


Save

Save

Save

Creamy Turkey Wild Rice Soup

Make this delicious, creamy turkey wild rice soup with wild rice, carrots, and onions in your slow cooker, using your Thanksgiving turkey leftovers!Make this delicious, creamy turkey wild rice soup with wild rice, carrots, and onions in your slow cooker, using your Thanksgiving turkey leftovers!

Another Thanksgiving has come and gone, and we still have some leftovers, thankfully! Speaking of LEFTOVERS…today I’m posting a recipe for Creamy Turkey Wild Rice Soup. I’ve been making this soup for years (using good old turkey leftovers!).

I found the original recipe in an old Taste Of Home Magazine years ago and tried it. The creamy turkey wild rice soup was so good!  I’ve been making it ever since, with a few slight changes to the original recipe.

Why NOT use the leftover turkey and carcass to make a huge pot of delicious soup? If you’re gonna go to the trouble of roasting a huge turkey, then make it “go the distance” for you. The original recipe for creamy turkey wild rice soup was made on the stove top, but I adapted it for crock pot cooking. I’ve included both sets of instructions in the printable recipe below.

Scroll Down For A Printable Recipe Card At the Bottom Of The Page

Could I Make This Recipe With A Whole CHICKEN Instead Of A Turkey?

Yes. You can also substitute a whole chicken, if desired. Remember to make sure you have at least 2 cups of shredded meat for the soup. Prepare the recipe the same exact way.

How To Make Creamy Turkey Wild Rice Soup

Start with that leftover turkey. Yeah. Use that beast you fixed for Thanksgiving. Our 15 pounder looked like this when it came out of the oven on Thanksgiving.

Roast turkey is used to make creamy turkey wild rice soup.

The next morning, the leftover turkey looked like this photo below… in a huge pot of water, with onions, celery, carrots, spices, etc. I’m telling you, that turkey never knew what hit it!

The turkey carcass (with some meat still attached) cooks for about 1½ hours (covered). Chopped onions, carrots, celery, salt and pepper are also added to the large pot of water. When done, let the turkey cool. Once the turkey has cooled,  cut or pull all the turkey meat you can get off the bones. You will need about 2 cups of turkey for this soup.

Turkey carcass is cooked with onions, celery and carrots in water to make creamy turkey wild rice soup.

Add Ingredients To A Slow Cooker (crock pot)

Put the broth from the turkey (and the veggies, too) into a large crock pot. The total mount of broth should be at least 4 cups. If making the turkey the way shown, you can use the strained broth created by cooking the turkey as replacement for store bought broth.

Add 2 cups of shredded turkey to the slow cooker. Add one box of Long Grain and Wild Rice (and seasoning packet) and butter to the soup. The original recipe called for 2 cups of wild rice. Using all wild rice is really tasty, but I found this package and seasonings to be perfectly easy (and a bit more economical).

Rice and seasonings are added to slow cooker full of creamy turkey wild rice soup.

Cook the creamy turkey wild rice soup on low temperature for 4 hours. After that, add some flour, whisked well with cool water to help thicken the soup broth slightly. Put the lid back on slow cooker, and let the soup cook for another hour. Add light cream to the soup, and cook for 15 minutes.

The Creamy Turkey Wild Rice Soup Is Ready To Serve

Taste test the soup before you ladle it into bowls. Add salt or pepper, if desired, to suit your taste buds. The creamy turkey wild rice soup is now ready to be served!

Lots of turkey in this delicious creamy turkey wild rice soup.

Here is the finished creamy turkey wild rice soup, after the cream has been added. It looks great, and is ready to eat!

Creamy turkey wild rice soup is served in bowl.

This creamy turkey wild rice soup is a really easy soup to make, and tastes absolutely delicious. I sure hope you will give this recipe a try next time you want to make something with Thanksgiving leftovers. Don’t throw that turkey carcass away… make a huge pot of delicious hot and filling soup!

Thanks for stopping by, and I sincerely hope you will come back again soon for more recipes. Have a great day.

Looking For More SOUP Recipes?

You can find all of my recipes in the Recipe Index, located at the top of the page. I have lots of delicious soup recipes, including:

Interested In More Recipes?

Thank you for visiting this website. I appreciate you using some of your valuable time to do soIf you’re interested, I publish a newsletter 2 times per month (1st and 15th) with all the latest recipes, and other fun info. I would be honored to have you join our growing list of subscribers, so you never miss a great recipe!
There is a Newsletter subscription box on the top right side (or bottom) of each blog post, depending on the device you use, where you can easily submit your e-mail address (only) to be included in my mailing list.

You Can Also Find Me On Social Media:
Facebook page: The Grateful Girl Cooks!
Pinterest: The Grateful Girl Cooks!
Instagram: jbatthegratefulgirlcooks

Author's signature

Recipe Adapted From: Taste Of Home Magazine, submitted by Terri Holmgren, Swanville, Minnesota (magazine issue unknown – I cut out her recipe years ago and couldn’t find it online)

0 from 0 votes
Creamy Turkey Wild Rice Soup
Prep Time
1 hr 30 mins
Cook Time
5 hrs 15 mins
Total Time
6 hrs 45 mins
 
Make this delicious, creamy turkey wild rice soup with wild rice, carrots, and onions in your slow cooker, using your Thanksgiving turkey leftovers!
Category: Soup
Cuisine: American
Keyword: turkey wild rice soup
Servings: 12 cups (approx. 3 quarts)
Calories Per Serving: 179 kcal
Author: JB @ The Grateful Girl Cooks!
Ingredients
  • 1 turkey "carcass" (with some meat still attached)
  • 1 medium onion , chopped
  • 2 celery ribs , diced
  • 2 carrots , diced
  • 1 Tablespoon butter
  • 1/2 cup all purpose flour
  • 1/4 cup water
  • 4 cups turkey or chicken broth
  • 1 box wild rice OR 1 box Long Grain and Wild Rice Mix + seasoning packet (Rice A Roni)
  • 2 cups light cream
  • 2 cups diced turkey (or chicken)
  • 1 teaspoon dried parsley flakes
  • 1/2 teaspoon salt
  • 1/4 teaspoon black pepper
  • 1/4 teaspoon garlic powder
  • Additional salt & pepper , to taste (if desired)
Instructions
  1. Place leftover turkey "carcass" in large stock pot. Cover with water. Add onion, celery, carrots, salt and pepper. Cover pot and boil for 1 1/2 hours on medium-low. Remove turkey; let cool, then cut all the meat off the bones. Discard bones. Pour 4 cups of the broth (with veggies) into a crock pot. Shred turkey meat, then add at least 2 cups of the meat back into the crock pot. Add entire box of rice (plus seasoning packet). Add salt, pepper, dried parsley, and butter to soup. Cook on Low for 4 hours.
  2. After 4 hours, mix together the flour and water until smooth. Stir this mixture into the soup in the crock pot until combined. Let soup cook for another hour.
  3. Stir in cream, and cook on LOW for another 15 minutes.
  4. Taste test; add additional salt/pepper, if desired, then serve!
Recipe Notes

If cooking on stove top: Saute onions, celery and carrots in butter 3-4 minutes. Reduce heat; add in flour-cook until it is bubbly. Add in broth, stirring constantly. Bring to boil; reduce heat. Add rice, turkey, cream, salt, pepper, garlic powder, etc. Simmer for about 20 minutes. Serve.
Another way to make this quicker, use store bought broth and shred up a rotisserie chicken or use pre-cooked turkey.

Nutrition Facts
Creamy Turkey Wild Rice Soup
Amount Per Serving (1 cup)
Calories 179 Calories from Fat 126
% Daily Value*
Fat 14g22%
Saturated Fat 8g50%
Cholesterol 58mg19%
Sodium 431mg19%
Potassium 189mg5%
Carbohydrates 7g2%
Protein 5g10%
Vitamin A 2140IU43%
Vitamin C 7mg8%
Calcium 39mg4%
Iron 0.6mg3%
* Percent Daily Values are based on a 2000 calorie diet.

Here’s one more to pin on your Pinterest boards!Make this delicious, creamy turkey wild rice soup with wild rice, carrots, and onions in your slow cooker, using your Thanksgiving turkey leftovers!


Save

Save

Blueberry Galette

Enjoy this rustic, freeform shaped blueberry galette dessert… it’s simple and delicious, uses pie crust dough, and is easier than making a pie!Enjoy this rustic, freeform shaped blueberry galette dessert... it's simple and delicious, uses pie crust dough, and is easier than making a pie!!

I had finished making my pies for Thanksgiving and had a medium sized ball of pie crust dough left over… what to do, what to do? I could throw it away or freeze it… but the practical side of me won out. Guess what I did? I made a small Blueberry Galette!!! YUM!

What exactly IS a galette? It is a French term used to describe different kinds of flat, round, or free form pies or cakes. This one is a free form pie galette. Very rustic, but so easy!

Scroll Down for A Printable Recipe Card At The Bottom Of The Page

Form The Dough For The Blueberry Galette

I had the equivalent dough leftover of one half of a pie crust. (I used DIY – Mom’s Pie Crust for the dough, but you can use any prepared pie crust).  Roll the dough out  to form a rustic round shape (it absolutely does NOT have to be perfectly round). Transfer the dough to a baking sheet (fold dough in half, then transfer- it’s easy!)

Free-form galette crust made with pie dough, on baking sheet

Make The Blueberry Topping For The Galette

I knew I had some blueberries in the freezer, so decided to make a small galette, then just made it up as I went. I’ve made thickened blueberry compote many times before, for various recipes, so quickly made up the blueberry filling.

Place frozen blueberries, lemon juice, cinnamon, sugar, lemon zest in a large saucepan. Add a water/cornstarch slurry to the blueberries, and cook the mixture down until it has thickened (about 10 minutes).

Blueberries are cooked in saucepan until thickened sauce is created

Blueberry sauce, thickened and cooked, in saucepan

Let the blueberries cool down a bit, then spoon the mixture into the center of the dough. Be sure to leave the edges free from filling. Carefully roll the edges up and over the filling (just enough to hold the filling in – try hard not to overfill the dough).

Ready To Bake The Blueberry Galette

Brush the “crust” with a beaten egg, then sprinkle the crust with raw sugar (larger than granulated). Pop it into the oven for about 30 minutes, or until the crust is golden brown, and the blueberry filling is bubbly.

Blueberry Galette crust sprinkled with sugar, on baking sheet

Let the blueberry galette cool completely on the baking sheet. Once cooled completely, carefully transfer (using two spatulas and a prayer) to the serving dish. I served it at Thanksgiving, alongside the other pies, and it was a big hit! We cut the blueberry galette into 6 small slices and it was really good! It’s always fun to see what you can make with odds and ends!

Blueberry galette on plate

The blueberry galette cuts easily, and was very simple to serve up individual slices! Didn’t think of it at the time, but a dollop of whipped cream would be awesome on a slice! If you enjoy this galette, be sure to check out my recipe for a delicious streusel topped peach galette.

Have a blessed day, friends. Choose to be thankful for the “things” that cross your path today! Thanks for stopping by, and hope you will come back again soon.

Looking For More Recipes Featuring BLUEBERRIES?

You can find all of my recipes in the Recipe Index, located at the top of the page. I have lots of recipes featuring blueberries that you’re gonna love, including:

Interested In More Recipes?

Thank you for visiting this website. I appreciate you using some of your valuable time to do soIf you’re interested, I publish a newsletter 2 times per month (1st and 15th) with all the latest recipes, and other fun info. I would be honored to have you join our growing list of subscribers, so you never miss a great recipe!
There is a Newsletter subscription box on the top right side (or bottom) of each blog post, depending on the device you use, where you can easily submit your e-mail address (only) to be included in my mailing list.

You Can Also Find Me On Social Media:
Facebook page: The Grateful Girl Cooks!
Pinterest: The Grateful Girl Cooks!
Instagram: jbatthegratefulgirlcooks

Author's signatureRecipe source: my brain, on Thanksgiving overload

0 from 0 votes
Blueberry Galette
Prep Time
15 mins
Cook Time
30 mins
Total Time
45 mins
 

You'll enjoy this blueberry galette- a simple, rustic, freeform shaped dessert that has all the flavor of blueberry pie... it still uses pastry dough, but is easier to make!

Category: Dessert
Cuisine: American
Keyword: blueberry galette
Servings: 6 servings
Calories Per Serving: 114 kcal
Author: JB @ The Grateful Girl Cooks!
Ingredients
  • 1 1/2 cups blueberries (I used frozen)
  • zest of 1/2 a lemon
  • 3 Tablespoons granulated sugar
  • 1 Tablespoon lemon juice
  • 1/4 teaspoon cinnamon
  • 1/3 cup water
  • 1 Tablespoon cornstarch
  • 1/2 pie crust (yep! I only used half)
Instructions
  1. Preheat oven to 425 degrees F.
  2. Roll out pie crust.. No need to trim it... this is a rustic looking galette! Place onto baking sheet.
  3. In a medium sized saucepan, combine the blueberries, lemon zest, sugar, lemon juice, and cinnamon.
  4. Mix the cornstarch into the water and stir well, to combine. Add the cornstarch mixture into the saucepan with the other ingredients. Heat on medium heat. Bring to a boil, then reduce heat and cook for about 10 minutes until mixture has thickened considerably.
  5. Let pie filling cool until almost room temp., then carefully spoon the cooled blueberry filling into the center of the pie dough circle. Make sure to leave at least an inch and a half of the outer edges with no filling. Roll the outer edges up and over the blueberry filling.
  6. Beat an egg with a fork. Brush the egg mixture over the crust, then sprinkle crust with raw sugar (can use regular granulated sugar if needed).
  7. Bake galette at 425 degrees F for approximatel30-35 minutes (for small size-more time if you are making a galette using the entire pie crust. When done, the crust should be golden brown and the filling should be bubbly. Remove from oven-let galette cool completely before transferring to serving dish. Enjoy!
Recipe Notes

If you want to use a whole pie crust (I only used a half to make a mini-galette), then remember to double the ingredients for the filling. OR make two small galettes (still doubling the filling). If making the small version, the slices are small, but were perfect side by side with other desserts!

Nutrition Facts
Blueberry Galette
Amount Per Serving (1 slice)
Calories 114 Calories from Fat 27
% Daily Value*
Fat 3g5%
Saturated Fat 1g6%
Sodium 59mg3%
Potassium 42mg1%
Carbohydrates 19g6%
Fiber 1g4%
Sugar 9g10%
Protein 1g2%
Vitamin A 20IU0%
Vitamin C 4.5mg5%
Calcium 5mg1%
Iron 0.5mg3%
* Percent Daily Values are based on a 2000 calorie diet.

Here’s one more to pin on your Pinterest boards!Enjoy this rustic, freeform shaped blueberry galette dessert... it's simple and delicious, uses pie crust dough, and is easier than making a pie!

Save

Save

Tip Of The Day #6-Freezing Lemon Juice In Small Portions

Ever find a great recipe, but end up needing just ONE ingredient? Sigh. It happens to all of us. I seem to constantly run out of lemons. Here’s the Tip Of The Day #6 – Freezing Lemon Juice In Small Portions, so it’s always there in your freezer when you need it.Freezing Lemon Juice In Small Portions

I got a great deal on a couple bags of lemons recently ($2 for about 25 lemons). A little bruised on the outside, but perfectly “normal” on the inside, and full of juice! When you can find a great deal like that, you go for it! But what to do with all those lemons?

Freeze the juice, and then have it handy and ready to go when you need lemon juice for a recipe throughout the year! Here’s what you do…

Juice the lemons. I used a juicer we received as a wedding present 38 years ago. True story. (Boy, was that a great gift!).

Tip Of the Day #6 - Freezing Lemon Juice In Small Portions / The Grateful Girl Cooks!

Pour the juice and pulp through a strainer into a measuring cup.

Tip Of The Day #6 - Freezing Lemon Juice In Small Portions / The Grateful Girl Cooks!

Once juice has been strained, pour it into ice cube tray compartments. Each compartment in a standard sized ice cub tray holds about 1 Tablespoon of juice.

Tip Of The Day #6 - Freezing Lemon Juice In Small Portions / The Grateful Girl Cooks!

Freeze the lemon juice until completely frozen (overnight is good). Once completely frozen, remove trays from freezer.

Tip Of The Day #6 - Freezing Lemon Juice In Small Portions / The Grateful Girl Cooks!

Loosen the “ice cubes” from the trays without using any water. Dump the cubes out of the trays.

Tip Of The Day #6 - Freezing Lemon Juice In Small Portions / The Grateful Girl Cooks!

Immediately put the lemon juice cubes into a freezer bag, label it, and stick bag in the freezer. Now you have conveniently frozen cubes of lemon juice (in 1 Tablespoon sized portions)… and can defrost as much or as little as needed whenever you want to. Very convenient!

Tip Of The Day #6 - Freezing Lemon Juice In Small Portions / The Grateful Girl Cooks!

I can’t tell you how many times having a bag of lemon juice cubes has helped me NOT have to make a trip to the grocery store! Hope this tip helps you, too!

Have a great day, friends. Try and make it a GOOD one!

Interested In More Recipes?

Thank you for visiting this website. I appreciate you using some of your valuable time to do soIf you’re interested, I publish a newsletter 2 times per month (1st and 15th) with all the latest recipes, and other fun info. I would be honored to have you join our growing list of subscribers, so you never miss a great recipe!
There is a Newsletter subscription box on the top right side (or bottom) of each blog post, depending on the device you use, where you can easily submit your e-mail address (only) to be included in my mailing list.

You Can Also Find Me On Social Media:

Facebook page: The Grateful Girl Cooks!
Pinterest:
The Grateful Girl Cooks!
Instagram:
jbatthegratefulgirlcooks

Author's signature

Here’s one more to pin on your Pinterest boards!Tip Of the Day #6 - Freezing Lemon Juice In Small Portions / The Grateful Girl Cooks!

Save

Save