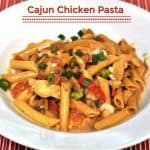
Fried Shrimp

 You’re going to love these crunchy, classic fried shrimp… they taste delicious, and are SO EASY to prepare, for a fraction of the cost of eating out!You're going to love these crunchy, classic fried shrimp... they taste delicious, and are SO EASY to prepare, for a fraction of the cost of eating out!

The other night I went “old school” for dinner… crunchy Fried Shrimp, with a seafood cocktail sauce on the side. I had a half of a pound of shrimp begging to be used, and decided to just “fry ’em up”. I usually grill or pan sear shrimp, but these bad boys were destined for hot oil.

Guess what? They were GOOD and CRUNCHY. They are also ridiculously EASY to make. Pass the seafood cocktail sauce, please! Crunchy and delicious… just the way they’re SUPPOSED to be!

Since I bought a pound of shrimp on sale, and only used 1/2 pound, the cost for my husband and I was only $3 total for some mighty delicious crunchy fried shrimp (cheaper than fast food!)!  Best part – the shrimp were on our plates in under 20 minutes total.  Such a deal!

Scroll Down For A Printable Recipe Card At The Bottom Of The Page

Prepare The Shrimp

Here’s what you do to make these “old school” crunchy fried shrimp:  First clean, remove shells and de-vein (if necessary) the shrimp. 

Let the shrimp soak for a couple minutes in a bowl filled with an egg and some milk that have been beaten together. Make sure to coat all sides with egg mixture (so the flour coating will adhere).

Shrimp rest in a bowl in a milk/egg mixture before coating in flour

Combine self-rising flour (see recipe for an easy substitution tip) and spices. Place flour mixture on a dinner plate.

Dredge the shrimp in the flour mixture, one at a time, to completely coat all sides.

Shrimp are coated in flour mixture before frying.

Dredge The Shrimp TWO Times!

Place each shrimp onto baking sheet (or aluminum foil) and set aside.  This is what they looked like after the FIRST flour coating.

Once they have all been dredged in flour mixture… dredge them AGAIN (in flour mixture) for the second time. Shake off excess flour.  Let shrimp rest while oil is heating to temperature in pan.

Shrimp are dredged in flour mixture two times before frying.

Time To Make Some Fried Shrimp!

Add enough oil to pan to fill about 2 inches deep. I used my electric skillet, but you can also use a pan or regular skillet (but you WILL need a thermometer to get the oil heated to the necessary temperature for frying these successfully!). 

Heat the oil to 350 degrees. It must be this hot to fry these correctly and get a great outside crunch!

Once the temperature is 350 degrees, carefully add the shrimp one at a time (remember- oil is very HOT). They will need to fry for about 4 minutes, flipping them over halfway through the cooking time. 

If you are doubling recipe or cooking a large amount of fried shrimp, cook them in batches, BUT remember to bring oil back to 350 degrees after each batch!

Shrimp are fried at 350 degrees to ensure a crispy crunch!

Once done, the fried shrimp should be golden brown and crunchy on all sides. I placed the fried shrimp on a wire rack (with a paper towel underneath the rack to catch any drips).

By placing the paper towel UNDER the rack, the shrimp won’t stick to the paper towel. Great tip!

Fried shrimp drain on wire rack before serving.

Serve The Fried Shrimp

These fried shrimp taste wonderful when served with seafood cocktail sauce on the side for dipping. We also paired them with a green salad and fresh fruit… and we LOVED them! Crunch, Crunch, Crunch!

Fried shrimp, served with seafood sauce.

This was an easy way to make great tasting fried shrimp… like you would pay big bucks for at a nice restaurant. The only catch was that I had to do the dishes, but it was still worth it for this easy, quick, great tasting dinner at home!

I sure hope you will consider trying this great tasting recipe, and as always, I really do hope you and those you love will enjoy it! Thanks for stopping by, and come back soon! Have a GREAT day.

Looking for More SHRIMP Recipes?

You can find all of my recipes in the Recipe Index, located at the top of the page. I have quite a few recipes using shrimp you’ll enjoy, including:

Want More Recipes? Get My FREE Newsletter!

I publish a newsletter 2 times per month (1st and 15th) with lots of recipes, tips, etc..
Would you like to join our growing list of subscribers?

There is a Newsletter subscription box on the top right (or bottom) of each blog post, depending on the device you use.
You can submit your e-mail address there, to be added to my mailing list.

Find Me On Social Media:

Facebook page: The Grateful Girl Cooks!
Pinterest:
The Grateful Girl Cooks!
Instagram:
jbatthegratefulgirlcooks

Author's signature

↓↓ PRINTABLE RECIPE BELOW ↓↓

0 from 0 votes
Fried Shrimp
Prep Time
15 mins
Cook Time
4 mins
Total Time
19 mins
 
You're going to love these crunchy, classic fried shrimp... they taste delicious, and are SO EASY to prepare, for a fraction of the cost of eating out!
Category: Entree, Seafood
Cuisine: American
Keyword: fried shrimp
Servings: 2 servings
Calories Per Serving: 529 kcal
Author: JB @ The Grateful Girl Cooks!
Ingredients
  • 1/2 pound large (or medium) shrimp
  • 1 large egg
  • 1/2 cup milk
  • 1 cup self-rising flour (see Notes section for substitution tip)
  • 1/4 teaspoon Creole or Cajun seasoning (optional, but good)
  • Salt (approx. 1/4 teaspoon)
  • Black pepper (approx. 1/8 teaspoon)
  • Vegetable oil for frying (at least 2 inches deep in pan or skillet)
Instructions
  1. Clean, shell and de-vein shrimp before beginning.
  2. Whisk together egg and milk in a medium sized bowl. Add shrimp, stirring to coat all sides. Set aside.
  3. Place self-rising flour and seasonings onto a dinner sized plate. Stir with a fork to mix together. Dredge shrimp, one at a time, in flour mixture, coating all sides. Set shrimp on a baking sheet or foil. Repeat process until all shrimp have been dredged in flour. Once all have been coated in flour, DO IT AGAIN. Coat all shrimp in flour mixture for the second time. Set aside.
  4. Heat oil (at least 2 inches deep) until it reaches a temperature of 350 degrees. Once it reaches temperature, carefully add shrimp, one at a time (oil is HOT). Cook shrimp for about 4 minutes, turning over shrimp halfway through cooking time. When done, shrimp should be golden brown and crispy on the outside.
  5. Remove shrimp to a wire rack for just a second (with a paper towel underneath rack to catch drips).
  6. While hot, serve fried shrimp with a side of seafood cocktail sauce, and enjoy!
Recipe Notes

Substitute for self-rising flour: 1 cup all purpose flour, 1+ 1/2 teaspoons baking powder, 1/2 teaspoon salt. Directions: Measure 1 cup all purpose flour. Take OUT 2 teaspoons of that flour and discard. Add baking powder and salt, Stir to combine. This equals 1 cup total of self-rising flour!

Nutrition Facts
Fried Shrimp
Amount Per Serving (1 serving)
Calories 529 Calories from Fat 180
% Daily Value*
Fat 20g31%
Saturated Fat 13g81%
Cholesterol 373mg124%
Sodium 939mg41%
Potassium 264mg8%
Carbohydrates 48g16%
Fiber 1g4%
Sugar 3g3%
Protein 35g70%
Vitamin A 340IU7%
Vitamin C 4.6mg6%
Calcium 255mg26%
Iron 3.4mg19%
* Percent Daily Values are based on a 2000 calorie diet.

Here’s one more to pin on your Pinterest boards!You're going to love these crunchy, classic fried shrimp... they taste delicious, and are SO EASY to prepare, for a fraction of the cost of eating out!


Save

Save

Mixed Salad with Hoisin Vinaigrette and Crisp Panko Chicken

We’ve been having record-setting heat here in Portland this week. It was too hot for a heavy meal the other evening, so I made a Mixed Salad with Hoisin Vinaigrette and Crisp Panko Chicken for our dinner. It was easy, delicious, light but filling, and PERFECT on a hot day!Mixed Salad with Hoisin Vinaigrette and Crisp Panko Chicken / The Grateful Girl Cooks!
I found the recipe in one of my cookbooks… a Cooking Light cookbook (such good recipes)! This entree salad has it all! Crispy chunks of oven-baked chicken breast on a bed of chilled, mixed greens, and drizzled with a vinaigrette that is slightly tangy (but good) due to the addition of hoisin sauce, fresh ginger and Dijon mustard. I loved every bite (shocker, huh?)

Here’s how easy it is to make this yummy salad (start to finish took only about 25 minutes):

I first preheated my oven, then mixed up panko, salt, chili powder, and black pepper.

Mixed Salad with Hoisin Vinaigrette and Crisp Panko Chicken / The Grateful Girl Cooks!

I tossed the chicken pieces, a few at a time, in the panko mix to fully coat all sides.

Mixed Salad with Hoisin Vinaigrette and Crisp Panko Chicken / The Grateful Girl Cooks!

Place chicken in a single layer on a baking sheet coated with non-stick cooking spray.

Mixed Salad with Hoisin Vinaigrette and Crisp Panko Chicken / The Grateful Girl Cooks!

Bake chicken at 375 degrees for a total of 15 minutes. Turn the chicken pieces over halfway through the cooking time. When done, they will be golden brown and crispy on the outside.

MIxed Salad with Hoisin Vinaigrette and Crisp Panko Chicken / The Grateful Girl Cooks!

While chicken is baking, quickly blend together the vinaigrette, using a food processor or a blender. It will look like this once fully blended. Set aside.

Mixed Salad with Hoisin Vinaigrette and Crisp Panko Chicken / The Grateful Girl Cooks!

Arrange the chilled salad greens onto serving plate or into bowl. Add chopped green onions, blueberries, and tomatoes. (If it is easier, you can add the vinaigrette at this point, and mix greens, then top with chicken. OR you can add chicken, then top with vinaigrette (my plan).

Mixed Salad with Hoisin Vinaigrette and Crisp Panko Chicken / The Grateful Girl Cooks!

I chose to add chicken to top of salad, THEN drizzle with vinaigrette, cause I think it looks better for serving. Whatever is easiest for you works for me. Once that’s done, all that is left for you to do is EAT!

Mixed Salad with Hoisin Vinaigrette and Crisp Panko Chicken / The Grateful Girl Cooks!

See how easy that was? Sure hope you enjoy this fantastic main dish salad. It truly was perfect for a hot April night! Glad I stumbled upon the recipe in one of my cookbooks (and adapted it just a smidge). Can’t wait to make this again. Have a great day!

Interested In More Recipes?

Thank you for visiting this website. I appreciate you using some of your valuable time to do soIf you’re interested, I publish a newsletter 2 times per month (1st and 15th) with all the latest recipes, and other fun info. I would be honored to have you join our growing list of subscribers, so you never miss a great recipe!
There is a Newsletter subscription box on the top right side (or bottom) of each blog post, depending on the device you use, where you can easily submit your e-mail address (only) to be included in my mailing list.

You Can Also Find Me On Social Media:
Facebook page: The Grateful Girl Cooks!
Pinterest: The Grateful Girl Cooks!
Instagram: jbatthegratefulgirlcooks

Mixed Salad with Hoisin Vinaigrette and Crisp Panko Chicken / The Grateful Girl Cooks!

Recipe Adapted From: The Cookbook “Cooking Light-Annual Recipes 2007, page 103, published 2006 by Oxmoor House, Inc.

0 from 0 votes
Mixed Salad with Hoisin Vinaigrette and Crisp Panko Chicken
Prep Time
10 mins
Cook Time
15 mins
Total Time
25 mins
 
You'll love this entree salad...Spring greens, topped with crisp chicken breast chunks, tomatoes, green onions, and drizzled with a delicious Hoisin Vinaigrette.
Category: Main Dish Salad
Cuisine: American
Keyword: salad with hoisin vinaigrette
Servings: 2 servings
Calories Per Serving: 463 kcal
Author: JB @ The Grateful Girl Cooks!
Ingredients
For chicken:
  • 1/2 cup panko (Japanese breadcrumbs)
  • 1/2 teaspoon salt
  • 1/4 teaspoon chili powder
  • 1/4 teaspoon black pepper
  • 1 lb. chicken breast , cut in 1 inch pieces (I used one large chicken breast, cut horizontally then cubed)
  • Cooking spray
For Vinaigrette:
  • 2 Tablespoons white wine vinegar
  • 1 1/2 Tablespoons hoisin sauce (found in Asian section of grocery store)
  • 1 Tablespoon finely grated fresh ginger (peeled)
  • 1 Tablespoon Dijon mustard
  • 2 teaspoons canola or vegetable oil
  • 1 1/2 teaspoons soy sauce (low-sodium if you have it)
  • 1 teaspoon toasted sesame oil
  • 1 large clove garlic , minced
For Salad:
  • 1 8 oz. package mixed greens (or use a combo: I used mesculin, romaine, spinach)
  • 1 cup chopped tomatoes , seeded (or use cherry tomatoes, cut in half)
  • 1/2 cup fresh blueberries
  • 1/2 cup chopped green onions
Instructions
  1. Preheat your oven to 375 degrees.
  2. Mix panko, salt, chili powder and black pepper in small bowl. Add chicken pieces, a few at a time, tossing to fully coat with seasoned breadcrumbs. Set each piece in a single layer on lightly sprayed baking sheet; continue until all chicken pieces are coated. Bake chicken at 375 degrees for approx. 15 minutes (or until done and golden brown), turning chicken to other side halfway through cooking time.
  3. Blend the vinaigrette ingredients together, using a blender or food processor; blend until smooth.
  4. Place chilled salad greens, tomatoes, blueberries, and chopped green onions onto individual serving dishes. Top with a portion of the crisp panko chicken pieces, then drizzle with vinaigrette.
  5. Serve, and enjoy!
Recipe Notes

This makes enough for 2 main course servings. If smaller portions are desired (for side salad), it should serve 4.

Nutrition Facts
Mixed Salad with Hoisin Vinaigrette and Crisp Panko Chicken
Amount Per Serving (1 g)
Calories 463 Calories from Fat 117
% Daily Value*
Fat 13g20%
Saturated Fat 2g13%
Cholesterol 145mg48%
Sodium 1540mg67%
Potassium 1191mg34%
Carbohydrates 30g10%
Fiber 4g17%
Sugar 11g12%
Protein 52g104%
Vitamin A 530IU11%
Vitamin C 22.6mg27%
Calcium 94mg9%
Iron 3.4mg19%
* Percent Daily Values are based on a 2000 calorie diet.

Here’s one more to pin on your Pinterest boards!Mixed Salad with Hoisin Vinaigrette and Crisp Panko Chicken / The Grateful Girl Cooks!


Save

Save

Sweet Chili & Garlic Glazed Salmon

Sweet Chili Glazed Salmon fillets, marinated in sweet chili sauce, garlic, orange marmalade & soy sauce, is a simple, delicious, broiled seafood dish!Sweet Chili Glazed Salmon fillets, marinated in sweet chili sauce, garlic, orange marmalade & soy sauce, is a simple, delicious, broiled seafood dish!
As I write this, I am still savoring the memory and taste of the Sweet Chili & Garlic Glazed Salmon I fixed last night for dinner. It ranks right up there as one of the BEST pieces of salmon I’ve ever had (and I make salmon often!). UH-May-ZING!!!!

The recipe is so simple, yet I was amazed at just how fabulous it really was! My husband and I completely, 100% LOVED it! The recipe comes down to… marinate the salmon, then broil it! I know… EASY, RIGHT? Right.

Yet… there is so much flavor! Can you tell how excited I am to share this recipe with you today? While we were eating, I kept saying “this is soooo good”! Here’s how to make this delicious dish:

Scroll Down For A Printable Recipe Card At The Bottom Of The Page

Make The Sweet Chili Marinade

Mix up the marinade in a shallow dish. The marinade consists of sweet chili sauce, orange marmalade (I used my homemade jam!), soy sauce, 1 clove of minced garlic and chopped green onion. EASY.

Making the sweet chili sauce glaze for the salmon.
In case you’re wondering, here is the sweet chili sauce I used. It can be found in the Asian section of most grocery stores.

I used this sweet chili sauce to make the recipe.

Reserve Some Of The Marinade For Later!

After mixing up the marinade, I reserved a bit of it in a separate container to drizzle over the finished salmon.

Some of the sweet chili glaze is reserved to add to salmon after cooking.

Prepare And Marinade The Salmon Fillets

I seasoned the salmon fillets with salt and pepper. Note: this is “skin on” salmon. Got a large piece for $17 dollars at Costco… cut it into 7 fillets. Each serving will cost about $2.50 each, so it is less expensive (and healthier) than a Big Mac, and cheaper than ordering salmon in a restaurant!

Salt and pepper are sprinkled on fillet before marinating.

Place the salmon fillets into the marinade, SKIN SIDE UP.  *(Note: this recipe calls for 4 pieces of salmon; I only cooked 2 fillets, but made the same amount of sauce specified). Let the salmon marinade for at least an hour in the refrigerator. Do not turn salmon over.

Two salmon fillets are marinating skin side up before cooking.

Preparing To Cook Sweet Chili Glazed Salmon

Before cooking the salmon, cover a cookie sheet with aluminum foil, and then spray with non-stick spray. Trust me… you will be glad you did this at the end of the baking time. Clean up is a BREEZE, and the sweet chili glazed salmon will not stick to the pan!

Spraying a foil covered pan with cooking spray will help fish to not stick.

Place the marinated salmon fillets SKIN SIDE DOWN onto the foil. You can brush a tiny bit more of the marinade onto the fish, but be careful to NOT let the sauce “pool up” on the foil (cause it will burn!)

Marinated salmon fillets are placed on pan skin side down for broiling.

Broiling The Sweet Chili Glazed Salmon

Preheat your oven broiler. Once it’s hot hot, place the tray of salmon onto a MIDDLE RACK (about 5-6 inches away from the broiler unit). Broil for 7-10 minutes (mine took about 9 minutes), until the salmon is lightly browned and flakes easily. This is what it looked like when I removed the pan from under the broiler.

The sweet chili glazed salmon fillets are golden brown and flake easily after cooking

Serving This Dish

Place each of the salmon fillets onto individual plates. Spoon a little of the reserved chili glaze over the top. Garnish each piece with some toasted sesame seeds and a few chopped green onions for garnish (if desired).

Sweet Chili Glazed Salmon is topped with sesame seeds, green onions & sauce to serve.
Add a side dish or two… and BOOM!  It’s ready to eat… and let me tell you… this Sweet Chili Glazed Salmon is FANTASTIC!

The salmon is served with fruit salad and roasted vegetables.
Sure hope you will consider making this amazing salmon. The sauce is so good, I could eat it by the spoonful. I am confident you will enjoy this salmon as much as we did! Have a great day, and may God bless you with His presence!

Looking For More SALMON Recipes?

You can find all of my seafood recipes in the Recipe Index, located at the top of the page. A few favorite salmon recipes include:

Interested In More Recipes?

Thank you for visiting this website. I appreciate you using some of your valuable time to do soIf you’re interested, I publish a newsletter 2 times per month (1st and 15th) with all the latest recipes, and other fun info. I would be honored to have you join our growing list of subscribers, so you never miss a great recipe!
There is a Newsletter subscription box on the top right side (or bottom) of each blog post, depending on the device you use, where you can easily submit your e-mail address (only) to be included in my mailing list.

You Can Also Find Me On Social Media:
Facebook page: The Grateful Girl Cooks!
Pinterest: The Grateful Girl Cooks!
Instagram: jbatthegratefulgirlcooks

Author's signature

Recipe Source: http://therecipecritic.com/2015/02/sweet-chili-garlic-glazed-salmon/

↓↓ PRINTABLE RECIPE BELOW ↓↓

0 from 0 votes
Sweet Chili Garlic Glazed Salmon
Prep Time
1 hr 10 mins
Cook Time
8 mins
Total Time
1 hr 18 mins
 

Sweet Chili Glazed Salmon fillets, marinated in sweet chili sauce, garlic, orange marmalade & soy sauce, is a simple, delicious, broiled seafood dish!

Category: Dinner, Entree
Cuisine: Asian
Keyword: salmon
Servings: 4 servings
Calories Per Serving: 317 kcal
Author: JB @ The Grateful Girl Cooks!
Ingredients
  • 4 (6 ounce) pieces of salmon
  • 1/4 cup sweet chili sauce (I used Mae Ploy)
  • 2 Tablespoons orange marmalade
  • 3 Tablespoons soy sauce
  • 1 clove Minced garlic
  • 2 Tablespoons green onions , minced
  • Salt and black pepper
  • Additional chopped green onions , for garnish
  • Toasted sesame seeds , for garnish (toast seeds in dry skillet 2-3 minutes on low, stirring often)
Instructions
  1. Mix the sweet chili sauce, orange marmalade and soy sauce together in a shallow baking dish.
  2. Add the sliced green onions and minced garlic to the sauce. Stir well, to combine. Measure out approximately 1/4 cup of the marinade; set aside (to drizzle over cooked salmon before serving).
  3. Lightly season the salmon fillets with salt and pepper. Place the fillets SKIN SIDE UP in marinade. Let the salmon marinate for at least 1 hour.
  4. Heat your oven broiler. Place an oven rack in the middle of oven (about 5-6 inches from the broiler).
  5. Cover a cookie sheet with aluminum foil; generously spray it with non-stick spray (this will make clean up a breeze!).
  6. Remove salmon from marinade. Let any extra liquid drain off, then put the salmon SKIN SIDE DOWN onto the aluminum foil. It's okay to brush a little extra marinade onto the salmon, but don't let it "pool up" onto the foil, because it will burn under the heat.
  7. Broil the salmon for 6-10 minutes, or until browned and easily flaked in the middle. (Mine took about 8 minutes). When done, remove from oven, and place salmon onto individual serving plates. Spoon some of the reserved marinade over the top of each piece. If desired, garnish with toasted sesame seeds and additional green onion slices Enjoy!.
Recipe Notes

Note: Prep time includes the hour of marinating salmon fillets.

Nutrition Facts
Sweet Chili Garlic Glazed Salmon
Amount Per Serving (1 piece)
Calories 317 Calories from Fat 99
% Daily Value*
Fat 11g17%
Saturated Fat 1g6%
Cholesterol 93mg31%
Sodium 993mg43%
Potassium 871mg25%
Carbohydrates 15g5%
Sugar 13g14%
Protein 35g70%
Vitamin A 115IU2%
Vitamin C 1.3mg2%
Calcium 46mg5%
Iron 2mg11%
* Percent Daily Values are based on a 2000 calorie diet.

Here’s one more to pin on your Pinterest boards!Sweet Chili Glazed Salmon fillets, marinated in sweet chili sauce, garlic, orange marmalade & soy sauce, is a simple, delicious, broiled seafood dish!


Save

Save

Edie’s Carrot Cake

You’ll LOVE Edie’s Carrot Cake, an absolutely classic, DELICIOUS dessert with carrots, pineapple, pecans, cinnamon, and topped with cream cheese frosting!You'll LOVE Edie's Carrot Cake, an absolutely classic, DELICIOUS dessert with carrots, pineapple, pecans, cinnamon, and topped with cream cheese frosting!

Why I Call This Edie’s Carrot Cake

I’ve been making this Carrot Cake for almost 40 years now, and it’s the BEST! I received the recipe from my dear friend and former roommate, Edie, at a bridal shower 39 years ago! I’ve made it so many times over the years I can’t even begin to count… and it NEVER disappoints!

My sweet friend Edie has enjoyed much success as a musician in Los Angeles (she’s sung backup on vast numbers of albums, movies, commercials, TV theme songs, etc.). She’s acted in movies, and was also one of the stars of the classic TV show “General Hospital” years ago.

Edie still sings and has recorded music for many artists and TV/Movie soundtracks, conducts and has directed and sung with backup vocalists/choirs for The Voice, American Idol and other famous musicians (like Justin Timberlake, Aretha Franklin, and too many others to even count).

Scroll Down For A Printable Recipe Card At The Bottom Of The Page

Lifelong Friends Are The BEST!

We met in Junior High, grew up singing together at our church, then shared an apartment together (and many late night fast food tacos) before I got married.

I don’t recall Edie even liking to cook back then, so I’m telling you… this recipe was a great surprise the first time I made it and tasted just how good it was. Ha Ha.

But you know what the BEST part is about my friend? She is an amazingly gracious, humble, encouraging and loving friend to those who know her.  I dearly love Edie (and her delicious carrot cake recipe!).

Here’s the two of us at a music reunion in Los Angeles in 2015.  I remain grateful God allowed our lives to intersect so many years ago, and for the blessing of our continuing friendship to this day.

Two women (author of blog and friend, Edie)

OOH… THIS Carrot Cake Is SO GOOD!

Edie’s Carrot Cake is so moist and delicious! It’s filled with carrots, pineapple, pecans, coconut, cinnamon, etc., and is topped with a delicious cream cheese frosting!

If left alone in a room with a fork and Edie’s carrot cake, I might be forced to eat the entire thing (wink wink).  Yes… it honestly is the BEST carrot cake I’ve ever had! You will LOVE it!!

How To Make Edie’s Carrot Cake

Cream together the oil, sugar, eggs, and vanilla, using an electric mixer until smooth and combined.

Mixing batter for carrot cake

Sift the flour, baking powder, baking soda, salt, and cinnamon together into a separate bowl.

Flour, cinnamon and spices for Edie's carrot cake, cake in sifter.

Slowly mix the sifted flour mixture into the wet ingredients (eggs, oil, sugar, etc.). Mix to fully combine.

Stir in the grated carrots, drained crushed pineapple, chopped nuts, and shredded coconut, until fully combined.

Pecans, carrots, pineapple and coconut for Edie's carrot cake batter.

Edie’s carrot cake batter will look like this once the ingredients are fully mixed together.

Edie's carrot cake batter in mixing bowl.

Generously grease and flour two 9 inch cake pans (or 9×13 cake pan). Evenly distribute the batter into the prepared pan(s).

2 round cake pans with Edie's carrot cake batter in them.

Baking Edie’s Carrot Cake

Place the cake pan(s) into a 350°F. preheated oven. Bake for 35-40 minutes, until the cake is done. Test for doneness by inserting a toothpick into center of cake (see the hole in the middle of the bottom cake where I did this?).

If the toothpick comes out clean, then Edie’s carrot cake is done, and will look like this. Place cake pans on wire rack to cool.

Edie's carrot cake has been baked, and is cooling on wire rack

Let the cake cool down, then invert it (turn upside down) onto parchment paper, and release it from the pan.

Once the cake has completely cooled, turn it back over to the top side (still on the parchment paper).

Edie's carrot cake is inverted onto parchment paper on rack to release it from pan.

How To Toast Pecans

While the cake is cooling dry toast the chopped pecans, so they can be added as decoration onto the sides of the cake.

To do this, place the pecans in a large skillet on low heat. Cook, stirring often for 3-5 minutes. This step is optional, but the toasted pecans really add a LOT to this cake!

Dry toasting chopped pecans in skillet, for decorating Edie's carrot cake.

Make The Cream Cheese Frosting 

While the cake is cooking or cooling, mix up the cream cheese frosting. Sometimes I double the amount of cream cheese used, if I want lots of thick creamy frosting, but that’s optional.

I also add well drained, crushed pineapple to the frosting, but if you want plain cream cheese frosting, simply omit the pineapple!

Making the cream cheese frosting in a bowl, for Edie's carrot cake.

Frost Edie’s carrot cake with the cream cheese icing once the cake has completely cooled. If you’re making this as a layer cake, cover the entire cake with frosting, then add (optional) toasted pecans all over the sides of the cake.

I use my hands to carefully add the toasted pecans, a little at a time until cake is completely covered. Here it is the layer cake, midway through frosting.

Two layers of Edie's carrot cake, with frosting in the middle.

I am NOT a cake decorator (understatement of the century), but sometimes I will pipe colored frosting on top of finished cake. This is a photo of one time that I made this cake. You can see the chopped pecans on the side, and my flimsy attempt at decorating the top with colored frosting!  But guess what?

Edie’s carrot cake stands on its own merits. Even if you only make a 13×9 inch cake pan of carrot cake with simple cream cheese frosting (and that is all you do), you will LOVE this cake! 

Edie's carrot cake, with frosting and toasted pecans decorating it.

This Recipe Is VERY Adaptable

Over the years, I’ve also turned this recipe into cupcakes (adjusting cooking time), with cream cheese frosting and a dusting of cinnamon. 

Edie's Carrot cake batter can be used to make frosted cupcakes.

I’ve even used this same recipe to make miniature bundt cakes to give to friends (again- notice my LACK of decorating skills… Ha Ha!) 

My decorating skills may not be the best… but this recipe for Edie’s carrot cake IS the best!

Edie's carrot cake batter can be used to make frosted mini-bundt cakes.
However you decide to make it… cut yourself a big piece! You won’t regret it, because this is ONE AMAZING AND DELICIOUS CARROT CAKE!

A big slice of Edie's carrot cake, on plate with a fork.

Hope you enjoy Edie’s carrot cake! It tastes WONDERFUL! Remember all the great friends God has enriched your life with along the way, and be sure they know how much you love them!

Thanks for stopping by today, and I hope you will come back soon! Take care, may God bless you, and have a GREAT day!

Looking For Other Cake Recipes?

You can find ALL of my recipes in the Recipe Index, which is located at the top of the page. I have a nice variety of cake recipes you might also enjoy, including:

Want More Recipes? Get My FREE Newsletter!

I publish a newsletter 2 times per month (1st and 15th) with lots of recipes, tips, etc..
Would you like to join our growing list of subscribers?

There is a Newsletter subscription box on the top right (or bottom) of each blog post, depending on the device you use.
You can submit your e-mail address there, to be added to my mailing list.

Find Me On Social Media:

Facebook page: The Grateful Girl Cooks!
Pinterest:
The Grateful Girl Cooks!
Instagram:
jbatthegratefulgirlcooks

Author's signature

Recipe Source: Edie Lehmann-Boddicker

↓↓ PRINTABLE RECIPE BELOW ↓↓

0 from 0 votes
Edie's Carrot Cake
Prep Time
10 mins
Cook Time
35 mins
Total Time
45 mins
 
You'll LOVE Edie's Carrot Cake, an absolutely classic, DELICIOUS dessert with carrots, pineapple, pecans, cinnamon, and topped with cream cheese frosting!
Category: Dessert
Cuisine: American
Keyword: Edie's carrot cake
Servings: 12 servings
Calories Per Serving: 660 kcal
Author: JB @ The Grateful Girl Cooks!
Ingredients
For The Cake:
  • 1 1/2 cups vegetable oil
  • 2 cups granulated sugar
  • 3 eggs , well beaten
  • 2 teaspoons vanilla extract
  • 2 cups flour
  • 2 teaspoons baking powder
  • 2 teaspoons baking soda
  • 1 teaspoon salt
  • 2 teaspoons cinnamon
  • 2 cups grated carrots
  • 1 (8 ounce) can crushed pineapple, well drained
  • 1 cup chopped pecans or walnuts
  • 1 cup shredded coconut
For cream cheese frosting: (Double amount of cream cheese if you want really thick and plentiful frosting)
  • 8 ounces cream cheese softened
  • 1 lb. powdered sugar (confectioners) (1 box)
  • 1/2 stick butter =¼ cup or 4 Tablespoons
  • 1 teaspoon vanilla
  • 1 can (8 ounce) can crushed pineapple (optional) well drained
For garnish (completely optional):
  • Additional colored cream cheese frosting (for decorating)
  • Chopped pecans or walnuts (to cover sides of frosted cake), lightly toasted in dry skillet
Instructions
  1. Preheat oven to 350. Generously grease and flour two 9 inch round cake pans. Set aside.
  2. Using an electric mixer, mix together oil, sugar, eggs and vanilla in a large bowl until well blended.
  3. In separate bowl, sift together flour, baking powder, baking soda, salt, and cinnamon. Slowly add the flour mixture into the oil and sugar mixture. Mix well, to combine.
  4. Stir in grated carrots, drained pineapple, 1 C. chopped nuts, and coconut. Mix well.
  5. Divide batter evenly into well greased and floured cake pans. Bake at 350 degrees for 35-40 minutes, or until a toothpick inserted into center of each cake pan comes out clean. (Note: if making cupcakes or baking in a 9x13 pan, you will need to slightly decrease baking times!).
  6. Make frosting while cake bakes: Combine all frosting ingredients, and mix, using an electric mixer until smooth and thick.

  7. When cake is done, remove it to wire rack to cool. When cool, invert cakes onto parchment paper, then turn them back right side up on rack. Frost cake only when cake is room temperature. Place one layer onto serving platter. Spread a layer of cream cheese frosting, then add second layer and frost entire surface of cake.

  8. If desired, add lightly toasted, chopped pecans or walnuts to the side of cake. If desired, use colored cream cheese frosting to decorate top of cake.
Recipe Notes

NOTE: Caloric calculation does not include additional pecans for decorating sides of cake. TIP: If you want a really "thick frosted" cake, DOUBLE the ingredients (except for the pineapple) when you make the frosting. You will have a gorgeous cake with plenty of yummy cream cheese frosting! I always do this!

Nutrition Facts
Edie's Carrot Cake
Amount Per Serving (1 slice)
Calories 660 Calories from Fat 243
% Daily Value*
Fat 27g42%
Saturated Fat 14g88%
Cholesterol 82mg27%
Sodium 557mg24%
Potassium 314mg9%
Carbohydrates 101g34%
Fiber 2g8%
Sugar 80g89%
Protein 6g12%
Vitamin A 4130IU83%
Vitamin C 5mg6%
Calcium 86mg9%
Iron 1.9mg11%
* Percent Daily Values are based on a 2000 calorie diet.

Here’s one more to pin on your Pinterest boards!You'll LOVE Edie's Carrot Cake, an absolutely classic, DELICIOUS dessert with carrots, pineapple, pecans, cinnamon, and topped with cream cheese frosting!


Save

Save

Save

Chicken Club Pasta Salad

Chicken Club Pasta Salad is a delicious, filling, chilled salad with rotini pasta, chicken, bacon, tomato, cheese, etc. in a creamy homemade ranch dressing.Chicken Club Pasta Salad is a delicious, filling, chilled salad with rotini pasta, chicken, bacon, tomato, cheese, etc. in a creamy homemade ranch dressing.
The weather has finally warmed up here this week, so to celebrate the sunshine I made a Chicken Club Pasta Salad for dinner the other night. I served it with some fresh fruit on the side – and boy, was it good! It FELT like it was summer (at the end of March!)!

I found this recipe for a chicken club pasta salad on Pinterest, and decided to give it a try, because any salad with chicken and bacon in it has to be good! Add to that cheddar cheese, tomatoes, fresh herbs, and a creamy ranch dressing… and it sounded like a winner! And it was… we REALLY enjoyed this entree salad (and I got to use fresh parsley and chives from my garden in it, also!). If you like a more traditional pasta salad, check out my simple recipe for that here.

This is a very easy salad to prepare. Most of the prep work (and it’s not too tedious) involves cooking bacon, a piece of chicken, and some pasta (I like to call it “multi-tasking!”). The rest comes together quickly and with little to no fuss! My kind of meal! I made the entire salad in the early afternoon, tossed it with a bit of the dressing (to keep it from drying out) and refrigerated it until dinner time. Then I added more salad dressing right before serving!  Here’s how you make it:

Scroll Down For A Printable Recipe Card At The Bottom Of The Page

How To Make Chicken Club Pasta Salad

First cook a large chicken breast. (Boil it, grill it, bake it… or use leftovers… just get enough cooked chicken for 2 cups, and cut it into 1″ cubes and set aside).  Next thing is to cook the bacon until fairly crisp. Drain and cool, then cut. I used kitchen shears to cut it into small pieces.

Cutting cooked bacon for pasta salad

Cut the bacon, cheddar cheese and tomato into small pieces. Set aside.

Cheddar cheese, tomatoes and cooked bacon for chicken club pasta salad

Add all dressing ingredients to a medium sized bowl. Whisk to fully combine. Refrigerate until ready to add to salad.

Ingredients for creamy pasta salad dressing, in metal bowl

Creamy salad dressing is mixed for chicken club pasta salad

Cook pasta according to package directions. Drain and rinse with cold water, until pasta is completely cooled off. (I used tri-color rotini pasta for the color it added, but you could also use shells, macaroni noodles or mini-penne pasta for this dish).

Cooked tri-color rotini pasta is drained, for salad

Add cooled pasta, bacon, chicken, cheddar cheese and tomato to a large salad bowl.

Pasta, bacon, tomatoes and cheese are mixed together for club salad
Time For The Salad Dressing

Pour some of the dressing over the salad and stir to combine. If making this up early in the day, add only enough dressing to cover the pasta so it won’t dry out in the fridge. When ready to serve later, add additional dressing, to taste.

If you are making and serving this salad immediately, add enough dressing to taste and coat all ingredients (there will be some leftover dressing no matter which way you choose to prepare this!)

Creamy dressing is poured over pasta salad
Serve the salad up, dig in, and enjoy this delicious, filling salad!  It tastes wonderful the next day, as well. Hooray for leftovers at lunchtime!

Chicken club pasta salad, on plate with fresh fruit
We really enjoyed this chicken club pasta salad. I think it would be perfect on a HOT summer’s night, or to serve at a luncheon or potluck with friends! Hope you will consider giving this a try!  You might also like this BLT Wedge Salad, or my recipe for Chopped Greek Chicken Salad

Be sure to check out ALL of my recipes in the Recipe Index, which is located at the top of the page. Have a fantastic day, and may God bless the work of your hands!

Interested In More Recipes?

Thank you for visiting this website. I appreciate you using some of your valuable time to do soIf you’re interested, I publish a newsletter 2 times per month (1st and 15th) with all the latest recipes, and other fun info. I would be honored to have you join our growing list of subscribers, so you never miss a great recipe!
There is a Newsletter subscription box on the top right side (or bottom) of each blog post, depending on the device you use, where you can easily submit your e-mail address (only) to be included in my mailing list.

You Can Also Find Me On Social Media:

Facebook page: The Grateful Girl Cooks!
Pinterest:
The Grateful Girl Cooks!
Instagram:
jbatthegratefulgirlcooks

Author's signatureRecipe Adapted From:  http://www.spendwithpennies.com/chicken-club-pasta-salad/

0 from 0 votes
Chicken Club Pasta Salad
Prep Time
20 mins
Cook Time
0 mins
Total Time
20 mins
 

Chicken Club Pasta Salad is a delicious, filling, chilled salad with rotini pasta, chicken, bacon, tomato, cheese, etc. in a creamy homemade ranch dressing.

Category: Entree
Cuisine: American
Keyword: chicken club pasta salad
Servings: 5 servings
Calories Per Serving: 674 kcal
Author: JB @ The Grateful Girl Cooks!
Ingredients
For The Salad:
  • 8 ounce pasta (I used rotini tri-color pasta)
  • 8 slices bacon , cooked crisp, then cut into small pieces.
  • 2 cups cooked chicken breast , cut into 1" cubes
  • 1 tomato , seeded and diced
  • 1/2 cup cheddar cheese , cut into 1" cubes
For The Ranch Dressing:
  • 1/2 cup buttermilk
  • 1/2 cup mayonnaise
  • 1/2 cup sour cream
  • 1 Tablespoon fresh chives , chopped
  • 1 Tablespoon dried dill weed (or chopped fresh dill)
  • 1 Tablespoon fresh parsley , chopped
  • 1 teaspoon onion powder
  • 1 teaspoon garlic powder
  • salt & black pepper , to taste
Instructions
  1. Prep ingredients (cook chicken and bacon / chop tomatoes, cheese). Set aside.
  2. Make the salad dressing. Set aside.
  3. Cook the pasta according to package directions. Rinse with cold water, until pasta has completely cooled off; drain well.
  4. Put salad ingredients into a large salad bowl (except for the salad dressing). Mix.
  5. Add salad dressing to taste. You will NOT have to use all the dressing. If eating salad immediately, just add enough to toss and coat all ingredients well. If making salad early in day, add enough salad dressing to lightly coat all ingredients, stir, then cover dish and refrigerate until ready to serve. At serving time, add additional salad dressing to taste (since pasta will absorb some of the dressing while refrigerated). Stir to combine. Serve, and enjoy!
Recipe Notes

Note: I used 1 really large chicken breast, which provided me with the 2 cups chicken.
Original recipe also called for 1/2 of an avocado, diced. Didn't have one when I made this, but I'm sure it would be great in this salad, as well.

Nutrition Facts
Chicken Club Pasta Salad
Amount Per Serving (1 serving)
Calories 674 Calories from Fat 378
% Daily Value*
Fat 42g65%
Saturated Fat 13g81%
Cholesterol 106mg35%
Sodium 536mg23%
Potassium 475mg14%
Carbohydrates 38g13%
Fiber 1g4%
Sugar 4g4%
Protein 32g64%
Vitamin A 670IU13%
Vitamin C 5.3mg6%
Calcium 165mg17%
Iron 1.9mg11%
* Percent Daily Values are based on a 2000 calorie diet.

Here’s one more to pin on your Pinterest boards!Chicken Club Pasta Salad is a delicious, filling, chilled salad with rotini pasta, chicken, bacon, tomato, cheese, etc. in a creamy homemade ranch dressing.

Save

Garlic Infused Roasted Asparagus

Fresh oven roasted asparagus, lightly drizzled with garlic infused olive oil, is easy to make, and a wonderfully flavored, delicious vegetable side dish!Fresh oven roasted asparagus, lightly drizzled with garlic infused olive oil, is easy to make, and a wonderfully flavored, delicious vegetable side dish!
There’s nothing like the abundance and great taste of fresh asparagus in the Springtime! It’s especially tasty when it is Garlic Infused Roasted Asparagus! Roasted in the oven, with garlic infused olive oil flavor… YUM!

I love fresh asparagus, either steamed or roasted, but roasting it is my favorite way to make it.  It’s very simple to make this delicious vegetable side dish.

Scroll Down for A Printable Recipe Card At The Bottom Of The Page

Here’s How To Make Garlic Infused Roasted Asparagus

The first thing to do is infused garlic into oil. To do this, add olive oil to a small skillet. Turn heat to medium.  Lightly smash 3 medium sized garlic cloves (if small, use 4). Remove the peel, then add the smashed cloves to the oil in skillet. Cook until the oil starts to get bubbly around the garlic pieces.

Once it starts bubbling, turn the heat down to LOW. Continue cooking until it gets heated through, but do not let the garlic turn brown or burn (if you overcook the garlic it will become very bitter tasting!)

Cooking garlic cloves in olive oil to infuse flavor
Once the oil is heated through, remove the garlic from the oil; discard garlic. Trim the thick bottom ends off of each asparagus stalk (I snap the ends). Arrange the asparagus stalks in a single layer on a large baking sheet. Pour the garlic infused olive oil over the asparagus.

Garlic infused olive oil is poured over fresh asparagus
Toss to fully coat the asparagus with the garlic infused oil, and then season with salt and pepper.

Asparagus is seasoned with salt, pepper and garlic olive oil before roasting
Time to Cook The Garlic-Infused Roasted Asparagus

Roasted asparagus bakes in a preheated 450 degree oven for a total of 12-15 minutes. Note that the cooking time can vary, depending on the size of the asparagus stalks!

Keep an eye on the roasted asparagus at the 10 minute mark. We once had dinner guests and I forgot to check on them (got really busy in the kitchen).  Because I was using teensy, tiny asparagus stalks, I killed them. True story! With dinner guests in attendance… oh the horror!

After the asparagus has cooked for 6 minutes (halfway through cooking time), flip the asparagus over to the other side, and continue baking for the remainder of baking time.   See how the asparagus has begun to roast up in the photo below? This is a good thing!

Asparagus on baking sheet halfway through roasting time
Once the asparagus is done, remove from oven. It’s ready to serve! The asparagus is fantastic with a bit of shaved Parmesan cheese on top, too!

When I took these photos I was making this for a meal with a vegan in attendance (no dairy!), so I left the fresh Parmesan curls off as a garnish, but trust me… it’s delicious BOTH ways!

Do You Enjoy Vegetable Side Dishes?

If you enjoy vegetable dishes, be sure to check out my recipe for Oven Roasted CarrotsBrussel Sprouts with Bacon, Brown Butter Green Beans, or Fresh Corn Sauté, plus many vegetable dishes, all listed in the Recipe Index at the top of each page.

It’s a gorgeous day here in the great Pacific Northwest, so I’m gonna head outside in the fresh air and sunshine while it’s here!  Have a fantastic day!

Interested In More Recipes?

Thank you for visiting this website. I appreciate you using some of your valuable time to do soIf you’re interested, I publish a newsletter 2 times per month (1st and 15th) with all the latest recipes, and other fun info. I would be honored to have you join our growing list of subscribers, so you never miss a great recipe!
There is a Newsletter subscription box on the top right side (or bottom) of each blog post, depending on the device you use, where you can easily submit your e-mail address (only) to be included in my mailing list.

You Can Also Find Me On Social Media:

Facebook page: The Grateful Girl Cooks!
Pinterest:
The Grateful Girl Cooks!
Instagram:
jbatthegratefulgirlcooks

Author's signature

0 from 0 votes
Garlic Infused Roasted Asparagus
Prep Time
5 mins
Cook Time
14 mins
Total Time
19 mins
 
Fresh oven roasted asparagus, lightly drizzled with garlic infused olive oil, is easy to make, and a wonderfully flavored, delicious vegetable side dish!
Category: Side Dish
Cuisine: American
Keyword: asparagus
Servings: 6 servings
Calories Per Serving: 54 kcal
Author: JB @ The Grateful Girl Cooks!
Ingredients
  • 2 bunches fresh asparagus , thick ends trimmed
  • 2 1/2 Tablespoons olive oil
  • 3 medium sized garlic cloves (4, if small), lightly smashed, then peeled.
  • approx. 1/2 teaspoon salt and 1/2 teaspoon black pepper
  • Freshly shaved Parmesan cheese curls , if desired, for garnish
Instructions
  1. Preheat oven to 450 degrees.
  2. Smash and peel garlic cloves. Add them to olive oil in a small skillet. Heat oil on a MEDIUM heat. Once the oil around the cloves begins to bubble up a bit, make sure to turn the heat down to LOW. Cook until heated through, but be careful not to brown or burn the garlic (cause it makes the garlic have a bitter taste-not good!). Remove from heat; discard the garlic cloves.
  3. Place the trimmed asparagus stalks onto a large baking sheet, in a single layer. Pour the infused olive oil over the asparagus. Toss gently to fully coat with the oil, then season with salt and pepper.
  4. Bake in preheated 450 degree oven for 6 minutes. Flip the asparagus over, and cook for an additional 6-8 minutes, until roasted through. Check the stalks to ensure you do not overcook them (last half of cooking time will vary, due to various sizes of asparagus stalks).
  5. Serve while hot. Garnish with freshly shaved Parmesan cheese curls, if desired.
Recipe Notes

Caloric calculation does not include garnish of shaved Parmesan cheese (optional).

Nutrition Facts
Garlic Infused Roasted Asparagus
Amount Per Serving (1 serving)
Calories 54 Calories from Fat 45
% Daily Value*
Fat 5g8%
Potassium 16mg0%
Vitamin A 40IU1%
Vitamin C 0.7mg1%
Calcium 3mg0%
Iron 0.1mg1%
* Percent Daily Values are based on a 2000 calorie diet.

Here’s one more to pin on your Pinterest boards!Fresh oven roasted asparagus, lightly drizzled with garlic infused olive oil, is easy to make, and a wonderfully flavored, delicious vegetable side dish!

Save

Save

Save

Easy Cashew Chicken

Your friends and family will love easy cashew chicken (a favorite Chinese dish) , that can be made in 20 minutes, for a fraction of the cost of takeout!Your friends and family will love easy cashew chicken (a favorite Chinese dish) , that can be made in 20 minutes, for a fraction of the cost of takeout!
Do you like Chinese food? We sure do!  I really LOVE finding recipes for delicious dishes like Easy Cashew Chicken that are so simple to make at home.

I love to eat out, but also love saving money, especially when it’s easy to make this favorite Chinese meal in under 20 minutes!

It’s very easy to make this simple dish of cashew chicken at home. Really! And as an added bonus, IT’S QUICK TO PREPARE, AND TASTES FANTASTIC!!!!

Here’s what you do to make this Classic Chinese dish in under 20 minutes!

Scroll Down For A Printable Recipe Card At The Bottom Of The Page

Make The Sauce

Mix the ketchup, soy sauce, rice vinegar, sesame oil, garlic, brown sugar and ginger together in a small bowl, until fully combined. Set aside.

Sauce ingredients are mixed for cashew chicken.

Prepare The Chicken For Cooking

Cut two (large) boneless, skinless chicken breasts into 1″ cubes. Dry them with a paper towel, if necessary, to absorb juices.

Chicken breasts cut into cubes for cashew chicken.

Mix the flour, salt and pepper together. Add this mixture to the chicken pieces, then stir to coat chicken. I found it easiest to do this in a large bowl.

Chicken breast cubes are coated with flour and seasoning before cooking.

Be sure to get the flour coating onto all sides of the chicken. Shake off the excess flour.

Excess flour is shaken off chicken breast cubes before cooking.

Cook The Chicken

Heat a large non-stick skillet over medium-high heat. Drizzle a generous amount of canola or vegetable oil (approx. 3-4 Tablespoons) on bottom of skillet.

Once the oil and skillet are really hot (but not smoking!), add the chicken pieces. the chicken should sizzle when it hits the skillet!

Chicken pieces are cooked in very hot oil until browned.
Cook (without moving the chicken around) for 2-3 minutes, and then turn chicken to other side and cook for another couple minutes.

The chicken pieces should be light golden brown on all sides.

Cooked chicken is turned over so the other side is cooked until golden brown.

Add The Asian Sauce

Pour the Asian-inspired sauce over the chicken. Stir gently to combine and coat the pieces of chicken with sauce. Reduce the heat to medium-low.

Sauce is poured over the chicken pieces in skillet.

Cook for 2-3 minutes, stirring occasionally, until the chicken is cooked all the way through. It will start smelling really good right about now!

Chicken pieces are cooked in the Asian sauce for a few minutes until done.

Finish Making The Cashew Chicken

Add the cashews to the skillet, and stir gently to combine sauce, chicken, and cashews. Remove the skillet from the heat.

Cashews are added to chicken and sauce.

Time To Eat Some Cashew Chicken!

Serve the cashew chicken with a garnish of sliced green onions (if desired), and spoon it on top of a bed of rice!  That’s it, and now it’s time to enjoy this delicious meal.

Easy cashew chicken is ready to eat, on a bed of white rice!

I think you will find this is “restaurant quality” delicious! Since it only takes under 20 minutes to have cashew chicken on the table, who needs take-out?

Easy cashew chicken is served on a bed of rice.

I hope you will consider trying this recipe for cashew chicken. It truly tastes fantastic. If you enjoy chicken with an Asian twist, you might also enjoy my recipes for Asian Chicken Lettuce Wraps, P.F. Chang’s Ginger Chicken with BroccoliKung Pao Chicken or Asian Lemon Chicken Strips.

Be sure to check out ALL of my recipes, which are located in the Recipe Index at the top of the page. Have a wonderful day, and thanks for stopping by! Please come back again soon for more delicious recipes.

Want More Recipes? Get My FREE Newsletter!

I publish a newsletter 2 times per month (1st and 15th) with lots of recipes, tips, etc..
Would you like to join our growing list of subscribers?

There is a Newsletter subscription box on the top right (or bottom) of each blog post, depending on the device you use.
You can submit your e-mail address there, to be added to my mailing list.

Find Me On Social Media:

Facebook page: The Grateful Girl Cooks!
Pinterest:
The Grateful Girl Cooks!
Instagram:
jbatthegratefulgirlcooks

Author's signature

Recipe Source: http://www.ohsweetbasil.com/quick-and-easy-cashew-chicken-recipe.html

↓↓ PRINTABLE RECIPE BELOW ↓↓

0 from 0 votes
Easy Cashew Chicken
Prep Time
5 mins
Cook Time
10 mins
Total Time
15 mins
 
Your friends and family will love easy cashew chicken (a favorite Chinese dish) , that can be made in 20 minutes, for a fraction of the cost of takeout!
Category: Dinner, Entree
Cuisine: Asian
Keyword: cashew chicken
Servings: 4 servings
Calories Per Serving: 282 kcal
Author: JB @ The Grateful Girl Cooks!
Ingredients
  • 1 Tablespoon ketchup
  • 2 Tablespoons soy sauce
  • 1 Tablespoon rice wine vinegar
  • 1/8 teaspoon sesame oil
  • 1 clove garlic , minced
  • 1 1/2 Tablespoons brown sugar
  • 1/8 teaspoon ground ginger
  • 2 large chicken breasts , skinless/boneless (cut in 1" cubes)
  • 1/4 cup flour
  • 1/4 teaspoon salt
  • 1/4 teaspoon black pepper
  • 1/2 cup roasted cashews (salted or unsalted, but not raw)
  • 4 Tablespoons oil (canola, olive, or vegetable) - enough to coat the bottom of large skillet (approx.3-4Tbl)
  • 1 Tablespoon Thinly sliced green onions , for garnish (if desired)
Instructions
  1. In a small bowl, mix together ketchup, soy sauce, rice wine vinegar, sesame oil, minced garlic, brown sugar and ground ginger. Once fully blended, set aside.
  2. Place flour, salt and pepper in large bowl. Toss the chicken cubes (a few at a time) in the flour, salt and pepper, turning until fully coated on all sides. Shake off excess flour from chicken pieces and place on plate. Repeat until all are coated.

  3. Heat oil on medium high in a large, nonstick skillet (approx. 4 Tablespoons-enough to coat the bottom of skillet). Once the oil is really hot, add the chicken pieces, keeping them separated as you add them to the skillet. Cook on medium high on each side for 2-3 minutes (until fully cooked and light golden brown). Discard any leftover oil from skillet.

  4. When chicken is done, pour the sauce over the chicken. Stir gently to combine and coat chicken pieces. Immediately turn heat to medium low. Let the sauce and chicken simmer until hot, and heated through (a couple minutes), then add cashews to skillet. Stir to combine.
  5. Serve the cashew chicken on a bed of rice. Garnish with thinly sliced green onions, if desired. Serve and enjoy!

Nutrition Facts
Easy Cashew Chicken
Amount Per Serving (1 servings)
Calories 282 Calories from Fat 144
% Daily Value*
Fat 16g25%
Saturated Fat 7g44%
Cholesterol 36mg12%
Sodium 752mg33%
Potassium 336mg10%
Carbohydrates 17g6%
Sugar 6g7%
Protein 16g32%
Vitamin A 50IU1%
Vitamin C 1.2mg1%
Calcium 14mg1%
Iron 1.8mg10%
* Percent Daily Values are based on a 2000 calorie diet.

Here’s one more to pin on your Pinterest boards!Your friends and family will love easy cashew chicken (a favorite Chinese dish) , that can be made in 20 minutes, for a fraction of the cost of takeout!

Save

Save

Save

Save

Happy Easter!

Happy Easter!  I am celebrating this day that changed the world… and my life, FOREVER!Happy Easter / The Grateful Girl Cooks!

May you have a Happy Easter, as you celebrate the sacrifice that was made on our behalf. Truly amazing love.

Our family is rejoicing over a risen Savior!… Happy Easter!

Author's signature

Interested In More Recipes?

Thank you for visiting this website. I appreciate you using some of your valuable time to do soIf you’re interested, I publish a newsletter 2 times per month (1st and 15th) with all the latest recipes, and other fun info. I would be honored to have you join our growing list of subscribers, so you never miss a great recipe!

There is a Newsletter subscription box on the top right side (or bottom) of each blog post, depending on the device you use, where you can easily submit your e-mail address (only) to be included in my mailing list.

You Can Also Find Me On Social Media:
Facebook page: The Grateful Girl Cooks!
Pinterest: The Grateful Girl Cooks!
Instagram: jbatthegratefulgirlcooks

Save

Save

What’s “Good” about Good Friday?

What’s so “good” about Good Friday?  EVERYTHING. It is a moment in history that changed the world FOREVER.What's so "good" about Good Friday? HOPE.
Because Jesus Christ took my sins and my guilt onto Himself on the cross, He paid the penalty that I deserved.  Because of His sacrifice, I can now stand fully forgiven and pardoned before God. My debt has been marked “PAID IN FULL”.  I believe… and am forever grateful.  Yes… that horrible day in history was a very GOOD day.

I just couldn’t let this important day pass without sharing from my heart. My hope is that if you’re still reading this, you might consider for a moment what Good Friday is REALLY about… the ransom that was paid on our behalf, (that was far more costly than we will ever fully comprehend), to bring us “Prodigals” back into the loving arms of a holy God.  It still gets to me every time I think about it.

May we never forget the extremely brutal, sacrificial price Jesus paid to save us, for all eternity.  I’m profoundly amazed at the price He paid, and the unconditional love, mercy and grace He has poured so freely into my life. It has changed me for the better. And… I’m so glad he didn’t stay dead in the tomb.  As Tony Campolo says, “It’s Friday… but Sunday’s coming!”

Author's signature


Save

Save

Tandoori Chicken (Weight Watchers)

Tandoori chicken is a Wt. Watchers recipe for this classic Indian dish. It’s low-fat, full of spices and unique flavors, and very easy to prepare.Tandoori chicken is a Wt. Watchers recipe for this classic Indian dish. It's low-fat, full of spices and unique flavors, and very easy to prepare.

I tried a recipe for Tandoori Chicken (a classic Indian dish), a few months ago. It happened to be a Weight Watchers recipe that I found online. This version of a classic Indian dish is low in calories, seasoned with unique flavors, and is very easy to make.

Scroll Down For A Printable Recipe Card At The Bottom Of The Page

What IS Tandoori Chicken?

Tandoori Chicken is a very popular Indian dish, typically cooked in a clay oven called a Tandoor (which is where this chicken gets its name from).  Tandoori Chicken typically consists of roasted chicken, which is coated with a mixture of plain yogurt and pungent spices. The spices give the chicken its vibrant color and unique taste, and vary with different recipes.

I was curious to try Tandoori Chicken, so I started looking for simple recipes I could make, to see what the chicken tasted like.  The original recipe I used, (a Weight Watchers recipe), called for using chicken breasts for a lower calorie count. When I made the dish I used boneless chicken thighs, so my photos will reflect that.

Not everyone out there likes the mix of unique spices found in this popular Indian dish, but if you do, you might enjoy this “low calorie” version.

How To Make Tandoori Chicken

Combine spices, onion, garlic, lime juice and yogurt in a bowl. Mix well to fully combine ingredients.

The tandoori spices for the chicken are mixed with plain yogurt in a small bowl.

This is the spice mixture that the tandoori chicken will marinate in before cooking.

Place the chicken and the yogurt marinade in a large re-sealable plastic bag. Mash the bag around between your fingers until the chicken is fully covered with the sauce. Refrigerate the seasoned chicken for 6-8 hours (or overnight), for best flavor.

Chicken is marinated in tandoori spice mixture for 6-8 hours before cooking.

When you’re ready to prepare the tandoori chicken, remove it from the plastic bag. Spray a wire rack with non-stick spray. Place the wire rack on top of a baking pan or sheet. This will help to catch drips while the tandoori chicken cooks. Place the chicken pieces onto the rack.

Tandoori chicken pieces are placed on a wire rack, and is ready for the oven.

Cooking Tandoori Chicken In the Oven

Preheat the broiler in your oven.  Place the chicken (still on the rack) on the middle rack of the oven. Broil the tandoori chicken 4-5 inches from broiler element) until completely cooked through.

This usually takes about 15-20 minutes or so to completely cook the chicken. Once done, chicken should have an internal temperature of 165 degrees F). Remove the tandoori chicken from the oven, and serve. We enjoyed the chicken with rice and a veggie on the side!

A broiler is used to cook the tandoori chicken.

I think it’s interesting to try dishes, like Tandoori chicken, from other countries… why not see what people around the world eat and enjoy? Hope you have a fantastic day… full of culinary adventures!

Looking For More CHICKEN Recipes?

You can find all of my chicken recipes in the Recipe Index, located at the top of the page. I have LOTS of chicken recipes! A few favorites include:

Interested In More Recipes?

Thank you for visiting this website. I appreciate you using some of your valuable time to do soIf you’re interested, I publish a newsletter 2 times per month (1st and 15th) with all the latest recipes, and other fun info. I would be honored to have you join our growing list of subscribers, so you never miss a great recipe!

There is a Newsletter subscription box on the top right side (or bottom) of each blog post, depending on the device you use, where you can easily submit your e-mail address (only) to be included in my mailing list.

You Can Also Find Me On Social Media:
Facebook page: The Grateful Girl Cooks!
Pinterest: The Grateful Girl Cooks!
Instagram: jbatthegratefulgirlcooks

Author's signature Recipe Source: https://www.weightwatchers.com/

↓↓ PRINTABLE RECIPE BELOW ↓↓

0 from 0 votes
Tandoori Chicken (Weight Watchers)
Prep Time
6 hrs
Cook Time
15 mins
Total Time
6 hrs 15 mins
 

Tandoori chicken is a Wt. Watchers recipe for this classic Indian dish. It's low-fat, full of spices and unique flavors, and very easy to prepare.

Category: Entree
Cuisine: Indian
Keyword: tandoori chicken
Servings: 4 servings (using breasts)
Calories Per Serving: 175 kcal
Author: JB @ The Grateful Girl Cooks!
Ingredients
  • 2 Tablespoons tandoori spice mix (* see Notes section for substitute spices)
  • 1 medium brown onion , finely chopped
  • 2 cloves garlic , minced
  • 1 cup plain , fat free yogurt
  • 1 Tablespoon fresh lime juice
  • 1 pound boneless skinless chicken breasts (4 four ounce breasts) (I used 6 boneless skinless thighs)
Instructions
  1. Mix the spices, onion, garlic, yogurt and lime juice together until well combined.
  2. Place yogurt mixture in a large re-sealable plastic bag, and add chicken pieces. Seal bag. Mash bag together with your fingers until all chicken pieces are coated with yogurt mixture. Refrigerate 6-8 hours (or overnight) for full flavor.
  3. When ready to cook, preheat oven broiler. Spray a wire rack with non-stick spray. Place rack on top of baking sheet or baking pan (to catch drips while baking). Place chicken on rack on middle rack in broiler (about 4-5 inches from broiler element). Broil abut 15 minutes, or until chicken is completely cooked through (to internal temp. of 165 degrees).
  4. Remove from broiler, and serve with rice and veggies.
Recipe Notes

NOTE: Caloric calculation is based on using 4 (4 ounce) boneless, skinless chicken breasts (if using thighs, the caloric count will be higher)
TIP:If you need a substitute for the tandoori spices, you can mix together and substitute the following:
1 Tablespoon fresh minced ginger +1 1/2 teaspoons coriander +2 teaspoons cumin
+1 teaspoon paprika + 1 teaspoon salt +1/2 teaspoon pumpkin pie spice

Nutrition Facts
Tandoori Chicken (Weight Watchers)
Amount Per Serving (1 piece)
Calories 175 Calories from Fat 27
% Daily Value*
Fat 3g5%
Cholesterol 75mg25%
Sodium 151mg7%
Potassium 544mg16%
Carbohydrates 5g2%
Sugar 2g2%
Protein 29g58%
Vitamin A 35IU1%
Vitamin C 5mg6%
Calcium 70mg7%
Iron 0.5mg3%
* Percent Daily Values are based on a 2000 calorie diet.

Here’s one more to pin on your Pinterest boards!Tandoori chicken is a Wt. Watchers recipe for this classic Indian dish. It's low-fat, full of spices and unique flavors, and very easy to prepare.

Save

Save

Save

Save