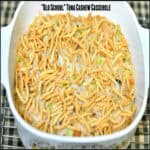
Blueberry Ice Cream Tart

A blueberry ice cream tart is a delicious, frozen dessert treat! Ice cream in a graham cracker crust, served with fresh blueberry sauce on the side!A blueberry ice cream tart is a delicious, frozen dessert treat! Ice cream in a graham cracker crust, served with fresh blueberry sauce on the side!

I love taking a tried and true recipe and tweaking and morphing it into a different recipe. Do you do that? That was the case when I took my recipe for Blueberry Ice Cream and changed it into a delicious, small Blueberry Ice Cream Tart for each guest at a dinner & dessert party.

I thought long and hard about what I wanted to make for dessert, then decided to make my blueberry ice cream, and add a graham cracker crust from another of my recipes. Then I decided to server it with a simple blueberry sauce on the side. Voila! That is how I came up with this recipe for these wonderful frozen dessert tarts! And boy… were they ever good, if I do say so myself!

Scroll Down For A Printable Recipe Card At The Bottom Of The Page

Do I Need An Ice Cream Machine?

I have an electric indoor Krups ice cream maker, which makes homemade ice cream in about 20 minutes. If you don’t have one or don’t want to take the time, just buy a good quality blueberry ice cream or gelato at the grocery store, and shave some time off of this recipe!

This recipe is actually very easy to prepare… it just needs to be done in steps. Make the ice cream, make the crumb topping, make the blueberry sauce, assemble the tarts, freeze, then serve!

Make Or Buy Blueberry Ice Cream

First make (or buy) the blueberry ice cream. If making homemade ice cream, put it back into your kitchen freezer after the initial freezing to really firm it up. My homemade blueberry ice cream also has cream cheese in it, so it has more of a blueberry cheesecake flavor!

My homemade blueberry ice cream looks like this photo below, when done. Here it is scooped up nice and pretty:

Blueberry ice cream is the main ingredient for these delicious frozen tarts.

Make The Crust Mix

The next thing I do is prepare a simple graham cracker crust mixture. This is made by mixing graham cracker crumbs with melted butter and sugar! EASY!

Ingredients for the graham cracker crust are mixed together in bowl.

Making The Blueberry Sauce Is Simple!

Prepare the blueberry sauce, by cooking blueberries, sugar, cornstarch and water until the sauce thickens and the blueberries “pop” open (6-7 minutes). Once the sauce thickens, remove the pan from the heat and let it cool completely. Set aside.

A thickened blueberry sauce is made to garnish the ice cream tart.

The blueberry sauce and graham cracker crust mix are ready to use.

Make The Crust For The Tarts

Firmly pack the graham cracker crumb mixture (reserve 1/2 cup for garnish) onto the bottom of 4 small tart pans (with removable bottoms). The crusts are baked for 6-7 minutes. Once they’re done, let them cool completely.

Graham cracker mixture is baked in mini tart pans.

Cover the crust and fill each cooled tart pan with slightly softened blueberry ice cream. Put each blueberry ice cream tart (in the pans) back into the freezer for 2 hours to firm up.

Ready To Serve The Blueberry Ice Cream Tart

Spread some of the thickened blueberry sauce onto each dessert plate. Sprinkle the sauce with some reserved graham cracker crumb mix. Carefully remove each blueberry ice cream tart from the removable bottom tart pans, and set them on top of the blueberry sauce.

Garnish the top of each blueberry ice cream tart with a spoonful of sauce, and sprinkle with graham cracker crumb mixture. Let each dessert sit on the plates for a couple minutes at room temp. to let the ice cream soften slightly, before serving! Serve and enjoy, because this dessert is delicious!!!!

Blueberry Ice Cream Tart is garnished with sauce, and sprinkled with graham cracker crumbs to serve.

What If I Don’t Have Small Tart Pans?

If you don’t have removable bottom tart pans, think outside the box! This recipe could be easily adapted to make into a pie. Make a graham cracker crust (using this recipe you might have to double amounts) or buy a graham cracker crust, then follow the rest of the directions.

You will have a delicious frozen pie, rather than a tart, but a slice of THAT pie would be fantastic, garnished with the blueberry sauce and graham cracker crumbs. It’s ALL good. Hope you will give this blueberry ice cream tart recipe  a try… it’s worth it!

Looking For More Recipes Featuring BLUEBERRIES?

You can find all of my recipes in the Recipe Index, located at the top of the page. I have lots of recipes that feature blueberries, including:

Interested In More Recipes?

Thank you for visiting this website. I appreciate you using some of your valuable time to do soIf you’re interested, I publish a newsletter 2 times per month (1st and 15th) with all the latest recipes, and other fun info. I would be honored to have you join our growing list of subscribers, so you never miss a great recipe!
There is a Newsletter subscription box on the top right side (or bottom) of each blog post, depending on the device you use, where you can easily submit your e-mail address (only) to be included in my mailing list.

You Can Also Find Me On Social Media:

Facebook page: The Grateful Girl Cooks!
Pinterest:
The Grateful Girl Cooks!
Instagram:
jbatthegratefulgirlcooks

Author's signature

↓↓ PRINTABLE RECIPE BELOW ↓↓

0 from 0 votes
Blueberry Ice Cream Tart
Prep Time
1 hr
Cook Time
7 mins
Inactive Freezer Time
2 hrs
Total Time
3 hrs 7 mins
 

A blueberry ice cream tart is a delicious, frozen dessert treat! Ice cream in a graham cracker crust, served with fresh blueberry sauce on the side!

Category: Dessert
Cuisine: American
Keyword: blueberry ice cream tart
Servings: 4 servings
Calories Per Serving: 789 kcal
Author: JB @ The Grateful Girl Cooks!
Ingredients
For Blueberry Ice Cream:
  • 2 cups blueberries (fresh or frozen)
  • 1/2 cup granulated sugar
  • 8 oz. cream cheese , room temp, and cut into chunks
  • 1/2 teaspoon vanilla extract
  • 3/4 cup whole milk
  • 3/4 cup heavy whipping cream
  • 3 drops blue food coloring (optional, but it helps enhances the color)
For Graham Cracker Crust and Garnish:
  • 1 cube butter , melted
  • 1 1/2 cups finely crushed graham cracker crumbs
  • 1/3 cup granulated sugar
For Blueberry Sauce:
  • 2 cups blueberries
  • 1/2 cup water
  • 2 Tablespoons granulated sugar
  • 1 Tablespoon cornstarch
Instructions
Prepare the ice cream:
  1. Place blueberries and sugar into blender or food processor. Blend/pulse until liquified. Add cream cheese chunks and vanilla. Mix until fairly smooth. Add milk; blend well. Pour mixture into large bowl. Add whipping cream and whisk to combine. Pour mixture into canister of ice cream maker, and freeze per manufacturer instructions. When done, remove to a covered container and place in freezer.

Prepare Blueberry Sauce:
  1. Place the water, sugar and cornstarch into a medium sized sauce pan. Stir until smooth. Add the blueberries. Cook on medium heat, stirring often, for about 6-7 minutes, until blueberries have popped, and the sauce has thickened. Remove from heat, and cool completely.
Prepare Graham Cracker Crust:
  1. Mix graham cracker crust ingredients until well blended. Reserve about 1/2 cup for garnish. Set aside. Divide the rest between 4 small tart pans with removable bottoms. Press crumb mixture firmly down to form bottom crust in pan. Bake at 375 degrees for about 7 minutes. Remove from oven. Cool completely. Do not remove crust from pan. Once crust has cooled completely, spoon blueberry ice cream into each shell to fill to top of the tart pan. Place in freezer for 2 hours to completely firm up.

To Assemble/Serve:
  1. Spread some blueberry sauce onto individual serving plates. Sprinkle with a little of the graham crumb mixture. Carefully remove ice cream tart from the pan by gently pushing up on the bottom to remove from pan, then slide the tart off the bottom tray onto the blueberry sauce on serving plate. Spoon a little sauce on top of the tart, then sprinkle with additional graham cracker crumbs. Let finished plates sit for several minutes to soften ice cream slightly, then serve and enjoy!

Recipe Notes

Most of the prep time is INACTIVE time... just waiting for ice cream to harden in freezer. I made up the ice cream, sauce and crust early in the day, then it was a snap to assemble later in the evening. ALL can be made ahead of time, if needed.

Nutrition Facts
Blueberry Ice Cream Tart
Amount Per Serving (1 tart)
Calories 789 Calories from Fat 369
% Daily Value*
Fat 41g63%
Saturated Fat 22g138%
Cholesterol 128mg43%
Sodium 430mg19%
Potassium 341mg10%
Carbohydrates 100g33%
Fiber 4g17%
Sugar 73g81%
Protein 9g18%
Vitamin A 1570IU31%
Vitamin C 14.6mg18%
Calcium 170mg17%
Iron 1.9mg11%
* Percent Daily Values are based on a 2000 calorie diet.

Here’s one more to pin on your Pinterest boards!A blueberry ice cream tart is a delicious, frozen dessert treat! Ice cream in a graham cracker crust, served with fresh blueberry sauce on the side!


Save

Save

Save

How To Make Pumpkin Puree

Learn how to make pumpkin puree from “pie” or “sugar” variety pumpkins! Make about 6 cups of puree (from 2 pumpkins) to freeze and use throughout the year!Learn how to make pumpkin puree from "pie" or "sugar" variety pumpkins! Make about 6 cups of puree (from 2 pumpkins) to freeze and use throughout the year!
Well… Fall is officially here, and just like clockwork, pumpkins are EVERYWHERE! It’s THAT time of year once again. Do you know how to make pumpkin puree? It’s easy.

I use pumpkin puree for making Pumpkin Streusel Coffeecake, Double-Glazed Pumpkin Scones, Glazed Pumpkin Buttermilk Doughnuts, and Pumpkin Bread, as well as many other Fall recipes!

I’ve been making my own pumpkin puree for years and years. I used to use our Halloween pumpkins, but found the water content of those BIG pumpkins was too high.

"Pie" or "Sugar" pumpkins are used to make pumpkin puree, versus regular pumpkins.

What Kind Of Pumpkins Are Best For Making Puree?

Years ago I switched and started buying “Sugar” or “Pie” pumpkins. They are smaller than traditional pumpkins, but are perfect for making puree (more flavor and LESS water). Most grocery stores carry this variety of pumpkin.

I like to make puree out of a couple pumpkins each year, then freeze it. By doing so, we can have pumpkin puree to use any time we want, during the year.

The convenience of having pumpkin puree in the freezer for baking pumpkin bread, muffins, etc., is to NOT have to run to the grocery store and buy it.  All you will need to do is thaw it!

How To Make Pumpkin Puree

First buy a couple Sugar pumpkins (also called a Pie pumpkin). Cut it in half horizontally with a very sharp knife. Use a spoon and remove the seeds and stem. I like to save the seeds and roast them later for a good snack!

Sugar pumpkins are cut in half horizontally to remove seeds/pulp before making pumpkin puree.

Remove all the seeds and the stem from the pumpkin(s). Put the pumpkins, cut side down on a aluminum foil lined baking sheet that’s been sprayed with a non-stick cooking spray.

You don’t want to have a sticking pumpkin now, do you? Nope. You sure don’t!

Pie pumpkins are roasted in oven until tender, before making pumpkin puree.

Bake the pumpkins at 375 degrees for about 45-50 minutes, depending on the size of the pumpkins.

When they are “done”, the skin will be much darker, and you will easily be able to pierce the skin with a sharp knife. Remove pan from oven.

Roasted pumpkins will be tender after roasting, in order to make pumpkin puree.

Turn the pumpkin halves over. Use a large spoon to remove the cooked pumpkin. Transfer to a large mixing bowl.

Tender baked pumpkin flesh is removed from shell with a spoon to make pumpkin puree.

Once all the pumpkin meat has been removed, puree the pumpkin. You can use a blender, food processor, stand mixer, or an immersion blender to make the pumpkin puree.

Puree until smooth. Once it is smooth, put the pumpkin puree in a strainer over a bowl for a few minutes (or you can use cheesecloth), to help remove any remaining liquids.

Baked pumpkin is beaten until smooth to make pumpkin puree.

Now you have pumpkin puree!  You can use it as is, in recipes, or you can freeze it in bags to use at other times.

Freezing Pumpkin Puree For Long Term Storage

To freeze the pumpkin puree for later use, measure out 1 cup of the puree and spoon it into a quart sized freezer bag. Try to get as much air out of the bag as possible, flatten the bag out, seal, and label bags.

Pumpkin puree is placed into freezer bags to store in freezer, long term.

My two little pie pumpkins yielded 6 cups to freeze. Yeehaw! By flattening the bags out, you will be able to get a lot of pumpkin into the freezer in a very small space!

Flattened freezer bags full of homemade pumpkin puree, ready to place in freezer.

The process for doing this is not hard at all, and won’t take too much of your time! Making pumpkin puree is a GREAT way to have extra pumpkin around for baking pumpkin bread, pumpkin bars, etc.

You can use the pumpkin puree throughout the year, without having to go out and buy a can of pumpkin at the grocery store. I sure hope you will try this tip this Fall!

Have a great day!

Interested In More Recipes?

Thank you for visiting this website. I appreciate you using some of your valuable time to do soIf you’re interested, I publish a newsletter 2 times per month (1st and 15th) with all the latest recipes, and other fun info. I would be honored to have you join our growing list of subscribers, so you never miss a great recipe!
There is a Newsletter subscription box on the top right side (or bottom) of each blog post, depending on the device you use, where you can easily submit your e-mail address (only) to be included in my mailing list.

You Can Also Find Me On Social Media:

Facebook page: The Grateful Girl Cooks!
Pinterest:
The Grateful Girl Cooks!
Instagram:
jbatthegratefulgirlcooks

Author's signature

0 from 0 votes
How To Make Pumpkin Puree
Prep Time
30 mins
Cook Time
45 mins
Total Time
1 hr 15 mins
 
Learn how to make pumpkin puree from "pie" or "sugar" variety pumpkins! Make about 6 cups of puree (from 2 pumpkins) to freeze and use throughout the year!
Category: Canning and Preserving, Vegetable
Cuisine: American
Keyword: pumpkin puree
Servings: 6 cups (approx.)
Calories Per Serving: 117 kcal
Author: JB @ The Grateful Girl Cooks!
Ingredients
  • 2 "Pie" or "Sugar" pumpkins
Instructions
  1. Cut sugar pumpkins in half horizontally with a very sharp knife. Use a spoon and remove the seeds and stem. Discard seeds, etc. (unless you will be roasting them).

  2. Put the pumpkins, cut side down on a aluminum foil lined baking sheet that's been sprayed with a non-stick cooking spray. Bake the pumpkins at 375 degrees for about 45-50 minutes, depending on the size of the pumpkins. When they are "done", the skin will be much darker, and you will easily be able to pierce the skin with a sharp knife. Remove pan from oven.

  3. Turn the pumpkin halves over. Use a large spoon to remove the cooked pumpkin. Transfer to a large mixing bowl. Once all pumpkin "meat" has been removed, puree the pumpkin. Use a blender, food processor, stand mixer, or an immersion blender to puree the pumpkin until smooth. Once smooth, put the pumpkin puree in a strainer over a bowl for a few minutes (or you can use cheesecloth), to help remove any remaining liquids. Puree is now ready to use.

To Freeze Pumpkin Puree For Later Use
  1. To freeze the pumpkin for later use, measure out 1 cup of the puree and spoon it into a quart sized freezer bag. Try to get as much air out of the bag as possible, flatten the bag out, seal, and label bags. Place in freezer. Use within 9 months.

Nutrition Facts
How To Make Pumpkin Puree
Amount Per Serving (1 cup)
Calories 117
% Daily Value*
Sodium 4mg0%
Potassium 1541mg44%
Carbohydrates 29g10%
Fiber 2g8%
Sugar 12g13%
Protein 4g8%
Vitamin A 38590IU772%
Vitamin C 40.8mg49%
Calcium 95mg10%
Iron 3.6mg20%
* Percent Daily Values are based on a 2000 calorie diet.

Here’s one more to pin on your Pinterest boards!Learn how to make pumpkin puree from "pie" or "sugar" variety pumpkins! Make about 6 cups of puree (from 2 pumpkins) to freeze and use throughout the year!

Save

Save

Cucumber And Zucchini Carpaccio Salad

You will LOVE this GORGEOUS and DELICIOUS carpaccio salad, with thinly sliced cucumbers, zucchini, feta cheese, and pecans, topped with a light, herb-seasoned dressing!You'll LOVE this GORGEOUS and DELICIOUS carpaccio salad, featuring thinly sliced cucumbers, zucchini, feta, pecans,and a light, herb-seasoned dressing!
Recently I used a birthday gift card I received to purchase a cookbook I had my eye on for a while: “Cristina Ferrare’s Big Bowl Of Love”. It is a great cookbook… and this cucumber and zucchini carpaccio salad is the FIRST recipe I made from the book.

I wasn’t quite sure what to expect, but found the dressing (which features fresh dill, flat leaf parsley, and mint), and the addition of feta cheese, and toasted pecans make this a unique looking and absolutely delicious, fresh crunchy salad! The salad is scrumptious, pretty to look at, and would be a perfect brunch, potluck or party dish!

Scroll Down For A Printable Recipe Card At the Bottom Of The Page

What Exactly IS A “Carpaccio Salad”?

I thought the salad looked wonderful, but was very curious what a “Carpaccio” salad actually was. Turns out the word Carpaccio (according to Wikipedia) originally referred to a dish utilizing extremely thin slices of raw meat, layered with white truffles or Parmesan cheese.

The dish was named after a Venetian painter named Vittore Carpaccio, who was well known for his paintings which prominently featured red and white tones. (see where the red meat and white truffles played a part?).

Nowadays the term “carpaccio” can be used for any dish made with thinly sliced raw meat, fish or vegetables. THIS carpaccio salad uses fresh cucumbers and zucchini. Only veggies-no raw meat for me!

How To Prepare This Cucumber Zucchini Carpaccio Salad

Very thinly slice one large cucumber and one zucchini of equal size (I picked both from my garden-yeehaw!). I used a mandolin to thinly slice the veggies, which made it very easy. However, if you are slicing the cucumbers and zucchini by hand, make sure you get the slices as thin as possible. Here are the cucumber slices, so you can see their “thin-ness”.

Very thinly sliced cucumbers for carpaccio salad
Here is me and my trusty mandolin (a gift from our oldest son), slicing the zucchini thinly. This is a great tool for this recipe!

Slicing zucchini for salad very thinly using a mandolin
Here are the finished cucumber and zucchini slices. The peel is left intact, which adds color to the cucumber zucchini carpaccio salad.

Cucumber and zucchini slices cut using mandolin
Arranging The Carpaccio Salad Veggies

Begin in the center of a round serving plate, and alternately arrange the slices (one cucumber, one zucchini, etc.), working outward around the circle.

Cucumber, zucchini slices overlapping from center of platter
Keep layering the veggies, one zucchini, one cucumber, and so on. Keep layering until all the veggies are distributed and the carpaccio salad looks like this:

Serving platter with decoratively arranged cucumber and zucchini slices

Prepare The Salad Dressing

Looks good already, doesn’t it? I think so! Mix the dressing, which includes, olive oil, lemon juice, rice wine vinegar, fresh mint, flat leaf parsley and dill (herbs were from our garden… nice).

Salad dressing for carpaccio salad mixed in small metal bowlToast The Pecans For The Salad

Toast chopped pecans in a “dry” skillet. A “dry skillet means you use no oil. Simply add chopped pecans, and heat on medium-low for 3-4 minutes, keeping them stirred, until lightly toasted.

Chopped pecans for salad dry toasting in skillet
To Serve The Cucumber Zucchini Carpaccio Salad

Mix the dressing really well, then drizzle it over the top of the veggies, trying to cover them all.  Sprinkle the top of the cucumber zucchini carpaccio salad with crumbled feta cheese, toasted pecans, and some cracked black pepper. I also added a few small mint leaves and dill for garnish, and a small red pear tomato (cut in quarters almost to bottom) from our garden, and that was it!

MAKE AHEAD TIP: If you want to make this up early, arrange the cucumbers and zucchini on plate, then cover and refrigerate. Right before serving, add the dressing, feta, pecans and black pepper. This is what it looked like at serving time! Pretty, huh?

Cucumber and Zucchini Carpaccio Salad ready to serve!
Trust me – this carpaccio salad is amazing! The dressing is fresh, and the fresh herbs shine through, to make this such a wonderful, tasty, and beautiful salad. Here… I saved a bite for you! (You’re welcome).

Close up bite of zucchini and cucumber salad on fork
I will most definitely be making this carpaccio salad again! Sure hope you will give it a try, also! Have a great day. Thank you for stopping by, and I hope you will come back again soon.

Looking For More Salads Using VEGGIES?

You can find all my salad recipes in the Recipe Index, located at the top of the page.  A few favorites include:

Interested In More Recipes?

Thank you for visiting this website. I appreciate you using some of your valuable time to do soIf you’re interested, I publish a newsletter 2 times per month (1st and 15th) with all the latest recipes, and other fun info. I would be honored to have you join our growing list of subscribers, so you never miss a great recipe!
There is a Newsletter subscription box on the top right side (or bottom) of each blog post, depending on the device you use, where you can easily submit your e-mail address (only) to be included in my mailing list.

You Can Also Find Me On Social Media:

Facebook page: The Grateful Girl Cooks!
Pinterest:
The Grateful Girl Cooks!
Instagram:
jbatthegratefulgirlcooks

Have a wonderful day!

Author's signatureRecipe Source: “Cristina Ferrare’s Big Bowl Of Love”, page 54, copyright 2011, by Cristina Ferrare., Sterling Publishing Co., Inc.

0 from 0 votes
Cucumber And Zucchini Carpaccio Salad
Prep Time
15 mins
Cook Time
0 mins
Total Time
15 mins
 

You will LOVE this GORGEOUS and DELICIOUS carpaccio salad, featuring thinly sliced cucumbers, zucchini, feta, pecans, and a light, herb-seasoned dressing!

Category: Salad, Vegetable Dish
Cuisine: American
Keyword: carpaccio salad
Servings: 6 servings
Calories Per Serving: 170 kcal
Author: JB @ The Grateful Girl Cooks!
Ingredients
For salad dressing:
  • 1/4 cup extra virgin olive oil
  • 4 Tablespoons fresh squeezed lemon juice
  • 1 Tablespoon rice wine vinegar
  • 1 Tablespoon finely chopped fresh mint
  • 2 teaspoons finely chopped fresh dill
  • 1 Tablespoon finely chopped Italian flat leaf parsley
For salad:
  • 2 zucchini , sliced very thin
  • 2 cucumbers , sliced very thin
  • 1/2 teaspoon Kosher salt
  • 1/2 cup feta cheese , crumbled
  • 1/4 cup finely chopped roasted pecans (or walnuts)
  • Freshly cracked black pepper
Instructions
  1. In a small bowl, whisk the olive oil, lemon juice, rice wine vinegar, mint, dill and parsley together until well combined. Set salad dressing aside (or cover with plastic wrap and refrigerate if making ahead).
  2. To make the salad, very thinly slice the cucumbers and zucchini. Arrange the veggie slices on a large serving plate, by alternating cucumbers and zucchini. Work from the inside of the plate around the circle to the outside, filling the entire plate. Once the veggies are arranged, sprinkle lightly with salt. NOTE: If you are making this salad ahead of serving time, wrap the veggie plate with plastic wrap and refrigerate at this point. Add the rest (salad dressing, feta, pecans, etc. at serving time).
  3. When ready to serve, drizzle the salad dressing over the entire salad, trying to cover all the veggies lightly.
  4. Add the crumbled feta cheese, distributing over the top of the salad. Do the same with the toasted pecans (or walnuts), then finish with cracked black pepper.
  5. If desired, garnish salad with additional mint leaves or dill sprigs. I added a small red pear tomato (cut into quarters, sliced from top to bottom). Serve, and enjoy!!!
Recipe Notes

NOTE: For my husband and myself, I cut the SALAD ingredients in half (i.e. one cucumber, one zucchini, etc.), but kept the quantity of salad dressing the same. There was still enough salad for 3-4 small servings. Just an FYI.

Nutrition Facts
Cucumber And Zucchini Carpaccio Salad
Amount Per Serving (1 serving)
Calories 170 Calories from Fat 135
% Daily Value*
Fat 15g23%
Saturated Fat 3g19%
Cholesterol 11mg4%
Sodium 341mg15%
Potassium 343mg10%
Carbohydrates 6g2%
Fiber 1g4%
Sugar 3g3%
Protein 3g6%
Vitamin A 345IU7%
Vitamin C 19.9mg24%
Calcium 91mg9%
Iron 0.8mg4%
* Percent Daily Values are based on a 2000 calorie diet.

Here’s one more to pin on your Pinterest boards!You'll LOVE this GORGEOUS and DELICIOUS carpaccio salad, featuring thinly sliced cucumbers, zucchini, feta, pecans,and a light, herb-seasoned dressing!

Save

Save

Mini Apple Crisps

Mini Apple Crisps are individual sized versions of this favorite American classic dessert! Whether you call them crisps or cobblers, they are super easy to make – serve with a scoop of vanilla ice cream!Mini Apple Crisps are individual sized versions of this favorite American classic dessert! Super easy to make - serve with a scoop of vanilla ice cream!

Well, well, well… the OFFICIAL start to Fall 2015 will be here in a couple of days. School’s begun, the days are cooler here in the Northwest, sunsets are earlier each day, leaves are beginning their color changes… and apples are everywhere!

Time to make Mini Apple Crisps and welcome in this change of season with a tasty dessert! Here’s how to make Mini Apple Crisps.

Scroll Down for A Printable Recipe Card At The Bottom Of The Page

Fall And Apples Just Seem To Go Well together, Right?

Fall just sort of screams “APPLES”, don’t ya think? There are so many varieties that come into season this time of year, and to me, there is something so memorable about making my first Apple Pie or Apple Crisp of the Fall.

Fall apples, freshly picked, and can be used to make mini apple crisps!

Apple desserts just seems to fit right in with Fall, wearing sweatshirts, raking leaves, football games, pumpkins, brilliant fall foliage, etc. Can you tell I enjoy this season?

I especially enjoy it here in the beautiful Pacific Northwest. The gorgeous colors on display make the ever present RAIN tolerable!

Fall leaves indicate it's time to make apple crisps, pies and cobblers!

Mini Apple Crisps Are PERFECT for Fall Weather!

This recipe for individual sized mini apple crisps is perfect for those nights when you just want to crawl up on the couch in your sweats, under a big warm blanket, and eat something decadent, like some warm apple crisp “goodness” while reading a good book, or watching a good TV show or movie.

Warm and bursting with fresh apple and cinnamon flavor, what could be better than that? Well, I guess a little scoop of vanilla ice cream could make this even better, right?

This is a very easy recipe that makes 4 individual servings, so you can eat one, and save 3 for later, if you are so inclined (Ha Ha).

How To Make Mini Apple Crisps

First thing to do is peel, core and slice the apples. Then place the apple slices, brown sugar, flour, lemon juice and cinnamon into a large skillet.

Mix the ingredients well, to combine. Cook the apples on medium-low for about 10 minutes, or until the apple slices have slightly softened.

Apple slices cooking with brown sugar, cinnamon, etc. for mini apple crisps.
While the apples are cooking, use a pastry blender (or two forks) to blend the crumb topping ingredients in a small bowl. Easy!

Crumb topping is mixed to add to top of apple crisps.
Spray 4 ramekins with non-stick cooking spray. The ones I use are 4″ wide.

Ramekins are coated with non stick cooking spray to bake apple crisps.
Fill ‘Em Up

Once the apples are done cooking, divide them evenly between the 4 greased ramekins.

Prepared apple filling divided and added to ramekins.
Divide the crumb topping evenly between the 4 ramekins, sprinkling it over the top of the mini apple crisps, all the way to the edges.

Crumb topping is added to mini apple crisps in ramekins before baking.Time To Cook the Mini Apple Crisps!

Bake the mini apple crisps in a 375 degree oven for about 25 minutes, until the mixture is bubbly, and the top crumble mixture is lightly browned.

Mini apple crisps, after baking for 25 minutes... ready to eat!
Let the desserts cool on a wire rack for a bit, then serve the Mini Apple Crisps while they are still warm. They are delicious!

Mini apple crisps are served warm!
Doesn’t that look delicious? These mini apple crisps are especially good with a tiny scoop of vanilla ice cream served on top! This recipe is so easy to make, too! You’re gonna LOVE it!

If you enjoy apple desserts, you might also be interested in Dutch Crumb Apple Pie, Apple Cobbler, Apple Shortbread Tart, or Apple Pie Stuffed Won Tons!

Welcome, FALL! Sure hope you will give this delicious recipe a try! Have a great week!

Looking For More COBBLER or CRISP Recipes?

You can find ALL of my recipes in the Recipe Index, which is located at the top of the page. I have a good variety of cobblers and crisp recipes to enjoy, including:

Want More Recipes? Get My FREE Newsletter!

I publish a newsletter 2 times per month (1st and 15th) with lots of recipes, tips, etc..
Would you like to join our growing list of subscribers?

There is a Newsletter subscription box on the top right (or bottom) of each blog post, depending on the device you use.
You can submit your e-mail address there, to be added to my mailing list.

Find Me On Social Media:

Facebook page: The Grateful Girl Cooks!
Pinterest:
The Grateful Girl Cooks!
Instagram:
jbatthegratefulgirlcooks

Author's signatureRecipe Slightly Adapted From: The New Pillsbury Family Cookbook, page 131, published 1973 by The Pillsbury Company,

↓↓ PRINTABLE RECIPE BELOW ↓↓

0 from 0 votes
Mini Apple Crisps
Prep Time
15 mins
Cook Time
25 mins
Total Time
40 mins
 
Mini Apple Crisps are individual sized versions of this favorite American classic dessert! Super easy to make - serve with a scoop of vanilla ice cream!
Category: Dessert
Cuisine: American
Keyword: mini apple crisps
Servings: 4 servings
Calories Per Serving: 591 kcal
Author: JB @ The Grateful Girl Cooks!
Ingredients
For apples:
  • 5 cups Granny Smith apples (peeled, cored, and sliced)
  • 1/4 cup brown sugar
  • 1/2 teaspoon cinnamon
  • 1 Tablespoon lemon juice
  • 2 Tablespoons water
For crumble mixture:
  • 3/4 cup firmly packed brown sugar
  • 1/2 cup all purpose flour (unsifted)
  • 1/2 cup rolled oats (old fashioned or quick cook)
  • 1 teaspoon cinnamon
  • 1/2 cup cold butter
Instructions
  1. Place sliced apples, 1/4 cup brown sugar, 1/2 tsp. cinnamon, lemon juice and water into a large skillet. Stir to combine. Cook on medium-low heat, stirring occasionally, for approximately 10 minutes, or until apples have softened slightly. Remove from heat.
  2. While apples are cooking, prepare the crumb topping. Place the brown sugar, flour, rolled oats, 1 tsp. and cinnamon in a medium sized bowl. Cut the butter into chunks and add to bowl. Using a pastry blender, cut in the butter until mixture is crumbly and butter is about the size of peas. Set aside.
  3. Spray 4 ramekins with non-stick spray. Once apples are done, divide and spoon them equally into the 4 ramekins.
  4. Divide the crumb topping equally between the 4 apple-filled ramekins.Spoon the crumb topping over the entire surface of the apples, all the way to the edges.
  5. Bake apple crisps at 375 degrees for approximately 25-30 minutes, or until mixture is bubbly and the crumb topping is a light, golden brown. Remove hot ramekins to a wire rack to cool a bit. Serve warm, with a tiny scoop of vanilla ice cream, if desired.

Recipe Notes

Firm tart baking apples are used in this recipe (Granny Smith, Gravenstein, etc.).

Nutrition Facts
Mini Apple Crisps
Amount Per Serving (1 serving)
Calories 591 Calories from Fat 216
% Daily Value*
Fat 24g37%
Saturated Fat 14g88%
Cholesterol 61mg20%
Sodium 220mg10%
Potassium 293mg8%
Carbohydrates 95g32%
Fiber 5g21%
Sugar 69g77%
Protein 3g6%
Vitamin A 795IU16%
Vitamin C 8.7mg11%
Calcium 72mg7%
Iron 1.7mg9%
* Percent Daily Values are based on a 2000 calorie diet.

Here’s one more to pin on your Pinterest boards!Mini Apple Crisps are individual sized versions of this favorite American classic dessert! Super easy to make - serve with a scoop of vanilla ice cream!


Save

Save

Save

Skillet Potatoes With Scallions And Parmesan

Skillet potatoes, cooked with garlic, scallions and Parmesan cheese, are an easy, delicious, and inexpensive side dish you will enjoy!Skillet potatoes, cooked with garlic, scallions and Parmesan cheese, are an easy, delicious, and inexpensive side dish you will enjoy!
I don’t know about you, but I’m on the lookout for new, easy, and inexpensive side dishes to add to our dinner meal. It’s easy to fall into a rut and serve the same old, same old veggies. That’s why I enjoyed making these Skillet Potatoes With Scallions And Parmesan!  Yum! They’re an easy and delicious dish you can serve with a variety of meats.

Scroll Down For A Printable Recipe Card At The Bottom Of The Page

It helped that I had just harvested some red potatoes from our backyard garden. Some of them were a little scarred from digging them up), but I was excited to use a few of them. I used 5 red potatoes, which made enough for 2-3 servings.

Red potatoes are used for this recipe after cleaning.
Prepare The Potatoes

Wash the potatoes very well, then slice them into about 1/2 inch slices. I keep the peel on, because I think the color looks really good in the finished dish, plus they contain extra fiber.

The red potatoes are sliced into rounds before cooking.
Place enough water in a large skillet to cover the bottom with about 1/2 – 3/4 inch of water. Put the sliced potatoes into the water and begin to cook them on medium-high heat.

Continue cooking the potatoes, turning gently, and added more water, when necessary, to ensure the potatoes do not stick to the bottom of the skillet. TIP: As the water cooks away you will need to add additional water.

Red potato slices begin cooking in a bit of water, in a large skillet.
Finish Cooking, Then Garnish Skillet Potatoes

Keep an eye on the potatoes as they finish cooking. Making sure there is enough water in skillet is the key to this dish.  Continue cooking (about 15 minutes or so) until the potatoes are fork-tender. Once fork-tender, remove any remaining water from the skillet. Add the butter, salt, pepper, minced garlic chopped scallions (green onions) to the skillet.

Coat the potatoes with the melted butter by spooning it up and over the top of the potatoes while they cook. Remove the potatoes from the heat after 1-2 minutes (don’t burn the garlic!). Gently pour potatoes into a serving bowl, and immediately sprinkle with grated Parmesan cheese.

Skillet Potatoes are garnished with butter, seasoning and green onions.

Grated Parmesan cheese is sprinkled on top of the hot potatoes.
Time To Eat The Skillet Potatoes With Scallions And Parmesan!

The cheese will melt in about a minute over the hot potato slices, then they are ready. Add additional salt and/or black pepper to taste, if desired. Serve, and enjoy!

A bowl of Parmesan and scallion covered buttered skillet potatoes, ready to eat.
 I’m pretty confident you will love these potatoes! The recipe is easily adapted to double or triple the amount of potatoes YOU want to serve!

A close-up photo of the skillet potatoes, served with chicken (in background).Thanks for stopping by today. I hope you have the opportunity to try these delicious skillet potatoes. Have a great day! I hope it is a memorable, and fun one for you! Please come back soon for more delicious recipes.

Looking For More POTATO Recipes?

You can find all of my potato recipes in the Recipe Index, located at the top of the page. I have some delicious ones, including:

Interested In More Recipes?

Thank you for visiting this website. I appreciate you using some of your valuable time to do soIf you’re interested, I publish a newsletter 2 times per month (1st and 15th) with all the latest recipes, and other fun info. I would be honored to have you join our growing list of subscribers, so you never miss a great recipe!
There is a Newsletter subscription box on the top right side (or bottom) of each blog post, depending on the device you use, where you can easily submit your e-mail address (only) to be included in my mailing list.

You Can Also Find Me On Social Media:

Facebook page: The Grateful Girl Cooks!
Pinterest:
The Grateful Girl Cooks!
Instagram:
jbatthegratefulgirlcooks

Author's signatureRecipe Source: My brain. This dish was a no brainer.

0 from 0 votes
Skillet Potatoes With Scallions And Parmesan
Prep Time
5 mins
Cook Time
15 mins
Total Time
20 mins
 

Skillet potatoes, cooked with garlic, scallions and Parmesan cheese, are an easy, delicious, and inexpensive side dish you will enjoy!

Category: Side Dishes
Cuisine: American
Keyword: skillet potatoes
Servings: 3 servings
Calories Per Serving: 320 kcal
Author: JB @ The Grateful Girl Cooks!
Ingredients
  • 5 red potatoes
  • water (enough to continue filling bottom of skillet during cooking time)
  • salt and pepper , to taste
  • 2 Tablespoons butter
  • 2 scallions (2 green onion stalks-green and white part), sliced
  • 1 teaspoon minced garlic
Instructions
  1. Slice potatoes into 1/2 inch slices.
  2. Pour enough water into large skillet to completely cover bottom of skillet by about an inch.
  3. Add potato slices to water. Heat on medium heat until fork-tender (approx. 15-20 minutes). Keep an eye on water level... add additional water, as needed, to ensure potatoes do not stick to bottom of pan as they cook.
  4. When potatoes are done, remove any remaining water from skillet. Add butter, salt, pepper, garlic, and chopped scallions to potatoes in skillet. Mix gently, to combine. Continue to spoon melted butter over the tops of the potatoes. Cook an additional 1-2 minutes.
  5. Remove potatoes from heat. Place into serving bowl, and immediately garnish with grated Parmesan cheese. The heat from the potatoes will melt the cheese. Taste, and add additional salt and pepper, if necessary.
  6. Serve, and enjoy!
Nutrition Facts
Skillet Potatoes With Scallions And Parmesan
Amount Per Serving (1 g)
Calories 320 Calories from Fat 72
% Daily Value*
Fat 8g12%
Saturated Fat 4g25%
Cholesterol 20mg7%
Sodium 132mg6%
Potassium 1637mg47%
Carbohydrates 57g19%
Fiber 6g25%
Sugar 4g4%
Protein 7g14%
Vitamin A 340IU7%
Vitamin C 32.6mg40%
Calcium 41mg4%
Iron 2.7mg15%
* Percent Daily Values are based on a 2000 calorie diet.

Here’s one more to pin on your Pinterest boards!Skillet potatoes, cooked with garlic, scallions and Parmesan cheese, are an easy, delicious, and inexpensive side dish you will enjoy!


Save

Save

Save

Save

Easy Spaghetti Sauce With Italian Sausage

Spaghetti Sauce with Italian Sausage is a delicious, quick and easy meal to make, with tomatoes, sausage, mushrooms, green peppers, onions, and Italian spices. Spaghetti Sauce with Italian Sausage is a delicious, quick and easy meal to make, with tomatoes, sausage, mushrooms, green peppers, onions, and Italian spices.

When I make spaghetti sauce, I typically cook the sauce for several hours. However, sometimes I don’t have time to spare, so I make this EASY and quick spaghetti sauce. The sauce is is flavored with Italian sausage, mushrooms, green peppers, onions, and lots of spices. It’s delicious and filling, especially on a “cool weather” kind of day, like today in the Pacific Northwest.

I grew up eating my Mom’s spaghetti sauce, which she cooked with ground beef in the sauce. While that is good, my husband and I prefer the taste of Italian sausage in our sauce. I’ve been making it this way for YEARS! If you’ve never made sauce with Italian sausage, I hope you will consider it. The spaghetti sauce only takes about 10 minutes of prep work, then the rest of the time (30 minutes) is inactive “simmering” time. Not too much time to invest, and the results are wonderful!

I like to make extra spaghetti sauce to freeze for another day! The recipe serves 4-6 depending on serving size. Even if you can’t use that many servings in a single meal, it’s nice to have extra sauce available, for other meals).

Scroll Down For A Printable Recipe Card At The Bottom Of The Page

How To Make Spaghetti Sauce With Italian Sausage

Start the party off by sautéing Italian sausage (which has been removed from the casing) with chopped onion. The meat and onions are cooked on medium heat in a large skillet.

Cooking Italian sausage and onions in skillet for spaghetti sauce.

Add chopped green pepper, and continue cooking until the Italian sausage is fully cooked.

Chopped green peppers are added to sausage, and onions for spaghetti sauce.

Drain the grease from the skillet, then add tomato paste, a large can of diced tomatoes, and water. Sometimes I add in 1/2 cup red wine, if I have an open bottle (optional, though).

Tomato paste, diced tomatoes and water are added to skillet with spaghetti sauce.
Next add the spices (oregano, basil, Italian seasoning, garlic powder, red pepper flakes, salt & pepper). Stir the spaghetti sauce well, to combine.

Dried Italian spices are added to skillet to season spaghetti sauce.

Add mushrooms. I used some of my dehydrated mushrooms (they ARE kind of handy to have around and re-hydrate wonderfully in the sauce).

Of course, you can use the same amount of fresh, sliced mushrooms. If you don’t like mushrooms, just leave ’em out!

Mushrooms (dehydrated or fresh) are added to spaghetti sauce.
Cook the Spaghetti Sauce

Bring the spaghetti sauce to a boil, then reduce heat to a low simmer. Cook for about 30 minutes or so. The sauce will reduce a bit, and all those yummy flavors will permeate the sauce.

While the sauce is cooking, cook the spaghetti noodles (or any other pasta). Drain the cooked pasta, then place the spaghetti noodles onto individual serving plates. Top pasta with a ladle of this yummy spaghetti sauce, then garnish with grated Parmesan cheese.

Easy Spaghetti Sauce With Italian Sausage is served on top of pasta!
That’s it! It’s such an inexpensive and delicious hearty meal, with an amazing tasting Italian spaghetti sauce! Thanks for stopping by, and I hope you will come back again soon. Have a GREAT day!

Looking For More PASTA Recipes?

You can find all of my pasta recipes in the Recipe Index, located at the top of the page. I have lots of them, including:

You can find many other pasta recipes in my Recipe Index at the top of each post. Have a great day, and Buon Appetito (Italian, for “enjoy your meal!)!

Interested In More Recipes?

Thank you for visiting this website. I appreciate you using some of your valuable time to do soIf you’re interested, I publish a newsletter 2 times per month (1st and 15th) with all the latest recipes, and other fun info. I would be honored to have you join our growing list of subscribers, so you never miss a great recipe!
There is a Newsletter subscription box on the top right side (or bottom) of each blog post, depending on the device you use, where you can easily submit your e-mail address (only) to be included in my mailing list.

You Can Also Find Me On Social Media:

Facebook page: The Grateful Girl Cooks!
Pinterest:
The Grateful Girl Cooks!
Instagram:
jbatthegratefulgirlcooks

Author's signatureRecipe source: My brain, in Italian mode.

0 from 0 votes
Easy Spaghetti Sauce With Italian Sausage
Prep Time
10 mins
Cook Time
30 mins
Total Time
40 mins
 
Spaghetti Sauce with Italian Sausage is a delicious, quick and easy meal to make, with tomatoes, sausage, mushrooms, green peppers, onions, and Italian spices.
Category: Entree
Cuisine: Italian
Keyword: spaghetti sauce
Servings: 6
Calories Per Serving: 278 kcal
Author: JB @ The Grateful Girl Cooks!
Ingredients
  • 3 Italian sausage links (mild or hot), casings removed.
  • 3/4 cup chopped brown onion
  • 1/3 cup chopped green pepper
  • 1 can (6 oz.) tomato paste
  • 1 large can (28 oz.) diced tomatoes
  • 1 cup water (or substitute 1/2 cup water and 1/2 cup red wine, if desired)
  • 1 1/2 teaspoons oregano (dried)
  • 1 teaspoon Italian seasoning
  • 1/2 teaspoon basil (dried)
  • 1 1/4 teaspoons garlic powder
  • 1 teaspoon salt
  • 1/4 teaspoon black pepper
  • 1/4 teaspoon red pepper flakes (dried)
  • 1 1/2 cups sliced mushrooms
  • Grated Parmesan cheese , for garnish (if desired)
Instructions
  1. Remove casing from sausage links by cutting with a knife down the length of the link, and removing the sausage. Discard the casing. Crumble the sausage into a large skillet.
  2. Sauté the sausage and chopped onion on medium heat. Add the green pepper; cook until sausage is fully cooked. Drain the grease out of the pan (discard), and return skillet to stovetop.
  3. Add tomato paste, can of diced tomatoes (including juice), and water to skillet. Add oregano, Italian seasoning, basil, garlic powder, salt, pepper and red pepper flakes. Add sliced mushrooms. Stir all ingredients well, to combine.

  4. Bring sauce to a boil, then reduce heat to low and continue to cook for about 30 minutes. The sauce will reduce down a bit, and the flavors will permeate the sauce. Taste test the sauce and add additional salt or spices as desired.
  5. While sauce is cooking, prepare the pasta of your choice according to package directions. Drain pasta, then serve with spaghetti sauce ladled over the top. Garnish with Parmesan cheese, if desired, and serve HOT!

Recipe Notes

Caloric calculation does not include pasta of your choice. It also does not include optional Parmesan cheese topping (optional).

Nutrition Facts
Easy Spaghetti Sauce With Italian Sausage
Amount Per Serving (1 g)
Calories 278 Calories from Fat 162
% Daily Value*
Fat 18g28%
Saturated Fat 6g38%
Cholesterol 42mg14%
Sodium 1199mg52%
Potassium 950mg27%
Carbohydrates 19g6%
Fiber 4g17%
Sugar 10g11%
Protein 12g24%
Vitamin A 780IU16%
Vitamin C 28.1mg34%
Calcium 83mg8%
Iron 3.7mg21%
* Percent Daily Values are based on a 2000 calorie diet.

Here’s one more to pin on your Pinterest boards!Spaghetti Sauce with Italian Sausage is a delicious, quick and easy meal to make, with tomatoes, sausage, mushrooms, green peppers, onions, and Italian spices.


Save

Save

HEADED TO… ALASKA!!!

Thank you for visiting The Grateful Girl Cooks! I want to let you know that my husband and I are headed to Alaska, for a much-needed and anticipated vacation! We feel so fortunate to have this opportunity to get away from our “normal life”.Bon voyage - we are headed to Alaska!Yes… we are cruising to beautiful Alaska… where we look forward to making some unforgettable memories, enjoying the majestic and natural beauty of God’s creation… and eating large quantities of amazing food (I mean, someone’s gotta do it, right?)!!

I will be back online, posting more family-friendly, delicious recipes (and maybe even some photos from our trip) on September 14th. Until then, I would love and appreciate it if you would check out my Recipe Index… I hope you find some great recipes to try!

Thanks, again, for stopping by… and I wish you a day filled with wonder, beauty, and great JOY!

Author's signature


Save

Save

Bacon Pecan Pralines

Bacon Pecan Pralines are a delightful twist on traditional pralines. These sweet treats include BACON, which gives them a sweet and salty flavor – a great combination! Bacon Pecan Pralines are a twist on traditional pralines. These sweet treats include BACON, which gives them a sweet and salty flavor - a great combination!
I recently made these Bacon Pecan Pralines for a “BACON” themed dinner my husband and I went to, with two other couples. Every course of the dinner had to include some type of bacon.

Since I was in charge of desserts, I made several. Included were these yummy pralines, which included salty bacon. Sweet and salty… a great combination! They were really good! Remember… everything is better with bacon. Even bacon pecan pralines, right?

I had never made Pralines before this, but I plunged right in, and managed to pull this one off!

Scroll Down For A Printable recipe Card At The Bottom Of The Page

Important Tip When Making Bacon Pecan Pralines

The only thing I would do different next time when making these pralines is to use a larger cooking pan. The one I used was medium sized.

I THOUGHT the medium sized pan was big enough, but I was wrong. There were a couple moments of near panic as the mixture nearly boiled up and out of my pan.

The hot praline mixture never did boil over, but please, listen to my advice here. Use a LARGE and DEEP saucepan when you prepare this recipe. You won’t have to frantically stir to keep the candy from boiling over the top of the pan… and yes, you will thank me for this important tip!

How To Make Bacon Pecan Pralines

In a LARGE and DEEP saucepan, mix together granulated sugar, brown sugar, buttermilk, corn syrup, baking soda and salt. Insert a candy thermometer into the mixture.

Cook mixture on medium heat, until it reaches 235 degrees on a candy thermometer.

This will take about 20 minutes or so. Mixture will be VERY hot. Stir mixture often while it cooks to prevent it from burning on the bottom of the pan. The mixture will turn a rich caramel color near the end of the cooking time.

Candy thermometer in boiling sauce for bacon pecan pralines.Candy thermometer in saucepan full of bacon pecan pralines sauce.
Once mixture reaches 235 degrees, remove pan from heat. Immediately add the butter, vanilla, chopped pecans, orange zest, and cooked bacon crumbles.

Adding chopped pecans for bacon pecan pralines to saucepan

Crumbled, cooked bacon pieces are added to praline mixture in pan.

Beat the bacon pecan praline mixture with a wooden spoon until the mixture is thoroughly combined. WARNING: The praline mixture will be very, very hot. Be very careful so you don’t burn yourself!

Hot bacon pecan pralines mixture, in saucepan after cooking.

Drop pralines by teaspoonfuls onto a sprayed baking sheet , a silicone mat, OR onto buttered parchment paper. Leave space between each of the pralines, as they will spread a bit while hot.

Dropping spoonfuls of bacon pecan pralines onto round baking pan, to cool.
Let the bacon pecan pralines sit and cool at room temperature for at least 30 minutes. The pralines will firm up as they cool. When completely firm, they are ready to be served. Carefully remove from pan.

Serve pralines by themselves, as a small treat, or as I did for our Bacon Night, on the side of a scoop of Candied Bacon Ice Cream. YEP! Bacon overload!

Bacon pecan pralines were served with a scoop of candied bacon ice cream!
If you’re looking for an interesting, yet amazingly good dessert treat, I hope you will consider making these yummy bacon pecan pralines! Have a great day!

Interested In More Recipes?

Thank you for visiting this website. I appreciate you using some of your valuable time to do soIf you’re interested, I publish a newsletter 2 times per month (1st and 15th) with all the latest recipes, and other fun info. I would be honored to have you join our growing list of subscribers, so you never miss a great recipe! 

There is a Newsletter subscription box on the top right side (or bottom) of each blog post, depending on the device you use, where you can easily submit your e-mail address (only) to be included in my mailing list.

You Can Also Find Me On Social Media:

Facebook page: The Grateful Girl Cooks!
Pinterest:
The Grateful Girl Cooks!
Instagram:
jbatthegratefulgirlcooks

Author's signatureRecipe Source: http://www.framedcooks.com/2011/06/buttermilk-bacon-pralines.html

0 from 0 votes
Bacon Pecan Pralines
Prep Time
10 mins
Cook Time
20 mins
Total Time
30 mins
 

Bacon Pecan Pralines are a twist on traditional pralines. These sweet treats include BACON, which gives them a sweet and salty flavor - a great combination!

Category: Candy
Cuisine: American
Keyword: bacon pecan pralines, pralines
Servings: 20
Calories Per Serving: 142 kcal
Author: JB @ The Grateful Girl Cooks!
Ingredients
  • 1 cup granulated sugar
  • 1/2 cup brown sugar (packed)
  • 1/2 cup buttermilk
  • 1 Tablespoon light corn syrup
  • 1/2 teaspoon baking soda
  • 1/4 teaspoon salt
  • 4 Tablespoons butter
  • 1/2 teaspoon vanilla extract
  • 1 cup chopped pecans
  • 1/2 teaspoon orange zest
  • 4 bacon slices , pre-cooked crisp, then crumbled
Instructions
  1. Place the granulated sugar, brown sugar, buttermilk, corn syrup, baking soda and salt into a large and deep heavy saucepan. Stir to combine. Insert a candy thermometer into mixture, attaching it to the side of pan. Heat on medium heat until the mixture reaches 235 degrees F on the candy thermometer, stirring often to prevent candy from burning on the bottom of pan.
  2. Once thermometer reads 235 degrees, carefully remove pan from heat. Be careful... it will be HOT!
  3. Add butter, vanilla extract, chopped pecans, orange zest, and bacon to the hot praline mixture. Beat ingredients together, using a wooden spoon, until all is combined.
  4. Drop by rounded teaspoonfuls onto a sprayed baking sheet, a silicone mat, OR onto buttered parchment paper. Leave space between each praline, as mixture will spread while hot.
  5. Let the pralines cool at room temperature for at least 30 minutes, until totally cooled and firm all the way through. Serve and enjoy! (Pralines may be stored in refrigerator).
Nutrition Facts
Bacon Pecan Pralines
Amount Per Serving (1 serving)
Calories 142 Calories from Fat 72
% Daily Value*
Fat 8g12%
Saturated Fat 2g13%
Cholesterol 9mg3%
Sodium 114mg5%
Potassium 46mg1%
Carbohydrates 17g6%
Sugar 16g18%
Protein 1g2%
Vitamin A 85IU2%
Vitamin C 0.2mg0%
Calcium 16mg2%
Iron 0.2mg1%
* Percent Daily Values are based on a 2000 calorie diet.

Here’s one more to pin on your Pinterest boards!Bacon Pecan Pralines are a twist on traditional pralines. These sweet treats include BACON, which gives them a sweet and salty flavor - a great combination!


Save

Save

Save

Apple Crumb Muffins

Apple crumb muffins with streusel topping, are moist, delicious, easy to make and will become a family favorite breakfast treat!Apple crumb muffins with streusel topping, are moist, delicious, easy to make and will become a family favorite breakfast treat!

This past weekend we have had quite lot of wind and heavy rain hit us here in Portland. The temperature has dropped quite a bit from the consistent HOT temps we’ve been experiencing all summer long.

To celebrate what FEELS like Fall, I made these Apple Crumb Muffins! Apples and cool, rainy weather just seem to go together well! So does a hungry tummy and these yummy muffins! 

I found the recipe for these delicious, easy-to-prepare muffins on a blog site that I enjoy, called “Heather’s French Press”, and decided to give ’em a try.

These apple crumb muffins are SO EASY to make… really! Here’s how you make them:

Scroll Down For A Printable Recipe Card At The Bottom Of The Page

How To Make Apple Crumb Muffins

First you whisk together flour, baking powder, granulated sugar, salt and cinnamon. You have to use cinnamon to make any good apple recipe a hit, right?

Flour and spices in bowl

Next, whisk together one egg, some milk and a bit of melted butter. Whisk it up good, then pour it into the flour mixture.

Egg, milk and butter with whisk in bowlPouring muffin batter into dry ingredients in bowl

Stir to combine the ingredients (just until blended in), then fold in the chopped apples.

Muffin batter with apple chunks in bowl

Time To Fill the Muffin Tins!

Fill paper-lined muffin cups with the apple mixture. Fill each muffin cup about 2/3 full. Now it’s time to bake the muffins.

PLEASE IGNORE my totally ancient/much-abused, horrible-looking muffin pans that have seen a LOT of use over the years! They are a little worse for the wear, but “work” just fine, so I can live with that.

Batter in paper-lined muffin cup tins

Now it’s time to make the crumb/streusel topping. Easy. Mix the ingredients together in a small bowl, then distribute the streusel over the top of each muffin.

Batter with streusel on top in muffin tins

Bake The Apple Crumb Muffins!

Bake the muffins at 400°F. for about 20 minutes, then remove the pan from the oven. The streusel topping on the muffins will be golden brown in color.

You can check for doneness by inserting a toothpick into the center of a muffin. If the toothpick comes out clean, the muffins are done!

Transfer the muffin tin to a wire rack and let the muffins cool slightly (2-3 minutes) before removing the muffins and serving.

Serve The Apple Crumb Muffins

Remove the muffins from the pan and serve these delicious breakfast or snack treats to those you love. See how nice the streusel topping looks?

Two muffins close up with apple on plateBaked apple crumb muffin on a paper towel

Here’s an apple crumb muffin that has been cut in half. See those apple chunks inside the muffin? YUM.

You can see the apple chunks inside the muffin!

These apple crumb muffins also freeze well, if wrapped securely! Sure hope you will find some time to give this recipe a try! I’m sure you will LOVE these muffins!

Thanks for stopping by, and I invite you to come back soon for more family-friendly recipes. Take care, and have a GREAT day!

Looking For More MUFFIN Recipes?

You can find ALL my recipes in the Recipe Index, which is located at the top of the page! I have lots of muffin recipes to choose from, including:

Want More Recipes? Get My FREE Newsletter!

I publish a newsletter 2 times per month (1st and 15th) with lots of recipes, tips, etc..
Would you like to join our growing list of subscribers?

There is a Newsletter subscription box on the top right (or bottom) of each blog post, depending on the device you use.
You can submit your e-mail address there, to be added to my mailing list.

Find Me On Social Media:

Facebook page: The Grateful Girl Cooks!
Pinterest:
The Grateful Girl Cooks!
Instagram:
jbatthegratefulgirlcooks

Author's signatureRecipe Source: http://www.heathersfrenchpress.com/2015/08/apple-streusel-coffee-cake-muffins.html

↓↓ PRINTABLE RECIPE BELOW ↓↓

0 from 0 votes
Apple Crumb Muffins
Prep Time
15 mins
Cook Time
20 mins
Total Time
35 mins
 
Apple crumb muffins with streusel topping, are moist, delicious, easy to make and will become a family favorite breakfast treat!
Category: Breakfast
Cuisine: American
Keyword: apple crumb muffins
Servings: 12 muffins
Calories Per Serving: 202 kcal
Author: JB @ The Grateful Girl Cooks!
Ingredients
For The Muffins:
  • 1 1/2 cups all purpose flour
  • 2 teaspoons baking powder
  • 1/2 cup granulated sugar
  • 1/2 teaspoon salt
  • 1/2 teaspoon cinnamon
  • 1 egg
  • 1/2 cup + 2 Tablespoons milk
  • 4 Tablespoons butter , melted
  • 2 cups apples , peeled, and diced
For The Crumb Topping:
  • 1/2 cup granulated sugar
  • 1/4 cup flour
  • 1/2 teaspoon cinnamon
  • 2 Tablespoons butter , melted
Instructions
  1. Preheat your oven to 400 degrees F.
  2. In a medium sized bowl, combine the flour, granulated sugar, baking powder, cinnamon and salt.
  3. In a separate bowl, whisk the egg, milk and melted butter (cooled) together.
  4. Add the egg mixture to the flour mixture. Stir this until is is just barely combined.
  5. Add the diced apples; fold them into the batter.
  6. Spoon the mixture into paper-lined or spayed standard sized muffin cups.
  7. In separate small bowl, mix together the crumb topping ingredients. Sprinkle the crumb topping over the top of each of the muffins. Use all the topping mixture.
  8. Bake the muffins at 400 degrees for 20 minutes. Remove to a wire rack, and let cool before serving. Enjoy!
Nutrition Facts
Apple Crumb Muffins
Amount Per Serving (1 muffin)
Calories 202 Calories from Fat 54
% Daily Value*
Fat 6g9%
Saturated Fat 3g19%
Cholesterol 29mg10%
Sodium 157mg7%
Potassium 126mg4%
Carbohydrates 34g11%
Fiber 1g4%
Sugar 19g21%
Protein 2g4%
Vitamin A 225IU5%
Vitamin C 1mg1%
Calcium 48mg5%
Iron 1mg6%
* Percent Daily Values are based on a 2000 calorie diet.

Here’s one more to pin on your Pinterest boards!Apple crumb muffins with streusel topping, are moist, delicious, easy to make and will become a family favorite breakfast treat!


Save

Save

Chili Mac With Summer Squash

Chili Mac with Summer Squash is a budget friendly, easy, delicious meal, with ground beef, pasta, fresh veggies and great Southwest flavor!Chili Mac with Summer Squash is a budget friendly, easy, delicious comfort food meal, with ground beef, pasta, fresh summer veggies and great Southwest flavor!
Well, if you’re looking for an inexpensive, easy to prepare “Comfort Food” kind of meal… this “Chili Mac With Summer Squash” is it!!  I made this Southwestern flavored recipe up as I went along (really), but it is loosely based on the goulash recipe (Italian-flavored) my Mom used to make for us kids when we were growing up.

I fixed this EASY PEASY yummy dish for my husband and I for dinner recently, and it filled us up!  It’s pretty amazing what you can do with a pound of hamburger meat, some fresh veggies from the garden (or store), elbow macaroni, and some tasty Southwestern spices! The recipe serves 4-6 depending on serving size, so all in all, it’s a lot of bang for your hard earned money! Here’s how to make this:

Scroll Down For A Printable Recipe Card At The Bottom Of The Page

Cook The Meat 

First, brown one pound of ground beef with chopped onions and a bit of diced jalapeno. When it is nearly done, add minced garlic.

Ground beef, onions, garlic and jalapeno are cooked for chili mac
Drain off the grease (discard), then add one small can of diced tomatoes, a little water, some taco seasoning, salt, and pepper to the beef. (I used 3 large Tablespoons of my homemade taco seasoning mix:  “Make Your Own Taco Seasoning Mix”).

Canned tomatoes and chili spices are added to ground beef mixture
Time To Add The Summer Squash!

Stir well, then add zucchini and yellow squash (cut in quarters). I used my homegrown veggies (yay for my garden). Stir again to combine, then cover the skillet and let it all cook for 9-10 minutes. Only cook long enough to cook the squash, but not let it get “smooshy”.

Sliced summer squash is added to chili beef mixture

Summer squash is cooked with ground beef, tomatoes and spices
To Save Time: While the meat and veggies are cooking, cook the elbow macaroni separately in a large saucepan. Once the meat and veggies were done cooking, I uncovered the skillet to take a photo to show what it will look like.

Summer squash is finished cooking with chili beef
Finish Making The Chili Mac with Summer Squash

Once the pasta noodles have finished cooking, drain the water from them. Put the drained macaroni noodles back into the large pot they were cooked in.

Macaroni noodles are cooked, then drained.
Immediately pour the entire skillet of hot meat and veggies into the pan of cooked/drained macaroni.

Summer squash, chili beef and tomatoes are poured over cooked macaroni
Stir it all together, then heat it another minute or two to make sure it is hot… then taste-test it to make sure it is seasoned with enough salt.

Pasta, beef and summer squash are stirred to combine.
Time to EAT!

Ladle the Chili Mac into serving bowls while it is piping hot!

Chili mac with summer squash is placed into bowls for serving
Sprinkle each bowl with a small amount of grated cheddar cheese, then serve it! There ya have it… a tasty one-dish meal that has meat, pasta, AND yummy veggies!

Chili mac is sprinkled with grated cheddar cheese to serve.
All that’s left to do is grab a fork and dig in! Chili Mac with summer squash is quick, easy, totally inexpensive to make, and really good. How good, you ask? The kind of good where you want to “put on stretchy pants and hang out on the couch watching a great movie while you eat this on a rainy day good”.

Sure hope you will give this recipe a try! The leftovers are amazingly yummy, as well- (speaking with first-hand knowledge!)  I think you’ll like this comforting dish as much as we do, and will LOVE how easy it is to prepare!

Looking For More PASTA Recipes?

You can find all of my recipes in the Recipe Index, which is located at the top of the page. I have LOTS of delicious featuring pasta, including:

Interested In More Recipes?

Thank you for visiting this website. I appreciate you using some of your valuable time to do soIf you’re interested, I publish a newsletter 2 times per month (1st and 15th) with all the latest recipes, and other fun info. I would be honored to have you join our growing list of subscribers, so you never miss a great recipe!
There is a Newsletter subscription box on the top right side (or bottom) of each blog post, depending on the device you use, where you can easily submit your e-mail address (only) to be included in my mailing list.

You Can Also Find Me On Social Media:
Facebook page: The Grateful Girl Cooks!
Pinterest: The Grateful Girl Cooks!
Instagram: jbatthegratefulgirlcooks

Have a GREAT day!

Author's signature

0 from 0 votes
Chili Mac With Summer Squash
Prep Time
15 mins
Cook Time
9 mins
Total Time
24 mins
 
Chili Mac with Summer Squash is a budget friendly, easy, delicious comfort food meal, with ground beef, pasta, fresh summer veggies and great Southwest flavor!
Category: Entree
Cuisine: Southwestern
Keyword: chili mac
Servings: 5 servings
Calories Per Serving: 562 kcal
Author: JB @ The Grateful Girl Cooks!
Ingredients
  • 1 pound hamburger meat
  • 1/3 cup chopped onion
  • 1/2 small jalapeno pepper , (de-stemmed and seeded), chopped finely
  • 1 1/2 teaspoons minced garlic
  • 1 teaspoon salt
  • 1/4 teaspoon black pepper
  • 1 envelope taco seasoning or 3 Tablespoons homemade taco seasoning
  • 1 can diced tomatoes (14.5 ounces)
  • 1/2 cup water
  • 1 green zucchini , sliced, then cut into quarters
  • 1 yellow squash , sliced, then cut into quarters
  • 2 cups elbow macaroni (cooked per package directions)
  • 1 cup grated cheddar cheese
  • Additional salt (to taste)
Instructions
  1. Before cooking the hamburger meat, bring a large saucepan full of water to a boil (to cook the macaroni in)
  2. In large skillet, brown the hamburger meat, chopped onion and jalapeno. Right before meat is fully cooked, add the minced garlic. Drain grease off meat when fully cooked. Return skillet to stove.
  3. Add tomatoes, taco seasoning, water, salt and pepper, zucchini, and yellow squash. Stir to combine. Cover skillet, then continue to cook on medium-low for approximately 9 minutes. Do not let squash get smooshy!
  4. While meat mixture is cooking, prepare macaroni noodles in a large saucepan, according to package directions. When done, drain macaroni, then return noodles to large saucepan.
  5. Add in the hot meat/squash mixture. Stir to combine. Heat quickly (uncovered) on medium-high for a minute or two, stirring constantly, to heat dish thoroughly. Taste test. If it needs more salt, add it now.
  6. Spoon mixture into individual serving bowls. Top with grated cheddar cheese, and serve hot!
Nutrition Facts
Chili Mac With Summer Squash
Amount Per Serving (1 serving (1/5 of total))
Calories 562 Calories from Fat 234
% Daily Value*
Fat 26g40%
Saturated Fat 11g69%
Cholesterol 88mg29%
Sodium 809mg35%
Potassium 767mg22%
Carbohydrates 49g16%
Fiber 3g13%
Sugar 5g6%
Protein 30g60%
Vitamin A 515IU10%
Vitamin C 24.1mg29%
Calcium 231mg23%
Iron 3.7mg21%
* Percent Daily Values are based on a 2000 calorie diet.

Here’s one more to pin on your Pinterest boards!Chili Mac with Summer Squash is a budget friendly, easy, delicious comfort food meal, with ground beef, pasta, fresh summer veggies and great Southwest flavor!


Save

Save