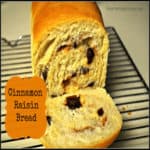
Delicious Cinnamon Raisin Bread can be made by hand, or in a bread machine. A delicious loaf that tastes wonderful toasted or used for French toast!
Does anyone out there love the smell of a fresh baked loaf of bread? I know I sure do. Well, how about a recipe for Cinnamon Raisin Bread… that extra burst of cinnamon flavor and chewy raisins, makes this a homemade bread loaf I’m pretty sure you will love!
I really enjoy baking bread, using a handy dandy bread machine that I received as a gift several years ago. It’s a real time saver for me to be able to dump the ingredients into the machine, turn it on, and walk away. I can come back a few hours later to a wonderful hot loaf of bread. Best part? The smell of that cinnamon raisin bread baking… don’t even get me started.
Scroll Down For A Printable Recipe Card At The Bottom Of The Page
Do I Have To Have A Bread Machine To Make This Cinnamon Raisin Bread?
NOPE! The good news here is that you DON’T have to own a bread machine to make this delicious loaf of cinnamon raisin bread. Aren’t you glad? You can make it all by hand (with a little help from a dough hook on a stand mixer or your own brute strength!)
This simple recipe transforms into a delicious soft cinnamon-raisin filled bread that is wonderful toasted or even used to make French Toast (my preferred way – oh yes…so good!).
Yes, it’s so easy, even our family monster “BIFF” can make it!
As you can see from this picture (below), our family monster, named BIFF, helped me make this loaf of cinnamon raisin bread. BIFF (in all his hideousness), makes random practical joke appearances throughout the year in our home. My dislike for Biff knows no limits… he creeps me out!
My practical joker husband once stuck scary BIFF into a huge Christmas wreath hanging over our fireplace in the living room. I hosted an entire cookie exchange party for 20 women in our home one evening BEFORE ever noticing it was hanging there, right by our Christmas tree… ugh!
At least this time BIFF didn’t surprise me in the refrigerator, our bed, my office chair or in our pantry, as he has previously! I have my sneaky, evil husband to thank for the heart attack it almost gave me, finding him there! Most people would hate this as much as me, right? Sigh.

Soooo… BIFF and I hope you will enjoy this delicious recipe for Cinnamon Raisin Bread…it’s a keeper! Try making French toast with this bread. Thanks for stopping by today, and I hope you come back soon for more family-friendly recipes. Have a GREAT day.
Looking For More BAKED BREAD Recipes?
You can find all of my recipes in the Recipe Index, located at the top of the page. A few favorite baked bread recipes include:
Interested In More Recipes?
Thank you for visiting this website. I appreciate you using some of your valuable time to do so. If you’re interested, I publish a newsletter 2 times per month (1st and 15th) with all the latest recipes, and other fun info. I would be honored to have you join our growing list of subscribers, so you never miss a great recipe!
There is a Newsletter subscription box on the top right side (or bottom) of each blog post, depending on the device you use, where you can easily submit your e-mail address (only) to be included in my mailing list.
You Can Also Find Me On Social Media:
Facebook page: The Grateful Girl Cooks!
Pinterest: The Grateful Girl Cooks!
Instagram: jbatthegratefulgirlcooks

Recipe Adapted From: http://www.momontimeout.com/2013/02/simply-divine-cinnamon-swirl-bread/
↓↓ PRINTABLE RECIPE BELOW ↓↓
- 3/4 cup warm water
- 2 1/4 teaspoons (1 packet) active dry yeast
- 1/2 cup milk , warmed slightly
- 3 1/2 Tablespoons butter , melted
- 1 egg (at room temperature!)
- 4 - 4 1/2 cups all-purpose flour
- 1 3/4 teaspoons cinnamon
- 1 teaspoon salt
- 1/4 cup granulated sugar
- 3/4 cup raisins
- non-stick baking spray
- In a small bowl, place the warm (not hot) water. Sprinkle the yeast over the top of the water. Let this stand for about 5 minutes. Bubbles should appear in the water (this lets you know the yeast is active)
- In a medium sized bowl, beat the milk, sugar, butter and room temp egg together.
- Add the yeast mixture to this.
- In a separate medium sized mixing bowl, place the flour, salt and cinnamon. Whisk to combine. Add 2 cups of flour mixture to the yeast and milk mixture. Beat until the batter is smooth.
- Add the remaining flour, mixture (a little at a time).
- Switch to a dough hook on a stand mixer and beat for an additional 5 minutes OR continue kneading the dough by hand for 5 minutes.
- Shape the dough into a smooth ball and place it in a large bowl that has been sprayed lightly with non-stick spray. Cover with a tea towel and let the dough rise for 1 1/2 hours or until doubled in size.
- Once doubled in size, punch down dough; ADD RAISINS, then knead it several times on a lightly floured work surface to fully combine raisins into the dough.
- Roll the dough out into a 9x15 inch rectangle. Starting with the narrow end, roll up the dough tightly. Pinch the edges together, to seal.
- Tuck the ends of the loaf under slightly, and carefully place the loaf into a 9x5 inch loaf pan that has been lightly sprayed with non-stick spray.
- Cover the dough with a tea towel, set in a warm place and let dough rise for an hour.
- Preheat oven to 350 degrees. Bake the bread for 30 minutes, or until the loaf is golden brown.
- Remove bread pan to a wire rack to cool. Let cool slightly before removing bread from pan. Enjoy!
Here’s one more to pin on your Pinterest boards!