Month: August 2017

Fresh Tomato, Bacon and Onion Fettucine

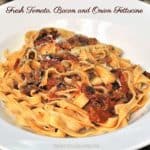
You’re gonna love this fresh tomato bacon onion fettucine, a delicious Italian seasoned pasta dish that can be easily made in only 20 minutes!You're gonna love this fresh tomato bacon onion fettucine... a delicious Italian seasoned pasta dish that can be easily made in only 20 minutes!
A few days ago our oldest son popped in for a visit, and ended up staying to have dinner with us. I made this yummy, quick recipe for Fresh Tomato Bacon Onion Fettucine, and we enjoyed it very much!

The recipe is one I’ve had for years and years, but do not know the original source, since only the recipe was written down on a little 3×5 card.  I’ve made a few changes to the recipe over the years to suit my taste buds, and let me tell you… it is good!

The basic recipe for this tomato bacon onion fettucine is actually quite simple… cook bacon, cook pasta, cook a few other simple fresh ingredients, combine, and serve in about 20 minutes! It tastes wonderful, too!  Here’s how you make this dish:

Scroll Down For A Printable Recipe Card At The Bottom Of The Page

How To Make Tomato Bacon Onion Fettucine

In a skillet, cook the bacon pieces until crisp. When done, transfer bacon pieces to paper towels to absorb the grease. Drain off the bacon drippings, BUT LEAVE 1 TABLESPOON BACON DRIPPINGS IN SKILLET (sorry for the slightly blurry photo). **Tip: While bacon is cooking, bring water for pasta to boiling, then cook in separate pot**.

Bacon is cooked until crispy for the fettucine sauce.
Add chopped onion, tomato, basil and crispy cooked bacon pieces to reserved Tablespoon of bacon drippings in skillet. The photo below is before I added the cooked bacon. (I used a variety of colored tomatoes, but any fresh tomatoes will be perfectly fine!).

Cook 3-4 minutes until onion is tender, and tomatoes have begun to break down. Add minced garlic and a couple Tablespoons of starchy water from the pasta that is cooking. Stir well, to combine. Cook, stirring occasionally, until heated completely through on medium heat.

Fresh tomatoes, onions are added to skillet.

Tomatoes, bacon, onions and Italian spices are cooked to make sauce for fettucine.

Prepare Fettucine Noodles

Heat lightly salted water in a large pot for cooking the pasta. Once the water is boiling, add the fettucine pasta, and cook according to package directions. (Note:  I did this while cooking the bacon and sauce to save time).

I made the fettucine from scratch with my little pasta machine earlier in the day just for fun!  Isn’t it beautiful?  I used it in this meal (because I find it relaxing to make homemade pasta), but absolutely recommend using store bought pasta for the easiest way to make this dish!

Fettucine pasta I made to use in this dish.

Fettucine noodles are cooked in boiling water until done.

When the pasta has finished cooking, drain it, then add pasta to the skillet with the sauce. Gently toss with tongs, to thoroughly coat the tomato bacon onion fettucine pasta with sauce. Cook until heated through, adding an additional touch of water if necessary to thin the sauce to cover.

Cooked and drained fettucine noodles are added to tomato, bacon and onion sauce.

Tomato, bacon and onion sauce is stirred into cooked fettucine pasta.

Serve The Tomato Bacon Onion Fettucine

Place pasta and sauce onto serving dishes, then garnish the tomato bacon onion fettucine with grated Parmesan cheese and a sprinkle of dried or fresh parsley. Serve, and enjoy!

Fresh tomato, bacon onion fettucine is served in white bowl.

Close up photo to fettucine with bacon, tomato and onion Italian sauce.

We really enjoyed this tomato bacon onion fettucine with a simple mixed green salad on the side.  The recipe, as written, makes 3 main course servings or 4-5 small side servings. The caloric calculation is based on 3 main course servings.

As I write this blog today, my heart is broken over the Hurricane Harvey destruction and horrific flooding occurring in Texas and Louisiana this week. We are continuing to pray for our fellow citizens impacted by this event, and are hopeful God will meet their needs physically, emotionally and spiritually during and after this tragedy. He is “a very present help in times of trouble”.

Have a good day, friends. May you know God’s unconditional love, no matter what you are going through!

Looking for More PASTA Recipes?

You can find all of my recipes in the Recipe Index, located at the top of the page. I have some delicious pasta recipes you might want to try, including:

Interested In More Recipes?

Thank you for visiting this website. I appreciate you using some of your valuable time to do soIf you’re interested, I publish a newsletter 2 times per month (1st and 15th) with all the latest recipes, and other fun info. I would be honored to have you join our growing list of subscribers, so you never miss a great recipe!
There is a Newsletter subscription box on the top right side (or bottom) of each blog post, depending on the device you use, where you can easily submit your e-mail address (only) to be included in my mailing list.

You Can Also Find Me On Social Media:

Facebook page: The Grateful Girl Cooks!
Pinterest:
The Grateful Girl Cooks!
Instagram:
jbatthegratefulgirlcooks

Author's signature

Original Recipe Source: unknown (recipe handwritten on a 3×5 card many years ago)

0 from 0 votes
Fresh Tomato Bacon Onion Fettucine
Prep Time
10 mins
Cook Time
10 mins
Total Time
20 mins
 
You're gonna love this fresh tomato bacon onion fettucine... a delicious Italian seasoned pasta dish that can be easily made in only 20 minutes!
Category: Main Course
Cuisine: Italian
Keyword: tomato bacon onion fettucine
Servings: 3
Calories Per Serving: 347 kcal
Author: JB @ The Grateful Girl Cooks!
Ingredients
  • 6 ounces fettucine noodles
  • 3 slices raw bacon , cut into 1/2 inch slices
  • 1/4 cup chopped onion
  • 1 cup chopped tomato
  • 1 teaspoon minced garlic
  • 1/2 teaspoon dried basil (or 2 Tablespoons chopped fresh basil)
  • 2-3 Tablespoons starchy pasta water
  • Grated Parmesan cheese (for garnish)
  • Dried parsley (for garnish)
Instructions
  1. Heat lightly salted water in large pot. When boiling, add pasta, and cook according to package directions. (I did this at same time I was cooking bacon and sauce).
  2. In a skillet, cook bacon pieces until crisp. Transfer bacon pieces to paper towel to absorb grease. Drain grease from skillet, BUT LEAVE 1 TABLESPOON BACON GREASE IN SKILLET.
  3. Add chopped onion, tomato, basil and bacon pieces to bacon drippings in skillet. Cook 3-4 minutes until onion is tender, and tomatoes have begun to break down. Add minced garlic and a couple Tablespoons of water from the pasta that is cooking. Stir well, to combine. Cook, stirring occasionally, until heated completely through on medium heat.
  4. When pasta is finished cooking, drain and add pasta to skillet with the sauce. Gently toss to coat the pasta with the sauce. Heat until hot throughout. Place pasta and sauce onto serving plates, and garnish with grated Parmesan cheese and a sprinkle of dried parsley. Serve, and enjoy!
Nutrition Facts
Fresh Tomato Bacon Onion Fettucine
Amount Per Serving (1 g)
Calories 347 Calories from Fat 108
% Daily Value*
Fat 12g18%
Saturated Fat 4g25%
Cholesterol 66mg22%
Sodium 237mg10%
Potassium 319mg9%
Carbohydrates 44g15%
Fiber 2g8%
Sugar 3g3%
Protein 13g26%
Vitamin A 490IU10%
Vitamin C 8.1mg10%
Calcium 84mg8%
Iron 1.5mg8%
* Percent Daily Values are based on a 2000 calorie diet.

Here’s one more to pin on your Pinterest boards!You're gonna love this fresh tomato bacon onion fettucine... a delicious Italian seasoned pasta dish that can be easily made in only 20 minutes!


Save

Save

Save

Save

Save

Save

Save

Save

Save

Easy Cheesy Garlic Crescent Rolls

Easy Cheesy Garlic Crescent Rolls with Italian seasoning are easy to make in about 20 minutes, and taste fantastic served with meats, soups and salads!Easy Cheesy Garlic Crescent Rolls with Italian seasoning are easy to make in about 20 minutes, and taste fantastic served with meats, soups and salads!
What’s NOT to love about Easy Cheesy Garlic Crescent Rolls?  They are super easy to prepare, are stuffed with cheese and Italian seasoning, and can be on the table in about 20 minutes!

You know what the best part is? These tasty little rolls are absolutely scrumptious! Here’s how to make them.

Scroll Down For A Printable Recipe Card At The Bottom Of The Page

How To Make Easy Cheesy Garlic Crescent Rolls

Preheat your oven to 375 degrees F. Line a 13×9 inch cookie sheet with parchment paper, and then set it aside.

Mix the melted butter, Italian seasoning, garlic, dried parsley and dried basil together, in a small bowl.  Unwrap the crescent rolls, and separate the dough at the perforations into triangles.

Using a pastry brush, brush the dough with the butter and seasoning mixture (but reserve a bit of the mixture to use later).

Crescent roll dough is unwrapped and brushed with seasonings.

Now Add The Cheese!

Place some of the grated mozzarella at the wide end of the dough (or place the string cheese half at the wide end).

Shredded mozzarella cheese is added to cheesy garlic crescent rolls before baking.

Carefully roll up the dough, and try to tuck the edges of dough in, to seal. Place dough onto parchment paper, with about 2 inches in between each one.

Brush the tops of the dough with the remaining butter/seasoning mixture. I even sprinkled just a bit more mozzarella cheese on top of the easy cheesy garlic crescent rolls!

Easy Cheesy Garlic Crescent Rolls are rolled up and are ready to bake.

Bake The Rolls

Bake the rolls at 375°F. for 10-12 minutes, until the rolls are golden brown on the outside. Remove the rolls from the oven.

If any of the cheese has leaked out, simply push it back onto the roll with a spatula while cheese is still warm!

Easy Cheesy Garlic Crescent Rolls are baked and cooling on parchment paper.

Serve The Cheesy Garlic Crescent Rolls

Serve these easy cheesy garlic crescent rolls while they are warm, and enjoy them!  They taste wonderful, and I’m willing to bet you can’t stay out of them.

Easy Cheesy Garlic Crescent Rolls, served warm, on a red platter.

We really enjoy these scrumptious cheesy garlic crescent rolls, and LOVE how EASY they are to make!  I hope you will give them a try. They really are quite delicious, and this recipe can easily be doubled to make more delicious rolls!

Thanks for stopping by, and please come back again soon for more family-friendly recipes. Take care, may God bless you, and have a GREAT day!

Looking For More BREAD Recipes?

You can find ALL of my recipes in the Recipe Index, which is located at the top of the page. I have lots of delicious bread recipes (sweet and savory) you might enjoy, including:


Want More Recipes? Get My FREE Newsletter!

I publish a newsletter 2 times per month (1st and 15th) with lots of recipes, tips, etc..
Would you like to join our growing list of subscribers?

There is a Newsletter subscription box on the top right (or bottom) of each blog post, depending on the device you use.
You can submit your e-mail address there, to be added to my mailing list.

Find Me On Social Media:

Facebook page: The Grateful Girl Cooks!
Pinterest:
The Grateful Girl Cooks!
Instagram:
jbatthegratefulgirlcooks

Author's signature

Recipe Source:  https://www.thechunkychef.com/cheesy-garlic-crescent-rolls/

↓↓ PRINTABLE RECIPE BELOW ↓↓

0 from 0 votes
Easy Cheesy Garlic Crescent Rolls
Prep Time
6 mins
Cook Time
11 mins
Total Time
17 mins
 
Easy Cheesy Garlic Crescent Rolls with Italian seasoning are easy to make in about 20 minutes, and taste fantastic served with meats, soups and salads!
Category: Bread, Side Dish
Cuisine: American
Keyword: cheesy garlic crescent rolls
Servings: 8 rolls
Calories Per Serving: 180 kcal
Author: JB @ The Grateful Girl Cooks!
Ingredients
  • 1 (8 ounce) can refrigerated crescent rolls
  • 1 cup freshly grated mozzarella cheese OR 4 pieces string cheese (cut in half to make 2 short pieces)
  • 3 Tablespoons butter , melted
  • 3 cloves garlic , minced
  • 1/2 teaspoon Italian seasoning
  • 1/2 teaspoon dried parsley
  • 1/4 teaspoon dried basil
Instructions
  1. Before beginning, be sure to preheat your oven to 375 degrees F. Line a cookie sheet with parchment paper, then set aside.
  2. Mix the melted butter, Italian seasoning, garlic, dried parsley and dried basil together, in a small bowl.
  3. Unwrap the crescent rolls. Separate dough into triangles. Using a pastry brush, brush the dough with the butter and seasoning mixture (but reserve a bit of the mixture to use later). Place some of the grated mozzarella at the wide end of the dough (or place the string cheese half at the wide end). Carefully roll up the dough, and try to tuck the edges of dough in, to seal. Place dough onto parchment paper, with about 2 inches in between each one.
  4. Brush the tops of the dough with the remaining butter/seasoning mixture. Bake rolls at 375 degrees for 10-12 minutes, until rolls are golden brown. Remove from oven. If any cheese has leaked out, simply push it back onto roll with a spatula while cheese is still warm! Serve, and enjoy!
Nutrition Facts
Easy Cheesy Garlic Crescent Rolls
Amount Per Serving (1 roll)
Calories 180 Calories from Fat 117
% Daily Value*
Fat 13g20%
Saturated Fat 7g44%
Cholesterol 22mg7%
Sodium 348mg15%
Potassium 15mg0%
Carbohydrates 12g4%
Sugar 2g2%
Protein 4g8%
Vitamin A 225IU5%
Vitamin C 0.3mg0%
Calcium 76mg8%
Iron 0.5mg3%
* Percent Daily Values are based on a 2000 calorie diet.

Here’s one more to pin on your Pinterest boards!Easy Cheesy Garlic Crescent Rolls with Italian seasoning are easy to make in about 20 minutes, and taste fantastic served with meats, soups and salads!

Save

Save

Save

Save

Save

Save

Save

Save

Save

Save

Chocolate Oaties

You’re gonna love Chocolate Oaties, delicious and EASY 10 minute “no-bake” drop cookies with chocolate, peanut butter, nuts and oats!You're gonna love Chocolate Oaties, delicious and EASY 10 minute "no-bake" drop cookies with chocolate, peanut butter, nuts and oats!

Looking for a quick and easy treat? How about Chocolate Oaties? They are delicious “No-Bake” drop cookies featuring chocolate, peanut butter, nuts and oats? The best part is they only take about 10 minutes to make, and are soooo GOOD. Yes, please!

I grew up eating Chocolate Oaties. My Mom made them for our family quite often, I suppose because they taste so good (gotta be that chocolate-peanut butter combo!). It also may have been because they are fairly inexpensive and ridiculously QUICK AND EASY to make in 10 minutes.

Whatever her reasons were, these no-bake cookies were always a big hit with our family.  I’ve been making them this way for over 45 years now, and they never fail to get gobbled up! Here’s how to make them:

Scroll Down For A Printable Recipe Card At The Bottom Of The Page

How To Make Chocolate Oaties

Measure the peanut butter, oats, vanilla, salt and chopped nuts into a large mixing bowl. Set aside. It’s important to do this BEFORE next step! Trust me.

Ingredients for chocolate oaties in bowl.

In a medium saucepan, place sugar, cocoa, butter, and evaporated milk. Cook on medium heat, stirring often, until mixture comes to a boil. Boil ingredients for 1 minute.

Cocoa, butter, sugar and evaporated milk cook before adding to dry ingredients.

Immediately remove the chocolate sauce from heat and pour over peanut butter/oat mixture in mixing bowl while it is boiling hot.  The very hot chocolate sauce helps to melt the peanut butter!

Hot cocoa mixture poured over peanut butter, oats and nuts.

Stir the chocolate oaties well, to fully melt peanut butter and combine all ingredients.  Place a piece of wax paper on a 9×13 baking sheet.

Ingredients are stirred to combine ingredients for chocolate oaties.

Form And Then Refrigerate The Chocolate Oaties

Drop the chocolate oaties batter by rounded spoonfuls onto wax paper. Use 2 spoons… one to scoop, and the back of the other to scoop/drop cookies onto paper. Place the baking sheet (uncovered) into refrigerator, and refrigerate for an hour so they can set up.

Chocolate Oaties firm up in the refrigerator before serving.

Time To Eat Some Yummy Chocolate Oaties!

After they have been refrigerated for an hour or more, they’re ready to enjoy! That’s it!!!  See how easy that was?  Remember to store any uneaten chocolate oaties in a covered container in refrigerator. By the way… here’s one I saved for you… want a bite?

Here's a single chocolate oatie just for YOU!

I hope you enjoy these quick, yummy, easy to prepare drop cookies… we sure do! They are so delicious, it is hard to keep away from them… ha ha! Have a GREAT day, friends.

Looking For More COOKIE Recipes?

You can find all of my cookie recipes in the Recipe Index, located at the top of the page. I have quite a few of them you might enjoy, including:

Interested In More Recipes?

Thank you for visiting this website. I appreciate you using some of your valuable time to do soIf you’re interested, I publish a newsletter 2 times per month (1st and 15th) with all the latest recipes, and other fun info. I would be honored to have you join our growing list of subscribers, so you never miss a great recipe!
There is a Newsletter subscription box on the top right side (or bottom) of each blog post, depending on the device you use, where you can easily submit your e-mail address (only) to be included in my mailing list.

You Can Also Find Me On Social Media:
Facebook page: The Grateful Girl Cooks!
Pinterest: The Grateful Girl Cooks!
Instagram: jbatthegratefulgirlcooks

Have a great day, friends.

Author's signature

Recipe Source: My Mom

0 from 0 votes
Chocolate Oaties
Prep Time
10 mins
Cook Time
0 mins
Total Time
10 mins
 
You're gonna love Chocolate Oaties, delicious and EASY 10 minute "no-bake" drop cookies with chocolate, peanut butter, nuts and oats!
Category: Cookies
Cuisine: American
Keyword: chocolate oaties
Servings: 30 cookies (approx.)
Calories Per Serving: 154 kcal
Author: JB @ The Grateful Girl Cooks!
Ingredients
  • 1/2 cup peanut butter
  • 3 cups quick cook oats (dry)
  • 1 teaspoon vanilla extract
  • 1/4 teaspoon salt
  • 1/2 cup chopped walnuts or pecans
  • 2 cups granulated sugar
  • 4 Tablespoons unsweetened cocoa powder
  • 1 cube butter
  • 1/2 cup evaporated milk
Instructions
  1. Measure the peanut butter, oats, vanilla, salt and chopped nuts into a large mixing bowl. Set aside.
  2. In a medium saucepan, place sugar, cocoa, butter, and evaporated milk. Cook on medium heat, stirring often, until mixture comes to a boil. Boil ingredients for 1 minute. Immediately remove sauce from heat and pour over peanut butter/oat mixture in mixing bowl. Stir well, to fully melt peanut butter and combine all ingredients.
  3. Place a piece of wax or parchment paper on a 9x13 baking sheet. Drop batter by rounded spoonfuls onto paper (Use 2 spoons... one to scoop, and the back of the other to scoop/drop cookies onto paper). See NOTES section for tip.
  4. Place baking sheet (uncovered) into refrigerator, and refrigerate for an hour so they can set up. Enjoy! Store chocolate oaties in a covered container in refrigerator.
Recipe Notes

I used a rounded Tablespoon batter for each cookie (yielded 31, 2-3" wide cookies).
If you want more cookies, simply make them smaller by using a rounded teaspoon!

Nutrition Facts
Chocolate Oaties
Amount Per Serving (1 cookie)
Calories 154 Calories from Fat 63
% Daily Value*
Fat 7g11%
Saturated Fat 2g13%
Cholesterol 9mg3%
Sodium 71mg3%
Potassium 88mg3%
Carbohydrates 20g7%
Fiber 1g4%
Sugar 14g16%
Protein 2g4%
Vitamin A 105IU2%
Vitamin C 0.1mg0%
Calcium 20mg2%
Iron 0.6mg3%
* Percent Daily Values are based on a 2000 calorie diet.

Here’s one more to pin on your Pinterest boards!You're gonna love Chocolate Oaties, delicious and EASY 10 minute "no-bake" drop cookies with chocolate, peanut butter, nuts and oats!

Save

Save

Save

Save

Save

Save

Save

Save

Save

Save

Save

Save

Blackberry Scones

Delicious blackberry scones are easy to make, using frozen blackberries! The scones are absolutely perfect for a simple breakfast or afternoon snack.Delicious blackberry scones are easy to make year round, using frozen blackberries! The scones are absolutely perfect for a simple breakfast or afternoon snack.
Anyone who knows me well, knows I love a good scone… and I sure do love these yummy Blackberry Scones for breakfast or an afternoon snack!

Blackberries grow wild all over the beautiful Pacific Northwest.  We have a forest park behind our home and the blackberry vines creep over our back fence (until we madly hack them back each Fall!). 

This summer we have a bumper crop of blackberries, free for the taking, and so it is a perfect scenario for making blackberry scones!

I’ve been picking berries every other day, and get about a quart of berries each time.  I’ve already used them to make  a Blackberry Cobbler, a Berry and Orange Spinach Salad, and  Blackberry Pie Bars, so now I’m making blackberry scones, and have saved a bunch more to make jam. Yeehaw!

Scroll Down For A Printable Recipe Card At The Bottom Of The Page

Blackberries growing in our backyard - perfect for scones!

These scones are very easy to prepare; the method used is similar to my other scone recipes on this blog.  For this particular recipe, it is important to use frozen blackberries, because blackberries are really juicy and if not frozen, they will “leak” juice all over the scones while mixing and baking. 

Here’s how to make them (there’s a printable recipe card at the bottom of this post):

How To Make Blackberry Scones

First, preheat your oven to 400° F.  In a large bowl, whisk together the all purpose flour, baking powder and salt.  Cut up COLD butter into small chunks and add to flour mixture.

Use a pastry blender to cut the butter into the flour until the butter has been reduced to the size of small peas. 

You can also do this in a food processor, if desired.  Add sugar to the bowl, and stir to combine. Set this mixture aside.

Cutting butter into flour to make scone dough

In a separate bowl, add heavy whipping cream, eggs and vanilla extract. Whisk together until blended.  Set aside.

Whipping cream, eggs and vanilla mixed for scone dough

Add frozen blackberries to flour mixture. Toss gently to lightly coat the berries with flour.

Frozen blackberries added to scone dough mixture

Pour the whisked whipping cream/egg mixture into the flour mixture.  Stir gently to mix. Your dough will be fairly sticky.

Please note that the frozen berries will begin to thaw very quickly, so do this step quickly, but gently.  

Whipping cream, egg and vanilla added to dry scone mixture

Shape And Cut The Scones

Once mixed, place the dough onto a lightly floured work surface. Knead the dough VERY LIGHTLY 3-4 times to ensure the dough comes together in a ball. 

Shape dough into an 8 inch circle using your clean hands. The dough should be about 1½ inches high. 

Cut the blackberry scones into 8 wedges with a sharp knife or pizza cutter. I use a pizza cutter- easy, and works like a charm!

Scone dough formed, then cut into 8 wedges before baking

Bake The Blackberry Scones

Place the scones onto an ungreased baking sheet in a circle.  I leave a little space between each wedge. If desired, sprinkle tops with sugar (optional).

Bake the scones in a preheated 400 degree oven for 20-22 minutes. They are done when the tops are light golden brown in color and they are “set” in the middle.

Blackberry scone wedges placed on cookie sheet to bake

Blackberry scones, golden brown and fresh from the oven!

Time To Eat Some Blackberry Scones!

When the blackberry scones have finished baking, let them cool on the baking sheet for several minutes. Once cooled, separate them and transfer to a wire rack to finish cooling.  That’s it!

I hope you enjoy these tasty blackberry scones for breakfast, or for an afternoon treat with some tea, coffee, or a big cold glass of milk! They are delicious!

Blackberry scone on a white plate with a mint garnish.

Close up of a blackberry scone being held up.

Thanks for taking time to look at this recipe!  I am thankful to Roberta Reynolds for this delicious recipe, and hope you give it a try (and give my other scone recipes a look, too!).

Have a wonderful day, friends… be kind and encouraging to others out there in the big ol’ world. It can really make a positive difference in someones day!

Looking For More Recipes For SCONES?

You can find all of my recipes in the Recipe Index, located at the top of the page. All of my scone recipes are in the BREAD category, and I have quite a few, including:

Want More Recipes? Get My FREE Newsletter!

I publish a newsletter 2 times per month (1st and 15th) with lots of recipes, tips, etc..
Would you like to join our growing list of subscribers?

There is a Newsletter subscription box on the top right (or bottom) of each blog post, depending on the device you use.
You can submit your e-mail address there, to be added to my mailing list.

Find Me On Social Media:

Facebook page: The Grateful Girl Cooks!
Pinterest:
The Grateful Girl Cooks!
Instagram:
jbatthegratefulgirlcooks

Author's signature

Recipe Adapted From:  http://birdsnestbites.com/blackberry-scones/

↓↓ PRINTABLE RECIPE BELOW ↓↓

0 from 0 votes
Blackberry Scones
Prep Time
15 mins
Cook Time
20 mins
Total Time
35 mins
 

Delicious blackberry scones are easy to make year round, using frozen blackberries! The scones are absolutely perfect for a simple breakfast or afternoon snack.

Category: Breakfast
Cuisine: American
Keyword: blackberry scones
Servings: 8 scones
Calories Per Serving: 307 kcal
Author: JB @ The Grateful Girl Cooks!
Ingredients
  • 2 cups all purpose flour
  • teaspoons baking powder
  • 1 teaspoon salt
  • 7 Tablespoons COLD butter (almost a whole cube)
  • 1/4 cup granulated sugar
  • 1/2 cup heavy whipping cream
  • 2 large eggs
  • teaspoons vanilla extract
  • cups FROZEN blackberries
Instructions
  1. Preheat oven to 400 degrees. In a large bowl, whisk together the flour, baking powder and salt. Cut up COLD butter into small chunks; add to flour mixture. Use a pastry blender and cut the butter into the flour until butter has been reduced to the size of small peas. You can also do this in a food processor if desired. Add sugar; stir to combine. Set aside.
  2. In separate bowl, add heavy whipping cream, eggs and vanilla extract. Whisk together until blended. Set aside.
  3. Add frozen blackberries to flour mixture. Toss gently to lightly coat the berries with flour. Pour whipping cream/egg mixture into flour mixture. Stir gently to mix. Please note that frozen berries will begin to thaw very fast, so do this step quickly, but gently. Your dough will be fairly sticky.
  4. Once mixed, place the dough onto a lightly floured work surface. Knead the dough VERY LIGHTLY 3-4 times so dough comes together in a ball. Shape dough into an 8 inch circle using your hands. The dough should be about 1½ inches high. Cut into 8 wedges with a sharp knife or pizza cutter.
  5. Place the scones onto an ungreased baking sheet in a circle, leaving a little space between each wedge. If desired, sprinkle tops with sugar (optional). Bake in preheated 400 degree oven for 20-22 minutes, or until tops are light golden brown in color and they are "set" in the middle. When finished baking, let scones cool on baking sheet for several minutes, then transfer to a wire rack to finish cooling. Serve at room temperature... and enjoy!
Nutrition Facts
Blackberry Scones
Amount Per Serving (1 scone)
Calories 307 Calories from Fat 144
% Daily Value*
Fat 16g25%
Saturated Fat 10g63%
Cholesterol 87mg29%
Sodium 401mg17%
Potassium 229mg7%
Carbohydrates 33g11%
Fiber 2g8%
Sugar 7g8%
Protein 5g10%
Vitamin A 640IU13%
Vitamin C 5.7mg7%
Calcium 85mg9%
Iron 1.9mg11%
* Percent Daily Values are based on a 2000 calorie diet.

Here’s one more to pin on your Pinterest boards!Delicious blackberry scones are easy to make year round, using frozen blackberries! The scones are absolutely perfect for a simple breakfast or afternoon snack.


Save

Save

Save

Save

Save

Save

Save

Save

Save

Save

Save

Save

Save

Save

Save

Save

Albondigas Soup

Delicious Albondigas Soup (“little meatball”) is an easy, inexpensive, Southwestern flavored dish, and can be served as a first course or an entree!Delicious Albondigas ("little meatball") Soup is an easy, inexpensive, Southwestern flavored dish to prepare, and can be served as a first course or an entree!
I made Albondigas Soup for dinner a couple of days ago… did you know that “Albondigas” simply means “little meatballs”? That’s right!

This is a yummy, Southwestern flavored “little meatball soup”.  It’s very simple to make… and it sure tastes good!

How I Got This Recipe

I was given this recipe at my bridal shower (almost 40 years ago) by the Mom of one of my bridesmaids.  This recipe for albondigas soup has been made so many times over the years, and we still enjoy it, to this day.

Simple and economical to make, the soup has a mild Southwestern flavor, due in small part to chili powder and other spices! The tiny meatballs made with ground beef, rice, and spices, really fill you up, too!

Albondigas soup is cooked all in one pan. Even the meatballs are added uncooked to the hot broth, and they cook in the pan.

No pre-browning of the meatballs is necessary, so it really doesn’t take much work at all to serve up a hot, steaming pot of albondigas soup! Here’s how to make it:

Scroll Down For A Printable Recipe Card At The Bottom Of The Page

How To Make Albondigas Soup

  Sauté chopped onions in a large soup pot in hot oil until the onions are translucent in color and tender, but not yet browned.

Cooking onions for the albondigas soup in a skillet.
Add the rest of soup ingredients to the pan. These ingredients are chili powder, garlic powder, bisque of tomato soup, condensed beef consommé, water, sliced celery and carrots.

Simmer, uncovered, on medium-low heat for 20 minutes, stirring occasionally. While the albondigas soup is simmering, make the meatballs.

Carrots and celery cooking in broth for soup

Prepare The Meatballs

Make the meatballs while the soup is simmering. Place the ground beef, cooked rice, cornstarch, garlic powder, oregano, egg, salt, pepper, and dried parsley in a large bowl.

Stir (or use your hands) until the ingredients are fully mixed together. Form the meat mixture into small meatballs about the size of a walnut shell (about 1½” wide).

I was able to make 31 little meatballs with this mixture. Place the meatballs on parchment paper as they are formed.

Meat, egg, spices for albondigas soup in bowlMeatball ingredients ready to shape into ballsMeatballs formed on wax paper

Add The Meatballs To The Soup

Carefully place the uncooked meatballs into the simmering broth.  They will sink to the bottom of the pot.  I took this first photo below, so you could see the meatballs go into the pot “uncooked”.

The meatballs will begin to cook immediately after putting them in. You can see this in the 2nd photo below, taken 30 seconds after adding the meatballs to the hot broth.

Putting the meatball into the soup potStirring meatballs in soup
Cook the Soup

Simmer the albondigas soup on low heat for 30 minutes after adding the meatballs. Do not put a lid on the saucepan.

When done, the meatballs will float to the top of the soup, as shown below. They should be fully cooked through, as well.

Simmering albondigas soup

The Albondigas Soup Is Ready To Eat!

All that’s left to do is to ladle the hot soup into individual serving bowls. Serve albondigas soup hot with a slice of warm bread and a mixed green salad on the side. Enjoy!

A bowl of albondigas soup, with meatballs and carrots.

I hope you enjoy this simple to prepare, yet tasty albondigas soup! It is a family favorite, and I really think you will enjoy it!

Thanks for stopping by, and I invite you to come back again soon, for more family-friendly recipes. Take care, and have a GREAT day!

Looking For More SOUP Recipes?

You can find ALL of my recipes in the Recipe Index, located at the top of the page. I have lots of delicious soup recipes to choose from, including:

Want More Recipes? Get My FREE Newsletter!

I publish a newsletter 2 times per month (1st and 15th) with lots of recipes, tips, etc..
Would you like to join our growing list of subscribers?

There is a Newsletter subscription box on the top right (or bottom) of each blog post, depending on the device you use.
You can submit your e-mail address there, to be added to my mailing list.

Find Me On Social Media:

Facebook page: The Grateful Girl Cooks!
Pinterest:
The Grateful Girl Cooks!
Instagram:
jbatthegratefulgirlcooks

Author's signature

Recipe Source: Mrs. Phyllis Dean

0 from 0 votes
Albondigas Soup
Prep Time
25 mins
Cook Time
30 mins
Total Time
55 mins
 
Delicious Albondigas ("little meatball") Soup is easy and inexpensive Southwestern flavored soup to prepare, and can be served as a first course or an entree!
Category: Main Course, Soup
Cuisine: Southwestern
Keyword: albondigas soup
Servings: 6 servings
Calories Per Serving: 338 kcal
Author: JB @ The Grateful Girl Cooks!
Ingredients
For the broth:
  • 1/2 cup onion , chopped
  • 2 Tablespoons vegetable oil
  • 1/2 teaspoon chili powder
  • dash garlic powder
  • 1 can Campbells Bisque of Tomato Soup
  • 3 cans Campbells Condensed Beef Consomme soup
  • 3 cans water
  • cups carrots , sliced
  • cups celery , diced
For the meatballs:
  • 1 pound ground beef
  • 1/2 cup COOKED rice
  • 1 Tablespoons cornstarch
  • dash garlic powder
  • 1/4 teaspoon oregano
  • 1 teaspoon salt
  • 1/4 teaspoon black pepper
  • 1 egg
  • 1/4 cup parsley flakes
Instructions
  1. Heat oil in large soup pot. Saute onion until limp, but not browned. Add remainder of soup ingredients (chili powder, garlic powder, salt, tomato soup, beef consomme, water, sliced carrots and celery). Simmer uncovered on medium-low heat for 20 minutes, stirring occasionally. While soup simmers, make the meatballs.
  2. Combine all ingredients for meatballs in medium bowl (ground beef, cooked rice, cornstarch, garlic powder, oregano, salt, pepper, egg and parsley). Stir well, to fully combine. Form little meatballs with your hands (meatballs should be only about 1½ inches wide). Set formed meatballs on wax paper or parchment paper while you continue to make meatballs.
  3. When soup is done simmering (after 20 minutes), carefully add the uncooked meatballs to the hot broth. They will sink to bottom of pan, but will begin to cook immediately. Cook, uncovered, on a low simmer for 30 minutes. When done, the meatballs will be cooked through and will float to the surface of the soup. Ladle up the hot soup into individual bowls... serve and enjoy!
Nutrition Facts
Albondigas Soup
Amount Per Serving (1 serving)
Calories 338 Calories from Fat 189
% Daily Value*
Fat 21g32%
Saturated Fat 10g63%
Cholesterol 80mg27%
Sodium 1493mg65%
Potassium 822mg23%
Carbohydrates 18g6%
Fiber 2g8%
Sugar 6g7%
Protein 18g36%
Vitamin A 5760IU115%
Vitamin C 11.3mg14%
Calcium 73mg7%
Iron 2.7mg15%
* Percent Daily Values are based on a 2000 calorie diet.

Here’s one more to pin on your Pinterest boards!Delicious Albondigas ("little meatball") Soup is an easy, inexpensive, Southwestern flavored dish to prepare, and can be served as a first course or an entree!

Save

Save

Save

Save

Save

Save

Save

Save

Save

We’re Celebrating!

We’re celebrating! We have reached a milestone after 3 years of hard work! When I first started this blog, I had no idea how much work it would be. It still is a LOT of time and work, but I am so very thankful I accepted the challenge, when presented it by several dear friends.

We're celebrating over 1 million visitors to our blog!

I am so grateful for the way this little ol’ blog has slowly grown over the past 3 years. It has been a labor of LOVE.  Thank you for reading, trying and sharing my recipes, and letting me know how they turned out, etc.  I couldn’t do this without you!

We’re celebrating! Hope you will continue to search for good, tried and true, family friendly recipes here on The Grateful Girl Cooks! Have a fantastic day, friends!

Author's signature

Save

Save

Potato Hash with Rosemary

Potato Hash with Rosemary is easy to prepare, seasoned with salt, pepper, onion, and fresh rosemary. A simple side dish for beef, pork, and poultry!Potato Hash with Rosemary is easy to prepare, seasoned with salt, pepper, onion, and fresh rosemary, and is a simple side dish for beef, pork, and poultry.
If you are looking for a simple vegetable side dish to serve with beef, poultry or pork, may I suggest this simple yet delicious Potato Hash With Rosemary? I found the recipe for a potato hash side dish in a Southern Living cookbook I bought while on vacation in Washington state earlier this summer.

The recipe couldn’t be simpler! A baking potato, sweet potato, onion, garlic, fresh rosemary, and light seasonings are cooked together until tender, and then served. The potato hash with rosemary was a wonderful side dish for a chicken dinner I fixed recently. I want to share this easy recipe with YOU, in the hope that you will want to try it, too!

Scroll Down For A Printable Recipe Card At The bottom Of The Page

How To Make Potato Hash

Here’s how to make the potato hash:  First, prep the ingredients (truly this is easy, and it’s the “hardest” part of the whole recipe).  Peel and cube potatoes, mince garlic, chop onion and fresh rosemary.

Russet and sweet potatoes on plate with herbs.

Time To Cook!

Heat the olive oil in a non-stick skillet on medium-low heat. Add the rest of the ingredients except for the garnish. This includes the potato, sweet potato, onion, garlic, a Tablespoon of fresh rosemary, salt, and pepper. Stir these ingredients together.

Cover the skillet and cook, on medium-low heat, for 20-25 minutes, stirring and turning occasionally, until the potatoes are tender.

Potatoes, rosemary, onions and spices are cooked in skillet.

Time To Serve The Potato Hash With Rosemary!

When done, transfer potato hash to serving dish and garnish with fresh sprigs of rosemary. Serve hot, and enjoy this simple veggie side dish!

The finished potato hash is served with a sprig of fresh rosemary as garnish.

I think this potato hash with rosemary looks pretty good… and guess what? It TASTES good, also! Win-Win!

Potato Hash with Rosemary is served on white plate

I enjoy finding and trying new recipes for side dishes, and glad I found this one for potato hash. Hope you have the opportunity to try making it, as well, and trust you enjoy it. Sure do hope you have a fantastic day, friends. I am grateful today for another GORGEOUS warm summer day here in Oregon.

Looking for More Recipes Featuring POTATOES?

You can find ALL my recipes in the Recipe Index, located at the top of the page. I have some wonderful recipes using potatoes you might enjoy, including:

Interested In More Recipes?

Thank you for visiting this website. I appreciate you using some of your valuable time to do soIf you’re interested, I publish a newsletter 2 times per month (1st and 15th) with all the latest recipes, and other fun info. I would be honored to have you join our growing list of subscribers, so you never miss a great recipe!
There is a Newsletter subscription box on the top right side (or bottom) of each blog post, depending on the device you use, where you can easily submit your e-mail address (only) to be included in my mailing list.

You Can Also Find Me On Social Media:

Facebook page: The Grateful Girl Cooks!
Pinterest:
The Grateful Girl Cooks!
Instagram:
jbatthegratefulgirlcooks

Author's signatureRecipe Source: The cookbook “Southern Living – 1998 Annual Recipes”, Published 1998, Oxmoor House, Inc., Book Division of Southern Progress Corporation, page 16.

0 from 0 votes
Potato Hash with Rosemary
Prep Time
5 mins
Cook Time
20 mins
Total Time
25 mins
 
Potato Hash with Rosemary is easy to prepare, seasoned with salt, pepper, onion, and fresh rosemary, and is a simple side dish for beef, pork, and poultry.
Category: Side Dish
Cuisine: American
Keyword: potato hash
Servings: 4 servings
Calories Per Serving: 139 kcal
Author: JB @ The Grateful Girl Cooks!
Ingredients
  • 1 large baking potato , peeled and cubed
  • 1 large sweet potato , peeled and cubed
  • 1/4 cup chopped onion
  • 2 cloves garlic , minced
  • 2 Tablespoons olive oil
  • 1 Tablespoon chopped fresh rosemary
  • 1/2 teaspoon salt
  • 1/2 teaspoon ground black pepper
  • **Garnish (optional): fresh sprigs of rosemary
Instructions
  1. Heat olive oil in a non-stick skillet on medium-low heat. Add rest of ingredients except for garnish (potato, sweet potato, onion, garlic, Tablespoon of fresh rosemary, salt and pepper). Stir together.
  2. Cover skillet and cook (on medium-low) for 20-25 minutes, stirring occasionally, until potatoes are tender.
  3. When done, transfer potato hash to serving dish and garnish with fresh sprigs of rosemary.
  4. Serve hot, and enjoy this simple side dish!
Nutrition Facts
Potato Hash with Rosemary
Amount Per Serving (1 g)
Calories 139 Calories from Fat 63
% Daily Value*
Fat 7g11%
Saturated Fat 1g6%
Sodium 312mg14%
Potassium 346mg10%
Carbohydrates 17g6%
Fiber 1g4%
Sugar 2g2%
Protein 1g2%
Vitamin A 4625IU93%
Vitamin C 5mg6%
Calcium 19mg2%
Iron 0.6mg3%
* Percent Daily Values are based on a 2000 calorie diet.

Here’s one more to pin to your Pinterest boards!Potato Hash with Rosemary is easy to prepare, seasoned with salt, pepper, onion, and fresh rosemary, and is a simple side dish for beef, pork, and poultry.

Save

Save

Save

Save

Save

Save

Save

Save

Save

Save

Save

The Pioneer Woman’s Blackberry Cobbler

Nothing says “Summer” dessert like homemade blackberry cobbler! This version is a copycat recipe from The Pioneer Woman, and tastes amazing!Nothing says "Summer" dessert like homemade blackberry cobbler! This version is a copycat recipe from The Pioneer Woman, and tastes amazing!
It’s the middle of summer here in the Pacific Northwest, and wild blackberries are everywhere!  I recently tried a new cobbler recipe after picking blackberries near our home.  It’s called The Pioneer Woman’s Blackberry Cobbler, and boy, is it GOOD!!

This type of cobbler is made slightly different than other traditional cobblers, but anything Ree Drummond (The Pioneer Woman) makes is fabulous!

Scroll Down For A Printable Recipe Card At The Bottom Of The Page

A Unique Way To Make This Blackberry Cobbler

Most cobblers tend to place the berries on the bottom of the dish, then a batter is poured or spooned over the berries. That’s how I would normally make a berry cobbler.  Not so with THIS blackberry cobbler!  The batter is placed in the pan first, then the berries and sugar are placed on top, which creates a more “cake-like” texture under the berries!

This technique sounded interesting to me (and I always am curious about new ways of doing things), so I decided to make a blackberry cobbler, using some of the free wild blackberries I picked just a few blocks from our home.

We also have a lot of blackberries growing over our back fence from the forest behind our home… how fun to have an huge and FREE supply of these tasty berries! I just HAD to make a cobbler, and decided to try this version!

Blackberries ready to be picked in our backyad!
The recipe for this blackberry cobbler is very simple to prepare, and I gotta tell ya, homemade berry cobbler and a scoop of ice cream is the perfect summer dessert, if you ask me!  Here’s how to make this berry delicious cobbler:

Make The Batter For The Blackberry Cobbler

First, melt butter in the microwave, then let it cool.  In a separate medium mixing bowl, combine 1 cup of granulated sugar and flour. Whisk in a cup of milk until a batter is formed. Slowly drizzle in the cooled down melted butter, and whisk well, to fully combine ingredients.

Making the batter for the blackberry cobbler.

Melted butter is added to the cobbler batter in bowl.

Grease or butter a 9 inch round baking dish.  Pour the batter into the prepared dish, and spread evenly.

Cobbler batter is poured into a buttered cake pan.
Add Blackberries To The Cobbler

Rinse the blackberries and then pat them dry. Evenly place the blackberries on top of the batter. Sprinkle the berries with 1/4 cup granulated sugar.

Fresh blackberries are added to the top of the cobbler batter.

The blackberry cobbler is sprinkled with sugar before baking.

Bake The Blackberry Cobbler

Bake cobbler in a preheated 350 degree oven for 55-60 minutes, until the cobbler is bubbly and the surface is golden in color.

If you want, you can remove the cobbler from the oven about 10 minutes before it is done, sprinkle the top with another couple teaspoons of sugar, then place back in oven for final 10 minutes. (This is what I did).

More sugar is sprinkled on the blackberry cobbler partway through the baking time.

The cobbler is finished baking, and cools down before slicing.

Time To EAT!

When the blackberry cobbler is done baking, remove the pan from the oven. Let the hot cobbler cool down a little bit before serving. Once it is has cooled down (but is still warm) slice it up, and serve with a big ol’ scoop of vanilla ice cream! Enjoy this delicious dessert!

A scoop of vanilla ice cream is served with a slice of the blackberry cobbler.

The Pioneer Woman's Blackberry Cobbler is served with ice cream and fresh berries.

This recipe for blackberry cobbler was certainly EASY to make… and it was really yummy, too! Hope you will consider making this yummy dessert! Fixing this cobbler with fresh boysenberries would be amazing, as well. Have a wonderful day!

Looking For More COBBLER Recipes?

You can find all of my dessert recipes in the Recipe Index, located at the top of the page. A few favorite COBBLER recipes include:

Interested In More Recipes?

Thank you for visiting this website. I appreciate you using some of your valuable time to do soIf you’re interested, I publish a newsletter 2 times per month (1st and 15th) with all the latest recipes, and other fun info. I would be honored to have you join our growing list of subscribers, so you never miss a great recipe!
There is a Newsletter subscription box on the top right side (or bottom) of each blog post, depending on the device you use, where you can easily submit your e-mail address (only) to be included in my mailing list.

You Can Also Find Me On Social Media:
Facebook page: The Grateful Girl Cooks!
Pinterest: The Grateful Girl Cooks!
Instagram: jbatthegratefulgirlcooks

Author's signature.

Recipe Source: www.thepioneerwoman.com/cooking/the_great_cobbl/

0 from 0 votes
The Pioneer Woman's Blackberry Cobbler
Prep Time
10 mins
Cook Time
55 mins
Total Time
1 hr 5 mins
 

Nothing says "Summer" dessert like homemade blackberry cobbler! This version is a copycat recipe from The Pioneer Woman, and tastes amazing!

Category: Dessert
Cuisine: American
Keyword: blackberry cobbler
Servings: 8 servings
Calories Per Serving: 308 kcal
Author: JB @ The Grateful Girl Cooks!
Ingredients
  • 1 cube butter , melted, cooled to room temp.
  • cups granulated sugar , divided
  • 1 cup self-rising flour (See note section for substitution)
  • 1 cup milk
  • 2-3 cups blackberries (fresh or frozen) I used 3 cups fresh.
  • 1 teaspoon granulated sugar (to sprinkle on cobbler during last 10 minutes of baking)
Instructions
  1. First, melt butter in the microwave, then let it cool. In a separate medium mixing bowl, combine 1 cup of granulated sugar and flour. Whisk in a cup of milk until batter is formed. Slowly drizzle in the cooled down melted butter, and whisk well, to fully combine ingredients.
  2. Grease or butter a 9 inch round baking dish. Pour the batter into the prepared dish, and spread evenly.
  3. Rinse the blackberries and then pat them dry. Evenly place the blackberries on top of the batter. Sprinkle the berries with 1/4 cup granulated sugar.
  4. Bake cobbler in a preheated 350 degree oven for 55-60 minutes, until the cobbler is bubbly and surface is golden in color. If you want, you can remove the cobbler from the oven about 10 minutes before it is done, sprinkle the top with another couple teaspoons of sugar, then place back in oven for final 10 minutes. When cobbler is done, remove pan from oven. Let it cool down a little bit before serving, then slice it up and serve with a big ol' scoop of vanilla ice cream! Enjoy!
Recipe Notes

No self-rising flour? No problem. For 1 cups self-rising flour, substitute 1 cup all-purpose flour + 1½ teaspoons baking powder + ½ teaspoon salt.

Nutrition Facts
The Pioneer Woman's Blackberry Cobbler
Amount Per Serving (1 serving)
Calories 308 Calories from Fat 108
% Daily Value*
Fat 12g18%
Saturated Fat 7g44%
Cholesterol 31mg10%
Sodium 115mg5%
Potassium 118mg3%
Carbohydrates 48g16%
Fiber 2g8%
Sugar 35g39%
Protein 3g6%
Vitamin A 490IU10%
Vitamin C 7.6mg9%
Calcium 53mg5%
Iron 0.4mg2%
* Percent Daily Values are based on a 2000 calorie diet.

Here’s one more to pin on your Pinterest boards!Nothing says "Summer" dessert like homemade blackberry cobbler! This version is a copycat recipe from The Pioneer Woman, and tastes amazing!

Save

Save

Save

Save

Save

Save

Save

Save

Save

Save

Save

Save

Save

Save

Save

Save

Save

Save

Pork Medallions in Mushroom Marsala Sauce

Pork medallions in mushroom marsala sauce is a one-pan wonder, featuring pork tenderloin and mushrooms in a creamy wine sauce, and can be “on the table” in 30 minutes!Pork medallions in mushroom Marsala sauce is a one-pan wonder, featuring pork tenderloin and mushrooms in a creamy wine sauce, and "on the table" in 30 minutes!

Looking for a delicious “new” way to cook pork tenderloin? How about this recipe for pork medallions?  The recipe is a one-pan wonder, featuring tender pork and mushrooms in a creamy Marsala wine sauce. This easy to make dish can be “on the table” in 30 minutes! The best part is that it tastes amazing!

I originally found the recipe on Pinterest months ago, from Jennifer at Seasons and Suppers, and finally got around to trying it. Delicious!!!!  The recipe (as written below) serves 4; since I was only cooking for my husband and myself, I halved the recipe, so the photos reflect that.

Scroll Down For A Printable Recipe Card At The Bottom Of The Page

Prepare The Pork Medallions

Trim any excess fat (and silverskin) from pork. Slice into 2 inch thick medallions. Lightly season the pork with salt and pepper.  In a large skillet, heat the olive oil and 1 Tablespoon of the butter using medium-high heat. Once you see the butter melt and get foamy (and the skillet is really hot), add the slices of pork in a single layer (cook it in two batches, if you need to).

Sear the pork until lightly browned (2-3 minutes). Turn the pork over; continue to cook the other side for another 2-3 minutes until golden brown. Remove pork from skillet to a plate. Set aside. Do not clean out skillet.

Pork medallions are lightly seasoned with salt, pepper.

Pork medallions are cooked in butter.

Pork medallions are cooked until browned on all sides.

Melt the rest of the butter (2 T.) in the same skillet you cooked pork in. Add chopped shallots; season with a touch of salt and pepper. Cook for 30 seconds, stirring and scraping browned bits off bottom of skillet with a wooden spoon.

Add sliced mushrooms; cook until golden in color and any mushroom liquid has evaporated. This will take approximately 2-3 minutes.

Butter and shallots are cooked for marsala sauce for pork medallions.

Sliced mushrooms are added to marsala sauce for pork medallions.

Make The Marsala Sauce for The Pork Medallions

Sprinkle mushrooms with flour, then pour in the Marsala wine. Stir to combine. Cook until the Marsala wine has almost completely evaporated. Add the chicken broth, stir and cook until the amount of liquid in skillet is reduced in half (this will take about 3-4 minutes).

Stir the whipping cream and parsley into the pan. True Story- I accidentally dumped a bit of extra whipping cream into the skillet, so the sauce is lighter in color than it normally would be-oops!.

Chicken broth and whipping cream are added to marsala wine sauce for pork medallions.

Mushroom marsala sauce has thickened; parsley is added to pan.

Return The Pork to the Skillet

Add the pork medallions (and any extra juices on plate) back into the skillet. Stir to combine and turn, to coat pork with sauce. Cook on medium-low for an additional 2-4 minutes, stirring often, until pork is hot. Try not to let the sauce boil.

Browned pork medallions are added into mushroom marsala sauce in skillet.

Time To EAT!

Taste test the sauce. Season with additional salt and pepper, if desired. Serve and enjoy! I served the pork medallions with creamy mashed potatoes and green beans from our garden.

Pork medallions in mushroom marsala sauce, served with potatoes and green beans.

The flavor of the sauce is wonderful, and really makes the dish! I hope you will consider trying this easy, quick recipe for pork medallions, and trust that you will enjoy it as much as we did.

Have a fantastic day and remember to be kind to those you meet or cross paths with today. It feels good to be a positive force for good in our often harsh, hurting world. God Bless You.

Looking For More PORK Recipes?

You can find ALL my recipes in the Recipe Index, located at the top of the page. I have lots of pork recipes, including:

Interested In More Recipes?

Thank you for visiting this website. I appreciate you using some of your valuable time to do soIf you’re interested, I publish a newsletter 2 times per month (1st and 15th) with all the latest recipes, and other fun info. I would be honored to have you join our growing list of subscribers, so you never miss a great recipe!
There is a Newsletter subscription box on the top right side (or bottom) of each blog post, depending on the device you use, where you can easily submit your e-mail address (only) to be included in my mailing list.

You Can Also Find Me On Social Media:

Facebook page: The Grateful Girl Cooks!
Pinterest:
The Grateful Girl Cooks!
Instagram:
jbatthegratefulgirlcooks

Author's signature

Recipe Source:  https://www.seasonsandsuppers.ca/skillet-pork-medallions-mushroom-marsala-sauce/

0 from 0 votes
Pork Medallions in Mushroom Marsala Sauce
Prep Time
10 mins
Cook Time
20 mins
Total Time
30 mins
 

Pork medallions in mushroom Marsala sauce is a one-pan wonder, featuring pork tenderloin and mushrooms in a creamy wine sauce, and "on the table" in 30 minutes!

Category: Entree
Cuisine: American
Keyword: pork medallions
Servings: 4 servings
Calories Per Serving: 566 kcal
Author: JB @ The Grateful Girl Cooks!
Ingredients
  • 2 pound pork tenderloins (2 small tenderloins)
  • Salt and pepper
  • 3 Tablespoons extra-virgin olive oil
  • 3 Tablespoons butter
  • 2 medium shallots , finely diced (can substitute red onion)
  • 12 ounces button mushrooms (or cremini)
  • 1 Tablespoon all purpose flour
  • 1/2 cup dry Marsala wine
  • 1 cup chicken broth
  • 3 Tablespoons heavy whipping cream
  • Tablespoons dried parsley (or 1/4 cup fresh chopped flat leaf parsley)
Instructions
  1. Trim excess fat (and silverskin) from pork. Slice into 2 inch thick medallions. Lightly season the pork with salt and pepper.
  2. In a large skillet, heat the olive oil and 1 Tablespoon of the butter using medium-high heat. Once you see the butter getting foamy (and the skillet is really hot), add the slices of pork in a single layer (cook it in two batches, if you need to). Sear the pork until lightly browned (2-3 minutes). Turn the pork over; continue to cook the other side for another 2-3 minutes until golden brown. Remove pork from skillet to a plate. Set aside. Do not clean out skillet.
  3. Melt the rest of the butter (2 T.) in the same skillet you cooked pork in. Add chopped shallots; season with a touch of salt and pepper. Cook for 30 seconds, stirring and scraping browned bits off bottom of skillet with a wooden spoon. Add sliced mushrooms; cook until golden in color and mushroom liquid is evaporated. This will take approximately 2-3 minutes.
  4. Sprinkle mushrooms with flour, then pour in the Marsala wine. Stir to combine. Cook until the Marsala wine has almost completely evaporated. Add the chicken broth, stir and cook until the amount of liquid in skillet is reduced in half (this will take about 3-4 minutes). Stir the whipping cream and parsley into the pan. Add the pork (and any extra juices on plate) back into the skillet. Stir to combine and coat pork with sauce. Cook on medium-low for an additional 2-4 minutes, until pork is hot. Try not to let the sauce boil.
  5. Taste test the sauce. Season with additional salt and pepper, if desired. Serve... and enjoy!
Nutrition Facts
Pork Medallions in Mushroom Marsala Sauce
Amount Per Serving (1 g)
Calories 566 Calories from Fat 279
% Daily Value*
Fat 31g48%
Saturated Fat 12g75%
Cholesterol 185mg62%
Sodium 424mg18%
Potassium 1298mg37%
Carbohydrates 11g4%
Fiber 1g4%
Sugar 5g6%
Protein 50g100%
Vitamin A 440IU9%
Vitamin C 7.8mg9%
Calcium 43mg4%
Iron 3.3mg18%
* Percent Daily Values are based on a 2000 calorie diet.

Here’s one more to pin on your Pinterest boards!Pork medallions in mushroom Marsala sauce is a one-pan wonder, featuring pork tenderloin and mushrooms in a creamy wine sauce, and "on the table" in 30 minutes!

Save

Save

Save

Save

Save

Save

Save

Save

Save

Save

Save

Save

Save

Save

Save

Save

Save

Save

Watermelon, Feta, and Mint Salad

Sweet, cold watermelon feta mint salad with fresh mint, salty feta cheese crumbles and red onion is an easy, delicious salad for a hot Summer day!Sweet, cold watermelon feta mint salad with fresh mint, salty feta cheese crumbles and red onion is an easy, delicious salad for a hot Summer day!
I recently made a very yummy and unique salad as a side dish with our dinner! It is a chilled Watermelon, feta cheese, and mint salad, to be exact! Wow! This is a fantastic chilled salad to serve when temperatures heat up, like it’s doing in Oregon this week (temps of 108)!

I found the recipe for this watermelon feta mint salad on Pinterest and thought it sounded interesting, and guess what? It tastes FANTASTIC! Cold, ripe sweet watermelon pairs unbelievably well with slightly salty feta cheese! The addition of chopped fresh mint, a touch of olive oil and a some red onion make this a delectable and refreshing summer salad!

Scroll Down For A Printable Recipe Card At The Bottom Of The Page

How To Make A Watermelon Feta Mint Salad

This simple recipe could not be any easier to prepare! There are two methods, and both are simple! Shown here is the way I made this yummy watermelon feta mint salad. See the printable recipe at the bottom of this post for other method.

Cut up a well-chilled seedless watermelon into cubes. You only need 6 cups worth of watermelon cubes, and so this was only two large slices out of a whole watermelon!

Cold watermelon melon is cut into chunks for the salad.

Add the remaining ingredients to the watermelon cubes. These ingredients are crumbled feta cheese, olive oil, thinly sliced red onion, and chopped fresh mint. Season the salad with a little bit of salt and pepper to taste.

Toss gently to combine, and try not to break up the feta crumbles too much.  See the printable recipe below, for another way to prepare this salad!

Olive oil, red onion, chopped mint leaves and feta cheese are added to the salad.

Serve The Watermelon Feta Mint Salad Chilled

Once the salad is gently mixed together, it CAN be served right away. HOWEVER, I think the salad is at it’s best when really cold, and the flavors have come together in the fridge.  If you like watermelon really cold, refrigerate this salad for about an hour before serving.

When ready to serve, place the watermelon feta mint salad in a pretty serving dish, and garnish with a fresh mint sprig. Grab a fork, and dig in, because it is DELICIOUS!

The cold watermelon feta mint salad is garnished with a mint sprig and served!

We’ve had record-breaking heat here in the Portland, Oregon area this week.  Our power has gone out 2 times in 24 hours (last night and this morning), so it hasn’t been fun trying to stay cool with no electricity or cooling! We are very thankful for COLD SALADS and CANDLES, and that the problems have now been fixed.  Whew!!! 

If you enjoy watermelon like we do, be sure and check out some of my other recipes featuring it, like Watermelon, Feta and Balsamic Bites, Watermelon and Cucumber Gazpacho, and Watermelon Lime & Mint Agua Fresca!  Hope you have a great day!

Looking For More SALAD Recipes?

You can find all of my salad recipes in the Recipe Index, located at the top of the page. I have many salad recipes, which include:

Interested In More Recipes?

Thank you for visiting this website. I appreciate you using some of your valuable time to do soIf you’re interested, I publish a newsletter 2 times per month (1st and 15th) with all the latest recipes, and other fun info. I would be honored to have you join our growing list of subscribers, so you never miss a great recipe!
There is a Newsletter subscription box on the top right side (or bottom) of each blog post, depending on the device you use, where you can easily submit your e-mail address (only) to be included in my mailing list.

You Can Also Find Me On Social Media:

Facebook page: The Grateful Girl Cooks!
Pinterest:
The Grateful Girl Cooks!
Instagram:
jbatthegratefulgirlcooks

Author's signature

Recipe Source:  http://www.slenderkitchen.com/recipe/watermelon-feta-and-mint-salad

0 from 0 votes
Watermelon, Feta, and Mint Salad
Prep Time
10 mins
Cook Time
0 mins
Total Time
10 mins
 

Sweet, cold watermelon feta mint salad with fresh mint, salty feta cheese crumbles and red onion is an easy, delicious salad for a hot Summer day!

Category: Salad
Cuisine: American
Keyword: watermelon feta mint salad
Servings: 4 servings
Calories Per Serving: 160 kcal
Author: JB @ The Grateful Girl Cooks!
Ingredients
  • 6 cups cold watermelon , cubed
  • 3/4 cup crumbled feta cheese
  • 1/4 cup red onion , sliced thinly
  • 1/4 cup fresh mint leaves , roughly chopped
  • 1/2 Tablespoon olive oil
  • Salt and ground black pepper , to taste
Instructions
Method 1: (this is the method I used)
  1. Combine all ingredients in large serving bowl. Toss gently, to combine, trying to not break up the feta crumbles too much. Cover and refrigerate until ready to serve. Serve and enjoy!
Method 2:
  1. Combine all ingredients except for crumbled feta cheese. Cover and refrigerate until ready to serve. Sprinkle salad with feta cheese crumbles (but do not mix it in) right before serving. Serve and enjoy!
Nutrition Facts
Watermelon, Feta, and Mint Salad
Amount Per Serving (1 serving)
Calories 160 Calories from Fat 72
% Daily Value*
Fat 8g12%
Saturated Fat 4g25%
Cholesterol 25mg8%
Sodium 326mg14%
Potassium 288mg8%
Carbohydrates 18g6%
Fiber 1g4%
Sugar 15g17%
Protein 5g10%
Vitamin A 1535IU31%
Vitamin C 19.4mg24%
Calcium 161mg16%
Iron 0.9mg5%
* Percent Daily Values are based on a 2000 calorie diet.

Here’s one more to pin to your Pinterest boards!Sweet, cold watermelon feta mint salad with fresh mint, salty feta cheese crumbles and red onion is an easy, delicious salad for a hot Summer day!

Save

Save

Save

Save

Save

Save

Save

Save

Save

Save

Save

Save