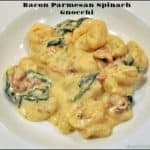
Bacon Parmesan Spinach Gnocchi in a creamy Alfredo sauce, is a simple, delicious Italian comfort food dish that can be ready to eat in about 20 minutes!

Do you like gnocchi? We have really enjoyed trying this little “potato pasta” with several different recipes over the past couple of years. They are known primarily as Italian potato dumplings. Did you know the word “gnocchi” actually means “lumps” in Italian? Yep. There are numerous ways to use gnocchi. These little “lumps” of potatoes and flour can be baked, fried, boiled, etc., and taste amazing when paired with a variety of sauces!
A couple months ago I bought a package of gnocchi at the grocery store (usually found in the pasta aisle). I decided to create my own recipe for Bacon Parmesan Spinach Gnocchi, and used a sauce I’ve made a bazillion times to tie all the ingredients together!
The Bacon Parmesan Spinach Gnocchi ended up tasting wonderful. Creamy alfredo sauce was the perfect sauce to coat the pillowy soft gnocchi, bacon and fresh baby spinach leaves! The added bonus is that it was a very simple (and quick) dinner to make!
Scroll Down For A Printable Recipe Card At The Bottom Of The Page
How To Make Bacon Parmesan Spinach Gnocchi
The first thing you need to do is to cook the bacon. If you cut the raw bacon into thin strips, it will cook a lot faster (thanks, kitchen scissors)! Cook the bacon in a skillet until it is fully cooked and crispy.
Remove the crisp bacon from the skillet; transfer to a paper towel to drain. Leave any bacon drippings in the skillet (there shouldn’t be too much!). This will help give flavor to the sauce!


Making The Sauce For Bacon Parmesan Spinach Gnocchi
Using the same skillet (undrained), add the butter and cook on medium low heat until melted. Once the butter has melted, add the heavy whipping cream and garlic powder. Stir well, to combine the ingredients. Add freshly grated Parmesan cheese to the sauce in the skillet. Whisk or stir the sauce until the ingredients are fully blended together.
Continue to cook the sauce on medium low heat, until the alfredo sauce has thickened slightly and is heated through. Be careful to not let the sauce come to a boil. Remove the pan from the heat once the sauce has thickened.


Cook the gnocchi in a large pot of boiling water according to the package instructions. Once the gnocchi is cooked, drain it well in a colander or strainer. Do not rinse the gnocchi.

Finish The Gnocchi For Serving
Place the drained, hot gnocchi back into the saucepan. Pour the alfredo sauce, fresh baby spinach leaves and crumbled bacon back into the pan.
Stir the ingredients well, to fully coat everything with the alfredo sauce. Turn the heat to low, and continue to heat the bacon parmesan spinach gnocchi until it’s heated through. It only takes a couple minutes to heat through, and the spinach will wilt down as it cooks.


Once the bacon parmesan spinach gnocchi is heated all the way through, it is ready to serve! Portion out the gnocchi to individual serving bowls or plates. Top each serving with additional grated Parmesan cheese, if desired. Serve the bacon parmesan spinach gnocchi while it is hot… and enjoy every bite!

We truly did love this Bacon Parmesan Spinach Gnocchi! The creamy flavorful gnocchi is Italian comfort food at it’s best! I sincerely hope you will give the recipe a try, because I think you’re gonna love it, too! Have a wonderful day.
Looking For More Recipes Using Gnocchi?
I have a few recipes using gnocchi on my blog that you might also enjoy! They include:
- Olive Garden Chicken Gnocchi Soup (copycat)
- Creamy Italian Sausage Spinach Gnocchi
- Chicken, Parmesan & Spinach Gnocchi
Interested In More Recipes?
Thank you for visiting this website. I appreciate you using some of your valuable time to do so. If you’re interested, I publish a newsletter 2 times per month (1st and 15th) with all the latest recipes, and other fun info. I would be honored to have you join our growing list of subscribers, so you never miss a great recipe!
There is a Newsletter subscription box on the top right side (or bottom) of each blog post, depending on the device you use, where you can easily submit your e-mail address (only) to be included in my mailing list.
You Can Also Find Me On Social Media:
Facebook page: The Grateful Girl Cooks!
Pinterest: The Grateful Girl Cooks!
Instagram: jbatthegratefulgirlcooks

- 2 strips bacon , cooked until crispy
- 4 Tablespoons butter
- 1¼ cups heavy whipping cream
- 1¼ cups grated Parmesan cheese
- 1/4 teaspoon garlic powder
- 1/4 teaspoon salt , plus more to taste
- 17.5 ounces gnocchi
- 2 cups baby spinach leaves (fresh)
- Parmesan cheese , optional for garnish
Cook bacon in skillet on medium heat until fully cooked/crispy. TIP: If you cut the raw bacon into thin strips before cooking, it will cook a LOT faster! Remove crisp bacon from skillet; transfer to a paper towel to drain, then crumble (if not already cut into small pieces).
Using the same skillet (undrained), add butter; cook on medium low heat until melted. Once the butter melts, add heavy whipping cream and garlic powder. Stir well, to combine. Add grated Parmesan cheese to the sauce in skillet. Whisk or stir sauce until the ingredients are fully blended together. Continue to cook sauce on medium low heat, until it has thickened slightly and is heated through. Be careful to not let the sauce come to a boil. Remove the pan from the heat once the sauce has thickened.
Cook the gnocchi in a large pot of boiling water according to package instructions. Once the gnocchi is cooked, drain it well in a colander or strainer. Do not rinse the gnocchi. Place the drained, hot gnocchi back into the saucepan.
Pour the alfredo sauce, fresh baby spinach leaves and crumbled bacon into the pan of gnocchi. Stir well, to fully coat everything with the sauce. Turn heat to low, and continue to heat gnocchi until heated through. It only takes a couple minutes to heat through; the spinach will wilt down as it cooks. Once gnocchi is heated all the way through, it is ready to serve! Transfer gnocchi into individual bowls or plates. Top each serving with more grated Parmesan cheese, if desired. Serve hot... and enjoy!
Here’s one more to pin on your Pinterest boards!