Chocolate Crinkle Cookies- How can you go wrong with easy to make chocolate, chocolate chip cookies that get all cute and “crinkly” when you bake ’em?
I found a recipe for Chocolate Crinkle Cookies in a used cookbook I bought in a used bookstore while on vacation last summer in Washington.
Whoa… I had to spend a whopping $2 dollars on it (great deal, right?), and found some great recipes in it, including this one for a simple, fudgy, chewy cookie.
If you like chocolate chip cookies, then you will enjoy this cookie! I love chocolate chip cookies AND finding great cookbooks at bargain basement prices to add to my ever-increasing cookbook collection!
These cookies are very easy to make. Melted chocolate chips give the batter it’s dark brown color. The dough also contains whole chocolate chips, so basically, it’s a 2 in 1 chocolate cookie.
That’s why you will like these! Seriously, how can you go wrong with chocolate, chocolate chip cookies that get all cute and “crinkly” when you bake ’em?
Scroll Down For A Printable Recipe Card At The Bottom Of The Page
Make The Cookie Dough
These cookies are so easy to make. The first thing you will need to do is cream the butter and sugar with an electric mixer.

Next, melt the chocolate chips. I melted mine in the microwave. Cook on high for 30 seconds, stir well. If necessary, place back into microwave and cook and additional 30 seconds.
Give them a good stir, and they should be fully melted. If not, pop them back in the microwave for a few more seconds.

Mix in all of the melted chocolate with the batter. This is where the dough for these chocolate crinkle cookies starts to get GOOD!

Finish the Cookie Batter
The melted chocolate gives the batter a beautiful color, because it is nicely brown. Now it’s time to add the remaining ingredients to the cookie batter.

Add the flour a little at a time to the batter. Mix the dough on slow speed and continue adding the flour until it is all gone.
Mix all the ingredients together until the mixture becomes a smooth light brown and thick batter.

Add The Chocolate Chips
Now add the chocolate chips to the cookie dough. Stir well, until all of the chocolate chips have been incorporated into the dough.
The cookie dough should be quite thick. Cover and refrigerate the dough for about 15 minutes. After the dough is chilled it is much easier to roll into balls.

Shaping The Cookies
Shape the dough into 1½ inch balls by rolling teaspoons of dough between your clean hands to shape into balls.
Place the balls of dough onto a large baking sheet a couple of inches apart. Separate them because the cookies will spread out while cooking.

Bake The Cookies
Let the cookies bake for about 10-12 minutes at 350°F. In the photo below you can see one of the cookies straight out of the oven. See how cute and crinkly they are?
Let the cookies cool a bit before transferring them from the pan onto a wire rack to finish cooling.

Sift a tiny bit of powdered sugar on top of each one! because it helps to finish the chocolate crinkle cookies off with a little extra pizazz.

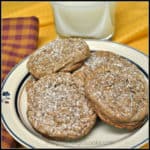
Enjoy Some Chocolate Crinkle Cookies!
Once the cookies have a light dusting of sifted powdered sugar, they are ready for you and your family and friends to enjoy them.
Pour yourself a nice, cold glass of milk and grab a few delicious, chocolate crinkle cookies! I am confident you’re going to love them!

Look at the inside of that cookie (see photo below). YUM! I took one for the team and bit into one just so you could see the chocolate chips on the inside. You’re welcome!

I hope you will give this recipe for chocolate crinkle cookies a try because they are scrumptious! The recipe yields about 2½ dozen cookies.
Thank you for stopping by, and I invite you to come back again soon for more family friendly recipes. Take care, may God bless you, and have a wonderful day.
Looking For More Cookie Recipes?
You can find ALL of my recipes in the Recipe Index, which is located at the top of the page. I have LOTS of fantastic cookie recipes to choose from, including:
- Butter Pecan Crisps
- Flourless 3 Ingredient Peanut Butter Cookies
- Peppermint Pinwheel Cookies
- Oatmeal Raisin Cookies
- Dipped Gingersnaps
Want More Recipes? Get My FREE Newsletter!
I publish a newsletter 2 times per month (1st and 15th) with lots of recipes, tips, etc.
Would you like to join our growing list of subscribers?
There is a Newsletter subscription box on the top right (or bottom) of each blog post, depending on the device you use.
You can submit your e-mail address there, to be added to my mailing list.
Find Me On Social Media:
Facebook page: The Grateful Girl Cooks!
Pinterest: The Grateful Girl Cooks!
Instagram: jbatthegratefulgirlcooks
 Recipe Source: The cookbook “Company’s Coming-Christmas Gifts From the Kitchen”, by Jean Paré, pg.31. Published by Company’s Coming Publishing Unlimited, 2006
↓↓ PRINTABLE RECIPE BELOW ↓↓
- 6 Tablespoons butter , softened
- 1 cup granulated sugar
- 2 large eggs
- 1 1/2 teaspoons vanilla extract
- 1 cup semi-sweet chocolate chips
- 1 1/2 cups all-purpose flour
- 1 1/2 teaspoons baking powder
- 1/4 teaspoon salt
- 1 cup semi-sweet chocolate chips
- 2 Tablespoons powdered sugar (for dusting finished cookies)
- Preheat oven to 350 degrees.
In a large bowl or base of a stand mixer, cream butter and granulated sugar until smooth. Add eggs, one at a time. Beat well after each egg. Add vanilla and beat until batter is smooth.
Place 1 cup chocolate chips in a microwaveable bowl. Heat on high in microwave for 30 seconds. Stir well. Put back in microwave for another 30 seconds. Remove, and stir until chocolate is smooth. (You can also melt chocolate chips in saucepan over low heat). Add melted chocolate to batter mixture. Continue beating until smooth.
In separate bowl, whisk together flour, baking powder and salt. Add this to batter, in small increments, until flour is fully incorporated. Stir in remaining 1 cup of chocolate chips. Mix dough well. Cover and refrigerate dough for 15 minutes.
Roll cookie dough between your hands into 1½ inch balls. Place dough balls on a greased cookie sheet about 1 inch apart.
Bake at 350 degrees for 10-12 minutes, or until edges are firm. The centers may still be a bit soft, but that's okay. Remove cookies from oven. Let them stay on cookie sheets and cool for 5 minutes before removing them. Place cookies on wire racks to cool completely. Using a sieve or sifter, sift powdered sugar over the top of cooled cookies. Serve, and enjoy!
Here’s one more to pin on your Pinterest boards!


, dipped in chocolate are a unique, sweet treat to make and give to friends and family during the holidays! / The Grateful Girl Cooks!")


, dipped in chocolate are a unique, sweet treat to make and give to friends and family during the holidays! / The Grateful Girl Cooks!")


