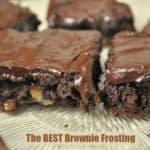
Category: Chocolate

Homemade Chocolate Pudding

Make your own rich and decadent homemade chocolate pudding from scratch in about 10 minutes! Let it chill, then enjoy this creamy, delicious dessert!

Do you like chocolate pudding? We sure do! We tend to keep boxes of the stuff around, for those moments when you want something cold and creamy, and SWEET!

Well, did you know it is really EASY to make HOMEMADE chocolate pudding, from scratch? The ingredients are cooked, then the pudding is chilled until really cold. That’s it!  The hardest part is waiting for the pudding to chill, because it usually takes a couple hours. That’s not really too much of a sacrifice though, because then you get to enjoy this delicious pudding!

Scroll Down For A Printable Recipe Card At The Bottom Of The Page

How To Make Homemade Chocolate Pudding

Place milk, sugar, cornstarch, cocoa powder and salt into a medium sized saucepan. Use a whisk and whisk these ingredients together until fully blended.

Cocoa, milk, sugar, cornstarch and salt are mixed and heated in pan to make homemade chocolate pudding

Bring this mixture to a full boil, over medium-high heat. Continue to whisk the ingredients often while it cooks. Boil for one minute, and continue to whisk. The homemade chocolate pudding mixture will slightly thicken as it cooks.

The mixture for the homemade chocolate pudding is brought to a boil to thicken.

After boiling the pudding mixture for one minute, remove the pan from the heat and immediately add all of the grated chocolate and vanilla extract to the pan. Stir, and keep stirring, until all of the grated chocolate has melted into the homemade chocolate pudding mixture. You want the ingredients to be fully blended.

Grated bittersweet chocolate is added to hot homemade chocolate pudding mixture in pan.

Homemade chocolate pudding mixture is stirred until all chocolate pieces have melted.

Once the homemade chocolate pudding is fully blended and all the chocolate has melted, pour (and scrape) the pudding into a medium sized bowl.

Time To Refrigerate The Homemade Chocolate Pudding!

Cover the pudding with plastic wrap, making sure to press the plastic wrap gently right onto the surface of the pudding.  By applying the wrap directly onto the top of the pudding, it will prevent a “skin” from forming on top of the pudding!

Place the bowl of pudding into the refrigerator, and let it chill for AT LEAST 2 hours, or until it gets really cold! It’s easy to make this up early in the day, or at night, then chill all day OR overnight, for best results!

The homemade chocolate pudding is poured into bowl, then covered with plastic wrap, to seal.

Serve The Homemade Chocolate Pudding

When the pudding is fully chilled, it is ready to serve! Spoon the homemade chocolate pudding into small individual serving dishes. Garnish with whipped cream, if desired and serve!

This recipe for homemade chocolate pudding, as written, will make enough for 4 servings. The serving dishes I used were only 4 ounce dishes, so I had enough for 5 servings! Keep any extras covered and refrigerated. The pudding will “keep” for a couple days!

The cold homemade chocolate pudding is portioned into dishes, topped with whipped cream and served.

Hope you enjoy making and eating this simple, homemade chocolate pudding! It is a nice, chocolatey, creamy treat, and will be enjoyed. If you enjoy homemade pudding, be sure to check out my yummy recipe for Old-Fashioned Tapioca Pudding, too! Thanks for stopping by, and I hope you will come back soon. Have a great day.

Looking For More CHOCOLATE DESSERTS?

You can find all of my recipes in the Recipe Index, located at the top of the page. A few favorite chocolate dessert recipes include:

Interested In More Recipes?

Thank you for visiting this website. I appreciate you using some of your valuable time to do soIf you’re interested, I publish a newsletter 2 times per month (1st and 15th) with all the latest recipes, and other fun info. I would be honored to have you join our growing list of subscribers, so you never miss a great recipe!
There is a Newsletter subscription box on the top right side (or bottom) of each blog post, depending on the device you use, where you can easily submit your e-mail address (only) to be included in my mailing list.

You Can Also Find Me On Social Media:

Facebook page: The Grateful Girl Cooks!
Pinterest:
The Grateful Girl Cooks!
Instagram:
jbatthegratefulgirlcooks

Author's signature

Recipe Source: Woman’s Day Magazine clip out recipe card, from issue dated November 1, 2010.

0 from 0 votes
Homemade Chocolate Pudding
Prep Time
10 mins
Cook Time
0 mins
Refrigeration
2 hrs
Total Time
2 hrs 10 mins
 
Make your own rich and decadent homemade chocolate pudding from scratch in about 10 minutes! Let it chill, then enjoy this creamy, delicious dessert!
Category: Dessert
Cuisine: American
Keyword: homemade chocolate pudding
Servings: 4
Calories Per Serving: 317 kcal
Author: JB @ The Grateful Girl Cooks!
Ingredients
  • 2 cups milk
  • 5 Tablespoons granulated sugar
  • 2 Tablespoons cornstarch
  • 1 Tablespoon unsweetened cocoa powder
  • 1 pinch salt
  • 4 ounces bittersweet chocolate , grated or chopped finely
  • 1 teaspoon vanilla extract
Instructions
  1. Place milk, sugar, cornstarch, cocoa powder and salt into a medium sized saucepan. Use a whisk and whisk these ingredients together until fully blended. Bring this mixture to a full boil, over medium-high heat. Continue to whisk often while it cooks. Boil for one minute, and continue to whisk. The pudding mixture will slightly thicken as it cooks.

  2. After boiling the pudding for one minute, remove pan from the heat and immediately add the grated chocolate and vanilla extract to the pan. Stir, and keep stirring, until all of the grated chocolate has melted into the pudding. You want the ingredients to be fully blended.

  3. Once pudding is fully blended and all chocolate has melted, pour (and scrape) pudding into a medium sized bowl. Cover the pudding with plastic wrap, making sure to press the plastic wrap gently right onto the surface of the pudding.  By applying the wrap directly onto the top of the pudding, it will prevent a "skin" from forming on top! Place the bowl of pudding into the refrigerator, and let it chill for AT LEAST 2 hours, or until it gets really cold! It's easy to make this up early in the day, or at night, then chill all day OR overnight, for best results!

  4. When the pudding is fully chilled, it is ready to serve! Spoon the homemade chocolate pudding into 4 small individual serving dishes. Garnish with whipped cream, if desired and serve! Enjoy!

Recipe Notes

NOTE: Caloric calculation was made using whole milk in the recipe.

Nutrition Facts
Homemade Chocolate Pudding
Amount Per Serving (1 (1/4 of total))
Calories 317 Calories from Fat 135
% Daily Value*
Fat 15g23%
Saturated Fat 8g50%
Cholesterol 13mg4%
Sodium 65mg3%
Potassium 340mg10%
Carbohydrates 40g13%
Fiber 2g8%
Sugar 31g34%
Protein 5g10%
Vitamin A 210IU4%
Calcium 155mg16%
Iron 2mg11%
* Percent Daily Values are based on a 2000 calorie diet.

Here’s one more to pin on your Pinterest boards!Make your own rich and decadent homemade chocolate pudding from scratch in about 10 minutes! Let it chill, then enjoy this creamy, delicious dessert!

Chocolate Pots de Crème

If you’re looking for a quick and easy decadent dessert that can be made in under 10 minutes, you’ll love these thick and smooth, tiny Chocolate Pots de Crème, with deep rich chocolate flavor!Looking for a quick and easy decadent dessert you can make in under 10 minutes? You'll love these tiny Chocolate Pots de Crème with deep, rich chocolate flavor!

Last year I made Irish Chocolate Pots de Crème for a family gathering, and they were a huge hit!  The tiny ramekins of chocolate were flavored with Bailey’s Irish Cream and tasted amazing!

Because they were so good, I knew I wanted to go back and try the basic chocolate pot de crème recipe! Did you know this dessert can be traced back to France in the 17th century? If it’s been around that long, it MUST be good. It sure is!

If you are a chocolate lover like myself, you absolutely cannot go wrong with this simple recipe!  The recipe takes under 10 minutes to prepare and pop in the refrigerator, then all you need to do is let them fully chill before serving (at least an hour).  I usually mix them up and pop them in the fridge in the morning, to serve later in the evening. Here’s how easy they are to prepare:

Scroll Down For A Printable Recipe Card At The Bottom Of The Page

How To Make Chocolate Pots de Créme

Before beginning, place really small bowls or ramekins on a baking sheet (with rimmed edges).  The recipe will make about 9 (1/3 cup) servings, or about 7 (1/2) cup servings. With this dessert, small sized containers are a GOOD thing, as it is a really rich treat!

You can store the chocolate pots de créme, once made, for 2-3 days, so it’s easy to make a batch, then grab one when the craving for chocolate hits! Not that I’ve had this personal experience (*snicker, snicker*).

Blend The Chocolate Ingredients

Put chocolate chips, granulated sugar, vanilla, egg, salt in a blender. If using Grand Marnier (which is optional), add this, as well. I used a combination of 1/2 bittersweet (60% cacao) chocolate and 1/2 semi-sweet chocolate chips. Do NOT add the whipping cream.

Blend these on low for 1 minute, then increase to medium speed for an additional minute. Stop blender, and set aside.

Mixing chocolates and egg in blender

Heat The Whipping Cream

Pour the whipping cream into a large microwave safe bowl. Use a large bowl, because the cream will be microwaved, and will rise up some as it heats. (I used a glass bowl so I could see to make sure the whipping cream didn’t bubble up and over the top of the bowl).

Heat whipping cream in microwave on high power for 2 to 2½ minutes, until the cream is REALLY bubbling (needs to be super hot to cook the egg fully when added to blender).

Whipping cream in large bowl

Bubbles in whipping cream after microwaving

Place a funnel into the center hole in the top of your blender lid. Place the lid on the blender.

Funnel inserted in blender top

Time To Blend The Ingredients

Turn blender on LOW and blend ingredients already in there for 15 seconds. SLOWLY pour the hot whipping cream through the funnel into the chocolate mixture while mixing on low.

Once you’ve added all the cream, put your hand over the top of the funnel (to cover), and turn the speed up to HIGH. Let the mixture blend on high for two minutes. When done, carefully pour the chocolate pots de créme (dividing evenly) into the serving bowls. Refrigerate for at least 1 hour (preferably more) before serving.

Pouring blended chocolate into small serving pots

Pots of chocolate chilling in refrigerator

The chocolate pots de créme can be made 2-3 days in advance, but make sure to cover each dish with plastic if storing that long in refrigerator.

Ready To Serve!

When ready to serve, garnish with a dollop of whipped cream if you want, OR just grab a spoon a take a big old bite of chocolate goodness! It’s thick, it’s rich, it’s smooth, and it tastes decadently amazing!

Spoonful of thick fudgey dessert

Hope you enjoy these delicious little desserts with big flavor!  I told my husband “these chocolate pots de créme are so rich, it’s gonna put hair on my chest!!!”  Ha Ha!  We love ’em, and really hope you will, too! Have a great day.

Looking For Other DECADENT DESSERT Recipes?

You can find all of my dessert recipes in the Recipe Index, located at the top of the page. I have tons of yummy desserts you’ll enjoy, including:

Want More Recipes? Get My FREE Newsletter!

I publish a newsletter 2 times per month (1st and 15th) with lots of recipes, tips, etc..
Would you like to join our growing list of subscribers?

There is a Newsletter subscription box on the top right (or bottom) of each blog post, depending on the device you use.
You can submit your e-mail address there, to be added to my mailing list.

Find Me On Social Media:

Facebook page: The Grateful Girl Cooks!
Pinterest:
The Grateful Girl Cooks!
Instagram:
jbatthegratefulgirlcooks

Author's signature

Recipe Source: https://thecafesucrefarine.com/chocolate-pots-de-creme/

↓↓ PRINTABLE RECIPE BELOW ↓↓

0 from 0 votes
Chocolate Pots de Crème
Prep Time
5 mins
Cook Time
1 hr
Total Time
1 hr 5 mins
 

Looking for a quick and easy decadent dessert you can make in under 10 minutes? You'll love these tiny Chocolate Pots de Crème with deep, rich chocolate flavor!

Category: Dessert
Cuisine: American
Keyword: chocolate pots de creme
Servings: 9 (1/3 cup) servings
Calories Per Serving: 306 kcal
Author: JB @ The Grateful Girl Cooks!
Ingredients
  • 5 ounces semi-sweet chocolate chips
  • 3 Tablespoons granulated sugar
  • 5 ounces bitter sweet chocolate , 60%
  • 1 egg , large
  • 1 teaspoon vanilla extract
  • 1 pinch salt
  • 1 cup heavy whipping cream , or half n' half
  • 2 Tablespoons Grand Marnier , Optional
Instructions
  1. Before beginning, place tiny bowls, mugs or ramekins on a large baking sheet. Set aside. Recipe will yield approx. 9 (1/3 cup) servings or 7 (1/2) cup servings.

  2. Put chocolate chips, granulated sugar, vanilla, egg, salt in a blender. If using Grand Marnier (which is optional), add this, as well. Blend these on low for 1 minute, then increase to medium speed for an additional minute. Stop blender, and set aside.

  3. Pour whipping cream into a large microwave safe bowl. Use a large bowl, because the cream will be microwaved, and will rise up some as it heats. (I used a glass bowl so I could see to make sure the whipping cream didn't bubble up and over the top of the bowl). Heat whipping cream in microwave on high power for 2 to 2½ minutes, until the cream is REALLY bubbling (needs to be super hot to cook the egg fully when added to blender).

  4. Place a funnel into the center hole in the top of the blender lid. Place lid onto blender. Turn blender on LOW and blend ingredients already in there for 15 seconds. SLOWLY pour the hot whipping cream through the funnel into the chocolate mixture while mixing on low.  Once you've added all the cream, put your hand over the top of the funnel (to cover), and turn the speed up to HIGH. Let the mixture blend on high for two minutes.  When done, carefully pour the chocolate, (dividing evenly) into serving bowls.

  5. Refrigerate for at least 1 hour (preferably more) before serving. Garnish with whipped cream, if desired (Optional) Can be made 2-3 days in advance. Store, covered with plastic wrap in refrigerator.

Nutrition Facts
Chocolate Pots de Crème
Amount Per Serving (1 (1/3 cup) serving)
Calories 306 Calories from Fat 198
% Daily Value*
Fat 22g34%
Saturated Fat 13g81%
Trans Fat 0.03g
Polyunsaturated Fat 1g
Monounsaturated Fat 6g
Cholesterol 50mg17%
Sodium 22mg1%
Potassium 212mg6%
Carbohydrates 22g7%
Fiber 3g13%
Sugar 17g19%
Protein 3g6%
Vitamin A 431IU9%
Vitamin C 0.2mg0%
Calcium 40mg4%
Iron 2mg11%
* Percent Daily Values are based on a 2000 calorie diet.

Here’s one more to pin on your Pinterest boards!Looking for a quick and easy decadent dessert you can make in under 10 minutes? You'll love these tiny Chocolate Pots de Crème with deep, rich chocolate flavor!

Chocolate Covered Peanut Butter Ritz Cookies

Crunchy, creamy, chocolate covered peanut butter Ritz cookies are quick, delicious, and totally EASY holiday treats to make, using only a few ingredients! Crunchy, creamy, chocolate covered peanut butter ritz cookies are quick, delicious, and totally EASY holiday treats to make, using only a few ingredients!

Chocolate Covered Peanut Butter Ritz® Cookies are an annual Christmas family tradition for us. The recipe has been handed down from my Aunt to my Mom, and then to me. These delectable treats are incredibly FAST and EASY to make, which is perfect for this busy time of year!

Many years ago (at least 15), my Mom shared these cookies with me and told me that her sister, my Aunt Theda in Texas made them for her, and Mom raved about how good they were! I tried a couple, and sure enough, they tasted fantastic.

When I asked my Mom how to make them she told me how incredibly easy it was.  I really loved my sweet Aunt… she passed away quite a few years ago, but I think of her whenever I make these goodies.

I’ve made these cookies so many times since then, but finally took pictures and decided to share the “recipe” on this blog.  I added a white glaze drizzled over the top, and some red and white sprinkles for the Christmas season, but really all you need to make these is 4 ingredients! Here’s how to make a quick dozen of these yummy stacked goodies.

Scroll Down For A Printable Recipe Card At The Bottom Of The Page

How To Make Chocolate Peanut Butter Ritz Cookies

Place 12 Ritz® crackers onto a piece of parchment paper.  Spread a teaspoon of creamy peanut butter onto each one. When done, top with another cracker.

Creamy peanut butter is spread on Ritz cracker for cookies.

Peanut Butter Ritz Cookies before being covered in chocolate.

Make The Dipping Chocolate

Melt 1½ cups semi-sweet chocolate chips with 1 HEAPING Tablespoon vegetable shortening in a microwave-safe bowl the microwave. Heat on High for 30 seconds. Remove the bowl and stir the chocolate. It will not be completely melted at this point.

Place the bowl back in microwave oven and heat an additional 30 seconds on High. Remove the bowl and stir the mixture again, until completely smooth.

Chocolate chips are melted with shortening to cover the peanut butter ritz cookies.

Time To Dip Some Chocolate Covered Peanut Butter Ritz Cookies!

Dip cookies, one at a time into melted chocolate mixture. I use a fork to hold the cookie, and sometimes use a spoon to help coat the entire cookie with chocolate. Let any excess chocolate drip back into bowl. Place the cookie back onto a piece of parchment paper.

Do not move the chocolate covered peanut butter Ritz cookies once you set them down.  Repeat process with all of the cookies. Once the chocolate has firmed up, they are ready to eat, unless you want to decorate them.

Each of the peanut butter ritz cookies are covered with melted chocolate

Decorating The Cookies More?

If you want to decorate the cookies, let the cookies sit, undisturbed, until the chocolate has firmed up completely.  To make an icing to decorate with, place powdered sugar in a small bowl.  Add only a couple drops of water at a time to the sugar, stirring well, until the glaze has reached a drizzling consistency.

Too thin? Add additional powder sugar. Too thick?  Add a drop or two of water.  Use a fork to drizzle the icing over each cookie.  Garnish with colored sprinkles, if desired, while glaze is still wet.

NOTE: You do not have to drizzle powdered sugar glaze on them. You can shorten the process even further by garnishing the fresh dipped chocolate cookies with candy colored sprinkles and leave off the white icing altogether if you want!

Chocolate Covered Peanut Butter Ritz Cookies are drizzled with a powdered sugar glaze.

Ready To Serve!

Let the icing completely firm up at room temperature.  Once chocolate and icing are totally firm, cookies can be transferred to a serving plate for everyone to enjoy!

Chocolate Covered Peanut Butter Ritz Cookies on a Christmas plate.

These delicious cookies can be decorated any way you wish. When I make these and it’s NOT Christmas time, I simply leave them plain, with only the chocolate covering them, and no powdered sugar drizzle. They taste good whether you fancy them up or not!

Chocolate Covered Peanut Butter Ritz Cookies can be decorated in various ways.

The flavor is wonderful in these treats, with the creamy peanut butter AND the chocolate coating going so well together. They remain crunchy from the cracker “shell”. The chocolate peanut butter Ritz cookies are so good it will be hard to stay out of them. Just remember to leave at least ONE left for good ol’ Santa Claus!

One of the Chocolate Covered Peanut Butter Ritz Cookies cut in half, on a Christmas plate.

I love to make these family favorites at Christmas time. They are made quickly without a lot of ingredients (a big plus), look good and taste even better! I hope you will consider making these chocolate covered peanut butter Ritz cookies a part of your holiday traditions, too!

Looking For More COOKIE Recipes?

You can find ALL of my recipes in the Recipe Index, located at the top of the page. I have lots of yummy cookie recipes, including:

Interested In More Recipes?

Thank you for visiting this website. I appreciate you using some of your valuable time to do soIf you’re interested, I publish a newsletter 2 times per month (1st and 15th) with all the latest recipes, and other fun info. I would be honored to have you join our growing list of subscribers, so you never miss a great recipe! 

There is a Newsletter subscription box on the top right side (or bottom) of each blog post, depending on the device you use, where you can easily submit your e-mail address (only) to be included in my mailing list.

You Can Also Find Me On Social Media:

Facebook page: The Grateful Girl Cooks!
Pinterest:
The Grateful Girl Cooks!
Instagram:
jbatthegratefulgirlcooks

Author's signature

Recipe Source: My Mom and Aunt Theda

0 from 0 votes
Chocolate Covered Peanut Butter Ritz Cookies
Prep Time
15 mins
Cook Time
0 mins
Total Time
15 mins
 
Crunchy, creamy, chocolate covered peanut butter ritz cookies are quick, delicious, and totally EASY holiday treats to make, using only a few ingredients!
Category: Cookies
Cuisine: American
Keyword: peanut butter ritz cookies
Servings: 12 cookies
Calories Per Serving: 255 kcal
Author: JB @ The Grateful Girl Cooks!
Ingredients
For Cookies:
  • 24 buttery crackers (I used Ritz® crackers)
  • 12 teaspoons creamy peanut butter
For Chocolate Coating:
  • cups semi-sweet chocolate chips
  • 1 Tablespoon vegetable shortening , use heaping Tablespoon!
For White Drizzle:
  • 1 cup powdered sugar
  • Water ( a couple drops at a time)
Instructions
  1. Place 12 crackers onto a piece of parchment paper. Carefully spread a teaspoon of creamy peanut butter onto each one . When done, top with another cracker.
  2. Melt semi-sweet chocolate chips and vegetable shortening in the microwave. Heat on High for 30 seconds. Remove bowl and stir chocolate. Place bowl back in microwave oven and heat an additional 30 seconds on High. Remove bowl and stir mixture until smooth.
  3. Dip cookies, one at a time into melted chocolate mixture. Use a fork to hold the cookie, and a spoon to help coat entire cookie with chocolate. Let excess chocolate drip back into bowl, then set cookie onto parchment paper. Do not move cookie once you set it down. Repeat process with all cookies. Let the cookies sit, undisturbed, until chocolate has firmed up completely.
  4. Place powdered sugar in a small bowl. Add only a couple drops of water at a time to the sugar, stirring well, until the glaze has reached a drizzling consistency. Use a fork to drizzle the icing over each cookie. Garnish with colored sprinkles, if desired, while glaze is still wet.
  5. Let the icing completely firm up at room temperature. Once chocolate and icing are firm, cookies can be transferred to serving plate. Enjoy!
Nutrition Facts
Chocolate Covered Peanut Butter Ritz Cookies
Amount Per Serving (1 cookie)
Calories 255 Calories from Fat 135
% Daily Value*
Fat 15g23%
Saturated Fat 6g38%
Cholesterol 1mg0%
Sodium 92mg4%
Potassium 186mg5%
Carbohydrates 27g9%
Fiber 2g8%
Sugar 19g21%
Protein 3g6%
Vitamin A 10IU0%
Calcium 27mg3%
Iron 1.8mg10%
* Percent Daily Values are based on a 2000 calorie diet.

Here’s one more to pin to your Pinterest boards!Crunchy, creamy, chocolate covered peanut butter ritz cookies are quick, delicious, and totally EASY holiday treats to make, using only a few ingredients!

Chocolate Dipped Shortbread Cookies

Cute, buttery, chocolate dipped shortbread cookies are a cinch to make in 10 minutes, using store-bought cookies. They’re a real time saver during the holidays!Cute, buttery, chocolate dipped shortbread cookies are a cinch to make in 10 minutes, using store-bought cookies. They're a real time saver during the holidays!

If you’re looking for a quick and easy last minute Christmas treat (a shortcut) to take to a holiday party or give to friends, how about Chocolate Dipped Shortbread Cookies? They LOOK great, taste wonderful, and only take about 10 minutes to make!

Scroll Down For A Printable Recipe Card At The Bottom Of The Page

Easy To Make, Using Store Bought Shortbread Cookies!

These festive looking goodies are so easy because… wait for it… YOU USE STORE-BOUGHT SHORTBREAD COOKIES! That’s a major time-saver right there, folks!

I don’t know about you, but the Christmas season seems to get quite busy, whether I want it to or not.  Why not take some of the holiday “stress” out of the day, and make these delicious decorated cookies in no time at all?

All you will need are some store-bought shortbread cookies (any shape or size), some milk chocolate or semi-sweet chocolate chips, a bit of vegetable shortening, and Christmas sprinkles to fancy the treats up a bit! I used an assortment of Walker’s Shortbread that my hubby bought in a huge tin at Costco (but Lorna Doone’s are wonderful, as well)! 

Ingredients necessary for chocolate dipped shortbread cookies.

The good part about using store-bought shortbread is that you can “make” as many cookies you want!

How To Make Chocolate Dipped Shortbread Cookies

Spread a sheet of parchment paper on work surface. Melt chocolate chips and shortening in heat-proof bowl in microwave. 30 Seconds on High. Remove. Stir. 30 seconds on High. Remove. Stir. The chocolate should have melted.

If not, place back in for 15 seconds, being careful not to burn it.  Dip one end of the cookie into the melted chocolate mixture, making sure to cover all sides. (I use a spoon to help coat it with chocolate).

Dipping part of the shortbread cookie into chocolate.

As soon as the shortbread is covered to your liking, place it onto parchment paper. Once you set it down, don’t move it or the chocolate will smear.

Immediately garnish with colored sprinkles (sprinkle them on using your fingers) while chocolate is still wet. Do NOT dip the wet cookie into the sprinkles or it will be a BIG mess. Trust me!

Chocolate Dipped Shortbread Cookies resting on parchment paper.

Repeat process until all cookies are decorated.  Let the cookies rest on the parchment paper without moving them until the chocolate has hardened.

Chocolate Dipped Shortbread Cookies are on parchment paper, until chocolate firms up.

Ready To EAT!

Once the chocolate is firm, transfer cookies to a serving plate, and serve.  See how cute they are?  I used an assortment of triangular, rectangular and circular shaped cookies!

Chocolate Dipped Shortbread Cookies on a white serving plate, ready to eat!

The chocolate dipped shortbread cookies would be a perfect hostess gift for a special friend, or served on a pretty Christmas platter at a dessert buffet or Christmas party!

They look fancy, but no one needs to know how easy they were to make!  I mean, really… who wouldn’t like a sweet, buttery shortbread cookie dipped in chocolate, topped with “Christmasy” looking sprinkles?

Chocolate Dipped Shortbread Cookies, covered with colored sprinkles, on a white plate.

Our home is in the middle of a total kitchen remodel this Christmas season, so we have nothing in the kitchen at the moment except walls, floor and ceiling. I made the chocolate dipped shortbread cookies (pictured above) in October before construction began. They were wrapped and frozen, so I would still be able to give my neighbors plates of yummy goodies at Christmas, as is my tradition!

There may not be a kitchen available to me this year, but I can still give gifts of food! I might have even saved a few chocolate dipped shortbread cookies for my husband and I as well! Yum! Hope you’ll enjoy making and eating these Christmas cookies!

Looking For Other Recipes For Christmas Goodies?

All of my recipes can be found in the Recipe Index at the top of the page. You might even like my post featuring quite a few recipes in a Holiday Goodies Collection! Speaking of Christmas goodies, be sure and check out my recipes for:

Interested In More Recipes?

Thank you for visiting this website. I appreciate you using some of your valuable time to do soIf you’re interested, I publish a newsletter 2 times per month (1st and 15th) with all the latest recipes, and other fun info. I would be honored to have you join our growing list of subscribers, so you never miss a great recipe! 

There is a Newsletter subscription box on the top right side (or bottom) of each blog post, depending on the device you use, where you can easily submit your e-mail address (only) to be included in my mailing list.

You Can Also Find Me On Social Media:

Facebook page: The Grateful Girl Cooks!
Pinterest:
The Grateful Girl Cooks!
Instagram:
jbatthegratefulgirlcooks

Author's signature

0 from 0 votes
Chocolate Dipped Shortbread Cookies
Prep Time
10 mins
Cook Time
0 mins
Total Time
10 mins
 
Cute, buttery, chocolate dipped shortbread cookies are a cinch to make in 10 minutes, using store-bought cookies. They're a real time saver during the holidays!
Category: Cookies, Dessert
Cuisine: American
Keyword: chocolate dipped shortbread cookies
Servings: 2 dozen
Calories Per Serving: 290 kcal
Author: JB @ The Grateful Girl Cooks!
Ingredients
  • 2 dozen store-bought shortbread cookies (any shape or size)
  • 2 cups milk chocolate or semi-sweet chocolate chips
  • 1 HEAPING Tablespoon vegetable shortening
  • Christmas colored sprinkles
Instructions
  1. Cover work surface with a sheet of parchment paper.
  2. In a microwave-safe bowl, place chocolate chips and shortening. Heat on high in microwave for 30 seconds. Remove bowl from microwave. Stir well. Place bowl back in microwave and microwave on high for an additional 30 seconds. Remove bowl from microwave. Stir well, until mixture is smooth. If necessary, place back in microwave for 15 seconds, then stir.
  3. Dip the end or part of the cookie in melted chocolate, being sure to coat all sides. Let excess drip back into bowl, then place cookie onto parchment paper and do not move it. Garnish cookie immediately with colored sprinkles while chocolate is still wet.
  4. Repeat process with all cookies. If necessary, make another 1/2 batch of melted chocolate to finish cookies or coat additional cookies. Let cookies rest on parchment paper for at least an hour or until chocolate has hardened. Transfer to serving platter, and enjoy!
Recipe Notes

Caloric calculation is based on using Walkers Shortbread. Caloric count will vary, based on the type of shortbread cookie used.

Nutrition Facts
Chocolate Dipped Shortbread Cookies
Amount Per Serving (1 cookie)
Calories 290
* Percent Daily Values are based on a 2000 calorie diet.

Here’s one more to pin on your Pinterest boards!Cute, buttery, chocolate dipped shortbread cookies are a cinch to make in 10 minutes, using store-bought cookies. They're a real time saver during the holidays!

Irish Chocolate Pots de Crème

Easy, decadent, Irish chocolate pots de créme dessert, with Irish cream liqueur, is made in under 10 minutes in a blender! It’s a PERFECT recipe for St. Patrick’s Day!Easy, decadent, Irish chocolate pots de créme dessert, with Irish cream liqueur, is made in under 10 minutes in a blender! Perfect for St. Patrick's Day!
Decadent, rich, simple to prepare (in under 10 minutes!) and extremely delicious. Those are the first words that come to mind when describing these Irish Chocolate Pots de Crème!

“Pots de Crème” is actually a French dessert “custard” that dates back to the 17th century. It’s name literally means “pots of cream”.

I made this amazing dessert a couple weeks ago for a family get together, and oh my goodness! Soooo good!  Let me tell you, pots de crème are much thicker than pudding or mousse and  extremely rich.

I told our guests they were so rich it would put hair on their chests!. It may be rich, but oh boy, it is DELICIOUS! Here’s how to make it:

Scroll Down For A Printable Recipe Card At the Bottom Of The Page

How I Got This Recipe

The preparation takes less than 10 minutes, which is an added benefit!  I’d been drooling over the recipe posted on a website called “The Café Sucre Farine”, so I gave in and decided to make it!  If you’ve never checked out this website, I would encourage you to do so.

Chris shares phenomenal recipes, and her husband Scott shares in the fun with his amazing photography work. It’s a wonderful, creative website for food lovers.

Making Irish Chocolate Pots de Crème Is Incredibly EASY!

Anyways… the method to making these is to simply use a blender. Yep… that’s right! Ingredients are blended together, then poured into small dessert cups (the dessert is very rich, so small servings are the best!).

I also made a Bailey’s Irish Cream syrup which was drizzled onto the tops of the finished Pots de Créme, then they were garnished with whipped cream, a sprig of fresh mint (and dessert cookies!).  Easy and delicious… you’re gonna LOVE this dessert!  Here’s how to make it:

How To Make This Decadent Dessert

Before you begin, make sure you have your dessert dishes ready to go. Place them on a baking sheet. The dessert bowls I used (Libby Tasting Bowls) hold 4.25 ounces (just over 1/2 cup), so I ended up with 6 portions (I set out 8 cups but only needed 6).

The total amount of servings will depend on the size dish you use. The recipe, as written, will yield 8 (1/3 cup) servings.

Small serving dishes are used for Irish Chocolate Pots de Crème.

Place chocolate chips, sugar, Bailey’s Irish Cream Liqueur, an egg, and sea salt into a blender.  The ingredients are pulsed several times, just to mix them up a bit! NOTE: they will not be fully blended at this point.

Ingredients for the pots de crème are placed into a blender and pulsed.

Irish Chocolate Pots de Crème ingredients are chopped up in a blender.

Take out the center cap from the blender lid and place a funnel directly into the opening. Place the lid (with the funnel in it) back onto the blender (NOTE: I took it off to take the photo).

A funnel is placed into the top of a blender lid, in order to add hot whipping cream.

Heat The Whipping Cream In A Microwave

Pour the whipping cream into a large microwave safe bowl.  TIP: Make sure to use a large bowl, because the cream will be microwaved, and will rise up as it heats

I used a glass bowl so I could see to make sure the whipping cream didn’t bubble up and over the top of the bowl, as it cooked. Heat the whipping cream in the microwave on high power for 2 to 2½ minutes, until the cream is really bubbling. 

You can see from the photo below how high the cream rose in the bowl, and what the bubbling cream looked like when I took it out of microwave.

Whipping cream is microwaved before adding to Irish Chocolate Pots de Crème in blender.

Turn blender on LOW and blend ingredients already in there for 15 seconds. SLOWLY pour the hot whipping cream through the funnel into the chocolate mixture while mixing on low.

Once you’ve added all the cream, put your hand over the top of the funnel (to cover), and turn the speed of the blender to HIGH. Let the Irish pots de crème mixture blend on HIGH speed for one minute.

When done, carefully pour the chocolate into the serving bowls. Refrigerate for at least 2 hours before serving.

The Irish Chocolate Pots de Crème is poured into serving dishes.

Irish Chocolate Pots de Crème are refrigerated for several hours before serving.

Once fully chilled, the Chocolate Pots de  Crème are PERFECT to serve just as they are, BUT… if you want to kick it up a notch, read on! Make some Bailey’s Irish Cream Syrup to garnish the finished dessert!

The syrup can easily be made while the pots de crème are chilling.  It’s VERY SIMPLE to prepare, and adds an extra pop of flavor to the finished dessert.

Make Irish Cream Syrup For The Pots de Crème

Pour Irish Cream liqueur into a little saucepan and bring to a boil, on medium heat.  Boil the liqueur, stirring constantly for 2-3 minutes, until it has reduced in volume and turned syrupy.

Remove the syrup from the heat and let it cool. As the Irish cream syrup cools down, it will thicken a little bit more. Let the syrup cool to room temperature before serving.

Irish cream syrup is cooked to drizzle onto finished dessert.

I also decided to add some more calories fancy cookies to garnish the finished Irish Chocolate Pots de Crème, so I found these at our local grocery store… perfect!

Cookies are used to garnish the finished Irish Chocolate Pots de Crème.

To Serve Irish Chocolate Pots de Crème

When ready to serve, garnish each serving with whipped cream and a sprig of fresh mint, then drizzle a tiny bit of the Bailey’s syrup over the top!

Finish this decadent dessert off by Inserting a couple fancy cookies into the chocolate!  You can see in the picture below the drizzle of Bailey’s syrup on top of the chocolate.

Irish Chocolate Pots de Crème, garnished with cookies, whipped cream, mint, and Irish cream syrup.

That, my friends, is how you make this incredible dessert, with very little effort or time involved, but with amazing results!  I made the Irish Chocolate Pots de Crème in the morning, then simply added the garnishes when ready to serve later that evening! Easy!

Garnished Irish Chocolate Pots de Crème are ready to serve and eat!

NOTE: If you want to make this easy dessert without the alcohol, be sure to check out the recipe for chocolate pots de crème (a version made without any alcohol). Just as decadent and delicious!

Sure hope you will consider making this wonderful, decadent chocolate dessert.  I will definitely be making Irish Chocolate Pots de Crème again! 

Have a wonderful day, and remember to show love, respect and kindness to all you meet today. They may need your kindness more than you will ever know! God Bless You.

Looking For More CHOCOLATE DESSERT Recipes?

You can find all my recipes in the Recipe Index, located at the top of the page. I have some yummy chocolate dessert recipes you will love, including:

Want More Recipes? Get My FREE Newsletter!

I publish a newsletter 2 times per month (1st and 15th) with lots of recipes, tips, etc..
Would you like to join our growing list of subscribers?

There is a Newsletter subscription box on the top right (or bottom) of each blog post, depending on the device you use.
You can submit your e-mail address there, to be added to my mailing list.

Find Me On Social Media:

Facebook page: The Grateful Girl Cooks!
Pinterest:
The Grateful Girl Cooks!
Instagram:
jbatthegratefulgirlcooks

Author's signature

Recipe Source:  https://thecafesucrefarine.com/2015/03/five-minute-irish-chocolate-pots-de-creme

↓↓ PRINTABLE RECIPE BELOW ↓↓

4 from 1 vote
Irish Chocolate Pots de Crème
Prep Time
10 mins
Cook Time
0 mins
Refrigeration
2 hrs
Total Time
10 mins
 

Easy, decadent, Irish chocolate pots de créme dessert, with Irish cream liqueur, is made in under 10 minutes in a blender! Perfect for St. Patrick's Day!

Category: Dessert
Cuisine: Irish
Keyword: Irish chocolate pots de creme
Servings: 8 servings (1/3 cup per)
Calories Per Serving: 351 kcal
Author: JB @ The Grateful Girl Cooks!
Ingredients
For Pots de Crème:
  • 10 ounces semi-sweet chocolate chips (good quality)
  • 3 Tablespoons granulated sugar
  • 3 Tablespoons Bailey's Irish Cream Liqueur
  • 1 large egg
  • pinch of kosher or sea salt
  • 1 cup heavy cream (can substitute Half n' Half)
For Bailey's Irish Cream Syrup (Optional-not included in caloric calculation) :
  • 6 Tablespoons Bailey's Irish Cream liqueur
For Garnish (Optional-not included in caloric calculation):
  • Whipped Cream
  • Fresh mint sprigs
  • Cookies (optional)
  • Bailey's syrup
Instructions
  1. Put small serving dishes onto a baking sheet before beginning.
  2. Put the chocolate chips, sugar, Bailey's Irish Cream, egg, and sea salt into a blender. Pulse the ingredients several times, just to mix them up a bit (they won't be fully blended). Take out the center cap from blender lid and place a funnel directly into the opening.
  3. Pour the whipping cream into a large microwave safe bowl. Use a large bowl, because the cream will be microwaved, and will rise up as it heats. (I used a glass bowl so I could see to make sure the whipping cream didn't bubble up and over the top of the bowl). Heat whipping cream in microwave on high power for 2 to 2½ minutes, until the cream is REALLY bubbling.
  4. Turn blender on LOW and blend ingredients for 15 seconds. SLOWLY pour the hot whipping cream through the funnel into the chocolate mixture while blending on LOW (the very hot cream will help cook the raw egg). Once you've added all the cream, put your hand over the top of the funnel (to cover), and turn speed up to HIGH. Let the mixture blend on high for one minute. When done, carefully pour the chocolate into the serving bowls. Refrigerate for at least 2 hours before serving.
To Make The Bailey's syrup (optional):
  1. If you want Bailey's Irish Cream Syrup to garnish the finished dessert, it can be made while the desserts are chilling. Irish Cream liqueur is poured into a little saucepan, then brought up to a boil on medium heat. The liqueur is boiled for 2-3 minutes until it has reduced in volume and turned syrupy. Remove from heat and let cool. As the syrup cools, it will thicken a little bit more. Let syrup cool to room temperature before serving.
To serve:
  1. Garnish each of the chilled pots de crème with whipped cream, and a sprig of fresh mint, then drizzle a little bit of the Bailey's syrup over the top. Add a couple fancy cookies to the chocolate, if desired! Serve, and enjoy!
Nutrition Facts
Irish Chocolate Pots de Crème
Amount Per Serving (1 serving (w/out syrup, cookies or whipping cream))
Calories 351 Calories from Fat 225
% Daily Value*
Fat 25g38%
Saturated Fat 15g94%
Cholesterol 63mg21%
Sodium 22mg1%
Potassium 230mg7%
Carbohydrates 25g8%
Fiber 2g8%
Sugar 18g20%
Protein 3g6%
Vitamin A 485IU10%
Vitamin C 0.2mg0%
Calcium 44mg4%
Iron 2.3mg13%
* Percent Daily Values are based on a 2000 calorie diet.

Here’s one more to pin on your Pinterest boards!Easy, decadent, Irish chocolate pots de créme dessert, with Irish cream liqueur, is made in under 10 minutes in a blender! Perfect for St. Patrick's Day!

Save

Save

Save

Save

Save

Save

Save

Save

Save

Save

Save

Save

Save

Save

Save

Save

Save

Save

Save

Save

Save

Save

Save

Pumpkin Chocolate Chip Pancakes

Need a taste of Fall for breakfast? Try these delicious, fluffy, pumpkin chocolate chip pancakes, with chocolate chips, pumpkin puree, cinnamon and allspice!Need a taste of Fall for breakfast? Try these delicious, fluffy, pumpkin chocolate chip pancakes, with chocolate chips, pumpkin puree, cinnamon and allspice!
As a kid, one of my favorite occasional “treats” was when my Mom would make our family chocolate chip pancakes. We ALL loved them!  I’ve made them for my family for many years, but when I stumbled upon this recipe for PUMPKIN Chocolate Chip Pancakes, I knew I had to make these…stat!

Scroll Down For A Printable Recipe Card At The Bottom Of The Page

This past week I made Pumpkin Spice Latte Biscotti, and had some leftover pumpkin puree in the fridge… (conveniently the exact amount I needed for this recipe). So, into the kitchen I went to make this breakfast! The recipe was very simple to prepare (only took 5 minutes to prep), and the “from scratch” pancakes are delicious!

The taste of pumpkin, cinnamon, allspice, and chocolate chips are amazing in these pancakes! Yes, they are a bit sweet, but I figured since we only have pancakes occasionally, it wouldn’t be TOO bad. Here’s how you whip up a batch of these delicious pumpkin chocolate chip pancakes:

Pumpkins are a sign of Fall and that means it is time for pumpkin pancakes!

How To Make Pumpkin Chocolate Chip Pancakes

In a large bowl, stir together flour, baking powder, baking soda, cinnamon, allspice and semi-sweet chocolate chips. (Bet you didn’t even break into a sweat…)

Adding ingredients to make pumpkin pancake batter.

In a separate bowl, stir the brown sugar, egg, vanilla, pumpkin puree, and oil together until fully combined.

Pumpkin puree, eggs, etc. are mixed to add to pancake batter.

Stir in the buttermilk and blend well.

Buttermilk is added to pumpkin chocolate chip pancakes batter

Add the wet ingredients to the dry ingredients and stir well, until mixture is fully blended. Do not overstir.

Wet ingredients added to dry ingredients to make pancake batter.

Time To Cook The Pancakes!

Pour pancake batter onto a pre-heated griddle (350 degrees) or large skillet (heated on medium-high) that has been sprayed with a non-stick spray or a little oil. Cook pancakes about 3 minutes or until little air bubbles form on top of the batter.

Pumpkin chocolate chip pancakes cooking on a griddle.

Carefully flip the pancakes over and continue cooking other side for 2-3 minutes.

Pumpkin chocolate chip pancakes are flipped when they get brown.

Time To EAT!

When done, serve immediately with some butter and maple syrup, and ENJOY!

Pumpkin chocolate chip pancakes served with butter and maple syrup.

Pumpkin chocolate chip pancakes on plate with fork.

I saved you a bite, but only ONE. You’re welcome!  Here you go, and isn’t that delicious? Hey, if you enjoy pancakes for breakfast, chances are you will also enjoy Homemade Blueberry Pancakes,  Banana Nut Waffles, or Waffles with Homemade Peach Topping!

Cutting into the pumpkin chocolate chip pancakes with a fork.

Hope you will these scrumptious pumpkin chocolate chip pancakes a try. I think you will really enjoy them. (I made half a recipe and it made 5 good sized pancakes). The full recipe (shown below in printable form) yields approximately 10-12 pancakes.

Have a great day, friends. Make every moment count for good! Be sure to check out ALL my recipes in the Recipe Index, located at the top of the page. There’s a LOT of them!

Interested In More Recipes?

Thank you for visiting this website. I appreciate you using some of your valuable time to do soIf you’re interested, I publish a newsletter 2 times per month (1st and 15th) with all the latest recipes, and other fun info. I would be honored to have you join our growing list of subscribers, so you never miss a great recipe!
There is a Newsletter subscription box on the top right side (or bottom) of each blog post, depending on the device you use, where you can easily submit your e-mail address (only) to be included in my mailing list.

You Can Also Find Me On Social Media:

Facebook page: The Grateful Girl Cooks!
Pinterest:
The Grateful Girl Cooks!
Instagram:
jbatthegratefulgirlcooks

Author's signature

Recipe Source: Erin, at http://dinnersdishesanddesserts.com/pumpkin-chocolate-chip-pancakes/

0 from 0 votes
Pumpkin Chocolate Chip Pancakes
Prep Time
5 mins
Cook Time
10 mins
Total Time
15 mins
 
Need a taste of Fall for breakfast? Try these delicious, fluffy, pumpkin chocolate chip pancakes, with chocolate chips, pumpkin puree, cinnamon and allspice!
Category: Breakfast
Cuisine: American
Keyword: pumpkin chocolate chip pancakes
Servings: 12 pancakes
Calories Per Serving: 243 kcal
Author: JB @ The Grateful Girl Cooks!
Ingredients
  • 2 cups all purpose flour
  • 2 teaspoons baking powder
  • 1 teaspoon baking soda
  • 2 teaspoon cinnamon
  • 1/2 teaspoon allspice
  • 1 cup semi-sweet chocolate chips
  • 1/4 cup brown sugar
  • 1 egg
  • 1 teaspoon vanilla extract
  • 1 cup pumpkin puree (not pumpkin pie mix)
  • 3 Tablespoons vegetable or canola oil
  • 1 1/2 cups buttermilk (*see notes)
  • non-stick spray or a bit of oil (used to grease griddle or skillet)
Instructions
  1. In a large bowl, whisk together the all purpose flour, baking powder, baking soda, cinnamon, allspice and the chocolate chips. Set aside.
  2. In another bowl, blend together the brown sugar, egg, vanilla extract, pumpkin puree and oil. Mix well, then add in the buttermilk, stirring well.
  3. Add the wet ingredients to the dry ingredients. Stir until combined, but do not over stir.
  4. Spray a griddle or large skillet with non-stick spray or lightly grease with oil.
  5. Preheat grill to 350 degrees or heat skillet on medium-high. When hot, pour batter for pancakes onto griddle. Cook for about 3 minutes, or until tiny air bubbles begin to form on top of each pancake. Carefully flip the pancakes over, and continue cooking for another 2-3 minutes.
  6. Serve pancakes hot, and top with a dollop of butter and some maple syrup. Enjoy!
Recipe Notes

If you do not have buttermilk, you can easily make your own (I did this for the pancakes): Place 1 1/2 Tablespoons white vinegar in a large measuring cup. Add milk up to the 1 1/2 cup level. Stir. Let it sit for 5 minutes, then use it in the recipe as indicated. It is a perfect substitution!!!

Nutrition Facts
Pumpkin Chocolate Chip Pancakes
Amount Per Serving (1 pancake)
Calories 243 Calories from Fat 90
% Daily Value*
Fat 10g15%
Saturated Fat 6g38%
Cholesterol 17mg6%
Sodium 132mg6%
Potassium 268mg8%
Carbohydrates 32g11%
Fiber 2g8%
Sugar 12g13%
Protein 4g8%
Vitamin A 3255IU65%
Vitamin C 0.8mg1%
Calcium 90mg9%
Iron 2.4mg13%
* Percent Daily Values are based on a 2000 calorie diet.

Here’s one more to pin on your Pinterest boards!Need a taste of Fall for breakfast? Try these delicious, fluffy, pumpkin chocolate chip pancakes, with chocolate chips, pumpkin puree, cinnamon and allspice!


Save

Save

Pumpkin Spice Latte Biscotti

If you enjoy Fall & pumpkin spiced “everything”, you’ll love pumpkin spice latte biscotti, a yummy, crispy & dunkable cookie with lots of flavor!I have several friends who "do the happy dance" each Fall, when their local coffee stand begins offering their seasonal Pumpkin Spice Lattes. Cracks me up to see how fast the "news" spreads via Social Media. Well... if you like Pumpkin Spice Lattes, then I would be willing to bet you will love these Pumpkin Spice Latte Biscotti!

I have several friends who “do the happy dance” each Fall, when their local coffee stand begins offering their seasonal Pumpkin Spice Lattes. Cracks me up to see how fast the “news” spreads via Social Media. Well… if you like Pumpkin Spice Lattes, then I’m willing to bet you will love these Pumpkin Spice Latte Biscotti!

I saw this recipe pop up on Pinterest and thought I would give it a try. I’ve made biscotti before (here’s my recipe for Orange Almond Biscotti -yum!), so I knew I would enjoy the flavor combination of these biscotti.

How can you go wrong with a yummy coffee drink in COOKIE FORM? It’s practically impossible! Here’s how easy these pumpkin spice latte biscotti are to make:

Scroll Down For A Printable Recipe Card At The Bottom Of The Page

Prepare Batter For The Pumpkin Spice Latte Biscotti

In a medium sized bowl, whisk together flour, baking powder, salt and spices, then set aside. See the ground coffee in the middle of the pile? Yes!

Dry ingredients for biscotti are mixed together in large bowl.

Using a hand mixer or a stand mixer, cream the butter and sugar together until creamy, and then add in eggs, and beat well.

A stand mixer is used to blend butter, sugar and eggs to make biscotti batter.

Add the pumpkin puree and vanilla extract to the batter, and beat these, until incorporated.

Pumpkin puree and vanilla extract are added to the biscotti batter, to combine.

Now add the dry ingredients to the wet ingredients, a little at a time, beating well until ingredients are fully combined.

Dry ingredients are now added to the wet ingredients to make the pumpkin spice latte biscotti batter.

Prepare The Pumpkin Spice Latte Biscotti Batter For Baking

The batter for the pumpkin spice latte biscotti will look like this when done… see the little coffee granules? Ooh…

Flecks of instant coffee are visible in the biscotti batter.

Spoon the soft dough onto a parchment paper lined baking sheet. Make two separate mounds (about 3 inches wide by 12 inches long) of dough several inches away from each other. Don’t forget to do this, because the dough will spread while baking.

Two log shapes are formed by spreading out the pumpkin spice latte biscotti batter on parchment paper.

Shape The Biscotti Logs

Using moistened hands, shape the dough into 3 inch wide by 12 inch long logs, remembering to leave several inches space between logs, cause they will spread when baking.

Batter is shaped into 2 log shapes before baking for the first time.

Bake The Biscotti

Bake the biscotti logs in a preheated 300 degree oven for 35-40 minutes, until firm (mine took 40 minutes). Please see my note on oven temp. in the NOTES section of the printable recipe! When done, remove the pan from the oven, and let the biscotti rest for a full 10 minutes.

After baking, the biscotti dough has spread considerably, and cools on parchment paper.

After 10 minutes, remove the biscotti logs to a cutting board, and remove the parchment paper. Carefully slice each log into 12 (one inch) slices along the short side, using a serrated knife to cut.

Each of the biscotti logs are sliced into 12 portions before they are baked again.

Time To Bake The Pumpkin Spice Latte Biscotti AGAIN

Once cut, carefully move the slices one at a time (I used the blade of the knife) back to a baking sheet (no parchment paper needed this time), making sure to place the cut side down. 

After 15 minutes, remove the biscotti from the oven, and turn them over. Put them back in the oven and bake an additional 15-20 minutes until golden brown and crispy. I actually let the second cooking go for 20 minutes.

Pumpkin Spice Latte Biscotti slices are baked a second time, cut side down.

When done, remove the biscotti to a wire rack and let the cookies cool down completely.

Baked biscotti slices, cooling on a wire rack.

Make The Chocolate Drizzle

While the biscotti cools, make a chocolate drizzle to decorate them with, once completely cooled. Melt chocolate chips and a little bit of vegetable shortening in the microwave. Microwave 30 seconds on high. Stir. Microwave again for 30 seconds on high. Stir.

Chocolate is melted with shortening, to make a drizzle for topping the biscotti.

Drizzle the tops of the biscotti with the melted chocolate. II use a honey dipper, but you can use a fork, etc.. Let the chocolate harden, then “PAINT” the bottoms of each biscotti with the melted chocolate, using a pastry brush. Let the chocolate firm up fully before serving.

Melted chocolate is drizzled over the tops of the baked biscotti.

The bottom of each piece of biscotti is brushed with melted chocolate.

Ready To Serve And Eat!

Once the chocolate has hardened up on the top and bottom of each cookie, the pumpkin spice latte biscotti are ready to eat… or dunk in a hot cup of coffee!

Pumpkin Spice Latte Biscotti is ready to eat once the chocolate has firmed up.

Hope you enjoy this little taste of FALL with these delicious pumpkin spice latte biscotti!  Be sure to check out ALL of my recipes in the Recipe Index, located at the top of the page. Have a great day, and may God bless the work of your hands!

Interested In More Recipes?

Thank you for visiting this website. I appreciate you using some of your valuable time to do soIf you’re interested, I publish a newsletter 2 times per month (1st and 15th) with all the latest recipes, and other fun info. I would be honored to have you join our growing list of subscribers, so you never miss a great recipe!
There is a Newsletter subscription box on the top right side (or bottom) of each blog post, depending on the device you use, where you can easily submit your e-mail address (only) to be included in my mailing list.

You Can Also Find Me On Social Media:
Facebook page: The Grateful Girl Cooks!
Pinterest: The Grateful Girl Cooks!
Instagram: jbatthegratefulgirlcooks

Author's signatureRecipe Source: Jennifer, at http://www.seasonsandsuppers.ca/pumpkin-spice-latte-biscotti

0 from 0 votes
Pumpkin Spice Latte Biscotti
Prep Time
20 mins
Cook Time
1 hr 10 mins
Total Time
1 hr 30 mins
 

If you enjoy Fall & pumpkin spiced "everything", you'll love pumpkin spice latte biscotti, a yummy, crispy & dunkable cookie with lots of flavor!

Category: Breakfast, Cookie
Cuisine: American
Keyword: pumpkin spice latte biscotti
Servings: 24
Calories Per Serving: 185 kcal
Author: JB @ The Grateful Girl Cooks!
Ingredients
For the biscotti:
  • 3 cups all purpose flour
  • 1 1/2 teaspoons baking powder
  • 2 1/2 teaspoons finely ground coffee (grounds)
  • 1/4 teaspoon salt
  • 2 teaspoons cinnamon
  • 1 teaspoon ginger
  • 1/2 teaspoon nutmeg
  • 1/2 cup butter (at room temperature!)
  • 1 cup granulated sugar
  • 3 large eggs
  • 1 teaspoon vanilla extract
  • ½ cup canned pumpkin puree (not pie filling)
For The Chocolate Drizzle:
  • 1 cup semi-sweet chocolate chips
  • 1 1/2 Tablespoons vegetable shortening
Instructions
  1. Preheat your oven to 300 degrees.
  2. In a large bowl, whisk together the flour, baking powder, coffee grounds, and spices until well combined. Set bowl aside.
  3. Place the room temp. butter and sugar in a mixing bowl or the bowl of a stand mixer. Beat with mixer on high until completely smooth. Add the eggs, one at a time. Beat the mixture well after adding each egg. When smooth, add the pumpkin puree and the vanilla extract. Beat this well.
  4. Turn the mixer to low and gradually add the dry ingredients to the wet ingredients (a little at a time), while mixer is running, until completely combined.
  5. Spoon the dough out onto a parchment paper-covered baking sheet. Divide dough evenly into 2 separate log shapes, about 12 inches long by 3 inches wide (approx.). Wet your hands and shape the dough into a smooth log (12 x 3). REMEMBER TO KEEP LOGS SEVERAL INCHES APART AS THEY WILL SPREAD WHILE BAKING!
  6. Bake the dough at 300 degrees for 35-40 minutes or until firm. When done, remove pan from oven and let dough rest for 10 minutes.
  7. Remove dough logs to a cutting board (remove parchment paper). Carefully slice each log into 12 one inch slices, using a serrated knife. Place biscotti slices, CUT SIDE DOWN onto baking sheet. Bake for 15 minutes; remove pan from oven. Turn the biscotti slices over, return pan to oven, and cook an additional 15-20 minutes. When done, remove from oven. Carefully place biscotti on wire racks to completely cool.
To make chocolate drizzle:
  1. Place chocolate chips and vegetable shortening in microwave safe bowl. Microwave on HIGH for 30 seconds. Stir. Microwave again for 30 seconds. Remove from microwave and stir well, until smooth. Drizzle over each biscotti. Let chocolate harden. Use a pastry brush to brush chocolate on the bottom of each biscotti. Let chocolate fully harden, then they are ready to eat!
Recipe Notes

*FYI- I noticed that these biscotti were not as crunchy the day after I made them. After looking at my other recipes for biscotti, I'm convinced the lower oven temp. for this particular recipe played a part. Next time, I will bake these at 350 degrees, then place the cut slices standing upright on sheet (as opposed to flipping to both sides), and bake for approx. 20-25 min. until firm and set... cause we want crunchy biscotti, right?

Nutrition Facts
Pumpkin Spice Latte Biscotti
Amount Per Serving (1 g)
Calories 185 Calories from Fat 72
% Daily Value*
Fat 8g12%
Saturated Fat 4g25%
Trans Fat 1g
Polyunsaturated Fat 1g
Monounsaturated Fat 2g
Cholesterol 31mg10%
Sodium 68mg3%
Potassium 105mg3%
Carbohydrates 25g8%
Fiber 1g4%
Sugar 11g12%
Protein 3g6%
Vitamin A 947IU19%
Vitamin C 1mg1%
Calcium 25mg3%
Iron 1mg6%
* Percent Daily Values are based on a 2000 calorie diet.

Here’s one more to pin on your Pinterest boards!If you enjoy Fall & pumpkin spiced "everything", you'll love pumpkin spice latte biscotti, a yummy, crispy & dunkable cookie with lots of flavor!


Save

Save

Maple Bacon Pecan Truffles

Maple Bacon Pecan Truffles are a decadent treat! They’re creamy & maple flavored, w/ nuts & crisp bacon, coated in melted chocolate and butterscotch.Maple Bacon Pecan Truffles are a decadent treat! They're creamy & maple flavored, w/ nuts & crisp bacon, coated in melted chocolate and butterscotch.

This morning I am posting a recipe for Maple Bacon Pecan Truffles that I made for a bacon-themed dinner we enjoyed with dear friends a couple months ago. They’re so good, and decadent!

In Memory Of Our Friend, Richard

This was an extremely hard post to write, because I began to write this post over a week ago, but then tragedy struck. The host for that dinner (my husband’s best friend) passed away very suddenly this past weekend, and we have been in shock ever since, grieving his loss.

He and his wife were two of our very best friends so we grieve for her, as well. Our comfort comes because our dear friend Richard believed in and knew Jesus, so we know this is a “temporary” loss, because we trust in God’s Word that we will see him again in heaven. How we long for that great reunion!

Richard… this one’s in your honor today, as I know you tried these maple bacon pecan truffles the last time we shared a meal together. We loved you… with all our hearts, and miss you terribly already.

Scroll Down For A Printable Recipe Card At The Bottom Of The Page

How To Make Maple Bacon Pecan Truffles

Here’s how to make these really delicious truffles, (which I adapted from my recipe for Maple Cream Bon Bons) for our Bacon Themed dinner. I figured bacon makes everything better, so that was my inspiration. Here’s what I did: First, cook 6-7 slices of bacon until VERY crisp.

Frying the bacon until crisp to add to the truffles.

When bacon is crisp, drain, cool, then crumble or chop it up into very small pieces. Set aside a small amount to be used for garnishing the finished truffles later.

Crisp bacon crumbles will be added to the truffle dough.

Place the butter, powdered sugar and maple flavoring in a large bowl or base of an electric stand mixer.

Butter, powdered sugar and maple extract are beaten together to make dough for truffles.

Using an electric mixer, cream these ingredients until fully combined and creamy.

Creamy batter for the maple bacon pecan truffles is prepared.

Add Pecans And Bacon Crumbles To The Truffle Mixture

Add the chopped pecans and most of the bacon crumbles to the truffle mixture. NOTE: Set some of the bacon crumbles aside for garnishing the truffles later. Mix well until combined. Refrigerate the dough for maple bacon pecan truffles for a while to let it chill and firm up.

Crisp bacon and chopped pecans are added to the truffle dough.

Shape The Maple Bacon Pecan Truffles

Once mixture is chilled, shape the mixture into 1″ balls, by rolling them between your hands. Place dough balls onto a wax paper covered cooking sheet. Once all of the maple bacon pecan truffles have been formed, place them into freezer for 1/2 an hour to firm up again.

Coat The Maple Bacon Pecan Truffles With Chocolate

Remove truffles from freezer and carefully dip each one into the melted chocolate butterscotch coating. Let excess chocolate drip back into the bowl. NOTE: My picture turned out blurry (sorry), but I use a toothpick inserted into truffle to dip into the chocolate, and a spoon to help cover each one.

The maple bacon pecan truffles are dipped in chocolate, to cover.

Dip each truffle completely in chocolate, then place it onto wax paper or aluminum foil. Use another toothpick to help pull the first toothpick out of the truffle. See the little holes on top of the chocolate covered truffles? You will fill those later. Repeat until all the truffles are coated in chocolate.

Some of the truffles have been covered with melted chocolate.

Finish The Truffles

Spoon a little melted chocolate over each of the holes created by the toothpick to cover them up. Then sprinkle a few of the reserved bacon crumbles over the top of each of the maple bacon pecan truffles as a garnish.

Lots of maple bacon pecan truffles, garnished with crisp bacon crumbles.

Refrigerate Finished Truffles To Firm Them Up

Let the finished truffles sit for a while (at least half an hour), to allow the chocolate to firm up, then place them into little candy sized paper wrappers, as shown. Keep truffles in a covered container in the refrigerator until you are ready to serve.

To serve, the maple bacon pecan truffles are placed into paper candy wrappers.

Here’s an inside view of one of the maple bacon pecan truffles. They taste their very best when served chilled!

A look at the inside of one of the truffles.

Hope you enjoy these maple bacon pecan truffles. The maple, pecans, bacon, chocolate and butterscotch flavors make this an INCREDIBLY delicious treat, and they really aren’t too hard to make, either! God Bless You. Have a great day. Hold your family and friends close. Let them KNOW you love and care for them. Life IS short.

Looking For More TRUFFLE or BON BON Recipes?

You can find all of my recipes in the Recipe Index, located at the top of the page. You might also enjoy these yummy treats!

Interested In More Recipes?

Thank you for visiting this website. I appreciate you using some of your valuable time to do soIf you’re interested, I publish a newsletter 2 times per month (1st and 15th) with all the latest recipes, and other fun info. I would be honored to have you join our growing list of subscribers, so you never miss a great recipe!
There is a Newsletter subscription box on the top right side (or bottom) of each blog post, depending on the device you use, where you can easily submit your e-mail address (only) to be included in my mailing list.

You Can Also Find Me On Social Media:

Facebook page: The Grateful Girl Cooks!
Pinterest:
The Grateful Girl Cooks!
Instagram:
jbatthegratefulgirlcooks

Author's signature

0 from 0 votes
Maple Bacon Pecan Truffles
Prep Time
1 hr
Cook Time
0 mins
Total Time
1 hr
 
Maple Bacon Pecan Truffles are a decadent treat! They're creamy & maple flavored, w/ nuts & crisp bacon, coated in melted chocolate and butterscotch.
Category: Dessert
Cuisine: American
Keyword: truffles
Servings: 48
Calories Per Serving: 158 kcal
Author: JB @ The Grateful Girl Cooks!
Ingredients
For Truffles:
  • 1 cup butter (2 cubes)
  • 3 1/2 cups powdered sugar
  • 3 Tablespoons Maple flavoring
  • 1 1/2 cups pecans , chopped (may substitute walnuts)
  • 6-7 slices bacon , cooked crisp, and crumbled (reserve some to garnish finished truffles)
For Truffle Coating:
  • 2 cups semi-sweet chocolate chips
  • 1 cup butterscotch chips
Instructions
  1. Cook bacon slices until very crisp. Drain, then crumble or chop into small pieces once cooled. Set aside.
  2. In a large bowl, use an electric mixer to cream the butter, powdered sugar, and maple flavoring until smooth.
  3. Stir in chopped pecans and most of the bacon crumbles (remember to save some for garnishing the finished truffles!)
  4. Place bowl in refrigerator for half an hour to let it firm up a bit.
  5. When chilled, shape the dough into 1 inch balls, by rolling the dough between your hands (yes, it might be a bit messy...) Place the dough balls onto a wax paper or foil lined baking sheet and place into freezer for about half an hour or so. (You want the dough to be very chilled before dipping in chocolate).
  6. While dough is in freezer, make the chocolate/butterscotch coating. In a microwavable bowl, melt the chocolate and butterscotch chips (30 seconds on HIGH. Stir. 30 seconds on HIGH. Stir again. Watch carefully so that you don't burn the chocolate. At this point the chips should be melted and smooth after stirring the second time; if not, microwave an additional 15 seconds, then stir again.
  7. Dip dough balls into coating mixture one at a time (I insert a toothpick into the dough ball, dip, cover with coating then remove, allowing the excess to drip back into the bowl. You may find it helpful to use a spoon to help coating the truffle. Place each coated truffle onto wax paper or foil-lined baking sheets. Remove the toothpick after each one, and re-use on the next truffle.
  8. When all have been coated, hide the toothpick hole with a small bit of chocolate coating, then sprinkle (while it is still wet) with a few bacon crumbles for garnish.
  9. Let truffles sit until chocolate firms up. Place each truffle in a candy paper wrapper, if desired. Store in a covered container in refrigerator until chocolate has hardened and is ready to serve. These truffles are at their best when completely chilled.
Nutrition Facts
Maple Bacon Pecan Truffles
Amount Per Serving (1 truffle)
Calories 158 Calories from Fat 90
% Daily Value*
Fat 10g15%
Saturated Fat 4g25%
Cholesterol 12mg4%
Sodium 66mg3%
Potassium 61mg2%
Carbohydrates 16g5%
Sugar 14g16%
Protein 1g2%
Vitamin A 125IU3%
Calcium 8mg1%
Iron 0.6mg3%
* Percent Daily Values are based on a 2000 calorie diet.

Here’s one more to pin on your Pinterest boards!Maple Bacon Pecan Truffles are a decadent treat! They're creamy & maple flavored, w/ nuts & crisp bacon, coated in melted chocolate and butterscotch.


Save

Save

Chocolate-Covered Bacon

Chocolate-covered bacon is both sweet and salty, incredibly easy to make, and is a very unique, but DELICIOUS crispy treat you will LOVE!Chocolate-covered bacon is both sweet and salty, incredibly easy to make, and is a very unique, but DELICIOUS crispy treat you will LOVE!!
A couple years ago, my husband tried a piece of Chocolate-Covered Bacon at a little bakery, while out of our area on business. He said it was fantastic (I had my doubts). Now, don’t get me wrong… I love bacon, but chocolate covered bacon seemed a bit wonky to me. That is, UNTIL I MADE MY OWN! Wowzers! It’s fantastic, and EASY to make!

Scroll Down For A Printable Recipe Card At The Bottom Of The Page

My husband and I recently attended a THEMED dinner party with dear friends. The theme this time was BACON. All parts of the meal had to include some form of bacon. Everything. Beverages, appetizers, entrees (3), and desserts. All bacon inspired. Here’s our menu for the bacon-themed dinner:

Menu for bacon-themed dinner

Here’s a collage of some of the bacon dishes we enjoyed… everything from prosciutto risotto to candied bacon ice cream!

Collage of bacon themed dishes from our bacon themed dinner

I was in charge of the desserts, (as I typically am). One of the desserts I made was chocolate covered bacon strips. YUM! Even after being coated in semi-sweet chocolate, the bacon was crispy inside. The chocolate actually is a perfect counter balance to the saltiness of the bacon.  You can also see my Bacon Pecan Pralines, Maple Bacon Pecan Truffles, and Candied Bacon Ice Cream in the collage photo above.

It really was easy to make this chocolate-covered bacon. I didn’t have a “recipe”; I just used the technique I use for dipping truffles in chocolate. My fingers got a bit messy, but that’s no big deal. Here’s what I did.

How To Make Chocolate-Covered Bacon

First I fried the number of bacon strips I wanted. This recipe is for 8, but you can easily alter recipe to accommodate the number of strips you want to make.  I cooked the bacon strips until they were very crispy, then drained them on a paper towel to absorb the grease.

Bacon is fried until crisp.
I let the bacon cool completely. Then I melted semi-sweet chocolate chips with a heaping Tablespoon of vegetable shortening in my microwave. (30 seconds, stir. 30 seconds stir).

Chocolate chips and shortening are melted together to coat baconDipping the Bacon

The next thing I did was carefully (the bacon is crisp, remember?) dip one piece of bacon at a time in the chocolate.  I used a spoon to help cover about 3/4 of the piece on both sides with chocolate, then carefully flipped it over and did the remaining bit on both sides.

I used a spoon to spoon the chocolate into nooks and crannies that needed help to be covered. I let the excess chocolate drip back into the bowl.

Crisp bacon is dipped in melted chocolate until fully covered.
After each piece was completely covered in chocolate, it was carefully placed on a piece of aluminum foil to let the chocolate firm up.

Chocolate dipped bacon is left to dry until chocolate firms up
Once the chocolate had firmed up, I melted some white chocolate chips (about 1/2 cup) with a small amount of shortening (1 teaspoon), then decoratively drizzled it over the bacon slices. I even had some green colored chocolate chips from a bag of Christmas colored ones, so I also drizzled that over, for contrast (optional).

Ready For Some Chocolate-Covered Bacon!

At our bacon dinner that evening, one of my friends wondered if I had put mint flavored drizzle (the GREEN chips) on the bacon. No way… just used a different colored semi-sweet chocolate chip!

Chocolate covered bacon is drizzled with white and green chocolate
When I was done being “creative” (ha ha), I let the chocolate-covered bacon slices firm up completely before attempting to remove them from the aluminum foil. I then placed them in a single layer in a sealed plastic container, and kept them in the refrigerator until ready to serve later that evening.

The truffles you see in the picture (with the bacon strips) are another creation I made for bacon night. Here’s the recipe for these Maple Bacon Pecan Truffles. (they were yummy, too!)

Close up photo of chocolate-covered bacon strips
That’s it! It’s really not hard to make chocolate-covered bacon, at all! Hope you will give it a try. Bacon just seems to make everything better… even chocolate! Thanks for stopping by, and come back soon. Don’t forget to check out ALL of my recipes in the Recipe Index, located at the top of the page.

Interested In More Recipes?

Thank you for visiting this website. I appreciate you using some of your valuable time to do soIf you’re interested, I publish a newsletter 2 times per month (1st and 15th) with all the latest recipes, and other fun info. I would be honored to have you join our growing list of subscribers, so you never miss a great recipe!
There is a Newsletter subscription box on the top right side (or bottom) of each blog post, depending on the device you use, where you can easily submit your e-mail address (only) to be included in my mailing list.

You Can Also Find Me On Social Media:

Facebook page: The Grateful Girl Cooks!
Pinterest:
The Grateful Girl Cooks!
Instagram:
jbatthegratefulgirlcooks

Have a GREAT day!

Chocolate Covered Bacon / The Grateful Girl Cooks!

0 from 0 votes
Chocolate-Covered Bacon
Prep Time
25 mins
Cook Time
0 mins
Total Time
25 mins
 
Chocolate-covered bacon is both sweet and salty, incredibly easy to make, and is a very unique, but DELICIOUS crispy treat you will LOVE!!
Category: Candy
Cuisine: American
Keyword: chocolate covered bacon
Servings: 8 servings
Calories Per Serving: 301 kcal
Author: JB @ The Grateful Girl Cooks!
Ingredients
  • Bacon (I used 8 strips)
  • 1 1/2 cups semi-sweet chocolate chips
  • 1 HEAPING tablespoon vegetable shortening
  • 1/2 cup white chocolate chips + 1 teaspoon vegetable shortening (for drizzle)
  • 1/2 cup colored chocolate chips + 1 teaspoon vegetable shortening (for drizzle... totally optional!)
Instructions
  1. Cook bacon until very crisp. Remove from skillet to paper towels to absorb extra grease. Let cool completely.
  2. Place 1 1/2 cups chocolate chips in a microwave safe bowl. Add the shortening. Cook on high power for 30 seconds. Remove. Stir. Place bowl back in microwave. Cook on high power for 30 seconds. Stir well, to fully combine. If mixture is not fully smooth, place it back in microwave on medium high power for 15 seconds (I usually don't have to do this, but you might, depending on the wattage of your microwave). DO NOT BURN THE CHOCOLATE!
  3. Carefully coat all sides of the bacon strips with melted chocolate. Using a spoon to help get the chocolate onto the bacon works great! Place coated bacon strips onto aluminum foil, and let sit, undisturbed until chocolate has set.
  4. Melt white chocolate chips and shortening in the exact same way as described above. Decoratively drizzle the mixture over the chocolate covered strips. Let sit until chocolate is completely firmed up, then place bacon strips in a covered container and refrigerate until ready to serve. Enjoy!
Nutrition Facts
Chocolate-Covered Bacon
Amount Per Serving (1 slice)
Calories 301 Calories from Fat 207
% Daily Value*
Fat 23g35%
Saturated Fat 10g63%
Cholesterol 16mg5%
Sodium 149mg6%
Potassium 234mg7%
Carbohydrates 17g6%
Fiber 2g8%
Sugar 12g13%
Protein 4g8%
Vitamin A 25IU1%
Calcium 21mg2%
Iron 2.2mg12%
* Percent Daily Values are based on a 2000 calorie diet.

Here’s one more to pin on your Pinterest boards!Chocolate-covered bacon is both sweet and salty, incredibly easy to make, and is a very unique, but DELICIOUS crispy treat you will LOVE!!


Save

Save

Healthy Chocolate Banana “Ice Cream”

All you need are several frozen bananas, cocoa powder and a food processor to make a batch of this yummy and healthy Chocolate Banana “Ice Cream”!All you need are several frozen bananas, cocoa powder and a food processor to make a batch of this yummy and healthy Chocolate Banana "Ice Cream"!
So… here’s the backstory on this Healthy Chocolate Banana “Ice Cream”… there’s no cream in this at all!  As a matter of fact, there are only TWO ingredients. Frozen bananas and cocoa powder.

And amazing as it seems, I was skeptical the first time I tried it, but boy was I surprised! It tasted GREAT! All the flavor of chocolate banana ice cream, but it’s NOT ice cream! Take note, calorie-counters!

The only thing you need to have is a food processor or a majorly powerful blender (and some previously frozen bananas!) to mix this up really well. I am fortunate that I was given one that a family member no longer wanted… yay! That makes this healthy chocolate banana ice cream a breeze to make.

Scroll Down For A Printable Recipe Card At the Bottom Of The Page

Really Ripe Bananas Are Essential For Sweetness!

You know those bananas on the counter that have turned brown? Yeah. Put them into your freezer instead of throwing them away. They give this chocolate banana ice cream it’s creaminess and natural sweetness.

See these gnarly looking bananas? They are perfect for this recipe. They are frozen solid. Yep. Sometimes I peel them before freezing, but other times I just shove them in the freezer just the way they are!

Frozen ripe bananas, ready to peel to make ice cream!
Processing Healthy Chocolate Banana Ice Cream Is Easy!

Take those completely frozen bananas, peel, and then slice them into small chunks. Now toss the slices into your handy dandy food processor (or heavy duty blender).

Frozen chunks of banana are placed in a food processor.
Put the lid on and fire up your food processor to pulse the frozen banana chunks. After a minute or so the frozen bananas should be in tiny pieces and look like this (shown below).

The frozen bananas are processed into tiny pieces in food processor.
Time To Add Some Chocolate Flavoring

Once the bananas are pulverized into tiny pieces, add 4 Tablespoons cocoa powder to the mix. The cocoa powder adds wonderful flavor to the healthy chocolate banana ice cream, without adding lots of calories!

Cocoa powder is added to the frozen bananas in the food processor.
Keep Processing The Healthy Chocolate Banana Ice Cream

Turn the food processor back on, and keep on pulsing/mixing the ingredients together. Have no fear… this WILL work! Be patient, because this will take a bit of time to fully come together into a creamy, delicious treat!

Continue processing the frozen bananas and cocoa powder until smooth.
All Of A Sudden- “Ice Cream”!

After several minutes (when you think it’s NOT ever gonna turn into anything that resembles ice cream, and you’re starting to get hungry) this happens (see photo below)! Whoa… I’ll bet ya didn’t see THAT happening! Those frozen bananas and cocoa powder turn into a smooth, delectable  “Ice Cream-y” looking mixture! Time to stop processing it, and EAT!

Finally the healthy chocolate banana ice cream is smooth and creamy!Okay, Now What?

Now that it’s finished processing, you can either eat it right away, OR put it into a sealed container in your refrigerator’s freezer for awhile and let it firm up more. I usually let it firm up a bit in the freezer (after sampling it, of course!). The photo below shows what it looks like going into the freezer. Once frozen, let it sit out a few minutes to thaw slightly before serving, then enjoy!

Let healthy chocolate banana ice cream firm up in the freezer, after processing.
Enjoy every bite, knowing you saved some calories by not pigging out on regular ice cream, but enjoyed this delicious treat instead!  Remember… 7 bananas, 4 T. cocoa powder, and MIX, MIX, MIX. (makes approx. five or six 1/2 cup servings).

I thought everyone had heard of this kind of “ice cream” before, but we had a friend visit here recently. She had never heard of this before, so she tried some, and was quite surprised how good it was!  See? Scientific proof. Absolutely 1 out of 1 house guests recommend this treat! Hope you will give it a try, as well. You’re gonna love it!

Looking For More FROZEN TREAT Recipes?

You can find all of my recipes in the Recipe Index, located at the top of the page. I have lots of traditional ice cream recipes, too. A few favorite frozen treats include:

Interested In More Recipes?

Thank you for visiting this website. I appreciate you using some of your valuable time to do soIf you’re interested, I publish a newsletter 2 times per month (1st and 15th) with all the latest recipes, and other fun info. I would be honored to have you join our growing list of subscribers, so you never miss a great recipe! 

There is a Newsletter subscription box on the top right side (or bottom) of each blog post, depending on the device you use, where you can easily submit your e-mail address (only) to be included in my mailing list.

You Can Also Find Me On Social Media:

Facebook page: The Grateful Girl Cooks!
Pinterest:
The Grateful Girl Cooks!
Instagram:
jbatthegratefulgirlcooks

Author's signature


Here’s one more to pin on your Pinterest boards!All you need are several frozen bananas, cocoa powder and a food processor to make a batch of this yummy and healthy Chocolate Banana "Ice Cream"!

Save

Save

Save