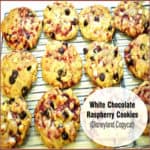
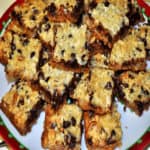
White Chocolate Raspberry Cookies are Disneyland Main Street favorites, filled with white and semi-sweet chocolate chips and ribbons of raspberry jam. 
A few days ago I was on the prowl for a new cookie recipe to try. It was pouring down rain outside and I was itching for something to do besides laundry or dusting. Do you ever have those moments?
Well I was having that moment…big time! I found this recipe for White Chocolate Raspberry Cookies (a Disneyland copycat) and knew I wanted to try them!
I began searching for a recipe that I might already have all the ingredients for in my pantry. Voila! This recipe popped up on my Pinterest feed!
I checked out the recipe because the picture of the cookies drew me in. I was excited to read through the recipe and realize that I had all the necessary ingredients! So I made them, and the rest is history. Here’s how to make white chocolate raspberry cookies.
Scroll Down For A Printable Recipe Card At The Bottom Of The Page
About This Cookie
White chocolate raspberry cookies are available at Disneyland (at Pooh Corner and a few Main Street shops). I’ve never bought this cookie while at Disneyland (despite MANY times there). This original recipe was created by another blogger, and it sounded fabulous to me.
Who can resist a big old chewy cookie with not one, but TWO kinds of chocolate AND raspberry jam swirled throughout? I knew I HAD to make these white chocolate raspberry cookies right away!
To be truthful, I blame this urgency completely on our Oregon rain. When I am stuck inside and it’s raining, I like to experiment with recipes in our kitchen.
These cookies came together fairly quickly. They’re a bit messy to make, but the results are really delicious! I hope you will give these cookies a try (even if it’s not raining!). They are worth your valuable time and effort.

How To Make White Chocolate Raspberry Cookies
Preheat your oven and whisk together the dry ingredients in a large bowl. In a separate bowl or stand mixer, cream the butter and sugars with an electric mixer.
After they are fully combined, add the egg, egg yolk, vanilla and almond extracts to the dough.
Add the dry ingredients to the wet ingredients and mix only until the ingredients are combined. Stir in the white and semi-sweet chocolate chips until they’re fully incorporated into the dough.

 Here’s The Crazy, Messy Part!
Scoop out about ¼ of the cookie dough into a small bowl (it’s easiest to work with a small bit at a time).
Add 1 Tablespoon of raspberry jam and “cut it” into the dough, using a butter knife. Be sure NOT to mix it in, because then the dough will turn completely pink, and frankly who wants a pink cookie?
Gently cut the jam into the dough. Think of it as stabbing the jam into the dough and dragging the knife through in a swirl, okay? Eventually you will work the jam into the dough.
 Shape The White Chocolate Raspberry Cookies
Take the jam swirled dough and drop it by large spoonfuls onto a baking sheet, lined with parchment paper. **TIP: You might find it easier (but messier) to scoop out the dough and shape it into a ball using your hands. It’s YOUR choice.
Yes, it was a bit messy, but this tip worked the best for me the next time I made this recipe. Flatten the dough balls slightly with clean hands or use the back of a spoon.
Repeat this step with the rest of the dough and jam until the cookie dough is all used. Now it’s time to bake them!

 Time To Bake The Cookies!
Bake the cookies at 350°F. for 12-17 minutes (the time will depend on the size of the cookies). Keep an eye on the cookies after the 10-minute mark.
I wanted larger cookies, so I cooked mine a bit longer. Remove the cookies from the oven when the edges of the cookie are set, but the center is still slightly soft.
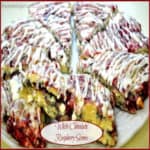
Cool the cookies on the baking sheet for 5 minutes before removing them from pan. After 5 minutes, transfer the cookies to a wire rack to cool completely. ENJOY!


These white chocolate raspberry cookies really are delicious! I hope you will give them a try!

Hope you enjoy these delicious white chocolate raspberry cookies! They are really good, and I am confident you are going to like them.
Thanks for stopping by, and I invite you to come back soon for more family-friendly recipes. Take care, may God bless you, and have a great day!
Looking For More COOKIE Recipes?
You can find ALL of my recipes in the Recipe Index, which is located at the top of the page. I have lots of yummy cookie recipes to choose from, including:
- Flourless, 3 Ingredient Peanut Butter Cookies
- Snowball Cookies
- Mom’s Chocolate Chip Cookies
- Chocolate Crinkle Cookies
- Raspberry Thumbprint Cookies
Want More Recipes? Get My FREE Newsletter!
I publish a newsletter 2 times per month (1st and 15th) with lots of recipes, tips, etc.
Would you like to join our growing list of subscribers?
There is a Newsletter subscription box on the top right (or bottom) of each blog post, depending on the device you use.
You can submit your e-mail address there, to be added to my mailing list.
Find Me On Social Media:
Facebook page: The Grateful Girl Cooks!
Pinterest: The Grateful Girl Cooks!
Instagram: jbatthegratefulgirlcooks
 Recipe Source: http://cocinandoconalena.blogspot.com/2011/03/disneylands-white-chocolate-raspberry.html
↓↓ PRINTABLE RECIPE BELOW ↓↓
White Chocolate Raspberry Cookies are Disneyland Main Street favorites, filled with white and semi-sweet chocolate chips and ribbons of raspberry jam.
- 2 1/2 cups all-purpose flour
- 1/4 tsp. baking soda
- 1/4 tsp. baking powder
- 1/4 tsp. cream of tartar
- 1/4 tsp. salt
- 1/2 cup butter (1 cube), room temperature
- 1/2 cup granulated sugar
- 1/2 cup brown sugar
- 1 egg , plus 1 egg yolk
- 1 tsp. vanilla extract
- 1/4 tsp. almond extract
- 4 Tablespoons Raspberry Jam , heaping
- 3/4 cup white chocolate chips
- 3/4 cup semi-sweet chocolate chips
- Preheat the oven to 350 degrees F. In a medium bowl, whisk together the flour, baking soda, baking powder, cream of tartar, and salt. Set aside.
- In a large bowl, using an electric mixer, cream the butter, granulated and brown sugars until well combined, light and fluffy. Add egg, egg yolk, vanilla and almond extracts to this mixture. Mix well.
- Add the dry ingredients to the wet ingredients; mix just until combined. Stir in the white and semi-sweet chocolate chips.
Scoop out about 1/4 of the cookie dough into a small bowl (it's easiest to work with a small bit at a time!) Add 1 TBSP of the raspberry jam and "cut it in" to the dough, using a butter knife. Be sure NOT to mix it in, because then the dough will turn completely pink, and frankly who wants a pink cookie? Just gently cut the jam into the dough. Think of it as stabbing the jam into the dough and dragging the knife through in a swirl, okay? Eventually you will work the jam into the dough...trust me!
- Take the jam swirled dough and place it by large spoonfuls onto a baking sheet, lined with parchment paper. **NOTE: I started out doing big spoonfuls, but found it easier (but messier) to just scoop out the dough and shape it into a ball using my (clean) hands. Yes, it was a bit messy (think jam), but worked the best for me. Flatten the dough balls slightly with your clean hands or the back of a spoon. *Repeat this process with the rest of the dough and jam until the dough is gone.*
- Bake the cookies at 350 degrees for 12-17 minutes (the time will depend on the size of the cookies). Keep an eye on the cookies after the 10 minute mark. I wanted larger cookies so I cooked mine a bit longer. You want to remove them from oven when the edges of the cookie are set, but the center is slightly soft. Cool the cookies on the baking sheet for 5 minutes before removing them from pan. After 5 minutes, transfer the cookies to a wire rack to cool completely. ENJOY!
If you make the cookies smaller, you will have a much larger quantity of cookies.
Here’s one more to pin on your Pinterest boards!


 and are an absolutely delicious treat your family will love! / The Grateful Girl Cooks!")


 and are an absolutely delicious treat your family will love! / The Grateful Girl Cooks!")


