Spinach Pear Salad

You’re gonna LOVE this easy and quick Spinach Pear Salad, with candied pecans, goat cheese and dried cranberries, drizzled with homemade citrus salad dressing!
You're gonna LOVE this easy and quick Spinach Pear Salad, with candied pecans, goat cheese and dried cranberries, drizzled with homemade citrus salad dressing!

Last week I received some FREE pears from one of our neighbors! I received a bag of pears and put them on our counter to ripen so I could can them for long term storage!  A couple of them ripened really fast (overachievers!), so I wanted to use them right away.

I remembered a salad I had eaten in a restaurant a couple years ago that had fresh pear slices on it. THAT was my inspiration for this salad.

I decided to see what I had on hand, gathered it up, and came up with this recipe for spinach pear salad, with goat cheese, cranberries, and candied pecans, drizzled with a citrus salad dressing.

Let me tell you- it tastes FANTASTIC! My husband and I both LOVED it, and said it was one of the best salads we had eaten recently!

Scroll Down For A Printable Recipe Card At The Bottom Of The Page

How To Make Spinach Pear Salad

Quickly candy some pecans (or use walnuts). Place granulated sugar, water and cinnamon in a skillet; stir until sugar dissolves, add pecans, then cook on medium-low heat, stirring constantly. Once syrup has cooked away, you are left with sweetened, sticky pecans. This only takes a few minutes.

Remove pecans from skillet and place them on aluminum foil to dry out (don’t let them touch each other) for a few minutes. Turn them over to dry the other side.

The sugary glaze will firm up as they cool, then you can peel them off the foil. Let them dry until ready to add to the salad; it only takes a few minutes (or make them ahead of time, if that is easier).

Candied pecans only take a few minutes to make for the spinach salad.

Make The Citrus Dijon Salad Dressing

Next thing is to make the citrus Dijon salad dressing (make while the candied pecans are drying ).  I had some leftover from another recipe, but trust me- it only takes 3-4 minutes to make… it’s EASY. Basically, the ingredients are placed in a sealed jar and shaken well until fully mixed. That’s it!

You will have leftover salad dressing. Keep it refrigerated in an airtight jar or container, and use it again and again! It’s wonderful!

Citrus dijon salad dressing used to drizzle on spinach pear salad.

For each salad, place chilled baby spinach leaves onto serving plate. Top with dried cranberries and several thin slices of red onion.

Baby spinach red onion and dried cranberries on salad.

Slice half of the ripe pear into thin slices, leaving peel ON.  Crumble goat cheese. **TIP: I freeze goat cheese, then when I need to use it, I simply “shave” off what I need using a sharp knife (while the cheese is still frozen- it thaws QUICKLY).

By freezing the cheese (well wrapped), it doesn’t spoil, and is always there when I need it.

Ripe pear is sliced and goat cheese prepared for salad.

Plating The Spinach Pear Salad For EATING!

Add the pear slices to top of salad, slightly fanning them out for best presentation.  Sprinkle with crumbled goat cheese, then add the candied pecans.

Candied pecans, goat cheese and sliced pear added to spinach salad.

Spinach pear salad with candied pecans, on white plate.

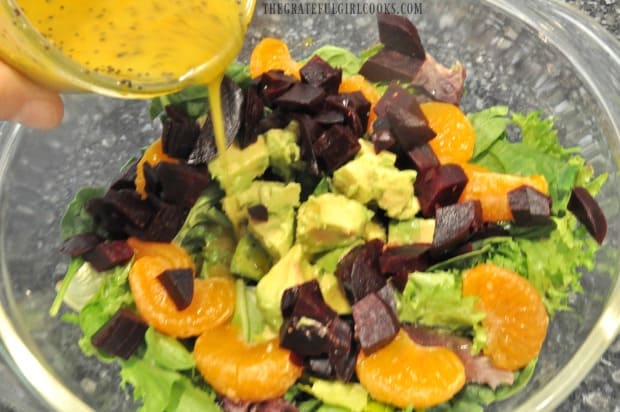
Drizzle the citrus Dijon salad dressing over the salad… and serve! You will LOVE the crunch of the candied pecans, the creamy goat cheese, the chewy dried cranberries, and the amazing citrus salad dressing.

The ripe pear slices add a great look and wonderful taste to this delicious spinach pear salad!

Citrus dressing is added to spinach pear salad before serving.

I really hope you will try this spinach pear salad! It LOOKS like a fancy restaurant salad, but is so easy to prepare!  If you enjoy this salad, you might also want to check out a more traditional spinach salad we also love and make often!

Looking For More SALAD Recipes?

You can find ALL my recipes in the Recipe Index, located at the top of the page. I have lots of delicious salad recipes you’ll enjoy, including:

Want More Recipes? Get My FREE Newsletter!

I publish a newsletter 2 times per month (1st and 15th) with lots of recipes, tips, etc..
Would you like to join our growing list of subscribers?

There is a Newsletter subscription box on the top right (or bottom) of each blog post, depending on the device you use.
You can submit your e-mail address there, to be added to my mailing list.

Find Me On Social Media:

Facebook page: The Grateful Girl Cooks!
Pinterest:
The Grateful Girl Cooks!
Instagram:
jbatthegratefulgirlcooks

Author's signature

Salad Dressing recipe adapted from: https://www.chelseasmessyapron.com/beet-and-goat-cheese-salad/

↓↓ PRINTABLE RECIPE BELOW ↓↓

0 from 0 votes
Spinach Pear Salad
Prep Time
15 mins
Cook Time
0 mins
Total Time
15 mins
 
You're gonna LOVE this easy and quick Spinach Pear Salad, with candied pecans, goat cheese and dried cranberries, drizzled with homemade citrus salad dressing!
Category: Salad
Cuisine: American
Keyword: spinach pear salad
Servings: 2
Calories Per Serving: 386 kcal
Author: JB @ The Grateful Girl Cooks!
Ingredients
For Candied Pecans:
  • 1/2 cup pecan halves
  • 1 Tablespoon granulated sugar
  • 1/4 teaspoon cinnamon
  • 1/4 cup water
For Citrus Dressing:
  • 1/3 cup fresh squeezed orange juice
  • 1 Tablespoon orange zest
  • Tablespoons honey
  • 1/2 teaspoon Dijon mustard
  • 1/4 teaspoon salt
  • 1/4 teaspoon onion powder
  • 1/3 cup vegetable oil
  • 3/4 Tablespoon poppyseeds
For Salad:
  • 4 cups baby spinach
  • 3 Tablespoons dried cranberries
  • 1/2 pear (ripe) , sliced thin
  • 1/4 cup goat cheese , crumbled
  • 1/4 cup red onion , thinly sliced
Instructions
Make Candied Pecans (or walnuts):
  1. Place granulated sugar, water and cinnamon in a skillet; stir until sugar dissolves, add pecans; cook on medium-low heat, stirring constantly. Once syrup has cooked away, you are left with sweetened, sticky pecans (only takes a few minutes). Remove pecans from skillet; place them on aluminum foil to dry (don't let them touch each other) for a few minutes. Turn them over to dry the other side. The sugary glaze will firm up as they cool, then you can peel them off the foil. Let them dry until ready to add to the salad; it only takes a few minutes..

Make Citrus Salad Dressing:
  1. Place all ingredients (except for the poppyseeds) in a small jar with a tight lid. Place the lid on the container... and shake the jar hard for about 30 seconds (while holding the lid on tightly) until dressing has fully combined. Add poppyseeds, then put lid back on and give jar a few more good shakes to fully blend the ingredients.

Assemble Salad:
  1. Place chilled baby spinach leaves onto serving plates. Top with dried cranberries and several thin slices of red onion. Slice half of the ripe pear into thin slices, leaving peel ON.  Crumble goat cheese. Add pear slices to top of salad, fanning them out for best presentation.  Sprinkle with crumbled goat cheese, then add candied pecans. Drizzle salad dressing over the salad... and serve!

Recipe Notes

Caloric calculation shown does NOT include salad dressing, as people enjoy varying amounts of salad dressing on their salads. The caloric calculation for the dressing is approximately 51 calories per Tablespoon.

Nutrition Facts
Spinach Pear Salad
Amount Per Serving (1 salad w/o dressing)
Calories 386 Calories from Fat 216
% Daily Value*
Fat 24g37%
Saturated Fat 5g31%
Cholesterol 13mg4%
Sodium 153mg7%
Potassium 517mg15%
Carbohydrates 38g13%
Fiber 6g25%
Sugar 27g30%
Protein 9g18%
Vitamin A 5920IU118%
Vitamin C 20.2mg24%
Calcium 117mg12%
Iron 2.9mg16%
* Percent Daily Values are based on a 2000 calorie diet.

Here’s one more to pin on your Pinterest boards!You're gonna LOVE this easy and quick Spinach Pear Salad, with candied pecans, goat cheese and dried cranberries, drizzled with homemade citrus salad dressing!

Canning Sliced Peaches

It’s easy to save summer’s bounty by canning sliced peaches for long term storage! Simple and economical way to preserve fresh peaches to enjoy year round!
It's easy to save summer's bounty by canning sliced peaches for long term storage! Simple and economical way to preserve fresh peaches to enjoy year round!

It’s THAT time of the summer season when fresh peaches are at their peak, juicy and ready for the picking or buying!  I LOVE to pick peaches straight off the trees at local U-Pick farms, support local hard-working farmers, AND get fresh peaches to cook, can, and bake with! You might enjoy canning Peach Jam, too!

I’ve been able to use fresh picked peaches in several recipes on this blog, including peach turnovers, homemade ice cream, pies, old-fashioned crisp, canned salsa, jam, overnight oats, and tarts! I LOVE fresh juicy peaches… they are one of my favorite summer fruits!

Fresh picked peaches... ready for canning!

Once I learned about canning sliced peaches, I was hooked! I love being able to can peaches, put them in our pantry, and pull out a jar in the middle of a cold winter, and be taken back to “glorious Summertime” when I eat them!  The process of canning sliced peaches for long term storage is fairly easy… here’s how!

Scroll Down For A Printable Recipe Card At The Bottom Of The Page

Canning Sliced Peaches – Prepare The Peaches

The first thing you will need to do is prepare the canning jars, lids, etc., AND peel the peaches. Of course, you can always peel them with a knife, but I’ve found a different way to do this easily (and do several peaches at a time)!

Place 3-4 peaches at a time into a large pot of boiling water. This helps to soften and loosen the peel. Only let the whole peaches stay in the boiling water for one minute, then remove.

Peaches placed in boiling water to help remove peels.

As soon as you remove the peaches from the boiling water, immediately place them in a large bowl of ice cold water (really cold). This will stop the “heating” process very quickly. Can you see how the skins are loosening from the peach in the photo below?

Peaches placed in ice water to help remove peel.

Remove peaches from ice water and you can easily pull the entire peeling off the peach, leaving a beautiful round peach, with no skin left on. Perfect. Repeat process with remaining peaches until done.

Peeled peaches, ready to be sliced for canning.

Remove seed from peaches, then slice. Place all peach slices into a large bowl. Treat peaches with Fruit Fresh or lemon juice to prevent browning.

Sliced fresh peaches, ready for canning!

Prepare The Canning Jars And Equipment

Prepare and sterilize canning jars. I like to place them in my water bath canner (on the elevated rack), and let them simmer (NOT boil) while I am preparing the peaches.

Have all your canning utensils, jar lids and rings prepared and ready to use, according to manufacturer instructions and standard USDA canning guidelines.

Jars in simmering water, being prepared for canning sliced peaches

Sterilized canning jars and funnel, ready to can peach slices!

Prepare the syrup for peaches, by combining sugar and water in stainless steel saucepan. Stir, and bring mixture to a boil, using medium high heat. Stir often until sugar dissolves. Turn heat to Low, and keep the syrup warm, until you are ready to fill canning jars, stirring occasionally.

Warm peach slices in large stainless steel pan (one single layer at a time) on medium-low heat. Cook ONLY until just heated through (about 1 minute), then repeat with remaining peaches. You CAN raw pack the peaches, but slightly heating them allows less air present in the jars (which can cause the fruit to “float” in the jar). Heating peaches is preferable.

Loading Peach Slices Into Jars

Remove peaches with a slotted spoon; pack the warm peach slices into prepared canning jars using a canning funnel, being sure to leave 1/2 inch headspace in jar. Ladle warm syrup into jars, leaving 1/2 inch headspace.

Remove air bubbles from jars with canning utensil; adjust headspace, if necessary, by removing or adding warm syrup. I use canning utensils that only cost a little over $10 (no I am NOT an Amazon affiliate- just showing you what I use when canning sliced peaches, etc.). Wipe rims of jars clean (to help jars seal properly), place flat lids on jars, then screw the bands on to fingertip tightness.

Carefully lower the jars (on their rack) into simmering water in canner. Make sure the jars are covered completely with water (at least 1-2 inches over tops of jars).  Bring water to a boil. Process pint jars for 20 minutes, and quart jars for 25 minutes.

Canning jars of sliced peaches in a water bath canner.

Once Done Processing The Jars

Once jars have been processed and you are finished canning sliced peaches, turn off the heat, and remove the canner lid. Wait 5 minutes, then carefully remove hot jars with canning tongs to a dish towel (don’t put the hot jars straight onto a counter top-this could cause jars to crack). Let jars cool (you should hear the jars “ping” as they seal) for 12 hours.

Jars of sliced peaches are canned, and ready for pantry!

Once the jars have sat, undisturbed, for 12-24 hours, check to make sure the jars have sealed correctly, then wipe down jars, label them, and store them in your pantry! I remove the screw bands for storing. Any jars that did not seal properly should be refrigerated and used within a week.

Canning sliced peaches for long term storage is simple and economical!

And that is how canning sliced peaches is done! It’s actually fairly easy, and it’s very convenient having jars of fresh summer peaches n our pantry year round! I sure hope you will try this recipe!

Looking For More CANNING Recipes?

You can find ALL of my recipes in the Recipe Index, which is located at the top of the page. I have have quite a few canning recipes for water bath AND pressure canners, including:

Interested In More Recipes?

Thank you for visiting this website. I appreciate you using some of your valuable time to do soIf you’re interested, I publish a newsletter 2 times per month (1st and 15th) with all the latest recipes, and other fun info. I would be honored to have you join our growing list of subscribers, so you never miss a great recipe!
There is a Newsletter subscription box on the top right side (or bottom) of each blog post, depending on the device you use, where you can easily submit your e-mail address (only) to be included in my mailing list.

You Can Also Find Me On Social Media:

Facebook page: The Grateful Girl Cooks!
Pinterest:
The Grateful Girl Cooks!
Instagram:
jbatthegratefulgirlcooks

Have a GREAT day!

Author's signature

Recipe Source: My guidebook for canning, called “Ball Complete Book of Home Preserving- 400 Delicious and Creative Recipes For Today”, pages 150 and 142. Published by Jarden Corporation, 2006.

↓↓ PRINTABLE RECIPE BELOW ↓↓

0 from 0 votes
Canning Sliced Peaches
Prep Time
15 mins
Cook Time
25 mins
Total Time
40 mins
 
It's easy to save summer's bounty by canning sliced peaches for long term storage! Simple and economical way to preserve fresh peaches to enjoy year round!
Category: Canning and Preserving
Cuisine: American
Keyword: canning sliced peaches
Servings: 8 pints (or 4 quarts)
Calories Per Serving: 394 kcal
Author: JB @ The Grateful Girl Cooks!
Ingredients
  • 8-12 pounds peaches , halved, pitted, treated to prevent browning
To Make Light Syrup:
  • cups granulated sugar
  • cups water
Instructions
  1. The first thing you will need to do is prepare the canning jars, lids, etc., and peel the peaches. Remove seed from peaches, then slice. Place all peach slices into a large bowl. Treat peaches with Fruit Fresh or lemon juice to prevent browning.

  2. Prepare and sterilize canning jars. I like to place them in my water bath canner filled half way with water (on the elevated rack), and let them simmer (NOT boil) while I am preparing the peaches. Have all your canning utensils, jar lids and rings prepared and ready to use, according to manufacturer instructions and standard USDA canning guidelines.

  3. Prepare syrup for peaches, by combining sugar and water in stainless steel saucepan. Stir, and bring mixture to a boil, on medium high heat. Stir often until sugar dissolves. Turn heat to Low; keep syrup warm, stirring occasionally, until ready to fill canning jars, stirring.

  4. Warm peach slices in large stainless steel pan (one single layer at a time) on medium-low heat. Cook ONLY until just heated through (about 1 minute), then repeat with remaining peaches.  Remove peaches with a slotted spoon; pack  peach slices into hot, prepared canning jars, being sure to leave 1/2 inch headspace in jar. Ladle warm syrup into jars, leaving 1/2 inch headspace.

  5. Remove air bubbles from jars; adjust headspace, if necessary, by removing or adding syrup. Wipe rims of jars clean (to help jars seal properly), place flat lids on jars, then screw the bands on to fingertip tightness. Carefully lower jars (on rack) into simmering water in canner. Make sure the jars are covered completely with water (at least 1-2 inches over tops of jars). Cover. Bring water to a boil. Process pint jars for 20 minutes, and quart jars for 25 minutes.

  6. Once jars have been processed, turn off heat; remove canner lid. Wait 5 minutes, then carefully remove hot jars with canning tongs to a dish towel (don't put the hot jars straight onto a counter top-this could cause jars to crack). Let jars cool (you should hear the jars "ping" as they seal) for 12-24 hours.

  7. Once the jars have sat, undisturbed, for 12-24 hours, check to make sure the jars have sealed correctly, then wipe down jars, label them, and store them in your pantry! I  remove the screw bands for storing. Any jars that did not seal properly should be refrigerated, and used within a week. ENJOY!

Recipe Notes

TIP FOR REMOVING PEACH PEELS: Place 3-4 peaches at a time into a large pot of boiling water. This helps to loosen peel. Only let the whole peaches stay in boiling water for one minute, then remove. As soon as you remove the peaches from boiling water, immediately place them in a large bowl of ice cold water (really cold). This will stop the "heating" process quickly. Remove peaches from ice water and easily pull the entire peeling off the peach, leaving a beautiful round peach, with no skin. Repeat process with remaining peaches.

Nutrition Facts
Canning Sliced Peaches
Amount Per Serving (1 pint)
Calories 394 Calories from Fat 9
% Daily Value*
Fat 1g2%
Potassium 861mg25%
Carbohydrates 99g33%
Fiber 6g25%
Sugar 94g104%
Protein 4g8%
Vitamin A 1480IU30%
Vitamin C 29.9mg36%
Calcium 27mg3%
Iron 1.2mg7%
* Percent Daily Values are based on a 2000 calorie diet.

Here’s one more to pin on your Pinterest boards!It's easy to save summer's bounty by canning sliced peaches for long term storage! Simple and economical way to preserve fresh peaches to enjoy year round!


Peach Jam Muffins

You will enjoy these family friendly, easy to make Peach Jam Muffins, with a sweet peach glaze on top! They are delicious and filled with peaches and cinnamon!
You will enjoy these family friendly, easy to make Peach Jam Muffins, with a sweet peach glaze on top! They are delicious, and filled with peaches and cinnamon!

Do you enjoy making muffins? I’ve posted a variety of muffin recipes on this blog, including Blueberry Crumble, Banana Espresso Chocolate Chip, Cranberry Orange, Carrot Cake, and Apple Raisin, to name a few.

I really enjoy making muffins for breakfast, and this recipe for a dozen peach jam muffins is EASY, quick, and delicious! Here’s how to make them:

Scroll Down for A Printable Recipe Card At The Bottom Of The Page

How To Make Peach Jam Muffins

Preheat oven to 400° F.  Peel, pit, and finely dice peaches. Place diced peaches in bowl with vegetable oil, egg and vanilla. Stir well, to combine. TIP: If FRESH peaches are not in season or readily available, you can easily substitute a 16 ounce can of peaches. DRAIN them, then dice them, before adding to recipe.

Fresh peaches are peeled, then diced and added to egg, for muffins.

In separate bowl, combine flour, sugar, baking powder, cinnamon and salt. Stir to mix, then add dry ingredients to peaches, a little at a time, while stirring. Stir only until the batter is combined and moistened. The mixture will be fairly thick.

Dry ingredients are combined then added to peaches for muffins.

Fill a 12 cup standard sized muffin tin with paper liners. Spray bottom of paper liners with non-stick spray. Divide muffin batter evenly between 12 muffin holders.

Batter for peach jam muffins is added to muffin tin for baking.

Time To Bake The Peach Jam Muffins

Bake peach jam muffins at 400° F. for 15-20 minutes, or until the tops of the muffins are light golden brown.  Remove the pan from oven. Let the peach jam muffins cool in the pan for 5 minutes, then transfer muffins out of pan onto a wire rack to cool.

Baked peach jam muffins, hot out of oven.

Peach jam muffins cool down on wire rack before adding glaze.

Brush The Top Of The Muffins With Peach Jam

Use a pastry brush to cover the tops of the muffins with (room temperature) peach jam. I place a piece of wax paper under the wire rack to catch any drips that might occur. I was fortunate to be able to use my homemade canned peach jam for this recipe. YUM!

Peach jam is brushed on top of each muffin with a pastry brush.

Time To EAT!

Once the peach jam muffins have cooled  to room temperature, they are ready to eat and enjoy! They’re sweet, and filled with peaches. I’m confident you’ll enjoy these delicious treats.

One dozen peach jam muffins on white serving tray, ready to eat!

Close up photo of one peach jam muffin, with fresh peach slice in front.

Nothing like a yummy peach jam muffin to bring the taste of summer right onto your breakfast table!  See the diced peaches inside the muffin (below)? 

An inside look at a cut open peach jam muffin.

These peach jam muffins taste wonderful! They also freeze well, if wrapped well and placed in freezer storage bags. I really hope you will consider making a dozen of them for those you love!  Be sure to check out ALL of my recipes in the Recipe Index, located at the top of the page. Have a fantastic day, friends!

Interested In More Recipes?

Thank you for visiting this website. I appreciate you using some of your valuable time to do soIf you’re interested, I publish a newsletter 2 times per month (1st and 15th) with all the latest recipes, and other fun info. I would be honored to have you join our growing list of subscribers, so you never miss a great recipe!
There is a Newsletter subscription box on the top right side (or bottom) of each blog post, depending on the device you use, where you can easily submit your e-mail address (only) to be included in my mailing list.

You Can Also Find Me On Social Media:

Facebook page: The Grateful Girl Cooks!
Pinterest:
The Grateful Girl Cooks!
Instagram:
jbatthegratefulgirlcooks

Author's signature

0 from 0 votes
Peach Jam Muffins
Prep Time
15 mins
Cook Time
18 mins
Total Time
33 mins
 
You will enjoy these family friendly, easy to make Peach Jam Muffins, with a sweet peach glaze on top! They are delicious, and filled with peaches and cinnamon!
Category: Bread/Breakfast
Cuisine: American
Keyword: peach jam muffins
Servings: 12
Calories Per Serving: 192 kcal
Author: JB @ The Grateful Girl Cooks!
Ingredients
  • 2 peaches (large) , peeled, chopped fine
  • 1/3 cup vegetable oil
  • 1/2 teaspoon vanilla extract
  • 1 egg , slightly beaten
  • 2 cups all purpose flour
  • 1/3 cup granulated sugar
  • 3 teaspoons baking powder
  • 3/4 teaspoon cinnamon
  • 1/2 teaspoon salt
  • 1/3 cup peach jam , room temperature
Instructions
  1. Preheat oven to 400° F.  Peel, pit, and finely dice peaches. Place diced peaches in bowl with vegetable oil, egg and vanilla. Stir well, to combine.
  2. In separate bowl, combine flour, sugar, baking powder, cinnamon and salt. Stir to mix, then add dry ingredients to peaches, a little at a time, while stirring. Stir only until batter is combined and moistened. Mixture will be fairly thick.
  3. Fill 12 cup standard sized muffin tin with paper liners. Spray bottom of paper liners with non-stick spray. Divide muffin batter evenly between 12 muffin holders. Bake muffins at 400° F. for 15-20 minutes, or until tops are light golden brown.  Remove pan from oven. Let peach jam muffins cool in pan for 5 minutes, then transfer muffins out of pan onto wire rack.

  4. Use a pastry brush to cover tops of muffins with room temperature peach jam. Once the peach jam muffins have cooled to room temperature, they are ready to eat and enjoy!

Recipe Notes

No fresh peaches in season? Can substitute a 16 ounce can peaches, drained and chopped fine, if necessary.

Nutrition Facts
Peach Jam Muffins
Amount Per Serving (1 muffin)
Calories 192 Calories from Fat 54
% Daily Value*
Fat 6g9%
Saturated Fat 5g31%
Cholesterol 13mg4%
Sodium 106mg5%
Potassium 183mg5%
Carbohydrates 30g10%
Fiber 1g4%
Sugar 12g13%
Protein 2g4%
Vitamin A 100IU2%
Vitamin C 2.5mg3%
Calcium 53mg5%
Iron 1.2mg7%
* Percent Daily Values are based on a 2000 calorie diet.

Here’s one more to pin on your Pinterest boards!You will enjoy these family friendly, easy to make Peach Jam Muffins, with a sweet peach glaze on top! They are delicious, and filled with peaches and cinnamon!

Oven Roasted Beets

It’s easy to make perfect oven roasted beets, with only 2 ingredients! Easy to bake, with little mess, and you’ll have perfectly cooked beets for eating, using in salads, or other dishes!
It's easy to make perfect oven roasted beets, with only 2 ingredients! Easy to bake, with little mess, and you'll have perfectly cooked beets for salads, etc.!

Growing up, I loathed beets (and that’s putting it mildly!). I did NOT enjoy the taste at all, and would “shudder” when I would see them in a salad buffet line, or taunting me in the canned vegetable section of the grocery store as a young married woman. Yeah… beets and I go way back! Ha Ha!

If you can even believe it., as an adult I even GREW beets in my little backyard garden (just to learn how to grow them by TRYING). Go figure! I gave them away to neighbors, because, you know… BEETS. Sigh.

Scroll Down For A Printable Recipe Card At The Bottom Of The Page

BUT… many years have come and gone, and I started to want to give them a try again (call me crazy). I found a recipe for a salad that had beets in it that I really wanted to make, so I bit the bullet, and bought some humble beets at our local grocery store.

The rest is history! I actually, truly liked them! It’s a Christmas miracle – my taste buds changed! So now I want to show you how easy it is to make oven roasted beets!

How To Make Oven Roasted Beets


Raw beets, fresh from the store!

Preheat your oven to 375° F. Before roasting the beets, scrub them well in water. Trim off most of the stem and leaves. Pat dry.

Beets are rinsed and trimmed before oven roasting.

Lightly coat each beet with olive oil. I used a pastry brush for this, but you can also just use your hands, if you don’t have a pastry brush. Some people recommend wearing gloves to cook beets (so you don’t end up with semi-stained red fingers), but you don’t have to!

Raw beet is lightly brushed with oil before oven roasting.

Wrap each beet well, in aluminum foil. Seal foil well. Place the wrapped beets on a cookie sheet.

Beets are individually wrapped in foil before oven roasting.

Time To Roast The Beets

Bake beets in a preheated 375° F. oven, until they are cooked through (approximately 45 to 65 minutes, depending on the size of the beets). This is what they looked like, straight from the oven after roasting (see below).

Oven roasted beets, hot from the oven.

Once you take the beets out of oven, open the foil. Let beets cool for 10 minutes, then peel them. The peel should come off easily. If you’re not wearing gloves, simply use a couple paper towels wadded up to gently rub the skins off.

Skin is removed from oven roasted beets by rubbing with paper towels.

Slice The Oven Roasted Beets Once Peeled

Once the peel is off, cut each of the oven roasted beets into 1/4″ slices. I LOVE the designs inside each one, nice spirals of color!

Once cooled, oven roasted beets are sliced thinly before serving.

They are ready to eat, as is (possibly with a touch of salt and pepper), or you can cut them into chunks for salads, or other recipes. I’ve even used them in fruit smoothies for extra nutrients!

That’s it! See how easy it is to make oven roasted beets? I hope you will consider trying this method. I really do think they taste much better than store bought canned beets. Have a wonderful day! Thanks for stopping by, and I hope you will come back soon.

Looking For More Veggie Recipes?

You can find all my recipes in the Recipe Index, located at the top of the page. I have a great variety of vegetable recipes, including:

Interested In More Recipes?

Thank you for visiting this website. I appreciate you using some of your valuable time to do soIf you’re interested, I publish a newsletter 2 times per month (1st and 15th) with all the latest recipes, and other fun info. I would be honored to have you join our growing list of subscribers, so you never miss a great recipe!
There is a Newsletter subscription box on the top right side (or bottom) of each blog post, depending on the device you use, where you can easily submit your e-mail address (only) to be included in my mailing list.

You Can Also Find Me On Social Media:
Facebook page: The Grateful Girl Cooks!
Pinterest: The Grateful Girl Cooks!
Instagram: jbatthegratefulgirlcooks

Have a GREAT day!

Author's signature

Recipe Source: http://www.geniuskitchen.com/recipe/bobby-flays-roasted-beets-for-recipes-370885

0 from 0 votes
Oven Roasted Beets
Prep Time
5 mins
Cook Time
50 mins
Total Time
55 mins
 
It's easy to make perfect oven roasted beets, with only 2 ingredients! Easy to bake, with little mess, and you'll have perfectly cooked beets for salads, etc.!
Category: Vegetable
Cuisine: American
Keyword: oven roasted beets
Servings: 4
Calories Per Serving: 57 kcal
Author: JB @ The Grateful Girl Cooks!
Ingredients
  • 3 medium sized beets
  • 1 Tablespoon olive oil
Instructions
  1. Preheat your oven to 375° F. Before roasting the beets, scrub them well in water. Trim off most of the stems and leaves, leaving an inch or so to hold. Pat dry.

  2. Lightly coat each beet with olive oil. I used a pastry brush for this, but you can also just use your hands, if you don't have a pastry brush. Some people recommend wearing gloves to cook beets (so you don't end up with semi-stained red fingers), but you don't have to!
  3. Wrap each beet in aluminum foil. Seal foil well. Place beets on cookie sheet. Bake beets in a preheated 375° F. oven, until they are cooked through (approximately 45 to 65 minutes, depending on the size of the beets). Once done and out of oven, open foil. Let beets cool for 10 minutes, then peel. The peel should come off easily. If not wearing gloves, use paper towels wadded up to rub the skins off. Once peel is off, cut beets into 1/4" wide slices. Enjoy!

Nutrition Facts
Oven Roasted Beets
Amount Per Serving (1 (1/4 of total))
Calories 57 Calories from Fat 27
% Daily Value*
Fat 3g5%
Sodium 48mg2%
Potassium 199mg6%
Carbohydrates 5g2%
Fiber 1g4%
Sugar 4g4%
Vitamin A 20IU0%
Vitamin C 3.1mg4%
Calcium 10mg1%
Iron 0.5mg3%
* Percent Daily Values are based on a 2000 calorie diet.

Here’s one more to pin on your Pinterest boards!It's easy to make perfect oven roasted beets, with only 2 ingredients! Easy to bake, with little mess, and you'll have perfectly cooked beets for salads, etc.!

Thai Quinoa Salad with Peanut Sauce

You’ll love this Thai Quinoa Salad, a delicious side dish with crunchy veggies and cashews, in an amazing tasting peanut sauce! Plus, this salad keeps fresh for days, when refrigerated!
You'll love this Thai Quinoa Salad, a delicious side dish with crunchy veggies and cashews, in an amazing tasting peanut sauce! Salad keeps fresh for days!

Do you cook with quinoa ?  This year I have enjoyed finding new recipes and making them for our family using this superfood! I have begun keeping quinoa in our pantry year-round, because there are so many recipes that can be made using it.

What Other Dishes Can You Use Quinoa For?

If you enjoy quinoa (pronounced KEEN-wah), you will enjoy my recipes for Southwest Quinoa Salad, Quinoa Enchilada Casserole, Creamy Chicken Broccoli Quinoa Casserole, or Mediterranean Quinoa Salad.  Each of those  recipes are fantastic, and full of flavor salads!

Recently I tried a recipe for a Thai Quinoa Salad with Peanut Sauce. Oh man… we LOVED this salad, and enjoyed the many vegetables, crunchy cashews, and the amazing sauce! Best part? It’s EASY to make, and any leftovers last for several days, if refrigerated, so it’s a great little side dish to have in the fridge!

Scroll Down For A Printable Recipe Card At The Bottom Of The Page

How To Make Thai Quinoa Salad:

Start with the peanut sauce. To make peanut sauce, mix all sauce ingredients (except water) in a medium sized bowl. Heat about 3/4 cup of water until it is just about to boil (but not boiling).  Slowly add the hot water, a little bit at a time, stirring or whisking the sauce very well as you go.

Continue to slowly add the hot water until the peanut sauce is thin enough to pour, but not too thin! I used a total of 1/2 cup water, and it was perfect! Once done, set sauce aside.

Making peanut sauce for Thai quinoa salad.

Prepare the quinoa according to the instructions on the package (while quinoa cooks, prep veggies for the salad). Once quinoa is done cooking, let quinoa cool to room temperature.

Quinoa is cooked to add to Thai salad.

Place grated carrots, cilantro, shredded cabbage, sliced green onions, and thinly sliced (or diced) red bell pepper into a salad bowl. Sorry for the slightly blurry photo… but aren’t those colors pretty?

Cabbage, carrots, cilantro, red bell pepper and green onions prepped for Thai quinoa salad.

Add the cooked, cool quinoa and cashews to the salad.

Cooked quinoa and cashews added to Thai salad vegetables.

Add The Peanut Sauce to the Quinoa Salad

Pour the peanut sauce into the salad. Stir these ingredients really well, to combine and fully coat everything in sauce.

Peanut sauce is added to Thai quinoa salad.

Ready To EAT!

This is what it looks like once combined. Thai quinoa salad sure is colorful! I garnished it with a few additional cilantro leaves and cashews, and sprinkled salad with sesame seeds before serving.

Thai quinoa salad is mixed together, and garnished with sesame seeds and cilantro.

Thai quinoa salad with peanut sauce is ready to serve!

The night we first had the salad, I served it on the side of chicken we had roasted on our Traeger grill!  The crunchy, colorful, flavor-filled Thai quinoa salad tasted fantastic paired with the slices of chicken breast!

Thai quinoa salad is served as a side dish for roasted chicken.

I really hope you enjoy this Thai Quinoa Salad.  By the way- if you eat a gluten-free diet, simply swap out Tamari for the soy sauce in the sauce, and you’ll be good to go! ENJOY! Have a great day, and thank you for stopping by. Please come back soon!

Looking For More SIDE SALAD RECIPES?

You can find all of my recipes in the Recipe Index, which is located at the top of the page. I have lots of side salad recipes (sweet and savory), including:

Interested In More Recipes?

Thank you for visiting this website. I appreciate you using some of your valuable time to do soIf you’re interested, I publish a newsletter 2 times per month (1st and 15th) with all the latest recipes, and other fun info. I would be honored to have you join our growing list of subscribers, so you never miss a great recipe!
There is a Newsletter subscription box on the top right side (or bottom) of each blog post, depending on the device you use, where you can easily submit your e-mail address (only) to be included in my mailing list.

You Can Also Find Me On Social Media:

Facebook page: The Grateful Girl Cooks!
Pinterest:
The Grateful Girl Cooks!
Instagram:
jbatthegratefulgirlcooks

Have a GREAT day!

Author's signature

Recipe Source: https://www.thegardengrazer.com/2018/04/fresh-thai-quinoa-salad-with-peanut-html

0 from 0 votes
Thai Quinoa Salad with Peanut Sauce
Prep Time
20 mins
Cook Time
0 mins
Total Time
20 mins
 
You'll love this Thai Quinoa Salad, a delicious side dish with crunchy veggies and cashews, in an amazing tasting peanut sauce! Salad keeps fresh for days!
Category: Salad
Cuisine: Thai
Keyword: Thai quinoa salad
Servings: 8 (as a side)
Calories Per Serving: 227 kcal
Author: JB @ The Grateful Girl Cooks!
Ingredients
For Peanut Sauce:
  • 1/2 cup creamy peanut butter
  • 2 Tablespoons brown sugar , or maple syrup
  • Tablespoons soy sauce , or tamari (for gluten free)
  • 2 cloves garlic , minced
  • 2 Tablespoons lime juice (fresh) , or lemon
  • 3/4 teaspoon grated ginger
  • 1/2 cup hot water ,(to thin to desired consistency)
For Salad:
  • 3/4 cup uncooked quinoa
  • 1 medium carrot , grated
  • cups red cabbage , shredded
  • 1 red bell pepper , thinly sliced or diced
  • 2 green onions , sliced (white and green parts)
  • 1/3 cup cilantro
  • 1/2 cup cashews , or peanuts
  • Cilantro, cashews, sesame seeds OPTIONAL, for garnish
Instructions
Make Peanut Sauce:
  1. Mix all ingredients (except water) in a medium sized bowl. Heat about 3/4 cup of water until it is just about to boil (but not boiling).  Slowly add the hot water, a little bit at a time, stirring or whisking the sauce very well as you go.  Continue to slowly add the hot water until the peanut sauce is thin enough to pour, but not too thin! **I used a total of 1/2 cup water, and it was perfect!** Once done, set sauce aside.

  2. Prepare the quinoa according to the instructions on the package (while quinoa cooks, prep veggies for the salad). Once quinoa is done cooking, let quinoa cool to room temperature.
  3. Place grated carrots, cilantro, shredded cabbage, sliced green onions, and thinly sliced (or diced) red bell pepper into a salad bowl. Add cooked, cooled quinoa and the cashews to salad. Add peanut sauce to the salad. Stir well, to thoroughly combine all ingredients. That's it!

  4. Serve at room temperature or chilled, garnished with a few additional cilantro leaves and cashews, and sprinkled with sesame seeds, if desired. Store any leftovers in a sealed container in refrigerator. This salad will keep it's crunch and flavor for 3-4 days if refrigerated. ENJOY!

Recipe Notes

NOTE: You can substitute Tamari for the soy sauce in the peanut sauce, to make this salad gluten-free.

Nutrition Facts
Thai Quinoa Salad with Peanut Sauce
Amount Per Serving (1 serving (1/8 of total))
Calories 227 Calories from Fat 108
% Daily Value*
Fat 12g18%
Saturated Fat 2g13%
Sodium 276mg12%
Potassium 359mg10%
Carbohydrates 22g7%
Fiber 3g13%
Sugar 6g7%
Protein 8g16%
Vitamin A 2000IU40%
Vitamin C 31.1mg38%
Calcium 33mg3%
Iron 1.9mg11%
* Percent Daily Values are based on a 2000 calorie diet.

Here’s one more to pin on your Pinterest boards!You'll love this Thai Quinoa Salad, a delicious side dish with crunchy veggies and cashews, in an amazing tasting peanut sauce! Salad keeps fresh for days!

Dry Rub Spice Mix

It’s easy to enhance the flavor of grilled chicken or pork with this Dry Rub Spice Mix! Make enough mix to season meat for several BBQ’s, in under 5 minutes!
It's easy to enhance the flavor of grilled chicken or pork with this Dry Rub Spice Mix! Make enough mix to season meat for several BBQ's, in under 5 minutes!

I enjoy finding new seasoning mixes to use in different recipes to enhance flavors.  I’ve shared posts in the past for Homemade Cajun Seasoning, Grilled Chicken Sauce, Homemade Taco Seasoning Mix, and Herb Butter for Steaks, so when I found this recipe for a dry rub spice mix online (for grilled chicken or pork), and I knew I had to try it! Guess what? It is WONDERFUL!

Scroll Down For A Printable Recipe Card At the Bottom Of The Page

How To Make This Dry Rub Spice Mix

Start by making the dry spice rub. EASY! Place the dry rub spices in a medium sized bowl. Stir well, to fully combine ingredients. I cut the recipe in half, and even after cutting it in half, it made enough dry rub spice mix to season a pork loin roast, and a few whole chickens.

Spices used to make dry rub spice mix measured into bowl before mixing.

Dry rub spice mix for chicken and pork ready to season meat!

Using this Spice Rub On Whole Chickens

Cover all sides of a whole chicken with the dry spice rub, lightly rubbing it onto the surface of the meat. The slight moisture of the meat will help the spices stick! Sprinkle some of the spice mix into the cavity of the chicken.  When done, set seasoned chicken aside until ready to cook in a smoker or on the grill.

Here is a photo of a whole chicken with the rub on it. We cooked two chickens this time, on our Traeger grill; they both turned out perfect, with a great added flavor from the spices!

Whole chicken with dry rub spice mix applied to skin.Whole chicken with dry rub spice mix, after roasting on Traeger grill.

Using The Spice Rub On A Pork Roast

Here are a couple photos from when we used this spice rub on a pork loin roast! We covered all sides of the roast with the spice rub, smoked the pork, then roasted it, long and slow on our Traeger grill. We then shredded about half of the meat, added BBQ sauce, and made incredible tasting BBQ pulled pork sandwiches!

Pork loin roast with dry rub spice mix applied to surface of meat.

Pork loin roast with dry rub spice mix, after roasting on grill

I hope you will enjoy this quick and easy to prepare dry rub spice mix… if you store it in an airtight container, you will have it handy, and ready to use to enhance the flavor of your next grilled chicken or pork dish!

Thanks for stopping by. I hope you will choose to come back soon. Be sure to check out ALL of my recipes in the Recipe Index, located at the top of the page. Have a great day.

Interested In More Recipes?

Thank you for visiting this website. I appreciate you using some of your valuable time to do soIf you’re interested, I publish a newsletter 2 times per month (1st and 15th) with all the latest recipes, and other fun info. I would be honored to have you join our growing list of subscribers, so you never miss a great recipe!
There is a Newsletter subscription box on the top right side (or bottom) of each blog post, depending on the device you use, where you can easily submit your e-mail address (only) to be included in my mailing list.

You Can Also Find Me On Social Media:

Facebook page: The Grateful Girl Cooks!
Pinterest:
The Grateful Girl Cooks!
Instagram:
jbatthegratefulgirlcooks

Have a GREAT day!

Author's signature

Recipe Adapted From: https://www.tastesoflizzyt.com/pulled-pork-rub/

0 from 0 votes
Dry Rub Spice Mix (for chicken and pork)
Prep Time
5 mins
Cook Time
0 mins
Total Time
5 mins
 
It's easy to enhance the flavor of grilled chicken or pork with this Dry Rub Spice Mix! Make enough mix to season meat for several BBQ's, in under 5 minutes!
Category: Spices
Cuisine: American
Keyword: dry rub spice mix
Servings: 8 (1/4 cup servings)
Calories Per Serving: 72 kcal
Author: JB @ The Grateful Girl Cooks!
Ingredients
  • 1/3 cup dark brown sugar
  • 1/2 cup smoked paprika
  • 1/4 cup garlic powder
  • 1/4 cup salt
  • 2 Tablespoons black pepper
  • 2 Tablespoons onion powder
  • 1 Tablespoon cayenne pepper
  • 1 Tablespoon ground cumin
  • 1 Tablespoon dry mustard
Instructions
  1. In a medium sized bowl, combine all spice rub ingredients. Stir to mix, until all ingredients are fully combined.

  2. When ready to use, sprinkle rub on chicken or pork, and pat it down to adhere to surface of meat. Smoke or grill meat until done. Enjoy!

Store unused spice rub mix in an airtight container until next use.
    Recipe Notes

    As written, dry rub recipe makes almost 2 cups. I cut the recipe for the dry rub in half. The quantities are easy to cut in half (except for the 1/3 cup of dark brown sugar. If cutting brown sugar in half, use 2 Tablespoons PLUS 2 teaspoons brown sugar). If halved, you'll end up with about 1 cup of spice rub, which is enough for 3 pork roasts or chickens (about 3 pounds each). Each roast or whole chicken will need approx. 1/3 cup of the rub to cover. Store leftover spice mix in airtight sealed container.

    Nutrition Facts
    Dry Rub Spice Mix (for chicken and pork)
    Amount Per Serving (0.25 cup)
    Calories 72 Calories from Fat 9
    % Daily Value*
    Fat 1g2%
    Sodium 3546mg154%
    Potassium 235mg7%
    Carbohydrates 15g5%
    Fiber 3g13%
    Sugar 9g10%
    Protein 1g2%
    Vitamin A 3600IU72%
    Vitamin C 0.9mg1%
    Calcium 48mg5%
    Iron 2.4mg13%
    * Percent Daily Values are based on a 2000 calorie diet.

    Here’s one more to pin on your Pinterest boards!It's easy to enhance the flavor of grilled chicken or pork with this Dry Rub Spice Mix! Make enough mix to season meat for several BBQ's, in under 5 minutes!

    Triple Chip Bar Cookies

    You’ll love these EASY to make Triple Chip Bar Cookies, loaded with semi-sweet, white, and cinnamon chips – it’s simple to have a dozen treats ready to eat in about 30 minutes!
    You'll love these EASY to make Triple Chip Bar Cookies, loaded with semi-sweet, white, and cinnamon chips- have a dozen treats ready to eat in about 30 minutes!

    If you’re looking for a ridiculously simple and DELICIOUS dessert that is a snap to make, then look no further. Have I got a recipe idea for YOU! Filled with assorted chips, these amazing tasting bar cookies are packed with flavor! AND… (drum roll, please!)… they only took 10 minutes to get into the oven!

    Scroll Down For A Printable Recipe Card At The Bottom Of The Page

    How To Make Triple Chip Bar Cookies

    Before beginning to make batter, preheat oven to 350° F, and line an 8×8 baking dish with aluminum foil. Be sure to let the ends of the foil overlap and hang over the sides of the baking dish. This will help to lift the entire pan of bar cookies out of the dish after baking. Spray the foil (bottom and sides) with non-stick cooking spray.

    In a medium sized bowl, mix together melted butter and brown sugar until blended.  I used a spoon- no need for a mixer.  Add egg and vanilla extract, stir until fully incorporated.Mixing batter for triple chip cookie bars.

    Stir the flour, baking powder and salt into the batter.  Add assorted chocolate chips (I used white chocolate, cinnamon and semi-sweet chips… if you can’t find cinnamon chips at your store (sometimes they are seasonal), you can substitute butterscotch or peanut butter chips). Stir the batter until ingredients are fully combined.

    Flour, mixture plus cinnamon, chocolate and white chips added to bar cookie batter.

    Bake The Bar Cookies

    Spread the batter into your prepared baking dish.  Bake triple chip bar cookies at 350° F. for 20-25 minutes, or until the top is golden brown and set. You can also test for doneness by inserting a toothpick into the middle top of the bar cookies. If it comes out clean with no dough on it, they are ready!

    Since oven temperatures vary greatly, I recommend checking them at 20 minutes, then bake a few minutes longer, if necessary, to ensure they are baked through.

    Foil lined and sprayed baking dish filled with triple chip bar cookie batter.

    Once done, place the baking dish on a wire rack and let them cool for about 10 minutes.  Using the foil overhangs, carefully lift the entire pan of bar cookies out of the dish and place (still on the foil) onto a wire rack to finish cooling. Once cool, cut into 12 equal sized squares. I find that using a pizza slicer works great to cut the bars quickly and cleanly, but it’s not necessary to use one!

    Triple chip bar cookies are cut into 12 pieces with pizza cutter.

    Time To Serve These Triple Chip Bar Cookies

    And just like that, in about 30 minutes from start to finish, you can have some really delicious triple chip bar cookies!  I personally think they taste best at room temperature!

    Triple chip bar cookies are served on a light green plate.

    Close up photo of triple chip bar cookies.

    The triple chip bar cookies freeze well, too, so if you have any leftovers (notice I said “IF”), wrap them very well in aluminum foil and save a few for a rainy day! My husband poured a cold glass of milk and gobbled up two of these treats before I knew what happened!

    Hand, holding one of the triple chip bar cookies.

    Do You Enjoy Making Bar Cookies?

    By the way, if you enjoy bar cookies, check out my recipes for Blackberry Pie Bars, Chocolate Pecan Pie Bars, JB’s Best Brownies, Lemon Bars, Pecan Chewies, Sprinkle Bars, Strawberry-Rhubarb Dream Bars, and Chocolate Peanut Butter Frosted Krispy Bars! You might also like Chocolate Chip Cheesecake-Swirl Brownie Bites. They’re not bars, but are equally wonderful!

    If you’re looking for a quick and easy dessert to make for family or friends, I hope you will give THIS one a try!  And, as always, I really hope you enjoy them! Don’t forget- you can find ALL of my recipes in the Recipe Index, located at the top of the page.

    Interested In More Recipes?

    Thank you for visiting this website. I appreciate you using some of your valuable time to do soIf you’re interested, I publish a newsletter 2 times per month (1st and 15th) with all the latest recipes, and other fun info. I would be honored to have you join our growing list of subscribers, so you never miss a great recipe!
    There is a Newsletter subscription box on the top right side (or bottom) of each blog post, depending on the device you use, where you can easily submit your e-mail address (only) to be included in my mailing list.

    You Can Also Find Me On Social Media:

    Facebook page: The Grateful Girl Cooks!
    Pinterest:
    The Grateful Girl Cooks!
    Instagram:
    jbatthegratefulgirlcooks

    Have a WONDERFUL day!

    Author's signature

    Recipe Source: Fiona at https://www.justsotasty.com/triple-chip-cookie-bars/


    ↓↓ PRINTABLE RECIPE BELOW ↓↓

    0 from 0 votes
    Triple Chip Bar Cookies
    Prep Time
    10 mins
    Cook Time
    20 mins
    Total Time
    30 mins
     
    You'll love these EASY to make Triple Chip Bar Cookies, loaded with semi-sweet, white, and cinnamon chips- have a dozen treats ready to eat in about 30 minutes!
    Category: Dessert
    Cuisine: American
    Keyword: triple chip bar cookies
    Servings: 12
    Calories Per Serving: 280 kcal
    Author: JB @ The Grateful Girl Cooks!
    Ingredients
    • 1/2 cup butter melted
    • 1 cup brown sugar (light or dark) packed
    • 1 Tablespoon vanilla extract
    • 1 large egg
    • cups all purpose flour
    • 1/2 teaspoon baking powder
    • 1/4 teaspoon salt
    • 1 cup assorted chocolate chips (I used semi-sweet, white, and cinnamon)
    Instructions
    1. Preheat oven to 350° F, and line an 8x8 baking dish with aluminum foil, being sure to let the ends of the foil hang over the sides of the baking dish (this will help lift the entire pan of bar cookies out of the dish after baking). Spray the foil (bottom and sides) with non-stick cooking spray.

    2. In a medium sized bowl, mix together melted butter and brown sugar with a spoon until blended. Add egg and vanilla extract; stir well, until combined.

    3. Add flour, baking powder and salt to the batter. Stir. Add assorted chocolate chips. Stir batter until ingredients are fully blended.

    4. Spread batter into prepared baking dish.  Bake at 350° F. for 20-25 minutes, or until top is golden brown and set. You can also test for doneness by inserting a toothpick into middle top of the bar cookies. If it comes out clean with no dough on it, they are ready! Since oven temperatures vary greatly, I recommend checking them at 20 minutes, then bake a few minutes longer, if necessary, to ensure they are baked through.

    5. Once done, remove dish from oven; place dish on wire rack and let bars cool for 10 minutes.  Using the foil overhang, carefully lift the entire pan of bar cookies out of dish and place (still on the foil) onto wire rack to finish cooling. Once cooled completely, cut into 12 equal sized squares. Serve, and enjoy!

    Recipe Notes

    If you can't find cinnamon chips at your store (sometimes they're seasonal), you can substitute butterscotch or peanut butter chips.

    Nutrition Facts
    Triple Chip Bar Cookies
    Amount Per Serving (1 bar (1/12th of total))
    Calories 280 Calories from Fat 117
    % Daily Value*
    Fat 13g20%
    Saturated Fat 8g50%
    Cholesterol 36mg12%
    Sodium 129mg6%
    Potassium 145mg4%
    Carbohydrates 36g12%
    Fiber 1g4%
    Sugar 23g26%
    Protein 2g4%
    Vitamin A 265IU5%
    Calcium 38mg4%
    Iron 1.8mg10%
    * Percent Daily Values are based on a 2000 calorie diet.

    Here’s one more to pin on your Pinterest boards!You'll love these EASY to make Triple Chip Bar Cookies, loaded with semi-sweet, white, and cinnamon chips- have a dozen treats ready to eat in about 30 minutes!

    Coconut Milk Braised Chicken

    Easy Coconut Milk Braised Chicken – big in flavor, low in calories (under 300)! Pan seared seasoned chicken breasts are cooked in, and topped with a spiced coconut milk sauce. You’re gonna LOVE this dish! YUM!
    Easy Coconut Milk Braised Chicken - big flavor, low calorie (under 300)! Pan seared seasoned breasts are cooked in/topped with a spiced coconut milk sauce. YUM!

    We just returned from our annual summer vacation to Whidbey Island, WA. One of my traditions while there is to visit a local community thrift store and browse for cookbooks to add to my collection. I LOVE to look at recipes in cookbooks… it’s been a crazy “down time” hobby of mine for years, even before I started blogging. I love the “thrill of the hunt” for great recipes to make for my family.

    This year I found several (8) “new to me” used cookbooks, including the one I found this recipe for coconut milk braised chicken in, for a tiny fraction of their original retail price. I paid $17.35 for 8 cookbooks, but their original retail value was over $150! Now that’s what I call a DEAL!!!! This recipe, for coconut milk braised chicken sounded really interesting to me, so I gave it a try…wowzer!  This is a FANTASTIC recipe! Seriously GOOD!  It’s also very easy to prepare, so it’s a WIN-WIN in my book!

    The chicken is seasoned nicely (it only has a tiny “kick” to it), and the coconut milk sauce tastes amazing! I “might” have taste-tested the sauce several times as it cooked…yum.  Who knew coconut milk braised chicken could taste so good? Let me show you how easy this dish is to make!

    Scroll Down For A Printable Recipe Card At The Bottom Of The Page

    How To Prepare Coconut Milk Braised Chicken

    Mix spices for the chicken in a small bowl (coriander, cumin, turmeric, cayenne pepper).  Add white wine vinegar, and stir to combine ingredients fully.

    (SIDE NOTE: I was able to hand grind coriander seeds I had dried from our garden a year or two ago… YAY for homegrown! If you use store bought ground coriander, it will be more powdery, so your sauce will be smoother… mine has “bumps” from hand-grinding coriander seeds).

    Mixing spices for braised chicken seasoning

    Give the chicken breasts a rinse, then place them on a paper towel, and pat them dry.  Rub or brush on the seasoning mixture, covering both sides of chicken.

    Chicken breasts are patted dry, then covered with seasoning mix.

    Cook The Chicken

    Heat oil in a large (10-12 inch) non-stick skillet on high heat.  Once the oil gets really hot (but not smoking), add the seasoned chicken breasts. Cook chicken for 2-3 minutes (without moving), then carefully flip chicken over and cook the other side 2-3 minutes.

    Both sides should be a nice golden brown color. Transfer the chicken to a rimmed plate (a rimmed plate will catch any juices from chicken as it sits). Do NOT clean out skillet.

    Seasoned chicken breasts are pan-seared in skillet, until golden brown in color.

    Create The Sauce For The Chicken

    Place onion slices and minced ginger into the same skillet.  Cook, stirring often for 2-3 minutes while the onions turn a golden color. Add the garlic, and stir well while it cooks for 1 more minute. Stir the coconut milk well with a fork or spoon while still in can (it’s thick). Pour entire can of coconut milk into the onion mixture in the skillet. Add salt. Stir well, to combine ingredients.

    (Note: this recipe (as written) calls for LIGHT canned coconut milk, which has far less calories than regular. I only had regular coconut milk in our pantry, so that is what I used, and what you see in photo below).Onions, ginger and garlic are cooked, then coconut milk is added to make sauce.

    Finish The Coconut Milk Braised Chicken

    Cook on medium heat until the sauce comes to a boil. Transfer the chicken breasts back into the sauce. Pour any accumulated juices into the skillet, as well. Reduce heat, and cook chicken (turning once) for 10-12 minutes total, and the chicken is cooked through and no longer pink in the thickest part. I also spoon sauce over the top of chicken occasionally as it cooks.

    Coconut milk sauce is used to braise chicken breasts in skillet.

    When chicken is finished cooking, remove chicken breasts; transfer them back onto the rimmed plate. Cover with foil to keep warm. Turn the heat back up to high and bring sauce to a boil. Cook the coconut sauce for about 4 minutes, or until the sauce has thickened a bit, and reduced down to about 1½ cups.

    Coconut milk sauce is reduced in volume before serving.

    Toast Shredded Coconut While the Sauce Thickens

    While the sauce is cooking, I quickly toast some shredded coconut in a small dry skillet. I use this toasted coconut as a garnish for the finished dish.

    To toast coconut, simply place coconut in skillet, and cook on low heat, stirring often, until coconut turns a golden brown in color (only takes a couple minutes). Remove from heat; transfer coconut to a plate or paper towel to cool. This step can also be done ahead of time or while the chicken is cooking.

    Shredded coconut is toasted for garnish for braised chicken

    Serve Coconut Milk Braised Chicken

    Place the coconut milk braised chicken breasts onto individual plates or a serving platter. Spoon the sauce evenly over the pieces. Garnish with chopped fresh parsley and toasted coconut, (if desired). Season with additional salt, if desired. I served the coconut milk braised chicken with white rice and peas. YUM!

    Coconut Milk Braised Chicken is served with rice and peas.

    Coconut Milk Braised Chicken is garnished with parsley and toasted coconut for serving.

    I REALLY hope you will give this recipe for coconut milk braised chicken a try.  My husband and I really enjoyed it, and I will definitely be making this quick dish again! I sure got my money’s worth finding that old used cookbook!

    Looking For More CHICKEN Recipes?

    If you enjoy chicken dishes, be sure to check out my recipes for Coq au Vin, Chicken Broccoli Fettucine Alfredo, Chicken Fried Chicken, and many, many others, all of which are listed in the Recipe Index shown at the top of the page.

    Interested In More Recipes?

    Thank you for visiting this website. I appreciate you using some of your valuable time to do soIf you’re interested, I publish a newsletter 2 times per month (1st and 15th) with all the latest recipes, and other fun info. I would be honored to have you join our growing list of subscribers, so you never miss a great recipe!
    There is a Newsletter subscription box on the top right side (or bottom) of each blog post, depending on the device you use, where you can easily submit your e-mail address (only) to be included in my mailing list.

    You Can Also Find Me On Social Media:

    Facebook page: The Grateful Girl Cooks!
    Pinterest:
    The Grateful Girl Cooks!
    Instagram:
    jbatthegratefulgirlcooks

    Have a WONDERFUL day!

    Author's signature

    Recipe Source: Sunset – Recipe Annual Cookbook (2002 Edition), page 14, Published November, 2001 by Sunset Publishing Corporation.

    0 from 0 votes
    Coconut Milk Braised Chicken
    Prep Time
    10 mins
    Cook Time
    25 mins
    Total Time
    35 mins
     
    Coconut Milk Braised Chicken - big flavor, low calorie (under 300)! Pan seared seasoned breasts are cooked in/topped with a spiced coconut milk sauce.
    Category: Entree
    Cuisine: American
    Keyword: coconut milk braised chicken
    Servings: 4
    Calories Per Serving: 277 kcal
    Author: JB @ The Grateful Girl Cooks!
    Ingredients
    For Chicken Seasoning:
    • 2 teaspoons ground coriander
    • 1 teaspoon ground cumin
    • 1/4 teaspoon ground dried turmeric
    • 1/2 teaspoon cayenne pepper
    • 2 Tablespoons white wine vinegar
    For Rest of Dish:
    • 4 chicken breasts (5-6 oz. each) (boneless, skinless)
    • 1 teaspoon vegetable oil
    • 1 cup thinly sliced onion
    • 2 Tablespoons minced garlic
    • 1 Tablespoon minced fresh ginger
    • 1 (14 oz.) canned coconut milk (reduced fat)
    • 1/2 teaspoon salt
    • 2 Tablespoons fresh parsley, chopped (optional garnish)
    • 3 Tablespoons shredded coconut
    Instructions
    1. Mix seasonings for chicken in a small bowl (coriander, cumin, turmeric, cayenne pepper).  Add white wine vinegar; stir to combine ingredients fully.

    2. Rinse chicken, then place on paper towel, and pat dry.  Rub or brush on seasoning mixture, covering both sides of chicken. Heat oil in a large (10-12 inch) non-stick skillet on high heat.  Once oil gets hot (but not smoking), add chicken. Cook 2-3 minutes (without moving), then flip chicken over and cook other side 2-3 minutes.  Both sides should be golden brown. Transfer chicken to a rimmed plate (rimmed plate will catch juices from chicken). Do NOT clean out skillet.

    3. Place onion slices and minced ginger into the same skillet.  Cook, stirring often for 2-3 minutes until onions turn a golden color. Add garlic; stir well while it cooks for 1 minute.  Stir coconut milk with a fork or spoon while still in can (it's thick). Pour coconut milk into onion mixture. Add salt. Stir well to combine ingredients.  Cook on medium heat until it comes to a boil.

    4. Transfer chicken back into sauce. Pour any accumulated juices into skillet. Reduce heat; cook chicken for 10-12 minutes total (turning once), until chicken is no longer pink in the middle of thickest part. Spoon sauce over top of chicken often as it cooks. When chicken is done, remove chicken from skillet back onto rimmed plate. Cover chicken with foil to keep warm.

    5. Turn heat back up to high; bring sauce to a boil. Cook sauce for 4 minutes, or until the sauce has thickened a bit, and reduced down to about 1½ cups.

    6. While sauce is reducing, toast coconut (for garnish) by placing shredded coconut into a dry skillet; cook on low, stirring often, until it turns golden brown (takes a couple minutes). Remove from heat; transfer coconut to a paper towel to cool. **This step can also be done ahead of time or while the chicken is cooking.

    7. Place chicken breasts onto individual plates or serving platter. Spoon sauce evenly over chicken. Garnish with chopped fresh parsley and toasted coconut, (if desired), and season with additional salt, to taste. Serve, and enjoy!

    Nutrition Facts
    Coconut Milk Braised Chicken
    Amount Per Serving (1 chicken breast + sauce)
    Calories 277 Calories from Fat 108
    % Daily Value*
    Fat 12g18%
    Saturated Fat 9g56%
    Cholesterol 72mg24%
    Sodium 524mg23%
    Potassium 531mg15%
    Carbohydrates 11g4%
    Fiber 1g4%
    Sugar 4g4%
    Protein 25g50%
    Vitamin A 305IU6%
    Vitamin C 8.5mg10%
    Calcium 30mg3%
    Iron 1.2mg7%
    * Percent Daily Values are based on a 2000 calorie diet.

    Here’s one more to pin on your Pinterest boards!Easy Coconut Milk Braised Chicken - big flavor, low calorie (under 300)! Pan seared seasoned breasts are cooked in/topped with a spiced coconut milk sauce. YUM! 


    Microwaved Ham and Cheese Omelet

    You’re gonna love this microwaved ham cheese omelet on those crazy BUSY days! Mix it up, cook for 1-2 minutes in the microwave, and BOOM… a delicious breakfast is served! Perfect for those mornings when you want a yummy breakfast, but don’t have much time to make it.You're gonna love this microwaved ham cheese omelet on those crazy BUSY days! Mix it up, cook for 1-2 minutes in the microwave, and BOOM... breakfast is served!

    It all started last November… we were doing a COMPLETE kitchen remodel, so I was cooking all our meals without a kitchen. I ended up with a small table set up in our dining room, which held our coffeemaker, toaster and our old microwave.

    That’s it. One electric outlet. One microwave…or THREE MONTHS! My husband and I both work from home, so all 3 meals every single day had to be cooked without a kitchen. Happy to tell ya, we survived, and we had several of these quick microwaved ham cheese omelets during the construction!

    Scroll Down For A Printable Recipe Card At the Bottom Of the Page

    Necessity Is The Mother Of Invention, Right?

    Needless to say, we ate a lot of cereal, toast, and microwaved oatmeal for breakfast. That is, UNTIL I learned how easy it is to microwave eggs and use them to make a microwave  egg breakfast sandwich! I experimented around with another way to quickly make eggs in the microwave and came up with this really quick microwaved ham cheese omelet.

    While our kitchen was being remodeled, I used our microwave to cook.

    If you would like the convenience of making an incredibly quick and delicious ham and cheese omelet before sending the kids off to school or rushing out the door to work, then this one is for YOU! This single serving microwaved ham cheese omelet tastes great, and is so EASY to put together, you will be pleasantly surprised! Plus… it only takes between 1-2 minutes to cook!

    I know traditional omelets are lovely elongated filled bundles of egg goodness, but THIS one is cooked in a custard sized dish (or a mug). It’s a non-traditional size, but still contains all the ham and cheese goodness found in a “normal” omelet!

    Here’s How EASY It Is To Make A Microwaved Ham Cheese Omelet:

    Spray a custard sized microwaveable dish with cooking spray (bottom and sides).  Crack two eggs into dish, and add water, salt and pepper. Mix the ingredients together with a fork until combined (notice I even used a plastic fork during the remodel- hey, whatever is easy!).

    Eggs and water, salt and pepper are mixed in a microwave dish or mug

    Cut a couple thin slices of ham into small pieces (I used thinly sliced deli ham – if using a piece of ham from a large piece of ham, cut it into very small cubes). Grate cheddar cheese. Add the ham pieces and grated cheddar cheese to the egg mixture, and stir to combine. This only takes a minute to get ready, and then all you need to do is microwave it!

    Deli ham and grated cheddar to add to egg mixture for omelet

    Time For the Microwave!

    Once the ingredients are mixed together, place the dish in the microwave. Microwave on high for 1-2 minutes, or until it is cooked through in the center (mine cooked in 1 minute 45 seconds). It looked like the photo below after I took it out of the microwave. See how the eggs puff up a bit when they cook?

    Since microwave temps do vary a bit, check the omelet after one minute. If there is still liquid present, stick it back in the microwave for another 30-45 seconds, then check it again.

    Microwaved ham cheese omelet right out of the microwave!

    Once it is finished cooking, it is ready to eat!  Grab a fork (hopefully NOT a plastic fork), and dig in.  As you can see in the photo below, I took it up to my office and ate it. The eggs come out fluffy, the cheese is melted, and the ham makes it perfect! DELICIOUS!

    Eggs are fluffy in this microwaved ham and cheese omelet.

    I love the convenience and the taste of this microwaved ham cheese omelet, and I hope you will, too! It sure is a real timesaver on busy mornings, and the cleanup is simple!

    Looking for More BREAKFAST Recipes?

    You can find ALL my recipes in the Recipe Index, located at the top of the page. I have a wide variety of breakfast recipes you might enjoy, including:

    Interested In More Recipes?

    Thank you for visiting this website. I appreciate you using some of your valuable time to do soIf you’re interested, I publish a newsletter 2 times per month (1st and 15th) with all the latest recipes, and other fun info. I would be honored to have you join our growing list of subscribers, so you never miss a great recipe!
    There is a Newsletter subscription box on the top right side (or bottom) of each blog post, depending on the device you use, where you can easily submit your e-mail address (only) to be included in my mailing list.

    You Can Also Find Me On Social Media:

    Facebook page: The Grateful Girl Cooks!
    Pinterest:
    The Grateful Girl Cooks!
    Instagram:
    jbatthegratefulgirlcooks

    Have a GREAT day!

    Author's signature

    0 from 0 votes
    Microwaved Ham and Cheese Omelet
    Prep Time
    3 mins
    Cook Time
    2 mins
    Total Time
    5 mins
     
    You're gonna love this microwaved ham cheese omelet on those crazy BUSY days! Mix it up, cook for 1-2 minutes in the microwave, and BOOM... breakfast is served!
    Category: Breakfast
    Cuisine: American
    Keyword: ham and cheese omelet
    Servings: 1
    Calories Per Serving: 318 kcal
    Author: JB @ The Grateful Girl Cooks!
    Ingredients
    • 2 eggs (large)
    • 1 Tablespoon water
    • Pinch salt and pepper (to taste)
    • 2 Tablespoons deli ham (cut into small pieces)
    • 2 Tablespoons grated sharp cheddar cheese
    Instructions
    1. Spray a custard sized microwave-safe dish with cooking spray (bottom and sides).  Crack two eggs into dish, and add water, salt and pepper. Mix ingredients together with a fork until combined.

    2. Cut a couple thin slices of ham into small pieces (I used thinly sliced deli ham - if using a piece of ham from a large ham, cut it into very small cubes). Grate cheddar cheese.  Add ham pieces and grated cheddar cheese to egg mixture, and stir well, to combine. 

    3. Place dish in microwave. Microwave on high for 1-2 minutes, or until it is cooked through in the center (mine cooked in 1 minute 45 seconds). Since microwave temps vary a bit, check the omelet after one minute. If there is still liquid present, stick it back in the microwave for another 30-45 seconds, then check again. When done, remove from microwave... and enjoy!

    Nutrition Facts
    Microwaved Ham and Cheese Omelet
    Amount Per Serving (1 g)
    Calories 318 Calories from Fat 207
    % Daily Value*
    Fat 23g35%
    Saturated Fat 10g63%
    Cholesterol 377mg126%
    Sodium 663mg29%
    Potassium 206mg6%
    Carbohydrates 1g0%
    Protein 24g48%
    Vitamin A 775IU16%
    Calcium 266mg27%
    Iron 2mg11%
    * Percent Daily Values are based on a 2000 calorie diet.

    Here’s one more to pin on your Pinterest boards!You're gonna love this microwaved ham cheese omelet on those crazy BUSY days! Mix it up, cook for 1-2 minutes in the microwave, and BOOM... breakfast is served!

    Parmesan Crust Baked Cod

    Parmesan Crust Baked Cod features fish fillets, coated with butter and a seasoned flour/cornmeal Parmesan cheese topping to form a crust, then baked until done!
    Parmesan Crust Baked Cod features fish fillets, coated with butter and a seasoned flour/cornmeal Parmesan cheese topping to form a crust, then baked until done!

    Do you enjoy seafood? If I’m being honest, it would not be my first choice at any restaurant… but I am always on the lookout for new ideas for preparing fish (in this case COD), since it is so good for you, and is low in calories.

    I found this recipe for Parmesan crust baked cod online and decided to make it for my husband and myself for dinner recently. The recipe, as written, serves 4 (but I cheated and cut the recipe in half since there were only two of us here to eat it). Parmesan crust baked cod is an extremely easy dish to prepare, which is always a plus, in my opinion!

    Cod is a very mild in flavor fish that flakes easily when cooked. I’ve used it in other recipes including Beer Battered Fish and Chips, and Chili, Lime and Cumin Cod.

    Scroll Down For A Printable Recipe Card At The Bottom Of The Page

    How To Make Parmesan Crust Baked Cod

    Mix together flour, cornmeal and spices on a shallow dish. I use a dinner plate and just mixed ingredients with my fingers.  Rinse the cod fillets, then pat them dry on a paper towel.

    Flour/cornmeal coating readied for fresh cod fillets

    Melt the butter in a medium sized bowl, then dip each piece of fish, one at a time in the butter. Let excess butter drip back into bowl, then place fish into seasoned flour/cornmeal mixture on plate. Turn to cover both sides of the cod with the seasoned flour mixture. Place coated fish into a baking dish. Repeat process with other fillets until all are coated and in the baking dish.

    Cod is dipped in butter, than coated with flour mixture before baking

    Drizzle fish pieces with the remaining melted butter. Sprinkle with shredded Parmesan cheese to cover top of fish.

    Bake The Fish

    Bake in a preheated 450° oven for 12-14 minutes. When done, the Parmesan topping will be golden brown in color, and the fish will flake very easily when tested with a fork. I sprinkle it with a few dried parsley flakes right before serving (optional).

    Parmesan crust baked cod, hot out of the oven!

    Time To Serve the Parmesan Crust Baked Cod

    I served the Parmesan crust baked cod with homemade Broccoli au Gratin Rice Pilaf and a simple green salad on the side.

    Parmesan crust baked cod served with salad and rice pilaf

    Baked cod with Parmesan crust is served with salad and rice pilaf

    Hope that you will consider trying this recipe for Parmesan crust baked cod. It’s always nice to try new low calorie recipes for fish, and find ones you enjoy. Thanks for stopping by, and I hope you will come back again soon. Have a great day!

    Looking For Recipes Using COD?

    You can find all of my seafood recipes in the Recipe Index, located at the top of the page. I have quite a few, including several that feature cod, including:

    Interested In More Recipes?

    Thank you for visiting this website. I appreciate you using some of your valuable time to do soIf you’re interested, I publish a newsletter 2 times per month (1st and 15th) with all the latest recipes, and other fun info. I would be honored to have you join our growing list of subscribers, so you never miss a great recipe!
    There is a Newsletter subscription box on the top right side (or bottom) of each blog post, depending on the device you use, where you can easily submit your e-mail address (only) to be included in my mailing list.

    You Can Also Find Me On Social Media:

    Facebook page: The Grateful Girl Cooks!
    Pinterest:
    The Grateful Girl Cooks!
    Instagram:
    jbatthegratefulgirlcooks

    Have a great day!

    Author's signature

    Recipe Adapted From: http://www.dierbergs.com/Recipes/Recipes/P/Pa/Parmesan/Parmesan-Baked-Cod

    0 from 0 votes
    Parmesan Crust Baked Cod
    Prep Time
    6 mins
    Cook Time
    14 mins
    Total Time
    20 mins
     
    Parmesan Crust Baked Cod features fish fillets, coated with butter and a seasoned flour/cornmeal Parmesan cheese topping to form a crust, then baked until done!
    Category: Dinner
    Cuisine: American
    Keyword: parmesan crust baked cod
    Servings: 4
    Calories Per Serving: 171 kcal
    Author: JB @ The Grateful Girl Cooks!
    Ingredients
    • 1 pound cod (4 four-ounce fillets)
    • 2 Tablespoons butter
    • 1/4 teaspoon salt
    • 1/8 teaspoon black pepper
    • 2 teaspoons cornmeal
    • 2 Tablespoons flour
    • 1/2 teaspoon onion powder
    • 2 Tablespoons Parmesan cheese (grated)
    Instructions
    1. Mix together flour, cornmeal and spices on a shallow dish (I used a dinner plate and just mixed ingredients with my fingers).  Rinse the cod fillets, then pat them dry on a paper towel.
    2. Melt the butter in a medium sized bowl, then dip each piece of fish, one at a time in the butter. Let excess butter drip back into bowl, then place fish into flour mixture on plate. Turn to cover both sides of the cod with the seasoned flour mixture. Place coated fish into a baking dish. Repeat process with other fillets.
    3. Drizzle fish pieces with the remaining melted butter. Sprinkle with shredded Parmesan cheese to cover top of fish.
    4. Bake in a preheated 450° oven for 12-14 minutes. When done, the Parmesan topping will be golden brown in color, and the fish will flake very easily when tested with a fork. Sprinkle with dried parsley right before serving, if desired Enjoy!

    Nutrition Facts
    Parmesan Crust Baked Cod
    Amount Per Serving (1 piece)
    Calories 171 Calories from Fat 63
    % Daily Value*
    Fat 7g11%
    Saturated Fat 4g25%
    Cholesterol 65mg22%
    Sodium 296mg13%
    Potassium 468mg13%
    Carbohydrates 3g1%
    Protein 21g42%
    Vitamin A 240IU5%
    Vitamin C 1.2mg1%
    Calcium 48mg5%
    Iron 0.6mg3%
    * Percent Daily Values are based on a 2000 calorie diet.

    Here’s one more to pin on your Pinterest boards!Parmesan Crust Baked Cod features fish fillets, coated with butter and a seasoned flour/cornmeal Parmesan cheese topping to form a crust, then baked until done!