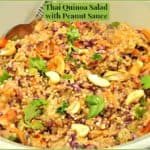
You’ll love this Thai Quinoa Salad, a delicious side dish with crunchy veggies and cashews, in an amazing tasting peanut sauce! Plus, this salad keeps fresh for days, when refrigerated!

Do you cook with quinoa ? This year I have enjoyed finding new recipes and making them for our family using this superfood! I have begun keeping quinoa in our pantry year-round, because there are so many recipes that can be made using it.
What Other Dishes Can You Use Quinoa For?
If you enjoy quinoa (pronounced KEEN-wah), you will enjoy my recipes for Southwest Quinoa Salad, Quinoa Enchilada Casserole, Creamy Chicken Broccoli Quinoa Casserole, or Mediterranean Quinoa Salad. Each of those recipes are fantastic, and full of flavor salads!
Recently I tried a recipe for a Thai Quinoa Salad with Peanut Sauce. Oh man… we LOVED this salad, and enjoyed the many vegetables, crunchy cashews, and the amazing sauce! Best part? It’s EASY to make, and any leftovers last for several days, if refrigerated, so it’s a great little side dish to have in the fridge!
Scroll Down For A Printable Recipe Card At The Bottom Of The Page
How To Make Thai Quinoa Salad:
Start with the peanut sauce. To make peanut sauce, mix all sauce ingredients (except water) in a medium sized bowl. Heat about 3/4 cup of water until it is just about to boil (but not boiling). Slowly add the hot water, a little bit at a time, stirring or whisking the sauce very well as you go.
Continue to slowly add the hot water until the peanut sauce is thin enough to pour, but not too thin! I used a total of 1/2 cup water, and it was perfect! Once done, set sauce aside.

Prepare the quinoa according to the instructions on the package (while quinoa cooks, prep veggies for the salad). Once quinoa is done cooking, let quinoa cool to room temperature.

Place grated carrots, cilantro, shredded cabbage, sliced green onions, and thinly sliced (or diced) red bell pepper into a salad bowl. Sorry for the slightly blurry photo… but aren’t those colors pretty?

Add the cooked, cool quinoa and cashews to the salad.

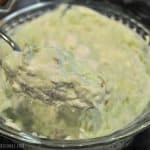
Add The Peanut Sauce to the Quinoa Salad
Pour the peanut sauce into the salad. Stir these ingredients really well, to combine and fully coat everything in sauce.

Ready To EAT!
This is what it looks like once combined. Thai quinoa salad sure is colorful! I garnished it with a few additional cilantro leaves and cashews, and sprinkled salad with sesame seeds before serving.


The night we first had the salad, I served it on the side of chicken we had roasted on our Traeger grill! The crunchy, colorful, flavor-filled Thai quinoa salad tasted fantastic paired with the slices of chicken breast!

I really hope you enjoy this Thai Quinoa Salad. By the way- if you eat a gluten-free diet, simply swap out Tamari for the soy sauce in the sauce, and you’ll be good to go! ENJOY! Have a great day, and thank you for stopping by. Please come back soon!
Looking For More SIDE SALAD RECIPES?
You can find all of my recipes in the Recipe Index, which is located at the top of the page. I have lots of side salad recipes (sweet and savory), including:
Interested In More Recipes?
Thank you for visiting this website. I appreciate you using some of your valuable time to do so. If you’re interested, I publish a newsletter 2 times per month (1st and 15th) with all the latest recipes, and other fun info. I would be honored to have you join our growing list of subscribers, so you never miss a great recipe!
There is a Newsletter subscription box on the top right side (or bottom) of each blog post, depending on the device you use, where you can easily submit your e-mail address (only) to be included in my mailing list.
You Can Also Find Me On Social Media:
Facebook page: The Grateful Girl Cooks!
Pinterest: The Grateful Girl Cooks!
Instagram: jbatthegratefulgirlcooks
Have a GREAT day!

Recipe Source: https://www.thegardengrazer.com/2018/04/fresh-thai-quinoa-salad-with-peanut-html
- 1/2 cup creamy peanut butter
- 2 Tablespoons brown sugar , or maple syrup
- 1½ Tablespoons soy sauce , or tamari (for gluten free)
- 2 cloves garlic , minced
- 2 Tablespoons lime juice (fresh) , or lemon
- 3/4 teaspoon grated ginger
- 1/2 cup hot water ,(to thin to desired consistency)
- 3/4 cup uncooked quinoa
- 1 medium carrot , grated
- 1½ cups red cabbage , shredded
- 1 red bell pepper , thinly sliced or diced
- 2 green onions , sliced (white and green parts)
- 1/3 cup cilantro
- 1/2 cup cashews , or peanuts
- Cilantro, cashews, sesame seeds OPTIONAL, for garnish
Mix all ingredients (except water) in a medium sized bowl. Heat about 3/4 cup of water until it is just about to boil (but not boiling). Slowly add the hot water, a little bit at a time, stirring or whisking the sauce very well as you go. Continue to slowly add the hot water until the peanut sauce is thin enough to pour, but not too thin! **I used a total of 1/2 cup water, and it was perfect!** Once done, set sauce aside.
- Prepare the quinoa according to the instructions on the package (while quinoa cooks, prep veggies for the salad). Once quinoa is done cooking, let quinoa cool to room temperature.
Place grated carrots, cilantro, shredded cabbage, sliced green onions, and thinly sliced (or diced) red bell pepper into a salad bowl. Add cooked, cooled quinoa and the cashews to salad. Add peanut sauce to the salad. Stir well, to thoroughly combine all ingredients. That's it!
Serve at room temperature or chilled, garnished with a few additional cilantro leaves and cashews, and sprinkled with sesame seeds, if desired. Store any leftovers in a sealed container in refrigerator. This salad will keep it's crunch and flavor for 3-4 days if refrigerated. ENJOY!
NOTE: You can substitute Tamari for the soy sauce in the peanut sauce, to make this salad gluten-free.
Here’s one more to pin on your Pinterest boards!


 is super easy to make, delicious, and is a great way to keep your kitchen cool during hot summer days, by cooking outside! / The Grateful Girl Cooks!")


 is super easy to make, delicious, and is a great way to keep your kitchen cool during hot summer days, by cooking outside! / The Grateful Girl Cooks!")
, served with a seasoned Ranch/Sour Cream dipping sauce and BBQ sauce, are the perfect appetizer to munch on at any dinner, get together or party! / The Grateful Girl Cooks!")


, served with a seasoned Ranch/Sour Cream dipping sauce and BBQ sauce, are the perfect appetizer to munch on at any dinner, get together or party! / The Grateful Girl Cooks!")


, with rice, orzo pasta, broccoli and cheese! / The Grateful Girl Cooks!")


, with rice, orzo pasta, broccoli and cheese! / The Grateful Girl Cooks!")


