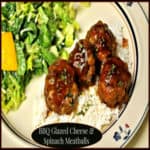
Italian Stuffed Zucchini

Baked Italian stuffed zucchini is a large zucchini, halved & filled with Italian sausage, tomato sauce, spices, Parmesan & mozzarella cheese.
Italian Stuffed Zucchini / The Grateful Girl Cooks!
I love to grow our own vegetables in my raised bed garden. Zucchini is one of my favorites, but sometimes they hide under the leaves until they have grown quite large. This recipe for Italian Stuffed Zucchini uses those great big zucchinis…which is why I love it!

Scroll Down For A Printable Recipe Card At The Bottom Of The Page

A fairly large zucchini is necessary for this dish. You know, the big zucchini you find you overlooked in your garden, or buy at your local Farmer’s market. It also might be the kind a friend gives you in a grocery bag after their harvest. You want a BIG one, so you have plenty of room for the delicious Italian filling!

Growing zucchini in our garden.
I received this recipe for Italian stuffed zucchini from a friend of mine named Shannon. I worked in a school office with Shannon for many years and love her dearly. She was one of my early inspirations for starting a veggie garden (for which I remain grateful!).

What Is In Italian Stuffed Zucchini?

I’ve made stuffed zucchini several times over the years. The pairing of a large garden-grown zucchini stuffed with Italian sausage, garlic, Parmesan and Mozzarella cheeses adds up to a delicious and quick dinner! Italian stuffed zucchini is so easy to prepare, and is an all-in-one meal- meat AND veggies! See how big the zucchini is in the photo below?

Two huge zucchini halves, stuffed, baked, and ready to serve!

Here is a side view of all that melted Parmesan and mozzarella cheese on top! YUM!

Lots of melted cheese on top of the stuffed zucchini.

Have a great day. I hope you will consider trying this recipe for stuffed zucchini, and trust you will enjoy it, too! Thank you for stopping by, and I sincerely hope you will come back again soon.

Looking For More Recipes That Use ZUCCHINI?

You can find all of my recipes in the Recipe Index, located at the top of the page. A couple recipes with zucchini you might also enjoy include:

Interested In More Recipes?

Thank you for visiting this website. I appreciate you using some of your valuable time to do soIf you’re interested, I publish a newsletter 2 times per month (1st and 15th) with all the latest recipes, and other fun info. I would be honored to have you join our growing list of subscribers, so you never miss a great recipe!
There is a Newsletter subscription box on the top right side (or bottom) of each blog post, depending on the device you use, where you can easily submit your e-mail address (only) to be included in my mailing list.

You Can Also Find Me On Social Media:
Facebook page: The Grateful Girl Cooks!
Pinterest: The Grateful Girl Cooks!
Instagram: jbatthegratefulgirlcooks

Author's signature
Recipe given to me by Shannon Newton. Original Recipe Source: Unknown

↓↓ PRINTABLE RECIPE BELOW ↓↓

0 from 0 votes
Italian Stuffed Zucchini
Prep Time
20 mins
Cook Time
25 mins
Total Time
45 mins
 

Baked Italian stuffed zucchini is a large zucchini, halved & filled with Italian sausage, tomato sauce, spices, Parmesan & mozzarella cheese.

Category: Main Dish
Cuisine: Italian
Keyword: italian stuffed zucchini
Servings: 6 (if using really big zucchini)
Calories Per Serving: 710 kcal
Author: JB @ The Grateful Girl Cooks!
Ingredients
  • 1 large zucchini
  • 1 pound ground beef
  • 1/2 pound Italian sausage (or use 2 links with casing removed)
  • 3/4 cup Italian bread crumbs
  • 1 medium onion , finely chopped
  • 1/4 teaspoons oregano
  • salt & pepper (to taste)
  • 2 cloves minced garlic
  • 6 ounces can tomato sauce
  • 3 Tablespoons butter , melted
  • 1 pound mozzarella cheese , grated
  • 1/2 cup Parmesan cheese (Kraft "green container" Parmesan works great)
Instructions
  1. Saute hamburger meat, Italian sausage, onion and garlic until cooked. Drain grease. Put meat mixture in large bowl.
  2. Add breadcrumbs, oregano, salt, pepper and tomato sauce to meat mixture. Mix well.
  3. In a skillet, par boil zucchini in water till tender. Remove zucchini and cut in half-length-wise. Remove seeds with a spoon, creating out a "tunnel" indentation in the zucchini (this will hold the filling-see photo below). Poke holes in zucchini with fork, then brush melted butter all over surface of the zucchini. Season with salt and pepper. Place zucchini halves in a 9x13 baking dish.
  4. Stuff both the carved "tunnels" with the hamburger mixture. Sprinkle with Parmesan cheese.
  5. Cover pan with aluminum foil. Bake at 350 degrees for 25-30 minutes. Remove from oven. Uncover.
  6. Divide grated Mozzarella cheese in half. Sprinkle across top surface of both halves. Place pan back into the oven (uncovered) and continue baking for another 10-15 minutes, or until cheese has melted.
  7. Remove from oven and cut into serving sizes (can usually get 2-3 servings per half, but it depends of course, on the size zucchini you are using). Serve, and enjoy!
Nutrition Facts
Italian Stuffed Zucchini
Amount Per Serving (1 (1/6 of total))
Calories 710 Calories from Fat 468
% Daily Value*
Fat 52g80%
Saturated Fat 25g156%
Cholesterol 162mg54%
Sodium 1336mg58%
Potassium 605mg17%
Carbohydrates 16g5%
Fiber 1g4%
Sugar 4g4%
Protein 41g82%
Vitamin A 970IU19%
Vitamin C 10.3mg12%
Calcium 543mg54%
Iron 3.5mg19%
* Percent Daily Values are based on a 2000 calorie diet.

Here’s one more to pin on your Pinterest boards!Baked Italian stuffed zucchini is a large zucchini, halved & filled with Italian sausage, tomato sauce, spices, Parmesan & mozzarella cheese.


Save

Save

Snowball Cookies

Snowball Cookies (aka Mexican Wedding Cakes or Russian Tea Cakes), are little balls of yummy buttery shortbread with pecans, coated with powdered sugar.Snowball Cookies / The Grateful Girl Cooks! These delicious cookies (aka Mexican Wedding Cakes or Russian Tea Cakes), are little balls of scrumptious buttery shortbread with pecans, coated with powdered sugar.

Traditions… I love them! This recipe for Snowball Cookies is one of those dearly loved holiday traditions in our family. Little balls of buttery shortbread, bursting with pecans (or walnuts) and rolled in sweet powdered sugar are the perfect Christmas treat to eat or give to family and friends!

My Mom made these delicious snowballs cookies for us when we were growing up. To continue the tradition, I’ve been making them with her recipe for over 40 years at Christmas for our family, and as gifts for friends and neighbors.

Scroll Down For A Printable Recipe Card At The Bottom Of The Page

Other Names For Snowball Cookies

I’ve heard these snowball cookies referred to as Mexican Wedding Cookies, Russian Tea Cakes, Shortbread Bites, etc. Seems like everyone has a recipe and a name for them. Whatever they are called, these cookies really are little bites of “shortbread goodness”.

The snowball cookies look like little snowballs because they are round and coated with powdered sugar once baked! They seem to just melt in your mouth (just like snow), and are very easy to make.

If You Enjoy Shortbread Cookies, You Will LOVE Snowball Cookies

Snowball cookies go perfectly with a cup of coffee or tea! These decadent treats are not just for Christmas, because they can be enjoyed ANY time of year. If you enjoy shortbread, you will LOVE these cookies! Rich and buttery, with a hint of sweetness from the powdered sugar, these are one of my favorite Christmas treats!

Here’s a photo of some of the snowball cookies ready to eat… yum! I hope you will give them a try, because they are lip-smackin’ delicious!!

Snowball cookies, cooling on a wire rack.

Time To Roll The Snowball Cookies In Powdered Sugar

The dough for snowball cookies is easy to make. Once made, the cookie dough is chilled, rolled into balls, baked, and then rolled in powdered sugar. That’s really all there is to it! And snowball cookies sure are delicious, so I bet ya can’t eat just one of ’em! YUM.

Snowball cookies, cooling on parchment paper.

I love to eat a couple of these buttery snowball cookies with a good strong cup of coffee to sip on! Ahhhh- they are so good, and are a perfect small bite of goodness! Hope you will consider making a nice big batch of snowball cookies. They are absolutely delicious, no matter what time of year you make them! Have a GREAT day!

Looking For More Cookie Recipes?

All of my cookie recipes can be found in the Recipe Index at the top of the page. Some of our favorites include:

Interested In More Recipes?

Thank you for visiting this website. I appreciate you using some of your valuable time to do soIf you’re interested, I publish a newsletter 2 times per month (1st and 15th) with all the latest recipes, and other fun info. I would be honored to have you join our growing list of subscribers, so you never miss a great recipe! 

There is a Newsletter subscription box on the top right side (or bottom) of each blog post, depending on the device you use, where you can easily submit your e-mail address (only) to be included in my mailing list.

You Can Also Find Me On Social Media:

Facebook page: The Grateful Girl Cooks!
Pinterest:
The Grateful Girl Cooks!
Instagram:
jbatthegratefulgirlcooks


Author's signature

↓↓ PRINTABLE RECIPE BELOW ↓↓

0 from 0 votes
Snowball Cookies
Prep Time
2 hrs 15 mins
Cook Time
15 mins
Total Time
2 hrs 30 mins
 
Snowball Cookies (aka Mexican Wedding Cakes or Russian Tea Cakes), are little balls of yummy buttery shortbread with pecans, coated with powdered sugar.
Category: Cookies
Cuisine: American
Keyword: snowball cookies
Servings: 60 (approx.)
Calories Per Serving: 67 kcal
Author: JB @ The Grateful Girl Cooks!
Ingredients
For cookies:
  • 1 cup butter (2 cubes, room temperature)
  • 1/3 cup granulated sugar
  • 2 teaspoons water
  • 2 teaspoons vanilla
  • 2 cups all-purpose flour
  • 1 cup nuts (walnuts or pecans), chopped
For Topping:
  • 1 cup confectioner's sugar (powdered) to roll the baked cookies in when done
Instructions
  1. Using an electric mixer, cream the butter and sugar together for several minutes until thoroughly mixed. Add the water and vanilla, and mix together. Slowly add the flour (the dough will become very thick). Stir in the nuts.
  2. Cover the dough with plastic wrap and refrigerate for 2-3 hours in refrigerator.
  3. Preheat oven to 325 degrees. Remove dough from refrigerator. Spoon out and roll dough in your hands to make 1" round cookie dough balls.
  4. Bake snowballs on un-greased baking sheets for 15-20 minutes at 325 degrees, or until just slightly browned. Remove cookies from oven; let cool just a minute, then carefully roll each cookie in a bowl of powdered sugar, to cover. Cool on a wire rack. Once cool, coat them a second time with the powdered sugar, if desired. That's it!
Recipe Notes

The prep time indicated is not active prep time. The cookies take only a few minutes to prepare, then dough must be refrigerated (inactive prep time) for a couple hours.

Nutrition Facts
Snowball Cookies
Amount Per Serving (1 cookie)
Calories 67 Calories from Fat 36
% Daily Value*
Fat 4g6%
Saturated Fat 2g13%
Cholesterol 8mg3%
Sodium 27mg1%
Potassium 13mg0%
Carbohydrates 6g2%
Sugar 3g3%
Vitamin A 95IU2%
Calcium 3mg0%
Iron 0.3mg2%
* Percent Daily Values are based on a 2000 calorie diet.

Here’s one more to pin on your Pinterest boards!Snowball Cookies (aka Mexican Wedding Cakes or Russian Tea Cakes), are little balls of yummy buttery shortbread with pecans, coated with powdered sugar.

Save

Save

Pasta Carbonara

Enjoy classic Pasta Carbonara, an Italian dish with pasta cooked in a creamy bacon and onion sauce, with grated Parmesan cheese. It tastes FANTASTIC!Enjoy classic Pasta Carbonara, an Italian dish with pasta cooked in a creamy bacon and onion sauce, with grated Parmesan cheese. It tastes FANTASTIC!

If you love bacon and you love pasta, then you’re going to LOVE this Pasta Carbonara recipe! I love recipes created by Ree Drummond, The Pioneer Woman, because I love her cooking, photos, and sense of humor. This recipe is adapted from her version of this classic pasta dish. I only made a couple of changes to suit our taste buds.
 
This pasta carbonara recipe is RIDICULOUS! I’m not kidding – the smell of bacon, onions, and garlic is amazing as they cook. I made this (again!) for us last night and my husband and I both LOVED it. We might have even exclaimed several times “Oh my gosh- this is so good!” Honestly, this dish is quite simple to make, economical, and if that’s not enough, it’s incredibly delicious! I’ve made it with spaghetti noodles (as in pic above) and fettucine noodles. Any pasta will do!

This recipe makes enough for 6 small servings or 4 generous servings. Since our sons are grown and it is now just the two of us at home, we always have LEFTOVERS! Yes…this pasta dish is truly a good thing. Here’s how to make it:

Scroll Down For A Printable Recipe Card At The Bottom Of The Page

How To Make Pasta Carbonara

Bring water in pan to a boil to cook the pasta. While the water is coming to a boil, fry the bacon in a large skillet, until crisp. Drain out the bacon grease, but leave about. 2 Tablespoons grease still in the skillet. Remove and drain the bacon strips on paper towels. When it has cooled, crumble the bacon into small pieces.

Bacon is cooked until crisp, for the pasta sauce.

Return the skillet you cooked the bacon in back to the stove. Add the onions and mushrooms and cook over medium-low heat until golden brown (3-4 minutes). Carefully add the garlic and crumbled bacon, and continue cooking/stirring for one minute. 

Cooking the onions and mushrooms for the pasta sauce.

The crumbled crisp bacon is added to the carbonara sauce.

Time To Make The Pasta Carbonara Sauce

Now it’s time to make the pasta carbonara sauce. In a small bowl, whisk the eggs, whipping cream, parmesan cheese, parsley, salt, pepper and red pepper flakes together. Now it’s time to “temper the eggs”.

IMPORTANT – “Temper” The Eggs

Because there are fresh eggs in the sauce, you will want to “temper” them. All this means is introducing hot liquid very slowly into the mixture so when you add the hot pasta to the sauce, the eggs won’t scramble. Okay? It’s EASY.  Don’t freak out… here’s what you do:

Take 6 Tablespoons of the hot, starchy water from your pasta (when it is about half way cooked). SLOWLY add the water, by drizzling one Tablespoon at a time to the egg mixture, stirring continuously while adding. Repeat until all 6 Tablespoons of hot starch water have been added. This helps warm up the egg mixture and “tempers” the eggs. 

Eggs, whipping cream, spices and Parmesan cheese are the base for the carbonara sauce.

The egg mixture is mixed together and eggs are tempered before adding to hot skillet.

Turn the heat on the skillet to low. Slowly pour the mixture back into the skillet with the bacon mixture. Stir continuously, until the egg mixture is fully blended in with the bacon mixture.

The tempered egg mixture is added to the skillet to make pasta carbonara sauce.

Now the pasta carbonara sauce is ready to go! The next step is to add the cooked pasta to the sauce! Add the cooked and drained pasta to the skillet with the sauce. Toss well, to fully combine the pasta and the sauce. Once everything is heated through, the pasta carbonara is ready to serve!

Pasta carbonara sauce is fully blended, and is ready for cooked pasta to be added.

Serve The Pasta Carbonara

When ready to serve, place portions of the pasta carbonara onto each plate. If desired, garnish the pasta carbonara with additional bacon crumbles, parsley, and grated Parmesan cheese. This is optional, but it looks (and tastes) good. Dig in, and enjoy this hearty pasta dish! I bet you will love it!

A plate with a serving of pasta carbonara, and a slice of french bread.

Hope you enjoy this pasta carbonara dish, because it really tastes fantastic! Have a wonderful day, friends. Thanks for stopping by, and I hope you will come back again soon.

Looking For More PASTA Recipes?

You can find all of my recipes in the Recipe Index, located at the top of the page. I have quite a few pasta dishes, including:

Interested In More Recipes?

Thank you for visiting this website. I appreciate you using some of your valuable time to do soIf you’re interested, I publish a newsletter 2 times per month (1st and 15th) with all the latest recipes, and other fun info. I would be honored to have you join our growing list of subscribers, so you never miss a great recipe!
There is a Newsletter subscription box on the top right side (or bottom) of each blog post, depending on the device you use, where you can easily submit your e-mail address (only) to be included in my mailing list.

You Can Also Find Me On Social Media:
Facebook page: The Grateful Girl Cooks!
Pinterest: The Grateful Girl Cooks!
Instagram: jbatthegratefulgirlcooks

Author's signature
Recipe Adapted From: http://thepioneerwoman.com/cooking/2012/05/pasta-carbonara/

↓↓ PRINTABLE RECIPE BELOW ↓↓

0 from 0 votes
Pasta Carbonara
Prep Time
10 mins
Cook Time
20 mins
Total Time
30 mins
 

Enjoy classic Pasta Carbonara, an Italian dish with pasta cooked in a creamy bacon and onion sauce, with grated Parmesan cheese. It tastes FANTASTIC!

Category: Entree, Pasta
Cuisine: Italian
Keyword: pasta carbonara
Servings: 6
Calories Per Serving: 557 kcal
Author: JB @ The Grateful Girl Cooks!
Ingredients
  • 6 slices thick cut bacon
  • 1/2 medium onion , chopped finely
  • 4 mushrooms , chopped (optional-I added them)
  • 2 garlic cloves , minced
  • 3 whole eggs
  • 3/4 cup grated Parmesan cheese ,or 1/2 c. fresh and 1/4 c. Kraft "green" can)
  • 3/4 cup heavy whipping cream
  • 1/2 teaspoon salt (add more later, to taste!)
  • 1/4 teaspoon black pepper
  • 1 teaspoon dried parsley flakes
  • 1/2 teaspoon red pepper flakes
  • 3/4 lb. pasta fettucine, spaghetti or other pasta you enjoy
Instructions
  1. While water is coming to a boil for pasta, fry bacon until crisp. Drain most of the grease from skillet, but leave approx. 2 TBSP bacon grease in the skillet. Remove and drain bacon on paper towels. When cool, crumble bacon into small pieces.

  2. Return skillet to stove. Place onions and mushrooms in skillet w/ bacon grease; cook on medium-low until golden brown (3-4 minutes). Add garlic and crumbled bacon; continue cooking for 1 minute, stirring often.

  3. In a small bowl, beat eggs, whipping cream, Parmesan cheese, parsley, salt, pepper and red pepper flakes together using a whisk or fork. Because there are fresh eggs in the sauce, you need to "temper" them. This means introducing hot liquid slowly into the mixture so when you add hot pasta to the sauce, the eggs won't scramble. It's EASY. Here's how (see next step):

  4. Cook pasta according to pkg. directions. When pasta is halfway cooked, measure out 6 Tablespoons of the starchy water. SLOWLY add this water, ONE TABLESPOON AT A TIME, drizzling it slowly into eggs while stirring continuously. Once hot starchy water has been added, the eggs are "tempered". Slowly pour egg mixture back into skillet (on Low heat) with bacon mixture, stirring continuously until egg mixture is fully incorporated.

  5. When pasta is done cooking, drain, then add it to the sauce, stirring while adding. Cook on low heat for 1-2 minutes (do not boil) until pasta and sauce are heated through. Garnish with additional parmesan cheese and bacon crumbles, if desired. Serve and enjoy!

Nutrition Facts
Pasta Carbonara
Amount Per Serving (1 (1/6) of total)
Calories 557 Calories from Fat 288
% Daily Value*
Fat 32g49%
Saturated Fat 15g94%
Cholesterol 157mg52%
Sodium 673mg29%
Potassium 322mg9%
Carbohydrates 46g15%
Fiber 2g8%
Sugar 2g2%
Protein 21g42%
Vitamin A 725IU15%
Vitamin C 1.5mg2%
Calcium 188mg19%
Iron 1.4mg8%
* Percent Daily Values are based on a 2000 calorie diet.

Here’s one more to pin on your Pinterest boards!Enjoy classic Pasta Carbonara, an Italian dish with pasta cooked in a creamy bacon and onion sauce, with grated Parmesan cheese. It tastes FANTASTIC!


Save

Save

Save

Save

Save

Apple Cinnamon Scones

Apple Cinnamon Scones are filled with chopped fresh apples, and topped with a cinnamon/oat topping, in this easy to make, scrumptious breakfast treat!Apple Cinnamon Scones are filled with chopped fresh apples, and topped with a cinnamon/oat topping, in this easy to make, scrumptious breakfast treat!
Anyone who knows me well knows I LOVE a good scone with a strong cup of coffee!  I also love to collect and try new recipes for scones…it’s what I enjoy doing! That is why I tried this yummy recipe for Apple Cinnamon Scones recently!

Do You Like SCONES?

Here’s a collage of several of the scone recipes already on this blog that you might also be interested in looking at. Besides these apple cinnamon scones, they include cinnamon chip, white chocolate raspberry, blackberry, banana nut, chocolate orange, lemon, gingerbread, and cranberry orange, as well as a few others.

A collage of scones on this blog, including apple cinnamon scones.

I found this recipe for apple cinnamon scones on Pinterest several days ago and thought it sounded pretty good. Since I love the smell of apples and cinnamon, I had a hunch I would love that same flavor combination in a scone (what’s not to love?), so off to the kitchen I went.

In no time at all these delicious scones were cooling on our kitchen counter, just waiting to be lovingly gazed at… and then devoured. These Apple Cinnamon Scones are easy, economical to make, and taste delicious. Give them a try…I think you’ll like them!

Scroll Down For A Printable Recipe Card At The Bottom Of The Page

Making Apple Cinnamon Scones

Cold butter is cut into flour mixture, using a pastry blender or two forks, until the butter has been reduced to the size of peas.

Butter is cut into flour for scones.

Honey, chopped apples, and some other ingredients are then added to the flour and butter mixture.

Honey, chopped apples are added to scone batter.

Form The Scone Dough For Baking

The scone dough is mixed, then shaped into a circle and cut into 8 wedges. Oat topping is then sprinkled on… then the apple cinnamon scones are ready to bake!

Scone dough cut into 8 wedges on cutting board

Yum. The apple cinnamon scones are out of the oven, cooled, and are now ready to eat! Look at those apple chunks! I really think you’re gonna enjoy them.

Close up of baked apple cinnamon scone on wire rack

Hope you enjoy these scones as much as we did. They taste perfect, and are lovely, especially when served with a cup of hot coffee or tea!

Scones cooling on wire rack

Hope you will consider trying these apple cinnamon scones, and trust you will enjoy them!  Have a wonderful day!  Be kind to those you meet, and try to be a force for GOOD in this crazy world!

Interested In More Recipes?

Thank you for visiting this website. I appreciate you using some of your valuable time to do soIf you’re interested, I publish a newsletter 2 times per month (1st and 15th) with all the latest recipes, and other fun info. I would be honored to have you join our growing list of subscribers, so you never miss a great recipe!
There is a Newsletter subscription box on the top right side (or bottom) of each blog post, depending on the device you use, where you can easily submit your e-mail address (only) to be included in my mailing list.

You Can Also Find Me On Social Media:
Facebook page: The Grateful Girl Cooks!
Pinterest: The Grateful Girl Cooks!
Instagram: jbatthegratefulgirlcooks

Author's signatureOriginal Recipe Source: http://www.jocooks.com/bakery/pastries/apple-cinnamon-scones/ 

↓↓ PRINTABLE RECIPE BELOW ↓↓

0 from 0 votes
Apple Cinnamon Scones
Prep Time
15 mins
Cook Time
20 mins
Total Time
35 mins
 

Apple Cinnamon Scones are filled with chopped fresh apples, and topped with a cinnamon/oat topping, in this easy to make, scrumptious breakfast treat!

Category: Breakfast
Cuisine: American
Keyword: apple cinnamon scones
Servings: 8 servings
Calories Per Serving: 366 kcal
Author: JB @ The Grateful Girl Cooks!
Ingredients
For Scones:
  • 2 cups all-purpose flour
  • 2/3 cup rolled oats
  • 1 Tablespoon baking powder
  • 1 teaspoon ground cinnamon
  • 1/4 teaspoon baking soda
  • 1/4 teaspoon salt
  • 1/4 teaspoon ground nutmeg
  • 1/2 cup COLD butter
  • 1 large apple , peeled and chopped (I use Granny Smith...nice and firm!)
  • 1/2 cup milk
  • 1/4 cup honey
For Topping:
  • 2 Tablespoons rolled oats
  • 1 Tablespoon Turbinado sugar (if you do not have this, substitute granulated sugar)
  • 1/2 teaspoon ground cinnamon
  • 2 Tablespoons milk
For Glaze:
  • 1 cup powdered sugar
  • 1/2 teaspoon vanilla extract
  • 2-3 teaspoons warm water (or till thin enough for "drizzling" tops of cooked scones
Instructions
  1. Preheat oven to 400 degrees. Prepare a baking sheet by lining it with parchment paper.
  2. In a large bowl, whisk together the flour, oats, baking powder, cinnamon, baking soda, salt and nutmeg. (You can also use a food processor for this, if desired)
  3. Cut in the COLD butter with a pastry blender (or pulse until cut into small crumbs in a food processor).
  4. In a separate bowl, mix together the milk, honey and apple. Add this mixture to the dry ingredients; mix until blended.
  5. Turn the dough out onto a lightly floured work surface. Knead the dough gently until all ingredients are combined. (You might want to lightly flour your hands) Form the dough into an 8-9 inch circle and about 3/4 inch thickness. Slice into 8 wedges. Carefully put the wedges onto prepared baking sheet (keep them in a circle, but leave about 3/4 inch between each wedge).
  6. In a small bowl, mix together the topping ingredients, EXCEPT FOR THE MILK.
  7. Using a pastry brush, lightly brush and cover the tops of each scone with the milk.
  8. Sprinkle each scone with the topping ingredients evenly till all of the mixture has been distributed.
  9. Bake at 400 degrees for approximately 20 minutes (or until golden brown). Remove scones from oven and let them cool on a wire rack. Mix glaze ingredients and decoratively drizzle glaze over tops of scones when cool. Serve... and enjoy!
Nutrition Facts
Apple Cinnamon Scones
Amount Per Serving (1 scone)
Calories 366 Calories from Fat 108
% Daily Value*
Fat 12g18%
Saturated Fat 7g44%
Cholesterol 31mg10%
Sodium 219mg10%
Potassium 272mg8%
Carbohydrates 59g20%
Fiber 2g8%
Sugar 28g31%
Protein 5g10%
Vitamin A 405IU8%
Vitamin C 1.1mg1%
Calcium 104mg10%
Iron 2mg11%
* Percent Daily Values are based on a 2000 calorie diet.

Here’s one more to pin on your Pinterest boards!Apple Cinnamon Scones are filled with chopped fresh apples, and topped with a cinnamon/oat topping, in this easy to make, scrumptious breakfast treat!


Save

Save

Bruleéd Blood Orange Mini-Cheesecakes, with Citrus Sauce

Blood Orange Mini-Cheesecakes are decadent treats, with a graham base, orange/cheesecake filling, ricotta glaze, bruleéd topping and a citrus sauce!Blood Orange Mini-Cheesecakes are decadent treats, with a graham base, orange/cheesecake filling, ricotta glaze, bruleéd topping and a citrus sauce!

My husband and I, along with four dearly loved friends, have enjoyed fantastic “Themed” dinner parties together for the past several years. We have cooked and celebrated great meals with one individual theme for each evening. I prepared these Bruleéd Blood Orange Mini-Cheesecakes with a Citrus Sauce for an “Orange” themed evening.

Scroll Down For A Printable Recipe Card At The Bottom Of The Page

Themed Dinners For The WIN!

Other evenings of “featured ingredients” or “Themes” have included Chocolate, Pomegranate, Orange, Pasta, Mediterranean, Burger Test Kitchen, and Watermelon. Every course for the themed dinner (appetizers, beverages, soups, salads, main dishes and desserts) has to include some form of the featured ingredient.

Our hostess for these evenings, my deeply treasured friend Shari (and my inspiration for all things “food”), is a wonderful cook. She specializes in the main dishes (usually 2-3) and they are unbelievable! I usually end up making the desserts (usually 3-4), and our other friends bring an appetizer and/or the beverages (also utilizing the same “themed” ingredient).

We have so much fun together and LOVE devouring the crazy recipes we all come up with! And we are all so FULL when we leave, we usually just waddle or roll out the door to our cars. Seriously.

How I Came Up with This Recipe

For our “Orange” themed dinner  a year or so ago (named “Night of the Bloody Oranges” by the way), I experimented with a recipe I found online. I ended up bringing these blood orange mini-cheesecakes as one of my dessert contributions that night. I took the original recipe and then made a citrus sauce to accompany it, and the results were delicious!

The cream cheese, ricotta, citrus, and graham cracker crust blend to make this a delightful cheesecake…and when paired with the bruleéd topping AND citrus sauce…whoa! This dessert is really, really good, and it looks great on a dessert plate, too! I’m not sure my photos do this dessert justice. Trust me…these are good. Really good.

Making The Orange Mini-Cheesecakes

Graham cracker crusts are made in small tart pans. These tart pans have removable bottoms, which makes it easy to remove and serve the desserts.

Graham cracker crusts are placed in the tiny tart pans.

The cheesecake filling is loaded in, and then the orange mini-cheesecakes are baked. Once baked, the little cheesecakes cool on wire racks.

The cheesecake topping has been baked, and is cooled completely before removing from pan..


Let the cheesecakes cool completely on a wire rack before removing from pans.

To Serve The Blood Orange Mini-Cheesecakes

Once totally refrigerated, carefully remove the tart pans from each orange mini-cheesecake. Add the ricotta topping to the top of each of the cheesecakes.
 
When you are ready to serve, it is time to bruleé the top of each dessert. Sprinkle sugar on top of each cheesecake. Use a kitchen torch to heat the sugar until the sugar is bruleéd, golden brown, and crunchy on top.  Now the orange mini-cheesecakes are ready to serve!

A ricotta topping is added to the cooled, baked mini-cheesecakes.
Serve The Orange Mini-Cheesecakes

The bruleéd orange mini-cheesecakes are served surrounded by citrus sauce, and with a slice of a blood orange on the side! YUM! It is such a delicious dessert!

The orange mini-cheesecakes are served on top of the citrus sauce.


Hope you enjoy this recipe for blood orange mini-cheesecakes! If you enjoy cheesecake-style desserts, be sure to check out my recipes for Chocolate Fudge Truffle Cheesecake! Have a great day!

Looking For More DESSERT Recipes?

You can find ALL of my recipes in the Recipe Index, located at the top of the page. I have LOTS of delicious dessert recipes, including:

Interested In More Recipes?

Thank you for visiting this website. I appreciate you using some of your valuable time to do soIf you’re interested, I publish a newsletter 2 times per month (1st and 15th) with all the latest recipes, and other fun info. I would be honored to have you join our growing list of subscribers, so you never miss a great recipe!
There is a Newsletter subscription box on the top right side (or bottom) of each blog post, depending on the device you use, where you can easily submit your e-mail address (only) to be included in my mailing list.

You Can Also Find Me On Social Media:
Facebook page: The Grateful Girl Cooks!
Pinterest: The Grateful Girl Cooks!
Instagram: jbatthegratefulgirlcooks

Author's signature


Cheesecake recipe source: http://domesticfits.com/2012/02/22/bruleed-blood-orange-and-ricotta-mini-cheesecakes/

0 from 0 votes
Bruleed Blood Orange Mini-Cheesecakes, with Citrus Sauce
Prep Time
2 hrs 30 mins
Cook Time
12 mins
Total Time
2 hrs 42 mins
 

Blood Orange Mini-Cheesecakes are decadent treats, with a graham base, orange/cheesecake filling, ricotta glaze, bruleéd topping and a citrus sauce!

Category: Dessert
Cuisine: American
Keyword: orange mini-cheesecakes
Servings: 6 servings
Calories Per Serving: 562 kcal
Author: JB @ The Grateful Girl Cooks!
Ingredients
For The Crust:
  • 4 standard sized graham crackers , crushed (about 3/4 cup crushed)
  • 2 Tablespoons brown sugar
  • 3 Tablespoons butter , melted
For The Cheesecake Filling:
  • 8 oz. cream cheese , softened
  • 1/4 cup ricotta cheese
  • 1/2 cup granulated sugar
  • 1 egg
  • 2 Tablespoons blood orange zest (finely grated blood orange peel)
  • 1/4 cup fresh squeezed blood orange juice (or use regular if you can't find blood oranges)
For The Topping:
  • 1/3 cup ricotta cheese
  • 1/3 cup confectioner's sugar (powdered)
  • 1/4 teaspoon vanilla extract
For The Citrus Sauce:
  • 1 cup granulated sugar
  • 1/4 teaspoon salt
  • 2 Tablespoons cornstarch
  • 1 cup orange juice
  • 1/4 cup lemon juice
  • 3/4 cup water
  • 1/2 teaspoon finely grated lemon rind
  • 1/2 teaspoon finely grated orange rind
For The Brulee:
  • Granulated sugar (to garnish and brulee the top of each mini-cheesecake-1 1/2 teaspoons per cheesecake)
Instructions
  1. Make The Crust: Spray mini-cheesecake pans or small tart pans (with removable disk on bottom) with non-stick spray.
  2. Process the graham crackers and brown sugar in food processor until it becomes small crumbs. Add the melted butter and mix until it looks like wet sand. Place 1 Tablespoon of the crumbs into the bottom of each pan. Press the crumbs together with your fingers or a spoon until well compacted. Set aside.
  3. Make The Cheesecake Filling: Place the cream cheese and 1/4 cup ricotta cheese in the bowl of a stand mixer (or a large bowl, if using hand mixer). Beat on high until combined. Add 1/2 cup granulated sugar, and beat on high until mixture is creamed. Add the egg, orange zest and blood orange juice; beat until well combined. (Scrape the bottom of the bowl to ensure all ingredients are mixed in well). Spoon the batter into the prepared crusts, being sure to only fill them 3/4 of the way to the top.
  4. Bake the cheesecakes at 375 degrees for 12-15 minutes (until the cheesecake filling no longer jiggles when rack is shaken). Remove from oven and let them cool on a wire rack for at least 20 minutes before attempting to remove the cheesecakes from the pans. Once they cheesecakes have cooled, press gently upward on the bottom disk. The cheesecake should remove easily from the pan. Now careful remove the bottom "disk" from the cheesecakes. (TIP: If you are making these in batches, as I did, this is where you wash the tart pans and bottom disks and begin again with the crusts).
  5. Once the cheesecakes have cooled, you will notice that they sink slightly in the middle. That is normal. Now make the topping (this will fill in that indentation rather nicely!)
  6. Make The Topping: In a small bowl, mix the ricotta, powdered sugar and vanilla with an electric mixer, till well combined. Top each cheesecake with enough topping to fill the indented hole in the center till entire top surface is level. (see photo above). Place the cheesecakes in the refrigerator and refrigerate for at least 1 hour.
  7. Make The Citrus Sauce: While the cheesecakes are chilling, make the citrus sauce.
  8. Stir together the sugar, salt and cornstarch in a saucepan. Gradually stir in the orange juice (regular), lemon juice and the water. Stir. Cook these ingredients over medium heat till mixture has boiled for 1 minute and has slightly thickened. Remove from heat, and add the finely grated lemon and orange rinds. Cover and let cool in refrigerator until ready to serve.
  9. To Serve: Right before serving, sprinkle an even layer of granulated sugar (approx. 1 1/2 tsp.) over the top surface of each cheesecake. Slowly pass a kitchen torch over the sugar (about 2-3 inches away) until the sugar melts and turns golden brown (be careful not to burn the sugar OR your fingers!).
  10. Place the citrus sauce on each serving plate, and center the cheesecake on top. Garnish with a slice of a blood orange. Take a big bite (scoop up that citrus sauce) and ENJOY!
Recipe Notes

Prep time indicated includes an hour "inactive" refrigeration time.

Nutrition Facts
Bruleed Blood Orange Mini-Cheesecakes, with Citrus Sauce
Amount Per Serving (1 tart)
Calories 562 Calories from Fat 207
% Daily Value*
Fat 23g35%
Saturated Fat 13g81%
Cholesterol 96mg32%
Sodium 363mg16%
Potassium 228mg7%
Carbohydrates 83g28%
Sugar 72g80%
Protein 7g14%
Vitamin A 955IU19%
Vitamin C 36.5mg44%
Calcium 115mg12%
Iron 0.9mg5%
* Percent Daily Values are based on a 2000 calorie diet.

Here’s one more to pin on your Pinterest boards!Blood Orange Mini-Cheesecakes are decadent treats, with a graham base, orange/cheesecake filling, ricotta glaze, bruleéd topping and a citrus sauce!


Save

Flour Tortillas DIY

It’s EASY to make homemade flour tortillas with only a few common ingredients, and no special equipment! Great for quesadillas, enchiladas, or tacos!It's EASY to make homemade flour tortillas with only a few common ingredients, and no special equipment! Great for quesadillas, enchiladas, or tacos!Our family LOVES Mexican food! (It’s my favorite!) I am routinely cooking tacos, enchiladas or quesadillas, and we never seem to get tired of them.  Today I want to show you how to make flour tortillas, because it’s fairly easy!

I’m curious by nature, and love to try and figure out how to make things myself. Because of this, my quest to find a recipe for good homemade flour tortillas began a few years back.

It’s really true that fresh flour tortillas taste better than store-bought (plus you can control what is in them)! These flour tortillas are very easy to make. Why not experiment and give them a try, because there is no fancy equipment needed?

Scroll Down for A Printable Recipe Card At The Bottom Of The Page

Make The Dough For The Flour Tortillas

Make a simple dough for the flour tortillas by mixing flour, baking powder, shortening, salt and hot water. The photo below shows the dough, mixed and ready to knead.

The dough for the flour tortillas is mixed and ready to knead.

The tortilla dough is then formed into 8 balls, all about the same size.

The tortilla dough is shaped into 8 equal sized dough balls.

Each of the dough balls is rolled out into a tortilla shape, and then it is ready for the hot skillet, to cook.

Each of the dough balls is rolled out to form flour tortillas.

Cook the Flour Tortillas

Cook the tortillas in a skillet, one at a time. When small bubbles appear on the surface, flip the tortilla over, to cook the other side.

The tortillas are cooked on a hot skillet until bubbles appear on top, then they are flipped.

This batch of tortillas was used to make shredded chicken quesadillas. My only regret (see photo below) is that I apparently cannot cut a straight line… ha ha!

Flour tortillas can be used to make quesadillas and other dishes!

It’s actually very simple to make homemade flour tortillas from scratch. I really hope you will give it a try sometime! Have a wonderful day, and please come back again soon for more yummy recipes.

Looking For More Recipes Using TORTILLAS?

You can find all of my recipes in the Recipe Index, located at the top of the page. A few recipes that use tortillas include:

Interested In More Recipes?

Thank you for visiting this website. I appreciate you using some of your valuable time to do soIf you’re interested, I publish a newsletter 2 times per month (1st and 15th) with all the latest recipes, and other fun info. I would be honored to have you join our growing list of subscribers, so you never miss a great recipe!
There is a Newsletter subscription box on the top right side (or bottom) of each blog post, depending on the device you use, where you can easily submit your e-mail address (only) to be included in my mailing list.

You Can Also Find Me On Social Media:
Facebook page: The Grateful Girl Cooks!
Pinterest: The Grateful Girl Cooks!
Instagram: jbatthegratefulgirlcooks

Author's signatureRecipe Source: http://www.mennonitegirlscancook.ca/2013/02/homemade-flour-tortillas.html  

↓↓ PRINTABLE RECIPE BELOW ↓↓

0 from 0 votes
Flour Tortillas DIY
Prep Time
10 mins
Cook Time
17 mins
Total Time
27 mins
 

It's EASY to make homemade flour tortillas with only a few common ingredients, and no special equipment! Great for quesadillas, enchiladas, or tacos!

Category: Bread
Cuisine: Mexican
Keyword: flour tortillas
Servings: 8 tortillas
Calories Per Serving: 170 kcal
Author: JB @ The Grateful Girl Cooks!
Ingredients
  • 2 cups all-purpose flour
  • 1/2 teaspoons baking powder
  • 3/4 teaspoon salt
  • 1/4 cup vegetable shortening
  • 2/3 cup hot water
Instructions
  1. Whisk the flour, baking powder & salt together. Cut in the shortening with a pastry blender until crumbly. Pour in the hot water, a little at a time with a fork, and mix until the dough comes together. (I also have made this in the food processor with the dough blade on...works well, also!)
  2. Place dough on a lightly floured work surface, and knead a few minutes until smooth dough ball is formed (use your food processor for this, if using)
  3. Cover the dough with a towel and let it rest for approx. 45 minutes.
  4. Divide the dough into 8 equal pieces; roll it with your hands; shape into a ball. Cover the dough balls with plastic wrap.
  5. Using a rolling pin, roll each ball into a 6-7 inch circle. Don't freak out...they do not have to be "perfect" circles... (that gives them their personality!) You can cook one tortilla while you roll out the next one, if you want.
  6. Preheat your skillet (non-stick or cast iron-done it both ways...cast iron is my preference) on medium high heat. DO NOT ADD OIL.
  7. Place tortilla in the hot skillet; cook till small bubbles appear on the surface before flipping the tortilla to the other side. You will end up cooking each side for about a minute (typically).
  8. Stack and cover the cooked tortillas (with a tea towel) as you remove them from the skillet until all the tortillas are cooked.
Recipe Notes

Once done, you are ready to use them for your favorite recipe. They are even good served hot off the grill, with butter (just sayin'). These tortillas can be frozen to use later. If freezing, be sure to wrap them in plastic wrap, then in aluminum foil for best storage.

Nutrition Facts
Flour Tortillas DIY
Amount Per Serving (1 tortilla)
Calories 170 Calories from Fat 54
% Daily Value*
Fat 6g9%
Saturated Fat 1g6%
Sodium 219mg10%
Potassium 58mg2%
Carbohydrates 23g8%
Protein 3g6%
Calcium 16mg2%
Iron 1.5mg8%
* Percent Daily Values are based on a 2000 calorie diet.

Here’s one more to pin on your Pinterest boards!It's EASY to make homemade flour tortillas with only a few common ingredients, and no special equipment! Great for quesadillas, enchiladas, or tacos!


Save

Save

Pan Seared Creole Salmon

Make delicious, lightly seasoned, pan seared Creole salmon fillets, using only a few ingredients, and have it on the table in under 15 minutes!Make delicious, lightly seasoned, pan seared Creole salmon fillets, using only a few ingredients, and have it on the table in under 15 minutes!
If you are looking for an EASY and DELICIOUS way to prepare salmon…look no further. I debated whether even to post this Pan Seared Creole Salmon as a “recipe”, but decided to preserve it on my blog for all time. This is my “go to” way to prepare salmon fillets. Seriously- this is THE way I have prepared salmon fillets in our home for the past several years. It is so easy to prepare this delicious seafood.

One of my dearest friends (who happens to be a fantastic cook) said it was fantastic after being served this for dinner in our home recently. In the summer my husband loves to grill salmon on a cedar plank on our Weber BBQ (when it sunny and dry outside!), but this truly is how we cook salmon 9 times out of 10. We LOVE it!

I sure hope you will give it a try. Salmon is so good for you, and this recipe only takes 15 minutes, from start to finish! EASY! Here’s how to make this yummy dish:

Scroll Down For A Printable Recipe Card At The Bottom Of The Page

How To Make Pan Seared Creole Salmon

Lightly sprinkle the creole seasoning onto one side of the salmon fillets. I used skinless fillets.

Salmon fillets are lightly seasoned with creole (cajun) seasoning.

This is the seasoning I use (shown below) in case you were wondering. NO, I do not receive any compensation for this product. If you do not have access to this seasoning mix, I recommend my recipe for homemade Cajun seasoning mix. It is a great substitute, and is very easy to make!

The seasoning mix used for this recipe.

Pan-Sear The Salmon Fillets

Heat oil on medium high heat in a large skillet. Place the salmon fillets, seasoned side down, into the hot skillet.

The salmon fillets are pan seared, seasoned side down, in hot oil.

When half of the way done, carefully turn the salmon to the other side and continue cooking until the salmon is done. Depending on the size of the salmon used, it “usually” only takes about 8-9 minutes total to cook the fillets.

Pan seared creole salmon cooking in skillet.

Baste Pan Seared Cajun Salmon With Melted Butter

After turning the fillets to the other side, butter is added to skillet. Let the butter melt in the skillet. Continue cooking side 2 of the salmon, and spoon the melted butter up and all over the salmon continuously while it finishes cooking. As the salmon cooks, the butter browns, and will add GREAT browned butter flavor to the salmon!

Melted butter is used to baste the creole salmon.

Once the fish is cooked through and flakes easily, this pan seared Creole salmon is ready to eat. See just how EASY it is to make? Enjoy!

A pan seared creole salmon fillet is served with rice and vegetables on the side.

Hope you enjoy this delicious pan seared creole salmon. We LOVE it! Have a good day, and I hope you will come back soon.

Looking For More SALMON Recipes?

You can find all of my recipes in the Recipe Index, located at the top of the page. I have quite a few salmon recipes, including:

Interested In More Recipes?

Thank you for visiting this website. I appreciate you using some of your valuable time to do soIf you’re interested, I publish a newsletter 2 times per month (1st and 15th) with all the latest recipes, and other fun info. I would be honored to have you join our growing list of subscribers, so you never miss a great recipe!
There is a Newsletter subscription box on the top right side (or bottom) of each blog post, depending on the device you use, where you can easily submit your e-mail address (only) to be included in my mailing list.

You Can Also Find Me On Social Media:
Facebook page: The Grateful Girl Cooks!
Pinterest: The Grateful Girl Cooks!
Instagram: jbatthegratefulgirlcooks

Author's signature

↓↓ PRINTABLE RECIPE BELOW ↓↓

0 from 0 votes
Pan Seared Creole Salmon
Prep Time
5 mins
Cook Time
10 mins
Total Time
15 mins
 

Make delicious, lightly seasoned, pan seared Creole salmon fillets, using only a few ingredients, and have it on the table in under 15 minutes!

Category: Entree
Cuisine: Cajun
Keyword: pan seared Creole salmon
Servings: 2 servings
Calories Per Serving: 353 kcal
Author: JB @ The Grateful Girl Cooks!
Ingredients
  • 2 Skinless salmon filets (we've used salmon with skin on, it's ok, but messy to remove at serving time).
  • Tony Chachere's Original Creole Seasoning (I'm sure any Cajun or Creole seasoning will work)
  • 1 Tablespoon olive oil
  • 1 Tablespoon butter
Instructions
  1. Lightly (do not put too much seasoning on!) sprinkle the surface of ONE side of each of the salmon filets.
  2. Heat the olive oil in a large non-stick skillet over medium-high heat. Once the skillet is very hot (but not smoking), place the salmon in SEASONING SIDE DOWN. It should sizzle.
  3. After 3-4 minutes (depending on thickness of filets), carefully turn salmon over; continue cooking. After 2-3 minutes (when salmon is right on the verge of being done, add the butter to the pan.
  4. Once the butter is melted, continually spoon up the melted butter and pour over tops of salmon. Continue to "baste" the salmon with butter for a couple of minutes. Remove salmon from skillet and serve!
Nutrition Facts
Pan Seared Creole Salmon
Amount Per Serving (1 g)
Calories 353 Calories from Fat 207
% Daily Value*
Fat 23g35%
Saturated Fat 6g38%
Cholesterol 108mg36%
Sodium 124mg5%
Potassium 833mg24%
Protein 33g66%
Vitamin A 245IU5%
Calcium 20mg2%
Iron 1.4mg8%
* Percent Daily Values are based on a 2000 calorie diet.

Here’s one more to pin on your Pinterest boards!Make delicious, lightly seasoned, pan seared Creole salmon fillets, using only a few ingredients, and have it on the table in under 15 minutes!


Save

Save

Blueberry Cheesecake Ice Cream

Blueberry Cheesecake Ice Cream is the PERFECT frozen treat! Blueberry sauce, cream cheese and graham cracker crumbles add to the taste!Blueberry Cheesecake Ice Cream is the PERFECT frozen treat! Blueberry sauce, cream cheese and graham cracker crumbles add to the taste!
It’s Winter (brr!) and guess what? I’m sharing a recipe today for homemade Blueberry Cheesecake Ice Cream (ironic, isn’t it?). However… ice cream is good any time of the year, right? THIS ice cream is absolutely amazing! Why? Because it’s beautiful and delicious, AND is there ever a reason to NOT have ice cream?!  I don’t think so… Two summers ago I received a new ice cream maker as a gift, and I’ve LOVED trying lots of delicious ice cream recipes since then.

Previously I made homemade ice cream outside in our trusty electric ice cream maker, loading the salt and ice in layers, then waiting and waiting. It always turned out wonderful, but was a bit time consuming and messy.

Scroll Down For A Printable Recipe Card At The Bottom Of The Page

I LOVE My Indoor Ice Cream Machine!

I received a Cuisinart indoor ice cream maker for a birthday… and it has been a game-changer! Now it can be pouring down rain or snowing outside (not that it would EVER happen in Oregon-ha ha) and I can be in my warm little kitchen making ICE CREAM (I know…I’m shouting, but don’t we all scream for ice cream?) No salt or ice to add, and ready in approx. 25 minutes. Yeah…this little ice cream maker is convenient and dangerous (to my waistline).

“Summer Of the Great Ice Cream Experiment”

So…back to my story: I decided to call that summer the “Summer of the Great Ice Cream Experiment”. I tried a new recipe almost every week or two and posted the pics on Facebook. Check out my Recipe Index to see all the ice cream recipes I’ve posted, including Strawberry, Chocolate Peanut Butter, Peach, and Coffee!

Out of all the recipes I tried, this one was my favorite! I made a couple of changes to the original recipe to suit my taste, and voila! An instant “keeper”.

This blueberry cheesecake ice cream is filled with cheesecake flavor, mingled in with with the graham cracker crust swirls, and I must say, the blueberry sauce is amazing! Give this recipe a try…it will NOT disappoint! It’s a party for your mouth.

Note: I am posting the recipe the way I modified it for my 2 quart ice cream maker. I made the topping ingredients and graham cracker crust ingredients as per the original recipe (so I would have extras for storing in my freezer). Refer to original recipe if you are making it in full sized ice cream maker.

Making The Blueberry Sauce

A blueberry sauce is cooked to add to ice cream.

Making Blueberry Cheesecake Ice Cream

A graham cracker mixture is made, then it is layered with the blueberry sauce onto the prepared ice cream…

Graham cracker crumbs are added to finished ice cream in a layer.

The ice cream is layered with graham cracker mixture, and the blueberry sauce. The blueberry cheesecake ice cream is then put into freezer to fully firm up and “ripen” for several hours.

Graham crackers crumbs and blueberry topping are layered in with the ice cream.

Now the blueberry cheesecake ice cream is almost ready to serve, after it has firmed up in the freezer. Now all that is left to do before serving is to top it with additional blueberry sauce and graham cracker mixture! That helps to make the presentation of the blueberry cheesecake ice cream look amazing, too!

Now the scoop of blueberry cheesecake ice cream just needs a topping.

Serving The Blueberry Cheesecake Ice Cream

When you’re ready to serve, just add a little bit of additional toppings to make it pretty! A little spoonful of blueberry sauce, and a sprinkle of graham cracker mix finishes off the blueberry cheesecake ice cream beautifully! Isn’t it gorgeous??? Grab a spoon, and dig in!

The blueberry cheesecake ice cream is topped with blueberry sauce and graham cracker crumbles to serve.

I sure hope you will consider making this delicious dessert!  I’m confident you and your friends or family will really enjoy this yummy frozen treat! The only thing left to do is… grab a spoon, take a big bite, and ENJOY some Blueberry Cheesecake Ice Cream!

Looking For More ICE CREAM Recipes?

You can find all of my recipes in the Recipe Index, located at the top of the page. I have quite a few ice cream recipes to choose from, including:

Interested In More Recipes?

Thank you for visiting this website. I appreciate you using some of your valuable time to do soIf you’re interested, I publish a newsletter 2 times per month (1st and 15th) with all the latest recipes, and other fun info. I would be honored to have you join our growing list of subscribers, so you never miss a great recipe!
There is a Newsletter subscription box on the top right side (or bottom) of each blog post, depending on the device you use, where you can easily submit your e-mail address (only) to be included in my mailing list.

You Can Also Find Me On Social Media:

Facebook page: The Grateful Girl Cooks!
Pinterest:
The Grateful Girl Cooks!
Instagram:
jbatthegratefulgirlcooks

Have a GREAT day!

Author's signature

Adapted From: http://www.tasteofhome.com/recipes/blueberry-cheesecake-ice-cream

↓↓ PRINTABLE RECIPE BELOW ↓↓

0 from 0 votes
Blueberry Cheesecake Ice Cream
Prep Time
20 mins
Cook Time
10 mins
Total Time
30 mins
 

Blueberry Cheesecake Ice Cream is the PERFECT frozen treat! Blueberry sauce, cream cheese and graham cracker crumbles add to the taste!

Category: Dessert
Cuisine: American
Keyword: blueberry cheesecake ice cream
Servings: 8 1/2 cup servings (2 quarts)
Calories Per Serving: 669 kcal
Author: JB @ The Grateful Girl Cooks!
Ingredients
For Blueberry Sauce:
  • 1/2 cup granulated sugar
  • 1 Tablespoons cornstarch
  • 1/2 cup water
  • 1 1/4 cups fresh or frozen blueberries
  • 1 Tablespoon fresh lemon juice
For Graham Cracker Mixture:
  • 2 1/4 cups graham cracker crumbs (about 36 squares)
  • 2 Tablespoons granulated sugar
  • 1/2 teaspoon ground cinnamon
  • 1/2 cup butter , melted
For Ice Cream:
  • 3/4 cup granulated sugar
  • 8 oz. package cream cheese , room temperature
  • 2 Tablespoons fresh lemon juice
  • 2 cups heavy whipping cream
  • 1 cup milk
  • 1 teaspoon vanilla extract
Instructions
  1. In a saucepan, combine the sugar and cornstarch. Whisk in the water until the mixture is smooth. Stir in the blueberries and the lemon juice, then bring this mixture to a boil. Reduce the heat, then simmer (uncovered), for 5-6 minutes or until the mixture has thickened slightly. Stir mixture occasionally. Once the berry mixture has thickened, remove from heat. Cover and refrigerate until fully chilled. (I made this hours before making the ice cream)
  2. Preheat oven to 350 degrees. In a large bowl, combine the cracker crumbs, sugar and cinnamon. Stir in the melted butter and mix till combined. Pat this crumb mixture into an ungreased 9x13 baking pan. Bake at 350 degrees for 10-15 minutes or until the crumbs are lightly browned. When done, remove; cool mixture completely. (I did this ahead of time, as well). When the mixture is completely cooled off, crumble the graham cracker mixture and set aside.
  3. To make the ice cream: In a large bowl, beat all the ice cream ingredients together until the sugar has dissolved (you will have some small cream cheese lumps...this is okay). Fill the ice cream container (the FREEZING cold ice cream container) 2/3 full. Freeze as per the manufacturer's instructions.
  4. When ice cream is done, evenly disperse layers of ice cream, cooled and crumbled graham cracker mixture, and blueberry sauce 3 times. Remember to only use half of the crumbled graham crackers and berry sauce for this (it made extra, remember?) Remember to repeat the layers (for a total of 3 times).
  5. Layer 1: Ice Cream
  6. Layer 2: Graham Cracker Crumbles
  7. Layer 3: Blueberry Sauce
  8. Swirl through the layers with a knife, being sure to take the tip of the knife all the way to the bottom of the bowl or ice cream storage container you are using. Freeze for at least a couple of hours for the ice cream to "firm up".
  9. Once you are ready to serve, scoop it into serving dishes; lightly top each serving with a spoonful of the blueberry sauce and a sprinkling of graham cracker crumbles. Enjoy!
Nutrition Facts
Blueberry Cheesecake Ice Cream
Amount Per Serving (1 (1/2 cup) serving)
Calories 669 Calories from Fat 405
% Daily Value*
Fat 45g69%
Saturated Fat 27g169%
Cholesterol 144mg48%
Sodium 384mg17%
Potassium 187mg5%
Carbohydrates 61g20%
Fiber 1g4%
Sugar 44g49%
Protein 5g10%
Vitamin A 1680IU34%
Vitamin C 4.8mg6%
Calcium 127mg13%
Iron 1.2mg7%
* Percent Daily Values are based on a 2000 calorie diet.

Here’s one more to pin on your Pinterest boards!Blueberry Cheesecake Ice Cream is the PERFECT frozen treat! Blueberry sauce, cream cheese and graham cracker crumbles add to the taste!


Save

Classic Creme Bruleé

Classic Creme Bruleé is a decadent dessert that can be made with only 5 ingredients. It has a custard filling, and a “crackable” sugar crust on top. And… it’s SO GOOD!Classic Creme Bruleé is a decadent dessert that can be made with only 5 ingredients. It has a custard filling, and a "crackable" sugar crust on top.
Well, another Valentine’s Day has come and gone. My husband and I have been sick for the past 10 days with major head colds and stubborn coughs. Time for Classic Creme Bruleé to make it all better, right?

We were going to go out together as is our tradition, but neither of us felt like it this year. We were just too tired and sick to enjoy the celebration.

Well that’s a great sad tale, but the bottom line is “You still have to eat, right?” Right. Believe me, if I could’ve snapped my fingers and summoned my own personal chef to cook a fabulous meal and then clean it all up, I wouldn’t have batted an eyelash.

Scroll Down For A Printable Recipe Card At The Bottom Of The Page

Valentines Day Dinner For The “Sickies”

But I live in reality world, so to ensure we didn’t shrivel up and die from starvation (*note: this might be an over-exaggeration on my part*), I decided to DRAG my “sniffle-y, cough-y” self (in my pajamas, I might add) into the kitchen and rustle up a decent dinner.

I ended up making pan seared Creole Salmon, with fresh asparagus and rice. Not bad for a sicko, right? But wait…there’s more. I decided to give it the old college try and make a nice dessert for my Valentine, even if it killed me. What did I make, you ask?

Classic Creme Bruleé! An easy, but decadent dessert that my husband LOVES. If you have never made creme brulee, give it a try. It’s truly a delicious classic! Hope you enjoy it… I know we did and we will (it made 4 portions…just our luck…leftovers tomorrow!!!!!)

I even changed out of my “sick-girl” pajamas to eat dinner and dessert. A proud moment. The End. Here’s how to make this yummy dessert.

Making Classic Creme Bruleé

Here is the classic creme bruleé, right after it came out of the oven.  My handy dandy butane kitchen torch is waiting patiently nearby to make the “magic” happen!

The creme bruleé has been baked, and chilled. Now time for torching!

Ready For The Blow Torch!

The top of each creme bruleé is sprinkled with a layer of granulated sugar, and now they are ready for the blow torch to crystallize the sugar on top into a crackly delight!

Granulated sugar is spread on the top of each creme bruleé before torching.

The sugar has been torched, and is now browned and hardened to form a crunchy crust on top of this classic creme bruleé.  Ooh… I can hardly wait!

The sugar has been browned and forms a crackable crust on top of the creme bruleé.

Ready To EAT!

Grab a spoon and crack through the top of one of these decadent desserts! Can you see how the sugar crust cracks? That is perfect, and exactly what it is supposed to do! 

This creme bruleé dessert is so creamy, rich tasting, and good. Go ahead… take another bite. You’re gonna enjoy this treat.

The crust is cracked open on the creme bruleé, revealing the custard filling.

Hope you enjoy this classic creme bruleé. It truly is a classic “must try” dessert. Be sure to check out my recipe for Chocolate Creme Brulee. It’s really tasty, too. Have a great day, and come back soon for more recipes!

Looking for More DECADENT DESSERT Recipes?

You can find all of my recipes in the Recipe Index, located at the top of the page. I have LOTS of yummy dessert recipes you might enjoy, including:

Want More Recipes? Get My FREE Newsletter!

I publish a newsletter 2 times per month (1st and 15th) with lots of recipes, tips, etc..
Would you like to join our growing list of subscribers?

There is a Newsletter subscription box on the top right (or bottom) of each blog post, depending on the device you use.
You can submit your e-mail address there, to be added to my mailing list.

Find Me On Social Media:

Facebook page: The Grateful Girl Cooks!
Pinterest:
The Grateful Girl Cooks!
Instagram:
jbatthegratefulgirlcooks

Author's signature

Recipe Adapted from the back of the box my ramekins came in… true story.

↓↓ PRINTABLE RECIPE BELOW ↓↓

0 from 0 votes
Classic Creme Brulee
Prep Time
10 mins
Cook Time
50 mins
Total Time
1 hr
 
Classic Creme Bruleé is a decadent dessert that can be made with only 5 ingredients. It has a custard filling, and a "crackable" sugar crust on top,
Category: Dessert
Cuisine: American
Keyword: classic creme brulee
Servings: 4 servings
Calories Per Serving: 468 kcal
Author: JB @ The Grateful Girl Cooks!
Ingredients
  • 6 egg yolks
  • 1/4 cup granulated sugar
  • 1 1/2 cups heavy whipping cream
  • 3/4 teaspoon pure vanilla extract
  • 6 teaspoons granulated sugar (for the caramelized tops)
  • 6- piece Creme Brulee set , OR 4 ramekins + baking pan (with sides) that will hold all 4 ramekins
Instructions
  1. Preheat oven to 300 degrees.
  2. In a medium bowl, whisk the egg yolks and 1/4 cup sugar together. Whisk until sugar has dissolved and egg yolk mixture is thick and light in color.
  3. Add the whipping cream and vanilla extract; whisk until blended. Strain the mixture into a large bowl, skimming off any foam or bubbles.
  4. Place wire rack in baking pan (if using brulee set) and fill pan halfway with water.
  5. Place the ramekins into the wire rack (if using brulee set) or into the baking pan and carefully pour the brulee mixture into the 4 ramekins. (Note: the water should cover the bottom half of the ramekins)
  6. Bake brulee at 300 degrees until the edges are set, but still slightly loose in the center, approximately 50-55 minutes. Remove pan from oven (carefully!), and let it rest on a wire rack until completely cooled. Once cooled, remove the cups from the rack and chill the brulee at least 2 hours or more.
  7. Before serving, sprinkle 1 1/2 tsp. granulated sugar evenly across the top of each one. Using a small, hand-held torch, carefully melt the topping by keeping the flame approx. 2-3 inches from the top of the sugar and move flame around, as the sugar melts, then caramelizes. Do not burn the sugar...it just needs to be a nice caramel color. As the caramelized sugar cools, it will form a hard "crackable" surface for your brulee. This is my favorite part!
If NOT using a butane torch to carmelize sugar: If you do not own a hand-held torch, you can use this method to caramelize the sugar:
  1. Once you remove the ramekins from the refrigerator where they have chilled, place them back in the pan (no water), and place them NO MORE than 5 inches under the oven's broiler until the sugar melts (in as little as 2 minutes). Remove pan promptly from the oven and cool. Re-chill the brulee in the refrigerator for several minutes, for optimum serving temperature.
Recipe Notes

Other flavor options: replace vanilla with 1 tsp. orange extract, 1 tsp. grated orange peel and 1/4 tsp. nutmeg OR use your favorite chocolate or espresso flavoring.

Nutrition Facts
Classic Creme Brulee
Amount Per Serving (1 g)
Calories 468 Calories from Fat 360
% Daily Value*
Fat 40g62%
Saturated Fat 23g144%
Cholesterol 415mg138%
Sodium 47mg2%
Potassium 96mg3%
Carbohydrates 22g7%
Sugar 18g20%
Protein 6g12%
Vitamin A 1700IU34%
Vitamin C 0.6mg1%
Calcium 93mg9%
Iron 0.7mg4%
* Percent Daily Values are based on a 2000 calorie diet.

Here’s one more to pin on your Pinterest boards!Classic Creme Bruleé is a decadent dessert that can be made with only 5 ingredients. It has a custard filling, and a "crackable" sugar crust on top,


Save

Save

Italian Sausage and Spinach Quiche

This delicious Italian sausage spinach quiche (with mozzarella and Parmesan cheeses) is a meal you can enjoy for breakfast, lunch or dinner! This delicious Italian sausage spinach quiche (with mozzarella and Parmesan cheeses) is a meal you can enjoy for breakfast, lunch or dinner! Nothing like a great piece of Italian Sausage Spinach Quiche to satisfy your hunger pangs, right? I think it’s going to be a great day!  It’s a great day to make a yummy Italian Sausage Spinach Quiche!

I woke up this morning with such peace and anticipation about what God will bring into my life today. I am so grateful He has proved Himself over and over through the years to be completely worthy of my trust and whole heart. “I lift up my eyes to the hills – where does my help come from? My help comes from the Lord, the Maker of heaven and earth”. (Psalm 121:1-2). I sure do love that Bible verse.

Scroll Down For A Printable Recipe Card At The Bottom Of The Page

Breakfast For Dinner!

Sometimes I feel like having “breakfast” for dinner. Do you ever feel that way? Yesterday I asked my husband for his input on choices for dinner. One of the ideas I gave him was quiche, but I really didn’t think (i.e. never dreamed) he would choose this option. But he did! He constantly surprises me. Hmmm… breakfast for dinner (I know some think of quiche as a lunch entree, but for us it’s been a breakfast option). This sounded like a good plan to me.

So… in the afternoon I checked out the ol’ refrigerator to see what my options were. I also found my old “faithful, tried and true” Quiche Lorraine recipe (handwritten on a 3×5 card), that I’ve used for over 25 years, but since I didn’t have any bacon or Swiss cheese in the fridge (bummer!), I decided to experiment with my original recipe a bit and make a quiche with what I DID have!

Necessity Is The Mother Of Invention, Right?

This monumental decision was influenced by the fact that 1) I was sick, 2) I remembered my car battery had died (again…ugh) during our recent snowstorm and 3) my husband was away working on inspections for the afternoon. I knew I wasn’t going to be headed to the grocery store any time soon.

So…being the determined woman I am, I decided to make our quiche with Italian sausage, Parmesan and mozzarella cheeses, and spinach. Sounded promising…I mean, really…how bad could THAT be? Right?

One More Mouth To Feed!

Success! It turned out to be quite delicious. Our oldest son, the same one who asked me a few weeks ago to teach him how to make quiche since he was craving it, but our schedules never came together, happened to drop by after work. He was surprised we were having quiche for dinner.

I was pleasantly surprised and thrilled to have an extra mouth to feed. Perfect! It was wonderful to have him join us. We really enjoyed the quiche, and even had seconds (yep…it WAS good)!  I promised him I would put the recipe on my blog so he could make one, also! So here ya go, Michael…this one’s for YOU! Hope you enjoy it! Love, Mom.

Preparing The Italian Sausage Spinach Quiche

Cooking the Italian sausage and onion…

Italian sausage slices and onions are cooked in skillet.

Spinach and garlic added to Italian sausage and onion…

Spinach and garlic are added to the skillet of sausage and onions.

Pie crust is pricked, and is ready to add the ingredients for quiche.

Pie crust is made and is ready to fill.

Ingredients added to pie crust… now for the egg filling…

Cheeses and meat mixture is added to the unbaked pie crust.

Whipping cream/egg mixture is added to pie shell, and ingredients are gently mixed together. In to the oven it goes!

A whipping cream and egg mixture is added to the quiche filling.

Hot and straight out of the oven!

The Italian Sausage Spinach Quiche is golden brown after baking is complete.

Time for a delicious slice of Italian sausage spinach quiche!

A side view of a slice of Italian sausage spinach quiche on a plate.

Hope you enjoy this Italian sausage spinach quiche! Have a great day.

Looking For Other QUICHE Recipes?

You can find all of my recipes in the Recipe Index, located at the top of the page. A couple quiche recipes you might enjoy include:

Interested In More Recipes?

Thank you for visiting this website. I appreciate you using some of your valuable time to do soIf you’re interested, I publish a newsletter 2 times per month (1st and 15th) with all the latest recipes, and other fun info. I would be honored to have you join our growing list of subscribers, so you never miss a great recipe!
There is a Newsletter subscription box on the top right side (or bottom) of each blog post, depending on the device you use, where you can easily submit your e-mail address (only) to be included in my mailing list.

You Can Also Find Me On Social Media:
Facebook page: The Grateful Girl Cooks!
Pinterest: The Grateful Girl Cooks!
Instagram: jbatthegratefulgirlcooks

Author's signature

↓↓ PRINTABLE RECIPE BELOW ↓↓

0 from 0 votes
Italian Sausage and Spinach Quiche
Prep Time
15 mins
Cook Time
50 mins
Total Time
1 hr 5 mins
 

This delicious Italian sausage spinach quiche (with mozzarella and Parmesan cheeses) is a meal you can enjoy for breakfast, lunch or dinner!

Category: Breakfast
Cuisine: American
Keyword: Italian sausage quiche
Servings: 8 servings
Calories Per Serving: 484 kcal
Author: JB @ The Grateful Girl Cooks!
Ingredients
  • 1 unbaked deep dish pie crust (make sure it is a deep-dish crust/pan)
  • 2 links mild Italian sausage , sliced 1/2 " thin, then quartered (**slice while sausage is still partly frozen...makes it so much easier to slice. You can also remove sausage casing and crumble the sausage, if you prefer!)
  • 1/3 cup onion , finely chopped
  • 1 teaspoon minced garlic
  • 1/3 cup shredded mozzarella cheese
  • 1/2 cup shredded Parmesan cheese (the real stuff)
  • 2 Tablespoons grated Kraft Parmesan cheese
  • 1/2 box frozen chopped spinach (thawed, cooked according to pkg. and drained well)
  • 2 cups heavy whipping cream
  • 4 large eggs
  • 1/4 teaspoon granulated sugar
  • 1/8 teaspoon cayenne pepper
  • 3/4 teaspoon salt
  • 1/4 teaspoon garlic powder
  • small pinch of red pepper flakes (optional)
Instructions
  1. Preheat oven to 425 degrees. While oven is preheating, cook the Italian sausage and onion in a non-stick skillet, till completely cooked through. (5-10 minutes approx.). Drain grease.
  2. In a separate saucepan, cook the spinach per pkg. instructions. Remove from heat, and drain really well to get excess moisture out. Add the cooked/drained spinach and the minced garlic to the skillet with sausage/onion mixture and mix well. Cook for an additional 1-2 minutes.
  3. Prepare the unbaked pie shell by piercing shell with the tines of a fork - (this is to prevent the crust from creating air pockets and puffing up too much while baking)
  4. Add cooked sausage, mozzarella and Parmesan cheese, garlic, onions, and spinach to the unbaked, prepared pie crust.
  5. In a separate bowl, whisk together whipping cream, eggs, sugar, cayenne pepper, salt, and red pepper flakes, until well blended.
  6. Pour egg mixture on top of the sausage/spinach/cheese mixture in pie crust. Gently mix ingredients together (I use a fork-be careful not to mix too hard or you will damage the crust. Just enough to blend the ingredients evenly together!)
  7. Carefully put quiche into the preheated 425 degree oven. Don't spill it!
  8. Bake at 425 degrees for 15 minutes, then reduce heat to 300 degrees and bake for an additional 35-40 minutes. (quiche is done when a knife comes out clean).
  9. Remove quiche pan to a wire rack. Let it cool a bit, slice, serve... and enjoy!
Nutrition Facts
Italian Sausage and Spinach Quiche
Amount Per Serving (1 slice)
Calories 484 Calories from Fat 396
% Daily Value*
Fat 44g68%
Saturated Fat 21g131%
Cholesterol 194mg65%
Sodium 720mg31%
Potassium 189mg5%
Carbohydrates 16g5%
Protein 13g26%
Vitamin A 1110IU22%
Vitamin C 1.6mg2%
Calcium 170mg17%
Iron 1.4mg8%
* Percent Daily Values are based on a 2000 calorie diet.

Here’s one more to pin on your Pinterest boards!This delicious Italian sausage spinach quiche (with mozzarella and Parmesan cheeses) is a meal you can enjoy for breakfast, lunch or dinner!


Save

Save

Save