Category: Desserts

Kiwi Mango Sorbet

Five simple ingredients are the only ingredients needed to make absolutely delicious Kiwi Mango Sorbet! It’s a refreshing frozen treat on hot summer days!Five simple ingredients are the only ingredients needed to make absolutely delicious Kiwi Mango Sorbet! A refreshing frozen treat on hot summer days!

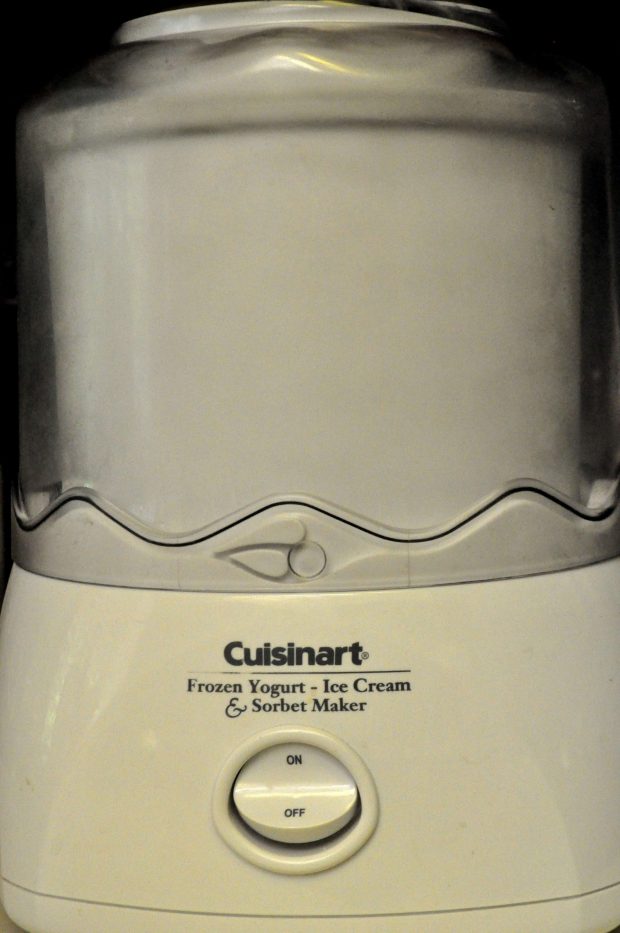
A couple of years ago I was fortunate enough to receive a Cuisinart ice cream maker. Guess what I did over summer vacation? Most of the summer I tried out a large variety of ice cream recipes, including this one for Kiwi Mango Sorbet.

I dubbed it my “Summer Ice Cream Experiment” and am slowly adding the various recipes I experimented with to this blog. It is almost Spring and I find myself longing for warm and clear summer nights, sitting out on our deck with family and friends. We really enjoy these nights when we can- talking, laughing and enjoying a dish of homemade ice cream or sorbet until late in the evening. What a simple pleasure, but so wonderful!

Scroll Down For a Printable Recipe Card At The Bottom Of The Page

Made A Slight “Tweak” To Another Recipe To Make Kiwi Mango Sorbet

This deliciously refreshing recipe originally was for mango sorbet, but I decided to tweak it slightly by using kiwis as the major component. Of course, I still threw in a fresh mango for good measure, and the sorbet results turned out even better than I had hoped for!

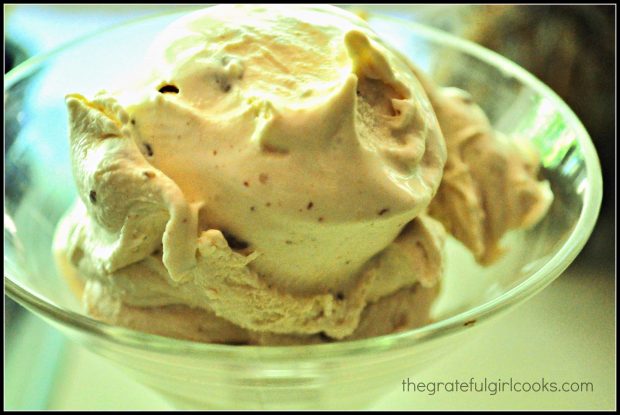
A bowl, with the kiwi mango sorbet in it.

Does It Take A Long Time To Make Kiwi Mango Sorbet?

The entire recipe from start to finish took about 35 minutes to make, and that’s not bad! Then I firmed the sorbet up some in our freezer before serving. This recipe makes a fairly small amount of kiwi mango sorbet, but it can be easily doubled or tripled!

An “inside” ice cream machine been a great addition to our home! (NO…I am not a spokeswoman for this company…I just love this product!) I know this recipe for kiwi mango sorbet would also work in any ice cream maker. This recipe could be doubled easily, for a larger ice cream freezer!

This is the ice cream maker I used to make the sorbet.Kiwi mango sorbet has great flavor, and truthfully is so easy to make with an indoor ice cream machine. Hope you enjoy this delicious frozen dessert! It’s really good! Have a great day.
 

Looking For More ICE CREAM Or SORBET Recipes?

You can find all of my ice cream or sorbet recipes in the Recipe Index, located at the top of the page. A few of our favorites include:

Interested In More Recipes?

Thank you for visiting this website. I appreciate you using some of your valuable time to do soIf you’re interested, I publish a newsletter 2 times per month (1st and 15th) with all the latest recipes, and other fun info. I would be honored to have you join our growing list of subscribers, so you never miss a great recipe!
There is a Newsletter subscription box on the top right side (or bottom) of each blog post, depending on the device you use, where you can easily submit your e-mail address (only) to be included in my mailing list.

You Can Also Find Me On Social Media:
Facebook page: The Grateful Girl Cooks!
Pinterest: The Grateful Girl Cooks!
Instagram: jbatthegratefulgirlcooks

 
Author's signature

Recipe adapted from: Cuisinart Instruction and Recipe Booklet

↓↓ PRINTABLE RECIPE BELOW ↓↓

0 from 0 votes
Kiwi Mango Sorbet
Prep Time
35 mins
Cook Time
0 mins
Total Time
35 mins
 
Five simple ingredients are the only ingredients needed to make absolutely delicious Kiwi Mango Sorbet! A refreshing frozen treat on hot summer days!
Category: Ice Cream/Sorbet
Cuisine: American
Keyword: kiwi mango sorbet
Servings: 6 small servings
Calories Per Serving: 250 kcal
Author: JB @ The Grateful Girl Cooks!
Ingredients
  • 1 ripe but firm mango , peeled, pitted and cubed
  • 7 kiwis , peeled and cubed
  • 2/3 cup granulated sugar
  • 1/2 cup corn syrup
  • 6 Tablespoons fresh lemon or lime juice (I used lemon)
Instructions
  1. Place the mango and kiwi cubes, sugar, corn syrup and lemon juice in a food processor or blender that has been fitted with a metal blade. Pulse to chop the fruit up, then continue to process (or blend) until the mixture is thick and smooth. If necessary, use a spatula to scrape down the sides of the blender canister or work bowl.
  2. Pour fruit puree into freezer canister and freeze per manufacturer's instructions. Ready in about 25-30 minutes.
  3. I recommend putting the finished sorbet in a covered container in the freezer for a couple of hours to "ripen" and firm it up.
Recipe Notes

*This fruit puree can be made up to a day ahead. If making it this way, cover the bowl and keep refrigerated until ready to freeze. Enjoy!

Nutrition Facts
Kiwi Mango Sorbet
Amount Per Serving (1 small serving)
Calories 250
% Daily Value*
Sodium 21mg1%
Potassium 392mg11%
Carbohydrates 64g21%
Fiber 3g13%
Sugar 57g63%
Protein 1g2%
Vitamin A 390IU8%
Vitamin C 114.3mg139%
Calcium 43mg4%
Iron 0.4mg2%
* Percent Daily Values are based on a 2000 calorie diet.

Here’s one more to pin on your Pinterest boards!Five simple ingredients are the only ingredients needed to make absolutely delicious Kiwi Mango Sorbet! A refreshing frozen treat on hot summer days!


Save

Save

Apple Shortbread Tart

This Apple Shortbread Tart is my “GO TO” dessert recipe. It’s one of my absolute favorite desserts… apples, cinnamon, topped with crumbly streusel on a buttery shortbread crust!Delicious Apple Shortbread Tart features apples in a brown sugar/cinnamon sauce on a buttery shortbread crust , topped with a crumbly streusel. SO GOOD!

Do you have one of those recipes? You know…the recipe you love to make when asked to “bring the dessert” to a friend’s home for dinner. Or maybe it’s the recipe you make when you have guests over for dessert and coffee?

Yep…this recipe for apple shortbread tart is MY GO-TO,  and yes…it’s THAT good. Here’s how to make this delicious dessert.

Scroll Down For A Printable Recipe Card At The Bottom Of The Page

How I Found This Recipe

I received this recipe on a little 3×5 card many years ago at a Christmas event for women at the church we attend. Since I never turn down a free recipe, I put it in my purse and brought it home. My thought was that “maybe someday” I would see if it was any good.

Well, that was a long time ago, but I tell you truthfully, I have made this delicious dessert so many times since then I’ve lost count! I’ve even “adapted” the recipe for other kinds of fruit and it works like a charm (peach and boysenberry), but this original version using tart apples is my absolute favorite!

The buttery, shortbread crust with the apples, cinnamon and crumbly shortbread topping is so good! I wish I knew WHO to thank for this, but, my little 3×5 card only had the recipe on it, with no source noted.

So, to the random mystery person out there in the big ol’ world who created this recipe originally…THANK YOU! Update 5/11/14: Turns out one of my dearest friends provided the recipe card I picked up…go figure. Thank you, Shari!

Here’s How To Make This Apple Shortbread Tart

Begin by preparing the shortbread crust. It’s easy to do in a food processor. You can also use a hand held pastry blender to mix the ingredients.  It’s important to add butter to make a good shortbread crust! 

Place all the crust ingredients in the processor, EXCEPT FOR THE EGG YOLKS. Process until the butter has been reduced to the size of peas.

Once the butter in the mixture has been reduced to the size of peas, add the egg yolks and process only until just combined.

Ingredients are processed until butter is reduced to the size of peas.

Egg yolks are added while preparing tart in a food processor.

Form The Crust In A Tart Pan

Firmly press the crust mixture into the bottom and up the sides of a tart pan (with removable bottom). Remember to reserve some of the shortbread topping for later!

Set the reserved shortbread topping aside, because it will be used later, to top the fruit filling, before baking.

A shortbread crumble mixture is pressed into a metal tart pan to form a firm crust.

Add Apple Filling and Shortbread Crumb Topping

Mix the apple slices with the brown sugar/cinnamon mixture in a large mixing bowl. Arrange the apple slices on top of the shortbread crust, mounding them up a bit in the middle of the pan.

Apple slices arranged in metal tart pan

The remaining shortbread crust mixture is sprinkled over the top of the apples as a streusel. Use all of the crumb topping to cover the entire surface.

Now the apple shortbread tart is ready to go into the oven! Make sure your oven is pre-heated to 400°F. before adding the tart.

Streusel topping spread on apple shortbread tart

Bake The Apple Shortbread Tart

Bake the fruit tart at 400°F for about 45 minutes.  Once done, the fruit filling should be slightly bubbling around the edge, and the top will be golden brown. Here is what the apple shortbread looks like, fresh from the oven and cooling down a bit on a wire rack!

After the apple tart has cooled for 5-10 minutes, remove it from the tart pan. To do this, gently push up from the bottom to separate the bottom tray from the scalloped edge ring.

Apple tart cooling down on wire rack after baking

Time To Enjoy The Apple Shortbread Tart

Slice the apple shortbread tart into 8 pieces, and it is best served warm, or at room temperature. Serve the apple shortbread tart with homemade vanilla ice cream and drizzle it with a warm golden caramel sauce, for an extra burst of flavor.

Slice of apple tart on plate with ice cream and caramel sauce

Here is the apple shortbread tart, served with a dark browned caramel sauce over the tart and a scoop of vanilla bean ice cream. Can you tell I’ve made this dessert a LOT?

This slice of apple shortbread tart is served with browned caramel sauce and ice cream

Now the only thing left to do is grab a fork!  Dig in and enjoy a big old slice of this absolutely DELICIOUS apple shortbread tart!

Caramel swirl ice cream was served with the apple tart this time (seen in photo below). Boy was it yummy!

A slice of the apple shortbread tart on plate with spoon and ice cream.

I really hope you will give this absolutely delicious apple shortbread tart a try. It is FANTASTIC, and I’m positive you (and your family and friends) will LOVE it!

Have a great day, and please come back again soon for more yummy recipes. Take care, may God bless you… and have a GREAT day!

Looking For More FRUIT TART Recipes?

You can find ALL of my recipes in the Recipe Index, located at the top of the page. I have several delicious fruit tarts you might want to check out, including:

Want More Recipes? Get My FREE Newsletter!

I publish a newsletter 2 times per month (1st and 15th) with lots of recipes, tips, etc..
Would you like to join our growing list of subscribers?

There is a Newsletter subscription box on the top right (or bottom) of each blog post, depending on the device you use.
You can submit your e-mail address there, to be added to my mailing list.

Find Me On Social Media:

Facebook page: The Grateful Girl Cooks!
Pinterest:
The Grateful Girl Cooks!
Instagram:
jbatthegratefulgirlcooks

Author's signatureRecipe Adapted From: Shari Altree

↓↓ PRINTABLE RECIPE BELOW ↓↓

0 from 0 votes
Apple Shortbread Tart
Prep Time
20 mins
Cook Time
45 mins
Total Time
1 hr 5 mins
 
Delicious Apple Shortbread Tart features apples in a brown sugar/cinnamon sauce on a buttery shortbread crust , topped with a crumbly streusel. SO GOOD!
Category: Dessert
Cuisine: American
Keyword: apple shortbread tart
Servings: 8 servings
Calories Per Serving: 395 kcal
Author: JB @ The Grateful Girl Cooks!
Ingredients
For the crust:
  • 2 cups all-purpose flour
  • 1/2 cup granulated sugar
  • 1/4 teaspoon salt
  • 3/4 cup COLD butter (cut in small chunks)
  • 2 egg yolks
For the filling:
  • 1 1/4 pounds tart apples (about 6 med. apples - Gravenstein or Granny Smith for best results)
  • 1/4 cup brown sugar , packed
  • 1 Tablespoon all-purpose flour
  • 1/2 teaspoon cinnamon
Instructions
  1. Preheat oven to 400 degrees.
  2. Blend all crust ingredients EXCEPT FOR EGG YOLKS until they are the texture of coarse meal. (You can use a fork, a pastry blender or a food processor). Add egg yolks and mix well to blend. **Set aside 1/4 of this mixture and save for later**. Using the remaining 3/4 of the crumbs, firmly pat them down over the bottom and up the sides of a tart pan with removable bottom disk or a large pie pan. Make sure crust is firmly pressed down into the pan and the sides to form a solid crust.

  3. Peel, core, and cut the apples into thin slices. Place sliced apples in a large bowl. Add 1/4 cup brown sugar, 1 TBSP flour and 1/2 tsp. cinnamon. Mix well to coat apple slices.

  4. Once apples and dry ingredients are mixed together, gently "pour" or spoon apples onto crust. Position apples so they mound in the center and fill in the crust.

  5. Sprinkle reserved 1/4 of the crust mixture over the top. I find it helpful to hold one hand up around the edge of the pan to try and catch the crumbles before they fall off the tart. Just scoop up any crumbles that fall onto your work surface and put them back on that tart! Cover the entire top of the tart.

  6. Bake at 400 degrees for 15 minutes, then reduce heat to 350 degrees and bake until the top begins to turn golden brown (approx. 25-30 minutes). Keep an eye on it and remove tart when golden brown. Let cool just a bit. If using a tart pan, hold your hand on the bottom of the tart and gently press upward on the metal disk to release the tart from the pan. Place the tart (keeping disk on the bottom of tart) on serving dish, slice and serve.

  7. Serve warm, with vanilla ice cream...and ENJOY!
Nutrition Facts
Apple Shortbread Tart
Amount Per Serving (1 serving)
Calories 395 Calories from Fat 162
% Daily Value*
Fat 18g28%
Saturated Fat 11g69%
Cholesterol 94mg31%
Sodium 230mg10%
Potassium 128mg4%
Carbohydrates 53g18%
Fiber 2g8%
Sugar 26g29%
Protein 4g8%
Vitamin A 635IU13%
Vitamin C 3.3mg4%
Calcium 26mg3%
Iron 1.7mg9%
* Percent Daily Values are based on a 2000 calorie diet.

Here’s one more to pin on your Pinterest boards!Delicious Apple Shortbread Tart features apples in a brown sugar/cinnamon sauce on a buttery shortbread crust , topped with a crumbly streusel. SO GOOD!

Save

Save

Save

Save

Copycat Cherry Garcia Ice Cream

Dark chocolate and Bing cherries are featured in delicious Cherry Garcia Ice Cream (copycat) recipe, made in an electric ice cream maker!Dark chocolate and Bing cherries are featured in delicious Cherry Garcia Ice Cream (copycat) recipe, made in an electric ice cream maker! Here’s a great recipe for Copycat Cherry Garcia Ice Cream I discovered two years ago during my Summer Ice Cream Experiment! I spent the summer experimenting with many homemade ice cream recipes in my Cuisinart Ice Cream maker.

Scroll Down For A Printable Recipe Card At The Bottom Of The Page

About Cherry Garcia Ice Cream

I only managed to get one picture of this yummy cherry garcia ice cream before we dove in….YUM!  I love it when I can experiment and make “copycat” recipes. This is a knockoff recipe for one of the most famous (and wildly popular) of Ben and Jerry’s ice cream flavors. If you love the original, you will love this simple to make version! Cherry Garcia ice cream is filled with juicy Bing cherries, sweet cream, and chocolate. 

Summer is just around the corner, and I hope you will give this recipe a try…perfect for a hot summer evening (or let’s get real…ANYTIME you require ice cream…stat!). Have a great day, and hope you enjoy this recipe for Cherry Garcia ice cream!

Looking For More ICE CREAM Recipes?

You can find all of my recipes in the Recipe Index, which is located at the top of the page. I have LOTS of ice cream recipes you’ll enjoy, including:

Interested In More Recipes?

Thank you for visiting this website. I appreciate you using some of your valuable time to do soIf you’re interested, I publish a newsletter 2 times per month (1st and 15th) with all the latest recipes, and other fun info. I would be honored to have you join our growing list of subscribers, so you never miss a great recipe!
There is a Newsletter subscription box on the top right side (or bottom) of each blog post, depending on the device you use, where you can easily submit your e-mail address (only) to be included in my mailing list.

You Can Also Find Me On Social Media:
Facebook page: The Grateful Girl Cooks!
Pinterest: The Grateful Girl Cooks!
Instagram: jbatthegratefulgirlcooks

Author's signatureRecipe source: My regular vanilla base (from Cuisinart book) + experimenting

↓↓ PRINTABLE RECIPE BELOW ↓↓

0 from 0 votes
Copycat Cherry Garcia Ice Cream
Prep Time
30 mins
Cook Time
0 mins
Total Time
30 mins
 

Dark chocolate and Bing cherries are featured in delicious Cherry Garcia Ice Cream (copycat) recipe, made in an electric ice cream maker!

Category: Ice Cream
Cuisine: American
Keyword: cherry garcia ice cream
Servings: 10 (1/2 cup servings) 1.5 qts. total
Calories Per Serving: 299 kcal
Author: JB @ The Grateful Girl Cooks!
Ingredients
  • 1/2 cup dark chocolate , grated finely, then covered & refrigerated (to keep it cold)
  • 1/2 cup fresh Bing cherries , pitted, halved, & then covered & refrigerated (to keep them cold)
  • 1/2 cup Egg substitute
  • 3/4 cup granulated sugar
  • 1/4 teaspoon vanilla extract
  • 2 cups heavy whipping cream
  • 1 cup milk
Instructions
  1. Prepare the chocolate and the cherries as indicated in ingredient list. Place them in separate bowls; cover and keep refrigerated until just before ice cream has finished freezing.
  2. In a large bowl, whisk the egg substitute, sugar, and vanilla together until the sugar has dissolved (a couple minutes). Pour in the whipping cream and milk; continue whisking until fully blended.
  3. Transfer the ice cream mixture to your ice cream maker, and freeze according to the manufacturer's instructions. About 5 minutes before the ice cream is done (and has thickened), add the grated chocolate and cherries to the ice cream mixture. Continue churning the ice cream for remainder of time indicated for your machine. When done, transfer mixture to a container suitable for a freezer, and let it continue to "ripen" (i.e. firm up) in the freezer. When ready to serve, grab an ice cream scoop and dig in!
Nutrition Facts
Copycat Cherry Garcia Ice Cream
Amount Per Serving (1 (1/2 cup serving))
Calories 299 Calories from Fat 198
% Daily Value*
Fat 22g34%
Saturated Fat 13g81%
Cholesterol 67mg22%
Sodium 55mg2%
Potassium 170mg5%
Carbohydrates 22g7%
Fiber 1g4%
Sugar 19g21%
Protein 3g6%
Vitamin A 865IU17%
Vitamin C 1.1mg1%
Calcium 75mg8%
Iron 1.3mg7%
* Percent Daily Values are based on a 2000 calorie diet.

Here’s one more to pin on your Pinterest boards!Dark chocolate and Bing cherries are featured in delicious Cherry Garcia Ice Cream (copycat) recipe, made in an electric ice cream maker!


Save

Save

Cantaloupe Sorbet

Cantaloupe Sorbet is easy to make (only 4 ingredients), and is a cold, refreshing frozen dessert treat to enjoy on a hot summer day!Cantaloupe Sorbet is easy to make (only 4 ingredients), and is a cold, refreshing frozen dessert treat to enjoy on a hot summer day!

A couple of summers ago I experimented making many different kinds of homemade ice cream and sorbets with my ice cream maker. This Cantaloupe Sorbet is one of the recipes I made… and guess what? It is very EASY to make, and is refreshing and DELICIOUS!
 
I began searching for fruit sorbet recipes online and found this simple one for Cantaloupe Sorbet. The recipe sounded a bit unusual and was a perfect candidate for my Summer Ice Cream Experiment. This experiment involved making and eating a variety of as many different ice creams  as I could without gaining an ounce…ha ha!
 
Scroll Down For A Printable Recipe Card At The Bottom Of The Page

Making Cantaloupe Sorbet Is Simple!

When I made this sorbet, all that was needed was to mix up the ingredients (super easy), and refrigerate the mixture for about 6 hours. Later that evening all I had to do is haul out my trusty ice cream maker and voila…cantaloupe sorbet! YUM YUM YUM! This frozen, sweet treat is so refreshing and delicious!
 
Here’s the most important tip I can give you when making this delicious sorbet: Make sure you get a wonderfully RIPE cantaloupe for best flavor!)
 

Picture of the ice cream maker used to make cantaloupe sorbet.

This would be a perfectly yummy frozen dessert on a warm summer evening…hope you will give it a try. It’s very refreshing! With only 4 ingredients, this cantaloupe sorbet recipe is also simple to prepare! Hope you will give it a try… it’s really tasty!

Looking For More ICE CREAM Or SORBET Recipes?

You can find ALL of my recipes in the Recipe Index, located at the top of the page. I have lots of frozen treat recipes, including Blueberry Cheesecake Ice Cream, Butter Pecan Ice Cream, and Homemade Strawberry Ice Cream! Another sorbet recipe you might enjoy is Kiwi Mango Sorbet – yum!

Interested In More Recipes?

Thank you for visiting this website. I appreciate you using some of your valuable time to do soIf you’re interested, I publish a newsletter 2 times per month (1st and 15th) with all the latest recipes, and other fun info. I would be honored to have you join our growing list of subscribers, so you never miss a great recipe!
There is a Newsletter subscription box on the top right side (or bottom) of each blog post, depending on the device you use, where you can easily submit your e-mail address (only) to be included in my mailing list.

You Can Also Find Me On Social Media:
Facebook page: The Grateful Girl Cooks!
Pinterest: The Grateful Girl Cooks!
Instagram: jbatthegratefulgirlcooks

Author's signatureRecipe Source: http://tastykitchen.com/recipes/desserts/cantaloupe-sorbet/

↓↓ PRINTABLE RECIPE BELOW ↓↓

0 from 0 votes
Cantaloupe Sorbet
Prep Time
30 mins
Cook Time
0 mins
Refrigeration Time
6 hrs
Total Time
6 hrs 30 mins
 
Cantaloupe Sorbet is easy to make (only 4 ingredients), and is a cold, refreshing frozen dessert treat to enjoy on a hot summer day!
Category: Ice Cream/Sorbet
Cuisine: American
Keyword: cantaloupe sorbet
Servings: 8 (1/2 cup) servings
Calories Per Serving: 130 kcal
Author: JB @ The Grateful Girl Cooks!
Ingredients
  • 1 whole very ripe cantaloupe , peeled, seeds removed, and cut into chunks
  • 2/3 cup granulated sugar
  • 1/3 cup light corn syrup
  • 6 Tablespoons fresh lemon juice (approx. 2 lemons)
Instructions
  1. Add all ingredients to a food processor (or blender) and puree till smooth.
  2. Place pureed fruit in the refrigerator (covered), and refrigerate at least 6 hours (or overnight).
  3. Pour ingredients into an ice cream maker and freeze per manufacturer's directions.
  4. Serve in chilled serving dishes and ENJOY!
Recipe Notes

**Prep time includes chilling time in the refrigerator.
**Be sure to use very ripe cantaloupe for best flavor.

Nutrition Facts
Cantaloupe Sorbet
Amount Per Serving (1 serving)
Calories 130
% Daily Value*
Sodium 20mg1%
Potassium 195mg6%
Carbohydrates 33g11%
Sugar 33g37%
Vitamin A 2335IU47%
Vitamin C 29.7mg36%
Calcium 8mg1%
Iron 0.1mg1%
* Percent Daily Values are based on a 2000 calorie diet.

Here’s one more to pin on your Pinterest boards!Cantaloupe Sorbet is easy to make (only 4 ingredients), and is a cold, refreshing frozen dessert treat to enjoy on a hot summer day!


Save

Save

Save

Save

Save

Snowball Cookies

Snowball Cookies (aka Mexican Wedding Cakes or Russian Tea Cakes), are little balls of yummy buttery shortbread with pecans, coated with powdered sugar.Snowball Cookies / The Grateful Girl Cooks! These delicious cookies (aka Mexican Wedding Cakes or Russian Tea Cakes), are little balls of scrumptious buttery shortbread with pecans, coated with powdered sugar.

Traditions… I love them! This recipe for Snowball Cookies is one of those dearly loved holiday traditions in our family. Little balls of buttery shortbread, bursting with pecans (or walnuts) and rolled in sweet powdered sugar are the perfect Christmas treat to eat or give to family and friends!

My Mom made these delicious snowballs cookies for us when we were growing up. To continue the tradition, I’ve been making them with her recipe for over 40 years at Christmas for our family, and as gifts for friends and neighbors.

Scroll Down For A Printable Recipe Card At The Bottom Of The Page

Other Names For Snowball Cookies

I’ve heard these snowball cookies referred to as Mexican Wedding Cookies, Russian Tea Cakes, Shortbread Bites, etc. Seems like everyone has a recipe and a name for them. Whatever they are called, these cookies really are little bites of “shortbread goodness”.

The snowball cookies look like little snowballs because they are round and coated with powdered sugar once baked! They seem to just melt in your mouth (just like snow), and are very easy to make.

If You Enjoy Shortbread Cookies, You Will LOVE Snowball Cookies

Snowball cookies go perfectly with a cup of coffee or tea! These decadent treats are not just for Christmas, because they can be enjoyed ANY time of year. If you enjoy shortbread, you will LOVE these cookies! Rich and buttery, with a hint of sweetness from the powdered sugar, these are one of my favorite Christmas treats!

Here’s a photo of some of the snowball cookies ready to eat… yum! I hope you will give them a try, because they are lip-smackin’ delicious!!

Snowball cookies, cooling on a wire rack.

Time To Roll The Snowball Cookies In Powdered Sugar

The dough for snowball cookies is easy to make. Once made, the cookie dough is chilled, rolled into balls, baked, and then rolled in powdered sugar. That’s really all there is to it! And snowball cookies sure are delicious, so I bet ya can’t eat just one of ’em! YUM.

Snowball cookies, cooling on parchment paper.

I love to eat a couple of these buttery snowball cookies with a good strong cup of coffee to sip on! Ahhhh- they are so good, and are a perfect small bite of goodness! Hope you will consider making a nice big batch of snowball cookies. They are absolutely delicious, no matter what time of year you make them! Have a GREAT day!

Looking For More Cookie Recipes?

All of my cookie recipes can be found in the Recipe Index at the top of the page. Some of our favorites include:

Interested In More Recipes?

Thank you for visiting this website. I appreciate you using some of your valuable time to do soIf you’re interested, I publish a newsletter 2 times per month (1st and 15th) with all the latest recipes, and other fun info. I would be honored to have you join our growing list of subscribers, so you never miss a great recipe! 

There is a Newsletter subscription box on the top right side (or bottom) of each blog post, depending on the device you use, where you can easily submit your e-mail address (only) to be included in my mailing list.

You Can Also Find Me On Social Media:

Facebook page: The Grateful Girl Cooks!
Pinterest:
The Grateful Girl Cooks!
Instagram:
jbatthegratefulgirlcooks


Author's signature

↓↓ PRINTABLE RECIPE BELOW ↓↓

0 from 0 votes
Snowball Cookies
Prep Time
2 hrs 15 mins
Cook Time
15 mins
Total Time
2 hrs 30 mins
 
Snowball Cookies (aka Mexican Wedding Cakes or Russian Tea Cakes), are little balls of yummy buttery shortbread with pecans, coated with powdered sugar.
Category: Cookies
Cuisine: American
Keyword: snowball cookies
Servings: 60 (approx.)
Calories Per Serving: 67 kcal
Author: JB @ The Grateful Girl Cooks!
Ingredients
For cookies:
  • 1 cup butter (2 cubes, room temperature)
  • 1/3 cup granulated sugar
  • 2 teaspoons water
  • 2 teaspoons vanilla
  • 2 cups all-purpose flour
  • 1 cup nuts (walnuts or pecans), chopped
For Topping:
  • 1 cup confectioner's sugar (powdered) to roll the baked cookies in when done
Instructions
  1. Using an electric mixer, cream the butter and sugar together for several minutes until thoroughly mixed. Add the water and vanilla, and mix together. Slowly add the flour (the dough will become very thick). Stir in the nuts.
  2. Cover the dough with plastic wrap and refrigerate for 2-3 hours in refrigerator.
  3. Preheat oven to 325 degrees. Remove dough from refrigerator. Spoon out and roll dough in your hands to make 1" round cookie dough balls.
  4. Bake snowballs on un-greased baking sheets for 15-20 minutes at 325 degrees, or until just slightly browned. Remove cookies from oven; let cool just a minute, then carefully roll each cookie in a bowl of powdered sugar, to cover. Cool on a wire rack. Once cool, coat them a second time with the powdered sugar, if desired. That's it!
Recipe Notes

The prep time indicated is not active prep time. The cookies take only a few minutes to prepare, then dough must be refrigerated (inactive prep time) for a couple hours.

Nutrition Facts
Snowball Cookies
Amount Per Serving (1 cookie)
Calories 67 Calories from Fat 36
% Daily Value*
Fat 4g6%
Saturated Fat 2g13%
Cholesterol 8mg3%
Sodium 27mg1%
Potassium 13mg0%
Carbohydrates 6g2%
Sugar 3g3%
Vitamin A 95IU2%
Calcium 3mg0%
Iron 0.3mg2%
* Percent Daily Values are based on a 2000 calorie diet.

Here’s one more to pin on your Pinterest boards!Snowball Cookies (aka Mexican Wedding Cakes or Russian Tea Cakes), are little balls of yummy buttery shortbread with pecans, coated with powdered sugar.

Save

Save

Bruleéd Blood Orange Mini-Cheesecakes, with Citrus Sauce

Blood Orange Mini-Cheesecakes are decadent treats, with a graham base, orange/cheesecake filling, ricotta glaze, bruleéd topping and a citrus sauce!Blood Orange Mini-Cheesecakes are decadent treats, with a graham base, orange/cheesecake filling, ricotta glaze, bruleéd topping and a citrus sauce!

My husband and I, along with four dearly loved friends, have enjoyed fantastic “Themed” dinner parties together for the past several years. We have cooked and celebrated great meals with one individual theme for each evening. I prepared these Bruleéd Blood Orange Mini-Cheesecakes with a Citrus Sauce for an “Orange” themed evening.

Scroll Down For A Printable Recipe Card At The Bottom Of The Page

Themed Dinners For The WIN!

Other evenings of “featured ingredients” or “Themes” have included Chocolate, Pomegranate, Orange, Pasta, Mediterranean, Burger Test Kitchen, and Watermelon. Every course for the themed dinner (appetizers, beverages, soups, salads, main dishes and desserts) has to include some form of the featured ingredient.

Our hostess for these evenings, my deeply treasured friend Shari (and my inspiration for all things “food”), is a wonderful cook. She specializes in the main dishes (usually 2-3) and they are unbelievable! I usually end up making the desserts (usually 3-4), and our other friends bring an appetizer and/or the beverages (also utilizing the same “themed” ingredient).

We have so much fun together and LOVE devouring the crazy recipes we all come up with! And we are all so FULL when we leave, we usually just waddle or roll out the door to our cars. Seriously.

How I Came Up with This Recipe

For our “Orange” themed dinner  a year or so ago (named “Night of the Bloody Oranges” by the way), I experimented with a recipe I found online. I ended up bringing these blood orange mini-cheesecakes as one of my dessert contributions that night. I took the original recipe and then made a citrus sauce to accompany it, and the results were delicious!

The cream cheese, ricotta, citrus, and graham cracker crust blend to make this a delightful cheesecake…and when paired with the bruleéd topping AND citrus sauce…whoa! This dessert is really, really good, and it looks great on a dessert plate, too! I’m not sure my photos do this dessert justice. Trust me…these are good. Really good.

Making The Orange Mini-Cheesecakes

Graham cracker crusts are made in small tart pans. These tart pans have removable bottoms, which makes it easy to remove and serve the desserts.

Graham cracker crusts are placed in the tiny tart pans.

The cheesecake filling is loaded in, and then the orange mini-cheesecakes are baked. Once baked, the little cheesecakes cool on wire racks.

The cheesecake topping has been baked, and is cooled completely before removing from pan..


Let the cheesecakes cool completely on a wire rack before removing from pans.

To Serve The Blood Orange Mini-Cheesecakes

Once totally refrigerated, carefully remove the tart pans from each orange mini-cheesecake. Add the ricotta topping to the top of each of the cheesecakes.
 
When you are ready to serve, it is time to bruleé the top of each dessert. Sprinkle sugar on top of each cheesecake. Use a kitchen torch to heat the sugar until the sugar is bruleéd, golden brown, and crunchy on top.  Now the orange mini-cheesecakes are ready to serve!

A ricotta topping is added to the cooled, baked mini-cheesecakes.
Serve The Orange Mini-Cheesecakes

The bruleéd orange mini-cheesecakes are served surrounded by citrus sauce, and with a slice of a blood orange on the side! YUM! It is such a delicious dessert!

The orange mini-cheesecakes are served on top of the citrus sauce.


Hope you enjoy this recipe for blood orange mini-cheesecakes! If you enjoy cheesecake-style desserts, be sure to check out my recipes for Chocolate Fudge Truffle Cheesecake! Have a great day!

Looking For More DESSERT Recipes?

You can find ALL of my recipes in the Recipe Index, located at the top of the page. I have LOTS of delicious dessert recipes, including:

Interested In More Recipes?

Thank you for visiting this website. I appreciate you using some of your valuable time to do soIf you’re interested, I publish a newsletter 2 times per month (1st and 15th) with all the latest recipes, and other fun info. I would be honored to have you join our growing list of subscribers, so you never miss a great recipe!
There is a Newsletter subscription box on the top right side (or bottom) of each blog post, depending on the device you use, where you can easily submit your e-mail address (only) to be included in my mailing list.

You Can Also Find Me On Social Media:
Facebook page: The Grateful Girl Cooks!
Pinterest: The Grateful Girl Cooks!
Instagram: jbatthegratefulgirlcooks

Author's signature


Cheesecake recipe source: http://domesticfits.com/2012/02/22/bruleed-blood-orange-and-ricotta-mini-cheesecakes/

0 from 0 votes
Bruleed Blood Orange Mini-Cheesecakes, with Citrus Sauce
Prep Time
2 hrs 30 mins
Cook Time
12 mins
Total Time
2 hrs 42 mins
 

Blood Orange Mini-Cheesecakes are decadent treats, with a graham base, orange/cheesecake filling, ricotta glaze, bruleéd topping and a citrus sauce!

Category: Dessert
Cuisine: American
Keyword: orange mini-cheesecakes
Servings: 6 servings
Calories Per Serving: 562 kcal
Author: JB @ The Grateful Girl Cooks!
Ingredients
For The Crust:
  • 4 standard sized graham crackers , crushed (about 3/4 cup crushed)
  • 2 Tablespoons brown sugar
  • 3 Tablespoons butter , melted
For The Cheesecake Filling:
  • 8 oz. cream cheese , softened
  • 1/4 cup ricotta cheese
  • 1/2 cup granulated sugar
  • 1 egg
  • 2 Tablespoons blood orange zest (finely grated blood orange peel)
  • 1/4 cup fresh squeezed blood orange juice (or use regular if you can't find blood oranges)
For The Topping:
  • 1/3 cup ricotta cheese
  • 1/3 cup confectioner's sugar (powdered)
  • 1/4 teaspoon vanilla extract
For The Citrus Sauce:
  • 1 cup granulated sugar
  • 1/4 teaspoon salt
  • 2 Tablespoons cornstarch
  • 1 cup orange juice
  • 1/4 cup lemon juice
  • 3/4 cup water
  • 1/2 teaspoon finely grated lemon rind
  • 1/2 teaspoon finely grated orange rind
For The Brulee:
  • Granulated sugar (to garnish and brulee the top of each mini-cheesecake-1 1/2 teaspoons per cheesecake)
Instructions
  1. Make The Crust: Spray mini-cheesecake pans or small tart pans (with removable disk on bottom) with non-stick spray.
  2. Process the graham crackers and brown sugar in food processor until it becomes small crumbs. Add the melted butter and mix until it looks like wet sand. Place 1 Tablespoon of the crumbs into the bottom of each pan. Press the crumbs together with your fingers or a spoon until well compacted. Set aside.
  3. Make The Cheesecake Filling: Place the cream cheese and 1/4 cup ricotta cheese in the bowl of a stand mixer (or a large bowl, if using hand mixer). Beat on high until combined. Add 1/2 cup granulated sugar, and beat on high until mixture is creamed. Add the egg, orange zest and blood orange juice; beat until well combined. (Scrape the bottom of the bowl to ensure all ingredients are mixed in well). Spoon the batter into the prepared crusts, being sure to only fill them 3/4 of the way to the top.
  4. Bake the cheesecakes at 375 degrees for 12-15 minutes (until the cheesecake filling no longer jiggles when rack is shaken). Remove from oven and let them cool on a wire rack for at least 20 minutes before attempting to remove the cheesecakes from the pans. Once they cheesecakes have cooled, press gently upward on the bottom disk. The cheesecake should remove easily from the pan. Now careful remove the bottom "disk" from the cheesecakes. (TIP: If you are making these in batches, as I did, this is where you wash the tart pans and bottom disks and begin again with the crusts).
  5. Once the cheesecakes have cooled, you will notice that they sink slightly in the middle. That is normal. Now make the topping (this will fill in that indentation rather nicely!)
  6. Make The Topping: In a small bowl, mix the ricotta, powdered sugar and vanilla with an electric mixer, till well combined. Top each cheesecake with enough topping to fill the indented hole in the center till entire top surface is level. (see photo above). Place the cheesecakes in the refrigerator and refrigerate for at least 1 hour.
  7. Make The Citrus Sauce: While the cheesecakes are chilling, make the citrus sauce.
  8. Stir together the sugar, salt and cornstarch in a saucepan. Gradually stir in the orange juice (regular), lemon juice and the water. Stir. Cook these ingredients over medium heat till mixture has boiled for 1 minute and has slightly thickened. Remove from heat, and add the finely grated lemon and orange rinds. Cover and let cool in refrigerator until ready to serve.
  9. To Serve: Right before serving, sprinkle an even layer of granulated sugar (approx. 1 1/2 tsp.) over the top surface of each cheesecake. Slowly pass a kitchen torch over the sugar (about 2-3 inches away) until the sugar melts and turns golden brown (be careful not to burn the sugar OR your fingers!).
  10. Place the citrus sauce on each serving plate, and center the cheesecake on top. Garnish with a slice of a blood orange. Take a big bite (scoop up that citrus sauce) and ENJOY!
Recipe Notes

Prep time indicated includes an hour "inactive" refrigeration time.

Nutrition Facts
Bruleed Blood Orange Mini-Cheesecakes, with Citrus Sauce
Amount Per Serving (1 tart)
Calories 562 Calories from Fat 207
% Daily Value*
Fat 23g35%
Saturated Fat 13g81%
Cholesterol 96mg32%
Sodium 363mg16%
Potassium 228mg7%
Carbohydrates 83g28%
Sugar 72g80%
Protein 7g14%
Vitamin A 955IU19%
Vitamin C 36.5mg44%
Calcium 115mg12%
Iron 0.9mg5%
* Percent Daily Values are based on a 2000 calorie diet.

Here’s one more to pin on your Pinterest boards!Blood Orange Mini-Cheesecakes are decadent treats, with a graham base, orange/cheesecake filling, ricotta glaze, bruleéd topping and a citrus sauce!


Save

Blueberry Cheesecake Ice Cream

Blueberry Cheesecake Ice Cream is the PERFECT frozen treat! Blueberry sauce, cream cheese and graham cracker crumbles add to the taste!Blueberry Cheesecake Ice Cream is the PERFECT frozen treat! Blueberry sauce, cream cheese and graham cracker crumbles add to the taste!
It’s Winter (brr!) and guess what? I’m sharing a recipe today for homemade Blueberry Cheesecake Ice Cream (ironic, isn’t it?). However… ice cream is good any time of the year, right? THIS ice cream is absolutely amazing! Why? Because it’s beautiful and delicious, AND is there ever a reason to NOT have ice cream?!  I don’t think so… Two summers ago I received a new ice cream maker as a gift, and I’ve LOVED trying lots of delicious ice cream recipes since then.

Previously I made homemade ice cream outside in our trusty electric ice cream maker, loading the salt and ice in layers, then waiting and waiting. It always turned out wonderful, but was a bit time consuming and messy.

Scroll Down For A Printable Recipe Card At The Bottom Of The Page

I LOVE My Indoor Ice Cream Machine!

I received a Cuisinart indoor ice cream maker for a birthday… and it has been a game-changer! Now it can be pouring down rain or snowing outside (not that it would EVER happen in Oregon-ha ha) and I can be in my warm little kitchen making ICE CREAM (I know…I’m shouting, but don’t we all scream for ice cream?) No salt or ice to add, and ready in approx. 25 minutes. Yeah…this little ice cream maker is convenient and dangerous (to my waistline).

“Summer Of the Great Ice Cream Experiment”

So…back to my story: I decided to call that summer the “Summer of the Great Ice Cream Experiment”. I tried a new recipe almost every week or two and posted the pics on Facebook. Check out my Recipe Index to see all the ice cream recipes I’ve posted, including Strawberry, Chocolate Peanut Butter, Peach, and Coffee!

Out of all the recipes I tried, this one was my favorite! I made a couple of changes to the original recipe to suit my taste, and voila! An instant “keeper”.

This blueberry cheesecake ice cream is filled with cheesecake flavor, mingled in with with the graham cracker crust swirls, and I must say, the blueberry sauce is amazing! Give this recipe a try…it will NOT disappoint! It’s a party for your mouth.

Note: I am posting the recipe the way I modified it for my 2 quart ice cream maker. I made the topping ingredients and graham cracker crust ingredients as per the original recipe (so I would have extras for storing in my freezer). Refer to original recipe if you are making it in full sized ice cream maker.

Making The Blueberry Sauce

A blueberry sauce is cooked to add to ice cream.

Making Blueberry Cheesecake Ice Cream

A graham cracker mixture is made, then it is layered with the blueberry sauce onto the prepared ice cream…

Graham cracker crumbs are added to finished ice cream in a layer.

The ice cream is layered with graham cracker mixture, and the blueberry sauce. The blueberry cheesecake ice cream is then put into freezer to fully firm up and “ripen” for several hours.

Graham crackers crumbs and blueberry topping are layered in with the ice cream.

Now the blueberry cheesecake ice cream is almost ready to serve, after it has firmed up in the freezer. Now all that is left to do before serving is to top it with additional blueberry sauce and graham cracker mixture! That helps to make the presentation of the blueberry cheesecake ice cream look amazing, too!

Now the scoop of blueberry cheesecake ice cream just needs a topping.

Serving The Blueberry Cheesecake Ice Cream

When you’re ready to serve, just add a little bit of additional toppings to make it pretty! A little spoonful of blueberry sauce, and a sprinkle of graham cracker mix finishes off the blueberry cheesecake ice cream beautifully! Isn’t it gorgeous??? Grab a spoon, and dig in!

The blueberry cheesecake ice cream is topped with blueberry sauce and graham cracker crumbles to serve.

I sure hope you will consider making this delicious dessert!  I’m confident you and your friends or family will really enjoy this yummy frozen treat! The only thing left to do is… grab a spoon, take a big bite, and ENJOY some Blueberry Cheesecake Ice Cream!

Looking For More ICE CREAM Recipes?

You can find all of my recipes in the Recipe Index, located at the top of the page. I have quite a few ice cream recipes to choose from, including:

Interested In More Recipes?

Thank you for visiting this website. I appreciate you using some of your valuable time to do soIf you’re interested, I publish a newsletter 2 times per month (1st and 15th) with all the latest recipes, and other fun info. I would be honored to have you join our growing list of subscribers, so you never miss a great recipe!
There is a Newsletter subscription box on the top right side (or bottom) of each blog post, depending on the device you use, where you can easily submit your e-mail address (only) to be included in my mailing list.

You Can Also Find Me On Social Media:

Facebook page: The Grateful Girl Cooks!
Pinterest:
The Grateful Girl Cooks!
Instagram:
jbatthegratefulgirlcooks

Have a GREAT day!

Author's signature

Adapted From: http://www.tasteofhome.com/recipes/blueberry-cheesecake-ice-cream

↓↓ PRINTABLE RECIPE BELOW ↓↓
0 from 0 votes
Blueberry Cheesecake Ice Cream
Prep Time
20 mins
Cook Time
10 mins
Total Time
30 mins
 

Blueberry Cheesecake Ice Cream is the PERFECT frozen treat! Blueberry sauce, cream cheese and graham cracker crumbles add to the taste!

Category: Dessert
Cuisine: American
Keyword: blueberry cheesecake ice cream
Servings: 8 1/2 cup servings (2 quarts)
Calories Per Serving: 669 kcal
Author: JB @ The Grateful Girl Cooks!
Ingredients
For Blueberry Sauce:
  • 1/2 cup granulated sugar
  • 1 Tablespoons cornstarch
  • 1/2 cup water
  • 1 1/4 cups fresh or frozen blueberries
  • 1 Tablespoon fresh lemon juice
For Graham Cracker Mixture:
  • 2 1/4 cups graham cracker crumbs (about 36 squares)
  • 2 Tablespoons granulated sugar
  • 1/2 teaspoon ground cinnamon
  • 1/2 cup butter , melted
For Ice Cream:
  • 3/4 cup granulated sugar
  • 8 oz. package cream cheese , room temperature
  • 2 Tablespoons fresh lemon juice
  • 2 cups heavy whipping cream
  • 1 cup milk
  • 1 teaspoon vanilla extract
Instructions
  1. In a saucepan, combine the sugar and cornstarch. Whisk in the water until the mixture is smooth. Stir in the blueberries and the lemon juice, then bring this mixture to a boil. Reduce the heat, then simmer (uncovered), for 5-6 minutes or until the mixture has thickened slightly. Stir mixture occasionally. Once the berry mixture has thickened, remove from heat. Cover and refrigerate until fully chilled. (I made this hours before making the ice cream)
  2. Preheat oven to 350 degrees. In a large bowl, combine the cracker crumbs, sugar and cinnamon. Stir in the melted butter and mix till combined. Pat this crumb mixture into an ungreased 9x13 baking pan. Bake at 350 degrees for 10-15 minutes or until the crumbs are lightly browned. When done, remove; cool mixture completely. (I did this ahead of time, as well). When the mixture is completely cooled off, crumble the graham cracker mixture and set aside.
  3. To make the ice cream: In a large bowl, beat all the ice cream ingredients together until the sugar has dissolved (you will have some small cream cheese lumps...this is okay). Fill the ice cream container (the FREEZING cold ice cream container) 2/3 full. Freeze as per the manufacturer's instructions.
  4. When ice cream is done, evenly disperse layers of ice cream, cooled and crumbled graham cracker mixture, and blueberry sauce 3 times. Remember to only use half of the crumbled graham crackers and berry sauce for this (it made extra, remember?) Remember to repeat the layers (for a total of 3 times).
  5. Layer 1: Ice Cream
  6. Layer 2: Graham Cracker Crumbles
  7. Layer 3: Blueberry Sauce
  8. Swirl through the layers with a knife, being sure to take the tip of the knife all the way to the bottom of the bowl or ice cream storage container you are using. Freeze for at least a couple of hours for the ice cream to "firm up".
  9. Once you are ready to serve, scoop it into serving dishes; lightly top each serving with a spoonful of the blueberry sauce and a sprinkling of graham cracker crumbles. Enjoy!
Nutrition Facts
Blueberry Cheesecake Ice Cream
Amount Per Serving (1 (1/2 cup) serving)
Calories 669 Calories from Fat 405
% Daily Value*
Fat 45g69%
Saturated Fat 27g169%
Cholesterol 144mg48%
Sodium 384mg17%
Potassium 187mg5%
Carbohydrates 61g20%
Fiber 1g4%
Sugar 44g49%
Protein 5g10%
Vitamin A 1680IU34%
Vitamin C 4.8mg6%
Calcium 127mg13%
Iron 1.2mg7%
* Percent Daily Values are based on a 2000 calorie diet.

Here’s one more to pin on your Pinterest boards!Blueberry Cheesecake Ice Cream is the PERFECT frozen treat! Blueberry sauce, cream cheese and graham cracker crumbles add to the taste!
 

Save

Classic Creme Bruleé

Classic Creme Bruleé is a decadent dessert that can be made with only 5 ingredients. It has a custard filling, and a “crackable” sugar crust on top. And… it’s SO GOOD!Classic Creme Bruleé is a decadent dessert that can be made with only 5 ingredients. It has a custard filling, and a "crackable" sugar crust on top.
Well, another Valentine’s Day has come and gone. My husband and I have been sick for the past 10 days with major head colds and stubborn coughs. Time for Classic Creme Bruleé to make it all better, right?

We were going to go out together as is our tradition, but neither of us felt like it this year. We were just too tired and sick to enjoy the celebration.

Well that’s a great sad tale, but the bottom line is “You still have to eat, right?” Right. Believe me, if I could’ve snapped my fingers and summoned my own personal chef to cook a fabulous meal and then clean it all up, I wouldn’t have batted an eyelash.

Scroll Down For A Printable Recipe Card At The Bottom Of The Page

Valentines Day Dinner For The “Sickies”

But I live in reality world, so to ensure we didn’t shrivel up and die from starvation (*note: this might be an over-exaggeration on my part*), I decided to DRAG my “sniffle-y, cough-y” self (in my pajamas, I might add) into the kitchen and rustle up a decent dinner.

I ended up making pan seared Creole Salmon, with fresh asparagus and rice. Not bad for a sicko, right? But wait…there’s more. I decided to give it the old college try and make a nice dessert for my Valentine, even if it killed me. What did I make, you ask?

Classic Creme Bruleé! An easy, but decadent dessert that my husband LOVES. If you have never made creme brulee, give it a try. It’s truly a delicious classic! Hope you enjoy it… I know we did and we will (it made 4 portions…just our luck…leftovers tomorrow!!!!!)

I even changed out of my “sick-girl” pajamas to eat dinner and dessert. A proud moment. The End. Here’s how to make this yummy dessert.

Making Classic Creme Bruleé

Here is the classic creme bruleé, right after it came out of the oven.  My handy dandy butane kitchen torch is waiting patiently nearby to make the “magic” happen!

The creme bruleé has been baked, and chilled. Now time for torching!

Ready For The Blow Torch!

The top of each creme bruleé is sprinkled with a layer of granulated sugar, and now they are ready for the blow torch to crystallize the sugar on top into a crackly delight!

Granulated sugar is spread on the top of each creme bruleé before torching.

The sugar has been torched, and is now browned and hardened to form a crunchy crust on top of this classic creme bruleé.  Ooh… I can hardly wait!

The sugar has been browned and forms a crackable crust on top of the creme bruleé.

Ready To EAT!

Grab a spoon and crack through the top of one of these decadent desserts! Can you see how the sugar crust cracks? That is perfect, and exactly what it is supposed to do! 
This creme bruleé dessert is so creamy, rich tasting, and good. Go ahead… take another bite. You’re gonna enjoy this treat.

The crust is cracked open on the creme bruleé, revealing the custard filling.

Hope you enjoy this classic creme bruleé. It truly is a classic “must try” dessert. Be sure to check out my recipe for Chocolate Creme Brulee. It’s really tasty, too. Have a great day, and come back soon for more recipes!

Looking for More DECADENT DESSERT Recipes?

You can find all of my recipes in the Recipe Index, located at the top of the page. I have LOTS of yummy dessert recipes you might enjoy, including:

Want More Recipes? Get My FREE Newsletter!

I publish a newsletter 2 times per month (1st and 15th) with lots of recipes, tips, etc..
Would you like to join our growing list of subscribers?

There is a Newsletter subscription box on the top right (or bottom) of each blog post, depending on the device you use.
You can submit your e-mail address there, to be added to my mailing list.

Find Me On Social Media:

Facebook page: The Grateful Girl Cooks!
Pinterest:
The Grateful Girl Cooks!
Instagram:
jbatthegratefulgirlcooks

Author's signature

Recipe Adapted from the back of the box my ramekins came in… true story.

↓↓ PRINTABLE RECIPE BELOW ↓↓

0 from 0 votes
Classic Creme Brulee
Prep Time
10 mins
Cook Time
50 mins
Total Time
1 hr
 
Classic Creme Bruleé is a decadent dessert that can be made with only 5 ingredients. It has a custard filling, and a "crackable" sugar crust on top,
Category: Dessert
Cuisine: American
Keyword: classic creme brulee
Servings: 4 servings
Calories Per Serving: 468 kcal
Author: JB @ The Grateful Girl Cooks!
Ingredients
  • 6 egg yolks
  • 1/4 cup granulated sugar
  • 1 1/2 cups heavy whipping cream
  • 3/4 teaspoon pure vanilla extract
  • 6 teaspoons granulated sugar (for the caramelized tops)
  • 6- piece Creme Brulee set , OR 4 ramekins + baking pan (with sides) that will hold all 4 ramekins
Instructions
  1. Preheat oven to 300 degrees.
  2. In a medium bowl, whisk the egg yolks and 1/4 cup sugar together. Whisk until sugar has dissolved and egg yolk mixture is thick and light in color.
  3. Add the whipping cream and vanilla extract; whisk until blended. Strain the mixture into a large bowl, skimming off any foam or bubbles.
  4. Place wire rack in baking pan (if using brulee set) and fill pan halfway with water.
  5. Place the ramekins into the wire rack (if using brulee set) or into the baking pan and carefully pour the brulee mixture into the 4 ramekins. (Note: the water should cover the bottom half of the ramekins)
  6. Bake brulee at 300 degrees until the edges are set, but still slightly loose in the center, approximately 50-55 minutes. Remove pan from oven (carefully!), and let it rest on a wire rack until completely cooled. Once cooled, remove the cups from the rack and chill the brulee at least 2 hours or more.
  7. Before serving, sprinkle 1 1/2 tsp. granulated sugar evenly across the top of each one. Using a small, hand-held torch, carefully melt the topping by keeping the flame approx. 2-3 inches from the top of the sugar and move flame around, as the sugar melts, then caramelizes. Do not burn the sugar...it just needs to be a nice caramel color. As the caramelized sugar cools, it will form a hard "crackable" surface for your brulee. This is my favorite part!
If NOT using a butane torch to carmelize sugar: If you do not own a hand-held torch, you can use this method to caramelize the sugar:
  1. Once you remove the ramekins from the refrigerator where they have chilled, place them back in the pan (no water), and place them NO MORE than 5 inches under the oven's broiler until the sugar melts (in as little as 2 minutes). Remove pan promptly from the oven and cool. Re-chill the brulee in the refrigerator for several minutes, for optimum serving temperature.
Recipe Notes

Other flavor options: replace vanilla with 1 tsp. orange extract, 1 tsp. grated orange peel and 1/4 tsp. nutmeg OR use your favorite chocolate or espresso flavoring.

Nutrition Facts
Classic Creme Brulee
Amount Per Serving (1 g)
Calories 468 Calories from Fat 360
% Daily Value*
Fat 40g62%
Saturated Fat 23g144%
Cholesterol 415mg138%
Sodium 47mg2%
Potassium 96mg3%
Carbohydrates 22g7%
Sugar 18g20%
Protein 6g12%
Vitamin A 1700IU34%
Vitamin C 0.6mg1%
Calcium 93mg9%
Iron 0.7mg4%
* Percent Daily Values are based on a 2000 calorie diet.

Here’s one more to pin on your Pinterest boards!Classic Creme Bruleé is a decadent dessert that can be made with only 5 ingredients. It has a custard filling, and a "crackable" sugar crust on top,


Save

Save

Triple Chocolate Zucchini Muffins

These triple chocolate zucchini muffins have a secret ingredient (shhh… it’s a vegetable!) and are an absolutely delicious treat your family will love!These triple chocolate zucchini muffins have a secret ingredient (shhh... it's a vegetable!) and are an absolutely delicious treat your family will love!
Ah… there’s nothing like a good cup of coffee and a good muffin – especially these Triple Chocolate Zucchini Muffins!  Chocolate AND zucchini for breakfast? They MUST be healthy, right? Seriously… chocolate AND zucchini? Who knew?

Scroll Down For A Printable Recipe Card At The Bottom Of The Pge

About Triple Chocolate Zucchini Muffins

I found this recipe for muffins on Pinterest several months ago (where else?). These are extremely “chocolate-y” muffins (3 types of chocolate)! Surprisingly, these yummy triple chocolate muffins have zucchini as a secret ingredient!

I’m pretty positive the fact that there is a vegetable inside these muffins makes them HEALTHY, right? RIGHT. I’ve found these muffins are a GREAT way to use up some of our summer garden zucchini!

Zucchini is the secret ingredient for these chocolate muffins!

Muffins and Morning Quiet Times Are A Good Combo

Here’s something I read this morning: “But I trust in Your unfailing love; my heart rejoices in your salvation. I will sing to the Lord for He has been good to me.” (Psalm 13:5-6).  I love those verses from the Bible, and am reminded daily of the never-ending love God has for me. He HAS been trustworthy, good, and faithful to me (and our family) over the course of a lifetime of good times, bad times, and everything else in-between…for that I am so grateful!

I love to have a little quiet time in the early morning hours. I delight in this time with God… just little old me and a couple cups of strong coffee. Occasionally I will make muffins and of course, I invite one of the muffins to join me in this special time… where I feed my soul and my tummy.

The Mystery Ingredient Is One Way To Eat More Veggies

Maybe you’re looking for a new muffin recipe. Maybe you get excited about camouflaging a vegetable in your child’s chocolate muffin (hey, we do what we have to, to get them to eat their veggies!).

Whatever your reasons, this is a fantastic recipe for triple chocolate zucchini muffins! See the grated zucchini that will be hiding in the muffins? You will never know it’s there, because all you can taste is the CHOCOLATE!

Grated zucchini ready to go into muffin batter

Below you see the triple chocolate zucchini muffins, right after they came out of the oven… all they need is to be lightly dusted with some sifted powdered sugar before serving! Don’t they look yummy?

Muffins out of oven- now they need a dusting of powdered sugar!

The finished chocolate zucchini muffins sure look good… see that CHOCOLATE? Time to take a bite! Ooh… they are so good! And by the way, if you like these you will probably also LOVE my Banana Espresso Chocolate Chip Muffins!

A dusting of powdered sugar and the muffins are ready to eat!

This Recipe Makes A LOT Of Triple Chocolate Zucchini Muffins!

These triple chocolate zucchini muffins are easy to make and extremely yummy; I sure hope you will enjoy them! The recipe as written makes quite a lot of muffins, 30 of them! If that sounds like a lot, cut the recipe in half! These muffins are easily “freezable”, if wrapped and sealed well! Then you will have some of them saved for another day after only cooking once!

Hope you will consider making these scrumptious triple chocolate zucchini muffins! They truly are delicious, and because you added zucchini, I’m POSITIVE they must be 100% healthy, as well! (wink, wink!). Have a wonderful day!

Looking For More MUFFIN Recipes?

You can find ALL my recipes in the Recipe Index, located at the top of the page. I have lots of delicious muffin recipes you’ll enjoy, including:

Interested In More Recipes?

Thank you for visiting this website. I appreciate you using some of your valuable time to do soIf you’re interested, I publish a newsletter 2 times per month (1st and 15th) with all the latest recipes, and other fun info. I would be honored to have you join our growing list of subscribers, so you never miss a great recipe!
There is a Newsletter subscription box on the top right side (or bottom) of each blog post, depending on the device you use, where you can easily submit your e-mail address (only) to be included in my mailing list.

You Can Also Find Me On Social Media:
Facebook page: The Grateful Girl Cooks!
Pinterest: The Grateful Girl Cooks!
Instagram: jbatthegratefulgirlcooks

Have a fantastic day.

Author's signatureRecipe source: carriesexperimentalkitchen.blogspot.com/2013/08/triple-chocolate-zucchini-muffins-html

↓↓ PRINTABLE RECIPE BELOW ↓↓

0 from 0 votes
Triple Chocolate Zucchini Muffins
Prep Time
15 mins
Cook Time
15 mins
Total Time
30 mins
 
These triple chocolate zucchini muffins have a secret ingredient (shhh... it's a vegetable!) and are an absolutely delicious treat your family will love!
Category: Breakfast
Cuisine: American
Keyword: chocolate zucchini muffins
Servings: 30 muffins
Calories Per Serving: 157 kcal
Author: JB @ The Grateful Girl Cooks!
Ingredients
  • 4 eggs
  • 2 cups granulated sugar
  • 1 cup canola oil (I used vegetable)
  • 3 1/2 cups all-purpose flour
  • 1 1/2 teaspoons baking soda
  • 1 teaspoon baking powder
  • 1 teaspoons salt
  • 3/4 cup cocoa powder
  • 2 1/2 cups grated zucchini (well drained/pressed to reduce water content)
  • 1/2 cup semi-sweet chocolate chips
  • 2 oz. dark chocolate , chopped
  • Cooking spray
  • 2 Tablespoons confectioners sugar (powdered), to sift on top of baked muffins
Instructions
  1. Preheat the oven to 350 degrees.
  2. In a large mixing bowl, place the eggs, sugar and oil. Whisk these together until smooth. 

  3. Add flour, baking soda, baking powder, salt and cocoa powder to the egg mixture; mix these ingredients very well.

  4. Add the drained/pressed grated zucchini, along with the chocolate chips and the dark chocolate pieces to the batter. Stir well by hand until ingredients are completely blended.

  5. Take the cooking spray and spray a standard sized muffin tins (liners are optional...I didn't use them). Fill the muffin holders about 3/4 of the way to the top with the batter. There is enough batter to yield approx. 30 muffins. Sprinkle a few extra chocolate chips on top before baking. (this is optional)

  6. Bake the muffins at 350 degrees for 15-20 minutes or until the top springs back when touched. Remove muffins from oven and cool on a wire rack. Dust with sifted powdered sugar for a nice presentation. Serve and enjoy!

Recipe Notes

That's a LOT of muffins! You can freeze extra muffins for another day, or easily cut the recipe in half and make 15 muffins.

Nutrition Facts
Triple Chocolate Zucchini Muffins
Amount Per Serving (1 muffin)
Calories 157 Calories from Fat 27
% Daily Value*
Fat 3g5%
Saturated Fat 1g6%
Cholesterol 22mg7%
Sodium 143mg6%
Potassium 127mg4%
Carbohydrates 29g10%
Fiber 1g4%
Sugar 15g17%
Protein 3g6%
Vitamin A 50IU1%
Vitamin C 1.8mg2%
Calcium 19mg2%
Iron 1.5mg8%
* Percent Daily Values are based on a 2000 calorie diet.
 Here’s one more to pin on your Pinterest boards!These triple chocolate zucchini muffins have a secret ingredient (shhh... it's a vegetable!) and are an absolutely delicious treat your family will love!


Save

Save

Save

White Chocolate Raspberry Scones

White chocolate raspberry scones are delicious, easy to make treats, filled with white chocolate chips and raspberries, and topped with a sweet glaze.White chocolate raspberry scones are delicious, easy to make treats, filled with white chocolate chips and raspberries, and topped with a sweet glaze.
It’s definitely a day for decadent White Chocolate Raspberry Scones and humongous cups of coffee. I’m sitting in my home office looking out at a forest filled with snow, and it has begun snowing again. We are on Day 3 of what Portland locals call “Snowpacalypse 2014”. Tonight we are expecting a coating of ice on top of it all. Yippee.

My husband and I both have been sick (we’re on Day 4-ugh), so we’re content to be house-bound and off the slippery streets. However, there’s only so much napping and taking medicine that one girl can take, so off to the kitchen I went yesterday to find something to bake.

I ended up trying a new recipe for white chocolate raspberry scones. I mean- if you’re going to be sick and snowbound…make sure you have treats, right?

Yay For New Scone Recipes!

I found the original recipe on Pinterest and tweaked it just a bit, and voila! A new, tasty recipe for a delicious scone! I had raspberries in my freezer that I picked this past summer, and happened to have a bag of white chocolate chips left over from Christmas baking. How convenient…it must be DESTINY…Perfect!

The recipe was very easy, although my kitchen work surface did look like a murder scene (blasted raspberries) when I was done, but no big deal! It just made it a bit more exciting! Hope you enjoy these tasty white chocolate raspberry scones!

Scroll Down For A Printable Recipe Card At The Bottom Of The Page

How To Make White Chocolate Raspberry Scones

Cut the butter into the flour. I use a food processor to do this simple step, but you can also use a pastry blender by hand. When done, the butter should be about the size of peas.

Butter is cut into the scones dough until it is in small pieces.

Add the white chocolate chips and raspberries to the scones dough. Can you tell my raspberries were still frozen?

White chocolate chips and raspberries are added to scone dough.

A Murder Scene, Perhaps? Nope… Just Some Scones!

The top of the white chocolate raspberry scones dough looks like a murder scene. Ha Ha! Roll the scone dough out into a circle, then slice it into 8 pie-shaped wedges.

The raspberry scones dough has been sliced and they are now ready to bake.

Bake And Then Glaze The White Chocolate Raspberry Scones

Bake the scones. The photo below shows how the white chocolate raspberry scones looked right when they came out of the oven.

Making the glaze is done by simply mixing powdered sugar, vanilla and warm water together. The glaze can be made while the scones cool. Once cooled, drizzle the glaze over them! After the glaze firms up, they are ready to eat!

The white chocolate raspberry scones have baked, and cool before being drizzled with glaze.

These scones look pretty good, and boy, do they ever taste good, too! Pretty sure you will really enjoy this decadent treat! Now it’s time to eat one of these delicious scones!

A few of the white chocolate raspberry scones, glazed and ready to eat!

Hope you enjoy these delicious white chocolate raspberry scones. We sure did, even while sick, and snowed in! Have a GREAT day!

Looking For More SCONE Recipes?

You can find all of my scone recipes in the Recipe Index, located at the top of the page. A few favorites include:

A collage of some of the scones featured on my blog.

Interested In More Recipes?

Thank you for visiting this website. I appreciate you using some of your valuable time to do soIf you’re interested, I publish a newsletter 2 times per month (1st and 15th) with all the latest recipes, and other fun info. I would be honored to have you join our growing list of subscribers, so you never miss a great recipe!
There is a Newsletter subscription box on the top right side (or bottom) of each blog post, depending on the device you use, where you can easily submit your e-mail address (only) to be included in my mailing list.

You Can Also Find Me On Social Media:
Facebook page: The Grateful Girl Cooks!
Pinterest: The Grateful Girl Cooks!
Instagram: jbatthegratefulgirlcooks

Author's signature
 
Recipe Adapted From: http://www.pastryaffair.com/blog/raspberry-white-chocolate-scones.htm

↓↓ PRINTABLE RECIPE BELOW ↓↓

0 from 0 votes
White Chocolate Raspberry Scones
Prep Time
20 mins
Cook Time
25 mins
Total Time
45 mins
 

White chocolate raspberry scones are delicious, easy to make treats, filled with white chocolate chips and raspberries, and topped with a sweet glaze.

Category: Breakfast, Snack
Cuisine: American
Keyword: white chocolate raspberry scones
Servings: 8 servings
Calories Per Serving: 435 kcal
Author: JB @ The Grateful Girl Cooks!
Ingredients
For Scone Dough:
  • 2 cups all-purpose flour
  • 2 Tablespoons granulated sugar
  • 1 Tablespoon baking powder
  • 1/2 teaspoon salt
  • 6 Tablespoons cold butter , cut into pieces
  • 6 oz. raspberries (fresh or frozen will work-I mixed mine in while still frozen)
  • 1/2 cup white chocolate chips
  • 1 large egg
  • 1 teaspoon vanilla extract
  • 1/3 cup milk (or heavy cream-I used milk)
For Glaze Topping:
  • 1 1/2 cups confectioner's sugar (powdered)
  • 1/4 teaspoon vanilla extract
  • 3-4 teaspoons warm water (to get glaze to correct "painting" consistency)
For White Chocolate Drizzle:
  • 1/2 cup white chocolate chips + 1 teaspoon vegetable shortening- melted (microwave 30 seconds, stir, microwave 20 seconds stir.-don't let them burn!)
Instructions
  1. Preheat oven to 350 degrees. Spray a baking sheet with non-stick spray.
  2. In the bowl of a food processor (or in a large bowl if making them by hand), combine all of the dry ingredients. Add the cold chunks of butter to the processor and pulse to cut in butter (or cut in by hand with a pastry cutter).
  3. In a separate bowl, mix the egg, milk (or heavy cream), and the vanilla; Mix these ingredients together, till well blended.
  4. Add the egg mixture to the dry ingredients and pulse till the dough comes together into a dough ball (If mixing by hand, stir and stir till you have a cohesive dough ball).
  5. Turn the dough ball onto a floured work surface (or into a large bowl) and GENTLY mix in the white chocolate chips and the raspberries by hand (might want to flour your hands) till blended. Note: Don't worry if it looks like a murder occurred at this point...it will all be okay. Really.
  6. With floured hands (sprinkle a bit more flour on dough if necessary, cause the dough is sticky), gently form the dough ball into a round "disc" approximately 8 inches across.
  7. Using a sharp knife or a pizza cutter (my weapon of choice!), cut the disc into 8 scones.
  8. Gently pick up each scone and re-arrange them in a circle on the prepared baking sheet, with a bit of space between each one.
  9. Bake the scones at 350 degrees for 25-30 minutes (mine were ready at the 25 minute mark-just keep an eye on them). Bake till golden brown.
  10. When done, remove from baking sheet to a wire rack, with parchment or foil underneath (to catch any drips from glaze icing). Let cool.
  11. While cooling, mix up the glaze ingredients. Once scones are completely cooled off, "paint" the icing over the tops of the scones, completely covering the surface; when that glaze hardens add the white chocolate drizzle in a decorative pattern. ENJOY!
Nutrition Facts
White Chocolate Raspberry Scones
Amount Per Serving (1 scone)
Calories 435 Calories from Fat 144
% Daily Value*
Fat 16g25%
Saturated Fat 10g63%
Cholesterol 48mg16%
Sodium 255mg11%
Potassium 303mg9%
Carbohydrates 66g22%
Fiber 2g8%
Sugar 39g43%
Protein 5g10%
Vitamin A 320IU6%
Vitamin C 5.6mg7%
Calcium 138mg14%
Iron 1.9mg11%
* Percent Daily Values are based on a 2000 calorie diet.

Here’s one more to pin on your Pinterest boards!White chocolate raspberry scones are delicious, easy to make treats, filled with white chocolate chips and raspberries, and topped with a sweet glaze.


Save

Save

Save