Fruit Smoothie Popsicles

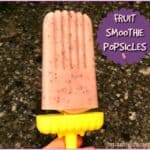
It’s EASY and ECONOMICAL to make yummy homemade fruit smoothie popsicles! Enjoy a fresh fruit smoothie, popsicle style! You and your kids will love ’em!
It's EASY and ECONOMICAL to make yummy homemade fruit smoothie popsicles! Enjoy a fresh fruit smoothie, popsicle style! You and your kids will love 'em!

Summer was a hot one, here in good ol’ Oregon. We had less rain than usual, and many days were above 90 degrees.  One of the things we enjoyed having in our freezer were fruit smoothie popsicles! Best part? These are not summer only treats…you can make them ANY time of year!

I tend to drink a lot of fresh fruit smoothies in the summer, so it was only natural that I started making popsicles out of them. The beauty of making fruit smoothie popsicles is that you can tailor make them to your own preferences! How great is that?

Scroll Down For A Printable Recipe Card At The Bottom Of The Page

What Ingredients Are Used To Make Fruit Smoothie Popsicles?

The ingredients were quite simple… fresh fruit, milk (of choice – I used coconut milk for this batch), and Greek vanilla yogurt. The best part is that you can make YOUR favorite smoothie, any flavor, into a popsicle!

For this recipe for fruit smoothie popsicles I used bananas, and blueberries and strawberries! I even was able to use homegrown blueberries and strawberries from our garden in the backyard!

Ingredients for fruit smoothie popsicles (strawberries, banana, blueberries, coconut milk, Greek vanilla yogurt)

Several years ago I paid around $8 for these “GROOVY” pop molds, and I have gotten so much use out of them! They make popsicle creating so easy (and NO, I don’t receive compensation from them, just thought I’d show what I used to make these fruit smoothie popsicles!).

Popsicle molds used to make fruit smoothie popsicles.

Making fruit smoothie popsicles could NOT be any easier!  You simply add the ingredients (again… YOUR choice) to a blender, just like making your smoothie normally.  Blend together for a couple minutes until mixture is smooth.

Once fully blended, pour the liquid into your popsicle molds. Make sure the plastic popsicle holders are securely standing in the base unit to secure them.  Fill the popsicle molds about 3/4 of the way full.

What If I Don’t Own A Popsicle Mold To Make Fruit Smoothie Popsicles?

If you do not own a popsicle mold, you can also make the fruit smoothie popsicles this way. Pour the smoothie mixture 3/4 of the way into a small paper dixie cup. Place in freezer on baking sheet. After the smoothie has partly frozen (thickened up), insert a popsicle or wood craft stick into the cup.  Freeze popsicles overnight, then simply tear off the paper cup to reveal the popsicle.

Fruit smoothie is made with ingredients blended in blender.

Fruit smoothie is poured into popsicle molds.

Here you can see the holder that securely anchors the popsicle molds for filling.  Once molds are filled, snap on and firmly secure the lids (with handles) onto tops of containers.

Popsicle molds are filled with fruit smoothie mix.

Fruit Smoothie popsicles, with lids on, ready to freeze!

Freeze smoothies overnight, and BOOM!  You’ve just made fruit smoothie popsicles!  See how easy that was? When you are ready to enjoy one, simply hold the popsicle mold under some running warm water to loosen popsicle from sides of the container, then carefully slip popsicle out… and ENJOY!

If you used the “paper cup” method (mentioned above), simply tear off the paper cup, and enjoy your fruit smoothie popsicles! Now you have a fruit-filled and protein-enhanced (Greek yogurt) “snack” for the kids after school, or an after dinner creamy frozen fruit smoothie popsicle for YOU!

Frozen fruit smoothie popsicle, ready to eat!

Using Other Smoothie Recipes To Make Popsicles

There are so many choices of flavors for fruit smoothies, including Orange Julius, PeachBerry, Triple Berry Banana, Chocolate Peanut Butter, Blueberry Kale, Strawberry, etc. Have fun making your very own flavor combinations for fruit smoothie popsicles!

thanks for stopping by. Be sure to check out ALL of my recipes in the Recipe Index, located at the top of the page. Have a GREAT day!

Interested In More Recipes?

Thank you for visiting this website. I appreciate you using some of your valuable time to do soIf you’re interested, I publish a newsletter 2 times per month (1st and 15th) with all the latest recipes, and other fun info. I would be honored to have you join our growing list of subscribers, so you never miss a great recipe! 

There is a Newsletter subscription box on the top right side (or bottom) of each blog post, depending on the device you use, where you can easily submit your e-mail address (only) to be included in my mailing list.

You Can Also Find Me On Social Media:

Facebook page: The Grateful Girl Cooks!
Pinterest:
The Grateful Girl Cooks!
Instagram:
jbatthegratefulgirlcooks

Author's signature

0 from 0 votes
Fruit Smoothie Popsicles
Prep Time
5 mins
Cook Time
0 mins
Freezing Time (inactive)
6 hrs
Total Time
6 hrs 5 mins
 
It's EASY and ECONOMICAL to make yummy homemade fruit smoothie popsicles! Enjoy a fresh fruit smoothie, popsicle style! You and your kids will love 'em!
Category: Frozen, Snack
Cuisine: American
Keyword: fruit smoothie popsicles
Servings: 6 popsicles
Calories Per Serving: 59 kcal
Author: JB @ The Grateful Girl Cooks!
Ingredients
  • 1 cup coconut milk (dairy) , or milk of choice
  • 1/2 cup Greek vanilla yogurt
  • 1 large banana
  • 1/2 cup blueberries
  • 8-10 strawberries
Instructions
  1. Place all ingredients in a blender or food processor. Blend until ingredients become smooth, approximately 2-3 minutes.

  2. Pour smoothie into popsicle molds, securely attached to holder/stand. Fill each container about 3/4 of the way full.  Cover with lid securely, then move entire holder with popsicle molds (vertically standing) to freezer. Freeze overnight, of for 6-8 hours.

  3. When ready to serve, hold a popsicle mold (still sealed) under warm running water, turning, until it has loosened from sides, and can easily slip out of the plastic mold.  Serve, and enjoy!

Recipe Notes

No plastic popsicle molds? You can make these popsicles using small paper dixie cups. Pour smoothie into paper cups, place cups on baking sheet, and let firm up a bit in the freezer. Insert a wooden popsicle or craft stick into cup, and let the popsicles finish freezing overnight.

Nutrition Facts
Fruit Smoothie Popsicles
Amount Per Serving (1 g)
Calories 59 Calories from Fat 9
% Daily Value*
Fat 1g2%
Saturated Fat 1g6%
Cholesterol 1mg0%
Sodium 6mg0%
Potassium 132mg4%
Carbohydrates 12g4%
Fiber 1g4%
Sugar 8g9%
Protein 2g4%
Vitamin A 15IU0%
Vitamin C 12.5mg15%
Calcium 19mg2%
Iron 0.2mg1%
* Percent Daily Values are based on a 2000 calorie diet.

Here’s one more to pin on your Pinterest boards!It's EASY and ECONOMICAL to make yummy homemade fruit smoothie popsicles! Enjoy a fresh fruit smoothie, popsicle style! You and your kids will love 'em!

Spicy Roasted Garbanzos

Looking for an easy, healthy, crunchy snack? You’ve got to try these spicy roasted garbanzos (chickpeas)! They’re a little bit sweet, and a little bit spicy!
Looking for an easy, healthy, crunchy snack? You've got to try these spicy roasted garbanzos (chickpeas)! They're a little bit sweet, and a little bit spicy!

I found the recipe for these spicy roasted garbanzos online, and thought it sounded quite interesting!  Garbanzo beans are also highly nutritious and filling.  I had all the ingredients, so quickly whipped up a batch (easy peasy)!

Garbanzo beans are lightly tossed with olive oil, then roasted. Once they are crunchy, and hot straight from the oven, they are tossed in a dry spice mix that is only a bit spicy and a bit sweet, to cover. The best part? The taste and the fact it is a fairly low calorie, nutritious snack!

Spicy roasted garbanzos (chickpeas) are BEST when eaten right after roasting… they tend to lose a bit of the crunch factor after sitting for awhile. I like to think of them as an alternative to hot popcorn, except without all the carbs and butter! Popcorn is always best right after popping, too!

Scroll Down For A Printable Recipe Card At The Bottom Of The Page

How Do I Make Spicy Roasted Garbanzos?

Preheat your oven to 450 degrees F.  While your oven is preheating, open, drain and rinse a can of garbanzo beans (also called chickpeas). Pat the garbanzos dry. I used a dish towel to remove most of the moisture.

Once garbanzos are dry, place them on a cookie sheet. Drizzle with a Tablespoon of olive oil, then gently toss, to coat. Spread the garbanzos out on the baking sheet, then bake in preheated 450 degree oven for approximately 15-20 minutes. When done, they should be crunchy on the outside and golden brown in color.

While the garbanzos are roasting, mix together the spices in a small bowl or cup.

When the garbanzos were done roasting, I placed them in a small bowl while they were still hot. The spice mix was then sprinkled over the hot garbanzos, and they were tossed together until the roasted garbanzos were covered with spice mix.

Time To Enjoy Some Spicy Roasted Garbanzos!

Serve the spicy roasted garbanzos hot and fresh! You can snack on them just like popcorn! A single serving (approximately 1/2 cup) has under 150 calories! Remember- this healthy snack is at it’s very crunchy BEST when served hot and fresh!

The spicy roasted garbanzos are a wonderful snack! They are only a little bit spicy, and you do taste a little bit of the sweetness from the small amount of brown sugar! They taste so good, it’s a safe bet to say that it will be hard for you to stay out of them!

Hope you enjoy these spicy roasted garbanzos!  I can hardly wait to make some more to snack on. You might also enjoy a few other of my snack recipes for Tex Mex Party Nuts, Coconut Candied Cashews or Candied Orange, Cinnamon Clove Spiced Pecans!

Thank you for stopping by, and I hope you will come back soon. Be sure to check out ALL my recipes in the Recipe Index, located at the top of the page. Have a FANTASTIC day!

Interested In More Recipes?

Thank you for visiting this website. I appreciate you using some of your valuable time to do soIf you’re interested, I publish a newsletter 2 times per month (1st and 15th) with all the latest recipes, and other fun info. I would be honored to have you join our growing list of subscribers, so you never miss a great recipe!
There is a Newsletter subscription box on the top right side (or bottom) of each blog post, depending on the device you use, where you can easily submit your e-mail address (only) to be included in my mailing list.

You Can Also Find Me On Social Media:

Facebook page: The Grateful Girl Cooks!
Pinterest:
The Grateful Girl Cooks!
Instagram:
jbatthegratefulgirlcooks

Recipe Source: Larisha, at https://wereparents.com/bbq-roasted-chickpeas-recipe/

↓↓ PRINTABLE RECIPE BELOW ↓↓

0 from 0 votes
Spicy Roasted Garbanzos
Prep Time
2 mins
Cook Time
18 mins
Total Time
20 mins
 
Looking for an easy, healthy, crunchy snack? You've got to try these spicy roasted garbanzos (chickpeas)! They're a little bit sweet, and a little bit spicy!
Category: Appetizer/Snack
Cuisine: Southwest
Keyword: spicy roasted garbanzos
Servings: 4 servings
Calories Per Serving: 132 kcal
Author: JB @ The Grateful Girl Cooks!
Ingredients
  • 15.5 ounces garbanzo beans (chickpeas)
  • 1 Tablespoon olive oil
For Spice Mix:
  • 1/4 teaspoon garlic powder
  • 1/4 teaspoon black pepper
  • 1/4 teaspoon cinnamon
  • 1/2 teaspoon brown sugar
  • 1/4 teaspoon onion powder
  • 1/4 teaspoon chili powder
  • 1/2 teaspoon smoked paprika
  • 1/4 teaspoon ground cumin
  • 1 pinch cayenne pepper
Instructions
  1. Preheat your oven to 450 degrees F.  While your oven is preheating, open, drain and rinse a can of garbanzo beans (also called chickpeas). Pat the garbanzos dry. 

  2. Once garbanzos are dry, place them on a cookie sheet. Drizzle with a Tablespoon of olive oil, then gently toss, to coat. Spread them out on the baking sheet, then bake at 450 degrees for 15-20 minutes. When done, they should be crunchy on the outside and golden brown in color.

  3. While the garbanzos are roasting, mix together the spices in a small bowl or cup. When garbanzos are done roasting, place them in a small bowl while hot. Sprinkle spice mix over hot garbanzos, and gently toss until roasted garbanzos are covered with spice mix.

Nutrition Facts
Spicy Roasted Garbanzos
Amount Per Serving (1 (1/2 cup serving))
Calories 132 Calories from Fat 45
% Daily Value*
Fat 5g8%
Sodium 308mg13%
Potassium 158mg5%
Carbohydrates 15g5%
Fiber 4g17%
Protein 5g10%
Vitamin A 175IU4%
Calcium 38mg4%
Iron 1.5mg8%
* Percent Daily Values are based on a 2000 calorie diet.

Here’s one more to pin on your Pinterest boards!Looking for an easy, healthy, crunchy snack? You've got to try these spicy roasted garbanzos (chickpeas)! They're a little bit sweet, and a little bit spicy!

Citrus Marinated Swordfish Kabobs

Citrus Marinated Swordfish Kabobs, with onions and red and green bell peppers are quick and easy to prepare, and can be grilled on a BBQ outside, or inside on a griddle.Citrus Marinated Swordfish Kabobs, with onions and red and green bell peppers are quick and easy to prepare, and can be grilled on a BBQ or an inside griddle.

My husband bought a small swordfish steak. ONE. There are two of us. Go figure! Swordfish can be a bit expensive (one 7 ounce piece of swordfish cost just under $10), so I needed to figure out something to do with just one piece of fish (cause I sure wasn’t going back to the store for another). Then it came to me… kabobs! By cutting it into smaller pieces and adding vegetable chunks, there would be plenty for BOTH of us! Aha!

I have used swordfish before, including in my recipe for Swordfish in Lemon Garlic Sauce, but I wanted to try something different. I recently had made a citrus Dijon salad dressing for a mixed green salad. It was so good I decided it would be a PERFECT sauce to make with swordfish kabobs, so I decided to go for it!

Scroll Down For A Printable Recipe Card At The Bottom Of The Page

How To Make Citrus Marinated Swordfish Kabobs

Cut the swordfish steak into 16 bite sized cubes (4 used per skewer).

Swordfish steak cut into cubes for kabobs.

Cut the red and green bell peppers and the red onion into approximate 2″ pieces (about the same size as the swordfish cubes).

Purple onion, red and green bell peppers are cut for kabobs

Threading The Kabobs

Thread the swordfish and vegetable pieces onto skewers, alternating vegetables and fish.  If you are grilling indoors on flat surface / griddle, there is no need to treat skewers.

NOTE: If grilling the citrus marinated swordfish kabobs outside using wood skewers, you will need to soak the wooden skewers for 30 minutes fully submerged in water. Do this step prior to adding the fish and veggies, to prevent burning the skewers up, once over an open flame.

Swordfish and vegetables are threaded onto skewers for kabobs.

Mix together the ingredients for the citrus marinade. Brush sauce onto the kabobs, covering both swordfish and veggies. Turn kabobs to brush both sides with sauce. Let the kabobs “marinate” in the sauce for a bit, while you get your outside BBQ started, or heat up your griddle.

Swordfish kabobs are brushed with citrus sauce before grilling

Cooking The Kabobs

Heat the griddle (or outside BBQ) with a tiny bit of oil on medium high heat.  Once the grill is hot, add the kabobs. You should hear them sizzle when they hit the hot grill.

Citrus marinated swordfish kabobs are cooked on griddle.

Cook for several minutes, then rotate kabobs to other side. Continue cooking (turning to cook all sides), and basting with additional sauce, until swordfish is seared on the outside, and cooked through (6-8 minutes).

TIP: If a piece of the fish isn’t fully touching the griddle, simply use a fork to lightly press it down, to ensure a crisp seared exterior. Sometimes the chunks of veggies prevent a few pieces of swordfish from being seared on outside; this is the best way I’ve found to solve that issue.

Swordfish kabobs are turned as they cook on griddle.

Pressing down on kabobs with fork to ensure all sides brown.

Time To EAT!

Once citrus marinated swordfish kabobs are fully cooked through, carefully remove them from the grill, and serve! Each serving is two skewers of swordfish and veggies! I served them with steamed broccoli, yellow squash and carrots, and rice on the side. YUM.

Two citrus marinated swordfish kabobs on plate with vegetables and rice on side.

I really hope you will enjoy these citrus marinated swordfish kabobs… we sure did!  By using only ONE swordfish steak between the two of us, it saved some money, too! It was a great way to eat a lot of veggies and healthy fish; all in all it was a very light, DELICIOUS meal! Have a fantastic day!

Looking For More SEAFOOD Recipes?

You can find all of my recipes in the Recipe Index, located at the top of the page. I have a great variety of seafood recipes you might enjoy, including:

Interested In More Recipes?

Thank you for visiting this website. I appreciate you using some of your valuable time to do soIf you’re interested, I publish a newsletter 2 times per month (1st and 15th) with all the latest recipes, and other fun info. I would be honored to have you join our growing list of subscribers, so you never miss a great recipe!
There is a Newsletter subscription box on the top right side (or bottom) of each blog post, depending on the device you use, where you can easily submit your e-mail address (only) to be included in my mailing list.

You Can Also Find Me On Social Media:
Facebook page: The Grateful Girl Cooks!
Pinterest: The Grateful Girl Cooks!
Instagram: jbatthegratefulgirlcooks

Author's signature

↓↓ PRINTABLE RECIPE BELOW ↓↓

0 from 0 votes
Citrus Marinated Swordfish Kabobs
Prep Time
10 mins
Cook Time
10 mins
Total Time
20 mins
 
Citrus Marinated Swordfish Kabobs, with onions and red and green bell peppers are quick and easy to prepare, and can be grilled on a BBQ or an inside griddle.
Category: Main Course, Seafood
Cuisine: American
Keyword: citrus marinated swordfish kabobs
Servings: 2
Calories Per Serving: 364 kcal
Author: JB @ The Grateful Girl Cooks!
Ingredients
  • 1 swordfish steak (approx. 7 ounces)
  • 1 small red bell pepper
  • 1 small green bell pepper
  • 1/4 small red onion
For Citrus Marinade:
  • 2.5 Tablespoons orange juice (fresh squeezed)
  • 1.5 teaspoons orange zest
  • 3/4 Tablespoon honey
  • 1/4 teaspoon Dijon mustard
  • 1/8 teaspoon salt
  • 1/8 teaspoon onion powder
  • 2.5 Tablespoons vegetable oil
  • 2 teaspoons poppyseeds
Instructions
  1. Cut the swordfish steak into 16 bite sized cubes (4 used per skewer). Cut the bell peppers and onion into approximate 2" wedges (about the same size as the swordfish cubes). 

  2. Thread swordfish and vegetables onto skewers, alternating vegetables and fish.  If you are grillng indoors on flat surface, no need to treat skewers. If grilling outside and using wood skewers, you will need to soak the wooden skewers for 30 minutes, (fully submerged in water) prior to adding fish and veggies, to prevent burning once over an open flame.

  3. Mix together the ingredients for the citrus marinade. Brush sauce onto the kabobs, covering both swordfish and veggies. Turn kabobs to brush both sides with sauce. Let the kabobs sit and "marinate" in the sauce for a bit, while you get your outside BBQ started or heat up your griddle.
  4. Heat griddle (or outside BBQ) with a tiny bit of oil on medium high heat.  Once hot, add kabobs. You should hear them sizzle once they hit the grill. Cook for several minutes, then rotate kabobs to other side. Continue cooking (turning to cook all sides), and basting with additional sauce, until swordfish is seared on the outside, and cooked through (6-8 minutes).  TIP: If a piece of the fish isn't fully touching the griddle, simply use a fork to lightly press it down, to ensure a crisp seared exterior. Sometimes the veggies prevent a few piecesfrom being seared on outside; this is the best way I've found to solve that issue.

  5. Once kabobs are fully cooked through, carefully remove them from the grill, and serve! Enjoy!

Nutrition Facts
Citrus Marinated Swordfish Kabobs
Amount Per Serving (1 (2 skewers))
Calories 364 Calories from Fat 225
% Daily Value*
Fat 25g38%
Saturated Fat 16g100%
Cholesterol 65mg22%
Sodium 236mg10%
Potassium 621mg18%
Carbohydrates 14g5%
Fiber 2g8%
Sugar 10g11%
Protein 20g40%
Vitamin A 1455IU29%
Vitamin C 89.7mg109%
Calcium 43mg4%
Iron 1mg6%
* Percent Daily Values are based on a 2000 calorie diet.

Here’s one more to in on your Pinterest boards!Citrus Marinated Swordfish Kabobs, with onions and red and green bell peppers are quick and easy to prepare, and can be grilled on a BBQ or an inside griddle.

Rigatoni Sausage Mushroom Ragu

You’re gonna enjoy rigatoni sausage mushroom ragu, an easy to make, one pot Italian meal that you will want to make again and again, because it is SO GOOD!
You're gonna enjoy rigatoni sausage mushroom ragu, an easy to make, one pot Italian meal that you will want to make again and again, because it is SO GOOD!

I found a recipe for a vegetarian ragu pasta dish online and thought it sounded interesting!  Just in case you’re wondering – no… this Ragu is not a brand of spaghetti sauce found in the jar on a grocery shelf.  Well, actually it is that, but the recipe I am sharing today is a homemade ragu sauce!

I made a couple changes to the original recipe, such as adding Italian sausage and beef broth, and ended up with an amazing rigatoni sausage mushroom ragu!

Don’t let the long ingredient list stop you from trying this dish… if you look closely, you will see that many of the ingredients are common ingredients or spices you probably already have in your home!  This hearty, delicious ragu tastes amazing, and I hope you will read on… and make this dish!

Scroll Down For A Printable Recipe Card At The bottom Of The Page

How To Make Rigatoni Sausage Mushroom Ragu

Before starting the actual cooking, be sure to have the veggies chopped ahead of time, and the rest of the ingredients ready to go!. You will thank me later. No… really! Note that half of the mushrooms are sliced, the other half are chopped. You will add them to the dish at different times. The chopped mushrooms will help add thickness to the sauce.

Mushrooms, onions, red pepper, celery and Italian sausage are used to make ragu sauce.

Put Italian sausage (taken OUT of the casings), butter and vegetable oil into a large stockpot (or skillet). Heat on medium heat, stirring often, until butter has melted. Add chopped onions and celery to the pot.

Cook them for a few minutes, stirring often, until the sausage has fully cooked, and the veggies have softened.

Italian sausage, mushrooms and celery are cooked in butter and olive oil for ragu sauce.

Add chopped red bell pepper and minced garlic. Cook, stirring often, for two minutes.

Red bell pepper and garlic added to ragu sauce in pot.

Add sliced mushrooms; cook for 1 more minute, stirring as they cook. You are slowly adding in layers of flavor!

Sliced mushrooms are added to ragu sauce in pot.

Add the chopped mushrooms, and cook for 1 minute.  Add red wine to pan. Heat, and let the wine gently boil for 2 minutes.

Chopped mushrooms, red wine, and broth are added to make ragu sauce.

Add canned tomatoes, tomato paste, beef stock (or vegetable stock), and spices. Stir to combine all ingredients.

Canned tomatoes and spices are added to make ragu sauce.

Time To Add The Rigatoni Pasta

Bring the sauce to a boil.

Sausage mushroom ragu sauce is cooking in large pot.

Once sauce is boiling, stir in the dry rigatoni noodles, to combine.  Put a lid on the pan (or cover with aluminum foil), and turn the heat down to LOW.

Rigatoni pasta is added to sausage musroom ragu sauce.

Let the pasta cook for 13-15 minutes (mine took 15), or until the pasta is cooked all the way through. Give the pasta a stir a few times while it is cooking, then put lid back on pan.

TIP: If at any time, the rigatoni sausage mushroom ragu looks like it is getting too dry (if heat was too high), then just add several spoonfuls of hot water to pan, and stir in, to combine.

Rigatoni sausage mushroom ragu is ready to be served.

Time To Serve Rigatoni Sausage Mushroom Ragu!

When the rigatoni sausage mushroom ragu is fully cooked, it is time to serve! Give the pasta a stir, then portion it out into serving bowls. Bowls seem to hold the sauce better than on a plate.

Garnish top of each bowl of pasta with some roughly chopped flat leaf parsley and grated Parmesan cheese. Serve… and enjoy! This rigatoni sausage mushroom ragu tastes AMAZING!

Rigatoni sausage mushroom ragu is garnished with flat leaf parsley and Parmesan cheese.

Rigatoni sausage mushroom ragu is served, garnished with Parmesan cheese and parsley.

And there you have it! Rigatoni sausage mushroom ragu for dinner! It tastes DELICIOUS, and I sincerely hope you will give this recipe a try!

If You Enjoy Pasta Recipes

If you enjoy pasta dishes, be sure to check out my recipes for Simple Chicken Sausage Pasta, Butternut Squash Ravioli with Browned Butter Sage Sauce, Vegetarian Spicy Noodles in Peanut Sauce, Shrimp and Penne Pasta Alfredo, or Florentine Lasagna Roll, to name a few!

ALL of my recipes are listed in the Recipe Index, located at the top of the page. I’m sure you will enjoy them, as well. Have a wonderful day!

Interested In More Recipes?

Thank you for visiting this website. I appreciate you using some of your valuable time to do soIf you’re interested, I publish a newsletter 2 times per month (1st and 15th) with all the latest recipes, and other fun info. I would be honored to have you join our growing list of subscribers, so you never miss a great recipe!
There is a Newsletter subscription box on the top right side (or bottom) of each blog post, depending on the device you use, where you can easily submit your e-mail address (only) to be included in my mailing list.

You Can Also Find Me On Social Media:

Facebook page: The Grateful Girl Cooks!
Pinterest:
The Grateful Girl Cooks!
Instagram:
jbatthegratefulgirlcooks

Author's signature

Recipe adapted from Nicky at: https://www.kitchensanctuary.com/one-pot-mushroom-ragu-with-pasta/

0 from 0 votes
Rigatoni Sausage Mushroom Ragu
Prep Time
10 mins
Cook Time
30 mins
Total Time
40 mins
 
You're gonna enjoy rigatoni sausage mushroom ragu, an easy to make, one pot Italian meal that you will want to make again and again, because it is SO GOOD!
Category: Entree
Cuisine: Italian
Keyword: rigatoni sausage mushroom ragu
Servings: 5
Calories Per Serving: 484 kcal
Author: JB @ The Grateful Girl Cooks!
Ingredients
  • 2 links Italian sausage (mild or hot) , casings removed
  • 1/2 pound mushrooms ,1/2 sliced, 1/2 chopped
  • 2 Tablespoons butter
  • 1 Tablespoon vegetable oil
  • 1 medium red bell pepper , de-seeded and chopped
  • 1 medium onion , finely chopped
  • 1 stick celery , finely chopped
  • 2 cloves garlic , minced
  • 1/4 cup red wine
  • 28 ounces canned diced tomatoes , 2 cans (14 oz.)
  • cups beef stock (or vegetable)
  • 1 teaspoon granulated sugar
  • 1 Tablespoon dried thyme
  • 1 teaspoon dried oregano
  • 1/2 teaspoon salt
  • 1/2 teaspoon black pepper
  • 2 Tablespoons tomato paste
  • 8 ounces rigatoni pasta
  • 2 Tablespoons Parmesan cheese
  • 1/4 cup flat leaf parsley , roughly chopped (for garnish)
Instructions
  1. Put Italian sausage (taken OUT of the casings), butter and vegetable oil into a large stockpot (or skillet). Heat on medium heat, stirring often, until butter has melted. Add chopped onions and celery to the pot. Cook for a few minutes, stirring often, until the sausage has fully cooked, and veggies have softened.

  2. Add chopped red bell pepper and minced garlic. Cook, stirring often, for two minutes. Add SLICED mushrooms; cook for 1 more minute, stirring as they cook. You are slowly adding in layers of flavor! Add CHOPPED mushrooms, and cook for 1 minute.  Add red wine to pan. Heat, and let wine gently boil for 2 minutes. Add canned tomatoes, tomato paste, beef stock (or vegetable stock), and spices. Stir, to combine all ingredients. 

  3. Bring sauce to a boil. Once sauce is boiling, add dry rigatoni noodles; stir to combine.  Put a lid on the pan (or cover with aluminum foil); turn heat down to LOW. Let pasta cook for 13-15 minutes (mine took 15), or until pasta is cooked all the way through. Give pasta a stir a few times while it is cooking, then put lid back on pan. If at any time, the rigatoni sausage mushroom ragu looks like it's getting too dry (if heat was too high), add several spoonfuls of hot water to pan, and stir in, to combine.

  4. When the rigatoni sausage mushroom ragu is fully cooked, it's time to serve! Give the pasta a stir, then portion it out into serving bowls. Bowls seem to hold the sauce better than on a plate. Garnish top of each bowl of pasta with some roughly chopped flat leaf parsley and grated Parmesan cheese. Serve... and enjoy!

Nutrition Facts
Rigatoni Sausage Mushroom Ragu
Amount Per Serving (1 (1/5 of total))
Calories 484 Calories from Fat 207
% Daily Value*
Fat 23g35%
Saturated Fat 10g63%
Cholesterol 47mg16%
Sodium 1068mg46%
Potassium 990mg28%
Carbohydrates 50g17%
Fiber 5g21%
Sugar 10g11%
Protein 18g36%
Vitamin A 1505IU30%
Vitamin C 55mg67%
Calcium 135mg14%
Iron 4.8mg27%
* Percent Daily Values are based on a 2000 calorie diet.

Here’s one more to pin on your Pinterest boards!You're gonna enjoy rigatoni sausage mushroom ragu, an easy to make, one pot Italian meal that you will want to make again and again, because it is SO GOOD!


Kung Pao Zoodles

Kung Pao Zoodles is a low calorie (under 300), low carb dish using spiralized zucchini noodles, cooked in a sweet/spicy Asian sauce, and it can be made with or without chicken.
Kung Pao Zoodles is a low calorie (under 300), low carb dish using spiralized zucchini noodles, cooked in a sweet/spicy Asian sauce, w/or without chicken.

I’ve got to be honest here… this recipe totally surprised me! I purchased a spiralizer recently, to essentially make “noodles” out of a lot of different vegetables. I’d been wanting one for a while, and finally bought a fairly inexpensive one ($29).

Scroll Down For A Printable Recipe Card At The Bottom Of The Page

What If I Do Not Have A Spiralizer?

If you do not have access to a Spiralizer, it IS possible to make zucchini noodles by hand. The best video I’ve seen to describe how to do this is on YouTube, which demonstrates three easy ways to make your own “zoodles” (with box grater, vegetable peeler, or mandoline). I recommend watching it! Here’s the link to the short video, from Kelly Senyei at “Just A Taste”: https://www.youtube.com/watch?v=ETgPaDQh9S4 This was the first recipe I made using it, and my expectations were fairly low for what Kung Pao Zoodles would taste like. Zoodles is a word commonly used to describe Zucchini Noodles!

Whoa! I’m NOT KIDDING… I totally LOVED this dish!  This dish can also be a healthy/delicious meatless meal, by simply omitting the chicken breast.  It only took a couple minutes to turn two medium sized zucchini into gorgeous pasta like strands of veggie goodness!  Once cooked with the amazingly easy Asian inspired sauce, this dish made me GIDDY with excitement with my first bite!

This recipe for Kung Pao Zoodles is very easy to prepare. If there is one tip I can give you, it is to HAVE EVERYTHING PREPPED AND READY TO GO BEFORE BEGINNING COOKING! The dish comes together very quickly once started, so be prepared!

How Do I Make Kung Pao Zoodles?

Cut ends off both zucchini, then spiralize them into spaghetti-like noodles, catching them as they come out into a medium sized bowl. If using a Spiralizer, cut the noodles with kitchen shears into 7 or 8 inch strips (cut long zoodles right in the bowl a couple of times- snip, snip!). Set aside.

Zucchini being spiralized into noodles to make Kung Pao zoodles.

Stir or whisk Asian sauce ingredients together in a small bowl (soy or tamari sauce, balsamic vinegar, hoisin sauce, water, sriracha, sugar and cornstarch). Set sauce aside.

Asian sauce is mixed in bowl for Kung Pao Zoodles.

If You Are Preparing Kung Pao Zoodles WITH Chicken:

If adding chicken to this dish, season lightly with salt and black pepper. Heat vegetable oil over medium high heat. Place chicken cubes into large skillet; cook until lightly browned on all sides and cooked through. Remove chicken from skillet and set aside (or drain on paper towel).

Chicken breast cubes are cooked for Kung Pao Zoodle dish.

Prepare The Rest of This Dish

Turn the heat down to medium and add sesame oil, minced garlic and grated fresh ginger to skillet. Stir and cook for 30-45 seconds, being careful to not let the garlic burn.

Sesame oil, garlic and ginger cooking for kung pao zoodles.

Add chopped red peppers, then stir in the Asian sauce. Bring sauce to a quick boil, then turn heat down to LOW, and cook for a minute or so until sauce is bubbling and has thickened.

Asian sauce and red bell peppers are added to skillet for kung pao sauce.

Add zucchini noodles (zoodles) to skillet.  Stir while cooking until the zoodles are coated with sauce.  Cook for two minutes, stirring often. As the zucchini noodles cook, they will release water, which will help to blend the sauce together with the noodles.

Zucchini noodles (zoodles) are added to skillet.

Zoodles (zucchini noodles) are cooked in the Kung Pao sauce.

Time To Eat Some Kung Pao Zoodles!

When done, add the cooked chicken pieces (if using) to the skillet, and stir to combine. I found using tongs worked great at getting everything mixed together. Divide Kung Pao zoodles between two serving bowls, and garnish each with chopped dry roasted peanuts and sliced green onions.

Bowl of Kung Pao Zoodles garnished with chopped peanuts and green onions.

Serve these delicious Kung Pao zoodles and enjoy! I absolutely LOVED this dish…there is so much yummy flavor! This meal is filling (as each serving is about 2 cups), it tastes amazing, and it so low in calories! Winner, winner… ZOODLE dinner!

Kung Pao Zoodles with a pair of chopsticks... ready to serve!

Chopsticks lifting up a bite of Kung Pao Zoodles!

I really hope you will try making these Kung Pao Zoodles!  If you prefer the more traditional version of Kung Pao Chicken, I hope you will check out that recipe, as well.

Looking For More SPIRALIZED FOOD Recipes?

You can find ALL my recipes in the Recipe Index, located at the top of the page. I have a few delicious zoodle recipes, including:

Interested In More Recipes?

Thank you for visiting this website. I appreciate you using some of your valuable time to do soIf you’re interested, I publish a newsletter 2 times per month (1st and 15th) with all the latest recipes, and other fun info. I would be honored to have you join our growing list of subscribers, so you never miss a great recipe!
There is a Newsletter subscription box on the top right side (or bottom) of each blog post, depending on the device you use, where you can easily submit your e-mail address (only) to be included in my mailing list.

You Can Also Find Me On Social Media:

Facebook page: The Grateful Girl Cooks!
Pinterest:
The Grateful Girl Cooks!
Instagram:
jbatthegratefulgirlcooks

Author's signature

Recipe Source: http://recipestotry.ca/kung-pao-chicken-with-zucchini/

0 from 0 votes
Kung Pao Zoodles
Prep Time
10 mins
Cook Time
10 mins
Total Time
20 mins
 
Kung Pao Zoodles is a low calorie (under 300), low carb dish using spiralized zucchini noodles, cooked in a sweet/spicy Asian sauce, w/or without chicken.
Category: Dinner
Cuisine: Asian
Keyword: kung pao zoodles
Servings: 2 (approx. 2 cups per serving)
Calories Per Serving: 281 kcal
Author: JB @ The Grateful Girl Cooks!
Ingredients
For Zoodles:
  • 2 medium zucchini , ends trimmed
  • 1 teaspoon vegetable or canola oil **if adding chicken
  • 6 ounces boneless, skinless chicken breast **cut in 1/2 inch cubes (if adding chicken)
  • 1 pinch salt and pepper , to taste
  • 1/2 medium red bell pepper , cut into 1/2" pieces
  • 1 teaspoon sesame oil
  • 1 teaspoon freshly ground ginger
  • 2 cloves garlic , minced
  • 2 Tablespoons finely chopped dry roasted peanuts (for garnish)
  • 2 Tablespoons thinly sliced green onions (for garnish)
For Asian Sauce:
  • Tablespoons reduced sodium soy sauce (tamari for gluten free)
  • 1 teaspoon hoisin sauce
  • 1 Tablespoon balsamic vinegar
  • Tablespoons water
  • 1/2 Tablespoon Sriracha sauce
  • 2 teaspoons granulated sugar
  • 2 teaspoons cornstarch
Instructions
  1. Cut ends off both zucchini, then spiralize them into spaghetti-like noodles,. Cut noodles with kitchen shears into 8 inch strips. Set aside.

  2. Stir or whisk Asian sauce ingredients together in a small bowl (soy or tamari sauce, balsamic vinegar, hoisin sauce, water, sriracha, sugar and cornstarch). Set sauce aside.
  3. If adding chicken to this dish, season lightly with salt and black pepper. Heat vegetable oil over medium high heat. Place chicken cubes into large skillet; cook until lightly browned on all sides and cooked through. Remove chicken from skillet and set aside (drain on paper towel).

  4. Turn heat down to medium and add sesame oil, minced garlic and grated fresh ginger to skillet. Stir and cook for 30-45 seconds, being careful to not let garlic burn. Add chopped red peppers, then stir in Asian sauce. Bring sauce to a boil, then turn heat to LOW, and cook for a minute or so until sauce is bubbling and has thickened.  Add zucchini noodles to skillet.  Stir while cooking until zoodles are coated with sauce.  Cook for two minutes, stirring often. As the zucchini noodles cook, they will release water, which will help to blend the sauce together with the noodles. When done, add cooked chicken pieces (if using), and stir to combine. I found using tongs worked great at getting everything mixed together.

  5. To serve, divide Kung Pao zoodles between two serving bowls, and garnish with chopped peanuts and sliced green onions. Serve hot, and enjoy!

Recipe Notes

NOTE: Caloric calculation of 281 per serving includes chicken and vegetable oil to cook it in.  If preparing this recipe as a MEATLESS meal, the calorie count would be approximately 167 calories per (2 cup) serving.

**Weight Watchers - Points+ = 7 points (with chicken).

Nutrition Facts
Kung Pao Zoodles
Amount Per Serving (1 g)
Calories 281 Calories from Fat 108
% Daily Value*
Fat 12g18%
Saturated Fat 3g19%
Cholesterol 54mg18%
Sodium 724mg31%
Potassium 976mg28%
Carbohydrates 20g7%
Fiber 3g13%
Sugar 12g13%
Protein 24g48%
Vitamin A 1410IU28%
Vitamin C 78.6mg95%
Calcium 42mg4%
Iron 1.6mg9%
* Percent Daily Values are based on a 2000 calorie diet.

Here’s one more to pin on your Pinterest boards!Kung Pao Zoodles is a low calorie (under 300), low carb dish using spiralized zucchini noodles, cooked in a sweet/spicy Asian sauce, w/or without chicken.

Easy Chicken Caesar Salad

Easy Chicken Caesar Salad is a light, yet filling entree, with grilled chicken breast on crisp romaine lettuce, with Parmesan cheese, croutons, and bottled dressing!Easy Chicken Caesar Salad is a light, yet filling entree, with grilled chicken breast on romaine lettuce, Parmesan cheese, croutons, and bottled dressing!

Do you enjoy Chicken Caesar Salad?  We sure do, in our home!  We have one for dinner every couple of weeks (especially in the summer), and it continues to be a family favorite meal.

Scroll Down For A Printable Recipe Card At the Bottom Of The Page

How Do You Season The Chicken For The Caesar Salad?

Whenever we grill chicken and use my Mom’s trusty chicken basting sauce (been using her recipe for over 40 years), I always try to grill two extra breasts to put aside for this salad! That way, the chicken is ready to go, any time we want to have this salad for dinner!

Basting sauce used for grilling chicken for caesar salad.

Having the chicken already grilled makes this a very quick meal to make… BUT… whether you use leftover chicken breasts, or grill them on an indoor grill, in the skillet, or on your BBQ, simply make sure you have a cooked, lightly seasoned chicken breast for each salad!

Many ways to cook chicken for a caesar salad.

When you are ready to make the chicken caesar salad, slice a head of romaine lettuce into thin strips. I typically buy romaine hearts (these have a lot of the darker outside leaves taken off) for this salad, but it really doesn’t matter.

Okay… So How Do I Make The Chicken Caesar Salad?

If using romaine hearts, one whole one should be enough for two entree salads. Place thinly sliced romaine into large bowl. Squeeze the juice of half a lemon over lettuce, catching any seeds that try to jump in!

Slicing romaine lettuce for chicken caesar salad.

Fresh lemon juice brings out the flavor in a chicken caesar salad.

Now, I have seen so many recipes to make homemade Caesar dressing, with anchovies, etc. in it, but when you want a quick dinner, what I use is bottled salad dressing!

We have used Cardini’s Caesar dressing for many many years. Caesar Cardini is the man who is known for creating Caesar salads, and we have found this dressing to be the very best tasting one on the market! Obviously you can use whatever Caesar dressing you wish, but we give this one, found in most grocery stores (or Amazon) a thumbs up, for sure!

Add the Caesar Salad Dressing

Pour the desired amount of salad dressing over the lettuce in the bowl, then mix it, to combine.

Romaine lettuce is topped with Caesar dressing.

I use the original Caesar Cardini dressing on this salad.

TIP: After the lettuce has the salad dressing on it, THEN add grated Parmesan cheese!  Because the lettuce has salad dressing on it, the cheese will stick to the romaine and not fall to the bottom of the bowl. Best tip I’ve ever found for a caesar salad! Mix to fully combine ingredients.

Shredded Parmesan cheese is added to caesar salad.

Serving The Salad

Portion salad into 2 serving bowls or plates.  Place croutons on top, and add a couple thin slices of lemon to dish as a garnish. Adding lemon slices looks good, and each person can squeeze additional lemon juice on their salad, if desired.

Croutons and lemon slices are added to caesar salad.

Slice the precooked grilled chicken breasts into thin slices.  Place the sliced chicken on top of the salad, slightly fanning out the slices across the salad. The chicken can be hot or chilled… we serve it both ways.

Garnish your chicken Caesar salad with additional Parmesan cheese, if desired. Serve, and enjoy this absolutely YUMMY entree salad!

Grilled chicken breast is sliced, then fanned out on top of caesar salad before serving.

I really hope you enjoy this classic grilled chicken Caesar salad, and trust you will enjoy it as much as we do! If you enjoy this salad, chances are you will also enjoy my recipes for Grilled Chili & Lime Chicken Fajita Salad or Strawberry Avocado Spinach Salad with Grilled Chicken (YUM). Don’t forget to check out ALL my recipes in the Recipe Index, located at the top of the page. Have a wonderful day.

Interested In More Recipes?

Thank you for visiting this website. I appreciate you using some of your valuable time to do soIf you’re interested, I publish a newsletter 2 times per month (1st and 15th) with all the latest recipes, and other fun info. I would be honored to have you join our growing list of subscribers, so you never miss a great recipe!
There is a Newsletter subscription box on the top right side (or bottom) of each blog post, depending on the device you use, where you can easily submit your e-mail address (only) to be included in my mailing list.

You Can Also Find Me On Social Media:

Facebook page: The Grateful Girl Cooks!
Pinterest:
The Grateful Girl Cooks!
Instagram:
jbatthegratefulgirlcooks

Author's signature

0 from 0 votes
Easy Chicken Caesar Salad
Prep Time
15 mins
Cook Time
0 mins
Total Time
15 mins
 
Easy Chicken Caesar Salad is a light, yet filling entree, with grilled chicken breast on romaine lettuce, Parmesan cheese, croutons, and bottled dressing!
Category: Entree Salad
Cuisine: American
Keyword: chicken caesar salad
Servings: 2 main course salads
Calories Per Serving: 530 kcal
Author: JB @ The Grateful Girl Cooks!
Ingredients
  • 2 small boneless, skinless chicken breasts , pre-grilled or baked
  • 1 head romaine lettuce (I use romaine hearts)
  • 1/2 large lemon
  • 1/4 cup Caesar salad dressing
  • 1/2 cup Parmesan Cheese
  • 3 Tablespoons croutons , for garnish
  • 4 thin slices lemon , for garnish
Instructions
  1. NOTE: Having the chicken already grilled makes this a very quick meal to make... BUT... whether you use leftover chicken breasts, or grill them on an indoor grill, in the skillet, or on your BBQ, simply make sure you have a small, cooked, lightly seasoned boneless chicken breast for each salad!

  2. Place thinly sliced romaine into large bowl. Squeeze the juice of half a lemon over lettuce, catching any seeds that try to jump in!  Pour desired amount of salad dressing over lettuce, then mix to combine.

  3. After the lettuce has the salad dressing on it, THEN add grated Parmesan cheese!  Because the lettuce has salad dressing on it, the cheese will stick to it, and not fall to the bottom of the bowl. Mix to fully combine ingredients.

  4. Portion salad into 2 serving bowls or plates.  Place croutons on top, and add a couple thin slices of lemon to dish as a garnish.

  5. Slice precooked grilled chicken breasts into thin slices.  Place chicken slices on top of salad, fanning out the slices across the salad. The chicken can be hot or chilled... we serve it both ways.  Garnish salad with additional grated Parmesan cheese, if desired. Serve, and enjoy this absolutely YUMMY entree salad!

Recipe Notes

NOTE: Caloric calculation is approximate, based on a 4 ounce chicken breast per serving. Caloric count will vary, due to weight of chicken and amount / type of salad dressing used.

Nutrition Facts
Easy Chicken Caesar Salad
Amount Per Serving (1 g)
Calories 530 Calories from Fat 252
% Daily Value*
Fat 28g43%
Saturated Fat 7g44%
Cholesterol 101mg34%
Sodium 1067mg46%
Potassium 1243mg36%
Carbohydrates 28g9%
Fiber 7g29%
Sugar 4g4%
Protein 40g80%
Vitamin A 27490IU550%
Vitamin C 14.9mg18%
Calcium 436mg44%
Iron 4.9mg27%
* Percent Daily Values are based on a 2000 calorie diet.

Here’s one more to pin on your Pinterest boards!Easy Chicken Caesar Salad is a light, yet filling entree, with grilled chicken breast on romaine lettuce, Parmesan cheese, croutons, and bottled dressing!

Turkey Ranch Rollups

Turkey Ranch Rollups are wrap sandwiches with turkey breast, roma tomatoes and baby spinach leaves, with a cream cheese ranch spread. They’re EASY to make, and perfect for school or work lunch boxes!
Turkey Ranch Rollups are wrap sandwiches with turkey breast, roma tomatoes and spinach with a cream cheese ranch spread. EASY to make; perfect for lunch boxes!

Well… school just started back in our area. We live several blocks away from the local elementary and middle school, so there were kids everywhere today, carrying their lunches in lunch boxes and backpacks!

This totally EASY quick recipe for turkey ranch rollups is perfect for lunches (kids OR adults… hint, hint). Make several up the night before, wrap them tightly, and the next morning the rollups are ready to drop into that favorite lunch box! Here’s how simple they are to make:

Scroll Down For A Printable Recipe Card At The Bottom Of The Page

How To Make Turkey Ranch Rollups

Spread whipped (or softened) cream cheese onto a flour tortilla. Spread almost all the way to the edges. Add a teaspoon of ranch dressing; spread over cream cheese.

Flour tortilla is spread with cream cheese and ranch dressing to make rollups.

Place two thin slices of deli style turkey breast on one side of tortilla (you can see these turkey slices were fairly wide). Add roma tomato slices (thinly sliced). Season lightly with salt and pepper, to taste.

Turkey slices and sliced roma tomatoes are place on flour tortilla for rollups.

Top with those HEALTHY (shhh, don’t tell the kids) baby spinach leaves. If you want, place a thin slice of the cheese of your choice on top of the spinach, trimmed to fit (optional). And for goodness sake, modify these rollups to make them your own. Simply add what you or your kids would enjoy (alfafa sprouts, bell peppers, etc). You really can’t hurt this rollup!

Baby spinach leaves are added to turkey ranch rollups.

Roll It Up And Refrigerate

TIGHTLY roll up the sandwich, tucking turkey, etc. in, as you roll. You want to get it tight and not loose. As soon as you get it rolled up, place it in plastic wrap, and seal, keeping it TIGHTLY rolled up. Repeat with additional turkey ranch rollups.

Place the plastic wrap sealed rollups in refrigerator. They are BEST if stored overnight in refrigerator. The cream cheese/ranch spread acts kind of like “glue” to hold the wrap together, once refrigerated.

Turkey ranch rollups are rolled tightly, then wrapped in plastic wrap and refrigerated.

Time To Eat Turkey Ranch Rollups

When ready to eat, either serve as one whole rollup (perfect for lunch boxes- leave them wrapped tightly in plastic wrap), OR unwrap, slice in half on a diagonal, and serve!

Turkey ranch rollups are cut in half, and are served with chips and apples.

Turkey ranch rollups - close up photo.

That’s it! Remember to tuck an ice pack of some kind in your child’s lunch to keep rollups (with meat and salad dressing) chilled! You probably already knew that, but it’s safe to remind everyone once again.

Hope you enjoy these delicious, easy to make lunch rollups. It’s so easy to make these up in the evening before bedtime. that way they are ready for you to grab for lunches for school or work the next day! Have a wonderful day.

Looking for More SANDWICH Recipes?

You can find all of my recipes in the Recipe Index, located at the top of the page. I have some yummy sandwich recipes, including:

Interested In More Recipes?

Thank you for visiting this website. I appreciate you using some of your valuable time to do soIf you’re interested, I publish a newsletter 2 times per month (1st and 15th) with all the latest recipes, and other fun info. I would be honored to have you join our growing list of subscribers, so you never miss a great recipe!
There is a Newsletter subscription box on the top right side (or bottom) of each blog post, depending on the device you use, where you can easily submit your e-mail address (only) to be included in my mailing list.

You Can Also Find Me On Social Media:

Facebook page: The Grateful Girl Cooks!
Pinterest:
The Grateful Girl Cooks!
Instagram:
jbatthegratefulgirlcooks

Author's signature

↓↓ PRINTABLE RECIPE BELOW ↓↓

0 from 0 votes
Turkey Ranch Rollups
Prep Time
5 mins
Cook Time
0 mins
Total Time
5 mins
 
Turkey Ranch Rollups are wrap sandwiches with turkey breast, roma tomatoes and spinach with a cream cheese ranch spread. They're EASY to make, and perfect for lunch boxes!
Category: Sandwich
Cuisine: American
Keyword: turkey ranch rollups
Servings: 2 rollups
Calories Per Serving: 179 kcal
Author: JB @ The Grateful Girl Cooks!
Ingredients
  • 2 flour tortillas
  • 2 Tablespoons whipped cream cheese
  • 2 teaspoons Ranch salad dressing
  • 4 slices deli turkey (thin slices)
  • 6 slices roma tomato (thin slices)
  • 1 pinch salt and pepper (to taste)
  • 1/2 cup baby spinach leaves
  • cheddar cheese (OPTIONAL)
Instructions
  1. For each rollup: Spread whipped (or softened) cream cheese onto a flour tortilla. Spread almost all the way to the edges. Add a teaspoon of ranch dressing; spread over cream cheese.

  2. Place two thin slices of deli style turkey breast on one side of tortilla. Add roma tomato slices (thinly sliced). Season lightly with salt and pepper, to taste. Top with baby spinach leaves. If you want, place a thin slice of the cheese of your choice on top of the spinach, trimmed to fit (optional).

  3. TIGHTLY roll up the sandwich, tucking turkey, etc. in as you roll. You want to get it tight and not loose. As soon as you get it rolled up, place it in plastic wrap, and seal, keeping it TIGHTLY rolled up. Repeat with additional rollups.  Place plastic wrap sealed rollups in refrigerator. They are BEST if stored overnight in refrigerator. The cream cheese/ranch spread acts kind of like a "glue" to hold the wrap together once refrigerated. When ready to serve, slice each rollup in half! Enjoy!

Nutrition Facts
Turkey Ranch Rollups
Amount Per Serving (1 rollup)
Calories 179 Calories from Fat 81
% Daily Value*
Fat 9g14%
Saturated Fat 3g19%
Cholesterol 22mg7%
Sodium 523mg23%
Potassium 140mg4%
Carbohydrates 17g6%
Sugar 2g2%
Protein 5g10%
Vitamin A 900IU18%
Vitamin C 2.1mg3%
Calcium 53mg5%
Iron 1.4mg8%
* Percent Daily Values are based on a 2000 calorie diet.

Here’s one more to pin on your Pinterest boards!Turkey Ranch Rollups are wrap sandwiches with turkey breast, roma tomatoes and spinach with a cream cheese ranch spread. EASY to make; perfect for lunch boxes!

Citrus Dijon Salad Dressing

Drizzle your crisp green salads with homemade Citrus Dijon Salad Dressing! Made in under 5 minutes, it’s an EASY way to make your garden salads “pop” with flavor!Drizzle your crisp green salads with Citrus Dijon Salad Dressing! Made in under 5 minutes, it's an EASY way to make your garden salads "pop" with flavor!

While searching for salad recipes recently, I discovered this recipe for a homemade salad dressing, which featured citrus (fresh squeezed orange juice and zest) and poppyseeds! I thought it sounded good so I made it, with only a couple slight changes to the original, and used it to dress our salad.  It’s FANTASTIC!

I love to make salad dressings from scratch! Not only do you avoid a lot of the shelf stabilizing EXTRA ingredients found in commercially prepared bottles of salad dressing, but honestly… it’s so EASY and usually far more cost effective to simply make it yourself!

Scroll Down For A Printable Recipe Card At the bottom Of the Page

Other Homemade Salad Dressings You Might Enjoy!

If you enjoy making salad dressings from scratch, too, be sure to check out my recipes for Citrus Vinaigrette, Bleu Cheese, Italian, Poppyseed, Ranch, Catalina, Strawberry Balsamic Vinaigrette, and Creamy Lemon. All are easy to make, and taste fabulous!

How To Make Citrus Dijon Salad Dressing

This particular recipe for Citrus Dijon salad dressing can be made in UNDER 5 minutes, and uses some very basic pantry items. Here’s the “cast of characters”: fresh squeezed orange juice, oil, poppy seeds, Dijon mustard, honey, orange zest, and simple seasonings. Easy peasy.

Ingredients for citrus dijon salad dressing.

Mixing The Citrus Dijon Salad Dressing

All ingredients (except for poppy seeds) are placed in a small jar with a tight lid.  I found it easy to use the same jar and lid I was going to store the dressing in, for less cleanup! Another couple options are to put ingredients in mixing bowl and use a whisk to blend ingredients, or to use a blender (but you’ll have more to clean up… just sayin’).

You can see the before and after photos below.  Place the lid on the jar… and shake the jar hard for about 30 seconds (while holding the lid on tightly) until dressing has fully combined.

Citrus dijon salad dressing before it is mixed.

Citrus dijon salad dressing after it is mixed.

Add the poppy seeds, then put the lid back on and give jar a few more good shakes to blend the ingredients. That’s it! TA DA! You just made an incredible tasting citrus Dijon salad dressing!

Poppyseeds are added to citrus dijon salad dressing in jar.

Citrus dijon dressing after poppyseeds are added and mixed in.

All that’s left to do after that is give it a quick shake or stir right before serving, then pour some of this delicious Citrus Dijon salad dressing over the salad of your choice! I recently used it to drizzle on a yummy Spinach Pear Salad!  It tastes delicious, and can be made ahead of time, too!

Making the Salad Dressing Ahead Of Time?

If you will be making this salad dressing ahead of the time you will need it, keep it refrigerated until you’re ready to use it. Give it a good stir or shake to re-mix the ingredients, and then serve!

Citrus Dijon salad dressing being poured over mixed green salad.

You Can Use Citrus Dijon Salad Dressing As A Marinade, Too!

We had a little bit of the salad dressing left over after making the salad (will keep for about a week in fridge), so a few days later I had a bit of a crazy idea.  Why not marinate fish kabobs with it!

That was a great idea!  The flavors of the citrus dressing paired perfectly with the fish (swordfish), and really enhanced the flavor… who knew? The kabobs were delicious, and were so very simple to make.

Citrus Dijon salad dressing used to marinade fish kabobs.

However you decide to use this Citrus Dijon salad dressing, you can be sure it’s gonna be GOOD!  Hope you will enjoy this absolutely delicious recipe!

Thanks for stopping by today. I hope you will have the opportunity to try this salad dressing. Be sure to check out my Recipe Index, which is located at the top of the page. You can find ALL of my recipes there. Have a great day.

Interested In More Recipes?

Thank you for visiting this website. I appreciate you using some of your valuable time to do soIf you’re interested, I publish a newsletter 2 times per month (1st and 15th) with all the latest recipes, and other fun info. I would be honored to have you join our growing list of subscribers, so you never miss a great recipe!
There is a Newsletter subscription box on the top right side (or bottom) of each blog post, depending on the device you use, where you can easily submit your e-mail address (only) to be included in my mailing list.

You Can Also Find Me On Social Media:

Facebook page: The Grateful Girl Cooks!
Pinterest:
The Grateful Girl Cooks!
Instagram:
jbatthegratefulgirlcooks

Have a GREAT day!

Author's signature

Recipe Adapted From: https://www.chelseasmessyapron.com/beet-and-goat-cheese-salad

0 from 0 votes
Citrus Dijon Salad Dressing
Prep Time
5 mins
Cook Time
0 mins
Total Time
5 mins
 
Drizzle your crisp green salads with Citrus Dijon Salad Dressing! Made in under 5 minutes, it's an EASY way to make your garden salads "pop" with flavor!
Category: Salad Dressing
Cuisine: American
Keyword: citrus dijon salad dressing
Servings: 12 Tablespoons (approx. 6 ounces)
Calories Per Serving: 67 kcal
Author: JB @ The Grateful Girl Cooks!
Ingredients
  • 1/3 cup fresh squeezed orange juice
  • 3 teaspoons orange zest
  • 1/2 teaspoon Dijon mustard
  • Tablespoons honey
  • 1/4 teaspoon salt
  • 1/4 teaspoon onion powder
  • 1/3 cup vegetable oil
  • 3/4 Tablespoon poppyseeds
Instructions
  1. Place all ingredients (except for the poppyseeds) in a small jar with a tight lid. Place the lid on the container... and shake the jar hard for about 30 seconds (while holding the lid on tightly) until dressing has fully combined.

  2. Add poppyseeds, then put lid back on and give jar a few more good shakes to fully blend the ingredients. Serve, and enjoy! If making this salad dressing ahead of the time, refrigerate until ready to use, give it a good stir, then serve!

  3. Leftover salad dressing should stay fresh and yummy for about a week in refrigerator, if stored in an airtight jar or container. Enjoy!

Nutrition Facts
Citrus Dijon Salad Dressing
Amount Per Serving (1 Tablespoon)
Calories 67 Calories from Fat 54
% Daily Value*
Fat 6g9%
Saturated Fat 4g25%
Sodium 51mg2%
Potassium 17mg0%
Carbohydrates 3g1%
Sugar 2g2%
Vitamin A 15IU0%
Vitamin C 4.1mg5%
Calcium 8mg1%
Iron 0.1mg1%
* Percent Daily Values are based on a 2000 calorie diet.

Here’s one more to pin on your Pinterest boards!Drizzle your crisp green salads with Citrus Dijon Salad Dressing! Made in under 5 minutes, it's an EASY way to make your garden salads "pop" with flavor!

Garden Vegetable Chowder

Easy to make, thick and creamy Garden Vegetable Chowder, with broccoli, cauliflower, potatoes, celery, and carrots will fill and warm you up, any time of year!

Do you have an overabundance of garden veggies or a produce drawer (filled with veggies) in your refrigerator begging for mercy? If so, then do I have a SOUP for YOU! I found it in one of my old Taste of Home magazines from July 1998 (yes… I kept them ALL from years of subscriptions!)..

Well, it’s actually a thick, wonderful vegetable chowder that is filled with a LOT of veggies… such as carrots, potatoes, cauliflower, bell peppers, onions, broccoli, and celery. The best part besides using all those yummy vegetables? Trust me – this chowder is EASY to make!

Scroll Down For A Printable Recipe Card At The Bottom Of The Page

How Do I Make Garden Vegetable Chowder?

Sauté chopped onions and green bell peppers in butter. While they are cooking, prep the remaining veggies.

Cooking onions and peppers in butter for chowder.

The vegetables in this chowder besides the onions and bell peppers are carrots, red potatoes, celery, broccoli, and cauliflower. These additional veggies are all cut into bite sized pieces. Add veggies, water, chicken bouillon, and salt and pepper to onion/bell pepper mixture in pan.

Bring this mixture to a boil. Once the liquid is boiling, reduce the heat. Cover the pan, and simmer the soup for 20 minutes.

Carrots, potatoes, celery, broccoli and cauliflower used to make vegetable chowder.

Vegetables for chowder cooked in chicken broth.

Make a slurry (used to thicken soup) by whisking together milk and flour until all lumps have disappeared. Once soup has cooked for 20 minutes, stir the slurry into the soup.

Making a slurry to add to soup to thicken it into chowder.

Adding flour slurry to soup to thicken it for vegetable chowder.

Once the flour slurry has been added, stir to combine, then bring the soup to a boil. Cook soup for 2 minutes. The liquid will thicken as it cooks.

After slurry is added to vegetable soup, it cooks until the broth thickens.

The vegetable chowder has thickened considerably in pan.

Time For Some Cheese!

Add parsley and grated cheddar cheese to vegetable chowder. Stir and cook on medium low heat until soup is heated through and all cheese has melted.

Grated cheddar cheese is added to vegetable chowder.

Cheese is mixed into the vegetable chowder until it has melted.

Serve The Garden Vegetable Chowder

Ladle hot, thick vegetable chowder into serving bowls. Garnish each bowl of soup with additional parsley, if desired. Serve it immediately, and enjoy a hot bowl of veggie chowder!

Bowl of garden vegetable chowder, garnished with dried parsley.

Garden vegetable chowder is ready to eat!

I really hope you enjoy this thick, creamy and DELICIOUS garden vegetable chowder! It’s so easy to make, and I think you will really LOVE it! What a delicious way to get your kids (or spouses or friends) to eat their veggies!

Looking For More SOUP Recipes?

You can find ALL of my recipes in the Recipe Index, located at the top of the page. I have lots of delicious soup recipes you might enjoy, including:

Interested In More Recipes?

Thank you for visiting this website. I appreciate you using some of your valuable time to do soIf you’re interested, I publish a newsletter 2 times per month (1st and 15th) with all the latest recipes, and other fun info. I would be honored to have you join our growing list of subscribers, so you never miss a great recipe!
There is a Newsletter subscription box on the top right side (or bottom) of each blog post, depending on the device you use, where you can easily submit your e-mail address (only) to be included in my mailing list.

You Can Also Find Me On Social Media:
Facebook page: The Grateful Girl Cooks!
Pinterest: The Grateful Girl Cooks!
Instagram: jbatthegratefulgirlcooks

Author's signature

Recipe Source: Taste of Home Magazine, July 1998 edition.

5 from 1 vote
Garden Vegetable Chowder
Prep Time
10 mins
Cook Time
25 mins
Total Time
35 mins
 

Easy to make, thick and creamy Garden Vegetable Chowder, with broccoli, cauliflower, potatoes, celery, onions, bell peppers and carrots will fill and warm you up, any time of year!

Category: Soup
Cuisine: American
Keyword: vegetable chowder
Servings: 6
Calories Per Serving: 356 kcal
Author: JB @ The Grateful Girl Cooks!
Ingredients
  • 1/4 cup butter
  • 1/2 cup onion ,chopped
  • 1/2 cup green bell pepper ,chopped
  • 1 cup (EACH) potato/celery/broccoli/cauliflower/carrots ,chopped, sliced or florets
  • 3 cups water
  • 3 cubes chicken bouillon
  • 1 teaspoon salt
  • 1/4 teaspoon black pepper
  • 1/2 cup all purpose flour
  • 2 cups milk
  • 1 Tablespoon parsley
  • 2 cups cheddar cheese ,grated
Instructions
  1. Sauté chopped onions and green bell peppers in butter in bottom of soup pot. While they are cooking, prep the remaining veggies, by slicing, chopping or cutting them into florets.

  2. Add veggies, water, chicken bouillon, and salt and pepper to onion/bell pepper mixture. Bring this mixture to a boil. Once boiling, reduce heat. Cover pan, and simmer soup for 20 minutes.

  3. Make a slurry (used to thicken soup) by whisking together milk and flour until all lumps have disappeared. Once soup has cooked for 20 minutes, stir the slurry into the soup.  Once the flour slurry has been added, stir to combine, then bring the soup to a boil. Cook soup for 2 minutes. The liquid will thicken as it cooks.

  4. Add parsley and grated cheddar cheese to vegetable chowder. Stir and cook on medium low heat until soup is heated through and all cheese has melted. Ladle hot, thick vegetable chowder into serving bowls. Garnish each bowl of soup with additional parsley, if desired. Serve... and enjoy!

Nutrition Facts
Garden Vegetable Chowder
Amount Per Serving (1 (1/6) of total)
Calories 356 Calories from Fat 207
% Daily Value*
Fat 23g35%
Saturated Fat 14g88%
Cholesterol 68mg23%
Sodium 775mg34%
Potassium 554mg16%
Carbohydrates 23g8%
Fiber 3g13%
Sugar 7g8%
Protein 15g30%
Vitamin A 4580IU92%
Vitamin C 39.8mg48%
Calcium 408mg41%
Iron 2.2mg12%
* Percent Daily Values are based on a 2000 calorie diet.

Here’s one more to pin on your Pinterest boards!Easy to make, thick and creamy Garden Vegetable Chowder, with broccoli, cauliflower, potatoes, celery, and carrots will fill and warm you up, any time of year!

Spinach Pear Salad

You’re gonna LOVE this easy and quick Spinach Pear Salad, with candied pecans, goat cheese and dried cranberries, drizzled with homemade citrus salad dressing!
You're gonna LOVE this easy and quick Spinach Pear Salad, with candied pecans, goat cheese and dried cranberries, drizzled with homemade citrus salad dressing!

Last week I received some FREE pears from one of our neighbors! I received a bag of pears and put them on our counter to ripen so I could can them for long term storage!  A couple of them ripened really fast (overachievers!), so I wanted to use them right away.

I remembered a salad I had eaten in a restaurant a couple years ago that had fresh pear slices on it. THAT was my inspiration for this salad.

I decided to see what I had on hand, gathered it up, and came up with this recipe for spinach pear salad, with goat cheese, cranberries, and candied pecans, drizzled with a citrus salad dressing.

Let me tell you- it tastes FANTASTIC! My husband and I both LOVED it, and said it was one of the best salads we had eaten recently!

Scroll Down For A Printable Recipe Card At The Bottom Of The Page

How To Make Spinach Pear Salad

Quickly candy some pecans (or use walnuts). Place granulated sugar, water and cinnamon in a skillet; stir until sugar dissolves, add pecans, then cook on medium-low heat, stirring constantly. Once syrup has cooked away, you are left with sweetened, sticky pecans. This only takes a few minutes.

Remove pecans from skillet and place them on aluminum foil to dry out (don’t let them touch each other) for a few minutes. Turn them over to dry the other side.

The sugary glaze will firm up as they cool, then you can peel them off the foil. Let them dry until ready to add to the salad; it only takes a few minutes (or make them ahead of time, if that is easier).

Candied pecans only take a few minutes to make for the spinach salad.

Make The Citrus Dijon Salad Dressing

Next thing is to make the citrus Dijon salad dressing (make while the candied pecans are drying ).  I had some leftover from another recipe, but trust me- it only takes 3-4 minutes to make… it’s EASY. Basically, the ingredients are placed in a sealed jar and shaken well until fully mixed. That’s it!

You will have leftover salad dressing. Keep it refrigerated in an airtight jar or container, and use it again and again! It’s wonderful!

Citrus dijon salad dressing used to drizzle on spinach pear salad.

For each salad, place chilled baby spinach leaves onto serving plate. Top with dried cranberries and several thin slices of red onion.

Baby spinach red onion and dried cranberries on salad.

Slice half of the ripe pear into thin slices, leaving peel ON.  Crumble goat cheese. **TIP: I freeze goat cheese, then when I need to use it, I simply “shave” off what I need using a sharp knife (while the cheese is still frozen- it thaws QUICKLY).

By freezing the cheese (well wrapped), it doesn’t spoil, and is always there when I need it.

Ripe pear is sliced and goat cheese prepared for salad.

Plating The Spinach Pear Salad For EATING!

Add the pear slices to top of salad, slightly fanning them out for best presentation.  Sprinkle with crumbled goat cheese, then add the candied pecans.

Candied pecans, goat cheese and sliced pear added to spinach salad.

Spinach pear salad with candied pecans, on white plate.

Drizzle the citrus Dijon salad dressing over the salad… and serve! You will LOVE the crunch of the candied pecans, the creamy goat cheese, the chewy dried cranberries, and the amazing citrus salad dressing.

The ripe pear slices add a great look and wonderful taste to this delicious spinach pear salad!

Citrus dressing is added to spinach pear salad before serving.

I really hope you will try this spinach pear salad! It LOOKS like a fancy restaurant salad, but is so easy to prepare!  If you enjoy this salad, you might also want to check out a more traditional spinach salad we also love and make often!

Looking For More SALAD Recipes?

You can find ALL my recipes in the Recipe Index, located at the top of the page. I have lots of delicious salad recipes you’ll enjoy, including:

Want More Recipes? Get My FREE Newsletter!

I publish a newsletter 2 times per month (1st and 15th) with lots of recipes, tips, etc..
Would you like to join our growing list of subscribers?

There is a Newsletter subscription box on the top right (or bottom) of each blog post, depending on the device you use.
You can submit your e-mail address there, to be added to my mailing list.

Find Me On Social Media:

Facebook page: The Grateful Girl Cooks!
Pinterest:
The Grateful Girl Cooks!
Instagram:
jbatthegratefulgirlcooks

Author's signature

Salad Dressing recipe adapted from: https://www.chelseasmessyapron.com/beet-and-goat-cheese-salad/

↓↓ PRINTABLE RECIPE BELOW ↓↓

0 from 0 votes
Spinach Pear Salad
Prep Time
15 mins
Cook Time
0 mins
Total Time
15 mins
 
You're gonna LOVE this easy and quick Spinach Pear Salad, with candied pecans, goat cheese and dried cranberries, drizzled with homemade citrus salad dressing!
Category: Salad
Cuisine: American
Keyword: spinach pear salad
Servings: 2
Calories Per Serving: 386 kcal
Author: JB @ The Grateful Girl Cooks!
Ingredients
For Candied Pecans:
  • 1/2 cup pecan halves
  • 1 Tablespoon granulated sugar
  • 1/4 teaspoon cinnamon
  • 1/4 cup water
For Citrus Dressing:
  • 1/3 cup fresh squeezed orange juice
  • 1 Tablespoon orange zest
  • Tablespoons honey
  • 1/2 teaspoon Dijon mustard
  • 1/4 teaspoon salt
  • 1/4 teaspoon onion powder
  • 1/3 cup vegetable oil
  • 3/4 Tablespoon poppyseeds
For Salad:
  • 4 cups baby spinach
  • 3 Tablespoons dried cranberries
  • 1/2 pear (ripe) , sliced thin
  • 1/4 cup goat cheese , crumbled
  • 1/4 cup red onion , thinly sliced
Instructions
Make Candied Pecans (or walnuts):
  1. Place granulated sugar, water and cinnamon in a skillet; stir until sugar dissolves, add pecans; cook on medium-low heat, stirring constantly. Once syrup has cooked away, you are left with sweetened, sticky pecans (only takes a few minutes). Remove pecans from skillet; place them on aluminum foil to dry (don't let them touch each other) for a few minutes. Turn them over to dry the other side. The sugary glaze will firm up as they cool, then you can peel them off the foil. Let them dry until ready to add to the salad; it only takes a few minutes..

Make Citrus Salad Dressing:
  1. Place all ingredients (except for the poppyseeds) in a small jar with a tight lid. Place the lid on the container... and shake the jar hard for about 30 seconds (while holding the lid on tightly) until dressing has fully combined. Add poppyseeds, then put lid back on and give jar a few more good shakes to fully blend the ingredients.

Assemble Salad:
  1. Place chilled baby spinach leaves onto serving plates. Top with dried cranberries and several thin slices of red onion. Slice half of the ripe pear into thin slices, leaving peel ON.  Crumble goat cheese. Add pear slices to top of salad, fanning them out for best presentation.  Sprinkle with crumbled goat cheese, then add candied pecans. Drizzle salad dressing over the salad... and serve!

Recipe Notes

Caloric calculation shown does NOT include salad dressing, as people enjoy varying amounts of salad dressing on their salads. The caloric calculation for the dressing is approximately 51 calories per Tablespoon.

Nutrition Facts
Spinach Pear Salad
Amount Per Serving (1 salad w/o dressing)
Calories 386 Calories from Fat 216
% Daily Value*
Fat 24g37%
Saturated Fat 5g31%
Cholesterol 13mg4%
Sodium 153mg7%
Potassium 517mg15%
Carbohydrates 38g13%
Fiber 6g25%
Sugar 27g30%
Protein 9g18%
Vitamin A 5920IU118%
Vitamin C 20.2mg24%
Calcium 117mg12%
Iron 2.9mg16%
* Percent Daily Values are based on a 2000 calorie diet.

Here’s one more to pin on your Pinterest boards!You're gonna LOVE this easy and quick Spinach Pear Salad, with candied pecans, goat cheese and dried cranberries, drizzled with homemade citrus salad dressing!