Month: October 2014

Homemade Cinnamon Rolls

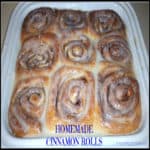
Looking for a yummy breakfast treat? Try glazed homemade cinnamon rolls! Nothing says “comfort food’ like a warm, made from scratch cinnamon roll!Looking for a yummy breakfast treat? Try glazed homemade cinnamon rolls! Nothing says "comfort food' like a warm, made from scratch cinnamon roll!
We had a dear friend staying with us from out of state last week. One morning for breakfast I made these Homemade Cinnamon Rolls, for an extra “sweet” start to the day. I LOVE cinnamon rolls, but don’t eat them too often! When I DO make them, they are a real treat, especially with a steaming big cup of Italian roast coffee.

I’ve made these cinnamon rolls for several years now, and am finally putting the recipe on my blog. This recipe makes 9 good sized cinnamon rolls, and they are delicious! 

I made a glaze to top this batch of homemade cinnamon rolls, but in the past I’ve also made a cream cheese frosting, which is equally delicious!

Scroll Down For A Printable Recipe Card At The Bottom Of The Page

Do I Have To Have A Bread Machine To Make Homemade Cinnamon Rolls?

You do NOT have to own a bread machine in order to make these homemade cinnamon rolls! I use my bread machine to make the dough, but recognize the fact that a lot of people don’t own a bread machine.

NOTE: I have included instructions in the note section of the recipe for those who wish to make these cinnamon rolls “by hand”.

Why Does It Take So Long?

Good things (especially dough) take time! If you’ve never made cinnamon rolls before, don’t be scared off by the “prep time” involved. Most of it is waiting for the dough to rise, so you could read an epic novel, paint your nails, or call a friend while you wait. Trust me.

Making Homemade Cinnamon Rolls

The dough is mixed (by machine or hand), and then the dough rises. After the dough has finished rising, it is rolled out into a 18×9 inch rectangle.

Homemade Cinnamon Rolls / The Grateful Girl Cooks!

Spread softened butter onto the surface of the dough, then cover with a cinnamon-sugar mixture. Tightly roll the dough up tightly into a long long shape, and tuck the ends in, to seal.

Homemade Cinnamon Rolls / The Grateful Girl Cooks!

Carefully cut the cinnamon roll dough log into 9 equal sized pieces.

Homemade Cinnamon Rolls / The Grateful Girl Cooks!

Place the slices, cut side up, in a prepared baking pan. Cover the pan, and let the dough rise again.

Homemade Cinnamon Rolls / The Grateful Girl Cooks!

Once the homemade cinnamon rolls have doubled in size, they are ready to bake!

Homemade Cinnamon Rolls / The Grateful Girl Cooks!

The homemade cinnamon rolls bake for 25-30 minutes in a preheated oven. Once done, a simple glaze is spread over the top of the rolls.

Homemade Cinnamon Rolls / The Grateful Girl Cooks!

Time To Eat!

Here’s what one of the cinnamon rolls looks like on a plate. Each layer inside is coated with cinnamon, sugar and butter. Wow… these homemade cinnamon rolls are delicious!

Homemade Cinnamon Rolls / The Grateful Girl Cooks!

Hope you will give this recipe for homemade cinnamon rolls a try. It is very economical to make these decadent treats, considering the cost of store-bought pastries these days.

Thanks for stopping by today, and invite you to come back soon for more family-friendly recipes. Take care, and have a GREAT day!

Looking For More Decadent Breakfast Treats?

You can find all of my recipes in the Recipe Index, located at the top of the page. A few decadent treats we occasionally have for breakfast include:

Want More Recipes? Get My FREE Newsletter!

I publish a newsletter 2 times per month (1st and 15th) with lots of recipes, tips, etc..
Would you like to join our growing list of subscribers?

There is a Newsletter subscription box on the top right (or bottom) of each blog post, depending on the device you use.
You can submit your e-mail address there, to be added to my mailing list.

Find Me On Social Media:

Facebook page: The Grateful Girl Cooks!
Pinterest:
The Grateful Girl Cooks!
Instagram:
jbatthegratefulgirlcooks

Homemade Cinnamon Rolls / The Grateful Girl Cooks!Original Recipe Source: Oster Deluxe Bread & Dough Maker Owner’s Manual, copyright 1994, Sunbeam-Oster Household Products

↓↓ PRINTABLE RECIPE BELOW ↓↓

0 from 0 votes
Homemade Cinnamon Rolls
Prep Time
2 hrs 30 mins
Cook Time
25 mins
Total Time
2 hrs 55 mins
 

Looking for a yummy breakfast treat? Try glazed homemade cinnamon rolls! Nothing says "comfort food' like a warm, made from scratch cinnamon roll!

Category: Breakfast
Cuisine: American
Keyword: homemade cinnamon rolls
Servings: 9 rolls
Calories Per Serving: 337 kcal
Author: JB @ The Grateful Girl Cooks!
Ingredients
For The Dough:
  • 1 cup water
  • 2 Tablespoons butter , softened
  • 1 large egg
  • 3 1/3 cups all purpose flour
  • 1/4 cup granulated sugar
  • 1 teaspoon salt
  • 3 teaspoons regular active dry yeast or bread machine yeast
For The Cinnamon Roll Filling:
  • 1/3 cup granulated sugar
  • 2 teaspoons ground cinnamon
  • 2 Tablespoons butter , softened
For The Glaze:
  • 1 cup powdered sugar
  • 1/2 teaspoon vanilla extract
  • 1-2 Tablespoons milk
Instructions
  1. Place all dough ingredients into bread machine pan in the order listed. Select Dough cycle. (if making these by hand, see NOTES section of this recipe).
  2. Spray a 9x9x2 inch square pan with non-stick spray. Set aside.
  3. In a small bowl, mix 1/3 cup sugar and the cinnamon for the filling.
  4. When dough is ready, roll the dough out on a lightly floured surface into a 18x9 inch rectangle.
  5. Spread the dough with the softened butter. Sprinkle the entire surface of the dough with the cinnamon sugar mixture.
  6. Roll the dough up tightly, BEGINNING AT THE 9" SIDE. Pinch or tuck the ends and edges into the roll to seal. Place roll seam side down.
  7. Cut the roll into nine 1 inch slices. Carefully place each slice into prepared baking dish. Cover dish with tea towel, and let the dough rise in a warm place for about an hour, until slices have doubled in size.
  8. Preheat oven to 375 degrees. Remove cover from rolls. Cook at 375 degrees for 25-30 minutes or until the rolls are golden brown. Remove pan from oven to a wire rack to cool.
  9. In a small bowl, mix the powdered sugar, vanilla and milk until the glaze is smooth and thin enough to drizzle.
  10. Drizzle the glaze over the tops of the cinnamon rolls to cover the tops completely. Let cinnamon rolls cool off slightly, so the glaze begins to firm up, then remove them from pan and serve. Enjoy!
Recipe Notes

To make by hand: Dissolve yeast in warm water in lg. bowl. Add/mix in the butter, egg, flour, sugar and salt. Mix well. Knead dough into a large ball on lightly floured surface. Spray a large mixing bowl with non-stick spray. Place dough ball into bowl. Turn dough over to coat with the spray. Cover dough with tea towel. Let rise in warm place for about an hour until doubled in size. Proceed with rest of recipe, beginning at Step 2.

Nutrition Facts
Homemade Cinnamon Rolls
Amount Per Serving (1 roll)
Calories 337 Calories from Fat 54
% Daily Value*
Fat 6g9%
Saturated Fat 3g19%
Cholesterol 31mg10%
Sodium 313mg14%
Potassium 94mg3%
Carbohydrates 63g21%
Fiber 2g8%
Sugar 26g29%
Protein 7g14%
Vitamin A 180IU4%
Calcium 17mg2%
Iron 2.4mg13%
* Percent Daily Values are based on a 2000 calorie diet.

Here’s one more to pin on your Pinterest boards!Looking for a yummy breakfast treat? Try glazed homemade cinnamon rolls! Nothing says "comfort food' like a warm, made from scratch cinnamon roll!


Save

Save

Pork Tenderloin With Apples And Apple Cider Sauce

Pork tenderloin with apples features tender pork cutlets with cooked apples, drizzled with a lovely apple cider sauce. Delicious!Pork tenderloin with apples features tender pork cutlets with cooked apples, drizzled with a lovely apple cider sauce. Delicious!
This recipe for Pork Tenderloin With Apples And Apple Cider Sauce has FALL written all over it! It’s surprising how well pork and apples go together! My husband and I had dinner recently at a friend’s home. Our friend Shari prepared a wonderful meal for us and it was FANTASTIC! It was absolutely delicious, and a wonderful recipe that was perfect for a cool, Fall evening.

This week we have a friend (a friend for 40 years) staying with us in our home. Her first night here, I decided to try making this recipe for our own dinner. I found the original recipe online at Epicurious, and prepared it for us. Miracle of miracles, it turned out GREAT (guess even little old me can’t hurt a good recipe, right?)

The original recipe from Bon Appétit, calls for Calvados, which is an apple brandy from France. I didn’t have any, and didn’t want to go buy an entire bottle for the small amount needed, so I substituted dry white wine (which I did have), and it turned out fine, as well. I followed the rest of the instructions as written, and was very pleased with the results (as was our guest).

Scroll Down For A Printable Recipe Card At The Bottom Of The Page

How To Make Pork Tenderloin With Apples

Pounding pork slices out with a meat mallet is a great stress reliever, yes? This helps to tenderize the pork.

Pounding the pork thin with a meat mallet helps tenderize the meat.

Peel and slice Golden Delicious apples, then they are ready to cook.

Golden delicious apples are peeled and sliced before cooking.

Apple slices are cooked in butter in a large skillet.

Cooking the apples in melted butter in a skillet.

When the apples are light golden brown, they are removed from the skillet.

Apples are cooked in a large skillet until golden brown on the outside.

Cooking The Pork Cutlets

Pork tenderloin cutlets are cooked in melted butter for a few minutes on each side.

The pork cutlets are cooked in melted butter in a hot skillet.

Halfway through the cooking time, they are turned to the other side to finish cooking. They are so thin, they only need to cook a few minutes on each side.

Pork cutlets are cooked on both sides in butter in a large skillet.

Preparing The Apple Cider Sauce

After removing the cooked pork cutlets, an apple cider sauce is made in the same skillet. Wine or Calvados is used to deglaze the skillet, then shallots and thyme are added to the mixture.

Shallots, thyme and wine are added to the sauce in the skillet.

Apple cider and whipping cream are then added to the sauce, and stirred to incorporate them into the sauce. By now the sauce is looking  and smelling delicious!

Apple cider and whipping cream are added to the sauce for the pork cutlets.

The finished pork tenderloin with apples is surrounded by lots of cooked, tender apples. It is then covered with the apple cider sauce, and is now ready to serve.

Apple cider sauce is poured over the cooked pork tenderloin with apples.

Pork tenderloin with apples is served. We usually give a couple of slices per person. Spoon some of the sauce on top of the pork, and serve, accompanied by apples on the side. We also like this dish with mashed potatoes on the side (with some of the sauce on top). Dig In!

The pork tenderloin with apples is served with mashed potatoes and a salad.

Sure hope you will give this wonderful meal a try. I know I will definitely make this again and again. It’s really very simple to make, and is full of flavor!

Looking For More PORK Recipes?

You can find ALL of my recipes in the Recipe Index, located at the top of the page. I have many delicious pork recipes for you to enjoy, including:

Interested In More Recipes?

Thank you for visiting this website. I appreciate you using some of your valuable time to do soIf you’re interested, I publish a newsletter 2 times per month (1st and 15th) with all the latest recipes, and other fun info. I would be honored to have you join our growing list of subscribers, so you never miss a great recipe!
There is a Newsletter subscription box on the top right side (or bottom) of each blog post, depending on the device you use, where you can easily submit your e-mail address (only) to be included in my mailing list.

You Can Also Find Me On Social Media:

Facebook page: The Grateful Girl Cooks!
Pinterest:
The Grateful Girl Cooks!
Instagram:
jbatthegratefulgirlcooks

Author's signatureRecipe Slightly Adapted From: http://www.epicurious.com/recipes/food/views/Pork-with-Apples-Calvados-and-Apple-Cider-1797

↓↓ PRINTABLE RECIPE BELOW ↓↓

0 from 0 votes
Pork Tenderloin With Apples And Apple Cider Sauce
Prep Time
15 mins
Cook Time
20 mins
Total Time
35 mins
 

Pork tenderloin with apples features tender pork cutlets with cooked apples, drizzled with a lovely apple cider sauce. Delicious!

Category: Entree
Cuisine: American
Keyword: pork tenderloin
Servings: 4 servings
Calories Per Serving: 595 kcal
Author: JB @ The Grateful Girl Cooks!
Ingredients
For the pork and apples:
  • 1 lb. pork tenderloin , cut into 1 inch thick slices
  • Salt & pepper (to season pork)
  • 5 Tablespoons butter
  • 3 medium Golden Delicious apples , (peeled, cored, sliced into 1/3 inch thick slices)
  • 1 1/2 teaspoons granulated sugar
For the Apple Cider Sauce:
  • 2 large shallots , chopped
  • 1 Tablespoon fresh thyme , chopped (or use 1 teaspoon dried)
  • 1/4 cup Calvados or other apple brandy (I substituted 1/4 cup dry white wine)
  • 1 cup heavy whipping cream
  • 1/4 cup apple cider (not apple juice)
Instructions
  1. Put the pork slices between two sheets of plastic wrap. Pound them out, one at a time, until they are about 1/4 inch thick. Set aside.
  2. In a large skillet over medium-high heat, melt 2 Tablespoons of butter. Add the apple slices, then sprinkle the slices with the sugar. Saute the apple slices until they are golden brown, on both sides (approximately 5-6 minutes). Remove apples from skillet and set aside. Cover and keep warm.
  3. Add 2 Tablespoons butter back into the large skillet. Melt butter over high heat. Season the pork with salt and pepper. Add pork slices to the hot skillet. Cook the slices until they are lightly browned and cooked through (about 3 minutes per side). Cook pork in batches, if necessary. Once pork has cooked through on both sides, remove to a platter, cover and keep warm. DO NOT CLEAN SKILLET OUT!
  4. Melt 1 Tablespoon butter over medium heat in the same skillet you cooked the pork in. Add the chopped shallots and thyme; saute these for 2 minutes.
  5. Add the Calvados (if using) or the white wine to the shallots, butter and thyme. Boil until the liquid is reduced to a glaze like consistency, scraping up the browned bits into the sauce as you go.
  6. Stir in the apple cider and whipping cream. Cook until the mixture thickens to sauce consistency (about 2-3 minutes). Lightly season with salt and pepper, to taste.
  7. Reheat the apples in another skillet or microwave, if necessary.
  8. Place pork slices on platter. Spoon the sauce over the top of the pork slices. Top with the apple slices, or place the apple slices around the pork.
  9. Serve and enjoy. This dish is perfect with mashed potatoes on the side. Use some of the apple cider sauce on top (like gravy) of the mashed potatoes for a perfect entree!
Nutrition Facts
Pork Tenderloin With Apples And Apple Cider Sauce
Amount Per Serving (1 g)
Calories 595 Calories from Fat 360
% Daily Value*
Fat 40g62%
Saturated Fat 24g150%
Cholesterol 192mg64%
Sodium 210mg9%
Potassium 703mg20%
Carbohydrates 26g9%
Fiber 3g13%
Sugar 18g20%
Protein 25g50%
Vitamin A 1470IU29%
Vitamin C 10.4mg13%
Calcium 70mg7%
Iron 1.7mg9%
* Percent Daily Values are based on a 2000 calorie diet.

Here’s one more to pin on your Pinterest boards!Pork tenderloin with apples features tender pork cutlets with cooked apples, drizzled with a lovely apple cider sauce. Delicious!


Save

Save

Pecan Praline Yams

Pecan Praline Yams are a yummy Thanksgiving tradition! Canned yams, baked with brown sugar, coconut, butter & pecans are an easy side dish for a family feast! Pecan Praline Yams are a yummy Thanksgiving tradition! Canned yams, baked with brown sugar, coconut, butter & pecans are an easy side dish for a family feast!

Wow… Thanksgiving is just around the corner. Time to start thinking about turkey, dressing, potatoes and the other traditional side dishes that will be prepared, including these amazing Pecan Praline Yams, baked with brown sugar, coconut, butter and pecans!

Scroll Down For A Printable Recipe Card At The Bottom Of The Page

Family Holiday Traditions

I grew up having yams (or sweet potatoes) at every single Thanksgiving meal. My mom (a Texas girl) always made the yams the same way a lot of people from the South eat them. The yams (or sweet potatoes) were mashed, and served with marshmallows melted on the top. I thought they were okay, but they weren’t anything I couldn’t live without at Thanksgiving.

THESE Pecan Praline Yams are a far different story. They have become one of my favorite parts of our Thanksgiving meal since I began making them about 15 years ago! Now these absolutely delicious praline yams are a favorite family holiday tradition!  Here they are, fresh pecan praline yams, straight out of the oven. It’s even a double batch!

Pecan praline yams, baked and ready to eat!

How I Found The Original Recipe

I originally found the recipe many years ago on a large can of Princella Yams. This is a name brand with the big cans of yams you can find at most any grocery store. I decided to try the recipe printed on the can just to see if they were any good. Believe me, they are delicious!

Praline Yams are topped with chopped pecans, butter, brown sugar, and coconut! It all bakes together to form a sweet little crust on top of the yams. Oh My Goodness. These praline yams are so very good.  See how the ingredients form a nice crumbly crust on top of the yams once baked? Yum.

Baked pecan praline yams have a crunchy buttery topping on them!

We Serve Pecan Praline Yams At Thanksgiving!

This recipe is ridiculously quick to prepare, and I think that’s fantastic, especially with all the other traditional dishes I make for Thanksgiving. You can prepare this recipe and have it in the oven in practically no time.

We enjoy traditional dishes, like Whole Berry Cranberry Orange Sauce, Homemade Dinner Rolls, Toll House Pie,  Rainbow Jello Salad and Mom’s Famous Cream Cheese Ball. You might also want to try my recipes for Candied Sweet Potatoes, Quick Easy Cornbread Stuffing, or Lemon Hazelnut Green Beans.

Pecan Praline Yams in a white baking dish.

These pecan praline yams are always served alongside other family traditional Thanksgiving “must haves”. This particular year we also had a lime jello salad made with a twist from this recipe.

Pecan praline yams, served with green beans and cornbread dressing, at Thanksgiving.

I sure hope you will give these pecan praline yams a try… we LOVE them!  You’re gonna enjoy serving these at your holiday meal (or any meal), alongside YOUR favorite family recipes! Thanks for stopping by, and I hope you will come back soon.

Looking For More VEGGIE Recipes?

You can find ALL of my recipes in the Recipe Index, located at the top of the page. I have many delicious veggie recipes for you to enjoy, including:

Interested In More Recipes?

Thank you for visiting this website. I appreciate you using some of your valuable time to do soIf you’re interested, I publish a newsletter 2 times per month (1st and 15th) with all the latest recipes, and other fun info. I would be honored to have you join our growing list of subscribers, so you never miss a great recipe! 

There is a Newsletter subscription box on the top right side (or bottom) of each blog post, depending on the device you use, where you can easily submit your e-mail address (only) to be included in my mailing list.

You Can Also Find Me On Social Media:

Facebook page: The Grateful Girl Cooks!
Pinterest:
The Grateful Girl Cooks!
Instagram:
jbatthegratefulgirlcooks

Author's signatureOriginal recipe source: Printed on can of Princella Yams!

↓↓ PRINTABLE RECIPE BELOW ↓↓

5 from 2 votes
Pecan Praline Yams
Prep Time
5 mins
Cook Time
35 mins
Total Time
40 mins
 
Pecan Praline Yams are a yummy Thanksgiving tradition! Canned yams, baked with brown sugar, coconut, butter & pecans are an easy side dish for a family feast!
Category: Side Dish
Cuisine: American
Keyword: pecan praline yams
Servings: 6 servings
Calories Per Serving: 329 kcal
Author: JB @ The Grateful Girl Cooks!
Ingredients
  • 29 oz. can of yams , drained (this is the large size can)
  • 1/3 cup chopped pecans
  • 1/3 cup coconut
  • 1/3 cup packed brown sugar
  • 3 Tablespoons all purpose flour
  • 3 Tablespoons butter , melted
Instructions
  1. Preheat oven to 350 degrees.
  2. Place drained yam pieces into an ungreased casserole dish in a single layer (8x8 - use 9x13 if doubling this recipe).
  3. In a small bowl, mix the remaining ingredients together. Sprinkle the crumbly mixture over the top of the yams, to cover.
  4. Bake, uncovered, at 350°F. for 35 - 40 minutes. Serve while hot, and enjoy!

Recipe Notes

This recipe is EASILY doubled. It is also perfectly good to bake ahead of time, then cover with foil and reheat before serving. This sure helps on a busy day of food prep for a Thanksgiving meal.

Nutrition Facts
Pecan Praline Yams
Amount Per Serving (1 **1/6 of total**)
Calories 329 Calories from Fat 99
% Daily Value*
Fat 11g17%
Saturated Fat 5g31%
Cholesterol 15mg5%
Sodium 66mg3%
Potassium 1175mg34%
Carbohydrates 54g18%
Fiber 6g25%
Sugar 13g14%
Protein 3g6%
Vitamin A 365IU7%
Vitamin C 23.6mg29%
Calcium 39mg4%
Iron 1.3mg7%
* Percent Daily Values are based on a 2000 calorie diet.

Here’s one more to pin on your Pinterest boards!Pecan Praline Yams are a yummy Thanksgiving tradition! Canned yams, brown sugar, coconut, butter & pecans are an easy side dish for a feast!


Save

Save

Glazed Pumpkin Buttermilk Doughnuts

Make a dozen yummy glazed pumpkin buttermilk doughnuts (and doughnut holes) in about 30 minutes! No rising time involved for this easy recipe.Make a dozen yummy glazed pumpkin buttermilk doughnuts (and doughnut holes) in about 30 minutes! No rising time involved for this easy recipe.
Don’t you just love Fall? I love this season of the year, when my thoughts turn to cool mornings, brilliantly colored tree leaves, and pumpkins! Which brings up today’s recipe for Glazed Pumpkin Buttermilk Doughnuts!

Oh boy, are these glazed pumpkin buttermilk doughnuts GOOD! They taste perfect on a cool Fall morning, accompanied by a strong cup of coffee. Now THAT tastes like Fall should, right? Right!

Scroll Down For A Printable Recipe Card At The Bottom Of The Page

Do Pumpkin Buttermilk Doughnuts Take A Lot Of Time To Make?

No, this recipe is pretty easy and straightforward. These doughnuts are very easy to make, because there is no rising time involved (no yeast is used).

You can make a dozen delicious pumpkin buttermilk doughnuts, as well as a dozen doughnut holes, in about 30 minutes! If you’ve never made doughnuts before, have no fear.

The dough is mixed, doughnut shapes are cut out, and then they are quickly fried in hot oil. Here’s one cooking away in my electric skillet in the hot oil. It’s almost done, and is looking good.

The pumpkin buttermilk doughnuts are fried in oil to cook.

When Do You Glaze The Doughnuts?

After cooking (while the pumpkin buttermilk doughnuts are still hot), they are dipped into a simple, sweet glaze.

The glazed pumpkin buttermilk doughnuts cool on a wire rack, and then they are ready to gobble up!

Glazed Pumpkin Buttermilk Doughnuts are done cooking, are glazed, and ready to eat!

It’s really not hard at all to make these doughnuts! Before you even know it, you can have a big plate of delicious glazed pumpkin buttermilk doughnuts ready to feed a hungry family!

Hope you enjoy these delicious pumpkin flavored doughnuts! You might also enjoy my glazed lemon poppy seed doughnuts or glazed chocolate doughnuts! They’re yummy!

Here’s how to make these glazed pumpkin buttermilk doughnuts.

Looking For More Recipes Using PUMPKIN?

You can find ALL of my recipes in the Recipe Index, which is located at the top of the page. I have quite a few recipes featuring pumpkin you might enjoy, including:

Want More Recipes? Get My FREE Newsletter!

I publish a newsletter 2 times per month (1st and 15th) with lots of recipes, tips, etc..
Would you like to join our growing list of subscribers?

There is a Newsletter subscription box on the top right (or bottom) of each blog post, depending on the device you use.
You can submit your e-mail address there, to be added to my mailing list.

Find Me On Social Media:

Facebook page: The Grateful Girl Cooks!
Pinterest:
The Grateful Girl Cooks!
Instagram:
jbatthegratefulgirlcooks

Author's signatureOriginal recipe source: http://barefootandbaking.blogspot.com/2011/10/glazed-pumpkin-buttermilk-donuts.html

↓↓ PRINTABLE RECIPE BELOW ↓↓

0 from 0 votes
Glazed Pumpkin Buttermilk Doughnuts
Prep Time
15 mins
Cook Time
15 mins
Total Time
30 mins
 

Make a dozen yummy glazed pumpkin buttermilk doughnuts (and doughnut holes) in about 30 minutes! No rising time involved for this easy recipe.

Category: Breakfast
Cuisine: American
Keyword: pumpkin buttermilk doughnuts
Servings: 12 doughnuts (+ holes)
Calories Per Serving: 182 kcal
Author: JB @ The Grateful Girl Cooks!
Ingredients
For doughnuts:
  • 1 3/4 cup all purpose flour
  • 2 teaspoons baking powder
  • 1/2 teaspoon salt
  • 1 teaspoon pumpkin pie spice
  • 1/2 cup granulated sugar
  • 1 Tablespoon butter , melted
  • 1 egg
  • 1 teaspoon vanilla
  • 1/4 cup buttermilk
  • 1/2 cup pumpkin puree
  • Vegetable or canola oil (for frying)
For Glaze:
  • 1 1/2 cups powdered sugar
  • 1/4 cup buttermilk
  • 1/4 teaspoon vanilla extract
Instructions
  1. In a large bowl, whisk together the flour, baking powder, salt, pumpkin pie spice, and sugar. Set aside.
  2. In a separate large bowl, whisk together the melted butter, egg, vanilla, buttermilk, and pumpkin puree until well combined. Set aside.
  3. Make a well in the center of the dry ingredients. Add the wet ingredients and mix well to combine fully. The dough will be somewhat sticky.
  4. Turn the dough out onto a lightly floured work surface. Using a rolling pin lightly coated with flour, roll the dough out until it is about 1/2 inch thick. Cut dough into circles with a doughnut cutter (or a biscuit cutter or canning jar lid). Cut out a small center circle with a medicine jar lid or a very small cap. (these cutouts will become the doughnut holes). Now your dough circles should look like thin doughnuts.
  5. Prepare the glaze for the doughnuts by mixing the powdered sugar, buttermilk and vanilla in a small bowl. Set aside until doughnuts have been cooked.
  6. To cook the doughnuts: In a large skillet, pour oil until it reaches a depth of 2 inches. Heat on medium-high (about 350 degrees). To test whether oil is hot enough, place a very tiny piece of dough into the oil to see if it bubbles. When hot enough, carefully place 2-3 doughnuts into oil (doughnuts should not touch each other). Cook doughnuts until edges are lightly browned, then carefully flip to the other side (I use 2 chopsticks to turn!). Cook the other side of the doughnut until lightly browned (about 2-3 minutes per side). Remove doughnuts to a paper towel lined plate to drain, and continue to cook the other doughnuts until done. Repeat process with doughnut holes.
  7. While doughnuts are still hot, dip the top side into the doughnut glaze. Let excess glaze drip off back into bowl. Place glazed doughnut onto a wire rack (glaze side UP) over a cookie sheet (to collect any drips), and let the doughnut glaze slightly dry and firm up before serving (just a few minutes).
  8. Once glaze is firmed up, serve doughnuts and enjoy!
Recipe Notes

Recipe will make at least 12 doughnuts and 12 doughnut holes.

Nutrition Facts
Glazed Pumpkin Buttermilk Doughnuts
Amount Per Serving (1 doughnut)
Calories 182 Calories from Fat 9
% Daily Value*
Fat 1g2%
Cholesterol 17mg6%
Sodium 122mg5%
Potassium 126mg4%
Carbohydrates 39g13%
Sugar 23g26%
Protein 2g4%
Vitamin A 1655IU33%
Vitamin C 0.4mg0%
Calcium 49mg5%
Iron 1.1mg6%
* Percent Daily Values are based on a 2000 calorie diet.

Here’s one more to pin on your Pinterest boards!Make a dozen yummy glazed pumpkin buttermilk doughnuts (and doughnut holes) in about 30 minutes! No rising time involved for this easy recipe.


Save

Save

Flourless, 3 Ingredient Peanut Butter Cookies

Easy and DELICIOUS is how I would describe these flourless peanut butter cookies, with only 3 ingredients! I admit, I was a skeptic… until I tried them!
Easy and DELICIOUS is how I would describe these flourless peanut butter cookies, with only 3 ingredients! I admit, I was a skeptic... until I tried them!These peanut butter cookies were wonderful… (how did I not know this all these years????)  I saw this recipe pop up on my Pinterest feed, and thought there was no way these could be truly tasty, but I was completely WRONG.

The recipe makes between 15 and 18 flourless peanut butter cookies, and took only 20 minutes from start to finish! Not bad for a kitchen experiment! I’ve posted some photos of the whole process, but trust me… it all boils down to this: mix the ingredients, place by spoonfuls onto baking sheet, flatten with sugar-dipped fork, bake, and EAT!

Scroll Down For A Printable Recipe Card At The Bottom Of The Page

How To Make These Yummy Flourless Peanut Butter Cookies

Here you go… some quick pics of the “process”… so easy! Here are the three ingredients for flourless peanut butter cookies ready to mix: peanut butter, egg, and sugar. THAT’S IT!

Ingredients for cookies (peanut butter, eggs, and sugar), in white bowl

The dough for the peanut butter cookies is mixed up using a spoon… then is ready to drop by spoonfuls onto baking sheet.

Peanut butter cookie dough is mixed in white bowl

The cookie dough balls are rounded off, then scored criss-cross with a sugar-dipped fork, and then are ready to put into the preheated oven…

The flourless cookies, on baking sheet, ready to put in oven

Who Wants Some Flourless Peanut Butter Cookies To Eat?

When the peanut butter cookies are golden brown and finished baking, they are transferred to a wire rack to cool, then they are ready to eat! YES!

Close up of baked peanut butter cookies

See? Even the bottoms of the peanut butter cookies look good. I’m not kidding… they are really quite tasty!

Bottom, browned side of flourless peanut butter cookie

That’s it! Trust me, these peanut butter cookies are ridiculously EASY and seriously GOOD. You won’t even miss the flour. Hope you’ll give these simple cookies a try. I’m confident you’ll be as surprised as I was at how good they are!

If you enjoy these flourless peanut butter cookies, be sure to also check out my recipe for flourless chocolate cake! It is really delicious, too!

Looking For More COOKIE Recipes?

If you enjoy these peanut butter cookies, you might also be interested in some of my other cookie recipes, including a Giant Chocolate Chip Cookie Pizza, Butterscotch Chip, Butter Pecan Crisps,Chocolate Crinkle, Cinnamon Chip, Date Roll, Peanut Butter Chocolate Chip n’ Nut Cookies, or Giant Sugar Cookies, to name a few. All of my cookie recipes can be found in the Recipe Index, located at the top of the page.

Interested In More Recipes?

Thank you for visiting this website. I appreciate you using some of your valuable time to do soIf you’re interested, I publish a newsletter 2 times per month (1st and 15th) with all the latest recipes, and other fun info. I would be honored to have you join our growing list of subscribers, so you never miss a great recipe!
There is a Newsletter subscription box on the top right side (or bottom) of each blog post, depending on the device you use, where you can easily submit your e-mail address (only) to be included in my mailing list.

You Can Also Find Me On Social Media:

Facebook page: The Grateful Girl Cooks!
Pinterest:
The Grateful Girl Cooks!
Instagram:
jbatthegratefulgirlcooks

Author's signatureOriginal Recipe source: http://www.aroundmyfamilytable.com/2010/10/flourless-peanut-butter-cookies/

↓↓ PRINTABLE RECIPE BELOW ↓↓

0 from 0 votes
Flourless, 3 Ingredient Peanut Butter Cookies
Prep Time
5 mins
Cook Time
14 mins
Total Time
19 mins
 
Easy and DELICIOUS is how I would describe these flourless peanut butter cookies, with only 3 ingredients! I admit, I was a skeptic... until I tried them!
Category: Cookies
Cuisine: American
Keyword: flourless peanut butter cookies
Servings: 18 cookies
Calories Per Serving: 130 kcal
Author: JB @ The Grateful Girl Cooks!
Ingredients
  • 1 cup peanut butter (creamy or crunchy- I used crunchy)
  • 1 cup granulated sugar (reserve 1 teaspoon)
  • 1 egg
Instructions
  1. Preheat oven to 350 degrees. Spray a large baking sheet with non-stick spray.
  2. Mix the peanut butter, sugar and egg together in a large bowl. Combine thoroughly.
  3. Drop the dough by rounded teaspoons onto prepared baking sheet. Slightly round out the dough with your fingers, once on baking sheet.

  4. Lightly moisten a fork with water. Dip it into a tiny bit of sugar, and press the tines of the fork crosswise (two different directions) into top of each dough ball to flatten. Repeat for each cookie.

  5. Bake cookies at 350 degrees for about 14 minutes. Do not let cookies overbake or get too brown. When done, transfer cookies to a wire rack to cool. Enjoy!

Nutrition Facts
Flourless, 3 Ingredient Peanut Butter Cookies
Amount Per Serving (1 cookie)
Calories 130 Calories from Fat 63
% Daily Value*
Fat 7g11%
Saturated Fat 1g6%
Cholesterol 9mg3%
Sodium 69mg3%
Potassium 96mg3%
Carbohydrates 13g4%
Sugar 12g13%
Protein 3g6%
Vitamin A 15IU0%
Calcium 8mg1%
Iron 0.3mg2%
* Percent Daily Values are based on a 2000 calorie diet.

Here’s one more to pin onto your Pinterest boards!Easy and DELICIOUS is how I would describe these flourless peanut butter cookies, with only 3 ingredients! I admit, I was a skeptic... until I tried them!


Save

Save

A Thankful Heart…

Having a thankful heart is my desire. Sometimes life doesn’t go exactly the way I “think” it should go… do YOU ever have days or weeks like that? I have… and so have many of my friends and family members, several of whom I’ve talked with recently about this very thing.A Thankful Heart... / The Grateful Girl Cooks!
If we’re being honest, we ALL have times in our lives like that. You know… times where you can’t see the forest for the trees…and our focus starts becoming “Out Of Focus”.. I love this quote by Henry Ward Beecher. It inspires me!

At times when life gets a bit out of focus, I hold on to my faith tightly and pray that God will give me eyes to see all the blessings around me that I tend to “forget” when I focus only on the challenges or troubles I am facing. This, in itself, can be a challenge, but I find it extremely helpful to pull back the magnifying glass a bit and take a look at the much bigger picture. It sure helps my perspective, attitude, etc. become much clearer.

I keep a Gratitude journal. It keeps me well-grounded, because it is a great discipline I’ve practiced for years to remind me to open my eyes, take a good, hard look around and realize just how truly blessed my life is. I try to write a few things I am thankful for in it each morning. My entire life I’ve always thought it was important to say “Thank You” to the people in my life who have blessed, inspired, challenged, and loved me. I feel it is just as important to tell the God who made me and blesses me with more than I deserve a big “Thank You” each day I have breath. It’s also  encouraging to look back at my journal over time and see a visual reminder of the many ways God has brought me through a tough time OR to be reminded how many things I have to be truly thankful for.

A Thankful Heart / The Grateful Girl Cooks!
If you don’t already keep a Gratitude Journal, I would humbly suggest you give it a try. You don’t need any fancy “stuff”… Seriously… I just use a spiral bound notebook for my gratitude journal. It’s not what you write it on, it’s what you write on it.

Discipline yourself to list out blessings daily, as they come to mind. Then thank God for bringing them into your life. “Give thanks to the Lord, for He is good; His love endures forever.” (Psalms 107:1) Blessings are all around, if we’ll just take the time to search them out and name them  It’s a great way to stay centered, and have a grateful, thankful heart for God’s many blessings. And that, in my humble opinion, is the best blessing to have!

Author's signature

.


Save

Save

Mom’s Apple Cake

Mom’s Apple Cake is a classic family dessert OR coffeecake, with fresh baking apples, cinnamon and pecans (or walnuts). Easy to prepare, and tastes delicious!Mom's Apple Cake is a classic family dessert OR coffeecake, with fresh baking apples, cinnamon and pecans (or walnuts). Easy to prepare, and tastes delicious!
I’m gonna let you in on a little secret….shhh… don’t tell. My Mom’s Apple Cake is amazing! Seriously. It’s packed with fresh apples and cinnamon, and is so moist, you don’t need to “fancy it up” with any extra frosting. It’s absolutely perfect just the way it is, for dessert OR as a coffeecake!

Scroll Down for A Printable Recipe Card At The Bottom Of The Page

Our Family History With This Apple Cake

My mom used to make this cake for our family as I was growing up, and this simple recipe has been in my collection for over 35 years. I don’t know where she got the original recipe, but I DO KNOW that it is absolutely delicious, and is perfect anytime, but especially in the Fall!

The recipe is super simple to make, and you probably already have the ingredients in your home. My mom always makes this cake in a 13×9 inch cake pan (I’ve made it this way for decades). This time I tried making it in a spring form pan and 2 miniature spring form pans (just as an experiment). They turned out PERFECT!

Result…ALWAYS fantastic, no matter WHAT you bake it in. This is a great dessert cake, but is equally good in the morning with a cup of good coffee. Well, someone had to try it for breakfast…*cough, cough*…I don’t mind “taking one for the team”). Here’s a few pics taken while making this yummy apple cake.

Making Mom’s Apple Cake

Mix the eggs, oil and sugar together in a large bowl. A whisk works very well!

Eggs, sugar and oil are mixed together to make batter for apple cake.

Add the sifted dry ingredients to the liquid ingredients in the bowl. EASY!

Dry ingredients are sifted into the cake batter.

The apple cake dough is a very thick dough. You will want to mix it up well, by hand.

The batter for Mom's apple cake is very thick.

Add the vanilla, peeled and chopped apples and nuts, and mix them into the dough. Keep stirring that thick batter until all ingredients are fully incorporated.

Apples, nuts and vanilla are added to the thick cake batter.

Time To Bake Mom’s Apple Cake!

Spread the cake batter into your prepared pan(s), and then bake until done (approximately 55 minutes). I used a little of the cake batter to make two small individual cakes at the same time! NOTE: Mom’s apple cake can also be made in a standard sized 13×9 inch baking pan.

The cake batter is spread into prepared baking pans.

Look how cute the miniature cakes turned out! I’m giving these little apple cakes to some of our friends!

Made tiny versions of the apple cake to give to friends.

Time To Serve Mom’s Apple Cake!

Yum… all I need now is some coffee to go with a nice slice of Mom’s Apple Cake! Once the cake has cooled, lightly sift powdered sugar over the top. You can also garnish it with mint sprigs and dried apple slices, if desired.

A side view of Mom's apple cake.

Here is a nice slice of cake, ready to serve. Wow – this slice of Mom’s apple cake looks so good! See all the apple chunks? YUM!

A piece of Mom's apple cake, on a plate, ready to eat!

Sure hope you’ll try this apple cake. It is absolutely FANTASTIC, and I know you’re gonna LOVE it! Thanks, Mom, for another great childhood recipe!

If You Enjoy Mom’s Apple Cake, You Will Like These Cake Recipes, Too!

If you enjoy baking or simply EATING cake, be sure to check out my other cake recipes on this blog, including German Chocolate, Raspberry Lemon, Poppyseed, Lemon, Hummingbird, Gingerbread, Carrot and Mom’s Easy Chocolate Cake. You can find ALL my recipes in the Recipe Index, located at the top of the page.

Collage of cakes with recipes on "The Grateful Girl Cooks!" blog.

Interested In More Recipes?

Thank you for visiting this website. I appreciate you using some of your valuable time to do soIf you’re interested, I publish a newsletter 2 times per month (1st and 15th) with all the latest recipes, and other fun info. I would be honored to have you join our growing list of subscribers, so you never miss a great recipe!
There is a Newsletter subscription box on the top right side (or bottom) of each blog post, depending on the device you use, where you can easily submit your e-mail address (only) to be included in my mailing list.

You Can Also Find Me On Social Media:

Facebook page: The Grateful Girl Cooks!
Pinterest:
The Grateful Girl Cooks!
Instagram:
jbatthegratefulgirlcooks

Author's signature

↓↓ PRINTABLE RECIPE BELOW ↓↓

0 from 0 votes
Mom's Apple Cake
Prep Time
15 mins
Cook Time
55 mins
Total Time
1 hr 10 mins
 
Mom's Apple Cake is a classic family dessert OR coffeecake, with fresh baking apples, cinnamon and pecans (or walnuts). Easy to prepare, and tastes delicious!
Category: Dessert
Cuisine: American
Keyword: Mom's apple cake
Servings: 12 slices
Calories Per Serving: 354 kcal
Author: JB @ The Grateful Girl Cooks!
Ingredients
  • 3 cups all purpose flour
  • 1 teaspoon salt
  • 1 teaspoon soda
  • 1 teaspoon cinnamon
  • 2 eggs
  • 2 cups granulated sugar
  • 1 1/4 cups vegetable oil
  • 1 teaspoon vanilla
  • 3 cups chopped apple (approximately 4-5 I usually use Granny Smith, but any apples will do)
  • 1 cup chopped walnuts or pecans
Instructions
  1. Preheat oven to 350 degrees.
  2. In a large mixing bowl, beat eggs, oil and sugar together by hand until well blended. Add sifted dry ingredients. Stir until well blended. Dough will be stiff... just keep on stirring! Add vanilla, chopped apples and nuts. Stir well until thoroughly combined. Dough will be stiff.

  3. Grease and flour a Springform pan, plus two miniature springform pans (or use a greased and floured 13x9 inch baking pan). Spread batter evenly in baking pan.

  4. Bake at 350 degrees for 55 minutes (for regular sized springform pan) *SEE NOTES SECTION FOR BAKING TIMES, IF USING OTHER TYPES OF BAKING PANS*
Recipe Notes

*BAKING TIMES:
1 regular-sized Springform pan = 55 minutes 
Miniature Springform pans = 40 minutes
13 x 9 inch cake pan = 1 hour

Nutrition Facts
Mom's Apple Cake
Amount Per Serving (1 (one 12th of total))
Calories 354 Calories from Fat 81
% Daily Value*
Fat 9g14%
Saturated Fat 2g13%
Cholesterol 27mg9%
Sodium 205mg9%
Potassium 119mg3%
Carbohydrates 63g21%
Fiber 2g8%
Sugar 36g40%
Protein 5g10%
Vitamin A 55IU1%
Vitamin C 1.6mg2%
Calcium 22mg2%
Iron 1.9mg11%
* Percent Daily Values are based on a 2000 calorie diet.

Here’s one more to pin on your Pinterest boards!Mom's Apple Cake is a classic family dessert OR coffeecake, with fresh baking apples, cinnamon and pecans (or walnuts). Easy to prepare, and tastes delicious!


Save

Save

Save

Save

Miracle Bread

You’re gonna love this easy, homemade Miracle Bread. The recipe makes two loaves and is so easy, even my son can make it! That’s gotta be some kind of MIRACLE!You're gonna love this easy, homemade Miracle Bread. Recipe makes two loaves and is so easy, even my son can make it! That's gotta be some kind of MIRACLE!Today I am sharing a recipe I’ve used for making homemade French bread loaves the last couple of years. It’s called “Miracle Bread” and it is DELICIOUS!

Scroll Down For A Printable Recipe Card At The Bottom Of The Page

I found the recipe for this easy, simple French bread on the internet, from Gina at Home Joys. I’ve made it at least 10 times since then, and can heartily recommend this, EVEN if you’ve never baked bread before! The slices are fantastic toasted, or they can be used to make French Toast, also (YUM).

Miracle bread can be used to make French toast!
Miracle Bread Is So Easy To Make… It’s A Miracle!

I guess that’s the Miracle of it… even if you’ve NEVER made homemade bread before, you can make this delicious, and amazingly simple bread to enjoy! The loaves are wonderful sliced and warm, with butter. The recipe makes two loaves, so you can eat one and give the other one away (or freeze for later), if you want!

I love to bake this bread, especially in the Fall. One year I baked 8 loaves and wrapped them up really nicely and surprised several neighbors on our street and some friends with a loaf of warm, freshly baked Miracle bread.

Loaves of miracle bread, wrapped to give to friends!

It’s So Easy To Make Miracle Bread, Even Our Son Can Make It!

A couple years ago I taught our youngest son and his girlfriend how to make miracle bread! Some of the pictures shown below are from this fun morning! I sure hope you will try this recipe. You’ll be surprised at just how easy it is to make fresh, homemade Miracle Bread!

Okay… we’ve mixed the dough all together. I guess now we have to wait for it to rise? YEP! I personally think they are really cute bread makers!

Our son and girlfriend mixing up dough for miracle bread.

Okay… this dough has risen and is rolled out. Are you saying I’m now supposed to roll this dough thing up like a log?

Our son rolling the dough to make a loaf of miracle bread.

Rolling the miracle bread dough up… like a boss!

Rolling dough for miracle bread into a loaf shape.

Now It’s Time To Bake The Miracle Bread!

Okay… the dough is rolled out, formed into loaves, and diagonal slits have been made on top of the loaves, and the dough has risen again. Time to bake!!!! Bake the bread for 15-20 minutes, and then it is DONE!

Miracle bread loaves ready to go into oven.

Hey- guess what? We just made homemade French bread… It’s a MIRACLE! Miracle Bread, that is!

Our son and his girlfriend each made a loaf of homemade miracle bread!

Ready To EAT!

The golden brown loaves of Miracle Bread sure look good, straight out of the oven! I sure could slice a piece right now, and gobble it up (with some butter, of course).

Two loaves of baked miracle bread, fresh from the oven!

Time for a warm slice, with some butter! Isn’t it nice looking? Yay- we have Miracle Bread success!

A slice of miracle bread, ready for some butter!

Don’t be afraid to try this “no kneading necessary” miracle bread. If you can stir ingredients, and roll out dough, you CAN make this! Most of the prep time involved is really just the sitting around, waiting for the dough to rise.

Simply go ahead and get lots of other things accomplished while waiting… and STILL end up with two delicious loaves of home baked bread (and an incredible smelling home)! You’ll be the hero of the day when your family sits down and enjoys your freshly baked miracle bread! Enjoy!

Looking For More BREAD Recipes?

You can find all of my bread recipes in the Recipe Index, located at the top of the page. A few favorites include:

Interested In More Recipes?

Thank you for visiting this website. I appreciate you using some of your valuable time to do soIf you’re interested, I publish a newsletter 2 times per month (1st and 15th) with all the latest recipes, and other fun info. I would be honored to have you join our growing list of subscribers, so you never miss a great recipe!
There is a Newsletter subscription box on the top right side (or bottom) of each blog post, depending on the device you use, where you can easily submit your e-mail address (only) to be included in my mailing list.

You Can Also Find Me On Social Media:

Facebook page: The Grateful Girl Cooks!
Pinterest:
The Grateful Girl Cooks!
Instagram:
jbatthegratefulgirlcooks

Author's signatureOriginal Recipe Source: http://homejoys.blogspot.com/2011/01/miracle-bread.html

↓↓ PRINTABLE RECIPE BELOW ↓↓

3 from 1 vote
Miracle Bread
Prep Time
2 hrs 30 mins
Cook Time
15 mins
Total Time
2 hrs 45 mins
 
You're gonna love this easy, homemade Miracle Bread. Recipe makes two loaves and is so easy, even my son can make it! That's gotta be some kind of MIRACLE!
Category: Bread
Cuisine: American
Keyword: miracle bread
Servings: 20 slices (2 loaves)
Calories Per Serving: 156 kcal
Author: JB @ The Grateful Girl Cooks!
Ingredients
  • 1/2 cup warm water
  • 2 Tablespoons active dry yeast
  • 2 Tablespoons sugar (or honey)
  • 2 cups warm water
  • 2 Tablespoons melted butter
  • 2 teaspoons table salt
  • 6-7 cups all purpose flour (will use 6 cups plus more, if necessary)
  • Non-stick spray (or a bit of oil)
  • 1 egg
  • 2 Tablespoons milk
  • Sesame seeds , if desired, for garnish
Instructions
  1. In a small bowl, mix together 1/2 cup warm water with the yeast and sugar (or honey). Stir until the yeast has fully dissolved. Let sit for a 3-4 minutes.
  2. In a large bowl, mix together 2 cups warm water, 2 Tablespoons melted butter, and the salt. When fully mixed, add the yeast/water mixture from the small bowl. Stir to combine well.
  3. Add 6 cups of all purpose flour to dough mixture. Stir well by hand until fully combined (or use a dough hook and stand mixer). If the dough is way too sticky, add a bit more flour a little at a time, until mixture is not sticky.
  4. Form the dough into a ball. Spray a large bowl with non stick spray, or lightly oil the bowl. Add the dough ball to the bowl; turn dough over, to coat sides with spray (or oil).
  5. Cover bowl with a tea towel, and let rise for 30-60 minutes in a warm place, free from drafts. The dough should double in size. Once doubled in size, divide the dough in half.
  6. Roll each half section of dough out (like making a pie!) on a very lightly floured work surface. Shape the dough into a 9-10 inch long rectanglular shape. Using your (clean) hands, roll up the dough, starting with the long edge of the dough and roll tightly up into a loaf shape. Tuck the edges in slightly and carefully place the "loaf" onto a greased or sprayed baking sheet (large enough for two loaves!). Repeat process with other half of dough and place a couple inches apart from other loaf on prepared baking sheet.
  7. Using a very sharp knife, make diagonal slits (about an inch deep) across the tops of each loaf. Cover the loaves with a tea towel and let the dough rise again, for one hour, or until dough loaves have doubled in size. Preheat your oven to 425 degrees during the last 15 minutes of rising time.
  8. In a small bowl, beat together the egg and 2 Tablespoons milk. Using a pastry brush, lightly brush this mixture over the top of each loaf. Sprinkle each loaf with sesame seeds (or can substitute poppy seeds, if desired).
  9. Bake bread at 425 degrees for 15-20 minutes, or until golden brown on top. Remove loaves to wire racks. Let bread cool slightly before slicing, for best results. Enjoy!
Nutrition Facts
Miracle Bread
Amount Per Serving (1 slice)
Calories 156 Calories from Fat 9
% Daily Value*
Fat 1g2%
Cholesterol 11mg4%
Sodium 247mg11%
Potassium 48mg1%
Carbohydrates 30g10%
Fiber 1g4%
Sugar 1g1%
Protein 4g8%
Vitamin A 45IU1%
Calcium 9mg1%
Iron 1.8mg10%
* Percent Daily Values are based on a 2000 calorie diet.

Here’s one more to pin on your Pinterest boards!You're gonna love this easy, homemade Miracle Bread. Recipe makes two loaves and is so easy, even my son can make it! That's gotta be some kind of MIRACLE!


Save

Save

Save

Rich Chocolate Mini-Cakes

Made in mini-muffin pans, you will LOVE these fudgy, rich chocolate mini-cakes, drizzled with white chocolate icing. Recipe makes 24 decadent treats!Made in mini-muffin pans, you will LOVE these fudgy, rich chocolate mini-cakes, drizzled with white chocolate icing. Recipe makes 24 decadent treats!

Sweet, dense, fudgy, amazingly delicious! These are just a few of the words I would use to describe these Rich Chocolate Mini-Cakes! I found this recipe online at Hershey’s Kitchens several years ago, and am sure glad I did!

Recently I made these for a chocolate-themed dinner party with friends. I was responsible for bringing several chocolate-based treats, and this is one of the “small bite” desserts I made. I don’t have photos of them while I prepared them, but they are easy enough to make with the instructions below.

Scroll Down For A Printable Recipe Card At The Bottom Of The Page

Why We Love These Rich Chocolate Mini-Cakes

These miniature “chocolatey” cakes are rich and decadent. They are made in miniature muffin tins, so this recipe makes 24 mini-cakes. Each cake may be fairly small in size, but they make up for it in FLAVOR! They are unbelievably moist, dense, and completely, ridiculously, “chocolately”!

The rich chocolate mini-cakes were a cinch to make and were perfect, small bite treats to add to the dessert tray offerings. Everyone loved them, and I recommend them, without hesitation. Hope you will give them a try… you won’t be disappointed!

Looking For More CHOCOLATE Recipes?

You can find ALL my recipes in the Recipe Index, located at the top of the page. I have some wonderful chocolate desserts you’ll enjoy, including:

Interested In More Recipes?

Thank you for visiting this website. I appreciate you using some of your valuable time to do soIf you’re interested, I publish a newsletter 2 times per month (1st and 15th) with all the latest recipes, and other fun info. I would be honored to have you join our growing list of subscribers, so you never miss a great recipe! 

There is a Newsletter subscription box on the top right side (or bottom) of each blog post, depending on the device you use, where you can easily submit your e-mail address (only) to be included in my mailing list.

You Can Also Find Me On Social Media:

Facebook page: The Grateful Girl Cooks!
Pinterest:
The Grateful Girl Cooks!
Instagram:
jbatthegratefulgirlcooks

Author's signatureOriginal Recipe Source: https://www.hersheys.com/recipes/recipe-details.aspx?id=5190

↓↓ PRINTABLE RECIPE BELOW ↓↓

0 from 0 votes
Rich, Chocolate Mini-Cakes
Prep Time
15 mins
Cook Time
12 mins
Total Time
27 mins
 

Made in mini-muffin pans, you will LOVE these fudgy, rich chocolate mini-cakes, drizzled with white chocolate icing. Recipe makes 24 decadent treats!

Category: Dessert
Cuisine: American
Keyword: chocolate mini-cakes
Servings: 24 mini-cakes
Calories Per Serving: 98 kcal
Author: JB @ The Grateful Girl Cooks!
Ingredients
For mini-cakes:
  • 2/3 cup all purpose flour
  • 1/2 cup granulated sugar
  • 3 Tablespoons cocoa
  • 1/2 teaspoon baking powder
  • 1/4 teaspoon baking soda
  • 1/4 teaspoon salt
  • 1/2 cup water
  • 3 Tablespoons vegetable oil
  • 1 teaspoon vanilla extract
For Chocolate Glaze:
  • 2 Tablespoons butter
  • 2 Tablespoons cocoa
  • 2 Tablespoons water
  • 1 cup powdered sugar
  • 1/2 teaspoon vanilla extract
For White Drizzle:
  • 1/2 cup white chocolate chips
  • 1 Tablespoon vegetable shortening (do NOT use butter, margarine or oil!)
Instructions
  1. Preheat oven to 350 degrees. Lightly grease or spray miniature muffin cups (1 3/4 inches in diameter). Set aside.
  2. To Make the Mini-Cakes:
  3. In a large bowl, mix together the flour, sugar, cocoa, baking powder, baking soda and salt. Add the water, oil and vanilla to the dry ingredients. Mix ingredients together until well blended. The batter will be fairly thin, so don't worry. Carefully spoon the batter into the greased muffin cups (these can be made in two batches if you only have one muffin pan). Fill each muffin cup 2/3 of the way full.
  4. Bake at 350 degrees for 12-14 minutes or until the top springs back when you gently touch it in the middle. When done, remove the muffin pan to a wire rack to cool. Let them cool for 3-4 minutes, then remove cakes from the muffin pan. (If making in two batches, clean pan, re-grease it and repeat previous directions for rest of the batter).
  5. Make sure cakes cool completely before glazing.
  6. To Make the Chocolate Glaze:
  7. Melt the 2 Tablespoons of butter in a saucepan on low heat. Stir in the 2 Tablespoons water and 2 Tablespoons cocoa. Cook, stirring constantly until smooth, and slightly thickened, but do not let mixture come to a boil. Remove the pan from heat and let it cool slightly. Add the powdered sugar and vanilla in gradually. Whisk the sauce as you add the sugar until mixture is smooth and lumps are gone.
  8. Carefully spread the chocolate glaze over the tops of each cooled mini-cake. Place frosted cakes on a wax-paper or parchment lined baking sheet. Refrigerate cakes for 10-15 minutes to let the glaze "set" and firm up. While the cakes are refrigerating, prepare the white drizzle.
  9. To Make The White Drizzle:
  10. Place 1/2 cup white chocolate chips and 1 Tablespoon of shortening into a microwave-safe bowl. Microwave on MEDIUM (50%) power for 30 seconds. Remove and stir until smooth. If it is necessary, microwave the chips an additional 10-15 seconds, just until the chips can be stirred and become smooth. Let cool slightly. Drizzle this onto the mini-cakes.
  11. Let drizzle firm up a bit, then serve and enjoy!
Nutrition Facts
Rich, Chocolate Mini-Cakes
Amount Per Serving (1 g)
Calories 98 Calories from Fat 36
% Daily Value*
Fat 4g6%
Saturated Fat 2g13%
Cholesterol 3mg1%
Sodium 47mg2%
Potassium 29mg1%
Carbohydrates 14g5%
Sugar 11g12%
Vitamin A 30IU1%
Calcium 12mg1%
Iron 0.2mg1%
* Percent Daily Values are based on a 2000 calorie diet.

Here’s one more to pin on your Pinterest boards!Made in mini-muffin pans, you will LOVE these fudgy, rich chocolate mini-cakes, drizzled with white chocolate icing. Recipe makes 24 decadent treats!


Save

Save

Easy Crock Pot Refried Beans

Easy crock pot refried beans – It is EASY (and economical) to make your own delicious and inexpensive Mexican refried beans, using a slow cooker!Easy crock pot refried beans - It is EASY (and economical) to make your own delicious and inexpensive Mexican refried beans, using a slow cooker!
I made some Crock Pot Refried Beans recently. From scratch. No cans involved. Guess what? They were absolutely delicious!  Really… these refried beans taste fantastic, they are inexpensive to make, and EASY!

I have been reading through a great book I own called “100 Days Of Real Food”, by author Lisa Leake, and came across this recipe for non-fried, refried beans, made from scratch.

The recipe can be thrown together in about 10 minutes in a crock pot. The pinto beans and spices are slow-cooked for 8-10 hours, lightly mashed, then served. How easy is THAT???

Scroll Down For A Printable Recipe Card At The Bottom Of The Page

Crock Pot Refried Beans Are EASY To Prepare

I started my crock pot when I got my morning coffee, and we enjoyed them with our evening meal later that day. They were so good! When the beans were ready, I took out half of them, mashed them and served them with cheddar cheese melted on top.

I took the other half of the beans (which were still in the flavored broth and served them just as they were (un-mashed) to my husband (because that is his favorite way to eat pinto beans).

Pinto beans are used to make refried beans... very economical!

The cost of a bag of dry pinto beans is minimal, and this recipe produces just under 4 cups of refried beans, so it is a great budget item, too! And, seriously, these beans are amazingly good!

We have used crock pot refried beans with tacos, burritos and tostadas, all with fantastic results. Here are some pics from while I made them:

How To Make Crock Pot Refried Beans

Here are the ingredients in my crock pot with the onions and other spices. The beans are ready to start cooking. This step will only take about 10 minutes or less!

Let them cook all day (9 hours), because you won’t have to mess with them! You just need to start them cooking, then go about your business! EASY!

Refried beans cook in crock pot all day.

After 9 hours in the crock pot this is what the crock pot refried beans looked like. Drain the beans over the crock pot, removed, and then mash the beans, using a potato masher. You can add a little broth from the crock pot to the beans if you don’t want them too thick.

Refried beans are ready to mash after cooking all day in the crock pot

The Crock Pot Refried Beans Are Ready To Serve

This was such an easy, economical way to make refried beans, and I will make them this way quite often. I really hope you will try making refried beans from scratch. They are so inexpensive to make, and taste absolutely delicious!

Here are the finished crock pot refried beans ready to eat! They were garnished with a little grated cheddar cheese and cilantro leaves on top, to serve! Muy bueno!

Crock pot refried beans are garnished with cheese and are ready to ea!

Crock pot refried beans are served with a garnish of grated cheddar cheese and cilantro.

Hope you enjoy this recipe for crock pot refried beans. Have a great day, friends! Make it count for something GOOD and courageous! Thanks for stopping by, and I hope you will come back soon for more recipes.

Looking For More Mexican-Style Recipes?

You can find all of my recipes in the Recipe Index, located at the top of the page. I have a good variety of Mexican-style recipes you might enjoy, including:

Interested In More Recipes?

Thank you for visiting this website. I appreciate you using some of your valuable time to do soIf you’re interested, I publish a newsletter 2 times per month (1st and 15th) with all the latest recipes, and other fun info. I would be honored to have you join our growing list of subscribers, so you never miss a great recipe! 

There is a Newsletter subscription box on the top right side (or bottom) of each blog post, depending on the device you use, where you can easily submit your e-mail address (only) to be included in my mailing list.

You Can Also Find Me On Social Media:

Facebook page: The Grateful Girl Cooks!
Pinterest:
The Grateful Girl Cooks!
Instagram:
jbatthegratefulgirlcooks

Author's signatureRecipe Source: “100 Days Of Real Food”, by Lisa Leake (page 155), Published 2014, William Morrow Publishers.

↓↓ PRINTABLE RECIPE BELOW ↓↓

0 from 0 votes
Easy Crock Pot Refried Beans
Prep Time
5 mins
Cook Time
8 hrs
Total Time
8 hrs 5 mins
 

Easy crock pot refried beans - It is EASY (and economical) to make your own delicious and inexpensive Mexican refried beans, using a slow cooker!

Category: Side Dishes
Cuisine: Mexican
Keyword: crock pot refried beans, refried beans
Servings: 8 (1/2 cup servings)
Calories Per Serving: 174 kcal
Author: JB @ The Grateful Girl Cooks!
Ingredients
  • 2 cups dried pinto beans , rinsed
  • 1 yellow onion , peeled, and cut in half
  • 1/2 medium jalapeno , cored, seeded, and diced
  • 2 garlic cloves , peeled and crushed
  • 1 1/4 teaspoons salt
  • 1/2 teaspoon ground black pepper
  • 1/8 teaspoon ground cumin
  • 6 cups water
Optional toppings:
  • Grated cheddar or monterey jack cheese , cilantro, or sour cream
Instructions
  1. Place all ingredients (except for optional toppings) into a crock pot.
  2. Cover pot and cook beans for 8-9 hours on high.
  3. When finished, remove beans from crock pot, drain, and mash them with a potato masher until they reach the correct consistency. Add a little broth from the crock pot to the beans while mashing, if they seem a bit dry. That's it! You just made refried beans from scratch!
  4. Serve with a garnish of grated cheese, cilantro, or sour cream, if desired. Enjoy!

Recipe Notes

NOTE: Caloric calculation does not include optional garnishes (sour cream, cheese or cilantro)

Nutrition Facts
Easy Crock Pot Refried Beans
Amount Per Serving (1 serving)
Calories 174
% Daily Value*
Sodium 369mg16%
Potassium 692mg20%
Carbohydrates 31g10%
Fiber 7g29%
Sugar 1g1%
Protein 10g20%
Vitamin A 10IU0%
Vitamin C 5.4mg7%
Calcium 59mg6%
Iron 2.5mg14%
* Percent Daily Values are based on a 2000 calorie diet.

Here’s one more to pin on your Pinterest boards!Easy crock pot refried beans - It is EASY (and economical) to make your own delicious and inexpensive Mexican refried beans, using a slow cooker!


Save

Save

Save