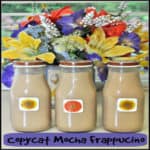
Make your own version of a famous coffeehouse’s cold, creamy mocha beverage, with this simple and delicious Copycat Mocha Frappucino recipe!
I own five or six books by author Todd Wilbur in his series called “Top Secret Recipes”. They are such fun books in which to find some great “copycat” recipes.
It’s a great way to fix a “very close to the original” (but for a fraction of the price) clone of a favorite food at home. This copycat mocha frappucino is one of those recipes found on his website.
Scroll Down For A Printable Recipe Card At The Bottom Of The Page
Why Not Make A Copycat Mocha Frappucino At Home?
Made popular by the famous coffee chain that seems to be on every corner, these chilled coffee beverages (the bottled version you find in grocery stores) can really add up ($$) if you purchase them often.
Well, now you can make a copycat mocha frappucino at home, so you can grab one on the way out the door without having to make an extra stop on the way to work or a kid’s baseball game (and for a fraction of the cost!)

We don’t buy these very often at all, but when we do, this is my favorite. So naturally, I was curious to try making these at home. This is the copycat recipe for the bottled version you find in the stores.
They are very easy to make (and if helps if you happen to have a few extra bottles left over to package this in…I saved a few for this very purpose!)
Making This Coffee Drink
The copycat recipe calls for Natural Fruit Pectin (don’t let that scare you off), which is a fruit thickener, commonly used when making jam. It actually acts as a thickening agent in this recipe. I used it, but the original author of the recipe states that you don’t have to use it, if you don’t care about duplicating the texture.

The recipe also calls for espresso, but you can “fake it” with the easy to follow tip (found in the notes section of the recipe) and make your own. This is what I did, using the very easy instructions.
The recipe, as written, makes 24 ounces, but can easily be doubled. Hope you enjoy this cold, creamy, mocha coffee beverage (how’s that for a description)!
Thank you for stopping by. I hope you have the opportunity to make a delicious copycat mocha frappucino for yourself or for someone you love. Have a great day, and come back soon.
Looking For More BEVERAGE Recipes?
You can find all of my recipes in the Recipe Index, located at the top of the page. I have a nice variety of beverage recipes, including:
- Caramel Apple Cider
- Watermelon Lime & Mint Agua Fresca
- Blackberry Soda
- Valencia Hot Chocolate
- Honey Almond Iced Latte
Want More Recipes? Get My FREE Newsletter!
I publish a newsletter 2 times per month (1st and 15th) with lots of recipes, tips, etc..
Would you like to join our growing list of subscribers?
There is a Newsletter subscription box on the top right (or bottom) of each blog post, depending on the device you use.
You can submit your e-mail address there, to be added to my mailing list.
Find Me On Social Media:
Facebook page: The Grateful Girl Cooks!
Pinterest: The Grateful Girl Cooks!
Instagram: jbatthegratefulgirlcooks
 Original Recipe Source: http://www.topsecretrecipes.com/Starbucks-Frappuccino-Bottled-Version-Copycat-Recipe.html
↓↓ PRINTABLE RECIPE BELOW ↓↓
Make your own copycat version of a famous coffeehouse's cold, creamy mocha beverage, with this simple and delicious recipe!
- 1/2 cup fresh espresso (see Notes below for how to create your own)
- 2 1/2 cups lo-fat milk (2 percent)
- 1/4 cup granulated sugar
- 1 Tablespoon dry pectin
- 1/4 teaspoon cocoa powder
Make the espresso. In a large bowl add the sugar, dry pectin and cocoa powder to the hot espresso and stir or whisk well until completely incorporated. Chill mixture.
- When espresso mixture is completely chilled, add the milk; stir until combined.
- Pour mixture into a serving pitcher or individual bottles, and refrigerate. Serve cold.
**How to make copycat espresso to use in this recipe**
Use 1/3 cup ground coffee and 1 cup of water in your drip coffee maker. Brew this once, then run it through again, using the same grounds. (this will make approx. 1/2 cup espresso needed). **Run a pot of water through coffeemaker when done, to clean machine.
NOTE: Original Recipe Source: http://www.topsecretrecipes.com/Starbucks-Frappuccino-Bottled-Version-Copycat-Recipe.html
Here’s one more to pin on your Pinterest boards!


, with chicken breasts, broccoli, and an amazing Asian inspired stir fry sauce! / The Grateful Girl Cooks!")


, with chicken breasts, broccoli, and an amazing Asian inspired stir fry sauce! / The Grateful Girl Cooks!")


 recipe, made in an electric ice cream maker! / The Grateful Girl Cooks!")
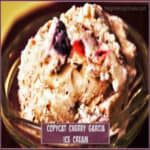
 recipe, made in an electric ice cream maker! / The Grateful Girl Cooks!")


, with cinnamon spiced and powdered sugar glazes! / The Grateful Girl Cooks!")


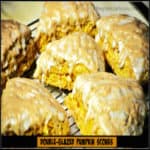
, with cinnamon spiced and powdered sugar glazes! / The Grateful Girl Cooks!")