Category: Chocolate

Pumpkin Spice Latte Biscotti

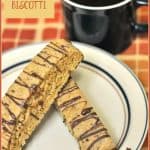
If you enjoy Fall & pumpkin spiced “everything”, you’ll love pumpkin spice latte biscotti, a yummy, crispy & dunkable cookie with lots of flavor!I have several friends who "do the happy dance" each Fall, when their local coffee stand begins offering their seasonal Pumpkin Spice Lattes. Cracks me up to see how fast the "news" spreads via Social Media. Well... if you like Pumpkin Spice Lattes, then I would be willing to bet you will love these Pumpkin Spice Latte Biscotti!

I have several friends who “do the happy dance” each Fall, when their local coffee stand begins offering their seasonal Pumpkin Spice Lattes. Cracks me up to see how fast the “news” spreads via Social Media. Well… if you like Pumpkin Spice Lattes, then I’m willing to bet you will love these Pumpkin Spice Latte Biscotti!

I saw this recipe pop up on Pinterest and thought I would give it a try. I’ve made biscotti before (here’s my recipe for Orange Almond Biscotti -yum!), so I knew I would enjoy the flavor combination of these biscotti.

How can you go wrong with a yummy coffee drink in COOKIE FORM? It’s practically impossible! Here’s how easy these pumpkin spice latte biscotti are to make:

Scroll Down For A Printable Recipe Card At The Bottom Of The Page

Prepare Batter For The Pumpkin Spice Latte Biscotti

In a medium sized bowl, whisk together flour, baking powder, salt and spices, then set aside. See the ground coffee in the middle of the pile? Yes!

Dry ingredients for biscotti are mixed together in large bowl.

Using a hand mixer or a stand mixer, cream the butter and sugar together until creamy, and then add in eggs, and beat well.

A stand mixer is used to blend butter, sugar and eggs to make biscotti batter.

Add the pumpkin puree and vanilla extract to the batter, and beat these, until incorporated.

Pumpkin puree and vanilla extract are added to the biscotti batter, to combine.

Now add the dry ingredients to the wet ingredients, a little at a time, beating well until ingredients are fully combined.

Dry ingredients are now added to the wet ingredients to make the pumpkin spice latte biscotti batter.

Prepare The Pumpkin Spice Latte Biscotti Batter For Baking

The batter for the pumpkin spice latte biscotti will look like this when done… see the little coffee granules? Ooh…

Flecks of instant coffee are visible in the biscotti batter.

Spoon the soft dough onto a parchment paper lined baking sheet. Make two separate mounds (about 3 inches wide by 12 inches long) of dough several inches away from each other. Don’t forget to do this, because the dough will spread while baking.

Two log shapes are formed by spreading out the pumpkin spice latte biscotti batter on parchment paper.

Shape The Biscotti Logs

Using moistened hands, shape the dough into 3 inch wide by 12 inch long logs, remembering to leave several inches space between logs, cause they will spread when baking.

Batter is shaped into 2 log shapes before baking for the first time.

Bake The Biscotti

Bake the biscotti logs in a preheated 300 degree oven for 35-40 minutes, until firm (mine took 40 minutes). Please see my note on oven temp. in the NOTES section of the printable recipe! When done, remove the pan from the oven, and let the biscotti rest for a full 10 minutes.

After baking, the biscotti dough has spread considerably, and cools on parchment paper.

After 10 minutes, remove the biscotti logs to a cutting board, and remove the parchment paper. Carefully slice each log into 12 (one inch) slices along the short side, using a serrated knife to cut.

Each of the biscotti logs are sliced into 12 portions before they are baked again.

Time To Bake The Pumpkin Spice Latte Biscotti AGAIN

Once cut, carefully move the slices one at a time (I used the blade of the knife) back to a baking sheet (no parchment paper needed this time), making sure to place the cut side down. 

After 15 minutes, remove the biscotti from the oven, and turn them over. Put them back in the oven and bake an additional 15-20 minutes until golden brown and crispy. I actually let the second cooking go for 20 minutes.

Pumpkin Spice Latte Biscotti slices are baked a second time, cut side down.

When done, remove the biscotti to a wire rack and let the cookies cool down completely.

Baked biscotti slices, cooling on a wire rack.

Make The Chocolate Drizzle

While the biscotti cools, make a chocolate drizzle to decorate them with, once completely cooled. Melt chocolate chips and a little bit of vegetable shortening in the microwave. Microwave 30 seconds on high. Stir. Microwave again for 30 seconds on high. Stir.

Chocolate is melted with shortening, to make a drizzle for topping the biscotti.

Drizzle the tops of the biscotti with the melted chocolate. II use a honey dipper, but you can use a fork, etc.. Let the chocolate harden, then “PAINT” the bottoms of each biscotti with the melted chocolate, using a pastry brush. Let the chocolate firm up fully before serving.

Melted chocolate is drizzled over the tops of the baked biscotti.

The bottom of each piece of biscotti is brushed with melted chocolate.

Ready To Serve And Eat!

Once the chocolate has hardened up on the top and bottom of each cookie, the pumpkin spice latte biscotti are ready to eat… or dunk in a hot cup of coffee!

Pumpkin Spice Latte Biscotti is ready to eat once the chocolate has firmed up.

Hope you enjoy this little taste of FALL with these delicious pumpkin spice latte biscotti!  Be sure to check out ALL of my recipes in the Recipe Index, located at the top of the page. Have a great day, and may God bless the work of your hands!

Interested In More Recipes?

Thank you for visiting this website. I appreciate you using some of your valuable time to do soIf you’re interested, I publish a newsletter 2 times per month (1st and 15th) with all the latest recipes, and other fun info. I would be honored to have you join our growing list of subscribers, so you never miss a great recipe!
There is a Newsletter subscription box on the top right side (or bottom) of each blog post, depending on the device you use, where you can easily submit your e-mail address (only) to be included in my mailing list.

You Can Also Find Me On Social Media:
Facebook page: The Grateful Girl Cooks!
Pinterest: The Grateful Girl Cooks!
Instagram: jbatthegratefulgirlcooks

Author's signatureRecipe Source: Jennifer, at http://www.seasonsandsuppers.ca/pumpkin-spice-latte-biscotti

0 from 0 votes
Pumpkin Spice Latte Biscotti
Prep Time
20 mins
Cook Time
1 hr 10 mins
Total Time
1 hr 30 mins
 

If you enjoy Fall & pumpkin spiced "everything", you'll love pumpkin spice latte biscotti, a yummy, crispy & dunkable cookie with lots of flavor!

Category: Breakfast, Cookie
Cuisine: American
Keyword: pumpkin spice latte biscotti
Servings: 24
Calories Per Serving: 185 kcal
Author: JB @ The Grateful Girl Cooks!
Ingredients
For the biscotti:
  • 3 cups all purpose flour
  • 1 1/2 teaspoons baking powder
  • 2 1/2 teaspoons finely ground coffee (grounds)
  • 1/4 teaspoon salt
  • 2 teaspoons cinnamon
  • 1 teaspoon ginger
  • 1/2 teaspoon nutmeg
  • 1/2 cup butter (at room temperature!)
  • 1 cup granulated sugar
  • 3 large eggs
  • 1 teaspoon vanilla extract
  • ½ cup canned pumpkin puree (not pie filling)
For The Chocolate Drizzle:
  • 1 cup semi-sweet chocolate chips
  • 1 1/2 Tablespoons vegetable shortening
Instructions
  1. Preheat your oven to 300 degrees.
  2. In a large bowl, whisk together the flour, baking powder, coffee grounds, and spices until well combined. Set bowl aside.
  3. Place the room temp. butter and sugar in a mixing bowl or the bowl of a stand mixer. Beat with mixer on high until completely smooth. Add the eggs, one at a time. Beat the mixture well after adding each egg. When smooth, add the pumpkin puree and the vanilla extract. Beat this well.
  4. Turn the mixer to low and gradually add the dry ingredients to the wet ingredients (a little at a time), while mixer is running, until completely combined.
  5. Spoon the dough out onto a parchment paper-covered baking sheet. Divide dough evenly into 2 separate log shapes, about 12 inches long by 3 inches wide (approx.). Wet your hands and shape the dough into a smooth log (12 x 3). REMEMBER TO KEEP LOGS SEVERAL INCHES APART AS THEY WILL SPREAD WHILE BAKING!
  6. Bake the dough at 300 degrees for 35-40 minutes or until firm. When done, remove pan from oven and let dough rest for 10 minutes.
  7. Remove dough logs to a cutting board (remove parchment paper). Carefully slice each log into 12 one inch slices, using a serrated knife. Place biscotti slices, CUT SIDE DOWN onto baking sheet. Bake for 15 minutes; remove pan from oven. Turn the biscotti slices over, return pan to oven, and cook an additional 15-20 minutes. When done, remove from oven. Carefully place biscotti on wire racks to completely cool.
To make chocolate drizzle:
  1. Place chocolate chips and vegetable shortening in microwave safe bowl. Microwave on HIGH for 30 seconds. Stir. Microwave again for 30 seconds. Remove from microwave and stir well, until smooth. Drizzle over each biscotti. Let chocolate harden. Use a pastry brush to brush chocolate on the bottom of each biscotti. Let chocolate fully harden, then they are ready to eat!
Recipe Notes

*FYI- I noticed that these biscotti were not as crunchy the day after I made them. After looking at my other recipes for biscotti, I'm convinced the lower oven temp. for this particular recipe played a part. Next time, I will bake these at 350 degrees, then place the cut slices standing upright on sheet (as opposed to flipping to both sides), and bake for approx. 20-25 min. until firm and set... cause we want crunchy biscotti, right?

Nutrition Facts
Pumpkin Spice Latte Biscotti
Amount Per Serving (1 g)
Calories 185 Calories from Fat 72
% Daily Value*
Fat 8g12%
Saturated Fat 4g25%
Trans Fat 1g
Polyunsaturated Fat 1g
Monounsaturated Fat 2g
Cholesterol 31mg10%
Sodium 68mg3%
Potassium 105mg3%
Carbohydrates 25g8%
Fiber 1g4%
Sugar 11g12%
Protein 3g6%
Vitamin A 947IU19%
Vitamin C 1mg1%
Calcium 25mg3%
Iron 1mg6%
* Percent Daily Values are based on a 2000 calorie diet.

Here’s one more to pin on your Pinterest boards!If you enjoy Fall & pumpkin spiced "everything", you'll love pumpkin spice latte biscotti, a yummy, crispy & dunkable cookie with lots of flavor!


Save

Save

Maple Bacon Pecan Truffles

Maple Bacon Pecan Truffles are a decadent treat! They’re creamy & maple flavored, w/ nuts & crisp bacon, coated in melted chocolate and butterscotch.Maple Bacon Pecan Truffles are a decadent treat! They're creamy & maple flavored, w/ nuts & crisp bacon, coated in melted chocolate and butterscotch.

This morning I am posting a recipe for Maple Bacon Pecan Truffles that I made for a bacon-themed dinner we enjoyed with dear friends a couple months ago. They’re so good, and decadent!

In Memory Of Our Friend, Richard

This was an extremely hard post to write, because I began to write this post over a week ago, but then tragedy struck. The host for that dinner (my husband’s best friend) passed away very suddenly this past weekend, and we have been in shock ever since, grieving his loss.

He and his wife were two of our very best friends so we grieve for her, as well. Our comfort comes because our dear friend Richard believed in and knew Jesus, so we know this is a “temporary” loss, because we trust in God’s Word that we will see him again in heaven. How we long for that great reunion!

Richard… this one’s in your honor today, as I know you tried these maple bacon pecan truffles the last time we shared a meal together. We loved you… with all our hearts, and miss you terribly already.

Scroll Down For A Printable Recipe Card At The Bottom Of The Page

How To Make Maple Bacon Pecan Truffles

Here’s how to make these really delicious truffles, (which I adapted from my recipe for Maple Cream Bon Bons) for our Bacon Themed dinner. I figured bacon makes everything better, so that was my inspiration. Here’s what I did: First, cook 6-7 slices of bacon until VERY crisp.

Frying the bacon until crisp to add to the truffles.

When bacon is crisp, drain, cool, then crumble or chop it up into very small pieces. Set aside a small amount to be used for garnishing the finished truffles later.

Crisp bacon crumbles will be added to the truffle dough.

Place the butter, powdered sugar and maple flavoring in a large bowl or base of an electric stand mixer.

Butter, powdered sugar and maple extract are beaten together to make dough for truffles.

Using an electric mixer, cream these ingredients until fully combined and creamy.

Creamy batter for the maple bacon pecan truffles is prepared.

Add Pecans And Bacon Crumbles To The Truffle Mixture

Add the chopped pecans and most of the bacon crumbles to the truffle mixture. NOTE: Set some of the bacon crumbles aside for garnishing the truffles later. Mix well until combined. Refrigerate the dough for maple bacon pecan truffles for a while to let it chill and firm up.

Crisp bacon and chopped pecans are added to the truffle dough.

Shape The Maple Bacon Pecan Truffles

Once mixture is chilled, shape the mixture into 1″ balls, by rolling them between your hands. Place dough balls onto a wax paper covered cooking sheet. Once all of the maple bacon pecan truffles have been formed, place them into freezer for 1/2 an hour to firm up again.

Coat The Maple Bacon Pecan Truffles With Chocolate

Remove truffles from freezer and carefully dip each one into the melted chocolate butterscotch coating. Let excess chocolate drip back into the bowl. NOTE: My picture turned out blurry (sorry), but I use a toothpick inserted into truffle to dip into the chocolate, and a spoon to help cover each one.

The maple bacon pecan truffles are dipped in chocolate, to cover.

Dip each truffle completely in chocolate, then place it onto wax paper or aluminum foil. Use another toothpick to help pull the first toothpick out of the truffle. See the little holes on top of the chocolate covered truffles? You will fill those later. Repeat until all the truffles are coated in chocolate.

Some of the truffles have been covered with melted chocolate.

Finish The Truffles

Spoon a little melted chocolate over each of the holes created by the toothpick to cover them up. Then sprinkle a few of the reserved bacon crumbles over the top of each of the maple bacon pecan truffles as a garnish.

Lots of maple bacon pecan truffles, garnished with crisp bacon crumbles.

Refrigerate Finished Truffles To Firm Them Up

Let the finished truffles sit for a while (at least half an hour), to allow the chocolate to firm up, then place them into little candy sized paper wrappers, as shown. Keep truffles in a covered container in the refrigerator until you are ready to serve.

To serve, the maple bacon pecan truffles are placed into paper candy wrappers.

Here’s an inside view of one of the maple bacon pecan truffles. They taste their very best when served chilled!

A look at the inside of one of the truffles.

Hope you enjoy these maple bacon pecan truffles. The maple, pecans, bacon, chocolate and butterscotch flavors make this an INCREDIBLY delicious treat, and they really aren’t too hard to make, either! God Bless You. Have a great day. Hold your family and friends close. Let them KNOW you love and care for them. Life IS short.

Looking For More TRUFFLE or BON BON Recipes?

You can find all of my recipes in the Recipe Index, located at the top of the page. You might also enjoy these yummy treats!

Interested In More Recipes?

Thank you for visiting this website. I appreciate you using some of your valuable time to do soIf you’re interested, I publish a newsletter 2 times per month (1st and 15th) with all the latest recipes, and other fun info. I would be honored to have you join our growing list of subscribers, so you never miss a great recipe!
There is a Newsletter subscription box on the top right side (or bottom) of each blog post, depending on the device you use, where you can easily submit your e-mail address (only) to be included in my mailing list.

You Can Also Find Me On Social Media:

Facebook page: The Grateful Girl Cooks!
Pinterest:
The Grateful Girl Cooks!
Instagram:
jbatthegratefulgirlcooks

Author's signature

0 from 0 votes
Maple Bacon Pecan Truffles
Prep Time
1 hr
Cook Time
0 mins
Total Time
1 hr
 
Maple Bacon Pecan Truffles are a decadent treat! They're creamy & maple flavored, w/ nuts & crisp bacon, coated in melted chocolate and butterscotch.
Category: Dessert
Cuisine: American
Keyword: truffles
Servings: 48
Calories Per Serving: 158 kcal
Author: JB @ The Grateful Girl Cooks!
Ingredients
For Truffles:
  • 1 cup butter (2 cubes)
  • 3 1/2 cups powdered sugar
  • 3 Tablespoons Maple flavoring
  • 1 1/2 cups pecans , chopped (may substitute walnuts)
  • 6-7 slices bacon , cooked crisp, and crumbled (reserve some to garnish finished truffles)
For Truffle Coating:
  • 2 cups semi-sweet chocolate chips
  • 1 cup butterscotch chips
Instructions
  1. Cook bacon slices until very crisp. Drain, then crumble or chop into small pieces once cooled. Set aside.
  2. In a large bowl, use an electric mixer to cream the butter, powdered sugar, and maple flavoring until smooth.
  3. Stir in chopped pecans and most of the bacon crumbles (remember to save some for garnishing the finished truffles!)
  4. Place bowl in refrigerator for half an hour to let it firm up a bit.
  5. When chilled, shape the dough into 1 inch balls, by rolling the dough between your hands (yes, it might be a bit messy...) Place the dough balls onto a wax paper or foil lined baking sheet and place into freezer for about half an hour or so. (You want the dough to be very chilled before dipping in chocolate).
  6. While dough is in freezer, make the chocolate/butterscotch coating. In a microwavable bowl, melt the chocolate and butterscotch chips (30 seconds on HIGH. Stir. 30 seconds on HIGH. Stir again. Watch carefully so that you don't burn the chocolate. At this point the chips should be melted and smooth after stirring the second time; if not, microwave an additional 15 seconds, then stir again.
  7. Dip dough balls into coating mixture one at a time (I insert a toothpick into the dough ball, dip, cover with coating then remove, allowing the excess to drip back into the bowl. You may find it helpful to use a spoon to help coating the truffle. Place each coated truffle onto wax paper or foil-lined baking sheets. Remove the toothpick after each one, and re-use on the next truffle.
  8. When all have been coated, hide the toothpick hole with a small bit of chocolate coating, then sprinkle (while it is still wet) with a few bacon crumbles for garnish.
  9. Let truffles sit until chocolate firms up. Place each truffle in a candy paper wrapper, if desired. Store in a covered container in refrigerator until chocolate has hardened and is ready to serve. These truffles are at their best when completely chilled.
Nutrition Facts
Maple Bacon Pecan Truffles
Amount Per Serving (1 truffle)
Calories 158 Calories from Fat 90
% Daily Value*
Fat 10g15%
Saturated Fat 4g25%
Cholesterol 12mg4%
Sodium 66mg3%
Potassium 61mg2%
Carbohydrates 16g5%
Sugar 14g16%
Protein 1g2%
Vitamin A 125IU3%
Calcium 8mg1%
Iron 0.6mg3%
* Percent Daily Values are based on a 2000 calorie diet.

Here’s one more to pin on your Pinterest boards!Maple Bacon Pecan Truffles are a decadent treat! They're creamy & maple flavored, w/ nuts & crisp bacon, coated in melted chocolate and butterscotch.


Save

Save

Chocolate-Covered Bacon

Chocolate-covered bacon is both sweet and salty, incredibly easy to make, and is a very unique, but DELICIOUS crispy treat you will LOVE!Chocolate-covered bacon is both sweet and salty, incredibly easy to make, and is a very unique, but DELICIOUS crispy treat you will LOVE!!
A couple years ago, my husband tried a piece of Chocolate-Covered Bacon at a little bakery, while out of our area on business. He said it was fantastic (I had my doubts). Now, don’t get me wrong… I love bacon, but chocolate covered bacon seemed a bit wonky to me. That is, UNTIL I MADE MY OWN! Wowzers! It’s fantastic, and EASY to make!

Scroll Down For A Printable Recipe Card At The Bottom Of The Page

My husband and I recently attended a THEMED dinner party with dear friends. The theme this time was BACON. All parts of the meal had to include some form of bacon. Everything. Beverages, appetizers, entrees (3), and desserts. All bacon inspired. Here’s our menu for the bacon-themed dinner:

Menu for bacon-themed dinner

Here’s a collage of some of the bacon dishes we enjoyed… everything from prosciutto risotto to candied bacon ice cream!

Collage of bacon themed dishes from our bacon themed dinner

I was in charge of the desserts, (as I typically am). One of the desserts I made was chocolate covered bacon strips. YUM! Even after being coated in semi-sweet chocolate, the bacon was crispy inside. The chocolate actually is a perfect counter balance to the saltiness of the bacon.  You can also see my Bacon Pecan Pralines, Maple Bacon Pecan Truffles, and Candied Bacon Ice Cream in the collage photo above.

It really was easy to make this chocolate-covered bacon. I didn’t have a “recipe”; I just used the technique I use for dipping truffles in chocolate. My fingers got a bit messy, but that’s no big deal. Here’s what I did.

How To Make Chocolate-Covered Bacon

First I fried the number of bacon strips I wanted. This recipe is for 8, but you can easily alter recipe to accommodate the number of strips you want to make.  I cooked the bacon strips until they were very crispy, then drained them on a paper towel to absorb the grease.

Bacon is fried until crisp.
I let the bacon cool completely. Then I melted semi-sweet chocolate chips with a heaping Tablespoon of vegetable shortening in my microwave. (30 seconds, stir. 30 seconds stir).

Chocolate chips and shortening are melted together to coat baconDipping the Bacon

The next thing I did was carefully (the bacon is crisp, remember?) dip one piece of bacon at a time in the chocolate.  I used a spoon to help cover about 3/4 of the piece on both sides with chocolate, then carefully flipped it over and did the remaining bit on both sides.

I used a spoon to spoon the chocolate into nooks and crannies that needed help to be covered. I let the excess chocolate drip back into the bowl.

Crisp bacon is dipped in melted chocolate until fully covered.
After each piece was completely covered in chocolate, it was carefully placed on a piece of aluminum foil to let the chocolate firm up.

Chocolate dipped bacon is left to dry until chocolate firms up
Once the chocolate had firmed up, I melted some white chocolate chips (about 1/2 cup) with a small amount of shortening (1 teaspoon), then decoratively drizzled it over the bacon slices. I even had some green colored chocolate chips from a bag of Christmas colored ones, so I also drizzled that over, for contrast (optional).

Ready For Some Chocolate-Covered Bacon!

At our bacon dinner that evening, one of my friends wondered if I had put mint flavored drizzle (the GREEN chips) on the bacon. No way… just used a different colored semi-sweet chocolate chip!

Chocolate covered bacon is drizzled with white and green chocolate
When I was done being “creative” (ha ha), I let the chocolate-covered bacon slices firm up completely before attempting to remove them from the aluminum foil. I then placed them in a single layer in a sealed plastic container, and kept them in the refrigerator until ready to serve later that evening.

The truffles you see in the picture (with the bacon strips) are another creation I made for bacon night. Here’s the recipe for these Maple Bacon Pecan Truffles. (they were yummy, too!)

Close up photo of chocolate-covered bacon strips
That’s it! It’s really not hard to make chocolate-covered bacon, at all! Hope you will give it a try. Bacon just seems to make everything better… even chocolate! Thanks for stopping by, and come back soon. Don’t forget to check out ALL of my recipes in the Recipe Index, located at the top of the page.

Interested In More Recipes?

Thank you for visiting this website. I appreciate you using some of your valuable time to do soIf you’re interested, I publish a newsletter 2 times per month (1st and 15th) with all the latest recipes, and other fun info. I would be honored to have you join our growing list of subscribers, so you never miss a great recipe!
There is a Newsletter subscription box on the top right side (or bottom) of each blog post, depending on the device you use, where you can easily submit your e-mail address (only) to be included in my mailing list.

You Can Also Find Me On Social Media:

Facebook page: The Grateful Girl Cooks!
Pinterest:
The Grateful Girl Cooks!
Instagram:
jbatthegratefulgirlcooks

Have a GREAT day!

Chocolate Covered Bacon / The Grateful Girl Cooks!

0 from 0 votes
Chocolate-Covered Bacon
Prep Time
25 mins
Cook Time
0 mins
Total Time
25 mins
 
Chocolate-covered bacon is both sweet and salty, incredibly easy to make, and is a very unique, but DELICIOUS crispy treat you will LOVE!!
Category: Candy
Cuisine: American
Keyword: chocolate covered bacon
Servings: 8 servings
Calories Per Serving: 301 kcal
Author: JB @ The Grateful Girl Cooks!
Ingredients
  • Bacon (I used 8 strips)
  • 1 1/2 cups semi-sweet chocolate chips
  • 1 HEAPING tablespoon vegetable shortening
  • 1/2 cup white chocolate chips + 1 teaspoon vegetable shortening (for drizzle)
  • 1/2 cup colored chocolate chips + 1 teaspoon vegetable shortening (for drizzle... totally optional!)
Instructions
  1. Cook bacon until very crisp. Remove from skillet to paper towels to absorb extra grease. Let cool completely.
  2. Place 1 1/2 cups chocolate chips in a microwave safe bowl. Add the shortening. Cook on high power for 30 seconds. Remove. Stir. Place bowl back in microwave. Cook on high power for 30 seconds. Stir well, to fully combine. If mixture is not fully smooth, place it back in microwave on medium high power for 15 seconds (I usually don't have to do this, but you might, depending on the wattage of your microwave). DO NOT BURN THE CHOCOLATE!
  3. Carefully coat all sides of the bacon strips with melted chocolate. Using a spoon to help get the chocolate onto the bacon works great! Place coated bacon strips onto aluminum foil, and let sit, undisturbed until chocolate has set.
  4. Melt white chocolate chips and shortening in the exact same way as described above. Decoratively drizzle the mixture over the chocolate covered strips. Let sit until chocolate is completely firmed up, then place bacon strips in a covered container and refrigerate until ready to serve. Enjoy!
Nutrition Facts
Chocolate-Covered Bacon
Amount Per Serving (1 slice)
Calories 301 Calories from Fat 207
% Daily Value*
Fat 23g35%
Saturated Fat 10g63%
Cholesterol 16mg5%
Sodium 149mg6%
Potassium 234mg7%
Carbohydrates 17g6%
Fiber 2g8%
Sugar 12g13%
Protein 4g8%
Vitamin A 25IU1%
Calcium 21mg2%
Iron 2.2mg12%
* Percent Daily Values are based on a 2000 calorie diet.

Here’s one more to pin on your Pinterest boards!Chocolate-covered bacon is both sweet and salty, incredibly easy to make, and is a very unique, but DELICIOUS crispy treat you will LOVE!!


Save

Save

Healthy Chocolate Banana “Ice Cream”

All you need are several frozen bananas, cocoa powder and a food processor to make a batch of this yummy and healthy Chocolate Banana “Ice Cream”!All you need are several frozen bananas, cocoa powder and a food processor to make a batch of this yummy and healthy Chocolate Banana "Ice Cream"!
So… here’s the backstory on this Healthy Chocolate Banana “Ice Cream”… there’s no cream in this at all!  As a matter of fact, there are only TWO ingredients. Frozen bananas and cocoa powder.

And amazing as it seems, I was skeptical the first time I tried it, but boy was I surprised! It tasted GREAT! All the flavor of chocolate banana ice cream, but it’s NOT ice cream! Take note, calorie-counters!

The only thing you need to have is a food processor or a majorly powerful blender (and some previously frozen bananas!) to mix this up really well. I am fortunate that I was given one that a family member no longer wanted… yay! That makes this healthy chocolate banana ice cream a breeze to make.

Scroll Down For A Printable Recipe Card At the Bottom Of The Page

Really Ripe Bananas Are Essential For Sweetness!

You know those bananas on the counter that have turned brown? Yeah. Put them into your freezer instead of throwing them away. They give this chocolate banana ice cream it’s creaminess and natural sweetness.

See these gnarly looking bananas? They are perfect for this recipe. They are frozen solid. Yep. Sometimes I peel them before freezing, but other times I just shove them in the freezer just the way they are!

Frozen ripe bananas, ready to peel to make ice cream!
Processing Healthy Chocolate Banana Ice Cream Is Easy!

Take those completely frozen bananas, peel, and then slice them into small chunks. Now toss the slices into your handy dandy food processor (or heavy duty blender).

Frozen chunks of banana are placed in a food processor.
Put the lid on and fire up your food processor to pulse the frozen banana chunks. After a minute or so the frozen bananas should be in tiny pieces and look like this (shown below).

The frozen bananas are processed into tiny pieces in food processor.
Time To Add Some Chocolate Flavoring

Once the bananas are pulverized into tiny pieces, add 4 Tablespoons cocoa powder to the mix. The cocoa powder adds wonderful flavor to the healthy chocolate banana ice cream, without adding lots of calories!

Cocoa powder is added to the frozen bananas in the food processor.
Keep Processing The Healthy Chocolate Banana Ice Cream

Turn the food processor back on, and keep on pulsing/mixing the ingredients together. Have no fear… this WILL work! Be patient, because this will take a bit of time to fully come together into a creamy, delicious treat!

Continue processing the frozen bananas and cocoa powder until smooth.
All Of A Sudden- “Ice Cream”!

After several minutes (when you think it’s NOT ever gonna turn into anything that resembles ice cream, and you’re starting to get hungry) this happens (see photo below)! Whoa… I’ll bet ya didn’t see THAT happening! Those frozen bananas and cocoa powder turn into a smooth, delectable  “Ice Cream-y” looking mixture! Time to stop processing it, and EAT!

Finally the healthy chocolate banana ice cream is smooth and creamy!Okay, Now What?

Now that it’s finished processing, you can either eat it right away, OR put it into a sealed container in your refrigerator’s freezer for awhile and let it firm up more. I usually let it firm up a bit in the freezer (after sampling it, of course!). The photo below shows what it looks like going into the freezer. Once frozen, let it sit out a few minutes to thaw slightly before serving, then enjoy!

Let healthy chocolate banana ice cream firm up in the freezer, after processing.
Enjoy every bite, knowing you saved some calories by not pigging out on regular ice cream, but enjoyed this delicious treat instead!  Remember… 7 bananas, 4 T. cocoa powder, and MIX, MIX, MIX. (makes approx. five or six 1/2 cup servings).

I thought everyone had heard of this kind of “ice cream” before, but we had a friend visit here recently. She had never heard of this before, so she tried some, and was quite surprised how good it was!  See? Scientific proof. Absolutely 1 out of 1 house guests recommend this treat! Hope you will give it a try, as well. You’re gonna love it!

Looking For More FROZEN TREAT Recipes?

You can find all of my recipes in the Recipe Index, located at the top of the page. I have lots of traditional ice cream recipes, too. A few favorite frozen treats include:

Interested In More Recipes?

Thank you for visiting this website. I appreciate you using some of your valuable time to do soIf you’re interested, I publish a newsletter 2 times per month (1st and 15th) with all the latest recipes, and other fun info. I would be honored to have you join our growing list of subscribers, so you never miss a great recipe! 

There is a Newsletter subscription box on the top right side (or bottom) of each blog post, depending on the device you use, where you can easily submit your e-mail address (only) to be included in my mailing list.

You Can Also Find Me On Social Media:

Facebook page: The Grateful Girl Cooks!
Pinterest:
The Grateful Girl Cooks!
Instagram:
jbatthegratefulgirlcooks

Author's signature


Here’s one more to pin on your Pinterest boards!All you need are several frozen bananas, cocoa powder and a food processor to make a batch of this yummy and healthy Chocolate Banana "Ice Cream"!

Save

Save

Save

Single Serving Deep Dish Chocolate Chip Cookie

Got a craving for something sweet? Why not make this decadent single serving deep dish chocolate chip cookie in the microwave in about 5 minutes!Got a craving for something sweet? Why not make this decadent single serving deep dish chocolate chip cookie in the microwave in about 5 minutes!
Wow… just typing out the title of this recipe almost took longer than it does to make this delicious, single serving deep dish chocolate chip cookie!

Ever have one of those evenings when you just want ONE chocolate chip cookie? Yeah… me neither. Usually it’s two or three, if I’m being truthful. BUT… here’s an incredibly easy recipe to make just ONE deep dish chocolate chip cookie. You will thank me, in case you ever get the urge for something sweet late at night.

Scroll Down For A Printable Recipe Card At The Bottom Of The Page

Making A Single Serving Deep Dish Chocolate Chip Cookie is EASY!

The batter for the deep dish chocolate chip cookie is easy to mix up (only takes a few minutes), and then you microwave it for a minute. How hard can that be, right? And a single serving deep dish chocolate chip cookie is so quick to make. And it sure tastes good, especially with a tiny scoop of vanilla ice cream!

Hope you enjoy this simple recipe. The first time I saw one of these posted on Facebook by my husband’s cousin, I jumped up, ran into the kitchen… and whipped out two of them; one each for my hubby and myself in just a few minutes. YUM!

Looking For More COOKIE Recipes?

You can find all of my cookie recipes in the Recipe Index, located at the top of the page. A few favorites include:

Interested In More Recipes?

Thank you for visiting this website. I appreciate you using some of your valuable time to do soIf you’re interested, I publish a newsletter 2 times per month (1st and 15th) with all the latest recipes, and other fun info. I would be honored to have you join our growing list of subscribers, so you never miss a great recipe!
There is a Newsletter subscription box on the top right side (or bottom) of each blog post, depending on the device you use, where you can easily submit your e-mail address (only) to be included in my mailing list.

You Can Also Find Me On Social Media:

Facebook page: The Grateful Girl Cooks!
Pinterest:
The Grateful Girl Cooks!
Instagram:
jbatthegratefulgirlcooks

Author's signatureRecipe Source: http://www.lovefromtheoven.com/2012/07/15/single-serving-deep-dish-cookie-a-la-mode/

0 from 0 votes
Single Serving Deep Dish Chocolate Chip Cookie
Prep Time
4 mins
Cook Time
1 min
Total Time
5 mins
 

Got a craving for something sweet? Why not make this decadent single serving deep dish chocolate chip cookie in the microwave in about 5 minutes!

Category: Cookies, Dessert
Cuisine: American
Keyword: deep dish chocolate chip cookie
Servings: 1 serving
Calories Per Serving: 585 kcal
Author: JB @ The Grateful Girl Cooks!
Ingredients
  • 1 1/2 Tablespoons melted butter
  • 1 Tablespoon granulated sugar
  • 1 Tablespoon brown sugar
  • 1/8 teaspoon vanilla
  • 1/4 cup flour (level, not heaping)
  • pinch of salt
  • 1/8 Tablespoon baking powder
  • 1/4 cup Chocolate Chips
  • Ice Cream (to serve with cookie)
Instructions
  1. Melt butter in a small ramekin (or microwave safe mug), in microwave.
  2. Add granulated sugar, brown sugar, and vanilla to melted butter. Stir to combine. Add flour, pinch of salt, and baking powder. Stir well, to combine. Add chocolate chips; mix in well.

  3. Microwave on high for approx. 60 seconds. Remove. Top warm cookie with small scoop of ice cream. Grab a spoon, and enjoy!

Recipe Notes

Caloric calculation does not include ice cream.

Nutrition Facts
Single Serving Deep Dish Chocolate Chip Cookie
Amount Per Serving (1 g)
Calories 585 Calories from Fat 243
% Daily Value*
Fat 27g42%
Saturated Fat 17g106%
Cholesterol 51mg17%
Sodium 186mg8%
Potassium 151mg4%
Carbohydrates 79g26%
Fiber 2g8%
Sugar 51g57%
Protein 5g10%
Vitamin A 625IU13%
Calcium 117mg12%
Iron 2mg11%
* Percent Daily Values are based on a 2000 calorie diet.

Here’s one more to pin on your Pinterest boards!Got a craving for something sweet? Why not make this decadent single serving deep dish chocolate chip cookie in the microwave in about 5 minutes!


Save

Save

Chocolate Peanut Butter Grahams

Craving chocolate? Make yummy chocolate peanut butter grahams easily and quickly to satisfy those cravings, using only a few simple ingredients!Craving chocolate? Make yummy chocolate peanut butter grahams easily and quickly to satisfy those cravings, using only a few simple ingredients!
Okay… have you ever had one of those nights when you craved chocolate so bad… and there was nothing to be found in the house, and it was too late to head to the store?  UGH. Well, I experienced that several months ago, and these delicious & easy Chocolate Peanut Butter Grahams were the result!

Scroll Down for A Printable Recipe Card At The Bottom Of The Page

How I Came Up With this Recipe

After opening every kitchen cabinet and drawer hoping I would find some old piece of chocolate just waiting to be found and devoured, I gave up the search. Tragic. But then… miracle of miracles, I remembered I had a small amount of chocolate chips… and peanut butter… and some graham crackers.

I put my thinking cap on (I guess most of the time I don’t have my thinking cap ON… which might explain a lot!), and decided to make these yummy little snacks. No recipe to use… only my brain and chocolate cravings (a dangerous combo, I might add) created these little munchies.

Anyways, they ended up tasting fantastic. I got my chocolate fix, and thankfully I survived. The ingredients are so simple, but these babies are good. Really good. The crunch of the graham crackers, combined with a peanut butter/chocolate combo = YUM!

Here’s How To Make Chocolate Peanut Butter Grahams:

1) Grab some graham crackers. Break them in half, carefully until they are in squares. Go crazy. Use as many as you like. (I only made 8). I won’t tell you how many of them I personally ate… wouldn’t be prudent.

2) Spread creamy or crunchy peanut butter (whatever floats your boat) fairly thick on one half all the way to edges. Put another half graham cracker on top. Are you tired yet? I know this is physically demanding….if you feel like you need to sit down and rest after one or two are “sandwiched” together, go ahead. I feel your pain..

3) In a small microwave safe bowl, melt 1 1/2 cups of chocolate chips plus 2 Tablespoons of vegetable shortening in the microwave. Cook on high for 30 seconds. Stir well.  If not all the way melted and smooth, put it back in the microwave for 30 seconds. Remove. Stir well. By now the chocolate and shortening should be completely melted. If not, put it back in for only 10 seconds. Stir until smooth. (Do not overcook or it will BURN…bad news if you’re hungry!)

Heating chocolate for dipping peanut butter filled graham crackers.

Dipping The Chocolate Peanut Butter Grahams

Put some foil or a cookie sheet on the counter (to catch drips). Place a second sheet of foil on counter (to place the dipped cookies on) Carefully dip the filled graham crackers into the melted chocolate (spoon chocolate onto crackers, if necessary).

I held and dipped the grahams with one hand, and used a spoon in the other to help cover grahams with the chocolate. Coat all sides of the graham crackers completely. If you run out of chocolate, just follow step 3 again.

Place chocolate coated grahams onto aluminum foil and do not move them until chocolate has completely hardened (in about 1/2 hour or so). If you’re desperate, you can put them in the refrigerator to speed the firming up process along. Once the chocolate has hardened, remove from foil and serve. I store them, covered, in the refrigerator to keep the chocolate firm.

The chocolate covered graham crackers have a peanut butter filling inside!
That’s it! “Late Night Chocolate Deprivation Catastrophe Averted”! Hope you will give these chocolate peanut butter grahams a try… they are so good! If you like these, be sure and try my chocolate covered BACON! It’s also amazing! Have a great day!

Looking for More BAR COOKIE Recipes?

You can find all of my recipes in the Recipe Index, located at the top of the page. I have quite a few bar cookie recipes you might enjoy, including:

Interested In More Recipes?

Thank you for visiting this website. I appreciate you using some of your valuable time to do soIf you’re interested, I publish a newsletter 2 times per month (1st and 15th) with all the latest recipes, and other fun info. I would be honored to have you join our growing list of subscribers, so you never miss a great recipe! 

There is a Newsletter subscription box on the top right side (or bottom) of each blog post, depending on the device you use, where you can easily submit your e-mail address (only) to be included in my mailing list.

You Can Also Find Me On Social Media:

Facebook page: The Grateful Girl Cooks!
Pinterest:
The Grateful Girl Cooks!
Instagram:
jbatthegratefulgirlcooks

Author's signature

0 from 0 votes
Chocolate Peanut Butter Grahams
Prep Time
10 mins
Cook Time
0 mins
Total Time
10 mins
 
Craving chocolate? Make yummy chocolate peanut butter grahams easily and quickly to satisfy those cravings, using only a few simple ingredients!
Category: Cookies
Cuisine: American
Keyword: chocolate peanut butter grahams
Servings: 8 grahams
Calories Per Serving: 346 kcal
Author: JB @ The Grateful Girl Cooks!
Ingredients
  • 8 graham crackers (rectangle sized)
  • 1/3 cup creamy peanut butter (or more as needed)
  • cups semi-sweet chocolate chips
  • 2 Tablespoons vegetable shortening
Instructions
  1. Break graham crackers (rectangle size) in half, carefully until they are in squares.

  2. Spread creamy peanut butter fairly thick on one half all the way to edges. Put another half graham cracker on top. 

  3. In a small microwave safe bowl, melt 1 1/2 cups of chocolate chips plus 2 Tablespoons of vegetable shortening in the microwave. Cook on high for 30 seconds. Stir well.  If not all the way melted and smooth, put it back in the microwave for 30 seconds. Remove. Stir well. By now the chocolate and shortening should be completely melted. If not, put it back in for only 10 seconds. Stir until smooth. (Do not overcook or it will BURN)

  4. Put some foil or a cookie sheet on the counter (to catch drips). Place a second sheet of foil on counter (to place the dipped cookies on) Carefully dip the filled graham crackers into the melted chocolate (spoon chocolate onto crackers, if necessary). I held and dipped the grahams with one hand, and used a spoon in the other to help cover grahams with the chocolate. Coat all sides of the graham crackers completely. If you run out of chocolate, just follow step 3 again. 
  5. Place chocolate coated grahams onto aluminum foil and do not move them until chocolate has completely hardened (in about 1/2 hour or so). If you're desperate, you can put them in the refrigerator to speed the firming up process along. Once chocolate has hardened, remove from foil and serve. Store extras, covered, in the refrigerator to keep the chocolate firm.

Recipe Notes

As written, this recipe made a total of 8 chocolate covered grahams, but obviously, you can adapt this to make any quantity you desire.

Nutrition Facts
Chocolate Peanut Butter Grahams
Amount Per Serving (1 g)
Calories 346 Calories from Fat 198
% Daily Value*
Fat 22g34%
Saturated Fat 9g56%
Cholesterol 2mg1%
Sodium 145mg6%
Potassium 285mg8%
Carbohydrates 30g10%
Fiber 3g13%
Sugar 16g18%
Protein 5g10%
Vitamin A 15IU0%
Calcium 37mg4%
Iron 2.9mg16%
* Percent Daily Values are based on a 2000 calorie diet.

Here’s one more to pin on your Pinterest boards!Craving chocolate? Make yummy chocolate peanut butter grahams easily and quickly to satisfy those cravings, using only a few simple ingredients!

Save

Save

Jumbo Chocolate Chip Banana Muffins

Make 6 jumbo chocolate chip banana muffins (or 12 standard sized)! You’ll enjoy these yummy muffins, topped with chocolate chips, graham cracker crumbs & vanilla glaze.Make 6 jumbo chocolate chip banana muffins (or 12 standard sized)! Yummy muffins, topped with chocolate chips, graham cracker crumbs & vanilla glaze.
Spring is on the way… it’s wonderful seeing changes in the landscape around our neighborhood. Leaves are beginning to unfurl on the trees, daffodils and crocuses are blooming everywhere, and the weather has been truly amazing. What a blessing!

We’ve enjoyed a bit warmer Winter here in northwest Oregon than we’re used to. As a result, nature is “springing to life” a bit earlier than normal. It’s amazing what other parts of our country have been dealing with, weather-wise this Winter. I made these Jumbo Chocolate Chip Banana Muffins last week for breakfast. A delicious muffin AND a couple cups of strong coffee and, you guessed it – we were “springing to life”.

Scroll Down For A Printable Recipe Card At The Bottom Of The Page

Making Jumbo Chocolate Chip Banana Muffins

I used a basic recipe for the muffins from a Banana Crumb Muffin recipe I posted last September. Some tweaks of the recipe were made, by adding chocolate chips to the batter, and graham cracker crumbs to the top, along with a few more chocolate chips! After baking, the muffins are drizzled with a simple glaze.

To make them LARGE in size, the muffins are baked in a jumbo sized muffin pan (only holds 6 muffins). However, the recipe can be easily adapted to make in a standard (12 servings) muffin tin. The muffins are easy to make, and the finished chocolate chip banana muffins are truly delicious!

Prepare The Batter

It’s quite easy to make the batter. Mix the flour, baking soda, powder and salt together in a large mixing bowl. Beat the bananas, sugar, egg and melted butter in a separate bowl. The two bowls of ingredients are then combined to make the muffin batter, and the chocolate chips are stirred in.

The batter is ready to put into muffin cups for baking.

Fill The Muffin Tins

Spoon the batter for the chocolate chip banana muffins into a lightly sprayed muffin tin. Add enough batter until the muffin cups are slightly over 1/2 full.

Muffin cups are filled with the batter.
Sprinkle the top of each muffin with crushed graham cracker crumbs, followed by a few more chocolate chips.

Chocolate chips and graham cracker crumbs are placed on top of the batter before baking.

Time To Bake The Chocolate Chip Banana Muffins!

Now the muffins are ready to bake! Bake six jumbo sized muffins for about 30-35 minutes, or until a toothpick inserted into the middle of a muffin comes out clean. Remove muffins to wire rack to cool.

If you are making twelve standard sized muffins, remember to reduce the cooking time to between 18-20 minutes, or until a toothpick inserted into the middle of a muffin comes out clean. Remove muffins to a wire rack to cool.

After baking, the chocolate chip banana muffins cool on a wire rack before glazing.

Make The Glaze For The Chocolate Chip Banana Muffins

Mix up the powdered sugar/vanilla/lemon glaze in a small bowl. Once the chocolate chip banana muffins have cooled, drizzle the glaze over the tops of the muffins. Let the icing firm up before serving. TIP: Place a piece of wax paper UNDER the wire rack before glazing the muffins. This will make your cleanup much easier!

Muffins are drizzled with vanilla glaze after baking.Once the icing has firmed up, you can enjoy one of these muffins! Hope you enjoy making and eating these jumbo chocolate chip banana muffins. We sure did!

A chocolate chip banana muffin, sliced in half, on a plate.

Hope you enjoy these delicious muffins for breakfast or a quick snack! If you’re looking for more muffin recipes, be sure to check out my Recipe Index, located at the top of the page. Have a GREAT day!

Looking For More MUFFIN Recipes?

You can find all my recipes in the Recipe Index, located at the top of the page. I have lots of delicious muffin recipes for you to check out, including:

Interested In More Recipes?

Thank you for visiting this website. I appreciate you using some of your valuable time to do soIf you’re interested, I publish a newsletter 2 times per month (1st and 15th) with all the latest recipes, and other fun info. I would be honored to have you join our growing list of subscribers, so you never miss a great recipe!
There is a Newsletter subscription box on the top right side (or bottom) of each blog post, depending on the device you use, where you can easily submit your e-mail address (only) to be included in my mailing list.

You Can Also Find Me On Social Media:
Facebook page: The Grateful Girl Cooks!
Pinterest: The Grateful Girl Cooks!
Instagram: jbatthegratefulgirlcooks

Author's signatureRecipe Adapted from:  http://thecafesucrefarine.com/2011/04/banana-crumb-muffins/

0 from 0 votes
Jumbo Chocolate Chip-Banana Muffins
Prep Time
15 mins
Cook Time
30 mins
Total Time
45 mins
 

Make 6 jumbo chocolate chip banana muffins (or 12 standard sized)! Yummy muffins, topped with chocolate chips, graham cracker crumbs & vanilla glaze.

Category: Breakfast
Cuisine: American
Keyword: chocolate chip banana muffins
Servings: 6 large or 12 regular
Calories Per Serving: 614 kcal
Author: JB @ The Grateful Girl Cooks!
Ingredients
For the muffins:
  • 1 1/2 cups all purpose flour
  • 1 teaspoon baking soda
  • 1 teaspoon baking powder
  • 1/2 teaspoon salt
  • 3 very ripe bananas , mashed
  • 3/4 cup granulated sugar
  • 1 egg , slightly beaten
  • 1/3 cup butter , melted
  • 1 cup chocolate chips (I used semi-sweet)
  • 1/3 cup finely crushed graham crackers
For the glaze:
  • 1 cup powdered sugar
  • 1/4 teaspoon vanilla extract
  • few drops of fresh lemon juice (plus more, if necessary to thin glaze)
Instructions
  1. Preheat oven to 375 degrees. Lightly spray muffin tin with non-stick spray OR line muffin tin with paper muffin wrappers.
  2. In a large bowl, mix the flour, baking soda, baking powder, and salt together. Set aside.
  3. In a separate bowl, beat the bananas, sugar, egg, and melted butter together until smooth. Add the banana mixture to the flour mixture. Stir to combine only until batter is well combined and moist. Gently stir in chocolate chips. Be careful not to over-mix. Spoon the batter into prepared muffin cups. Fill slightly over 1/2 full.
  4. Finely crush the graham crackers in a plastic zip-loc bag. I use a rolling pin to do this. Sprinkle the tops of the muffins with the crumbs. Add a few more chocolate chips to the top of the muffins, and slightly press them down into the batter.
  5. Bake at 375 degrees for approximately 30-35 minutes (oven temps vary). You will know they are done when a toothpick inserted into middle of muffin comes out dry. Remove muffins to a wire rack to cool.
  6. Mix up the glaze while the muffins are cooling. Stir well. If mixture is too thick, add additional drops of lemon juice (or water) to thin it out. You want the glaze to not be runny, but thick enough to drizzle. If you get it too thin, just add additional powdered sugar. Once the muffins have cooled off, drizzle the glaze over the tops of the muffins. Let them sit for a few more minutes so the glaze can firm up, then serve. Enjoy!
Recipe Notes

If making these in a regular (12 serving) muffin tin, remember to reduce the cooking time! About 18-20 minutes should be about the right cooking time for smaller muffins.

Caloric calculation made based on a LARGE muffin.

Nutrition Facts
Jumbo Chocolate Chip-Banana Muffins
Amount Per Serving (1 LARGE muffin)
Calories 614 Calories from Fat 162
% Daily Value*
Fat 18g28%
Saturated Fat 11g69%
Cholesterol 58mg19%
Sodium 532mg23%
Potassium 330mg9%
Carbohydrates 107g36%
Fiber 3g13%
Sugar 71g79%
Protein 6g12%
Vitamin A 460IU9%
Vitamin C 5.5mg7%
Calcium 82mg8%
Iron 2.4mg13%
* Percent Daily Values are based on a 2000 calorie diet.

Here’s one more to pin on your Pinterest boards!Make 6 jumbo chocolate chip banana muffins (or 12 standard sized)! Yummy muffins, topped with chocolate chips, graham cracker crumbs & vanilla glaze.


Save

Save

Chocolate Peanut Butter Ice Cream

Grab the ol’ ice cream maker and enjoy a scoop of this delicious, cold and creamy chocolate peanut butter ice cream! You’re gonna love it!Grab the ol' ice cream maker and enjoy a scoop of this delicious, cold and creamy chocolate peanut butter ice cream! You're gonna love it!
Chocolate peanut butter ice cream is such a great flavor combo!  I tried to capture that “yummi-ness” one summer while experimenting with homemade ice cream flavors, and tasting them, too!. Somebody has to do it, right?

Scroll Down For A Printable Recipe Card At The Bottom Of The Page

Making Chocolate Peanut Butter Ice Cream Is Easy!

I took a basic chocolate ice cream recipe from the book that came with our ice cream maker, and incorporated some creamy peanut butter into the mix. The result was really wonderful.  Making this ice cream is really a no brainer, if I’m being truthful.

I added some peanut butter to the ice cream mixture, poured it into my ice cream maker. About 5 minutes before it was done freezing, I added more peanut butter (in small bits) to the ice cream. By adding bits of peanut butter to the mostly finished ice cream, it allowed for it to be spread throughout the ice cream.  Easy-Peasy!

My trusty old machine used to make chocolate peanut butter ice cream.

The end result was a wonderful taste treat on a hot, summer’s day! And surprise, surprise! This chocolate peanut butter ice cream is even good in Winter, Spring, and Fall!

Hope you will consider giving this recipe a try! If you like ice cream, AND you like chocolate and peanut butter. I am confident you will enjoy it!

Looking For More ICE CREAM Recipes?

A collage of ice cream photos from my blog recipes.

You can find all of my recipes in the Recipe Index, located at the top of the page. A few favorite ice cream recipes include:

Interested In More Recipes?

Thank you for visiting this website. I appreciate you using some of your valuable time to do soIf you’re interested, I publish a newsletter 2 times per month (1st and 15th) with all the latest recipes, and other fun info. I would be honored to have you join our growing list of subscribers, so you never miss a great recipe!
There is a Newsletter subscription box on the top right side (or bottom) of each blog post, depending on the device you use, where you can easily submit your e-mail address (only) to be included in my mailing list.

You Can Also Find Me On Social Media:

Facebook page: The Grateful Girl Cooks!
Pinterest:
The Grateful Girl Cooks!
Instagram:
jbatthegratefulgirlcooks

Author's signatureRecipe slightly adapted from: Cuisinart Automatic Frozen Yogurt-Ice Cream & Sorbet Maker Instruction and Recipe Booklet, page 4

3 from 1 vote
Chocolate Peanut Butter Ice Cream
Prep Time
1 hr 30 mins
Cook Time
0 mins
Total Time
1 hr 30 mins
 

Grab the ol' ice cream maker and enjoy a scoop of this delicious, cold and creamy chocolate peanut butter ice cream! You're gonna love it!

Category: Dessert
Cuisine: American
Keyword: chocolate peanut butter ice cream
Servings: 12 (1/2 cup) servings
Calories Per Serving: 315 kcal
Author: JB @ The Grateful Girl Cooks!
Ingredients
  • 1 cup whole milk
  • 1/2 cup granulated sugar
  • 8 ounces semi-sweet chocolate chips
  • 2 Tablespoons peanut butter
  • 2 cups heavy whipping cream (very COLD)
  • 1 teaspoon vanilla extract
  • 1 heaping Tablespoon peanut butter (added in bits right before ice cream is finished)
Instructions
  1. In a small saucepan, heat the milk until it has begun to bubble around the edges of the pan (but not a full rolling boil). You want it hot, but not boiling.
  2. Using a food processor or blender, pulse the granulated sugar and chocolate pieces together, until the chocolate is finely chopped up. Add the 2 Tablespoons of peanut butter, then add the hot milk.
  3. Process until the mixture is well blended, and the mixture is fairly smooth.
  4. Pour the mixture into a large bowl, and let it cool COMPLETELY. Once mixture is cool, stir in the whipping cream and the vanilla extract. Cover ice cream mixture with plastic wrap and put into the refrigerator for at least an hour (the longer time, the better- you want it cold).
  5. When thoroughly chilled, remove mixture from refrigerator. Turn on the ice cream maker, and pour the cold ice cream mixture into the canister. Freezer per manufacturer's instructions (usually about 25 minutes). About 5 minutes BEFORE the ice cream is done, add the final heaping Tablespoon of peanut butter, (in small amounts at a time), to the ice cream.
  6. When ice cream is done, and has thickened, transfer to a covered container and place in freezer for an hour or two to firm up and "ripen".
Recipe Notes

Note that most of the "prep" time is inactive time, while mixture is refrigerating or firming up in freezer. I found it easiest to make up the ice cream and refrigerate it early in the day. I then made the ice cream right before dinner, then it was "ready and firmed up" for dessert a couple hours later!

Nutrition Facts
Chocolate Peanut Butter Ice Cream
Amount Per Serving (1 serving (1/2 cup))
Calories 315 Calories from Fat 216
% Daily Value*
Fat 24g37%
Saturated Fat 14g88%
Cholesterol 57mg19%
Sodium 44mg2%
Potassium 189mg5%
Carbohydrates 21g7%
Fiber 1g4%
Sugar 16g18%
Protein 3g6%
Vitamin A 625IU13%
Vitamin C 0.2mg0%
Calcium 62mg6%
Iron 1.3mg7%
* Percent Daily Values are based on a 2000 calorie diet.

Here’s one more to pin on your Pinterest boards!Grab the ol' ice cream maker and enjoy a scoop of this delicious, cold and creamy chocolate peanut butter ice cream! You're gonna love it!


Save

Save

Save

Chocolate Raspberry Sundae Sauce

Chocolate Raspberry Sundae Sauce is a great topping for ice cream or cake! Learn how to can this thick chocolate sauce for long term storage!Chocolate Raspberry Sundae Sauce is a perfect topping for ice cream or cake! Learn how to can this thick chocolate flavored sauce for long term storage!
Last year I found this recipe for Chocolate Raspberry Sundae Sauce in a book I received as a gift from my husband, called “Ball Complete Book of Home Preserving”.  It’s where I found this absolutely DELICIOUS recipe for this yummy dessert topping! The book has 400 different recipes for home canning that I am so excited about, since I love to make jams and jellies, and have now also begun pressure canning veggies from our garden. This chocolate raspberry sundae sauce is one of my more recent finds!

One of the recipes that caught my eye was this one. Chocolate Raspberry Sundae Sauce. Are you kidding me? I could hardly wait to try it out.  I made a batch last summer, after going raspberry picking at a local U-Pick farm. The recipe did not disappoint!

Scroll Down for A Printable Recipe Card At The Bottom Of The Page

Picking raspberries at a local farm to make chocolate raspberry sundae sauce!

Chocolate And Raspberry Flavors Are A Winning Combination!

The flavors of the raspberries and the chocolate come together well in this thick, sweet sauce. The sauce is fantastic served on top of ice cream, brownies, pound cake, cheesecake, etc. When serving it over ice cream, I warmed it up just a bit, and it was perfect!

I gave away several jars of this chocolate raspberry sundae sauce for birthdays and Christmas last year… guess I will need to make some more very soon!  If you are NOT canning it for long term storage, then make sure you keep the jars of sauce stored in refrigerator. It will only last short-term, but could still be given as gifts, or enjoyed with dessert!

I used some of these fresh raspberries that I picked for the sauce. Nothing beats the flavor of sun-kissed fresh raspberries!

Fresh raspberries ready to make sundae sauce!

Chocolate Raspberry Sundae Sauce Is Canned In A Water Bath Canner

Once the jars are filled per instructions (see printable recipe below), they are canned. This is a photo of the jars in my water bath canner, ready for processing. The process is simple and doesn’t take too much time to process jars of this sauce to make them stable enough for long term storage.

Loading jars of chocolate raspberry sauce into canner for processing.

Ready To Enjoy!

And there you have it… cute little jars of chocolate raspberry sundae sauce. It’s a perfect topping for ice cream or cake! I’ve even used it on cheesecake, with great results! You could even eat it straight from the jar (not that I have any experience with THAT- wink wink).

This chocolate raspberry sundae sauce is packed with decadent flavor, and I am sure you will love it!

Jar of chocolate raspberry sundae sauce ready to store in pantry.

See how thick the chocolate raspberry sundae sauce turns out? It really is delicious!!!

Sundae sauce is thick and rich, and tastes great on ice cream and cake.

Hope you will give this recipe for chocolate raspberry sundae sauce a try. You will love it! Thank you for stopping by, and I hope you will come back soon.

Looking For More SAUCE Recipes?

You can find all of my recipes in the Recipe Index, which is located at the top of the page. I have some wonderful recipes for a variety of sauces, including:

Interested In More Recipes?

Thank you for visiting this website. I appreciate you using some of your valuable time to do soIf you’re interested, I publish a newsletter 2 times per month (1st and 15th) with all the latest recipes, and other fun info. I would be honored to have you join our growing list of subscribers, so you never miss a great recipe!
There is a Newsletter subscription box on the top right side (or bottom) of each blog post, depending on the device you use, where you can easily submit your e-mail address (only) to be included in my mailing list.

You Can Also Find Me On Social Media:

Facebook page: The Grateful Girl Cooks!
Pinterest:
The Grateful Girl Cooks!
Instagram:
jbatthegratefulgirlcooks

Have a fantastic day!

Author's signatureRecipe Source: “Ball Complete Book of Home Preserving”, page 188, published by Robert Rose, Inc.

↓↓ PRINTABLE RECIPE BELOW ↓↓

0 from 0 votes
Chocolate Raspberry Sundae Sauce
Prep Time
15 mins
Cook Time
10 mins
Total Time
25 mins
 
Chocolate Raspberry Sundae Sauce is a perfect topping for ice cream or cake! Learn how to can this thick chocolate flavored sauce for long term storage!
Category: Dessert Sauce
Cuisine: American
Keyword: chocolate raspberry sundae sauce
Servings: 6 8 oz. jars
Calories Per Serving: 60 kcal
Author: JB @ The Grateful Girl Cooks!
Ingredients
  • 1/2 cup unsweetened cocoa powder
  • 1 package powdered pectin (1.75 ounces)
  • 4 1/2 cups crushed red raspberries
  • 4 Tablespoons fresh squeezed lemon juice
  • 6 3/4 cups granulated sugar
Instructions
  1. First, get your water bath canner, lids, and canning jars ready to go (per normal canning procedures for cleaning/heating jars and lids).
  2. Mix together the cocoa and pectin in a medium sized bowl until well combined. Set aside.
  3. Put the crushed raspberries and the lemon juice in a large stainless steel saucepan. Whisk in the pectin/cocoa mixture, until it dissolves. Turn your stovetop heat to high; bring this mixture to a full boil. Stir frequently.
  4. Once the fruit mixture is boiling, add the sugar all at one time. Stir to blend. Bring mixture to a full rolling boil; stir constantly so it doesn't burn. Boil it (a full, rolling boil) for 1 minute, then remove pan from heat, skim off any foam that has collected on top of the sauce, and discard.
  5. Ladle the HOT sauce into your hot, prepared jars. Be sure to leave 1/4 inch headspace. Remove any air bubbles that may be trapped in jar. Adjust the headspace (if needed). Add additional sauce if necessary to maintain 1/4' headspace. Wipe the rim of the jar to remove any residual sauce (to ensure a good seal). Center the lid on the jar, then screw the jar band down to finger-tip tight resistance.
  6. Carefully place the jars into your canner. Make sure the jars are completely covered with water (fill about an inch over the top of the jars). Bring the water in the canner to a boil, then cover, and process jars for 10 minutes. After 10 minutes, remove the canner lid. Wait an additional 5 minutes, then remove the jars to a dish towel to cool. Do not move the jars around while they cool. You should hear the jars make a "ping" sound several minutes later, as they seal.
  7. Once jars have sealed and are completely cooled, place them in storage or pantry.
Nutrition Facts
Chocolate Raspberry Sundae Sauce
Amount Per Serving (1 Tablespoon)
Calories 60
% Daily Value*
Sodium 1mg0%
Potassium 15mg0%
Carbohydrates 15g5%
Sugar 14g16%
Vitamin C 1.7mg2%
Calcium 2mg0%
Iron 0.1mg1%
* Percent Daily Values are based on a 2000 calorie diet.

Here’s one more to pin on your Pinterest boards!Chocolate Raspberry Sundae Sauce is a perfect topping for ice cream or cake! Learn how to can this thick chocolate flavored sauce for long term storage!


Save

Save

Save

Chocolate Dipped Frozen Banana Bites

Chocolate dipped frozen banana bites are sure to be a big hit with family or friends! A couple bites will help satisfy any sweet tooth!Frozen banana bites, dipped in chocolate, are sure to be a big hit with family or friends... just a couple pieces will satisfy your sweet tooth!
I love frozen chocolate bananas… and now I love making these chocolate dipped frozen banana bites!  Tiny bites of yumminess, that bring back lots of great memories!

Scroll Down For A Printable Recipe Card At The Bottom Of The Page

Chocolate Covered Frozen Bananas Bring Back Lots Of Memories

When our boys were little, we lived near Newport Beach, CA. We loved taking our boys every couple of weeks to Balboa Island (at Newport Beach) to feed the ducks! Our weekend or early evening walks would take us around the entire waterfront island.

We loved walking with our little boys, enjoying the sunshine AND gawking at the stunning multi-million dollar waterfront homes right next to the sidewalks we walked on. The sidewalks were also right next to the water in the bay! It was our CHEAP form of family entertainment, and our boys LOVED this fun family time!

Our walks around the island took quite a while (especially with two curious little boys AND hungry ducks!), as you can imagine. These family walks would always end up on the main street, which had lots of shops, restaurants, AND take out food stands!

We would end our adventure by purchasing  “Balboa Bars” (chocolate covered vanilla ice cream bars) or Chocolate Covered Frozen Bananas for each of us! My favorite treat was getting a frozen banana, and watching them dip it into a vat of melted chocolate! YUM!

How I Decided To Make This Bite-Size Frozen Treat

I have made frozen slices of bananas as snacks for several years, but decided recently that they would be even more delicious if the bite-sized slices were dipped in chocolate. I mean… who doesn’t enjoy a good chocolate dipped frozen banana at times, so I made some!

There were some semi-sweet and white chocolate chips left over in the pantry from a recent recipe, along with some butterscotch chips. I melted a little bit of EACH variety, and dipped some frozen banana slices into the chocolate to coat them, and then re-froze the banana slices. These chocolate dipped frozen banana bites are the result!

The results were wonderful! Here’s some photos and a few details showing how to make these frozen treats!

How To Make Chocolate Dipped Frozen Banana Bites

First you will need to slice up several bananas (I used 3). Place the slices in a single layer (not touching) on a large baking tray and freeze for 2 hours.

Sliced frozen bananas on a cookie sheet are ready to make chocolate dipped frozen banana bites.

Dipping the Frozen Banana Bites

Remove the frozen banana slices once solidly frozen. Melt the chocolate chips (whatever kind you like), and then completely coat each of the frozen banana slices.

The photo below shows me dipping the frozen banana bites into semi-sweet chocolate. Let the excess chocolate drip back into the bowl after dipping.

Melted semi-sweet chocolate is used to coat a frozen banana bite.

Place the covered frozen banana bites onto a baking sheet lined with wax paper. Refreeze the slices after coating with chocolate.

Decorating Chocolate Dipped Frozen Banana Bites

Once solidly frozen, you can decorate the tops of the chocolate dipped frozen banana bites, if desired. Drizzle some melted white chocolate and/or butterscotch chips over each one. Place back into the freezer for a final time. Freeze for a couple hours before serving!

These frozen chocolate covered banana bites are drizzled with melted white chocolate and butterscotch chips.

I also coated some of the banana slices in white chocolate, then drizzled melted semi-sweet and butterscotch chips over the tops. Just remember to freeze coated slices for a couple hours before serving!

Frozen banana bites are dipped in semi sweet chocolate or white chocolate.

Here’s a closeup picture of one that was cut into, so you could see what the inside looks like… nothing but frozen banana! YUM!

This chocolate dipped frozen banana bite is cut in half, to show inside.

PERFECTION!  The chocolate dipped frozen banana bites are just the right size for a quick bite. Instead of eating an entire chocolate dipped frozen banana, I can eat just a couple slices and be deliriously happy! Hope you’ll give these a try. You (and most kids) will love ’em!

Looking For More Frozen Dessert Treats?

You can find all of my recipes in the Recipe Index, located at the top of the page. I have lots of frozen desserts, including:

Interested In More Recipes?

Thank you for visiting this website. I appreciate you using some of your valuable time to do soIf you’re interested, I publish a newsletter 2 times per month (1st and 15th) with all the latest recipes, and other fun info. I would be honored to have you join our growing list of subscribers, so you never miss a great recipe! 

There is a Newsletter subscription box on the top right side (or bottom) of each blog post, depending on the device you use, where you can easily submit your e-mail address (only) to be included in my mailing list.

You Can Also Find Me On Social Media:

Facebook page: The Grateful Girl Cooks!
Pinterest:
The Grateful Girl Cooks!
Instagram:
jbatthegratefulgirlcooks

Author's signature

Recipe source: My brain.

↓↓ PRINTABLE RECIPE BELOW ↓↓

0 from 0 votes
Chocolate Dipped Frozen Banana Bites
Prep Time
2 hrs
Cook Time
0 mins
Freezing Time (inactive)
2 hrs
Total Time
4 hrs
 

Chocolate dipped frozen banana bites are sure to be a big hit with family or friends! A couple bites will help satisfy any sweet tooth!

Category: Dessert
Cuisine: American
Keyword: chocolate dipped frozen banana
Servings: 15 servings (2 per serving)
Calories Per Serving: 102 kcal
Author: JB @ The Grateful Girl Cooks!
Ingredients
  • 3 medium bananas
  • 1 cup semi-sweet chocolate chips (or chocolate of your choice)
  • 1 heaping teaspoon vegetable shortening
  • Additional melted butterscotch chips or white chocolate chips for garnish (optional)
Instructions
  1. Peel and slice bananas into 1 inch slices. Place slices in a single layer (not touching) on a baking tray, and freeze for 2-3 hours.

  2. In a small microwaveable bowl, put the chocolate chips and vegetable shortening. Microwave on high for 30 seconds. STIR. Melt an additional 30 seconds. Remove chocolate mixture and stir until completely smooth.
  3. Dip each frozen slice of banana into melted chocolate. Remove from chocolate (a fork works well), letting excess chocolate drip back into bowl. Place banana bites onto parchment paper or aluminum foil lined baking sheet to harden. Repeat process with other banana slices. If desired, you can freeze banana bites until hard again, then drizzle with additional melted white chocolate or butterscotch.

  4. Place cookie tray back into freezer. Freeze chocolate dipped banana bites for 2 additional hours or until frozen solid. Once frozen solidly, they are ready to eat! Keep extra frozen banana bites in a sealed container in freezer. Enjoy!

Recipe Notes

No matter what kind of baking chip you use, the ratio is still the same: 1 cup chips to 1 heaping teaspoon vegetable shortening.

Nutrition Facts
Chocolate Dipped Frozen Banana Bites
Amount Per Serving (2 pieces)
Calories 102 Calories from Fat 36
% Daily Value*
Fat 4g6%
Saturated Fat 2g13%
Sodium 12mg1%
Potassium 152mg4%
Carbohydrates 14g5%
Fiber 1g4%
Sugar 9g10%
Vitamin A 20IU0%
Vitamin C 2.1mg3%
Calcium 9mg1%
Iron 0.8mg4%
* Percent Daily Values are based on a 2000 calorie diet.

Here’s one more to pin on your Pinterest boards!Chocolate dipped frozen banana bites are sure to be a big hit with family or friends! A couple bites will help satisfy any sweet tooth!

Save

Save

Save

Save

Save