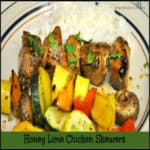
Honey lime chicken skewers, with marinated chicken breast, zucchini, yellow squash, mushrooms and bell peppers are the perfect (yummy) kabobs for grilling! kabobs for grilling! / The Grateful Girl Cooks!")
As I write this post for honey lime chicken skewers, it is the middle of winter in the Pacific Northwest…cold and overcast. Sigh. I find myself longing for more hours of sunlight, warm weather, and the smell of smoke coming from our hard-working BBQ grill, as another delicious chicken dinner is prepared.
We grill as soon as is it warm enough to hang around outside without getting frozen or pelted with rain; I can hardly wait for warm weather and Daylight Savings Time to arrive!
There’s nothing better than sitting outside, sipping iced tea on a warm evening and watching my husband (“The Grill Master”) help me cook dinner, armed with charcoal briquets, charcoal lighter, and kitchen tongs! Yay for BBQs and honey lime chicken skewers!
Scroll Down For A Printable Recipe Card At The Bottom Of The Page

This recipe for honey lime chicken skewers is one I found on Pinterest last year. I added skewers of summer veggies to the dish (grilled separately, but basted with the honey lime marinade), and we really loved it! Honey lime chicken skewers (with yummy grilled veggies) is definitely one of those “Perfect For Those Lazy Days Of Summer” meals.
How To Make These Chicken Skewers (it’s easy)
Boneless, skinless chicken breasts are cut into chunks, then marinated, threaded onto skewers, and grilled. TIP: Marinade the chicken early in the day, throw it in the refrigerator before you head to work or go have some summer fun, then skewer and grill it later for an amazing dinner!

I used zucchini, yellow squash, red and orange bell peppers and button mushrooms. If you want to add your own veggies (such as onions, tomatoes, etc.), please do! Make this honey lime chicken skewers recipe your own!

The chicken pieces are marinated in an amazing honey lime sauce. Marinated chicken cubes are then evenly divided between two skewers.
The veggies are cut, then threaded (alternating veggies), onto two additional skewers. Note: I used metal skewers. If you will be using wooden skewers, remember to soak them in water for approximately 15 minutes. This will help to prevent them from burning on the grill.

Grilling Honey Lime Chicken Skewers
The kabobs (also known as skewers), are grilled (turning occasionally) until done. They are brushed with some of the reserved honey lime marinade, while they cook. When fully cooked through, the honey lime chicken skewers and grilled veggies are removed from the grill.
The chicken and veggies are slid off their skewers onto individual plates. We served the grilled chicken and veggies with a side of steamed rice. Honey lime chicken skewers (along with the veggies) are very quick, tasty meal. It’s a real “no-brainer” recipe that is easily doubled or tripled, if you’re feeding a few people. I hope you enjoy it as much as we do!

Hope you will consider trying these honey lime chicken skewers! They have wonderful flavor! Have a great day, and remember… be kind to those you meet today. They may need a kind word from a stranger to make their day a little brighter.
Looking for More KABOB Recipes?
You can find all of my recipes in the Recipe Index, located at the top of the page. I have some delicious kabob recipes you might enjoy, including:
- Grilled Lime-Cilantro Shrimp Kabobs
- Fruit Kabobs
- Pineapple Coconut Shrimp Kabobs
- Lemon and Garlic Chicken Kabobs
Interested In More Recipes?
Thank you for visiting this website. I appreciate you using some of your valuable time to do so. If you’re interested, I publish a newsletter 2 times per month (1st and 15th) with all the latest recipes, and other fun info. I would be honored to have you join our growing list of subscribers, so you never miss a great recipe!
There is a Newsletter subscription box on the top right side (or bottom) of each blog post, depending on the device you use, where you can easily submit your e-mail address (only) to be included in my mailing list.
You Can Also Find Me On Social Media:
Facebook page: The Grateful Girl Cooks!
Pinterest: The Grateful Girl Cooks!
Instagram: jbatthegratefulgirlcooks
 Recipe Source: http://kitchenmeetsgirl.com/honey-lime-chicken-skewers/
↓↓ PRINTABLE RECIPE BELOW ↓↓
- 1 pound boneless skinless chicken breasts , (cut into large chunks)
- 2 Tablespoons cilantro , chopped (for garnish)
- 3 Tablespoons soy sauce
- 2 Tablespoons honey
- 1 Tablespoon vegetable oil
- Juice of 1 lime
- 2 garlic cloves , minced
- 1-2 teaspoons Sriracha sauce
- ⅛ teaspoon Red pepper flakes
- 1 small zucchini , sliced
- 1 small yellow squash , sliced
- 6 button mushrooms , rinsed
- 1/2 red / orange bell pepper
Cut boneless, skinless chicken breasts into 1-2" chunks. Set aside while you make the honey lime marinade.
In a small bowl, combine soy sauce, honey, oil, lime juice, minced garlic, Sriracha sauce and red pepper flakes, to make the marinade. Mix thoroughly.
NOTE: Measure out 3 Tablespoons of marinade and set aside for later. Pour the remaining marinade over the chicken chunks. Marinate the chicken (covered) in the refrigerator for a minimum of 1 hour. The longer you let the chicken marinate, the better the flavor.Thread marinated chicken onto skewers, dividing evenly. It is BEST to thread the veggies onto separate skewers, since the meat and the veggies tend to cook through at slightly different times. It's easier to cook them on separate skewers.
For veggie skewers: Alternate veggies onto 2 skewers. Place on grill and occasionally brush with the reserved honey lime chicken marinade. Cook veggies, turning skewers occasionally to cook all sides. They will probably take a bit less time to grill than the chicken. Plan accordingly.
Grill chicken skewers on medium-high heat for 6-8 minutes per side, or until the juices run clear. Turn chicken skewers occasionally to ensure they get browned on all sides. Remove skewers from grill, remove skewers from chicken and veggies. Serve, and enjoy!
The chicken skewers are best when served alongside grilled skewered vegetables like zucchini, onions, mushrooms and yellow squash. Use whatever veggies you enjoy!
*** I used metal skewers. If you will be using wooden skewers, remember to soak them in water for approximately 15 minutes (this will prevent them from burning on the grill...which would NOT be a good thing!)
Here’s one more to pin on your Pinterest boards! kabobs for grilling! / The Grateful Girl Cooks!")


