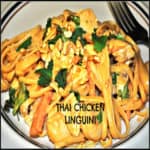
Thai Chicken Linguini (a Cheesecake Factory copycat recipe), with chicken breasts and pasta in a creamy Asian peanut sauce, is absolutely delicious!, with chicken breasts and pasta in a creamy Asian peanut sauce, is absolutely delicious! / The Grateful Girl Cooks!")
I have always loved the Thai Chicken Linguini at The Cheesecake Factory, however I don’t love the (sometimes) 1-2 hour wait for a table. When you’re hungry, you’re hungry!
Let’s just say I was shocked to find out this entree has been removed from their menu as of 2014. Sadness prevailed… until I found this recipe, and began making it myself, at home!
I began a search to find a good copycat recipe and found a wonderful recipe posted by Amy, at “Sing For Your Supper” that was absolutely perfect.
Now I’ve made this dish many times since then, and love the smooth and creamy Thai peanut sauce that coats the pasta, and the crunchy peanut garnish. This is such a delicious dish! Here’s how to make it.
Scroll Down For A Printable Recipe Card At The Bottom Of The Page
Why NOT Make Thai Chicken Linguini At Home?
Seriously…why wait endlessly for a table when you can make Thai chicken linguini for much less $$, but with the same results at home? It’s really not that difficult at all!
You will need cooked chicken breasts, cooked linguini, julienned and blanched carrots, water chestnuts, cilantro and chopped peanuts (optional) for this dish.
These ingredients will be combined with a simple, flavor-packed peanut sauce before serving. Cilantro and chopped peanuts (optional) will garnish for each serving.

Thai chicken linguini is very easy to make, the flavors and textures are magnificent, and any leftovers you may have are delicious when reheated.
Well, to be perfectly honest… you will ONLY have leftovers if you don’t polish all of it off in one sitting! Just sayin’.
Making The Creamy Peanut Sauce Is Easy!
The peanut sauce is made by combining the ingredients for the sauce in a small bowl. You simply stir the ingredients well, until the sauce becomes smooth and creamy.
Ingredients for the sauce are peanut butter, soy sauce, chili paste (or sriracha), brown sugar, lime juice, garlic, rice wine vinegar, ginger and sesame oil.


Once the sauce is smooth and creamy, pour it over the hot cooked linguini, cooked chicken breast slices, julienned carrots, water chestnuts, and cilantro. Toss to combine.

Grab some chopsticks or a fork and dig in! I really think you will love delicious Thai chicken linguini! It’s so good, and it’s hard to stop eating it, once you’ve started.

The creamy peanut sauce, chicken breast and the crunch of chopped peanuts, carrots and water chestnuts make this one wonderfully tasty meal.
I could spoon up the creamy peanut sauce and eat it all by itself, because it’s THAT good. Not that I’ve ever done that… wink, wink!
Hope you will give this Thai chicken linguini a try! The recipe makes 4 servings, and can easily be doubled, if necessary. Take care, may God bless you, and have a great day.
Looking For More CHICKEN AND PASTA Recipes?
You can find all of my recipes in the Recipe Index, which is located at the top of the page. I have quite a few recipes featuring chicken AND pasta for you to enjoy, including:
- Fiesta Chicken Pasta Casserole
- Cajun Chicken Pasta
- Chicken Club Pasta Salad
- Chicken Broccoli Fettucine Alfredo
Want More Recipes? Get My FREE Newsletter!
I publish a newsletter 2 times per month (1st and 15th) with lots of recipes, tips, etc..
Would you like to join our growing list of subscribers?
There is a Newsletter subscription box on the top right (or bottom) of each blog post, depending on the device you use.
You can submit your e-mail address there, to be added to my mailing list.
Find Me On Social Media:
Facebook page: The Grateful Girl Cooks!
Pinterest: The Grateful Girl Cooks!
Instagram: jbatthegratefulgirlcooks

Original Recipe Source: http://www.singforyoursupperblog.com/pasta/thai-chicken-pasta/
↓↓ PRINTABLE RECIPE BELOW ↓↓
Thai Chicken Linguini (a Cheesecake Factory copycat recipe), with chicken breasts and pasta in a creamy Asian peanut sauce, is absolutely delicious!
- 1 cup smooth peanut butter
- 1/4 cup soy sauce
- 3 tsp. chili paste (I usually substitute 2 tsp. Sriracha sauce)
- 2 TBSP brown sugar
- 2 limes , juiced
- 1/2 cup hot water
- 1 clove of garlic , minced
- 1 tsp. rice wine vinegar
- 1 tsp. ground ginger
- 1/2 tsp. sesame oil
- 1/2 lb. linguini (or spaghetti or fettucine), fully cooked and drained
- 2 boneless , skinless chicken breasts, (seasoned w/ salt/pepper, fully cooked, and sliced diagonally)
- 2 carrots , julienned (matchstick cut)
- 1 small can water chestnuts , drained
- 1/2 bunch of cilantro , chopped (stems discarded) Save small amount for garnish on top of dish.
- 1 handful chopped peanuts (optional, but GOOD , for garnish (if desired)
Cook chicken. (I usually grill it, or boil it for 45 minutes in large saucepan of water). Season with salt and pepper, then slice it thinly on a diagonal.
Make the sauce: Put all sauce ingredients in a small bowl and whisk or mix until fully combined, smooth and creamy. Cover and store in the refrigerator until needed (can be made ahead).
Blanch the julienned carrots (cut into matchstick sized slices) in boiling water for approximately 3 minutes, pulling them out while they are still bright and crisp.
Cook linguini per package directions. Place drained, hot pasta in a large bowl with the carrots, sliced chicken, water chestnuts and cilantro (save a bit of cilantro for garnish!). Pour the peanut sauce over the pasta and toss to coat.
Garnish dish with additional cilantro and chopped peanuts (if using). Serve and enjoy!
Note: Cook times for this recipe do not include time for cooking chicken breasts. Some may bake, boil, broil, etc. the chicken. It's up to you to choose the method you prefer.
Chopped peanut garnish is not included in caloric calculation, as this is an optional garnish.
Here’s one more to pin on your Pinterest boards!, with chicken breasts and pasta in a creamy Asian peanut sauce, is absolutely delicious! / The Grateful Girl Cooks!")


, with cinnamon spiced and powdered sugar glazes! / The Grateful Girl Cooks!")


, with cinnamon spiced and powdered sugar glazes! / The Grateful Girl Cooks!")


 for the holidays, or anytime! / The Grateful Girl Cooks!")


 for the holidays, or anytime! / The Grateful Girl Cooks!")