Month: January 2014

Mom’s Famous Cream Cheese Ball

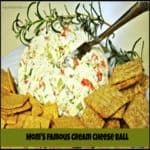
Mom’s Famous Cream Cheese Ball is a delicious, easy appetizer, w/ red and green peppers, green onions and chopped pecans! So good, served on assorted crackers!Mom's Famous Cream Cheese Ball is a delicious, easy appetizer, w/ red and green peppers, green onions and chopped pecans! So good, served on assorted crackers!

I love holidays, and all the happy memories associated with them. A lot of my holiday memories revolve around simple, delicious meals with family and friends.

Mom’s Famous Cream Cheese Ball is an appetizer I’ve prepared for many years (35+), and is always a big hit. My Mom got this recipe from a friend at church over 30 years ago. Mom has now passed the recipe down (and the “serving it at the holidays” tradition) to me and my sisters.

This recipe for Mom’s Famous Cream Cheese Ball is so easy to prepare! With only a few ingredients like green and red bell peppers, green onions and pecans, it’s also easy on the wallet. It’s large enough to split into two cheese balls, if you want.

Scroll Down For A Printable Recipe Card At The Bottom Of The Page

How To Make Mom’s Famous Cream Cheese Ball

One of the best things about Mom’s Famous Cream Cheese Ball is that it can be made the day before it is served.  I think the “good-flavor elves” work the flavors into the cheese ball even better that way. Place all the ingredients into a medium sized bowl.  Mix these ingredients together with a fork until fully combined.

The ingredients for Mom's famous cream cheese ball are placed in mixing bowl.

Mom's famous cream cheese ball ingredients are mixed together.

How To Shape Mom’s Famous Cream Cheese Ball

Line a ramekin with plastic wrap, making sure to leave a lot of the plastic wrap extended well past the edges. Use a couple pieces to ensure that all edges of the ramekin have a lot of plastic wrap hanging over the edges.

A ramekin with plastic wrap, is prepared for Mom's famous cream cheese ball mixture.

Spoon the cheese ball mixture into the ramekin. Use a spoon to firmly press down into all nooks and crannies of the ramekin.  You want to really pack it in there! Level off the top of the cheese ball.

Ingredients for Mom's famous cream cheese ball are packed into ramekin.

Once Mom’s famous cream cheese ball mixture is FIRMLY packed into the ramekin, cover tightly with the plastic wrap, pressing down as you wrap it. Make sure the cheese ball is completely wrapped. Place Mom’s famous cream cheese ball into the refrigerator for at least 6-8 hours (best if left in fridge overnight so the flavors can really develop!).

Ramekin with Mom's famous cream cheese ball is tightly wrapped, then refrigerated overnight.

When Ready To Serve

Once you are about half an hour or so before serving, remove cheese ball from refrigerator. Carefully unwrap it, and invert the the cheese ball (turn it upside down onto your serving platter. The rounded dome side of the cheese ball should be face up! Garnish with a sprig of fresh parsley, if desired.

Mom’s famous cream cheese ball can be served with any kind of savory cracker. Let the cheese ball sit out at room temperature for 30-45 minutes before serving. this helps the cheese to soften up a bit (it’s easier to spread it on a cracker that way).

Mom's Famous Cream Cheese Ball, served as appetizer with various crackers.
You’re going to be surprised how delicious Mom’s famous cream cheese ball is! It is a family tradition of ours, and is usually the very first thing our grown sons head straight to, when I make it!

Mom's Famous Cream Cheese Ball, garnished with fresh parsley.
 
Mom’s Famous Cream Cheese Ball will be a HUGE hit at any gathering… trust me! It is SO GOOD! Everyone that tries it wants the recipe! Have a great day, and don’t fet to check out the Recipe Index (with ALL my recipes), located at the top of the page!
 

Looking For More APPETIZER Recipes?

If you are looking for other appetizer recipes, perhaps you would want to check out my recipes for Classic Bruschetta, Mexican Layer Dip, Crostini with Figs, Gorgonzola, Honey and Walnuts.
Maybe you would also like to serve Homemade Boursin Cheese (and crackers), or Sun-Dried Tomato and Kalamata Olive Bruschetta?
 
Interested In More Recipes?

Thank you for visiting this website. I appreciate you using some of your valuable time to do soIf you’re interested, I publish a newsletter 2 times per month (1st and 15th) with all the latest recipes, and other fun info. I would be honored to have you join our growing list of subscribers, so you never miss a great recipe!
There is a Newsletter subscription box on the top right side (or bottom) of each blog post, depending on the device you use, where you can easily submit your e-mail address (only) to be included in my mailing list.

You Can Also Find Me On Social Media:

Facebook page: The Grateful Girl Cooks!
Pinterest:
The Grateful Girl Cooks!
Instagram:
jbatthegratefulgirlcooks

Author's signatureRecipe Source: My Mom

↓↓ PRINTABLE RECIPE BELOW ↓↓

0 from 0 votes
Mom's Famous Cream Cheese Ball
Prep Time
10 mins
Cook Time
0 mins
Total Time
10 mins
 

Mom's Famous Cream Cheese Ball is a delicious, easy appetizer, w/ red and green peppers, green onions and chopped pecans! So good, served on assorted crackers!

Category: Appetizer
Cuisine: American
Keyword: cream cheese ball
Servings: 40 servings (approx.) 1 Tablespoon each
Calories Per Serving: 48 kcal
Author: JB @ The Grateful Girl Cooks!
Ingredients
  • 2 8 ounce packages. cream cheese , at room temp
  • 1/2 cup chopped pecans or walnuts (I use pecans)
  • 2 stalks green onion , sliced (green stem and white part)
  • 1/4 cup chopped green pepper
  • 1/4 cup red pepper
Instructions
  1. Place all ingredients in a medium-sized bowl. I use a fork to "mash" the ingredients together (a fork helps to blend the veggies and nuts into the cream cheese).
  2. Once completely blended, I "mold" the cheese into the shape I want to serve it in. To do this, you take plastic wrap, drape a small bowl (whatever shape you choose to use) and completely cover it with plastic wrap with the sides overlapping and hanging over the bowl several inches on each side. Then I use a spoon to "mold" the cream cheese mixture into the bowl, being sure to push the mixture into every part of the bowl and packing it down.
  3. Once packed into the bowl, make sure you level off the top part of the cheese as flat as you can (this will end up being the bottom of the cheese ball, and you want it lay flat). Wrap the excess plastic wrap completely over the top of the cheese, so it is sealed completely.
  4. Refrigerate overnight, or at least 8 hours, in order for the flavors to come together.
  5. When ready to serve, unwrap the plastic and invert the cheese ball onto serving platter. Grab a serving knife and serve with the crackers of your choice. Enjoy!
Nutrition Facts
Mom's Famous Cream Cheese Ball
Amount Per Serving (1 Tablespoon)
Calories 48 Calories from Fat 36
% Daily Value*
Fat 4g6%
Saturated Fat 2g13%
Cholesterol 12mg4%
Sodium 36mg2%
Potassium 26mg1%
Vitamin A 190IU4%
Vitamin C 2.1mg3%
Calcium 13mg1%
Iron 0.1mg1%
* Percent Daily Values are based on a 2000 calorie diet.

Here’s one more to pin on your Pinterest boards!Mom's Famous Cream Cheese Ball is a delicious, easy appetizer, w/ red and green peppers, green onions and chopped pecans! So good, served on assorted crackers!

Save

Save

Chicago-Style Deep Dish Pizza

Make a delicious Chicago-style deep dish pizza from scratch, with 3 cheeses, sausage, pepperoni, tomatoes, green peppers and mushrooms.Make a delicious Chicago-style deep dish pizza from scratch, with 3 cheeses, sausage, pepperoni, tomatoes, green peppers and mushrooms.

My husband and I love pizza! We especially adore Chicago-Style Deep Dish Pizza…it’s so amazing! While there isn’t too much that is healthy in a slice or two of a good one, occasionally we just want the sheer cheesiness (new word) and oozy goodness of hot pizza. Nine times out of ten we just order from our favorite place, or I will throw together a homemade one, if the mood hits.

However…sometimes you just have a craving for a humongous deep dish pizza. You know, the kind that can feed a small village or two. That kind. I started searching online for the basics of a good deep-dish pizza and came upon this one. It sounded pretty easy, and I knew I could add a few things to personalize it for our taste buds to be delighted.

Scroll Down For A Printable Recipe Card At The Bottom Of The Page

This Chicago-Style Deep Dish Pizza Tastes GREAT!

The results with this deep dish pizza are fantastic! Stuffed FULL of goodies, this pizza came out of our oven just screaming to be devoured. The filling includes, pepperoni, Italian sausage, chunky tomatoes, provolone, mozzarella, Parmesan, mushrooms and green bell peppers.

Hot, cheesy, and full of flavor…yes, yes, yes! I sure hope you enjoy this Chicago-style deep dish pizza. I know we sure do.

A Chicago-Style Deep Dish Pizza, ready to slice and eat!
This pizza takes a bit of prep time (for dough to rise, etc.), but I know you will LOVE the finished product…absolutely delicious! C’mon…you KNOW you want a big ol’ bite of this deep dish pizza…can you smell it? Ooooooh! Hope you enjoy it!

Looking For More PIZZA Recipes?

You can find all of my recipes in the Recipe Index, located at the top of the page. A few pizza recipes you might enjoy include:

Interested In More Recipes?

Thank you for visiting this website. I appreciate you using some of your valuable time to do soIf you’re interested, I publish a newsletter 2 times per month (1st and 15th) with all the latest recipes, and other fun info. I would be honored to have you join our growing list of subscribers, so you never miss a great recipe!
There is a Newsletter subscription box on the top right side (or bottom) of each blog post, depending on the device you use, where you can easily submit your e-mail address (only) to be included in my mailing list.

You Can Also Find Me On Social Media:
Facebook page: The Grateful Girl Cooks!
Pinterest: The Grateful Girl Cooks!
Instagram: jbatthegratefulgirlcooks

Author's signatureRecipe Adapted From: http://www.seededatthetable.com/2011/01/24/chicago-style-deep-dish-pizza/

↓↓ PRINTABLE RECIPE BELOW ↓↓

0 from 0 votes
Chicago-Style Deep Dish Pizza
Prep Time
2 hrs 30 mins
Cook Time
25 mins
Total Time
2 hrs 55 mins
 

Make a delicious Chicago-style deep dish pizza from scratch, with 3 cheeses, sausage, pepperoni, tomatoes, green peppers and mushrooms.

Category: Entree
Cuisine: Italian
Keyword: deep dish pizza
Servings: 8 slices
Calories Per Serving: 464 kcal
Author: JB @ The Grateful Girl Cooks!
Ingredients
For the dough:
  • 1 1/2 cups + 2 TBSP all-purpose flour
  • 1/4 cup yellow cornmeal
  • 3/4 teaspoon salt
  • 1 teaspoon sugar
  • 1 1/8 teaspoon. instant yeast
  • 1/2 cup + 2 Tablespoons water , at room temperature
  • 1 1/2 Tablespoons unsalted butter , melted
  • 1 teaspoon. olive oil
  • 2 Tablespoons unsalted butter , softened
For the sauce:
  • 1 Tablespoon unsalted butter
  • 2 Tablespoons finely chopped onion
  • 1/4 teaspoon. dried oregano
  • 1/4 teaspoon salt
  • 1 clove garlic , minced or pressed
  • 1 (14.5 oz.) can petite-diced tomatoes
  • Pinch of sugar
  • 2 Tablespoons chopped basil
  • 1 1/2 teaspoons olive oil
  • Ground black pepper , to taste
  • Salt , to taste
For the filling and topping:
  • 2 Tablespoons olive oil
  • 1/2 cup chopped or sliced mushrooms
  • 1/4 cup chopped green pepper
  • 2 links Italian sausage , cooked (spicy or sweet, w/casing removed and crumbled, cooked in skillet)
  • 1/2 cup pepperoni slices
  • 1/4 oz. grated Parmesan cheese (about 2 TBSP)
  • 4 thin slices provolone cheese
  • 8 oz. shredded mozzarella cheese (approx. 2 cups)
Instructions
  1. Make the dough: Whisk together the flour, cornmeal, salt, sugar and yeast in the bowl of a stand mixer, until well blended. Attach the dough hook and mix in the water and melted butter on low speed for 1-2 minutes. Scrape dough down from sides of bowl, as needed. Increase the speed to medium-low and knead until dough is glossy and smooth (approx. 3-4 minutes)
  2. Coat a medium bowl with 1 tsp. of the olive oil. Transfer the dough to bowl, turning once to coat with oil. Cover tightly with plastic wrap; let rise at room temperature until nearly doubled in size (approx. 45-60 minutes)
  3. Once dough has risen, turn it out onto a lightly floured, dry work surface and roll it into an 8x6 inch rectangle. To laminate the dough, spread the softened butter over the surface, leaving a 1/2 inch border around the edge.
  4. Starting at the short end, roll the dough into a tight cylinder. With the seam side down, flatten the cylinder into a 9x2 inch rectangle, then fold into thirds like a business letter. Pinch the seams to form a ball, and return dough to oiled bowl.
  5. Cover tightly again with plastic wrap and let rise in the refrigerator for 40-50 minutes till it has risen quite a bit. (not doubled, but close)
  6. Prepare the sauce: In medium saucepan, melt the butter over medium heat.
  7. Stir in the onion, mushrooms, green pepper, oregano, and salt. Saute until the liquid has nearly evaporated and the onion is golden brown, stirring often, about 3-5 minutes.
  8. Add the garlic and cook just until fragrant, about 30-45 seconds.
  9. Stir in the tomatoes and sugar, then increase the heat to medium-high. Bring the mixture just to a boil, then lower the heat to medium-low and continue to simmer until reduced to about 1 1/4 cups (about 15 minutes). Remove from heat and stir in basil and oil.
  10. Season with salt and pepper to taste.
  11. Preheat oven to 425 degrees. Coat a 9 inch round cake pan with olive oil.
  12. To assemble and make pizza: Move the dough to a dry, lightly floured work surface and roll out into a 13 inch disk, about 1/4 inch thick. Fold in half and carefully transfer the dough to the pan. Unfold, and lightly press the dough to line the bottom of the pan and 1 inch up the sides of the pan. If the dough resists stretching, wait 5 minutes before trying again.
  13. Sprinkle 1 1/2 cups of the shredded mozzarella over the surface of the dough. Then layer 1/2 of the sauce over the cheese. Next layer is the sausage and pepperoni. Then add the other 1/2 of the sauce on top of the meat. Top with the remaining 1/2 cup of shredded mozzarella, the provolone slices, and the Parmesan cheese. I also sprinkle the top with a a bit more dried oregano.
  14. Bake in a 425 degree oven for 20-25 minutes (mine took 25), until the crust is golden brown. Remove pizza from oven and let it rest for 10 minutes before slicing (trust me on this...holds together better this way).
Recipe Notes

This recipe may seem a bit labor intensive, but if you brown the Italian sausage, and cook the sauce during the "rising" times of the dough, it really isn't so much. The hardest part really is just waiting for the dough to rise...and for that FIRST TASTE! I hope you enjoy this as much as we did!

Nutrition Facts
Chicago-Style Deep Dish Pizza
Amount Per Serving (1 slice)
Calories 464 Calories from Fat 279
% Daily Value*
Fat 31g48%
Saturated Fat 13g81%
Cholesterol 70mg23%
Sodium 973mg42%
Potassium 358mg10%
Carbohydrates 28g9%
Fiber 2g8%
Sugar 3g3%
Protein 18g36%
Vitamin A 595IU12%
Vitamin C 9.2mg11%
Calcium 258mg26%
Iron 3.4mg19%
* Percent Daily Values are based on a 2000 calorie diet.

Here’s one more to pin on your Pinterest boards!Make a delicious Chicago-style deep dish pizza from scratch, with 3 cheeses, sausage, pepperoni, tomatoes, green peppers and mushrooms.


Save

Mom’s Old-Fashioned Fudge

Mom’s Old Fashioned Fudge is creamy old-fashioned chocolate fudge with pecans! Easy to make, perfect treat for parties or gift giving during the holidays!Mom's Old Fashioned Fudge is creamy old-fashioned chocolate fudge with pecans! Easy to make, perfect treat for parties or gift giving during the holidays!

My Mom has been making this old fashioned fudge for at least 50 years! My memories of Christmas time are filled with happy thoughts of my Mom making this delicious chocolate candy. Lots of our neighbors and friends received little plates of Mom’s old fashioned fudge!.

Scroll Down For A Printable Recipe Card At The Bottom Of The Page

Our Family Tradition – Making Fudge At Christmas!

I don’t even know where she got the recipe from (she calls it “See’s Fudge”), but I do know it’s been made by my Mom since I was a child (over 50 years). Now making Mom’s old fashioned fudge is my tradition, passed from one generation to the next.

Now I’ve been making this absolutely DELICIOUS old fashioned fudge every Christmas for as long as I can remember!  That’s a loooong time, folks, and I still LOVE the memories it brings to mind, and the calories it brings to my tummy! Making and giving away homemade goodies at Christmas is part of my heritage…it’s just what I love to do!

The way you make Mom’s old fashioned fudge is fairly easy. The ingredients are cooked, mixed together, then spread onto a cookie sheet and refrigerated until firm.  Once firm, the fudge is cut into small bites of creamy chocolate deliciousness!

How To Make Mom’s Old Fashioned Fudge

The first thing you need to do is to place chocolate chips, marshmallow cream, vanilla, nuts and butter in a large mixing bowl. Set this bowl aside. NOTE: It’s important to do this step ahead of time.

The reason is because once the sugar syrup is cooked and is boiling hot, you need these ready to make your batch of old fashioned fudge! You will pour the boiling hot syrup into the bowl, and the heat will melt the butter and chocolate chips.

Chocolate chips, pecans, and butter are some of the ingredients used to make old fashioned fudge.

Make The Sugar Syrup

In a large, tall saucepan, add the evaporated milk and the sugar. Bring the sugar and evaporated milk to a rolling boil. Once it reaches a full, rolling boil, cook for 9 1/2 minutes. Make sure to stir often, so it doesn’t boil over the top of the pan.

Evaporated milk and sugar are boiled to add to the old fashioned fudge ingredients.

Once the 9 1/2 minutes is up, remove the pan from the heat and quickly pour this HOT mixture into the ingredients in the mixing bowl. Stir the old fashioned fudge thoroughly (this is good for your biceps!). Continue stirring until the butter and the chocolate chips are all melted and blended smooth.

Once Fudge Is Blended Completely

Immediately pour the hot contents of the bowl onto a BUTTERED (on the bottom and sides) 9×13 cookie sheet. Spread Mom’s old fashioned fudge out, to fill the cookie sheet completely. Refrigerate the fudge for several hours until it is firm. Cut the fudge cut into small squares (it’s very rich, so you only need small pieces). Serve and enjoy!

Old fashioned fudge is spread out in baking pan, then refrigerated until firm.

How Many Pieces Of Mom’s Old Fashioned Fudge Will This Make?

This recipe makes a LOT of Mom’s old fashioned fudge. If you cut a 13×9 inch batch into 1″ squares, it will yield about 117 pieces of fudge. That’s about 2 pounds of fudge! That’s a LOT of fudge for eating OR homemade gift giving! ‘Tis the season, right?

Pieces of Mom's old fashioned fudge, ready to eat!

Be sure to store fudge in covered container in the refrigerator! You will have plenty to have around to nibble on, or to serve friends who pop in for a quick visit!

We also enjoy giving plates of Mom’s old fashioned fudge and other Christmas goodies to our neighbors and friends. I sure hope you will give this delicious, old fashioned fudge a try…it’s DELICIOUS! Enjoy!

Looking For More Christmas Goodies?

I have lots of Christmas goodies on this website! They can be found in the Recipe Index at the top of the page. There are some really great ones, including:

Interested In More Recipes?

Thank you for visiting this website. I appreciate you using some of your valuable time to do soIf you’re interested, I publish a newsletter 2 times per month (1st and 15th) with all the latest recipes, and other fun info. I would be honored to have you join our growing list of subscribers, so you never miss a great recipe! 

There is a Newsletter subscription box on the top right side (or bottom) of each blog post, depending on the device you use, where you can easily submit your e-mail address (only) to be included in my mailing list.

You Can Also Find Me On Social Media:

Facebook page: The Grateful Girl Cooks!
Pinterest:
The Grateful Girl Cooks!
Instagram:
jbatthegratefulgirlcooks

Author's signatureRecipe Source: My Mom

↓↓ PRINTABLE RECIPE BELOW ↓↓

0 from 0 votes
Mom's Old-Fashioned Fudge
Prep Time
10 mins
Cook Time
10 mins
Total Time
20 mins
 
Mom's Old Fashioned Fudge is creamy old-fashioned chocolate fudge with pecans! Easy to make, perfect treat for parties or gift giving during the holidays!
Category: Dessert
Cuisine: American
Keyword: fudge, old fashioned fudge
Servings: 117 one inch pieces
Calories Per Serving: 97 kcal
Author: JB @ The Grateful Girl Cooks!
Ingredients
  • 2 pkgs. semi-sweet chocolate chips
  • 1 8 oz. jar marshmallow creme
  • 1 teaspoon vanilla
  • 2 cups chopped pecans or walnuts (I use pecans)
  • 1/2 lb. butter (or margarine, if you desire- I use butter-2 cubes)
  • 1 large can of evaporated milk (regular sized-don't use the dinky one)
  • 4 cups granulated sugar
Instructions
  1. Place the first five ingredients (chips, marshmallow creme, vanilla, nuts and butter) in a large mixing bowl. Set aside.
  2. In a large saucepan, add the evaporated milk and the sugar. Bring the mixture to a rolling boil; once it reaches a full, rolling boil, cook for 9 1/2 minutes, stirring to be sure it doesn't boil over the top of the pan.
  3. Once the 9 1/2 minutes is up, remove the pan from the heat and quickly pour this HOT mixture into the ingredients in the mixing bowl and stir thoroughly (this is good for your biceps!) until the butter and the chocolate chips are all melted and blended smooth.
  4. Pour the contents of the bowl onto a BUTTERED (rub a bit of butter on the bottom and sides) 9x13 cookie sheet. Spread fudge mixture out to fill cookie sheet completely.
  5. Refrigerate for several hours till firm, then cut into small squares. Keep refrigerated. Enjoy!
Nutrition Facts
Mom's Old-Fashioned Fudge
Amount Per Serving (1 (one inch square piece))
Calories 97 Calories from Fat 45
% Daily Value*
Fat 5g8%
Saturated Fat 2g13%
Cholesterol 5mg2%
Sodium 17mg1%
Potassium 51mg1%
Carbohydrates 12g4%
Sugar 10g11%
Vitamin A 60IU1%
Vitamin C 0.1mg0%
Calcium 14mg1%
Iron 0.4mg2%
* Percent Daily Values are based on a 2000 calorie diet.

Here’s one more to pin on your Pinterest boards!Mom's Old Fashioned Fudge is creamy old-fashioned chocolate fudge with pecans! Easy to make, perfect treat for parties or gift giving during the holidays!


Save

Save

Save

Swedish Pancakes

Swedish pancakes are a delicious breakfast treat! Thin crepe-like pancakes are buttered, dusted with powdered sugar and a dollop of raspberry jam.Swedish pancakes are a delicious breakfast treat! Thin crepe-like pancakes are buttered, dusted with powdered sugar and a dollop of raspberry jam. 

 I found this recipe for Swedish Pancakes online a couple of years ago, and it quickly became a favorite to fix when we have out of town guests staying in our home.

The original recipe calls for Lingonberry jam, which is the true Swedish way to serve these. Since I pick fresh raspberries each summer at a local berry farm, then make my own jam, I always seem to have plenty of RASPBERRY jam around. That is what I use for serving with the pancakes. We LOVE these Swedish pancakes with the fresh taste of raspberries (good old Pacific Northwest raspberries).

Scroll Down For A Printable Recipe Card At The Bottom Of The Page

Are Swedish Pancakes Hard To Make?

These pancakes are fairly easy to make. Once you “master” the cooking technique, these will be easy peasy. Really. Batter is swirled in a skillet to form a very thin “crepe-like” pancake and cooked briefly on both sides until done.  Pancakes are then folded, and topped with jam, dusted with powdered sugar and served.

Swedish pancakes are always a big hit with our guests (and my always hungry husband). I hope you enjoy them, as well! Ya, you betcha! (said with a Swedish accent, of course).

Here’s a picture of the last batch of Swedish pancakes I made…yum.

Several Swedish pancakes on plate with link sausage on the side.
 
Be sure to try these amazing tasting Swedish pancakes. They really are a delicious breakfast treat. Hope you have a great day, and please come back again soon!

Looking For More PANCAKE Recipes?

You can find all of my recipes in the Recipe Index, located at the top of the page. A few pancake recipes you might enjoy include:

Interested In More Recipes?

Thank you for visiting this website. I appreciate you using some of your valuable time to do soIf you’re interested, I publish a newsletter 2 times per month (1st and 15th) with all the latest recipes, and other fun info. I would be honored to have you join our growing list of subscribers, so you never miss a great recipe!
There is a Newsletter subscription box on the top right side (or bottom) of each blog post, depending on the device you use, where you can easily submit your e-mail address (only) to be included in my mailing list.

You Can Also Find Me On Social Media:
Facebook page: The Grateful Girl Cooks!
Pinterest: The Grateful Girl Cooks!
Instagram: jbatthegratefulgirlcooks

Author's signature


Recipe Source: http://www.alaskafromscratch.com/2012/03/10/swedish-pancakes/

↓↓ PRINTABLE RECIPE BELOW ↓↓

0 from 0 votes
Swedish Pancakes
Prep Time
10 mins
Cook Time
15 mins
Total Time
25 mins
 

Swedish pancakes are a delicious breakfast treat! Thin crepe-like pancakes are buttered, dusted with powdered sugar and a dollop of raspberry jam. 

Category: Breakfast
Cuisine: American, Swedish
Keyword: Swedish pancakes
Servings: 12 crepes
Calories Per Serving: 160 kcal
Author: JB @ The Grateful Girl Cooks!
Ingredients
  • 5 eggs
  • 1 cup milk
  • 3 TBSP. sour cream
  • 1 1/4 cup all-purpose flour
  • 1/2 tsp. salt
  • 2 TBSP granulated sugar
  • Oil , for the skillet
  • Raspberry Jam (or jam of your choice), for serving
  • Melted butter , for serving
  • Powdered sugar , for a dusting on top of the cooked crepes
Instructions
  1. In a blender, blend eggs, milk and sour cream together.
  2. Add flour, salt, and sugar to the blender. Blend until completely smooth. The batter will be thin and pourable.
  3. Heat a medium-sized frying pan over medium heat. With a pastry brush, oil the pan with about a teaspoon of oil (you may need to add more later).
  4. When the pan and the oil are hot, pour 1/4 cup of batter onto the center of the pan. Quickly, but gently lift and swirl the pan to spread the batter to the edges. The batter should sizzle some in the oil if the pan is hot enough. Cook about 60-90 seconds, until the bottom begins to turn golden, then carefully flip the thin pancake over. Cook another 30-60 seconds until the other side begins to brown. Remove from skillet. Fold in half, then in half again to make a triangle. Set the pancake aside and repeat with remaining batter.
  5. To Serve: Place folded Swedish pancakes onto plates. Lightly brush melted butter onto tops, then dust with sifted powdered sugar, and put a generous dollop of Raspberry jam in the middle. Enjoy!
Nutrition Facts
Swedish Pancakes
Amount Per Serving (1 crepe (w/ butter, jam, powdered sugar))
Calories 160 Calories from Fat 54
% Daily Value*
Fat 6g9%
Saturated Fat 4g25%
Cholesterol 75mg25%
Sodium 153mg7%
Potassium 78mg2%
Carbohydrates 20g7%
Sugar 8g9%
Protein 4g8%
Vitamin A 215IU4%
Vitamin C 0.6mg1%
Calcium 41mg4%
Iron 1mg6%
* Percent Daily Values are based on a 2000 calorie diet.

Here’s one more to pin on your Pinterest boards!Swedish pancakes are a delicious breakfast treat! Thin crepe-like pancakes are buttered, dusted with powdered sugar and a dollop of raspberry jam. 


Save

Save

Toll House Pie

Toll House Pie is an incredibly EASY and delicious pie to make, with chocolate chips, pecans, brown sugar and a drizzled chocolate top. Mix and bake!Toll House Pie is an incredibly EASY and delicious pie to make, with chocolate chips, pecans, brown sugar and a drizzled chocolate top. Mix and bake!
I absolutely HAD to post this recipe for Toll House Pie.  It is officially the most requested pie recipe in our home. This is the ONE food item requested for every Birthday, Thanksgiving, Christmas, Millard Fillmore’s Birthday, etc. Well, you get the idea. Our two sons are grown men and they STILL request this pie for their birthdays. That makes this mom’s heart happy.

I received this recipe for Toll House pie from a friend named Cindi,  who I used to sing with in a church choir in Southern CA over 30 years ago. I’m sure she had no idea that it would become one of my most worn out recipe cards. It is such an easy recipe – and what a keeper!

Scroll Down For A Printable Recipe Card At The Bottom Of The Page

Toll House Pie is cooling on a wire rack.
Enjoy a slice of this pie, which is filled with chocolate chips, butter, pecans, and brown sugar, etc. I’m not kidding – this pie is decadent, rich, and sweet enough to put hair on your chest!

Chocolate has been drizzled all over the top of the baked pie.

The ingredients for Toll House pie are mixed together in a large bowl, and then are spread into a homemade or store bought pie crust (unbaked).

Toll House Pie / The Grateful Girl Cooks!

Decorate The Toll House Pie With Melted Chocolate

A Toll House pie is baked for an hour in the oven, and when it is done cooking and cooling, it is time to enjoy it!  I like to drizzle melted chocolate over the top of the pie after it has cooled a bit. That just helps to “fancy it up” a little bit before serving!

Once the Toll House pie has cooled, and the chocolate has firmed up on the top, slice it, and serve! You’re gonna LOVE it!

Toll House Pie / The Grateful Girl Cooks!Grab a fork and take a nice big bite of this delicious pie! Hope you enjoy it, and have a great day. Thanks for stopping by, and please come back soon.

Looking For More PIE Recipes?

You can find all of my recipes in the Recipe Index, located at the top of the page. A few family favorite pie recipes include:

Interested In More Recipes?

Thank you for visiting this website. I appreciate you using some of your valuable time to do soIf you’re interested, I publish a newsletter 2 times per month (1st and 15th) with all the latest recipes, and other fun info. I would be honored to have you join our growing list of subscribers, so you never miss a great recipe!
There is a Newsletter subscription box on the top right side (or bottom) of each blog post, depending on the device you use, where you can easily submit your e-mail address (only) to be included in my mailing list.

You Can Also Find Me On Social Media:
Facebook page: The Grateful Girl Cooks!
Pinterest: The Grateful Girl Cooks!
Instagram: jbatthegratefulgirlcooks

Author's signatureOriginal Recipe Source: Cindi Carlisle Wilcox (over 30 years ago)

↓↓ PRINTABLE RECIPE BELOW ↓↓

0 from 0 votes
Toll House Pie
Prep Time
10 mins
Cook Time
1 hr
Total Time
1 hr 10 mins
 

Toll House Pie is an incredibly EASY and delicious pie to make, with chocolate chips, pecans, brown sugar and a drizzled chocolate top. Mix and bake!

Category: Dessert
Cuisine: American
Keyword: toll house pie
Servings: 8 slices
Calories Per Serving: 580 kcal
Author: JB @ The Grateful Girl Cooks!
Ingredients
  • 3/4 cup butter , melted (then cooled to room temp)
  • 1/2 cup all-purpose flour
  • 1/2 cup granulated sugar
  • 1/2 cup brown sugar (light or dark-I usually use dark)
  • 1/2 cup pecans or walnuts , chopped (I always use pecans)
  • 2 eggs
  • 1 6 oz. bag semi-sweet chocolate chips (plus additional chips if you want to swirl some on top of baked pie for decorative look)
  • 1 pie crust (either buy one or make your own...I always make my own)
Instructions
  1. Preheat oven to 325 degrees.
  2. Mix all ingredients together in large mixing bowl.
  3. Pour mixture into an unbaked pie crust. Bake at 325 degrees for 1 hour. Remove from oven and let cool down on a wire rack.
  4. If desired, melt 1/4 cup chocolate chips in a double boiler and decoratively swirl the melted chocolate over the top of the baked, and cooled pie.
Recipe Notes

Original Recipe Source: unknown. I was given the recipe by my friend Cindi Carlisle Wilcox years and years and years ago!

Nutrition Facts
Toll House Pie
Amount Per Serving (1 slice)
Calories 580 Calories from Fat 333
% Daily Value*
Fat 37g57%
Saturated Fat 18g113%
Cholesterol 88mg29%
Sodium 261mg11%
Potassium 233mg7%
Carbohydrates 56g19%
Fiber 3g13%
Sugar 35g39%
Protein 5g10%
Vitamin A 605IU12%
Calcium 46mg5%
Iron 2.9mg16%
* Percent Daily Values are based on a 2000 calorie diet.

Here’s one more to pin on your Pinterest boards!Toll House Pie is an incredibly EASY and delicious pie to make, with chocolate chips, pecans, brown sugar and a drizzled chocolate top. Mix and bake!


Save

Save

Mom’s Old-Fashioned Chili

Nothing beats a piping hot bowl of Mom’s old-fashioned chili (just how Mom made it), to serve for lunch or dinner on a cold day! Easy to make, and tastes delicious!Nothing beats a piping hot bowl of Mom's old-fashioned chili to serve for lunch or dinner on a cold day! Easy to make-tastes delicious!

On a cold, wintry day nothing tastes as good as a big bowl of Mom’s Old-Fashioned Chili…just the way my Mom always made it for us growing up. The tradition continues, and I’ve been using this family recipe forever! So easy. So GOOD! I think you’ll like it, too.

Scroll Down For A Printable Recipe Card At the Bottom Of The Page

It’s Easy To Make Mom’s Old-Fashioned Chili Vegetarian!

The awesome part is that if you simply omit the meat Mom’s old-fashioned chili can be a totally vegetarian meal. I know this amazing tidbit because I’ve tried it (we have two vegetarians and a vegan in our family) and they loved this hearty chili, too.

So…grab the ingredients, a wooden spoon, knife, cutting board, a big stockpot (or crock pot) and make a big pot of Mom’s old-fashioned chili.  After tasting it, get ready to say “Thank You, JB’s Mom!!!!!!”

I make Mom’s old-fashioned chili year-round, but it is an especially good comforting and filling dish when it is COLD outside. I’ve even left the meat out of this recipe to make a completely vegetarian chili when family members (who are vegetarian or vegan) come over for dinner. It tastes wonderful, even without the meat!

It’s EASY To Make Mom’s Old-Fashioned Chili

Making Mom’s old-fashioned chili couldn’t be any easier!  Ground beef, onions and green peppers are cooked until meat is cooked through. The meat, onions and peppers are then added to a large soup pot on the stove (or a crock pot) for cooking.

The rest of the ingredients are stirred into the pot, and cooked for about 1½ hours on the stove top, or for 5-6 hours in the slow cooker on low heat.  Once done, Mom’s old-fashioned chili is ladled into bowls, garnished with sour cream, cheese and cilantro, then served!

A big pot of Mom's old-fashioned chili, cooking on the stove.
Sometimes I change the recipe up and add different quantities of canned beans to this chili, based on what I have in the pantry at the time. You really can’t hurt this delicious chili! The printable recipe shown below is the standard recipe I use 99% of the time for making a big pot of Mom’s old-fashioned chili!

A bowl of Mom's old-fashioned chili, topped with sour cream and grated cheddar cheese.

I can almost smell it cooking away on the stove! It’s also really good garnished with some fresh cilantro, additional grated cheddar cheese, and a small dollop of sour cream!

A bowl of Mom's old-fashioned chili, garnished with cheese, sour cream and cilantro.
Sure hope you enjoy Mom’s Old Fashioned Chili! It is a great tasting, hearty, filling soup, and I really think you will love it! Have a great day! Thank you for stopping by, and please come back again soon.

Looking For More Southwest-Inspired SOUP Recipes?

You can find all of my recipes in the Recipe Index, located at the top of the page. A few of my yummy Southwest-inspired soup recipes include:

Interested In More Recipes?

Thank you for visiting this website. I appreciate you using some of your valuable time to do soIf you’re interested, I publish a newsletter 2 times per month (1st and 15th) with all the latest recipes, and other fun info. I would be honored to have you join our growing list of subscribers, so you never miss a great recipe! There is a Newsletter subscription box on the top right side (or bottom) of each blog post, depending on the device you use, where you can easily submit your e-mail address (only) to be included in my mailing list.

You Can Also Find Me On Social Media:

Facebook page: The Grateful Girl Cooks!
Pinterest:
The Grateful Girl Cooks!
Instagram:
jbatthegratefulgirlcooks

Author's signature

↓↓ PRINTABLE RECIPE BELOW ↓↓

5 from 1 vote
Mom's Old-Fashioned Chili
Prep Time
20 mins
Cook Time
1 hr 30 mins
Total Time
1 hr 50 mins
 
Nothing beats a piping hot bowl of Mom's old fashioned chili (just how Mom made it), to serve for lunch or dinner on a cold day! Easy to make-tastes delicious!
Category: Soup
Cuisine: Southwest
Keyword: Mom's old-fashioned chili
Servings: 8 servings
Calories Per Serving: 498 kcal
Author: JB @ The Grateful Girl Cooks!
Ingredients
  • 1 1/2 lbs. ground beef
  • 1 large brown onion , chopped (go ahead and have yourself a little cry)
  • 1/2 green pepper , chopped
  • 1 large (big, fat one)and 1 small can diced tomatoes (14.5 oz)
  • 1 large can chili beans (or 2 regular sized)
  • 1 can kidney beans (14.5 oz.)
  • 1 can black beans (14.5 oz.)
  • 1 can pinto beans (14.5 oz.)
  • 1 tsp. paprika
  • 2 tsp. Worcestershire sauce
  • 1/2 tsp. cayenne pepper
  • 3 TBSP. chili powder
  • 1 1/2 tsp. garlic powder
  • 2-3 tsp. salt (more or less, to taste)
  • 2 tsp. ground cumin
  • 1 tsp. oregano
  • 1 cup water
  • 1 small can tomato paste (I've also used tomato sauce when out of tomato paste)
Instructions
  1. In skillet, brown ground beef, chopped onion and green pepper. Drain off grease.
  2. If you are using a crock pot: Put the browned meat mixture in crockpot; add the rest of the ingredients...(cook on low for 6 hours)
  3. If cooking in a large pot on the stove top, add the browned meat mixture to the rest of the ingredients; simmer (uncovered) for about an hour and a half.
  4. When ready to serve, garnish each serving with grated cheese, a small dollop of sour cream and a sprig of cilantro (optional).
Recipe Notes

This recipe makes a large pot of soup. It will freeze well.

Nutrition Facts
Mom's Old-Fashioned Chili
Amount Per Serving (1 serving)
Calories 498 Calories from Fat 171
% Daily Value*
Fat 19g29%
Saturated Fat 6g38%
Cholesterol 60mg20%
Sodium 2179mg95%
Potassium 1574mg45%
Carbohydrates 52g17%
Fiber 16g67%
Sugar 12g13%
Protein 30g60%
Vitamin A 1400IU28%
Vitamin C 23.3mg28%
Calcium 165mg17%
Iron 8.5mg47%
* Percent Daily Values are based on a 2000 calorie diet.

Here’s one more to pin on your Pinterest boards!Nothing beats a piping hot bowl of Mom's old-fashioned chili (just how Mom made it), to serve for lunch or dinner on a cold day! Easy to make-tastes delicious!


Save

Save

Dipped Gingersnaps

Chewy dipped gingersnaps, drizzled with (or dipped in) white and/or semi-sweet chocolate glaze are classic molasses cookies your family will love!Chewy dipped gingersnaps, drizzled with (or dipped in) white and/or semi-sweet chocolate glaze are classic molasses cookies your family will love!

This is one of my all-time favorite “go-to” cookie recipes: Dipped Gingersnaps! I ALWAYS make them at Christmas to give away to family and friends. We also end up making them year-round, because they are so easy and delicious!

These delicious molasses cookies are actually soft and chewy, so I’ve never really figured out why that have the word “snap” in them. Rather than waste any brain cells trying to figure it out, I’ve found it best to just go with it. I feel I’m better for it. Hooray for dipped gingersnaps!

Scroll Down For A Printable Recipe Card At The Bottom Of The Page

How Many Dipped Gingersnaps Will This Make?

This recipe makes approximately 14 dozen dipped gingersnaps, which is a LOT. Never fear – you can easily half the recipe, if you’re not planning to feed an entire village, or eat them all by yourself.

These cookies also freeze very well, so I usually make the whole batch at once and then freeze some for another time. The molasses and ginger flavor permeates these delicious dipped gingersnaps!  If you choose to dip them in white chocolate icing or drizzle them with glaze, you won’t be sorry!

Dipped gingersnaps can also be drizzled with white chocolate icing as decoration.

Many Ways To Make Dipped Gingersnaps

I usually dip half of the cookie in a white chocolate icing, but they can also be drizzled with a light powdered sugar glaze or semi- sweet or white chocolate glaze. Both methods for either dipping or drizzling dipped gingersnaps are included in the printable recipe below.

Dipped Gingersnaps can be drizzled with chocolate and white chocolate icing.

You can even dip them in white chocolate, then give your kids some colorful sprinkles to add on top! Look at those cute dipped gingersnaps!

Dipped gingersnaps with sprinkles, on wire rack.

Whichever way you choose to decorate these delicious dipped gingersnaps, you will LOVE how they taste and how easy they are to make!  Hope you will give them a try. Thank you for stopping by, and I hope you come back soon. Have a GREAT day.

Looking For More COOKIE Recipes?

You can find all of my recipes in the Recipe Index, located at the top of the page. I have lots of yummy cookie recipes, including:

Interested In More Recipes?

Thank you for visiting this website. I appreciate you using some of your valuable time to do soIf you’re interested, I publish a newsletter 2 times per month (1st and 15th) with all the latest recipes, and other fun info. I would be honored to have you join our growing list of subscribers, so you never miss a great recipe! 

There is a Newsletter subscription box on the top right side (or bottom) of each blog post, depending on the device you use, where you can easily submit your e-mail address (only) to be included in my mailing list.

You Can Also Find Me On Social Media:

Facebook page: The Grateful Girl Cooks!
Pinterest:
The Grateful Girl Cooks!
Instagram:
jbatthegratefulgirlcooks

Author's signature

Recipe adapted from: Laura Kimball, via Taste of Home Magazine

↓↓ PRINTABLE RECIPE BELOW ↓↓

0 from 0 votes
Dipped Gingersnaps
Prep Time
25 mins
Cook Time
12 mins
Total Time
37 mins
 
Chewy dipped gingersnaps, drizzled with (or dipped in) white and/or semi-sweet chocolate glaze are classic molasses cookies your family will love!
Category: Cookies
Cuisine: American
Keyword: dipped gingersnaps
Servings: 14 dozen
Calories Per Serving: 55 kcal
Author: JB @ The Grateful Girl Cooks!
Ingredients
  • 2 cups sugar
  • 1 1/2 cups vegetable oil
  • 2 eggs
  • 1/2 cup molasses
  • 4 cups all-purpose flour
  • 4 tsp. baking soda
  • 1 TBSP. ground ginger (powder)
  • 2 tsp. ground cinnamon
  • 1 tsp. salt
  • Additional sugar
For dipped cookies:
  • 2 pkgs. (12 oz. each) vanilla baking chips
  • 1/4 cup shortening (Crisco)
For drizzle-glaze cookies:
  • 2 cups powdered sugar
  • 1-2 tsp. warm water (or more till glaze is slightly thin)
  • 1 tsp. vanilla
Instructions
  1. Preheat oven to 350 degrees.
  2. In a large mixing bowl, combine sugar and oil; mix well. Add eggs, one at a time, beating well after each addition. Stir in molasses.
  3. In separate bowl, combine dry ingredients; gradually add to the creamed mixture and mix this very well.
  4. Shape dough into 3/4 inch balls (roll the dough between both hands to form a ball) and then roll the cookie ball in sugar (approx 1/3 cup, more or less) in a small bowl.
  5. Place cookies 2 inches apart onto ungreased cookie sheets.
  6. Bake at 350 degrees for 10-12 minutes, or until the cookie springs back when touched lightly. Remove cookies to wire racks to cool.
  7. When completely cooled, you can either dip the cookies or drizzle a thin glaze over them...whatever you prefer. ENJOY!
  8. For dipping: Melt the vanilla chips with shortening in a small pan over low heat. Dip the cookies half way into the mixture, shake or let the excess drip off. Place on waxed paper or foil-lined baking sheets to harden.
  9. For drizzle-glazing: In small bowl, mix powdered sugar, vanilla and warm water till you have a slightly thin glaze, adding more sugar to thicken or a touch more water to thin. Place cookies on foil to catch the glaze that might run off the cookies. Drizzle the glaze on top of cookies. Let harden.
Recipe Notes

Caloric calculation is based on one cookie, dipped halfway in white chocolate coating.

Nutrition Facts
Dipped Gingersnaps
Amount Per Serving (1 cookie)
Calories 55 Calories from Fat 9
% Daily Value*
Fat 1g2%
Saturated Fat 1g6%
Cholesterol 2mg1%
Sodium 48mg2%
Potassium 31mg1%
Carbohydrates 9g3%
Sugar 6g7%
Vitamin A 5IU0%
Calcium 12mg1%
Iron 0.2mg1%
* Percent Daily Values are based on a 2000 calorie diet.

Here’s one more to pin on your Pinterest boards!Chewy dipped gingersnaps, drizzled with (or dipped in) white and/or semi-sweet chocolate glaze are classic molasses cookies your family will love!

Save

Save

Save

Fried Chicken, Spicy Mayo and Slaw Sandwich

You’re going to love this fried chicken sandwich on a toasted bun, with spicy mayo and slaw. Recipe is from Bon Appétit magazine, and tastes fantastic!You're going to love this fried chicken sandwich on a toasted bun, with spicy mayo and slaw. Recipe from Bon Appétit magazine, and tastes fantastic!

So here’s the story… my friend gave me a subscription to Bon Appétit magazine last year. My husband was looking through one of the issues and came upon this recipe for a Fried Chicken, Spicy Mayo and Slaw Sandwich.

Being the nice guy that he is, he hinted mentioned to me (of course rather casually) that it sure sounded good, and was wondering if I thought I could make this recipe. It sounded pretty straightforward, so I made it! Wow! This fried chicken sandwich tastes amazing… let me show you how to make it:

Scroll Down For A Printable Recipe Card At The Bottom Of The Page

Preparing The Fried Chicken Sandwich

The sandwich calls for fried chicken. I used boneless, skinless chicken breasts which were coated in flour, and buttermilk, and then fried in a skillet (in oil) until done. Large chicken breasts are cut in half, so they cook faster than normal.

Chicken breasts are dredged in flour, buttermilk, and then flour again, before frying. Dredging the chicken in buttermilk before frying.

The Spicy Slaw

A very easy to make spicy slaw is mixed together to go on the fried chicken sandwich. The slaw has cabbage, hot pepper sauce, garlic, jalapeno, bread and butter pickles and red onions. It’s not too spicy, but it does have a tiny kick to it!

Slaw is mixed to add to the sandwich.

Making The Fried Chicken Sandwich

The fried chicken is placed on a lightly toasted bun which has been spread with a spicy mayonnaise. The fried chicken breast is then added, and is topped with the slaw. Put the top bun on, and you’re ready to enjoy your sandwich! So I did. End of story. Did you enjoy it? Actually, it was fairly easy, and really tastes GOOD! Seriously good. The fried chicken sandwich was fairly easy to prepare, and the taste is unexpectedly wonderful!

My husband and I LOVED it and I have prepared this sandwich a few times since then. Hope you will give it a try, because I think you will really like this delicious fried chicken sandwich. Thanks for stopping by, and I hope you come back again really soon. Have a GREAT day!

Looking For More SANDWICH Recipes?

You can find all of my sandwich recipes in the Recipe Index, located at the top of the page. I have several you’ll enjoy, including:

Interested In More Recipes?

Thank you for visiting this website. I appreciate you using some of your valuable time to do soIf you’re interested, I publish a newsletter 2 times per month (1st and 15th) with all the latest recipes, and other fun info. I would be honored to have you join our growing list of subscribers, so you never miss a great recipe!
There is a Newsletter subscription box on the top right side (or bottom) of each blog post, depending on the device you use, where you can easily submit your e-mail address (only) to be included in my mailing list.

You Can Also Find Me On Social Media:
Facebook page: The Grateful Girl Cooks!
Pinterest: The Grateful Girl Cooks!
Instagram: jbatthegratefulgirlcooks

Author's signature

Recipe Source: http://www.bonappetit.com/recipe/fried-chicken-sandwiches-with-slaw-and-spicy-mayo

↓↓ PRINTABLE RECIPE BELOW ↓↓

0 from 0 votes
Fried Chicken, Spicy Mayo and Slaw Sandwich
Prep Time
20 mins
Cook Time
15 mins
Total Time
35 mins
 

You're going to love this fried chicken sandwich on a toasted bun, with spicy mayo and slaw. Recipe from Bon Appétit magazine, and tastes fantastic!

Category: Entree
Cuisine: American
Keyword: fried chicken sandwich
Servings: 4
Calories Per Serving: 845 kcal
Author: JB @ The Grateful Girl Cooks!
Ingredients
For Spicy Mayo:
  • 1 garlic clove , finely chopped
  • 1/2 cup light mayonnaise (can use regular mayo too, of course)
  • 1 Tablespoon Louisiana-style hot pepper sauce
For Slaw:
  • 1/2 small red onion , thinly sliced
  • 1 jalapeno , finely chopped
  • 4 C. thinly sliced green cabbage
  • 1/2 cup Bread and Butter pickle slices , plus 1/4 cup pickle juice from jar
For Fried Chicken and Assembly:
  • 2 cups all purpose flour
  • 1 Tablespoon ground black pepper
  • 1/2 teaspoon salt (plus more for later)
  • 1 cup buttermilk
  • 2 . large chicken breasts (8 ounces each) , cut in half lengthwise
  • Vegetable or Peanut oil enough to cover bottom of skillet with ½ inch of oil.
  • 4 sandwich rolls (I used Kaiser rolls)
  • 2 TBSP unsalted butter , room temperature (I used regular...whatever!)
Instructions
  1. Make spicy mayo: Mix garlic, mayo and pepper sauce in small bowl. Cover and refrigerate.

  2. Make slaw: In a separate bowl, toss red onion, jalapeno, cabbage, and pickles to combine. Cover and refrigerate.

  3. To make chicken: In a small bowl, whisk flour, black pepper and salt. Set aside. In separate shallow bowl, pour buttermilk. Working with 1 piece of chicken at a time, dredge chicken in flour mixture, shaking off the excess. Then dip the chicken in the buttermilk, letting excess drip back into bowl. Dredge the chicken again in flour mixture, shaking off excess. Set chicken onto a piece of foil while you coat the remaining chicken pieces.

  4. Pour oil into a large, heavy skillet to a depth of at least ½ inch. Place the deep-fry thermometer into the oil so that the bulb is submerged. Heat over medium heat until the thermometer registers 350°. Carefully place the 4 chicken breasts into hot oil. Fry chicken until golden brown and cooked through (approximately 3-4 minutes per side). When done, remove chicken and transfer to a wire rack. Season with additional salt to taste.

  5. Spread the cut sides of the rolls with butter. Heat a large skillet or griddle over medium heat. Working in batches, grill rolls, butter-side down, till lightly brown and crisp (about 1 minute).

  6. To "build" sandwich: Spread bottom of the toasted sandwich roll with 1/4 of the spicy mayo. Then add fried chicken breast, followed by 1/4 of the slaw. Top with other half of roll, and enjoy!

Recipe Notes

You will need a deep-fry thermometer for this recipe.

Nutrition Facts
Fried Chicken, Spicy Mayo and Slaw Sandwich
Amount Per Serving (1 sandwich)
Calories 845 Calories from Fat 306
% Daily Value*
Fat 34g52%
Saturated Fat 18g113%
Cholesterol 98mg33%
Sodium 1192mg52%
Potassium 807mg23%
Carbohydrates 94g31%
Fiber 5g21%
Sugar 11g12%
Protein 39g78%
Vitamin A 580IU12%
Vitamin C 34.8mg42%
Calcium 188mg19%
Iron 5.7mg32%
* Percent Daily Values are based on a 2000 calorie diet.

Here’s one more to pin on your Pinterest boards!You're going to love this fried chicken sandwich on a toasted bun, with spicy mayo and slaw. Recipe from Bon Appétit magazine, and tastes fantastic!


Save

Save

Save

Orange Cheese Danish Pastry

Enjoy a delicious Orange Cheese Danish Pastry, a buttery, orange-glazed treat filled with orange-flavored cream cheese and ricotta. Recipe makes 2 pastries!Enjoy a delicious Orange Cheese Danish Pastry, a buttery, orange-glazed treat filled with orange-flavored cream cheese and ricotta. Recipe makes 2!
SERIOUSLY- Some mornings you just don’t want a nutritious, healthy breakfast. Period. I know that’s how it is for me some days…I want to eat a healthy breakfast, but… you know how it is. That’s how this recipe for Orange Cheese Danish Pastry came about.

You know how it is at times when you wake up and all you want is a humongous cup of steaming hot coffee and something sweet and “not so good for you”?

It was that way for me one morning, so I went on a search for something tasty that would rock my world (in a “breakfast-y” kind of way), and found this recipe.

Scroll Down For A Printable Recipe Card At the Bottom Of The Page

How This Orange Cheese Danish Pastry Is Made

I don’t have a lot of photos (sorry-my bad), but the process for making this delicious pastry is fairly simple. An orange-flavored cream cheese and ricotta cheese filling is mixed with other ingredients.

This creamy mixture is then spread down the middle of puff pastry sheets. The pastry dough is sliced and “decoratively draped over the filling in a cross-wise “weaving” sort of way.

The pastries (the recipe make TWO) are then baked until golden brown, and then glazed with an orange-flavored icing. Sliced almonds are also sprinkled over the top! Once the glaze firms up, this incredible tasting breakfast treat is ready to slice and EAT!

The orange cheese danish pastry is topped with glaze and sliced almonds when done.

This orange cheese danish pastry is fairly easy to make, and is really tasty! Why not give it a try…I think you will be surprised at how delicious it is! Hope you enjoy this Orange Cheese Danish Pastry! Have a great day.

Looking For More PASTRY Recipes?

You can find all of my recipes in the Recipe Index, located at the top of the page. A few favorite pastry recipes include:

Interested In More Recipes?

Thank you for visiting this website. I appreciate you using some of your valuable time to do soIf you’re interested, I publish a newsletter 2 times per month (1st and 15th) with all the latest recipes, and other fun info. I would be honored to have you join our growing list of subscribers, so you never miss a great recipe!
There is a Newsletter subscription box on the top right side (or bottom) of each blog post, depending on the device you use, where you can easily submit your e-mail address (only) to be included in my mailing list.

You Can Also Find Me On Social Media:
Facebook page: The Grateful Girl Cooks!
Pinterest: The Grateful Girl Cooks!
Instagram: jbatthegratefulgirlcooks

Author's signature

Recipe adapted from: https://sites.google.com/site/thecomfortofcookingrecipes/orange-cheese-danish-pastry

0 from 0 votes
Orange Cheese Danish Pastry
Prep Time
30 mins
Cook Time
25 mins
Total Time
55 mins
 

Enjoy a delicious Orange Cheese Danish Pastry, a buttery, orange-glazed treat filled with orange-flavored cream cheese and ricotta. Recipe makes 2!

Category: Breakfast
Cuisine: American
Keyword: orange cheese danish
Servings: 10
Calories Per Serving: 428 kcal
Author: JB @ The Grateful Girl Cooks!
Ingredients
  • 4 ounces ricotta cheese
  • 4 ounces cream cheese
  • 1/3 cup sugar
  • 1 large egg
  • 2 Tablespoons butter , softened
  • 1 Tablespoons all-purpose flour
  • 2 teaspoons grated orange rind
  • 1/2 teaspoon vanilla
  • 2 sheets frozen puff pastry , thawed (1 lb.)
ICING:
  • 1/2 cup confectioners sugar (powdered)
  • 1 Tablespoon orange juice
GARNISH:
  • 2 Tablespoon sliced almonds (or you can use walnuts or pecans)(optional)
Instructions
  1. Combine cheeses, sugar, egg, butter, flour, orange rind and vanilla in a large bowl. Beat with a whisk, or an electric mixer on medium speed, until well blended.
  2. Carefully unfold the pastry sheet into a rectangle; place it on a baking sheet.
  3. With a sharp knife make 2-inch deep cuts at 1-inch intervals on the long sides of the pastry. Spread 1/2 of the cheese mixture down the center 3 inches of the pastry.
  4. Crisscross strips over the filling, alternating sides and bringing the strips all the way across the filling.
  5. Repeat process for the second pastry.
  6. Bake in a preheated 400 degree oven approximately 25 minutes or until the bottom of the pastry is golden brown. Remove from oven and cool on a wire rack.
  7. While pastry is cooling down, sift confectioners sugar into the orange juice in a bowl. Mix until the icing is smooth.
  8. Drizzle the mixture over the pastries, then sprinkle with sliced almonds.
  9. Serve and Enjoy!
Nutrition Facts
Orange Cheese Danish Pastry
Amount Per Serving (1 slice (1/10 of total))
Calories 428 Calories from Fat 252
% Daily Value*
Fat 28g43%
Saturated Fat 10g63%
Cholesterol 41mg14%
Sodium 195mg8%
Potassium 85mg2%
Carbohydrates 37g12%
Fiber 1g4%
Sugar 14g16%
Protein 7g14%
Vitamin A 300IU6%
Vitamin C 2.1mg3%
Calcium 53mg5%
Iron 1.6mg9%
* Percent Daily Values are based on a 2000 calorie diet.

Here’s one more to pin on your Pinterest boards!Enjoy a delicious Orange Cheese Danish Pastry, a buttery, orange-glazed treat filled with orange-flavored cream cheese and ricotta. Recipe makes 2!


Save

Save

Save

Save

Save