I am currently enjoying a 2 week break from blogging for the holidays, because it is vacation time. This Grateful Girl looks forward to sharing some new and DELICIOUS recipes with you here in January, 2015!
Vacation Time!
categories: Uncategorized
Faith, Family, Fun… and Great Food, Prepared With Love
I am currently enjoying a 2 week break from blogging for the holidays, because it is vacation time. This Grateful Girl looks forward to sharing some new and DELICIOUS recipes with you here in January, 2015!
Enjoy these festive looking and delicious cranberry-orange pinwheel cookies, filled with swirled cranberry, orange and pecans.
Every time Christmas rolls around, I prepare lots of our family’s “traditional” must-have cookies and goodies. I also try a new recipe or two each year. This year I tried a new recipe I found (on Pinterest!) for Cranberry-Orange Pinwheel Cookies. I think they’re so festive looking! And here’s the good news… they are delicious! A big shout out goes to Rachel at bakedbyrachel.com for the recipe for this yummy batch of Christmas cookies!
The cookies not only look good… they smell good, too. They have a light citrus aroma from the orange zest; and the filling in the middle is made from chopped cranberries, brown sugar and pecans, for extra flavor.
These are wonderful little holiday cookies! I gave away lots of them on plates of Christmas goodies given to our neighbors and friends this year. Sure hope you will give them a try!
Scroll Down For A Printable Recipe Card At The bottom Of The Page
Begin by chopping up the cranberries, pecans and brown sugar. This is very easy to do in a food processor or blender.

The next thing to do is mix up the dough. The dough for these cranberry-orange pinwheel cookies sure smells good, because of the fresh orange zest!

Roll the dough out on a large piece of wax paper, and then add the cranberry/pecan mixture to the top. Spread the cranberry brown sugar and pecan filling over the entire surface of the dough, leaving just a little space around the edges.

Roll the dough for the cranberry orange pinwheel cookies carefully into a log shape (starting with the long side). You can use the wax paper to help roll it. Cover the cookie dough log tightly, and refrigerate it overnight.

After refrigerating it overnight, slice the dough for the cranberry-orange pinwheel cookies into 1/4″ slices, using a sharp knife. See how pretty they look in the photo below? The festive looking pinwheel cookies are then baked on a parchment paper lined baking sheet.

Bake the cookies at 375 degrees for 8-10 minutes. They will NOT be browned, but will be fairly soft once done. Voila! Here are the cranberry-orange pinwheel cookies, right after they were taken out of the oven.
Cranberry orange pinwheel cookies need to cool on the baking sheet for 1-2 minutes before removing (this helps them firm up a bit). Transfer the cookies to a a wire rack to finish cooling, and then they are ready to eat!

I hope you will consider making these cranberry-orange pinwheel cookies. The cranberry and orange filling tastes amazingly fresh and wonderful! They are always a big hit! Thanks for stopping by, and have a great day. Come back soon.
You can find all of my recipes in the Recipe Index, located at the top of the page. A few favorite cookie recipes you might enjoy include:
Thank you for visiting this website. I appreciate you using some of your valuable time to do so. If you’re interested, I publish a newsletter 2 times per month (1st and 15th) with all the latest recipes, and other fun info. I would be honored to have you join our growing list of subscribers, so you never miss a great recipe!
There is a Newsletter subscription box on the top right side (or bottom) of each blog post, depending on the device you use, where you can easily submit your e-mail address (only) to be included in my mailing list.
Facebook page: The Grateful Girl Cooks!
Pinterest: The Grateful Girl Cooks!
Instagram: jbatthegratefulgirlcooks
 Original Recipe Source: http://www.bakedbyrachel.com/a-tradition-cranberry-orange-pinwheels/

Place cranberries, pecans and brown sugar in a food processor (or high-powered blender/chopper). Process until ingredients become small pieces. Set aside.
In a large mixing bowl (or stand mixer), cream the butter and granulated sugar together until well combined. Add baking powder, salt, eggs, and orange zest. Beat on low/medium for one minute. Add flour (by spoonfuls) to the mixture, while mixing on medium speed, until all ingredients have been thoroughly combined. Once combined, cover bowl and refrigerate dough for 1 hour.
Divide chilled dough in half. Place one half in between sheets of wax or parchment paper. Roll dough out into a rectangle, approximately 1/4 inch thick. Remove the top layer of paper. Spread half of the cranberry-pecan mixture evenly over the top of the dough to within 1/2 inch of all edges. Roll up dough (begin with the SHORT side of dough). Guide the dough with your hands and use the wax or parchment paper to pull the dough up as you form a "log-shaped" roll. Pinch dough to seal ends. Repeat with other half of dough. Transfer each "dough log" onto a clean sheet of wax or parchment paper. Seal dough in paper. Tape shut. Refrigerate overnight. (Dough must be thoroughly chilled to cut clean, nice even slices).
When ready to bake cookies, preheat oven to 375 degrees. Using a very sharp knife, cut cookie dough into 1/4 inch slices. Place slices 1-2 inches apart on a parchment paper lined baking sheet. Bake cookies for 8-10 minutes, or just until bottoms of the cookies begin to turn golden brown. Remove from oven. Let cookies "rest" a few minutes before removing from baking sheet. Let cookies cool completely on wire racks. Enjoy!
Don't be scared away from making these due to the long refrigeration time. I made the dough up the day before I wanted to bake them. Then I baked them up the next day... no trouble!
Here’s one more to pin on your Pinterest boards!
Entertaining for the holidays? You will LOVE this creamy Chocolate Fudge Truffle Cheesecake with chocolate graham cracker crust and chocolate drizzle garnish!
Cheesecake is my favorite dessert. Ever. This recipe for Chocolate Fudge Truffle Cheesecake is one of my favorites! Creamy AND fudge-like… cheesecake AND chocolate? How could you NOT love this dessert? So here ya go… sure hope you enjoy it! I know we do!
Scroll Down For A Printable Recipe Card At The Bottom Of The Page
Years ago, I was trying to come up with a recipe for chocolate cheesecake. I read through several recipes (none of which I remember 20+ years later), and combined various elements from 3 of them to create this recipe.
I’ve made this chocolate fudge truffle cheesecake with a chocolate graham cracker crust for so many special occasions over the past 2 decades, I can’t even count them. I made this absolutely delicious cheesecake again for some friends who came over for dessert about a week ago, and decided it was time to put the old Chocolate Fudge Truffle recipe on my blog.
A chocolate graham cracker crust is made (easy). This crust is formed by patting down the crumbs firmly in the bottom of a springform pan. Here is the crust, ready for the chocolate fudge truffle cheesecake filling to be added on top.

Chocolate fudge truffle cheesecake filling is poured onto the chocolate graham crust. Now the cheesecake is ready to be baked in the oven!

This is what the cheesecake looked like, immediately after it came out of the oven. You can tell it has risen quite a bit during the baking. Let it cool, in the pan, on a wire rack.

The next thing to do is mix up the sweetened sour cream topping for the cheesecake while it is cooling. This topping is simple to make with sour cream, vanilla and sugar, and is spread on top of the cooled cheesecake.

The surface of the cheesecake is already looking good, so far. Now it’s time to “fancy it up” a little bit by added chocolate swirled topping to the top of the dessert.
It’s easy to make a simple melted chocolate glaze in a snap, then it is drizzled on top of the cheesecake in a decorative design.

Here’s the finished chocolate fudge truffle cheesecake! It has been drizzled with chocolate, and topped with a decorative holly leaf garnish! After decorating, the cheesecake is thoroughly chilled until nice and cold, and then it’s ready to slice. Want to have a piece? It’s YUMMY GOOD.

You can also drizzle the serving plates with caramel and chocolate sauce if desired. The only thing left to now is slice a piece, and dig in!

We LOVE this rich, creamy decadent cheesecake, especially during the holidays! Hope you enjoy it, as well. Thank you for stopping by, and I hope you will come back again soon. Take care, and have a great day!
You can find all of my recipes in the Recipe Index, located at the top of the page. I have LOTS of delicious dessert recipes, including:
Thank you for visiting this website. I appreciate you using some of your valuable time to do so. If you’re interested, I publish a newsletter 2 times per month (1st and 15th) with all the latest recipes, and other fun info. I would be honored to have you join our growing list of subscribers, so you never miss a great recipe!
There is a Newsletter subscription box on the top right side (or bottom) of each blog post, depending on the device you use, where you can easily submit your e-mail address (only) to be included in my mailing list.
Facebook page: The Grateful Girl Cooks!
Pinterest: The Grateful Girl Cooks!
Instagram: jbatthegratefulgirlcooks

Here’s one more to pin on your Pinterest boards! 
It’s easy to make this yummy layered chicken enchilada casserole, filled with chicken, corn tortillas, creamy sauce, onions, green chiles, and cheddar cheese.
I received this recipe for a Layered Chicken Enchilada Casserole from my Mom’s best friend over 35 years ago. It is a family favorite meal to this day. It’s a recipe I have made countless times over the years, and during my 30+ years of heading to work every day, really appreciated how quickly it can be assembled, cooked, and enjoyed!
I love Mexican food, and typically eat enchiladas with the traditional red sauce. However, this recipe has a white sauce, with onions and green chiles, so the very first time I made it years ago, I wasn’t sure I would enjoy it. I was wrong. This is a hearty casserole that can easily serve 8-10 people. It’s not too spicy, but has a wonderful flavor from the layers of chicken, corn tortillas, green chiles, onions, white sauce, and cheese. It is absolutely delicious (especially the second day, for leftovers!), and is a snap to prepare.
Since the baking time is only 30 minutes, it is easy to prepare early in the day, cover and refrigerate it until ready to cook, then slam it (such a nice verbal picture, huh?) in the oven, and enjoy it a short time later. Here’s a few pics to show you the “ho-to’s of making this easy casserole:
Scroll Down For A Printable Recipe Card At The Bottom Of The Page
Cook the onions and green chiles in a large skillet to begin making the sauce for this casserole.

The remaining sauce ingredients are added to the skillet, and now the sauce is cooking happily.

3 layers are added, consisting of tortillas, chicken, sauce and cheddar cheese. Once fully layered, the casserole is ready to bake! This layering is easy to do, because you don’t have to fill and roll the tortillas, as you need to do with traditional enchiladas! You just have to tear the tortillas into pieces and LAYER them!

Here is the layered chicken enchilada casserole ready to eat, with a small salad on the side. Cheesy, chicken enchilada casserole… for the win!

Hope you will give this layered chicken enchilada casserole a try. It’s EASY and DELICIOUS. I REALLY think you will like it, and the leftovers can be EASILY reheated, too!
You can find all of my recipes in the Recipe Index, located at the top of the page. I have several casserole dishes, including:
Thank you for visiting this website. I appreciate you using some of your valuable time to do so. If you’re interested, I publish a newsletter 2 times per month (1st and 15th) with all the latest recipes, and other fun info. I would be honored to have you join our growing list of subscribers, so you never miss a great recipe!
There is a Newsletter subscription box on the top right side (or bottom) of each blog post, depending on the device you use, where you can easily submit your e-mail address (only) to be included in my mailing list.
Facebook page: The Grateful Girl Cooks!
Pinterest: The Grateful Girl Cooks!
Instagram: jbatthegratefulgirlcooks
Have a wonderful day!
Original recipe source: Sandy Rohrbacher

A whole rotisserie chicken can also be used as a substitute for the cooked chicken breasts, if you're pinched for time. Easy!
Here’s one more to pin on your Pinterest boards!
I LOVE making Christmas goodies, to give to friends and family. Here’s a Holiday Goodies Collection of 20+ recipes posted this year… each recipe is tried and true… and DELICIOUS! If you’re still looking for something yummy to make over the holidays, I would humbly ask you to give these recipes a look, with the hope that you might be able to find a new recipe or two, for your holiday celebration. Each picture (below) has the link to that particular recipe directly above it.
I really hope you have a wonderful holiday season, as you celebrate with family and friends. I love to give gifts to others at Christmas, but remain most grateful for the amazing gift God gave me, by sending His only son, Jesus, to this crazy old world as a baby in a manger. The God of the entire universe became a tiny baby who would grow up and die for my sins… wow! It still boggles my mind… I firmly believe that many times, the very best gifts come in small packages! Merry Christmas!
Click on title of each recipe for a direct link to that particular recipe!


Chocolate Dipped Coconut Macaroons

![]()


Chocolate Butterscotch Peanut Clusters


Lemon Panna Cotta With Raspberry-Orange Sauce

Candied Orange, Cinnamon & Clove Spiced Pecans


Mom’s Famous Cream Cheese Ball


 Have fun in the kitchen this blessed season!
And, from our home to yours… Merry Christmas!

You will enjoy these New York style Gingerbread Bagels! Perfect treat for the holidays (or any time), they’re boiled then baked, chewy AND delicious!, they're boiled then baked, chewy AND delicious! / The Grateful Girl Cooks!")
It’s my favorite time of the year…Cold mornings, Nativity scenes, Christmas lights, Christmas trees, Christmas music, the wonder of small children as they experience the season, and Gingerbread Bagels… wait, what?
Yep… you heard me. Just let it sink in… GINGERBREAD BAGELS. I found the recipe for these yummy bagels last year on Pinterest and made them to enjoy. Since the holiday season has rolled around once again, I thought I would share the recipe with you.
Scroll Down For A Printable Recipe Card At The Bottom Of The Page

I share this recipe for gingerbread bagels with the hopes that you will consider giving them a try. Most of the prep time listed includes two rising times for the dough, so it isn’t ACTIVE prep time.
I put that disclaimer there so no one would freak out… not that anyone would during this busy time of year. See – you can wrap presents or run to the grocery store, or even sing a few Christmas carols while the dough is rising… it’s not so bad!
Gingerbread bagels (especially these with molasses and traditional gingerbread spices) seems like a natural fit with the holiday season, don’t you think?
So here we go! Grab some coffee, tea or egg nog to sip on as you work, some cream cheese (to spread on the finished bagels), and make these gingerbread bagels… stat! Here’s a few pics of the process:
The gingerbread bagels dough is no problem to mix up using a stand mixer or electric beaters.

The gingerbread bagel dough is mixed, and now looks like the dough is ready to rise.

The dough is covered with dish towel and is rising in a warm spot. Yes, it happened to be sunny that day, so the dough rose out in the natural sunlight.

After the dough has risen, the gingerbread bagels are formed into round circulular shapes. A hole is formed in the middle of the dough. They are boiled briefly, then baked until done in the oven.

Once the gingerbread bagels have finished baking, they are transferred to a wire rack to cool down a bit.

Guess what the only other thing left to do is? That’s right! Slice one open, and grab the butter or the cream cheese! You’re gonna enjoy this homemade bagel!

You’re gonna enjoy every bite of these homemade, chewy, flavorful gingerbread bagels! These wonderful tasting bagels are nice and chewy… just like a true New York style bagel SHOULD always be!
If you enjoy making homemade bagels, be sure and check out my other bagel recipes!
Sure do hope you enjoy these delicious gingerbread bagels, or any of the others listed above! Have a great day!
Thank you for visiting this website. I appreciate you using some of your valuable time to do so. If you’re interested, I publish a newsletter 2 times per month (1st and 15th) with all the latest recipes, and other fun info. I would be honored to have you join our growing list of subscribers, so you never miss a great recipe!
There is a Newsletter subscription box on the top right side (or bottom) of each blog post, depending on the device you use, where you can easily submit your e-mail address (only) to be included in my mailing list.
Facebook page: The Grateful Girl Cooks!
Pinterest: The Grateful Girl Cooks!
Instagram: jbatthegratefulgirlcooks
Recipe Source: http://www.bakeaholicmama.com/2013/12/no-knead-gingerbread-bagels.html

Here’s one more to pin on your Pinterest boards!, they're boiled then baked, chewy AND delicious! / The Grateful Girl Cooks!")
It’s easy to make these absolutely DELICIOUS snickerdoodles! These classic cookies are soft and puffy, and are coated with a cinnamon sugar topping!
I recently tried a new recipe for Snickerdoodles. I’ve been baking snickerdoodle cookies for years and years with the same old recipe, and love them!
Recently I saw a “new” recipe on a website I love that looked interesting, so I gave it a try. The blogger I got this snickerdoodles recipe from is Chris Scheuer, at The Cafe Sucré Farine. She found this recipe in a cookbook from a famous bakery in London, England.
Bakeries tend to get things right in the cookie baking department, so I knew THESE snickerdoodles just HAD to be delicious, so I made a batch. The result? Outstanding! Do you know the story behind the humble snickerdoodle cookie? It’s pretty interesting. Find out here. It’s become such a well loved American classic cookie!
Scroll Down For A Printable Recipe Card At The Bottom Of The Page
My tried and true recipe for snickerdoodles are delicious, but usually come out fairly flat in appearance, like these pictured below. They’re absolutely wonderful, but flat in shape.

Not these NEW beauties! The snickerdoodles puffed up quite nicely! These cookies have a delicious cinnamon/sugar topping. The inside of the cookies are soft and fluffy, making these the perfect snickerdoodles, in my humble opinion.
I am glad I found this recipe and will happily make these yummy cookies again. Snickerdoodles would be perfect for gift-giving over the holidays or for a special occasion! They are easy to make… and let’s be honest here… who doesn’t love to eat cookies over the holidays? Wait, wait… who doesn’t like a good cookie ANYTIME???
Once the dough is made, the snickerdoodles are rolled into balls, coated with cinnamon and sugar, and then are ready to bake!
 Baked Snickerdoodles Are Nice And PUFFY!
Once the cookies have baked, they look like THIS! Behold… the humble little snickerdoodle! Can you tell that it is puffy? They are light and airy, and absolutely wonderful.

Maybe you can see how puffy and “pillowy” these snickerdoodle cookies are in the photo below. Yum. You’re gonna need to run and grab a cup of coffee, and help me eat these cute snickerdoodles! I would love to share a few with you!

Hope you will give these delicious cookies a try. I know you’re gonna LOVE them!
Here are a few cookie recipes on my blog. You can find these and other yummy cookie recipes in the Recipe Index, located at the top of the page.
Thank you for visiting this website. I appreciate you using some of your valuable time to do so. If you’re interested, I publish a newsletter 2 times per month (1st and 15th) with all the latest recipes, and other fun info. I would be honored to have you join our growing list of subscribers, so you never miss a great recipe!
There is a Newsletter subscription box on the top right side (or bottom) of each blog post, depending on the device you use, where you can easily submit your e-mail address (only) to be included in my mailing list.
Facebook page: The Grateful Girl Cooks!
Pinterest: The Grateful Girl Cooks!
Instagram: jbatthegratefulgirlcooks
Recipe Source: http://thecafesucrefarine.com/2012/06/snicker-doodles-from-londons-famous/#_a5y_p=1383068

Here’s one more to pin on your Pinterest boards!
Make delicious Cranberry Cashew Clusters, with only 3 ingredients (dried cranberries, white chocolate and cashews)! Easy to make, and perfect for gift giving!! Easy to make, and perfect for gift giving! / The Grateful Girl Cooks!")
Easy. Quick. Yummy. That explains this recipe for Cranberry Cashew Clusters, in a nutshell. Well… not really IN a nutshell, but you know what I mean, right?
This recipe is made with only 3 ingredients. They are white chocolate chips, dried cranberries and cashew pieces! Semi-sweet chocolate OR white chocolate can be used, depending on your taste. I love using white chocolate, because the cranberries show up a little bit better in the candy!
Scroll Down For A Printable Recipe Card At The Bottom Of The Page
Anyways… this cranberry cashew clusters recipe is as simple as melting the chocolate, and stirring in the dried cranberries and cashews. The you can place this mixture by spoonfuls (or spreading it out) onto wax paper. If you spread the mixture out, then the cranberry cashew clusters can be broken into bite-sized pieces once it has hardened.
The recipe makes approximately 2 dozen of these delicious cranberry cashew clusters. You should store them in an airtight container in the refrigerator, to keep the chocolate firm.

Cranberry Cashew Clusters are perfect little goodies to make when you are pressed for time! It’s so easy to make these delicious goodies to give to others, or have on hand for your ravenous family.
The chewy cranberries, crunchy cashews, and the sweet chocolate coating combine to make cranberry cashew clusters a wonderful treat! Sure hope you will give them a try! Have a great day, and please come back soon for more recipes
You can find all of my recipes in the Recipe Index, located at the top of the page. I have lots of yummy candy recipes you might want to check out, including:
Thank you for visiting this website. I appreciate you using some of your valuable time to do so. If you’re interested, I publish a newsletter 2 times per month (1st and 15th) with all the latest recipes, and other fun info. I would be honored to have you join our growing list of subscribers, so you never miss a great recipe!
There is a Newsletter subscription box on the top right side (or bottom) of each blog post, depending on the device you use, where you can easily submit your e-mail address (only) to be included in my mailing list.
Facebook page: The Grateful Girl Cooks!
Pinterest: The Grateful Girl Cooks!
Instagram: jbatthegratefulgirlcooks
Recipe Source: http://www.tasteofhome.com/recipes/cranberry-clusters

Here’s one more to pin on your Pinterest boards!! Easy to make, and perfect for gift giving! / The Grateful Girl Cooks!")
Classic Beef Stew, a “comfort food” soup filled with meat, potatoes, carrots, beans, and tomatoes, is a hearty and filling meal on a cold day!
My husband and I just returned home after an 11 day road trip to San Diego for Thanksgiving. It was freezing cold when we returned to our home in Oregon, so I decided to make some Classic Beef Stew for our first dinner home.
I found the recipe for this stew in one of my old copies of Taste of Home magazine years ago. I had cut out the recipe and saved it, but had never made this particular recipe before. I grew up in a home where my Mom made beef stew all the time, and that has been the recipe I have used for years, but decided to try this one, this time.
It turned out wonderful! This classic beef stew is baked over a couple of hours time, so the entire house smelled so amazingly good! My husband and I enjoyed this beef stew; it was easy to make, and since it yields 6-8 servings, we have leftovers for another meal!
Scroll Down For A Printable Recipe Card At The Bottom Of The Page
Here is how you make this hearty stew. Start by browning the stew meat in an ovenproof baking dish.


Add chopped onions, tomatoes, beef broth, garlic, and spices to the stew meat in the pan. Give it all a good stir, to mix it together.

You will need to transfer the mixture to an ovenproof baking dish, if not already using one, then bake the stew (covered) for 1½ hours. Pretty positive you are gonna love the smell in your kitchen as this classic beef stew bakes!

Remove the hot stew pan from the oven. Add potatoes, celery, carrots, and green beans to the classic beef stew. Mix well, to combine. Bake for an additional hour (covered).

 Time To Serve And Eat Classic Beef Stew
When done baking, carefully remove the baking dish from oven, because it will be HOT. Dish this classic beef stew up into individual bowls, to serve! I’m pretty sure you will be surprised at how tender the meat is!

I sure hope you will give this classic beef stew a try! We love it, served with some crusty sourdough bread on the side. Hope you enjoy this perfect winter meal!
You can find all of my recipes in the Recipe Index, located at the top of the page. I have a couple delicious stew recipes you will enjoy, like West African Chicken and Peanut Stew, or a vegetarian friendly Lentil Stew. They’re both delicious and I highly recommend them!
Thank you for visiting this website. I appreciate you using some of your valuable time to do so. If you’re interested, I publish a newsletter 2 times per month (1st and 15th) with all the latest recipes, and other fun info. I would be honored to have you join our growing list of subscribers, so you never miss a great recipe!
There is a Newsletter subscription box on the top right side (or bottom) of each blog post, depending on the device you use, where you can easily submit your e-mail address (only) to be included in my mailing list.
Facebook page: The Grateful Girl Cooks!
Pinterest: The Grateful Girl Cooks!
Instagram: jbatthegratefulgirlcooks
Recipe slightly adapted from: Taste of Home Magazine (year unknown), pg. 55, by Alberta McKay, of Bartlesville, Oklahoma

Here’s one more to pin on your Pinterest boards!
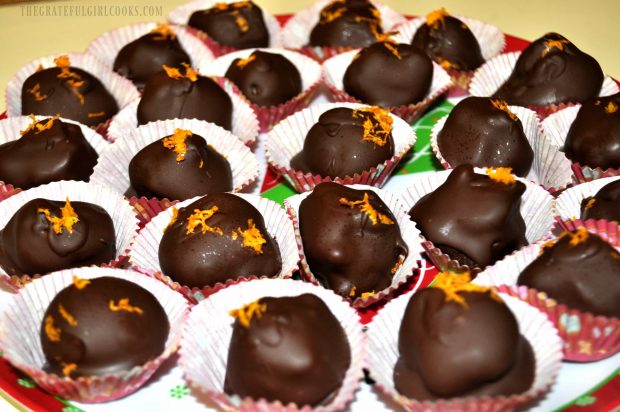
Do you enjoy Christmas goodies? Some of my favorite Christmas goodies to make are Chocolate Orange Truffles. Creamy orange flavored chocolate centers, covered with more chocolate… oh my goodness! They taste wonderful, and are perfect for gift giving!
Rich, creamy, chocolate truffles infused with just the right amount of orange flavor…YUM… what a taste treat! These delicious truffles are wonderful to give as gifts over the holidays, or simply to enjoy any time of the year.
The pairing of chocolate and orange remains one of my top flavor combos… it’s so GOOD! These truffles are easy to make (really… trust me!), and are a delicious and pretty treat or homemade gift for friends or family. They are absolutely delicious, and I think you will LOVE them!
I’ve been making these for as long as I can remember (over 30 years). I don’t even remember where I found the original recipe. I copied it down on a 3×5 card many, many years ago and have been making these for family and friends ever since!
Scroll Down For A Printable Recipe Card At The Bottom Of The Page
I’ve made these chocolate orange truffles with semi-sweet chocolate topping with just a little bit of grated orange zest for a garnish. Once they are placed in cute little candy paper liners, they look so festive, especially for gift-giving.
Another option is to dip the chocolate orange truffles in white chocolate, and then drizzle them with semi-sweet chocolate on top.
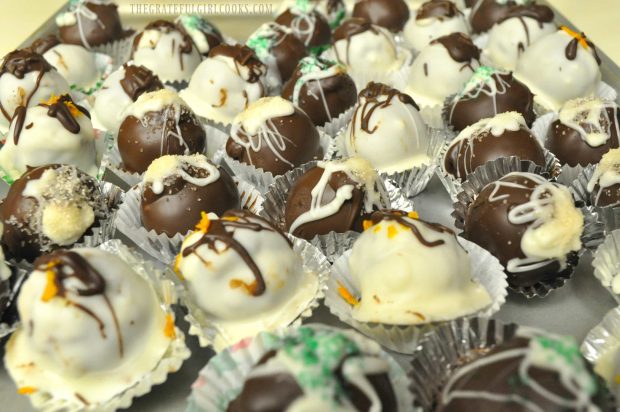
My favorite way is to dip them in semi-sweet chocolate and garnish each truffle with a melted white chocolate drizzle. Trust me, you really can’t go wrong with any of these dipping methods! Any way you make them, these chocolate orange truffles are delicious!

Don’t let the Prep Time scare you away from making these… most of the prep time is not active prep time… it’s just letting the truffles cool off in the refrigerator before dipping them in melted chocolate coating! Go wrap presents or put Aunt Edna’s fruitcake by the front door to use as a doorstop… whatever YOU like to do with some “hurry up and wait” time!
Thanks for stopping by today, and I hope you will come back soon. Have a wonderful day.
You can find all of my recipes in the Recipe Index, located at the top of the page. I have some delicious truffle and bon bon recipes you might enjoy, including:
Thank you for visiting this website. I appreciate you using some of your valuable time to do so. If you’re interested, I publish a newsletter 2 times per month (1st and 15th) with all the latest recipes, and other fun info. I would be honored to have you join our growing list of subscribers, so you never miss a great recipe!
There is a Newsletter subscription box on the top right side (or bottom) of each blog post, depending on the device you use, where you can easily submit your e-mail address (only) to be included in my mailing list.
Facebook page: The Grateful Girl Cooks!
Pinterest: The Grateful Girl Cooks!
Instagram: jbatthegratefulgirlcooks
Original recipe source: unknown

Most of the prep time listed is not active "cooking time"... it's just letting the chocolate truffles cool off in the refrigerator before finishing them off with the coating.
Here’s one more to pin on your Pinterest boards!