Canning Apple Cranberry Juice for long-term storage is easy to do, using only 3 ingredients, canning jars/lids and a water bath canner.

I love canning foods for long term storage. Previously I’ve enjoyed canning cranberry juice for our pantry and loved how it tasted, so it seemed only natural that I should try another flavor!
Last December I realized I still had some fresh cranberries in our refrigerator, so I decided to can some apple cranberry juice.
I only had enough cranberries left to make three, quart-sized jars of the juice, but I’m sure glad I made the juice and enjoyed having it in our pantry AND drinking it, too!
If you are a seasoned canner, then canning apple cranberry juice will be a cinch. If you are new to canning, I will show you how to do this, step by step!
Here’s how to make and can 3 quart-sized jars of apple cranberry juice, using fresh cranberries, granulated sugar and a bottle of apple juice or cider.
Scroll Down For A Printable Recipe Card At The Bottom Of The Page
Before Beginning- A Bit Of Prep
Any time you are canning food there are a few basic canning steps you need to take before beginning. They are: *Sterilize/heat the canning jars you are using in simmering water. *Prepare the jar flat lids and screw bands according to the manufacturer’s instructions.
You will also need to fill a water bath canner with water, per the manufacturer’s directions and bring this water to a simmer on Low heat.
Heat The Apple Juice Or Cider
For this recipe you will need a bottle of apple juice or apple cider. I recommend using a juice or cider that has no additional sugar added, because you will be adding granulated sugar to the jars already.
Pour the juice or cider into a large saucepan. Bring the juice to a boil, then reduce the heat and keep the juice/cider warm while you are filling the jars. The amount of juice you will need depends on the number of jars you are filling.
My photos will show you how to make three quart-sized jars of apple cranberry juice, so I used one 64 oz. jug of apple cider.
This recipe can easily be doubled, so the amount of juice you will need depends on the number of jars you are filling.


Fill The Hot Quart Canning Jars
Directions For EACH Jar: Rinse and drain the fresh cranberries and then measure 1¾ cups of cranberries into each sterilized, hot, quart-sized canning jar. The canning jars will not be full.

Next add ¼ cup of granulated sugar into each of the jars. There’s no need to stir the cranberries and sugar, because the sugar will dissolve and mix in, once warm apple juice or cider is added.

Carefully pour the warm apple juice or cider into each hot jar. I recommend using a canning funnel for less mess or drips! Fill the jars, leaving ½” headspace in each jar.
Remove the air bubbles from each jar by inserting a skewer or plastic knife into each jar around the edges. Adjust the headspace, if necessary, by removing or adding juice.
Wipe the rim of each jar clean with a damp cloth. Place a flat lid on each jar, add the screw band, then tighten until the band is fingertip tight. Repeat with all filled jars.

Canning Apple Cranberry Juice
Carefully place the sealed jars on a canning rack into a water bath canner (with the simmering water inside). Lower the rack into the hot water.
IMPORTANT: Make sure the jars are fully covered by 1″ of water above the jar lids, adding additional hot water, if necessary. Cover the canner with a lid.
Bring the water to a rolling boil, then set the timer for timer for processing. Process the jars for 20 minutes. Keep the jars at a gentle boil throughout the processing time (you may have to reduce the heat slightly).


Cool Jars And Store In A Dark Place
Once the jars have been processed, turn off the heat. Remove the lid, then let the jars rest 1-2 minutes before removing them from the canner.
Use canning tongs to transfer the hot jars onto a dish towel to cool. IMPORTANT: Do NOT put the hot jars directly on the counter, because temperature variances could cause the jars to crack or break.
Let the jars cool to room temperature, without disturbing them (about 12 hours). You should hear the lids “pop” or “ping” as each jar seals and becomes airtight.
Once the jars have cooled completely, check to ensure each jar is sealed. The lid should have no flexibility on top when you press down on it with a finger. Gently remove the screw bands from each jar for storage.
Store The Apple Cranberry Juice While It Develops
Store the sealed jars in a dark place in the pantry for 4-6 weeks as it develops its color and flavor. You want it to be away from heat and light while the juice develops.
Once a week during this storage time, carefully flip each jar upside down and then turn the jar quickly right side up. This helps infuse the extracted cranberry juice (and red color) into the liquid.
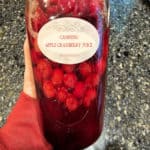
You can see in the photo below what the jars look like before storing, with the gold color of the apple juice showing.

As the jars sit (and are flipped) for the 4-6 weeks storage time, the sugar will begin to pull the juice out of those plump cranberries.
You will start to notice as time goes on, the color of the liquid will begin to darken to a beautiful red color.

Enjoy A Glass Of Apple Cranberry Juice
After 4-6 weeks the jars of apple cranberry juice should be ready to be opened and enjoyed! TIP: I recommend storing the juice the full 6 weeks for best flavor!

When you’re ready for a glass of apple cranberry juice, open a jar and remove the cranberries from the juice. Check out my tip below for what you can do with the leftover juicy cranberries as you open each jar for use!
To serve, pour the juice over ice and enjoy delicious apple cranberry juice any time of year! It is really GOOD! Cover and refrigerate any open jars of juice.
TIP: If you want to make the apple cranberry juice bubbly, add a small amount of sparkling water to each glass and stir to combine.

Tip- Save And Dehydrate Leftover Cranberries!
Don’t discard those cranberries after you’ve removed them from the jars! If you want to use the cranberries from inside an opened jar, consider drying them in a food dehydrator, an oven on low temps, or on a drying rack.
You will want them to be completely dried all the way through (yet pliable) in order to safely store them. This is a great way to get a second use from this recipe, in my opinion.
The cranberries are quite “plump and juicy” after soaking in the liquid for 4-6 weeks, so I recommend straining them out and laying them on paper towels to slightly dry them. Use a toothpick to poke them (to release a bit of the liquid) before dehydrating.
Once the cranberries are completely dried, they can be stored safely and used in baked goods, salads, etc. They taste similar to Craisins, due to the sweetness of the cranberry liquid they were soaking in.

I hope you have the opportunity for canning apple cranberry juice and trust you’ll enjoy the “fruit” of your labors. The juice (if the jars have sealed properly) can be stored for 12-18 months in a dark, cool pantry.
Looking For More CANNING Recipes?
You can find ALL of my recipes in the Recipe Index, which is located at the top of the page. I have a variety of canning recipes (water bath and pressure canning) to choose from, including:
- How To Can Dried Beans
- How To Can Strawberry Jam
- Canning Cranberry Juice
- Canning Sliced Peaches
- Ham and Bean Soup (and how to can it)
Want More Recipes? Get My FREE Newsletter!
I publish a newsletter 2 times per month (1st and 15th) with lots of recipes, tips, etc.
Would you like to join our growing list of subscribers?
There is a Newsletter subscription box on the top right (or bottom) of each blog post, depending on the device you use.
You can submit your e-mail address there, to be added to my mailing list.
Find Me On Social Media:
Facebook page: The Grateful Girl Cooks!
Pinterest: The Grateful Girl Cooks!
Instagram: jbatthegratefulgirlcooks

↓↓ PRINTABLE RECIPE BELOW ↓↓
Canning Apple Cranberry Juice for long-term storage is easy to do, using only 3 ingredients, canning jars/lids and a water bath canner.
- 5¼ cups fresh cranberries rinsed, drained
- ¾ cup granulated sugar
- 64 ounces apple cider or juice (no added sugar) *may not have to use it all!
Sterilize/heat the canning jars in simmering water. Prepare jar flat lids and screw bands according to manufacturer's instructions. Fill a water bath canner with water, per manufacturer's directions; bring water to a simmer on Low heat.
Pour cider (or juice) into a large saucepan. Bring juice to a boil, then reduce heat and keep it warm while you fill the jars.
Rinse/drain fresh cranberries. Measure 1¾ cups of cranberries into EACH sterilized, hot jar. Jars will not be full. Add ¼ cup sugar into EACH jar. Carefully pour warm cider/juice into EACH jar, using a canning funnel for less drips! Fill jars, leaving a ½" headspace in each jar.
Remove air bubbles from jars by inserting a skewer or plastic knife into each jar around the edges. Adjust headspace, if necessary (remove or add juice). Wipe the rim of each jar clean with a clean, damp cloth. Place a flat lid on each jar, add the screw band, then tighten until band is fingertip tight.
Carefully place jars on a canning rack into a water bath canner (with simmering water inside). Lower rack into the hot water. IMPORTANT: Make sure jars are covered by 1" of water above the jar lids, adding additional hot water, if necessary. Cover canner. Bring the water to a rolling boil, THEN set timer for processing. Process quart jars for 20 minutes. Keep water at a gentle boil throughout the processing time (you may have to reduce the heat slightly).
Once the jars have been processed, turn off the heat. Let jars rest 1-2 minutes, then carefully remove the lid. Use canning tongs to transfer hot jars onto a dish towel to cool. IMPORTANT: Do NOT put the hot jars directly on the counter, because temperature variances could cause jars to crack or break. Let jars cool to room temperature, undisturbed (about 12 hours). You should hear the lids "pop" or "ping" as each jar seals and becomes airtight. Once jars have cooled completely, check to ensure each jar is sealed. The lid should have no flexibility on top when you press down on it with a finger. Remove the screw band from each jar for storage.
Store sealed jars in a dark place in the pantry for 4-6 weeks as the juice develops flavor and color. Once a week, carefully flip each jar upside down and then turn quickly right side up. This helps infuse the extracted cranberry juice (and red color) into the liquid. As the jars sit (and are flipped) during the 4-6 weeks, the sugar will begin to extract juice from the cranberries. You will notice the color of the juice darkening to a beautiful red color as time goes on.
After the 4-6 weeks, the juice is ready. Open a jar; remove cranberries from the juice (see my blog post for how to use the cranberries!). To serve, pour juice over ice and enjoy. TIP: If you want to make the juice bubbly, add a small amount of sparkling water to each glass; stir to combine. Cover and refrigerate any open jars of juice. Canned juice (unopened jars) can be stored for 12-18 months.
NOTE: Caloric calculation is an estimate, based on the raw ingredients used in each quart-sized jar.
Here’s one more to pin on your Pinterest boards!