Traeger Smoked Pork Loin Roast (seasoned with dry rub spices) tastes amazing right off the smoker, OR as a tasty pulled pork sandwich, coated in BBQ sauce!
 tastes amazing right off the smoker, OR as a tasty pulled pork sandwich, coated in BBQ sauce! / The Grateful Girl Cooks!")
Someone Got A TRAEGER!
My husband has a NEW Traeger grill that he received for his birthday and Father’s Day (what a great combo gift) this past June. We have had fun trying new recipes for chicken, sausages, pork, steak, (and even dessert) ever since!

We were anxious to try pulled pork (as well as a “bazillion” other recipes), so I searched for a spice rub recipe online that sounded like it would be really good. My husband bought a 3 pound pork loin roast and we decided to cook it on our grill, seasoned with some of the spice rub I found online (which is perfect for pork or chicken).
We used the cookbook that came with the grill purchase to determine how long the roast would take to smoke, then slow roast. We crossed our fingers and followed the process exactly, and the results were wonderful! YAY- SUCCESS on a smoked pork loin roast!
Scroll Down For A Printable Recipe Card At The Bottom Of The Page
Here’s How We Made This Delicious Roast On Our Traeger Grill
Start by making the dry spice rub. EASY! Place the dry rub spices in a medium sized bowl. Mix well, to fully combine ingredients. I cut the recipe in half. The flavor-filled dry rub recipe made enough for the pork roast, PLUS a couple of extra uses. We’ve also used the spice rub on a whole chicken, and STILL have some left over (stored in an airtight container) for the next pork roast or chicken we grill.


Cover all sides of the pork roast with the dry spice rub, patting it onto the surface of the meat. The slight moisture of the meat will help the spices stick! When done, set seasoned roast aside until ready to put it in the smoker.

Ready To Make A Traeger Smoked Pork Loin Roast?
When ready to begin, turn the Traeger grill to the SMOKE setting. Let it fire up for 4-5 minutes, with the lid OPEN. Once grill is smoking, turn the temperature gauge to 225° F. Close the lid on the grill and let it preheat for 10 to 15 minutes. It doesn’t really matter, but in case you’re curious… we used Mesquite wood pellets for our Traeger smoked pork loin.
Once the grill/smoker is preheated, place an aluminum pan with 2 cups of apple juice into a corner (this will help keep some nice moisture in the grill during the long smoking process). Another option for this is to use a spray bottle and spritz the apple juice onto the roast about once an hour, if desired. Place the seasoned pork loin roast on the grill, FAT SIDE UP. Insert the temperature probe into the meat. Roast the pork for 3 hours, with the lid closed.

After pork has smoked/roasted for 3 hours, transfer the meat into an aluminum pan, and place back onto grill (with temperature probe still attached). Continue to cook the smoked pork loin roast for 5-6 hours, or until the temperature in the thickest part of the meat (not touching any bones) reaches an internal temperature of 190° F. The long cooking time ensures the meat will be very tender!

Almost Time to EAT!
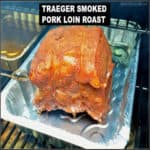
This is what the pork loin roast looked like, once it was done. Remove roast from grill. Cover the pan loosely with aluminum foil, and let the meat rest for approximately 30 minutes. Pour any accumulated juices in the pan into a separate container (or gravy separator). Transfer the Traeger smoked pork loin roast to a cutting board.

While the pork is still quite hot, slice it OR pull the pork into chunks (or shred with two forks). Be sure to discard any fat or bones (nobody wants a big bite of THAT!). You can add additional seasoning rub (and a little of the reserved juices) to the meat at this point OR mix meat with a favorite BBQ sauce. At that point, it’s ready to gobble up, and we cut off a portion of the Traeger smoked pork loin roast to eat just as it was (with it’s incredible smoked flavor). Yum.
We Shredded Part Of The Pork Loin To Make BBQ Sandwiches
After that, we took the remaining half of the roast, and pulled it into shreds. To the shredded pork we added a delicious a sweet n’ spicy BBQ sauce (Sweet Baby Ray’s), and mixed it until everything was covered! You can still see part of the pink “smoke” ring in the meat before I mixed in the sauce!

Since we decided to make BBQ pulled pork sandwiches, the next thing I did was to lightly toast hamburger buns, piled each one high with shredded BBQ smoked pork, covered the pork with homemade coleslaw (for added crunch), and enjoyed it for dinner!
Oh boy… this was a fantastic BBQ Traeger smoked pork loin sandwich! YUM! We enjoyed the leftovers for days!

I hope you enjoyed seeing the process of making this delicious Traeger smoked pork loin on our grill. If you own a smoker of any kind, I hope you will consider trying this recipe for your loved ones. We truly enjoyed it, and will make it again, this exact way!
If you have a smoker grill, you might also be interested in my recipe for Berry Cobbler (Traeger Grill Style), another of our first experiments on our Traeger. It was absolutely DELICIOUS!
Looking For More TRAEGER Recipes?
You can find all of my recipes in the Recipe Index, which is located at the top of the page. I have quite a few Traeger recipes you might enjoy, including:
Interested In More Recipes?
Thank you for visiting this website. I appreciate you using some of your valuable time to do so. If you’re interested, I publish a newsletter 2 times per month (1st and 15th) with all the latest recipes, and other fun info. I would be honored to have you join our growing list of subscribers, so you never miss a great recipe!
There is a Newsletter subscription box on the top right side (or bottom) of each blog post, depending on the device you use, where you can easily submit your e-mail address (only) to be included in my mailing list.
You Can Also Find Me On Social Media:
Facebook page: The Grateful Girl Cooks!
Pinterest: The Grateful Girl Cooks!
Instagram: jbatthegratefulgirlcooks
Have a wonderful day!

Recipe Source for cooking pork: Cookbook that came with purchase of Traeger grill.
Source for dry rub recipe: https://www.tastesoflizzyt.com/pulled-pork-rub/
↓↓ PRINTABLE RECIPE BELOW ↓↓
- 1/3 cup dark brown sugar
- 1/2 cup smoked paprika
- 1/4 cup garlic powder
- 1/4 cup salt
- 2 Tablespoons black pepper
- 2 Tablespoons chili powder
- 2 Tablespoons chipotle chili pepper (optional)
- 2 Tablespoons onion powder
- 1 Tablespoon cayenne pepper
- 1 Tablespoon ground cumin
- 1 Tablespoon dry mustard
- 3 pounds pork loin roast
- 2 cups apple juice
Make the dry spice rub by placing spices in a medium sized bowl. Mix well, to fully combine ingredients. Cover roast with about 1/3 cup of the dry spice rub, patting it onto the surface of the meat, making sure to cover all sides. *You will have leftover spice rub- SEE RECIPE NOTES BELOW)*. When done, set roast aside until ready for smoker.
When ready to begin, turn the Traeger grill to the SMOKE setting. Let it fire up for 4-5 minutes, with the lid OPEN. Once grill is smoking, turn the temperature gauge to 225° F. Close the lid on the grill and let it preheat for 10 to 15 minutes. We used mesquite pellets.
Once the grill/smoker is preheated, place an aluminum pan with 2 cups of apple juice into a corner (this will help keep some nice moisture in the grill during the long smoking process). Another option for this is to use a spray bottle and spritz the apple juice onto the roast about once an hour, if desired. Place the seasoned pork loin roast on the grill, FAT SIDE UP. Insert the temperature probe into thickest part of meat (but not touching any bones). Roast the pork for 3 hours, with the lid closed.
After pork has smoked/roasted for 3 hours, transfer the roast into an aluminum pan, and place back onto grill (with temperature probe still attached). Continue to cook the smoked pork loin roast for 5-6 hours, or until the temperature in the thickest part of the meat reaches an internal temperature of 190° F.
Remove roast from grill. Cover the pan loosely with aluminum foil, and let the meat rest for approximately 30 minutes. Pour any accumulated juices in the pan into a separate container (or gravy separator). Transfer the roast to a cutting board.
While the pork is still quite hot, slice it, or pull the pork into chunks or shred with two forks. Be sure to discard any fat or bones that you find (nobody wants a big bite of THAT!). You can add additional seasoning rub (and a little of the reserved juices) to the meat at this point OR a favorite BBQ sauce (if using pork to make sandwiches). Serve sliced or pulled, with or without and enjoy the delicious smoky flavor!
NOTE: As written, dry rub recipe makes almost 2 cups. I cut the recipe for the dry rub in half. The quantities are easy to cut in half (except for the 1/3 cup of dark brown sugar. If cutting brown sugar in half, use 2 Tablespoons PLUS 2 teaspoons brown sugar). If halved, you'll end up with about 1 cup of spice rub, which is enough for 3 pork roasts or chickens (about 3 pounds each). Each roast uses about 1/3 cup of the rub to cover. Store leftover spice mix in airtight sealed container.
Here’s one more to pin on your Pinterest boards! tastes amazing right off the smoker, OR as a tasty pulled pork sandwich, coated in BBQ sauce! / The Grateful Girl Cooks!")


