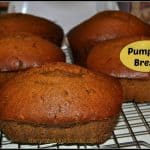
Chocolate Butterhorns

Chocolate butterhorns are made from scratch yeast rolls, with a delicious chocolate filling. Recipe yields 32, using a bread machine or made by hand.Chocolate butterhorns are made from scratch yeast rolls, with a delicious chocolate filling. Recipe yields 32, using a bread machine or made by hand.
Well, after almost a week of insane “busy-ness”, I am back to taking time out of my day to add a new recipe to this blog.  Today’s recipe is for Chocolate Butterhorns. I found this recipe online a couple of years ago from Jessica Fisher (at Life As Mom.com). After looking at the recipe, I thought these rolls sounded pretty good, so I gave them a try. Delicious!

The butterhorns are filled with chocolate chips (so how bad can that be?), are easy to make, and freeze well. This chocolate butterhorns recipe makes 32 rolls, so freezing some for another time is a perfect option for busy families!

Scroll Down For A Printable Recipe Card At The Bottom Of The Page

Making Chocolate Butterhorns

The recipe (as written) utilizes a bread machine. The dough is mixed and rises in the bread machine. The dough is then removed, rolled out, cut into portions, then chocolate pieces are added. Chocolate butterhorns are then rolled, rise again, and then are baked. That’s the instructions in a nutshell.

Do I Have To Have A Bread Machine To Make Chocolate Butterhorns?

The answer is NO. If you don’t have a bread machine, there are a couple other options, shown below.

Option #1: You can mix the dough in a stand mixer, with a dough hook.
Option # 2: You can also mix the dough by using your muscles and mixing the dough by hand.

Once Dough Is Mixed By Hand

If making the dough by hand (or stand mixer), once your dough has been mixed, place it in a lightly greased mixing bowl. Cover the dough, and place in a warm spot. Let the dough rise until it has doubled in size.

Once the dough has doubled in size, simply follow the remaining instructions in the recipe card for rolling them up, filling, baking, etc.

The dough for chocolate butterhorns in a large bowl has doubled in size.

The dough is rolled into a circle, then cut into individual rolls. Once cut, the dough is topped with semi-sweet chocolate, rolled into crescent shapes, and baked.

To Serve

Once done, the warm butterhorns are lightly dusted with sifted powdered sugar and cocoa powder before serving.

Platter of chocolate butterhorns, ready to eat!

Here is a picture of the rolls, fresh from the oven. They sure look good enough to eat!!!!

Close up photo of chocolate butterhorns.

I hope you will give these soft, chocolate butterhorns a try…we really enjoyed them! I think they would also taste fantastic with seedless raspberry jam added to the chocolate chip filling! Wouldn’t THAT be decadent to sink your teeth into??? YUM.

Looking For More “From Scratch” Bread Recipes?

All of my homemade bread recipes are located in the Recipe Index, which can be found at the top of the page. A few favorites you might enjoy include:

Interested In More Recipes?

Thank you for visiting this website. I appreciate you using some of your valuable time to do soIf you’re interested, I publish a newsletter 2 times per month (1st and 15th) with all the latest recipes, and other fun info. I would be honored to have you join our growing list of subscribers, so you never miss a great recipe!
There is a Newsletter subscription box on the top right side (or bottom) of each blog post, depending on the device you use, where you can easily submit your e-mail address (only) to be included in my mailing list.

You Can Also Find Me On Social Media:

Facebook page: The Grateful Girl Cooks!
Pinterest:
The Grateful Girl Cooks!
Instagram:
jbatthegratefulgirlcooks

Author's signatureRecipe Source: http://lifeasmom.com/2010/04/chocolate-butterhorns-perfect-for-freezing-perfect-for-anytime.html

↓↓ PRINTABLE RECIPE BELOW ↓↓

0 from 0 votes
Chocolate Butterhorns
Prep Time
1 hr 30 mins
Cook Time
12 mins
Total Time
1 hr 42 mins
 
Chocolate butterhorns are made from scratch yeast rolls, with a delicious chocolate filling. Recipe yields 32, using a bread machine or made by hand.
Category: Bread/Breakfast
Cuisine: American
Keyword: chocolate butterhorns
Servings: 32
Calories Per Serving: 145 kcal
Author: JB @ The Grateful Girl Cooks!
Ingredients
For dough:
  • 1 cup milk
  • 1/2 cup butter , melted
  • 2 eggs
  • 1/2 cup granulated sugar
  • 4 cups all-purpose flour
  • 1 teaspoon salt
  • 1 Tablespoon (heaping) dry active yeast
For rolls:
  • 1 - 2 cups chocolate chips (how much you add is up to you, depending on taste preference)
For Garnish: (optional-not included in caloric calculation)
  • 1/4 cup powdered sugar
  • 1 Tablespoon cocoa powder
Instructions
  1. Place the dough ingredients in a bread machine cannister. Set controls for dough cycle and start machine. Once dough cycle has completed, remove dough from pan. Place on lightly floured work surface and divide into 4 equal parts.
  2. Roll each section of dough into a 12 inch circle. Cut each circle into 8 pie shaped wedges. Place a small amount of chocolate chips over the surface of each individual wedge. Roll up each of the wedges, beginning at the wide part of the triangle and rolling up, ending at the point. Roll up each of the wedges, beginning at the wide part of the triangle and rolling up, ending at the point.

  3. Place rolls on greased baking sheet or parchment paper lined baking sheet. Let rise in a warm place until doubled in size.
  4. Bake rolls in a preheated 375 degree oven for 12-15 minutes (until golden brown). Remove from oven and cool on wire racks.
  5. TO PREPARE AHEAD FOR FREEZING: Once you roll up the rolls, place them (point side down) on a baking sheet. Place in freezer. Once frozen, remove rolls and store them in freezer bags in freezer until you want to prepare them. To prepare the frozen rolls: Remove from bag, place on greased or parchment paper lined baking sheet. Let thaw and rise for approximately 5 hours (until rolls are doubled in size). Bake in 375 degree oven for 12-15 minutes or until golden brown.
  6. TO GARNISH: Once rolls are baked, lightly sift cocoa powder and powdered sugar over the top of each butterhorn.  Serve warm, and enjoy!

Recipe Notes

No Bread Machine Available? Here are two options to prepare the dough:  Lightly spray a large mixing bowl with spray. Option #1: Mix the dough in a stand mixer, with a dough hook. Option # 2: Mix the dough by hand (really takes muscles!). Once dough is mixed, transfer to the greased mixing bowl. Cover the bowl, place in a warm spot, and let dough rise until doubled in size. One doubled in size, continue with Step #2 in recipe.

Nutrition Facts
Chocolate Butterhorns
Amount Per Serving (1 butterhorn)
Calories 145 Calories from Fat 45
% Daily Value*
Fat 5g8%
Saturated Fat 3g19%
Cholesterol 19mg6%
Sodium 111mg5%
Potassium 35mg1%
Carbohydrates 21g7%
Sugar 8g9%
Protein 2g4%
Vitamin A 135IU3%
Vitamin C 0.1mg0%
Calcium 24mg2%
Iron 0.9mg5%
* Percent Daily Values are based on a 2000 calorie diet.

Here’s one more to pin on your Pinterest boards!Chocolate butterhorns are made from scratch yeast rolls, with a delicious chocolate filling. Recipe yields 32, using a bread machine or made by hand.


Save

Save

Save

Grilled Ham Salad With Peaches And Goat Cheese

Looking for a filling salad? You’ll love Grilled Ham Salad on spring greens, with fresh peaches, goat cheese, toasted pecans, and balsamic dressing.Looking for a filling entree salad? You'll love this Grilled Ham Salad on spring greens, with fresh peaches, goat cheese, toasted pecans, and balsamic dressing.

One of the gifts I received for Mother’s Day this year was a subscription to Food Network Magazine. That’s where I discovered this recipe for Grilled Ham Salad With Peaches and Goat Cheese.  I was thumbing through the September 2014 issue that recently and saw the recipe for a grilled ham salad, with peaches. It got my attention), because it sounded so different from other salads I’ve made.

The combination of ham and fresh peach slices sounded interesting to me. Guess what? They go WELL together! Who knew? Plus… just about ANYTHING with fresh peaches has to be wonderful, right?

Scroll Down For A Printable Recipe Card At The Bottom Of The Page

Fresh peaches being sliced for grilled ham salad.

Well, my curiosity got the best of me and I ended up making this salad for dinner for my husband and myself a couple of nights ago. Even as I was making it, I truthfully wasn’t sure we would like it… but guess what? We both LOVED it! It was WAY better than I thought it would be, and THAT was a great surprise!

What’s IN A Grilled Ham Salad?

The grilled ham salad is a filling entree for dinner. You’ve got your meat (ham), dairy (creamy goat cheese), peaches (fruit), toasted pecans and lots of lettuce (veggies). Top it off with a homemade balsamic dressing and how could you NOT love a salad like this?

I only tweaked the original recipe just a bit. This grilled ham salad is quick to throw together, easy on the eyes, and completely delicious! I hope you will give this delicious salad a try.

Is This Grilled Ham Salad Hard To Make?

The answer is no. This grilled ham salad is not difficult at all to prepare. Ham slices are quickly grilled (indoor or outdoor), peaches are sliced, dressing is whisked together, and a delicious salad is created! It truly is a very easy salad to make!

Here’s a photo of the grilled ham salad with peaches and goat cheese (shown below), ready to eat. YUM! Sometimes just taking a chance on a new recipe ends up being a great decision when you find a GREAT tasting meal!  This grilled ham salad would be a wonderful dish to serve on a hot day!

Grilled Ham Salad With Peaches And Goat Cheese is a filling entree salad.

Hope you will consider making this grilled ham salad. I think you will be surprised with how good it tastes! Have a great day, and thank you for stopping by. Please come back again soon.

Looking For More MAIN COURSE SALADS?

You can find all of my recipes in the Recipe Index, located at the top of the page. A few main course salads you might enjoy include:

Interested In More Recipes?

Thank you for visiting this website. I appreciate you using some of your valuable time to do soIf you’re interested, I publish a newsletter 2 times per month (1st and 15th) with all the latest recipes, and other fun info. I would be honored to have you join our growing list of subscribers, so you never miss a great recipe!
There is a Newsletter subscription box on the top right side (or bottom) of each blog post, depending on the device you use, where you can easily submit your e-mail address (only) to be included in my mailing list.

You Can Also Find Me On Social Media:

Facebook page: The Grateful Girl Cooks!
Pinterest:
The Grateful Girl Cooks!
Instagram:
jbatthegratefulgirlcooks

Author's signature

Recipe Adapted From: Food Network Magazine, September 2014 issue, pg. 82

↓↓ PRINTABLE RECIPE BELOW ↓↓

0 from 0 votes
Grilled Ham Salad With Peaches And Goat Cheese
Prep Time
20 mins
Cook Time
6 mins
Total Time
26 mins
 
Looking for a filling entree salad? You'll love this Grilled Ham Salad on spring greens, with fresh peaches, goat cheese, toasted pecans, and balsamic dressing.
Category: Salad
Cuisine: American
Keyword: grilled ham salad
Servings: 4
Calories Per Serving: 649 kcal
Author: JB @ The Grateful Girl Cooks!
Ingredients
  • 1/2 cup pecans , chopped
  • 1/3 cup olive oil (plus more for grill)
  • 2 - 1 inch thick slices ham (approx. 7 oz. each)
  • 2 Tablespoons balsamic vinegar
  • 1 Tablespoon honey
  • 2 teaspoons Dijon mustard
  • 1 1/2 Tablespoons Chives , chopped
  • 1/2 Tablespoon Tarragon (I used dried)
  • 1 shallot , finely minced
  • 3 fresh peaches , peeled, pitted, and sliced into 1/2 inch wedges
  • 8 cups fresh spring greens
  • 1 pinch Salt and black pepper , to taste
  • 4 ounces goat cheese , crumbled
Instructions
  1. Preheat a grill to medium heat. (I used an indoor grill to prepare the ham)
  2. Brush the grill lightly with olive oil. Place the ham slices on the grill; heat through (about 2-3 minutes per side). Remove the ham when heated through; set aside to cool, then slice into 1/2 inch strips. Set aside.

  3. Lightly toast chopped pecans over medium high heat in a dry skillet. Stir pecans occasionally, until toasted (about 5-6 minutes). Be careful to not let them burn. Set pecans aside to cool.

  4. In a small bowl, whisk together the balsamic vinegar, honey, Dijon mustard, herbs and shallot. Slowly whisk the olive oil into the mixture; Mix until emulsified.

  5. Place salad greens, pecans, ham, and peaches in salad bowl. Add the salad dressing and GENTLY toss. Season with salt and pepper to taste. Arrange salad onto serving plates, and top with crumbled goat cheese. Serve and enjoy!

Recipe Notes

**Original recipe uses 2 Tablespoons of sherry vinegar or white balsamic vinegar (instead of the regular balsamic vinegar I used).**

Nutrition Facts
Grilled Ham Salad With Peaches And Goat Cheese
Amount Per Serving (1 g)
Calories 649 Calories from Fat 450
% Daily Value*
Fat 50g77%
Saturated Fat 13g81%
Cholesterol 74mg25%
Sodium 1344mg58%
Potassium 742mg21%
Carbohydrates 22g7%
Fiber 3g13%
Sugar 16g18%
Protein 30g60%
Vitamin A 1655IU33%
Vitamin C 27.6mg33%
Calcium 82mg8%
Iron 3mg17%
* Percent Daily Values are based on a 2000 calorie diet.

Here’s one more to pin on your Pinterest boards!Looking for a filling entree salad? You'll love this Grilled Ham Salad on spring greens, with fresh peaches, goat cheese, toasted pecans, and balsamic dressing.


Save

Save

Rissole Potatoes With Feta

Crispy on the outside and soft on the inside, rissole potatoes are phenomenal, enhanced with butter, bacon, chives, and feta cheese.Crispy on the outside and soft on the inside, rissole potatoes are phenomenal, enhanced with butter, bacon, chives, and feta cheese.
Here’s a fantastic tasting side dish for “Rissole Potatoes With Feta”. Oh wow…they are sooo good! By “good” I mean these potatoes are “phenomenally GOOD”!

My hubby and I went to our local Farmer’s Market on Saturday to look around. Since our home garden is in full production right now, I ended up not buying any fresh produce (it’s a miracle!) EXCEPT for some baby red potatoes, which I had a diabolical plan for.

I found a recipe online this past week from Martha at “A Family Feast” for these potatoes, and decided to give the recipe a try (with just a slight tweak). I loved that they are cooked on the stovetop. It’s been crazy hot in Portland recently and I’ve been trying not to use my oven so I don’t heat up the house!

Scroll Down For A Printable Recipe Card At The Bottom Of The Page

What Does “Rissole” Mean?

Rissole (rihs-uh-lay) is just a fancy way of describing a method (French) of cooking food (usually something “breaded”) by frying it until it is crispy brown and crunchy on the outside, and soft on the inside.

Well…these rissole potatoes fit the bill. Peeled, baby red potatoes… crispy on the outside and garnished with butter, parsley, chives, scallions, crispy crumbled bacon, and crumbled feta cheese. Have mercy…these potatoes were absolutely FANTASTIC! I really hope you will give them a try… This recipe is a definite keeper, and is going to be used in our home…OFTEN!

My pictures only show HALF the quantity of this recipe, because I made these just for myself and my husband. These rissole potatoes are fantastic, but we can’t eat an entire batch of them. Well, maybe another time- just not this time. Enjoy!

How To Make Rissole Potatoes

Peeled baby red potatoes are boiled in water for 10 minutes to start the cooking process.

Peeled, baby red potatoes are boiling in water in pan, to make rissole potatoes.

The rissole potatoes steaming in melted butter, in a covered skillet.

Rissole potatoes are steamed in covered pot, with butter.

To Serve The Rissole Potatoes

Once the rissole potatoes have finished cooking, it is time to serve them!  That’s one of the best parts. The potatoes are garnished with chives, parsley, parsley, green onions, bacon, butter and feta…oh my goodness. So good!

The finished rissole potatoes are garnished with feta, parsley, and crisp bacon.

That’s it! See how easy it is to make these delicious rissole potatoes? Hope you enjoy this simple vegetable side dish, and have a great day!

Looking For More POTATO Recipes?

You can find all of my recipes in the Recipe Index, located at the top of the page. A couple recipes you might enjoy that use potatoes include:

Interested In More Recipes?

Thank you for visiting this website. I appreciate you using some of your valuable time to do soIf you’re interested, I publish a newsletter 2 times per month (1st and 15th) with all the latest recipes, and other fun info. I would be honored to have you join our growing list of subscribers, so you never miss a great recipe!
There is a Newsletter subscription box on the top right side (or bottom) of each blog post, depending on the device you use, where you can easily submit your e-mail address (only) to be included in my mailing list.

You Can Also Find Me On Social Media:

Facebook page: The Grateful Girl Cooks!
Pinterest:
The Grateful Girl Cooks!
Instagram:
jbatthegratefulgirlcooks

Author's signature.

Recipe slightly adapted from: http://www.afamilyfeast.com/rissole-potatoes-fresco/

↓↓ PRINTABLE RECIPE BELOW ↓↓

0 from 0 votes
Rissole Potatoes With Feta
Prep Time
15 mins
Cook Time
30 mins
Total Time
45 mins
 

Crispy on the outside and soft on the inside, rissole potatoes are phenomenal, enhanced with butter, bacon, chives, and feta cheese. YUM!

Category: Side Dishes
Cuisine: American
Keyword: rissole potatoes
Servings: 4
Calories Per Serving: 464 kcal
Author: JB @ The Grateful Girl Cooks!
Ingredients
  • 5 strips bacon
  • 3 green onions (white and green parts)
  • 1/4 cup fresh parsley , chopped
  • 1/4 cup chives , snipped
  • 1 1/2 pounds baby new red potatoes (small)
  • 6 Tablespoons butter (Divided)
  • 1 teaspoon salt
  • 1/4 teaspoon freshly ground black pepper
  • 1/4 pound Feta cheese , crumbled (or you can use queso fresco, if desired)
Instructions
  1. Cook the bacon in a skillet until crispy. Remove from pan; let cool, then crumble. Set aside.
  2. Chop the parsley and green onions; snip the chives (it's easy using kitchen scissors). Set aside.
  3. Peel the potatoes. Put them in a large non-stick pot (or really large skillet) of salted water. The water should cover the tops of the potatoes. Bring water to a boil on high heat. Once boiling, reduce heat to a slow boil and cook potatoes (uncovered) for 10 minutes.

  4. Drain the potatoes (gently) into a colander. Place 4 Tablespoons butter (not all of it!) in the pot or skillet. Let butter begin to melt, then gently place hot potatoes back into pan. Put a lid on pan, turn heat to medium-low, and cook potatoes for an additional 10 minutes (without removing the lid!!!).

  5.  After the 10 additional cooking minutes have passed, remove the pan or skillet cover. Turn the heat to high, and add salt and pepper to potatoes. Continue to cook (and brown) the potatoes for another 8-10 minutes. Turn the potatoes gently as they brown, so they stay whole. Spoon the butter up and over the tops of the potatoes as they cook. HINT: *Use two wooden spoons to gently turn the potatoes-works like a charm*. Once the potatoes are nicely browned on all sides (smaller potatoes will brown faster than the larger ones), remove them to serving dish.

  6. In a separate dish, melt the remaining 2 Tablespoons of butter. To serve, pour the RESERVED butter (NOT the brown butter left in the pan) over the potatoes. Garnish potatoes with green onions, chives, crumbled bacon pieces, parsley, and top with crumbled feta cheese. Serve, and enjoy!

Nutrition Facts
Rissole Potatoes With Feta
Amount Per Serving (1 (1/4 of total))
Calories 464 Calories from Fat 306
% Daily Value*
Fat 34g52%
Saturated Fat 18g113%
Cholesterol 88mg29%
Sodium 1263mg55%
Potassium 891mg25%
Carbohydrates 29g10%
Fiber 3g13%
Sugar 3g3%
Protein 11g22%
Vitamin A 1160IU23%
Vitamin C 22.8mg28%
Calcium 173mg17%
Iron 1.9mg11%
* Percent Daily Values are based on a 2000 calorie diet.

Here’s one more to pin on your Pinterest boards!Crispy on the outside and soft on the inside, rissole potatoes are phenomenal, enhanced with butter, bacon, chives, and feta cheese. YUM!


Save

Save

Grilled “THAI” PB&J Sandwich

A Grilled “Thai” PB&J Sandwich is a delicious, grown up, gourmet version of the classic peanut butter and jelly sandwich. Sounds strange, but tastes GREAT!A Grilled "Thai" PB & J Sandwich is a delicious, grown up, gourmet version of the classic peanut butter and jelly sandwich. Sounds strange, but tastes GREAT!

Look at this Grilled THAI Peanut Butter & Jelly Sandwich. What kind of crazy, weird sandwich is that anyways? A REALLY GOOD ONE.  YES. It’s really THAT good.

Scroll Down For A Printable Recipe Card At The Bottom Of The Page

How I First Discovered this Amazing Sandwich

The first I ever heard of such a crazy sounding sandwich was when my sister Joni (who was visiting from California) ordered one at our local Farmer’s Market last summer. One of the food vendors were selling these sandwiches, along with a few other gourmet grilled sandwiches.

Truth is, It sounded horrible to me, UNTIL she forced me to try a bite of her sandwich. I didn’t think it would be good a all.  GULP… Here is the actual picture I took of her handing me the grilled Thai PB&J sandwich to taste for the first time (shown below).

My sister offering me a bite of Thai PB & J sandwich from the farmer's market.

May I just tell you truthfully that this grilled “Thai” PB&J sandwich was absolutely 100% AMAZING!!!!! That’s right… you heard me. Who ever would have believed that an ordinary old PB&J sandwich could go from “normal” to “over the top” just by adding a few…interesting…Thai-inspired ingredients!

So What Exactly Is IN This Grilled Thai PB&J Sandwich Sandwich?

Because I was curious, I decided to try and make a copycat grilled Thai PB & J sandwich myself in the comfort of my own kitchen and so I did! We have a WINNER! I have made this sandwich MANY times now, for friends and family, and they have always been surprised at how good it is!

Here’s the partial cast of characters: Peanut Butter, Orange Marmalade, Curry Powder, Sriracha Sauce, and fresh Basil. I know…weird, huh?  Sounds like some definite Thai inspired flavor combos going on. You will also need some good bread and some butter for grilling, of course!

Some of the key ingredients for the Thai PB & J sandwich.
Crazy, huh? But trust me, this is an absolutely delicious “Gourmet Grown Up Version” of the traditional PB&J Sandwich that you will LOVE if you like Thai flavors. You just have to try this at least once. This is definitely NOT YOUR MAMA’S PB&J sandwich!!!!

Making it is super easy (the pictures aren’t glamorous, but how do you class up a peanut butter and jelly sandwich? Here’s how:

How To Make A Grilled Thai PB&J Sandwich

First, spread one piece of bread with butter on one side, then coat the other side of the bread with peanut butter. Spread some of the sriracha sauce on top of the peanut butter. Place the bread, butter side down, in a large skillet on medium heat.

Peanut butter and sriracha sauce are spread on one side of bread.

Lightly sprinkle on some curry powder. I never measure it. Just be careful to sprinkle lightly. You don’t need a lot.

Curry powder is lightly sprinkled onto peanut butter.

Roll up a couple of large fresh basil leaves into a tight roll like this…

Fresh basil leaves are rolled before cutting to add to sandwich.

Then slice the rolled basil into thin strips. The technical term for this is to “chiffonade” the basil.

Basil is sliced into thin strips before adding to sandwich.

Add Basil And Marmalade!

Evenly sprinkle the basil over the peanut butter side. Spread a layer of orange marmalade (I used my own homemade marmalade!) over the basil. The photo below shows the marmalade halfway spread on the sandwich. Spread the entire slice of bread with the marmalade.

Sliced basil leaves and orange marmalade added to PB&J sandwich.

Ready To Grill!

Butter one side of the second piece of bread and place it on top of the sandwich, butter side up. Grill the sandwich on both sides (just like you would a grilled cheese sandwich). I usually grill it on medium-low heat.

Grilled THAI PB&J Sandwich cooking in skillet.

Grill until both sides of the sandwich are toasted and golden brown. Transfer the sandwich from the skillet onto a serving plate.

Grilled THAI PB&J Sandwich is cooked until golden brown on both sides.

Time To Eat!

Slice the Grilled Thai PB&J Sandwich diagonally across to form two triangles. Yes, it might be a bit messy…but that’s great, because the sandwich is so GOOD! Take a bite, and enjoy this delicious sandwich.

Grilled THAI PB&J Sandwich is sliced in half and served. Messy, but good!

It’s still hard to believe that this crazy sounding grilled “Thai” PB&J sandwich is so amazingly GOOD, but it’s true! I’ve made this sandwich at least twenty times since I took that first tentative bite, and it never fails to be ridiculously delicious! I hope you will give it a try. 

Thanks for stopping by today! I hope you will be able to come back again soon for more recipes. Don’t forget to check out the Recipe Index, located at the top of the page to see ALL of my recipes. Have a great day.

Interested In More Recipes?

Thank you for visiting this website. I appreciate you using some of your valuable time to do soIf you’re interested, I publish a newsletter 2 times per month (1st and 15th) with all the latest recipes, and other fun info. I would be honored to have you join our growing list of subscribers, so you never miss a great recipe!
There is a Newsletter subscription box on the top right side (or bottom) of each blog post, depending on the device you use, where you can easily submit your e-mail address (only) to be included in my mailing list.

You Can Also Find Me On Social Media:

Facebook page: The Grateful Girl Cooks!
Pinterest:
The Grateful Girl Cooks!
Instagram:
jbatthegratefulgirlcooks

Author's signature

↓↓ PRINTABLE RECIPE BELOW ↓↓

0 from 0 votes
Grilled "THAI" PB&J Sandwich
Prep Time
5 mins
Cook Time
5 mins
Total Time
10 mins
 
A Grilled "Thai" PB & J Sandwich is a delicious, grown up, gourmet version of the classic peanut butter and jelly sandwich. Sounds strange, but tastes GREAT!
Category: Sandwich
Cuisine: Thai
Keyword: thai pb&j sandwich
Servings: 1 sandwich
Calories Per Serving: 366 kcal
Author: JB @ The Grateful Girl Cooks!
Ingredients
  • 2 slices good quality bread
  • butter (to spread on one side of each piece of bread)
  • peanut butter (enough to cover one piece of bread
  • orange marmalade (enough to cover one slice of bread)
  • 1/2 - 1 teaspoon sriracha sauce (hot chile sauce found in Asian section of grocery store)
  • curry powder (I don't measure...just light sprinkle over one side of bread)
  • 2 large , fresh basil leaves
Instructions
  1. Spread one side of one piece of bread with butter. Place butter side down in skillet.
  2. Spread peanut butter on top of the slice of bread in skillet to cover. Spread sriracha sauce over the peanut butter evenly. Lightly sprinkle with curry powder. Roll and slice the fresh basil leaves. Sprinkle evenly over peanut butter. Carefully spread orange marmalade over sliced basil leaves. Butter one side of the second piece of bread. Put on top of marmalade, butter side up.

  3. Grill sandwich on medium heat, turning during cooking. Grill until each side is toasted and golden brown. Remove hot sandwich to serving plate. Cut on the diagonal, and serve! Enjoy!
Nutrition Facts
Grilled "THAI" PB&J Sandwich
Amount Per Serving (1 sandwich)
Calories 366 Calories from Fat 144
% Daily Value*
Fat 16g25%
Saturated Fat 6g38%
Cholesterol 21mg7%
Sodium 576mg25%
Potassium 222mg6%
Carbohydrates 47g16%
Fiber 3g13%
Sugar 17g19%
Protein 10g20%
Vitamin A 250IU5%
Vitamin C 4mg5%
Calcium 77mg8%
Iron 2.3mg13%
* Percent Daily Values are based on a 2000 calorie diet.

Here’s one more to pin on your Pinterest boards!A Grilled "Thai" PB & J Sandwich is a delicious, grown up, gourmet version of the classic peanut butter and jelly sandwich. Sounds strange, but tastes GREAT!


Save

Save

Save

Oven-Roasted Carrots

Oven Roasted Carrots are simple to make, delicious and healthy, and are a perfect vegetable side dish for beef, chicken, pork or fish.Oven Roasted Carrots are simple to make, delicious and healthy, and are a perfect vegetable side dish for beef, chicken, pork or fish.

Have you ever made oven roasted carrots before? I hardly ever bake them. Usually I grate them for carrot cake, throw some in when I cook a pot roast, or serve baby carrots as an appetizer with dip. But roasting them in the oven? Not so much. Until now.

Scroll Down For a Printable Recipe Card At The Bottom Of The Page

Oven roasted carrots are a cinch to make. The flavors intensify when you roast them, so the end result is a sweet, concentrated carrot flavor, enhanced with olive oil, salt, pepper and some garlic powder (for extra goodness!)

I’ve been growing rainbow carrots in our backyard garden, and recently pulled up quite a few “baby carrots”… you know, the kind that aren’t 2 feet long!

These rainbow carrots are each about 4-5 inches long and about an inch to two inches thick. This size is perfect for roasting!

Rainbow carrots, picked fresh from our garden, to make oven roasted carrots.
Prepare The Carrots For Roasting

The crunchy carrots are washed and scrubbed really good, peeled (optional), then left whole. I even left a tiny bit of the green tops on because it looks cute and adds color to the dish! Of course that is optional, but hey… they look CUTE!!!

Once the carrots have been cleaned well, toss them in a bit of olive oil to coat (about 1-2 Tablespoons). Season the carrots (to taste) with salt, pepper and garlic powder. Once seasoned, place them in a single layer on a baking sheet.

How Long To Cook The Oven Roasted Carrots

Place the pan with those beautiful carrots into a 350° F oven. Roast the carrots for approximately 30 minutes.

Make sure to TURN the carrots over, half-way through the baking time, because that ensures an even bake for all sides of the oven roasted carrots!

The oven-roasted carrots are cooked in single layer on baking sheet,

Once the carrots are fork tender, they are done! Ready to eat… simple, and delicious oven roasted carrots!

Oven roasted carrots, hot out of the oven, and ready to eat!

That’s it! These oven roasted carrots are so delicious… and healthy! Hope you try this recipe…grab some fresh carrots at your local Farmer’s Market this summer… and enjoy!

Looking For More Vegetable Side Dishes?

You can find all of my recipes in the Recipe Index, located at the top of the page.  A few of these vegetable side dishes include:

Want More Recipes? Get My FREE Newsletter!

I publish a newsletter 2 times per month (1st and 15th) with lots of recipes, tips, etc..
Would you like to join our growing list of subscribers?

There is a Newsletter subscription box on the top right (or bottom) of each blog post, depending on the device you use.
You can submit your e-mail address there, to be added to my mailing list.

Find Me On Social Media:

Facebook page: The Grateful Girl Cooks!
Pinterest:
The Grateful Girl Cooks!
Instagram:
jbatthegratefulgirlcooks

Author's signature

↓↓ PRINTABLE RECIPE BELOW ↓↓

0 from 0 votes
Oven-Roasted Carrots
Prep Time
5 mins
Cook Time
30 mins
Total Time
35 mins
 
Oven Roasted Carrots are simple to make, delicious and healthy, and are a perfect vegetable side dish for beef, chicken, pork or fish.
Category: Side Dish
Cuisine: American
Keyword: oven roasted carrots
Servings: 4 servings
Calories Per Serving: 124 kcal
Author: JB @ The Grateful Girl Cooks!
Ingredients
  • 15-20 small carrots (I used rainbow carrots, but any carrots will be fine)
  • 1-2 Tablespoons olive oil
  • Salt
  • Pepper
  • Garlic Powder
Instructions
  1. Preheat oven to 350 degrees. Scrub carrots well, to clean. Peel them if you want, but it not necessary. You can also leave an inch or so of the green carrot tops on, if you wish (adds color to the veggies).

  2. In a medium bowl, place the whole carrots. Add the olive oil. Mix gently, to coat the carrots. Season with a little salt, pepper, and a little bit (approximately 1/8 teaspoon) of garlic powder. Mix well to combine. Place carrots in a single layer on a baking sheet.

  3. Bake carrots at 350 degrees for approximately 30 minutes, or until carrots are fork-tender. Turn carrots over on baking sheet half way through the baking time. Carrots are done when they are fork-tender. Serve, and enjoy! 

Nutrition Facts
Oven-Roasted Carrots
Amount Per Serving (1 g)
Calories 124 Calories from Fat 36
% Daily Value*
Fat 4g6%
Sodium 157mg7%
Potassium 732mg21%
Carbohydrates 21g7%
Fiber 6g25%
Sugar 10g11%
Protein 2g4%
Vitamin A 38215IU764%
Vitamin C 13.5mg16%
Calcium 75mg8%
Iron 0.7mg4%
* Percent Daily Values are based on a 2000 calorie diet.

Here’s one more to pin on your Pinterest boards!Oven Roasted Carrots are simple to make, delicious and healthy, and are a perfect vegetable side dish for beef, chicken, pork or fish.


Save

Save

Save

Save

Save

Save

Fresh Peach Salsa!

Fresh peach salsa is a quick, delicious appetizer! This fruit salsa is yummy with tortilla chips, or it can be served on grilled chicken or fish.

Here’s a really easy and delicious recipe for Fresh Peach Salsa!  It’s perfect as an appetizer (with tortilla chips), in the summer when peaches are at their prime! The salsa also tastes wonderful served on top of grilled chicken or fish!

Scroll Down For A Printable Recipe Card At The Bottom Of The Page

I went peach picking a few days ago. In about 20 minutes, I picked 25 pounds of juicy fresh peaches at a local U-Pick farm. I got them home safely without bruising the fruit, then was faced with a wonderful “problem”. What to do with all those delicious peaches? Such a dilemma!

Over the past few days I’ve made peach jam, dehydrated peach slices, and flash frozen 10 pounds of peaches to pull from the freezer in the middle of winter.  I’ve given away peaches to neighbors, eaten peaches with yogurt, etc., and still have peaches left!

Making Fresh Peach Salsa Is Easy!

Yesterday I decided to make a quick peach salsa to have around for a snack to munch on with some tortilla chips. So that’s what I did! I ran out back to our garden and got a red onion, some cilantro and a jalapeno. I came back inside and quickly and easily made this fresh peach salsa. It’s delicious! It has a lovely sweet taste from those fresh, juicy peaches, and just a touch of heat from the jalapeno…perfect for a hot, summer evening.

Sure glad I used some of those fresh peaches to make this fresh peach salsa!  Here’s a picture of my haul. Now that’s 25 pounds of juicy goodness!

Peaches picked at local farm.

Make The Fresh Peach Salsa

Making this fresh peach salsa is simple. Peel, chop and mix the ingredients together. THAT’S IT! Oh yeah… grab a big bag of tortilla chips, because you will need those, too! I hope you will enjoy summer’s bounty of fresh peaches…and make this tasty salsa! It’s easy.

Shown below are the simple ingredients in a bowl, ready to mix up. Give them a good stir, and then the fresh peach salsa is done, and is ready to enjoy! EASY!

Ingredients for the fresh peach salsa in a bowl, ready to be mixed together.

Ready To Eat!

Grab the tortilla chips, and take a big old scoop of this yummy fresh peach salsa! You and your family or guests will enjoy the sweetness of the fresh peaches paired with the cilantro and onion flavors. It really is quite yummy.

A bowl for fresh peach salsa, ready to eat with some tortilla chips!

The delicious flavors of summer are fully present in this delicious fresh peach salsa. I hope you enjoy making some for your family and friends this summer.

Looking For More Delicious APPETIZER Recipes?

You can find all of my recipes in the Recipe Index, located at the top of the page. A few family favorite appetizer recipes include:

Interested In More Recipes?

Thank you for visiting this website. I appreciate you using some of your valuable time to do soIf you’re interested, I publish a newsletter 2 times per month (1st and 15th) with all the latest recipes, and other fun info. I would be honored to have you join our growing list of subscribers, so you never miss a great recipe!
There is a Newsletter subscription box on the top right side (or bottom) of each blog post, depending on the device you use, where you can easily submit your e-mail address (only) to be included in my mailing list.

You Can Also Find Me On Social Media:

Facebook page: The Grateful Girl Cooks!
Pinterest:
The Grateful Girl Cooks!
Instagram:
jbatthegratefulgirlcooks

Author's signature

↓↓ PRINTABLE RECIPE BELOW ↓↓

0 from 0 votes
Fresh Peach Salsa!
Prep Time
5 mins
Cook Time
0 mins
Total Time
5 mins
 

Fresh peach salsa is a quick, delicious appetizer! This fruit salsa is yummy with tortilla chips, or it can be served on grilled chicken or fish.

Category: Appetizer
Cuisine: Mexican
Keyword: fresh peach salsa
Servings: 2 cups (total)
Calories Per Serving: 23 kcal
Author: JB @ The Grateful Girl Cooks!
Ingredients
  • 3 Large ripe peaches , peeled, pitted and chopped
  • 2 Tablespoons red onion , chopped
  • 2 Tablespoons cilantro , chopped (or torn into small pieces)
  • 1 Tablespoon jalapeno pepper , finely chopped
  • Juice of 1/2 a lime
  • Pinch of salt (to taste...very light!)
Instructions
  1. Place all ingredients in a medium mixing bowl.
  2. Stir until combined.
  3. Cover and refrigerate for 1 hour to let flavors blend.
  4. Serve with tortilla chips for dipping, and enjoy!
Recipe Notes

NOTE: This salsa also tastes wonderful served on top of grilled chicken or fish!

Nutrition Facts
Fresh Peach Salsa!
Amount Per Serving (0.25 cup)
Calories 23
% Daily Value*
Potassium 111mg3%
Carbohydrates 5g2%
Sugar 4g4%
Vitamin A 210IU4%
Vitamin C 6.7mg8%
Calcium 3mg0%
Iron 0.1mg1%
* Percent Daily Values are based on a 2000 calorie diet.

Here’s one more to pin on your Pinterest boards!Fresh peach salsa is a quick, delicious appetizer! This fruit salsa is yummy with tortilla chips, or it can be served on grilled chicken or fish.


Save

Save

Save

Easy Chocolate Mousse

Make light and creamy, easy chocolate mousse in about 10 minutes! This yummy treat can be eaten as is, or added to cakes or puff pastry! Make light and creamy, easy chocolate mousse in about 10 minutes! This yummy treat can be eaten as is, or added to cakes or puff pastry!

If you enjoy decadent desserts, you will love this very easy to prepare recipe for Chocolate Mousse! This classic dessert can be eaten just as it is, or it can be used as filling for other desserts! The possibilities are endless! For a creamy light chocolate dessert, it sure can be flexible!

You can also sandwich chocolate mousse in between layers of baked puff pastry or cakes, with fresh fruit (raspberries or chocolate go especially well with this creamy treat).

Scroll Down For A Printable Recipe Card At The Bottom Of The Page

Chocolate Mousse Only Takes About 10 Minutes To Make!

From start to finish, this easy chocolate mousse dessert will only take about 10 minutes to prepare. Gelatin, whipping cream, sugar, vanilla and cocoa powder are about the only ingredients needed to make this dessert!

Four dessert cups full of easy chocolate mousse, ready to eat!

After being fully blended until light and fluffy, the dessert is chilled in the refrigerator. Once the chocolate mousse is nice and cold, it can be served as a wonderful dessert! Hope you enjoy it!

Easy chocolate mousse, with chocolate sprinkles on top.

Looking For More Creamy DESSERT Recipes?

You can find all of my dessert recipes in the Recipe Index, located at the top of the page. The desserts include:

Interested In More Recipes?

Thank you for visiting this website. I appreciate you using some of your valuable time to do soIf you’re interested, I publish a newsletter 2 times per month (1st and 15th) with all the latest recipes, and other fun info. I would be honored to have you join our growing list of subscribers, so you never miss a great recipe!
There is a Newsletter subscription box on the top right side (or bottom) of each blog post, depending on the device you use, where you can easily submit your e-mail address (only) to be included in my mailing list.

You Can Also Find Me On Social Media:

Facebook page: The Grateful Girl Cooks!
Pinterest:
The Grateful Girl Cooks!
Instagram:
jbatthegratefulgirlcooks

Author's signatureRecipe Adapted From: https://www.hersheys.com/recipes/recipe-details.aspx?id=5146

↓↓ PRINTABLE RECIPE BELOW ↓↓

0 from 0 votes
Easy Chocolate Mousse
Prep Time
10 mins
Cook Time
0 mins
Total Time
10 mins
 

Make light and creamy, easy chocolate mousse in about 10 minutes! This yummy treat can be eaten as is, or added to cakes or puff pastry!

Category: Desssert
Cuisine: American
Keyword: chocolate mousse
Servings: 4 servings
Calories Per Serving: 320 kcal
Author: JB @ The Grateful Girl Cooks!
Ingredients
  • 1 teaspoon unflavored gelatin
  • 1 Tablespoon cold water
  • 2 Tablespoons boiling water
  • 1/2 cup granulated sugar
  • 1/4 cup Hershey's cocoa powder
  • 1 cup (1/2 pint) COLD whipping cream (I use heavy whipping cream)
  • 1 teaspoon vanilla extract
Instructions
  1. Place the cold water in a small cup or bowl. Sprinkle the gelatin powder over the top of the water. Let the mixture stand for 1 minute (this softens the gelatin). Add the boiling water to the gelatin mixture; stir until the gelatin has completely dissolved in the hot water. Set aside and let mixture cool slightly.

  2. In a medium sized bowl, mix the granulated sugar and the cocoa powder together to combine. Add the whipping cream and the vanilla extract. Using an electric mixer, beat on medium speed until the mixture is stiff (you may need to scrape the bottom of the bowl occasionally). Add the gelatin mixture to the cream mixture. Beat until it is well blended.

  3. Place mousse into individual serving cups, cover and refrigerate until completely chilled. Serve and enjoy!

Nutrition Facts
Easy Chocolate Mousse
Amount Per Serving (1 serving)
Calories 320 Calories from Fat 198
% Daily Value*
Fat 22g34%
Saturated Fat 14g88%
Cholesterol 81mg27%
Sodium 26mg1%
Potassium 126mg4%
Carbohydrates 29g10%
Fiber 1g4%
Sugar 25g28%
Protein 3g6%
Vitamin A 875IU18%
Vitamin C 0.3mg0%
Calcium 46mg5%
Iron 0.7mg4%
* Percent Daily Values are based on a 2000 calorie diet.

Here’s one more to pin on your Pinterest boards!Make light and creamy, easy chocolate mousse in about 10 minutes! This yummy treat can be eaten as is, or added to cakes or puff pastry!


Save

Save

Strawberry-Rhubarb Pie

Nothing beats the taste of a classic strawberry-rhubarb pie! This double crusted pie is delicious, packed with fresh fruit, and is quite easy to make!Nothing beats the taste of a classic strawberry-rhubarb pie! This double crusted pie is delicious, packed with fresh fruit, and is quite easy to make!

One of my husband’s all-time favorite desserts is an old-fashioned Strawberry-Rhubarb Pie! And today, I am going to share the recipe I use for making this sweet-tangy treat!

I grow rhubarb in my backyard raised beds and container garden, but was delighted to receive some rhubarb from my friend Debbie’s backyard garden recently. I was looking for recipes for using rhubarb, but decided to make a pie for my hubby because I love him. and knew he would enjoy it (insert cheesy grin here).

I found this recipe on Pinterest and was surprised that it contained brown sugar… that got my interest, so I tried this recipe. I sure am glad I did! This strawberry-rhubarb pie is all-around fantastic! I used my Mom’s tried and true recipe for the pie crust, too (DIY-Mom’s Pie Crust)!  The recipe is even easier if you use pre-made pie crust dough from the store! If you love strawberries, I’m positive you will love this…and the extra little twang the rhubarb gives to this pie. Truly delicious! Here’s how to make it:

Scroll Down For A Printable Recipe Card At The Bottom Of The Page

Prepare The Fresh Strawberries And Rhubarb

Look at that beautiful rhubarb and those gorgeous strawberries! Now go crazy and slice them all up.

Strawberry-Rhubarb Pie / The Grateful Girl Cooks!

Chop, Chop, or should I say Slice, Slice? Rinse the rhubarb, then slice it up!

Strawberry-Rhubarb Pie ? The Grateful Girl Cooks!

There’s nothing like fresh strawberries and rhubarb in the Spring and early summer! They are SO colorful! The fresh strawberries are also sliced up, and then you’re ready to make this delicious strawberry-rhubarb pie!

Strawberry-Rhubarb Pie / The Grateful Girl Cooks!

Prepare The Strawberry-Rhubarb Pie Filling

Place the sliced rhubarb and strawberries into a large mixing bowl, and add the rest of the ingredients. Mix these pie filling ingredients well, so they are totally combined.

Strawberry-Rhubarb Pie / The Grateful Girl Cooks!

Fill The Pie Crust

Pour the strawberry-rhubarb pie filling into an unbaked pie crust. Dot the top of the filling with cold chunks of butter.

Strawberry-Rhubarb Pie / The Grateful Girl Cooks!

Place Another Pie Crust On Top Of Filling

Place either a regular crust on top of the pie filling or make a lattice top crust. Crimp the edges to form the pie crust, and seal the two crusts together. I failed miserably at this lattice crust. I didn’t notice the weave was wrong until AFTER pie was baked…oh well! It really doesn’t matter, because the pie still tastes fantastic!

You can also lay a second pie crust on top and seal the two crusts together, instead of making a lattice crust. This is much easier way to make the crust, if desired. Remember to flute the edges to form a nice crust edge on the pie, after sealing the crusts together.

Strawberry-Rhubarb Pie / The Grateful Girl Cooks!

Bake The Strawberry-Rhubarb Pie

Place the pie in a 400° F. oven and cook for 20 minutes. Reduce the heat to 350°, and bake the strawberry-rhubarb pie for another 25 minutes. The pie crust should be nice and golden in color when done. Let the pie cool down a bit before slicing, and then serve a slice of pie with a nice scoop of vanilla ice cream!

Strawberry-Rhubarb Pie / The Grateful Girl Cooks!

Grab a plate and a fork, and a carton of vanilla ice cream! It’s time to dig into this strawberry-rhubarb pie.YUM!

Strawberry-Rhubarb Pie / The Grateful Girl Cooks!

Hope you enjoy this yummy strawberry-rhubarb pie! We sure do love it! Have a great day, friends, and thank you for stopping by. I hope you will come back again soon for more delicious recipes..

Looking For More PIE Recipes?

You can find all of my pie recipes in the Recipe Index, located at the top of the page. A few favorites include:

Interested In More Recipes?

Thank you for visiting this website. I appreciate you using some of your valuable time to do soIf you’re interested, I publish a newsletter 2 times per month (1st and 15th) with all the latest recipes, and other fun info. I would be honored to have you join our growing list of subscribers, so you never miss a great recipe!
There is a Newsletter subscription box on the top right side (or bottom) of each blog post, depending on the device you use, where you can easily submit your e-mail address (only) to be included in my mailing list.

You Can Also Find Me On Social Media:

Facebook page: The Grateful Girl Cooks!
Pinterest:
The Grateful Girl Cooks!
Instagram:
jbatthegratefulgirlcooks

Author's signatureRecipe slightly adapted from: http://www.the-baker-chick.com/2013/05/classic-strawberry-rhubarb-pie/?utm_source=feedly&utm_medium=feed&utm_campaign=Feed%3A%20TheBakerChick%20%28The%20Baker%20Chick%29

↓↓ PRINTABLE RECIPE BELOW ↓↓

0 from 0 votes
Strawberry-Rhubarb Pie
Prep Time
15 mins
Cook Time
45 mins
Total Time
1 hr
 

Nothing beats the taste of a classic strawberry-rhubarb pie! This double crusted pie is delicious, packed with fresh fruit, and is quite easy to make!

Category: Dessert
Cuisine: American
Keyword: strawberry-rhubarb pie
Servings: 8 slices
Calories Per Serving: 346 kcal
Author: JB @ The Grateful Girl Cooks!
Ingredients
  • 2 unbaked pie crusts (purchased or homemade - one for top and one for bottom crust)
  • 3 1/2 cups chopped rhubarb
  • 3 1/2 cup sliced strawberries
  • 1 Tablespoon lemon juice
  • 1/2 cup granulated sugar
  • 1/4 cup brown sugar (I used dark brown sugar)
  • 1/4 cup all-purpose flour (original recipe called for tapioca flour)
  • pinch of salt
  • 2 Tablespoons cold butter , cut into small chunks
  • cream or milk , for lightly brushing top of pie crust
  • raw sugar , for sprinkling on top of pie crust
Instructions
  1. Preheat oven to 400 degrees F.

  2. If making your own pie crusts, roll the dough into a 12 inch circle, fold it in half and transfer carefully to a 9 inch pie pan. Set second crust aside until ready to top the pie filling.
  3. Place the sliced strawberries, rhubarb, granulated and brown sugars, lemon juice, salt and flour in a large mixing bowl. Mix well to combine.
  4. Carefully pour the pie filling into the bottom crust. Dot the top of the filling with the butter chunks. Place second crust completely over the pie filling and seal, or make a lattice crust with the second crust. (it's your call!) Seal the edges of the crust, and form the crimped edges as desired.
  5. Using a pastry brush, lightly brush the crust top with the cream or milk, then sprinkle lightly with raw sugar.
  6. Place pie in oven; bake at 400 degrees for 20 minutes, then reduce the heat to 350 degrees and bake for another 25 minutes or the crust is a golden color. The pie filling will be bubbly and HOT!
  7. Remove the finished pie from oven. Set aside for several hours while the filling cools (the filling will thicken a bit as it sits).
  8. Serve with a scoop of vanilla ice cream... and ENJOY!
Nutrition Facts
Strawberry-Rhubarb Pie
Amount Per Serving (1 slice)
Calories 346 Calories from Fat 126
% Daily Value*
Fat 14g22%
Saturated Fat 5g31%
Cholesterol 7mg2%
Sodium 209mg9%
Potassium 300mg9%
Carbohydrates 51g17%
Fiber 3g13%
Sugar 24g27%
Protein 4g8%
Vitamin A 150IU3%
Vitamin C 42.1mg51%
Calcium 72mg7%
Iron 1.7mg9%
* Percent Daily Values are based on a 2000 calorie diet.

Here’s one more to pin on your Pinterest boards!Nothing beats the taste of a classic strawberry-rhubarb pie! This double crusted pie is delicious, packed with fresh fruit, and is quite easy to make!


Save

Save

Jalapeño Pepper Jelly

Jalapeño Pepper Jelly is sweet and spicy, can be used for appetizers, or as a glaze for pork or chicken. Canning instructions for long term storage included!Jalapeño Pepper Jelly is sweet and spicy, can be used for appetizers, or as a glaze for pork or chicken. Canning instructions for long term storage included!

Well, here it is…the recipe I found for making and canning the most wonderful Jalapeño Pepper Jelly ever! It is a fantastic jelly to use as an appetizer, or as a glaze on cooked pork or chicken.

Scroll Down For A Printable Recipe Card At the Bottom Of The Page

What Can You Use Jalapeño Pepper Jelly For?

We LOVE this jelly…it’s sweet and a bit spicy, and is amazingly fantastic when served over a block of cream cheese, with some good crackers to spread it on. Talk about a yummy appetizer…yum.

Some people even enjoy jalapeño pepper jelly when heated and served over pork or chicken as a glaze. It has just enough sweet taste and a slight bit of heat to make it GREAT!

How Many Jars Of Canned Jelly Will This Recipe Make?

Jalapeño pepper jelly is very easy to process and can, for long term storage. Amazingly easy!  When I make this jelly, I usually get five 8 ounce (1/2 pint) jars and one smaller jar of jelly from one batch. You use a water bath canner to process the jars for long term storage.

Jalapeno jelly jars are processed in water bath canner for long term storage.
Can This Jelly For Year Round Use

Once canned, the jelly is perfect to store in the pantry and grab a jar throughout the year for a quick and delicious appetizer.  Hope you will give it a try…and enjoy it like we do! Here’s a photo of the finished jalapeño pepper jelly.  Isn’t it gorgeous? See all the little bitty bits of peppers floating in the jelly? Yum.

The jelly also can be used as a glaze for baked or grilled pork or chicken. This sweet and slightly spicy jelly, once heated, makes an amazing sauce that can be brushed on meat during the cooking process or when serving!

Jalapeño Pepper Jelly is able to be canned for long term storage.

Such A GREAT Tasting Appetizer!

In need of a quick, delicious appetizer for the gang? No Problem! Grab a jar, and spread the jalapeño pepper jelly on top of a bit of cream cheese on a cracker… it tastes wonderful!!!!!!

Jalapeno Pepper Jelly tastes wonderful spread on cream cheese on a cracker!

Hope you will consider trying this recipe for jalapeño pepper jelly! It is a unique and versatile jelly that I’m sure you will enjoy!

Looking For More CANNED JAM OR JELLY Recipes?

You can find all of my canning recipes in the Recipe Index, located at the top of the page. A few favorite jam or jelly recipes include:

Interested In More Recipes?

Thank you for visiting this website. I appreciate you using some of your valuable time to do soIf you’re interested, I publish a newsletter 2 times per month (1st and 15th) with all the latest recipes, and other fun info. I would be honored to have you join our growing list of subscribers, so you never miss a great recipe!
There is a Newsletter subscription box on the top right side (or bottom) of each blog post, depending on the device you use, where you can easily submit your e-mail address (only) to be included in my mailing list.

You Can Also Find Me On Social Media:

Facebook page: The Grateful Girl Cooks!
Pinterest:
The Grateful Girl Cooks!
Instagram:
jbatthegratefulgirlcooks

Have a great week!

Author's signatureRecipe Source: http://www.food.com/recipe/hot-pepper-jelly-35699

↓↓ PRINTABLE RECIPE BELOW ↓↓

5 from 2 votes
Jalapeño Pepper Jelly
Prep Time
25 mins
Cook Time
15 mins
Total Time
40 mins
 
Jalapeño Pepper Jelly is sweet and spicy, can be used for appetizers, or as a glaze for pork or chicken. Canning instructions for long term storage included!
Category: Appetizer, Jam / Canning and Preserving, Jelly
Cuisine: American
Keyword: jalapeno pepper jelly
Servings: 5 half pint jars
Calories Per Serving: 64 kcal
Author: JB @ The Grateful Girl Cooks!
Ingredients
  • 1 1/2 cups green bell peppers , seeded & veins removed (can also use red sweet peppers)
  • 1/4 cup jalapeño pepper , seeded & veins removed
  • 1 1/2 cups white vinegar
  • 6 ounces liquid pectin (this is 2 packets)
  • 1 drop liquid green food coloring (optional...can use red if using red peppers)
  • cups granulated sugar
Instructions
  1. Prepare water bath canner, lids, rings and jars according to manufacturer instructions and safe canning guidelines before beginning to make the jelly.

  2. Cut the peppers and jalapeños into small pieces. Place them, along with the vinegar into a food processor (or blender); blend until the mixture is smooth. Pour the mixture into a large stockpot.
  3. Add the sugar to the pot. Heat this mixture on medium-high heat. Stir constantly until sugar has dissolved fully. Bring the mixture to a full boil, and boil for 3 minutes, stirring often. (While doing this, pour boiling water over flat canning lids in a separate small bowl, and let them sit for 5 minutes to soften rubber seal.

  4. Stir in the pectin; return the mixture to a full boil. Boil it for 1 minute longer, then remove the pan from the heat. Skim off any foam that may have accumulated on the top of the jelly. Add drop of food coloring to achieve the color you desire (optional). Stir to combine.

  5. Pour the jelly into hot, sterilized half pint (8 oz.) jars. Fill the jars to within 1/4 inch of the top. Insert plastic knife into jelly to help remove air bubbles. Adjust headspace in jars, if necessary. Wipe rims completely clean to ensure a good seal. Center the hot flat lid onto the jar. Screw the band on until it is fingertip tight.

  6. Place jars on an elevated rack in a canner with simmering water (about half full). Make sure the jars are completely covered with water by at least one inch over the top.

  7. Put lid on the canner. Bring the simmering water to a gentle boil, then process jelly in jars for 10 additional minutes. After 10 minutes, turn off heat; remove the canner lid. Wait for 5 minutes, then carefully remove hot jars (with canning tongs) to a dish towel on counter (do not place hot jars directly on kitchen counter as the glass might crack, due to temperature variations). Let jars sit, undisturbed for 24 hours before moving. You should hear a "ping" sound as each jar successfully seals. Remember to check to make you have a good seal on the jars before storing! If a jar does not seal properly, it cannot be stored in pantry. Place it in refrigerator, and use within a few weeks.

Nutrition Facts
Jalapeño Pepper Jelly
Amount Per Serving (1 Tablespoon)
Calories 64
% Daily Value*
Potassium 5mg0%
Carbohydrates 16g5%
Sugar 16g18%
Vitamin A 15IU0%
Vitamin C 2.6mg3%
Calcium 1mg0%
* Percent Daily Values are based on a 2000 calorie diet.

Here’s one more to pin on your Pinterest boards!Jalapeño Pepper Jelly is sweet and spicy, can be used for appetizers, or as a glaze for pork or chicken. Canning instructions for long term storage included!


Save

Save

Save

Save

Save

Save

Save

Caprese Salad

Caprese Salad is an easy to make Italian classic, with fresh ripe tomatoes, mozzarella cheese and basil leaves, drizzled with olive oil and balsamic vinegar!Caprese Salad is an easy to make Italian classic, with fresh ripe tomatoes, mozzarella cheese and basil leaves, drizzled with olive oil and balsamic vinegar!

Well, I’ve made this Caprese Salad two nights in a row for my husband and myself. Truth! It is so refreshing and delicious, especially with peak of season tomatoes and basil! With very few ingredients, you can make this delicious salad. We enjoy it as a side salad OR as a main dish on a hot summer night.

Scroll Down For A Printable Recipe Card At The Bottom Of The Page

Inspiration Hits

It all started innocently enough… I happened to see a post on my friend Elizabeth’s Facebook page. She made a Caprese Salad for her family…so I got to thinking that I should make one for my husband and I, too! I didn’t have an official recipe, but how hard could it be, right?

Fresh basil leaves in garden are used to make a caprese salad.

I have basil and tomatoes growing in our garden. Hmmm. All I need is some fresh mozzarella. Hmmm. This would be a great light summer appetizer or salad…Hmmm. (you realize, of course, that those “Hmmms” are me, putting on my thinking cap, right?).

Caprese Salad… For the WIN!

Caprese salad is such a easy dish to prepare, and you can make it as large or small as you wish! My husband and I had late lunches the past couple of days, so two nights ago, we just sat out on our deck. We enjoyed this simple dish, along with a glass of wine, for our dinner. Sooo deliciously tasty on a hot, summer night!

Another caprese salad, ready to eat with dinner!

Last night, the same story. Late lunch, and we weren’t really hungry for a “normal” dinner, so I ran out to our garden, picked some basil and fresh tomatoes, and made another Caprese Salad for dinner. Yee Haw! When you have the flavor of homegrown tomatoes, this salad SHINES!

Fresh garden tomatoes will make a wonderful tasting caprese salad.

So what exactly is a “Caprese Salad”, you ask?  Wikipedia defines it: “Caprese Salad is a simple salad, made of sliced fresh mozarella, tomatoes and basil, seasoned with salt, and olive oil. It was made to resemble the colors of the Italian flag: red, white, and green.”

I also added pepper, and drizzled some balsamic vinegar on top (along with the olive oil). Perfect! I’ve made caprese salad so many times now I’ve lost count!

Two caprese salads, ready to eat!

Hope you will give this easy salad a try. The flavors of the fresh tomatoes and basil combined with creamy fresh mozzarella is wonderful!

Caprese Salad , served on a white platter.

Hope you enjoy this delicious caprese salad! It is REALLY easy to prepare, and is absolutely delicious! Have a GREAT day!

Looking For More SALAD Recipes?

You can find all of my recipes in the Recipe Index, which is located at the top of the page. I have lots of delicious salad recipes, including:

Interested In More Recipes?

Thank you for visiting this website. I appreciate you using some of your valuable time to do soIf you’re interested, I publish a newsletter 2 times per month (1st and 15th) with all the latest recipes, and other fun info. I would be honored to have you join our growing list of subscribers, so you never miss a great recipe! 

There is a Newsletter subscription box on the top right side (or bottom) of each blog post, depending on the device you use, where you can easily submit your e-mail address (only) to be included in my mailing list.

You Can Also Find Me On Social Media:

Facebook page: The Grateful Girl Cooks!
Pinterest:
The Grateful Girl Cooks!
Instagram:
jbatthegratefulgirlcooks

Author's signature

↓↓ PRINTABLE RECIPE BELOW ↓↓

0 from 0 votes
Caprese Salad
Prep Time
10 mins
Cook Time
0 mins
Total Time
10 mins
 

Caprese Salad is an easy to make Italian classic, with fresh ripe tomatoes, mozzarella cheese and basil leaves, drizzled with olive oil and balsamic vinegar!

Category: Salad
Cuisine: Italian
Keyword: caprese salad
Servings: 4 servings
Calories Per Serving: 272 kcal
Author: JB @ The Grateful Girl Cooks!
Ingredients
  • Fresh mozzarella cheese , room temp, sliced in 1/2 inch slices (2-3 slices per person)
  • Fresh tomatoes , sliced in 1/2 inch slices (2-3 slices per person)
  • Fresh basil sprigs ( one for each slice of cheese and tomato)
  • Sea salt (to taste)
  • Cracked pepper (to taste)
  • Olive oil (enough to drizzle over the top of the salad)
  • Balsamic vinegar (enough to drizzle over the top of the salad)
Instructions
  1. Layer the serving platter with slice of cheese, then a slice of tomato. Repeat, until you have as much on the platter as you desire.
  2. Lightly salt and pepper the salad.
  3. Lightly drizzle the salad with olive oil and balsamic vinegar.

  4. Place a sprig or two of fresh basil leaves on, or in between each slice of tomato and cheese. Serve, and enjoy!

Nutrition Facts
Caprese Salad
Amount Per Serving (1 (1/4 of total))
Calories 272 Calories from Fat 171
% Daily Value*
Fat 19g29%
Saturated Fat 11g69%
Cholesterol 67mg22%
Sodium 547mg24%
Potassium 292mg8%
Carbohydrates 5g2%
Fiber 1g4%
Sugar 3g3%
Protein 19g38%
Vitamin A 1545IU31%
Vitamin C 13.2mg16%
Calcium 446mg45%
Iron 0.8mg4%
* Percent Daily Values are based on a 2000 calorie diet.

Here’s one more to pin on your Pinterest boards!Caprese Salad is an easy to make Italian classic, with fresh ripe tomatoes, mozzarella cheese and basil leaves, drizzled with olive oil and balsamic vinegar!


Save